In this article: We'll unbox and review Sony's XAV-AX8000 head unit, walking you through the unboxing with images, detail it's features and provide our own insight along the way.
*Update: 1/6/2020 – Sony's XAV-AX8000 has made it on our list of Best Touch Screen Head Units. Check out the full list!
Only in the past couple years have the big players in the automotive aftermarket world started to make oversized, free-floating style head units with their massive touchscreens. When I first began installing and testing automotive electronics products over a decade ago, the 7″ touchscreen head unit with GPS navigation was a tough product to beat. They would also cost you an arm and a leg. But like everything else, evolving car audio tech will leave you in the dust if you keep up with the latest trends. An oversized digital media receiver is the perfect example of the latest and greatest and they're here to stay.
Sony is at the forefront of this trend, with the introduction of their XAV-AX8000 and it's 8.95″ touchscreen. Built to compete with units like the Pioneer DMH-C5500NEX and Alpine Halo9 ILX-F309, it's packed with all of Sony's latest features. Yea, its price is a bit tough to swallow if you're on a tight budget, but for those who want to bring their older car's dash and stereo up to speed with the look and features of the newest vehicles on the road, it's units like this that will get you there.
- USB port to charge and connect your media or smartphone devices.
- Bluetooth technology to stream music and make handsfree calls.
- Integrated music app functionality like Pandora and Spotify.
- + more
The best head units shouldn't just output high quality sound, they really should incorporate the latest trends in digital tech to simplify how you listen to your music, navigate to where you're going and make wireless phone calls. In our list below, you'll find our top pick car stereos that embrace the swift changes in audio and digital technology. We're frequently updating all of our lists, so check back for updates as new products get released and added!
Unboxing the XAV-AX8000

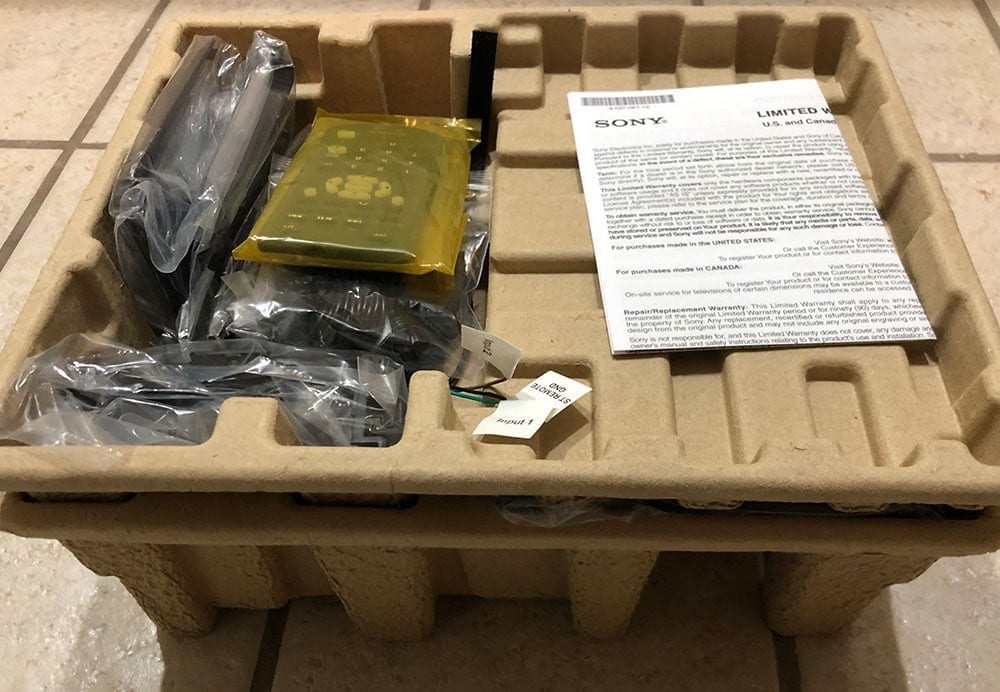
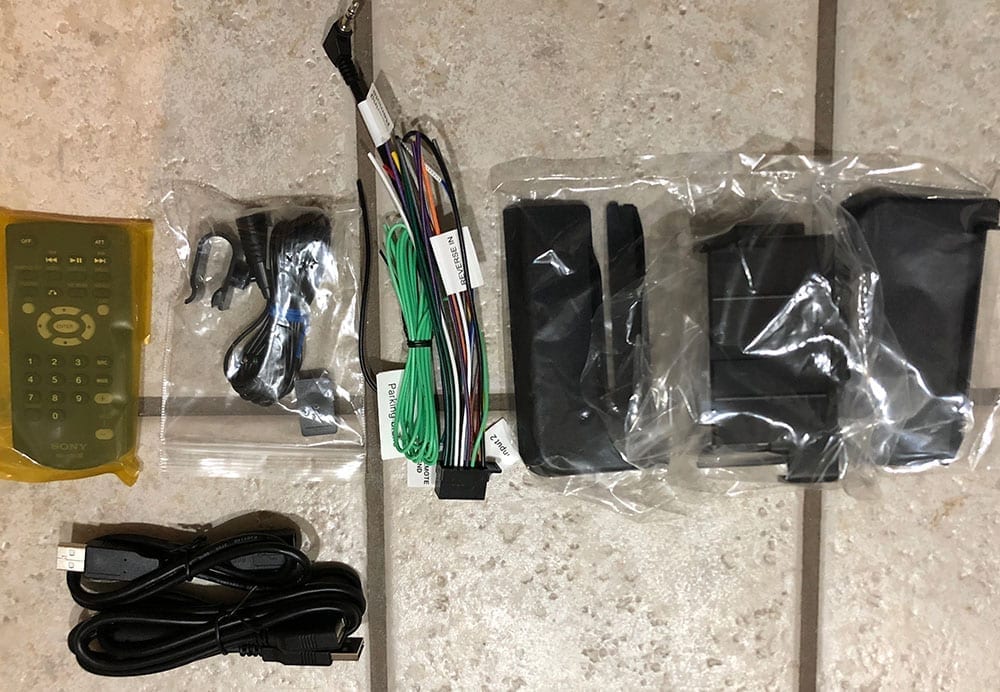
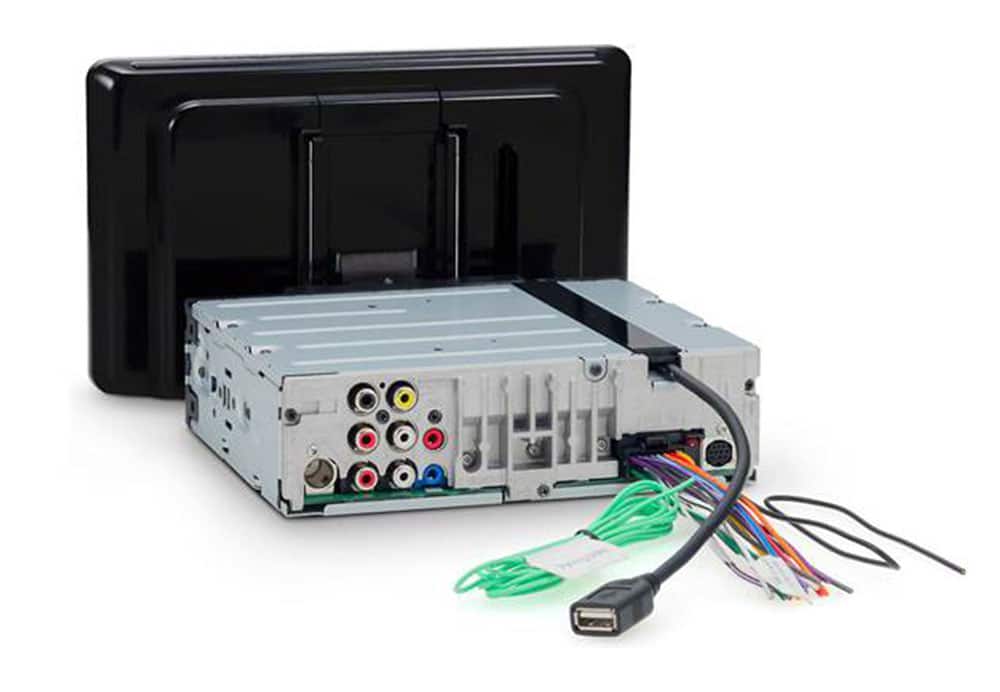
Sony's XAV-AX8000 comes shipped with the head unit chassis, screen, wiring harnesses, remote control, microphone, USB extensions, plastic trim for the back of the screen and mount point, and of course the owners manual. Nothing too out of the ordinary in terms of what's included. It has all the essentials to install the unit in any car.
*Note that you will likely need a vehicle-specific dash kit and wire harness to easily adapt and install the unit in your car
First Look and Impression
Anticipation is always high when you make a large purchase. And unboxing your new head unit, along with the feelings and first impressions it has on you, could make the difference between a thumbs up and thumbs down on a product. It's the first impression that buyer's remorse'll typically set in.
For me, as soon as I pulled off the packaging lid and exposed the head unit components it was a thumbs up. When opening up the box and removing the top panel the first thing you notice is the size of the screen. Nearly 9 inches, it's not the typical double din touchscreen that I'm used to seeing. Naturally that's the first thing I saw pulled out and inspected.
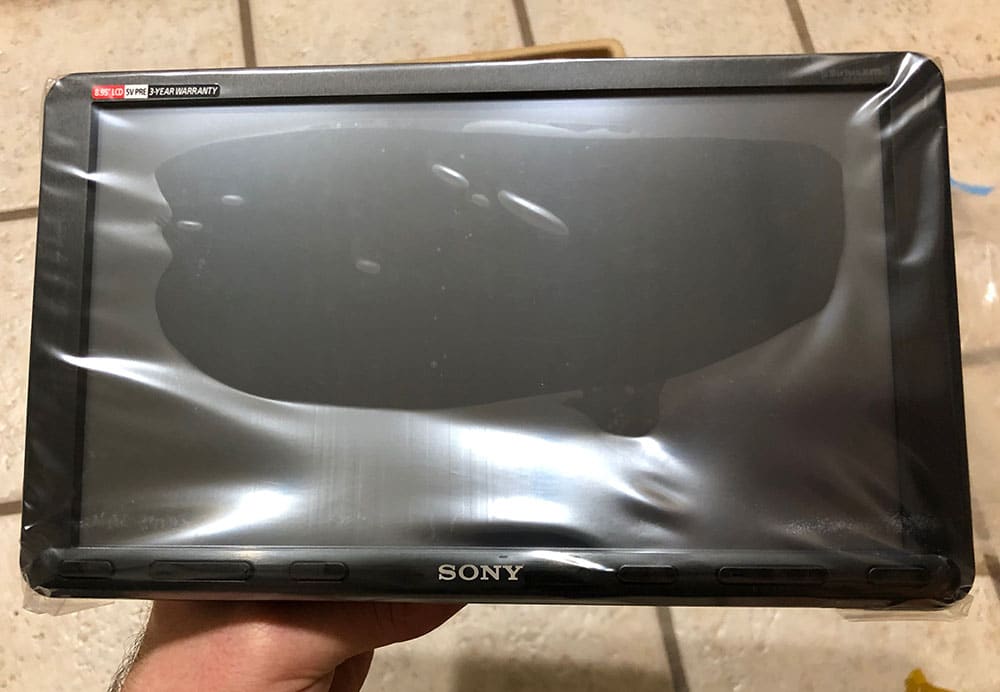
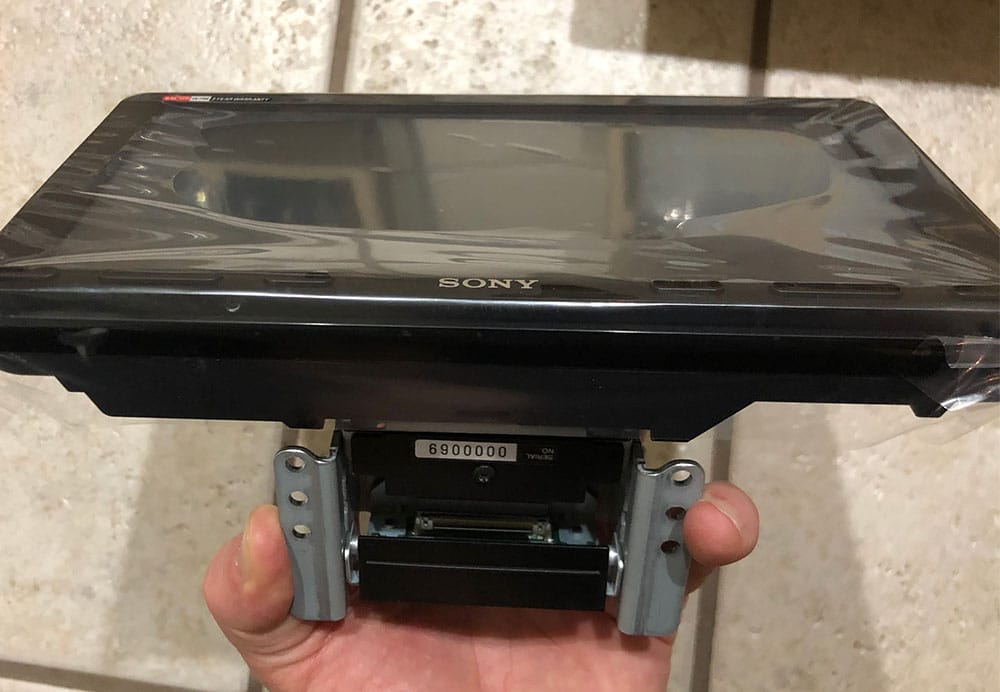
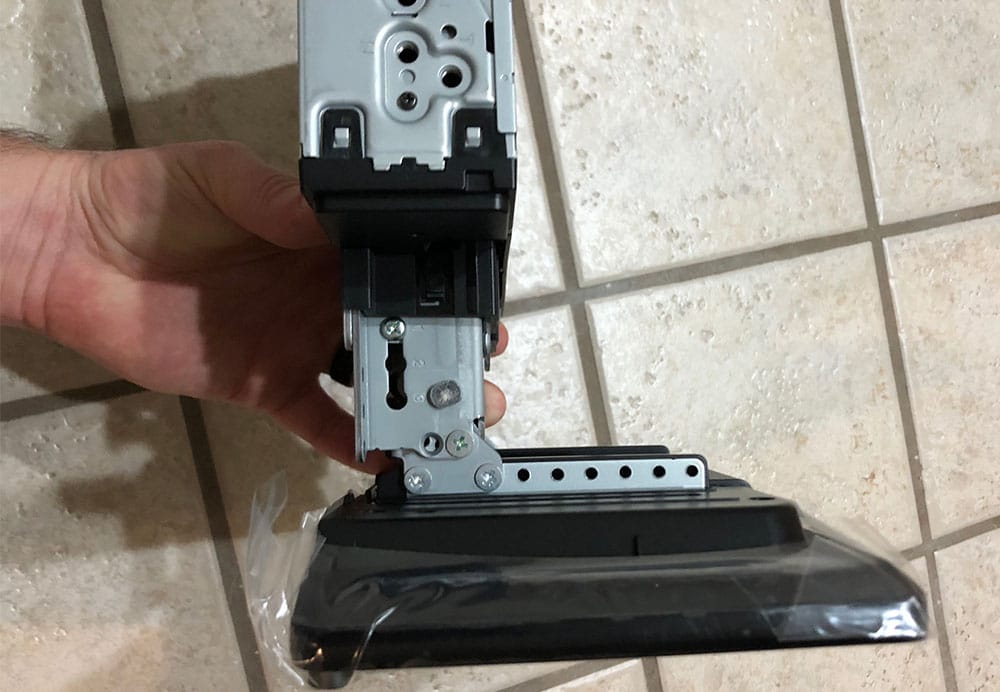
Apart from the general size , the LCD touchscreen itself seemed pretty sturdy as well. it measures roughly 3/4″ (20mm). There's a hefty mounting mechanism on the back of the screen that powers three different axises: tilt, depth and height. According to the specs, the tilt can offer a 10 degree pitch, the depth adjustments can offer between a 40 and 60mm depth, and the height adjustment can offer up to a 60mm adjustment in the overall height of the screen. These'll be critical when you go to install the screen and offer a ton of flexibility to get the screen exactly where and how you want it.
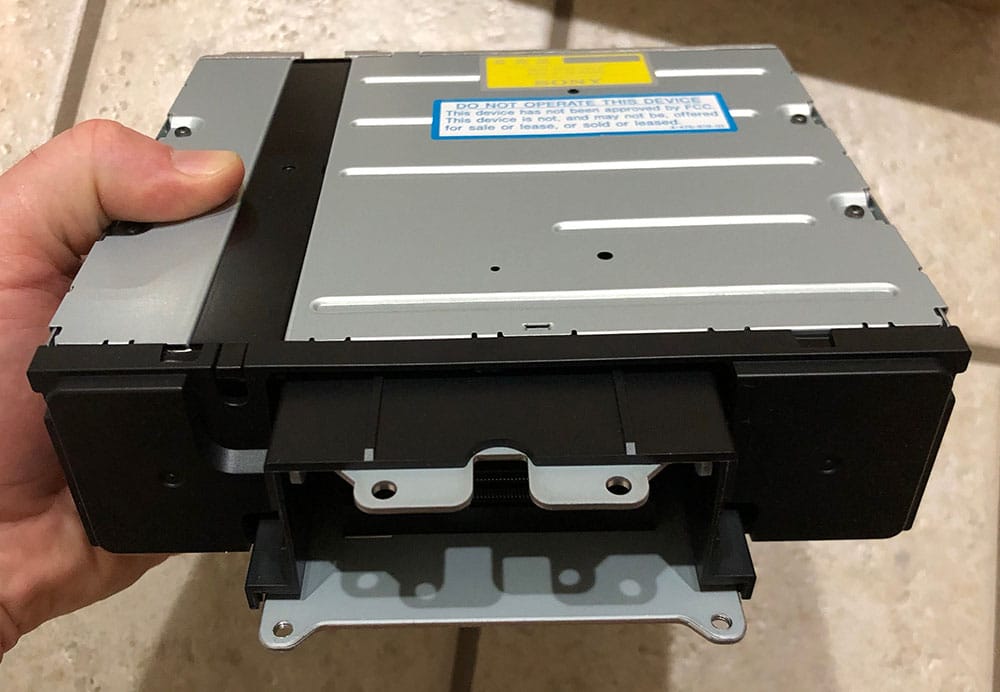
Moving onto the chassis, Sony chose a single DIN chassis to power the oversized screen. This is becoming more and more common today, even for the double DIN sized screens. Single DIN chassis are a lot more flexible in terms of installation and they can be installed on almost every car. They're less bulky, lighter and are just as powerful. Cramming a double DIN in a german car is probably one of my least favorite installs, having a condensed single DIN chassis helps with those scenarios.
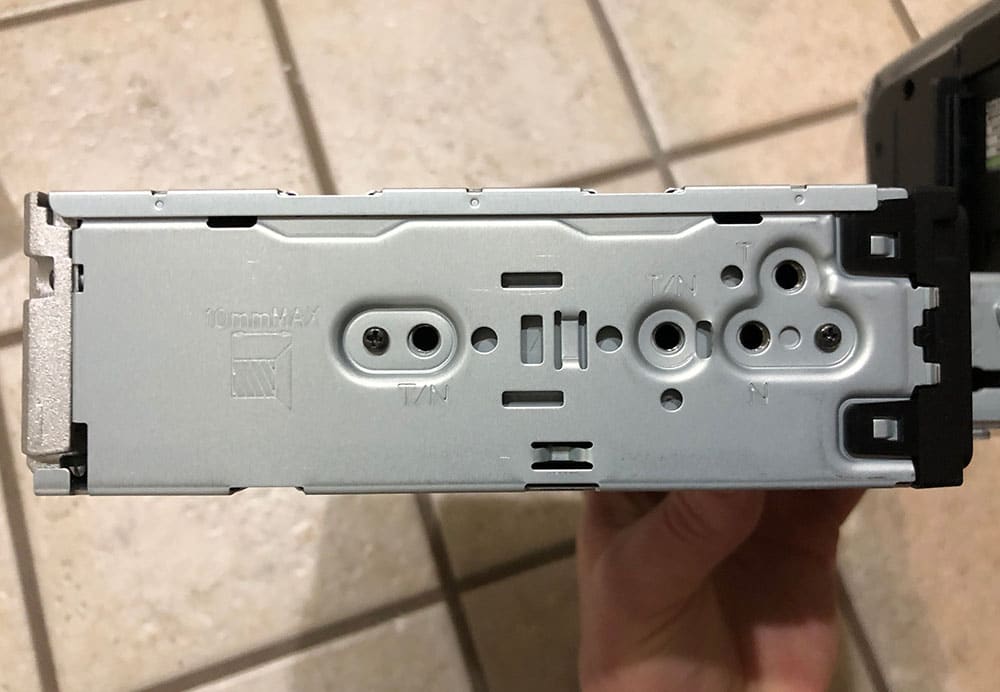
On the back of the chassis you'll find all of the inputs and outputs. This includes:
- 5-channel preamp outputs (5-volt front, rear, mono sub)
- Rear camera video input
- Microphone input
- Remote controls input (for steering wheel and other similar factory controls)
- Expansion input (for additional modules like SiriusXM)
- Antennae input
- Wire harness
- The USB shown in the image below actually runs from the back of the screen through to the back of the unit
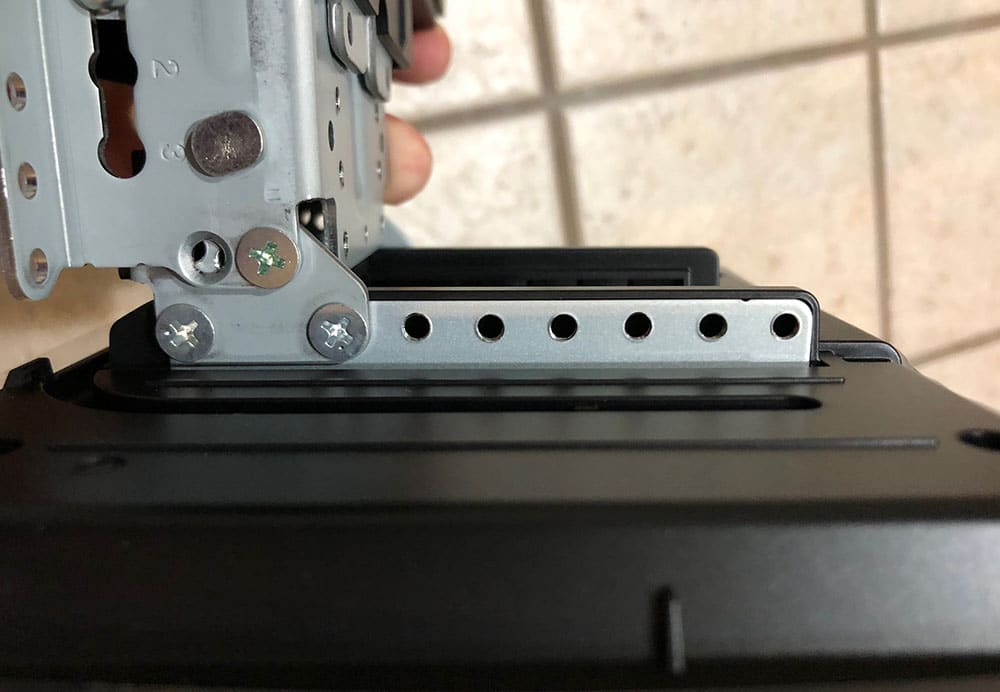
The actual mounting of the screen to the chassis is really simple as well, it slides right into the mount on the chassis and has four mounting screws to hold it in place firmly.
Installation
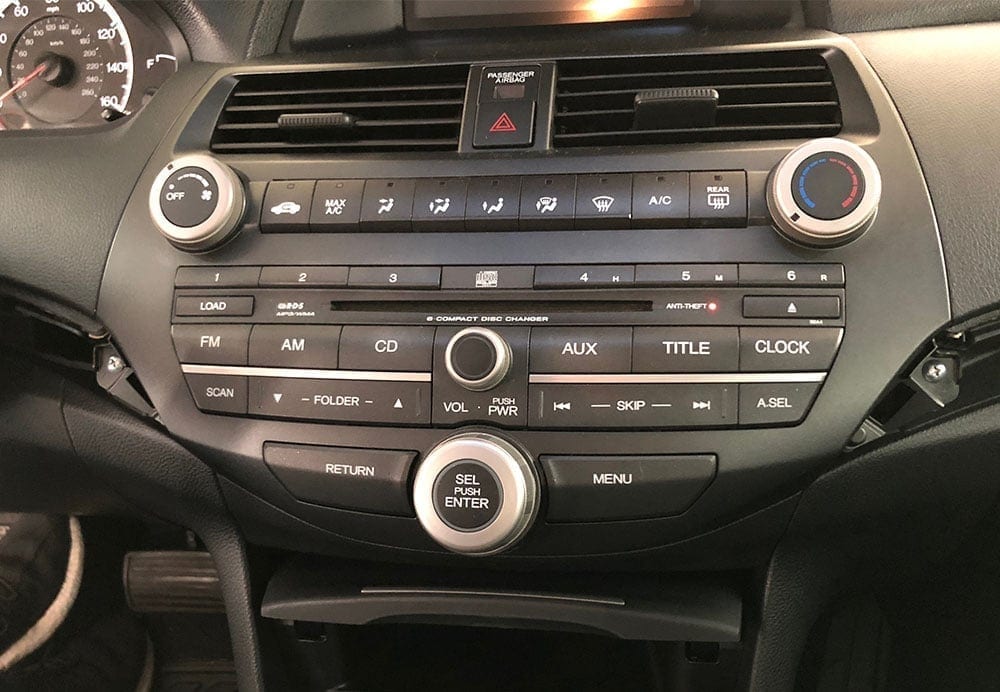
I installed and tested out the XAV-AX8000 in a 2009 Honda Accord. With the help of a few parts from Metra and CRUX, the installation was pretty straight forward. I wired up the Sony harness to the vehicle specific CRUX harness, which enabled steering wheel controls, powered Antennae, etc. And utilized Metra's dash kit to easily convert the radio bezel to a single/double DIN opening.
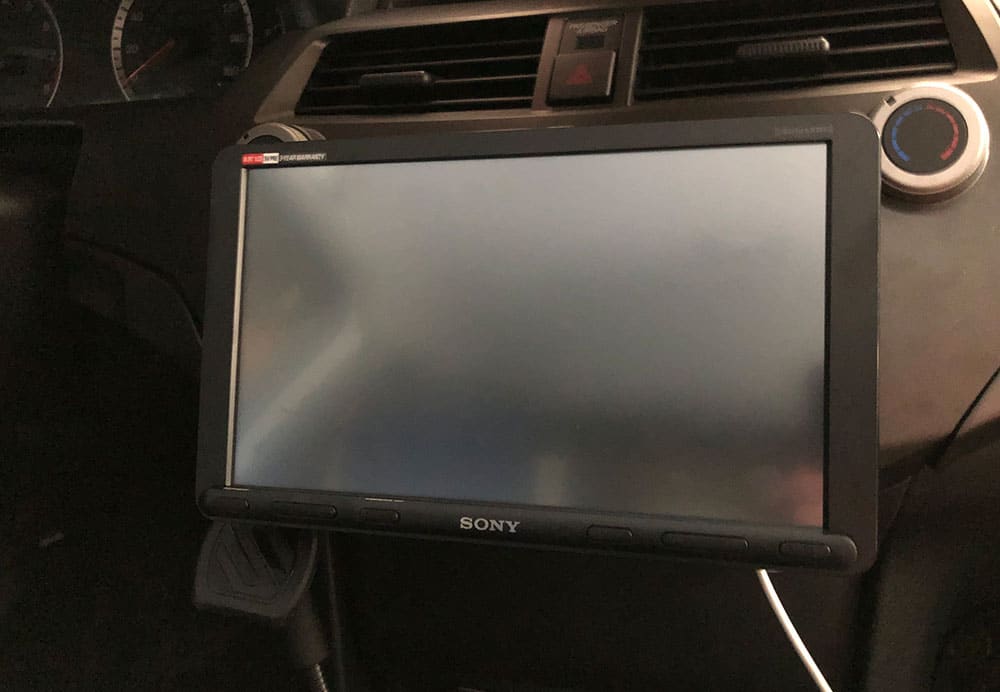
I also installed a rear view camera to utilize the unit's backup camera functionality and utilized the CRUX harness/module to integrate steering wheel controls. In my case, I didn't need to configure any of the steering wheel controls in the unit but if you need to, the unit has a configuration screen where you can easily select a function (e.g. volume up) and assign it to a button on your steering wheel.
This was the first installation that I've actually done with a screen that's designed to be separate from the chassis of the head unit. There's a few critical components to the XAV-AX8000 that simplified the installation of this type of head unit, and allowed for some needed customization of the screen positioning.

In order to make this configuration work universally with nearly every car's dash, Sony designed the screen to have three different axises of adjustment: tilt, depth and height. Tilt will allow you to adjust the forward-back motion of the screen so that it's angled just right based on where you're sitting in relation to the dash. The Depth configuration gives you flexibility with how far you'd like it to be away from the dash in order to make it look natural or clear buttons and other components on your dash. Finally the height configuration will give you tons of flexibility to lift or lower the screen to, again, clear components on your car's dash or just to look natural.
In my install, I didn't need to touch the tilt, but I did adjust the depth to the closest setting, and dropped the height to the lowest configuration to make the unit fit the Honda Accord's dash.
The BIG Screen
Sony chose an oversized 8.95″ resistive touchscreen for the XAV-AX8000. Per wikipedia, a resistive touchscreen is a touch-sensitive computer display composed of two flexible sheets coated with a resistive material and separated by an air gap or microdots. When you touch the AX8000's screen, you can somewhat feel the flexible sheets in comparison to your iPhone's which is like touching a hard piece of glass. One of the benefits of a resistive touchscreen is that any object that touches it – nails, pens, hands with gloves, etc – will trigger the touchscreen.
For comparison, iPhones have what's called a capacitive touchscreen which use an electrical charge to detect touch and movement on the screen. Most folks who own an iPhone know by now that not every surface will trigger the phone's touchscreen. What's nice about a resistive touchscreen is that it registers touch from anything. For example if it was cold out and you were still wearing gloves until your car warmed up, you'd still be able to use the head unit to it's fullest.
In terms of the screen size, I really enjoy having an extra-large screen in the dash. Interacting with the elements on the screen is much easier on this unit than a traditional double din. Fonts are easier to read and it's just easier to navigate through the features of the unit in general, making it less distracting when you're driving and trying to switch features or read navigation instructions. And with its adjustable mounting point and configurations (mentioned above), it almost appears to float in your dash.
The screen also has an anti-glare feature, with an anti-glare film built into the screen to reduce annoying glare at certain angles. It's the same anti-glare that they feature in other units including the XAV-AX7000 that we reviewed earlier. I have to say that it really does work well, but what I don't like about the anti-glare (or it could just bee the resistive touchscreen) is the matte-look that comes along with it. That said, I drove the car around for a few days at all times of the day, and positioned the car at certain angles of the sun and I couldn't get a position where the screen was not legible. However, I did notice that with polarized glasses, the screen appears significantly dimmer than normal.
Screen quality and clarity is equal to a normal double DIN unit. I wouldn't say it's anything comparative to a 4k or retina screen, considering the 800×480 resolution. But it's perfectly clear and music imagery, maps, icons and other features on the screen look great. I haven't been able to test out the WebLink Cast to put a video on the unit yet. Per Sony, this feature will come at a later time. This will be the telling test for the screen quality and I'll update you as soon as they release this feature and I'm able to test.
Powering it Up for the First Time
I was pretty excited for the first start-up. Anticipation grew when the ‘Sony' screen appeared, followed by the typical language, date and time configuration.
Sony touts their “Quick Wakeup” feature with all their new units like this, with a startup time of less than 6.5 seconds. Coming from someone who has seen the worst in terms of stereo startup times – 20 seconds and beyond – the quick startup time of the AX8000 is noticeable and really convenient. When I measured the startup it was closer to 6 seconds. This quick-startup is especially nice when you're backing out of a parking space. Gone are the days where you had to wait for your head unit to display your backup camera feed after you put it into reverse.
Running Through the Key Features
Where to start. There's a ton of great features on this unit. Although I didn't put every single one to use to its absolute fullest (I don't have an amplified system with speakers, subwoofers etc), my installation is consistent with a typical OEM replacement head unit.
Display & Customization
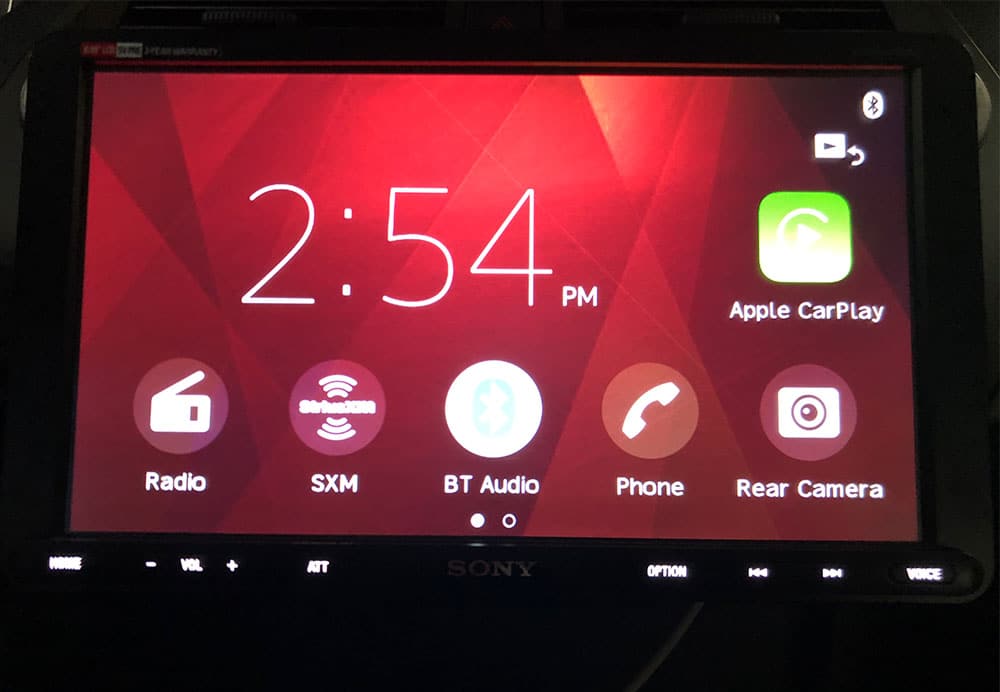
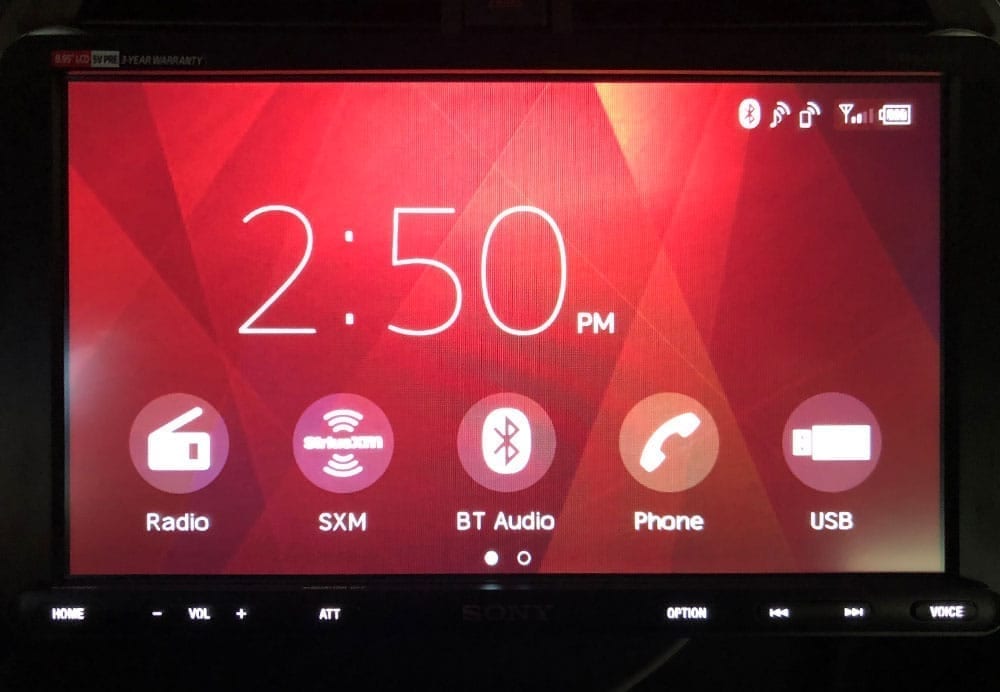
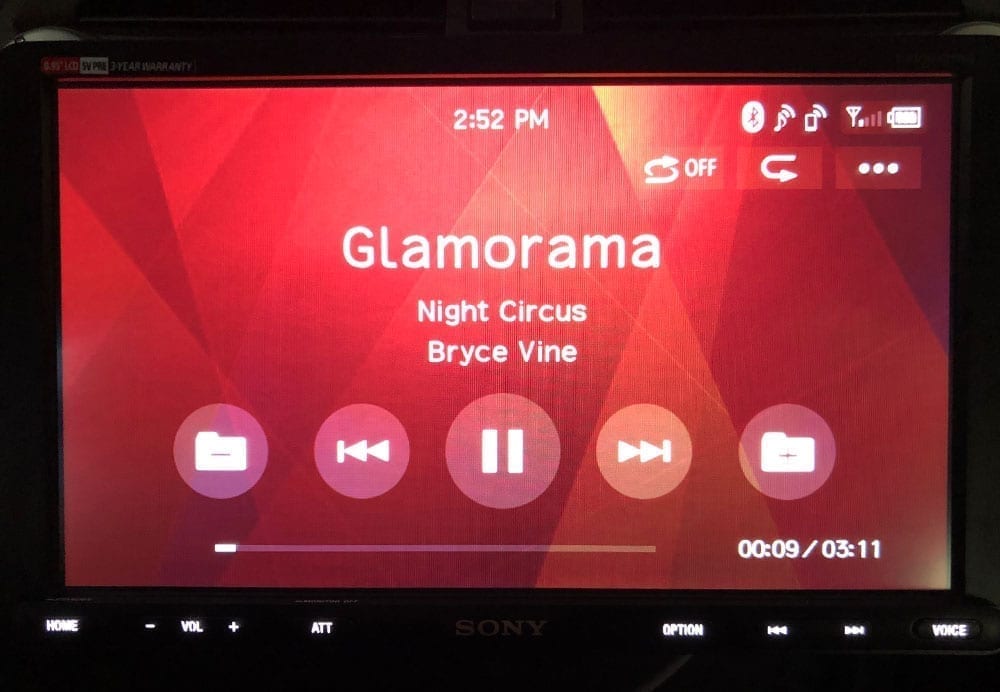
Let's start out with the display and some of the customization features of the unit. The first thing you see when you start up the AX8000 is the wallpaper and home screen. It has five total options for a colored background, giving you a decent set of choices. Unfortunately, at the moment it doesn't offer custom wallpapers. I wasn't particularly ‘in love' with any of the color options but I did find that the red matched best with the rest of my interior and dash at night.
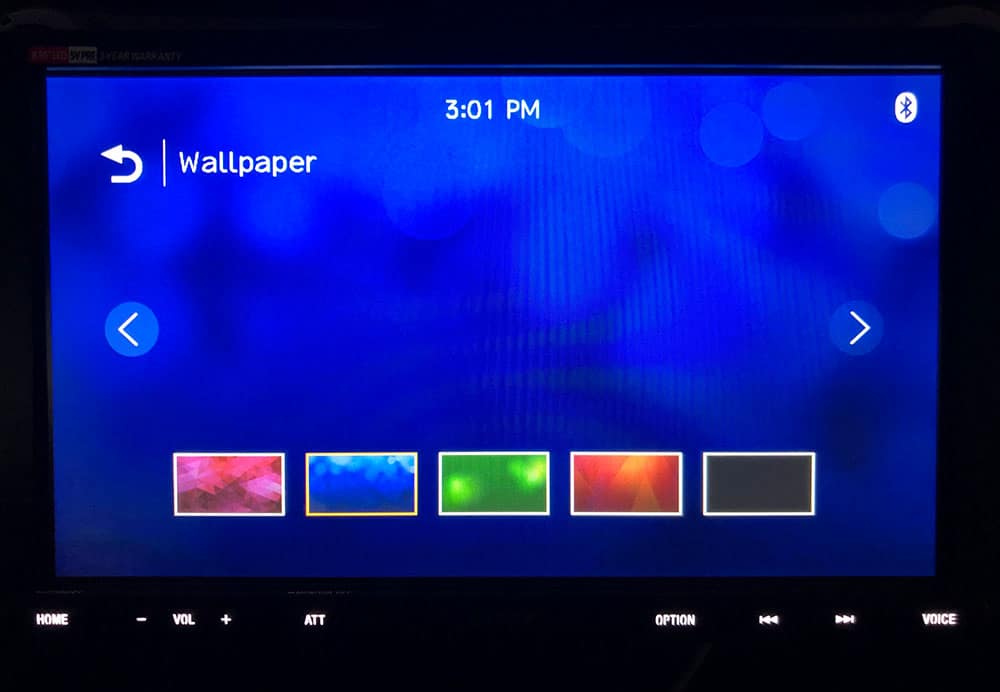
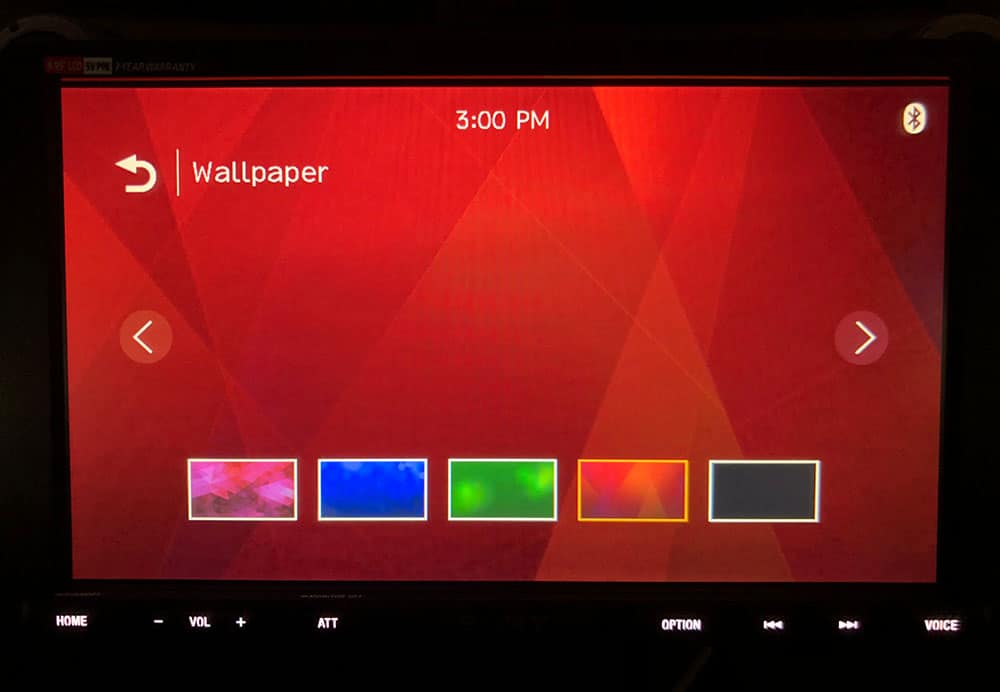
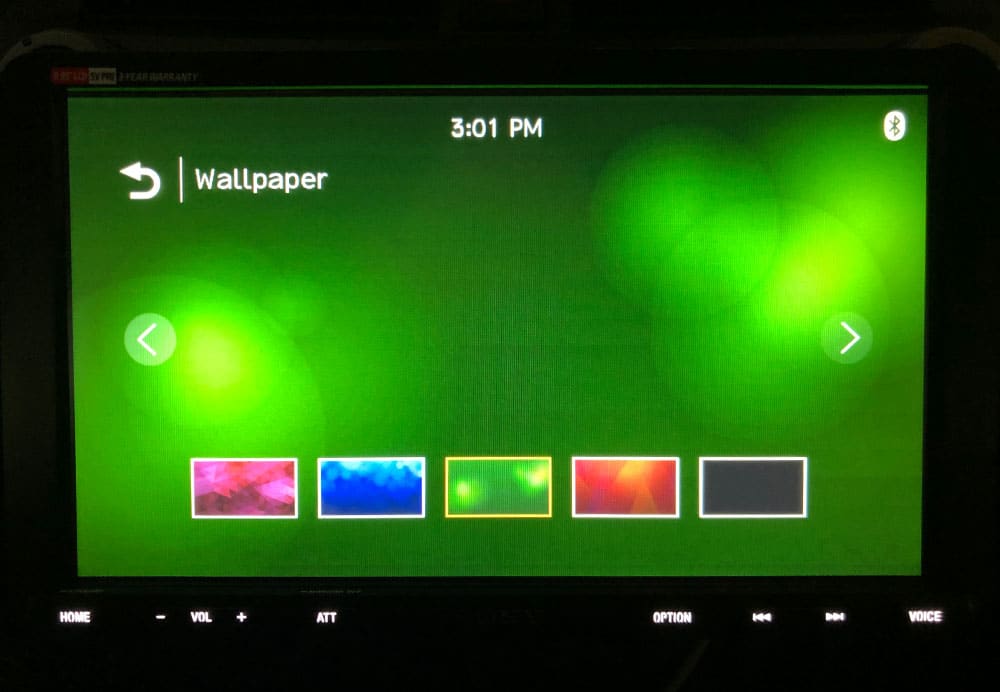
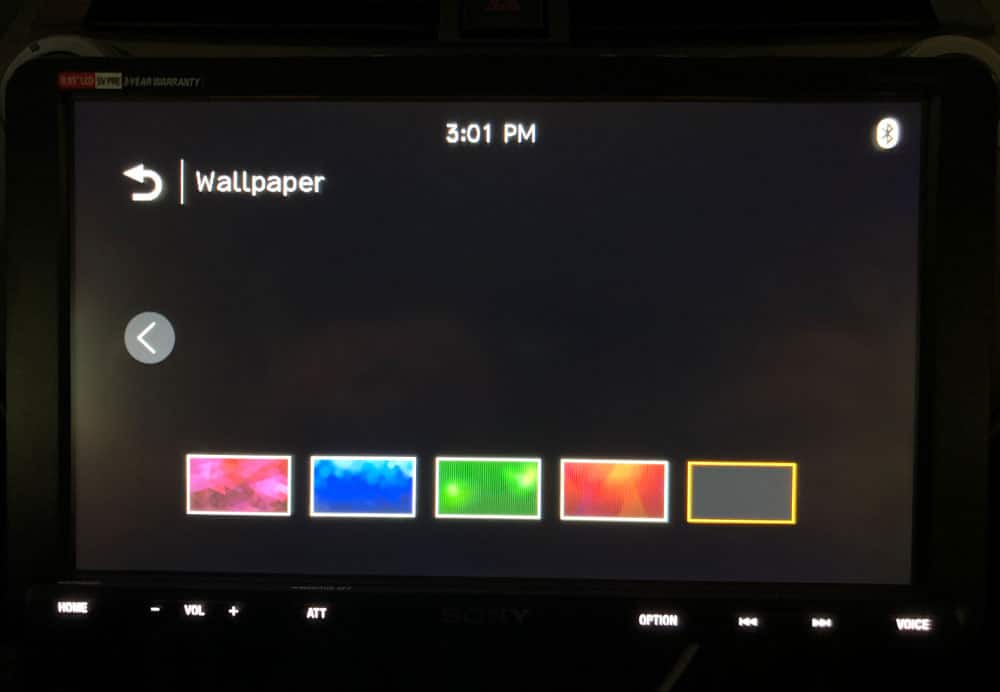
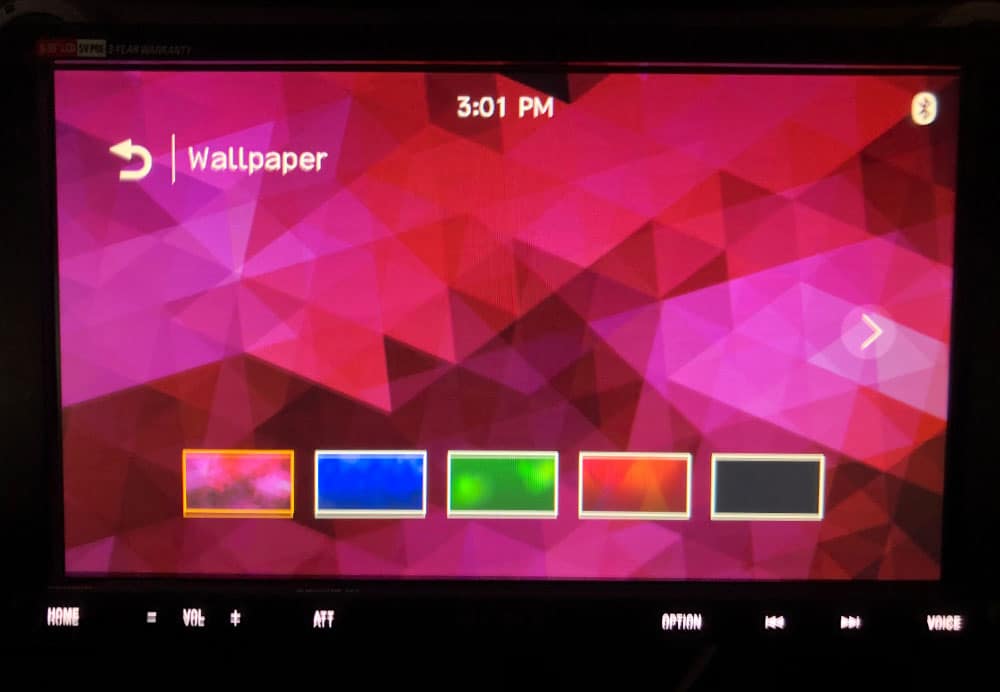
In terms of visual adjustments and customizations, there wasn't too many other options in settings. Apart from the wallpaper, the homepage is pretty static. The buttons on the bottom of the screen glow white.
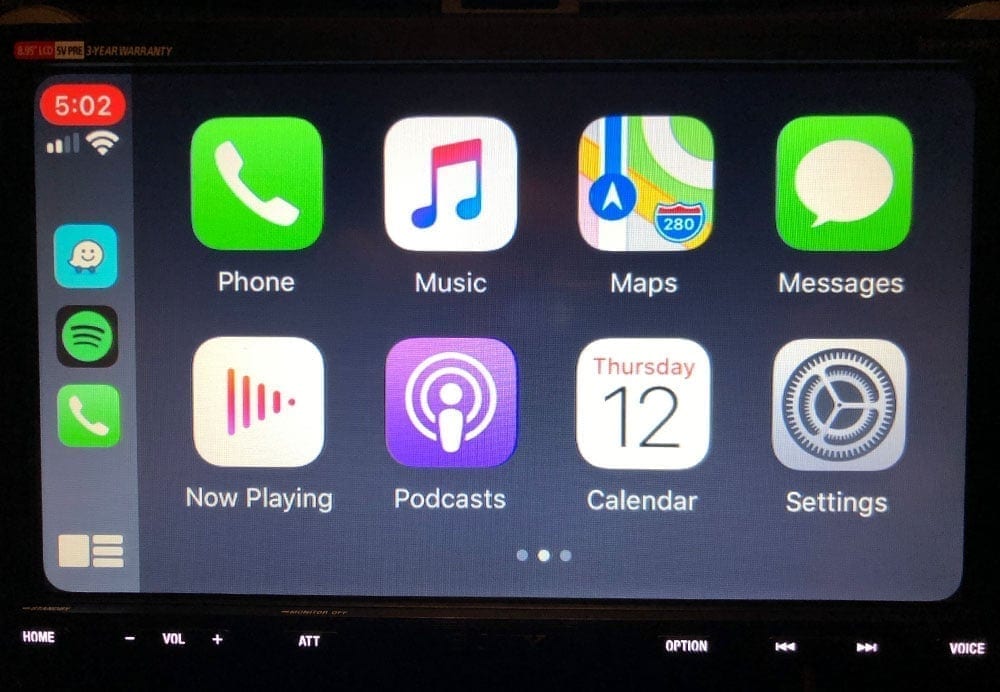
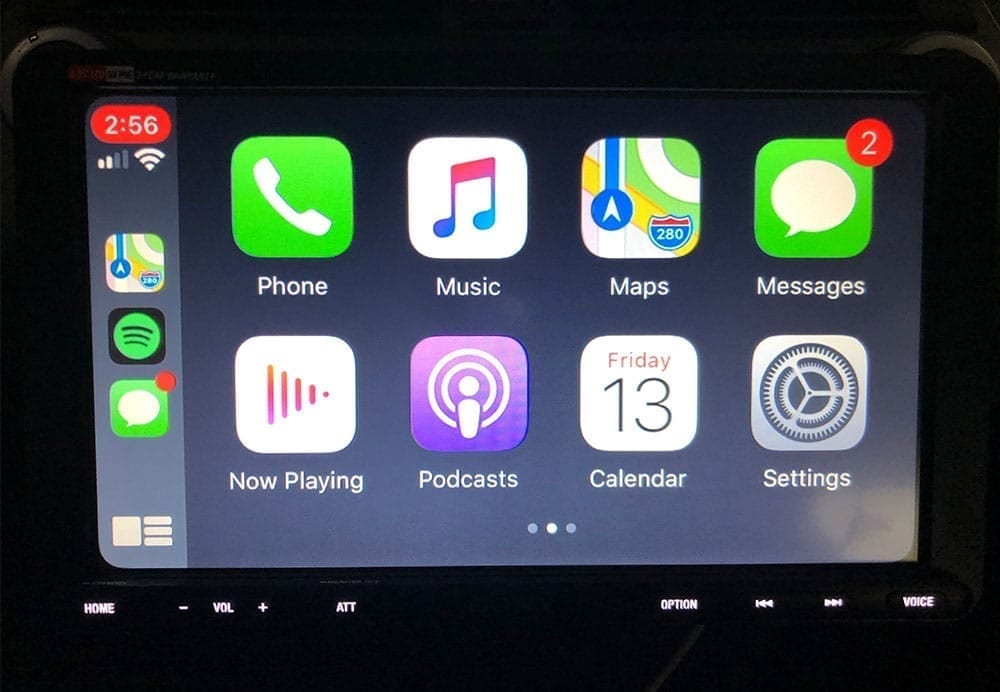
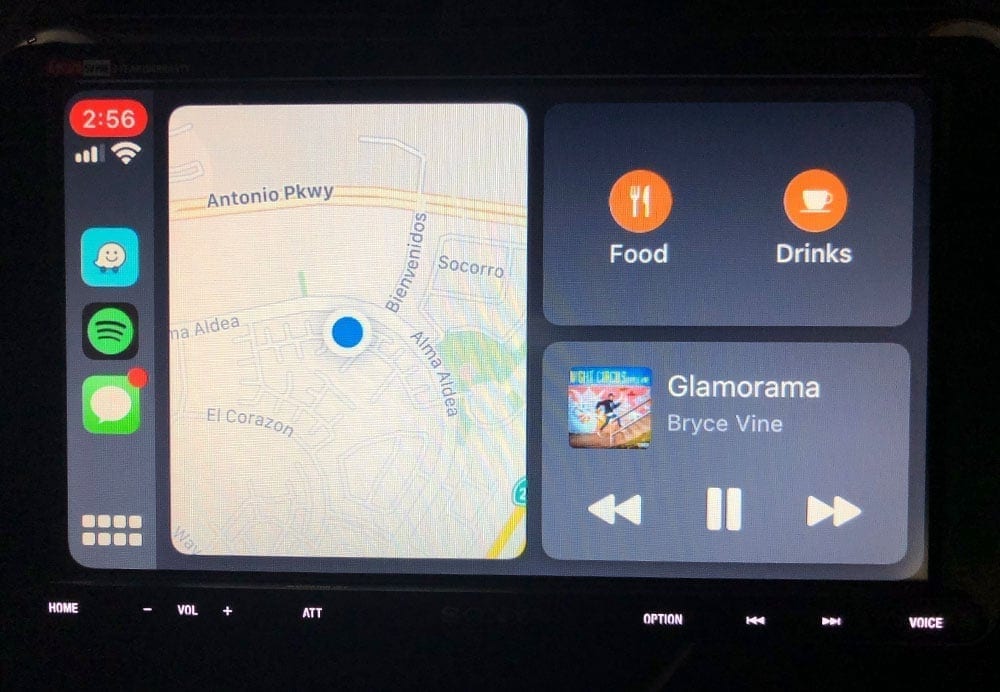
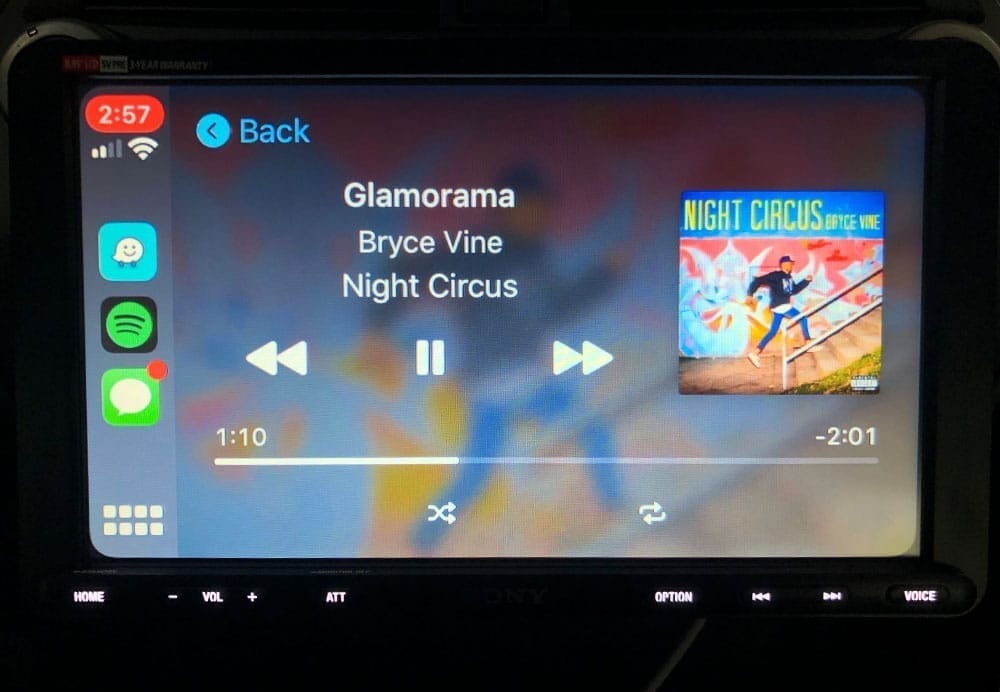
Connecting Your Device With Apple CarPlay
Apple CarPlay was a huge feature add for me. I've previously used it in my wife's Jeep, so stepping back into my ‘dumb' (tech wise) daily commuter was depressing! Unfortunately for Android users, I can't say too much about Android Auto, apart from the fact that it'll likely be close to, if not identical to, any other Android Auto unit on the market in terms of features and functionality.
In general, I think that Apple CarPlay has a long way to go to be truly a powerful feature set in cars. The list of supported apps is pretty small and functionality within the apps that are supported is limited. That said, it's the best interface I've tried in a car with my iPhone (for obvious reasons). It covers the necessary features:
- Voice command for opening apps or audio within apps. I frequently ask Siri to play the latest news on the way home from work. You can use it to dial numbers or people in your contact list and even write or respond to texts. You can use it to play music or open up apps or even use it for navigational purposes. For example “take me to the nearest gas station”.
- Voice read text messages and voicemail. You can use it to read your latest text messages, respond to those text messages via voice and listen to voicemail.
- Calls – you can obviously make phone calls! Your entire contact list will appear on the screen so you can interact and click on a contact to call them directly.
- Directions – use your voice to ask for directions to a location or point of interest, or manually input it on your phone. CarPlay defaults to your Apple Maps but you can open up Waze or Google to punch in and navigate to destinations as well.
- Streaming music – all of the key players in the audio streaming space have apps – Spotify, Apple Music, Pandora, Audible, etc. Although the features aren't identical to what you find on your phone I found it relatively easy to use and, in general, very functional when I was browsing and trying out Spotify and Pandora.
For a full readout of CarPlay you can find its features directly from Apple Here. But if you want Apple CarPlay, the XAV-AX8000 has it and truly does it justice with the large screen. I said this before, this was a key feature from me, and by far my favorite. Similar to the majority of units on the market today, the XAV-AX8000 will require you to hook up via USB if you want to access CarPlay features.
Bluetooth Connectivity
Bluetooth on the AX8000 is exactly what you would expect. I found the process for connecting new devices particularly simple and quick. Once your device is connected you have access to a number of features, including:
- Streaming music on your app of choice
- Hands free phone calls and text messaging
- Voice command (via phone)
However, I found myself always plugging in my phone to access Apple CarPlay. But if you don't need the maps or functionality of CarPlay and just want to keep your phone in your pocket or purse, Bluetooth is flawless, quick and the streaming music/audio quality was fantastic.
Audio & Sound – Tweaking It to the Way You Like It
Sony put a ton of great audio features in this unit. It's a great option for both OEM replacements in cars without amplified or aftermarket speakers and subwoofers. But if you do belong to the group of people who are looking for an aftermarket system and plan on adding amplifiers, speakers and/or subwoofers, I personally felt that this unit has all of the features you need to make a killer, customized system.
First thing to mention is it has 5V preouts – front, rear and mono sub. So it's an ample platform to upgrade your system with aftermarket amplifiers. You can easily hook up and distribute the audio signals to how you need in your vehicle too. In the audio settings, you can configure the channel high and low pass frequencies as well for the outputs. I didn't get to try this myself, but its nice because if you're using the front or rear channels to power different sizes of speakers, it'll allow you to tune the signal to your amplifier from the screen to align with the frequency ranges of the speakers, instead of adjusting the frequencies directly on your amplifiers.
For those who would like to utilize the built-in amplifier in the head unit, it offers an output of 20 watts RMS and 55 peak x 4 channels.
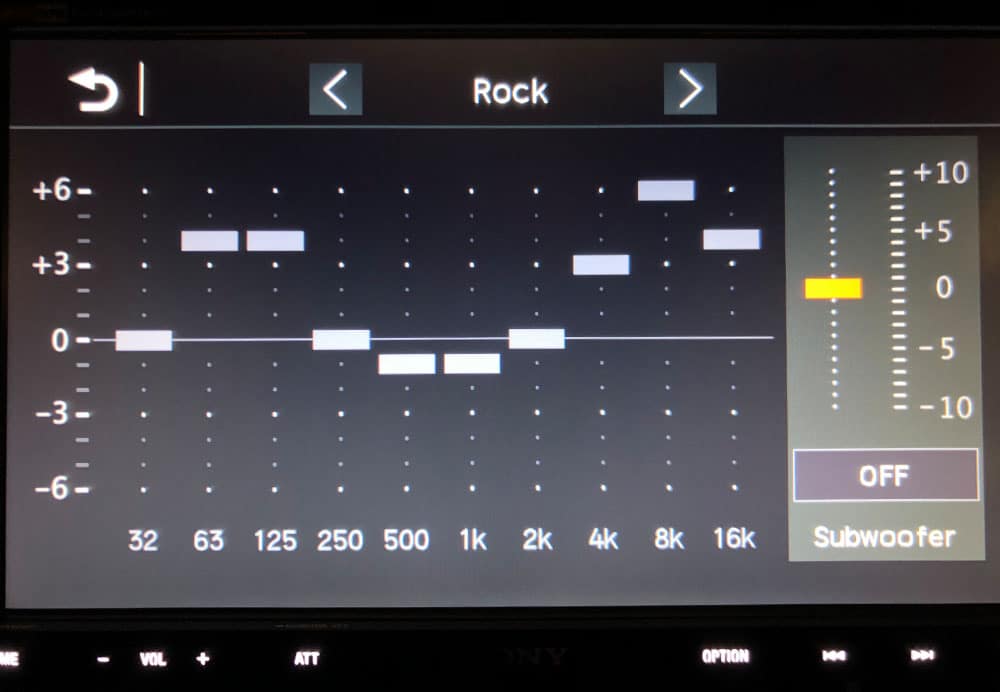
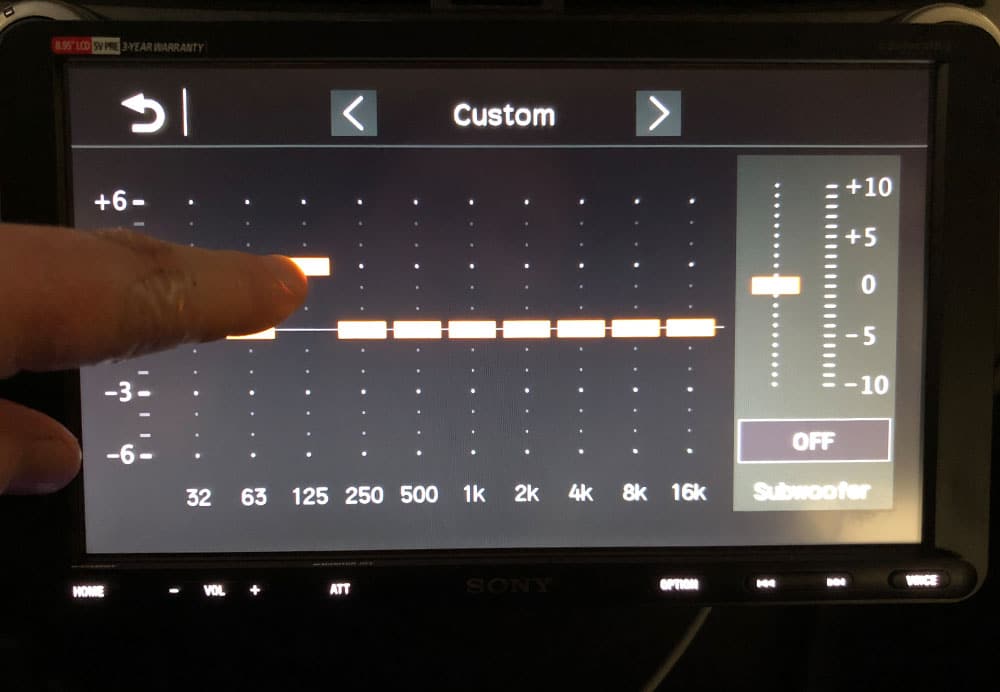
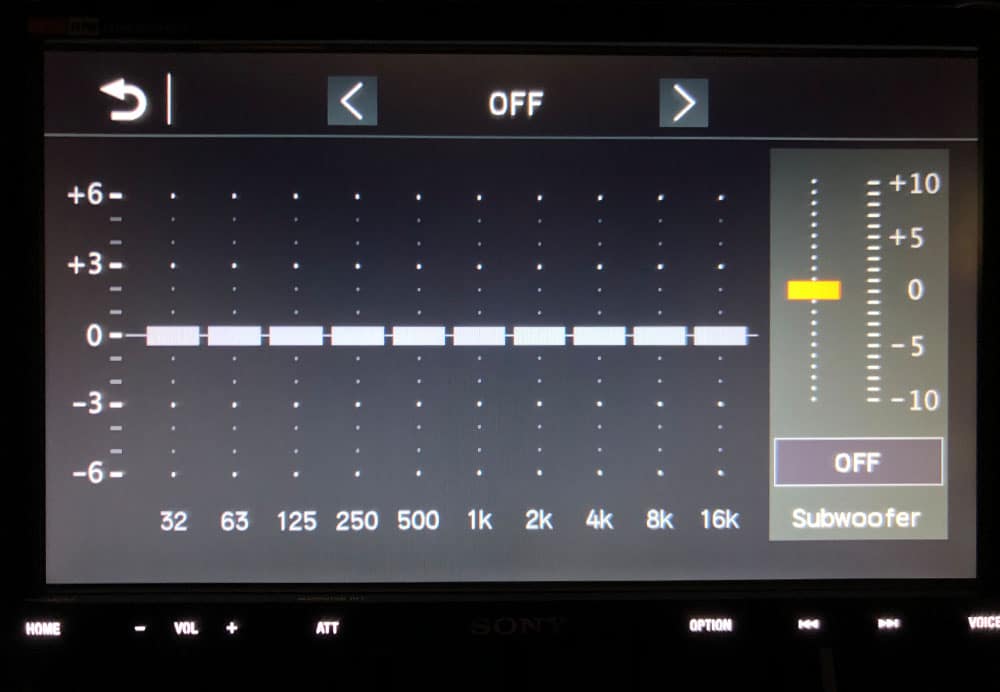
10-band Equalizer
Digging into the on-screen audio features. It features a 10-band equalizer, where you can run through a number of presets from the factory (pop, rock, jazz, etc), or you can customize each band with the drag of a finger. For me, I played a genre of music that I frequently listen to and ran through the presets to find one that I personally liked at mid-high volume. I ended up on the rock preset, which gave the fullest and most well rounded sound for the music that I was testing with. But for the tuning savvy you can adjust each individual range of frequency to your liking and speaker configuration.
On the same screen, there's also an adjustment to set the gain for the subwoofer. Or you can turn it off entirely. I liked the fact that they combined the subwoofer settings with the equalizer in the same interface.
Dynamic Stage Organizer (DSO)
One of the unique features to Sony head units is their Dynamic Stage Organizer, or DSO. This feature was designed for speakers that are built into door panels, that vary in their distance away from your ears, or are generally mounted lower/further from where you're seated – anything that might alter the way that the speaker sounds as a result of where they're installed. With DSO, the frequency output of your speakers is altered to make the speakers and sound more natural given their placement. It's meant to make the sound appear as if it was coming from your dashboard rather than your feet. Sony calls this “virtual speakers in your dashboard”. There are four adjustments – low, medium, high and off.
For my setup, I used the middle setting. There is a noticeable difference in the sound and where the sound appears to come from. The higher the setting, the ‘higher' the sound appeared to come from. Literally. Your setting will be dependent on where your car's speakers are positioned and how far they are away from you.
What's Missing or Could Be Improved?
I found Sony's XAV-AX8000 to be a fantastic upgrade to the OEM head unit that was in my car. That said, I felt there are a couple things that are missing or could be improved in the interface and design that are worth noting.
- Video – Streaming video with a 9″ screen in your car would offer pretty amazing entertainment for you and your passengers during a long drive. WebLink Cast is a tool that can be used to mirror your device's screen directly on the head unit, enabling you to watch video and any other streaming entertainment that you would watch on your phone. In a press release, Sony announced that the unit would be compatible with this feature in a future software update but has yet to release it.
- Wallpapers – The devil is in the details. As simple as it sounds, I would have preferred to have more options for wallpapers. If you don't love any of the options that are available in the settings, you'll be staring at something that you'd prefer to change every time you're in the car! Although I found one that I ‘liked' and looked great, I didn't feel like it matched the rest of the car and would have chosen an alternative if I had the option.
- Button Colors – The buttons on the unit glow white at night, which is really neutral and doesn't really conflict that much in my own car. I don't personally mind it but there are many units on the market that allow you to match your button colors with your interior's OEM button colors to make the unit look as though it were integrated from the factory (or at least create the illusion). Would have been a really nice feature-add.
- Homepage app configuration – Another small thing I noticed was that I couldn't alter anything on the homepage. All of the unit's apps and placements were static. This is more of an operating system change, but being able to update what apps show and where/how would have been awesome. I'm not a frequent SiriusXM user, yet it's front and center on the homepage for me. And when I tried to remove it, I wasn't able to.
Update June 2020
Update 6/27/20 –
A few months into having this unit and I still love it just as much as the first day I installed it. We were reviewing a new double din unit of Sony's, their XAV-AX5500 and it reminded me to check for a software update for the AX8000. This weekend, I did a quick search for a software update for the XAV and found that in March they released an update that would enable two big things – WebLink and custom wallpaper uploads! You can find all of the latest software updates on this page.
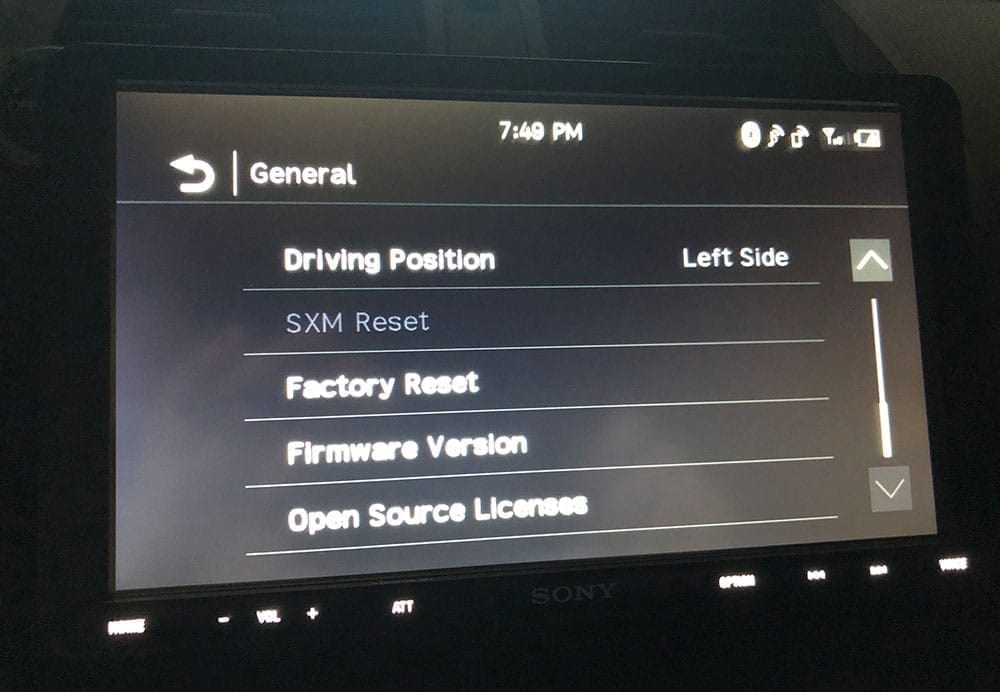
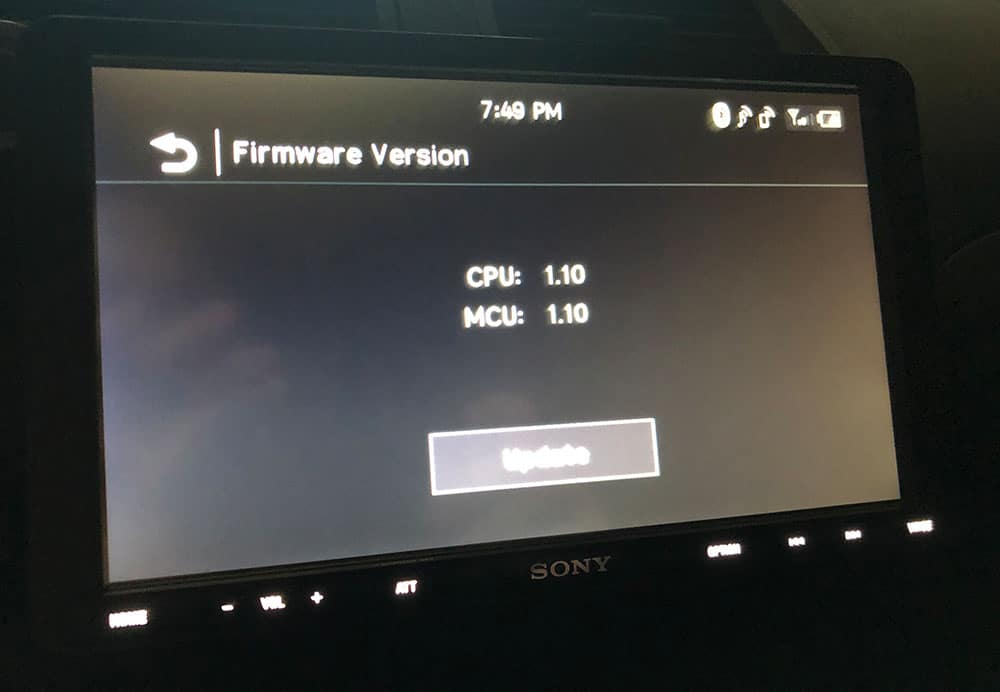
Firmware Update
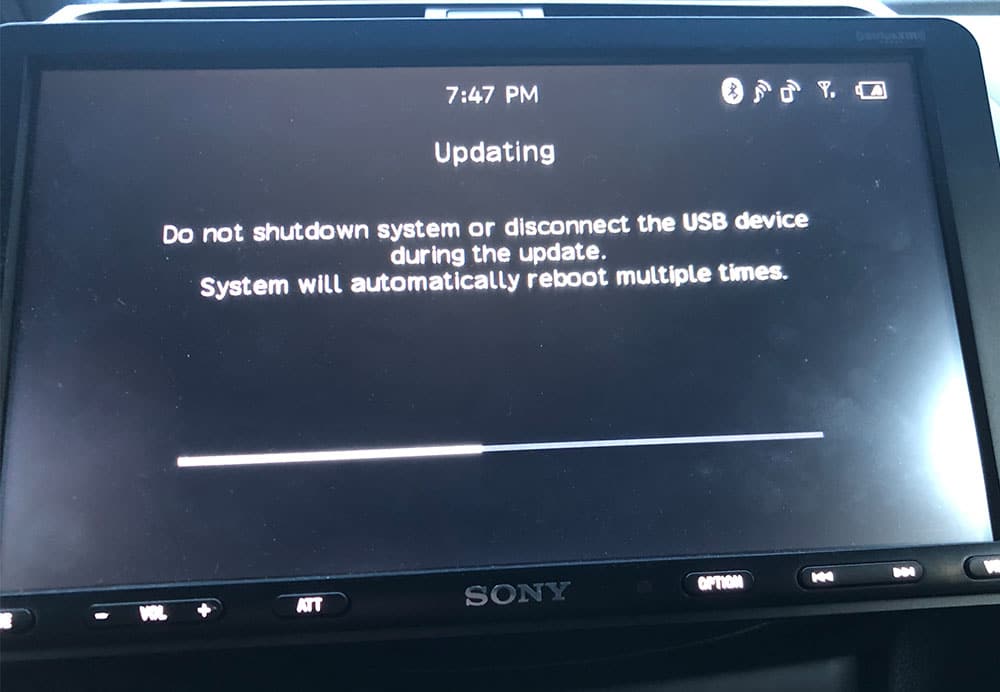
The update process was very easy, simply download the latest software to your computer and unzip the file. Drag all of the files to a USB thumb drive and then plug the thumb drive directly into the head unit.
Once you have it plugged in, navigate to the Settings >> General >> Firmware Version and click on the “Update” button and proceed with the update. You'll see a screen like this:
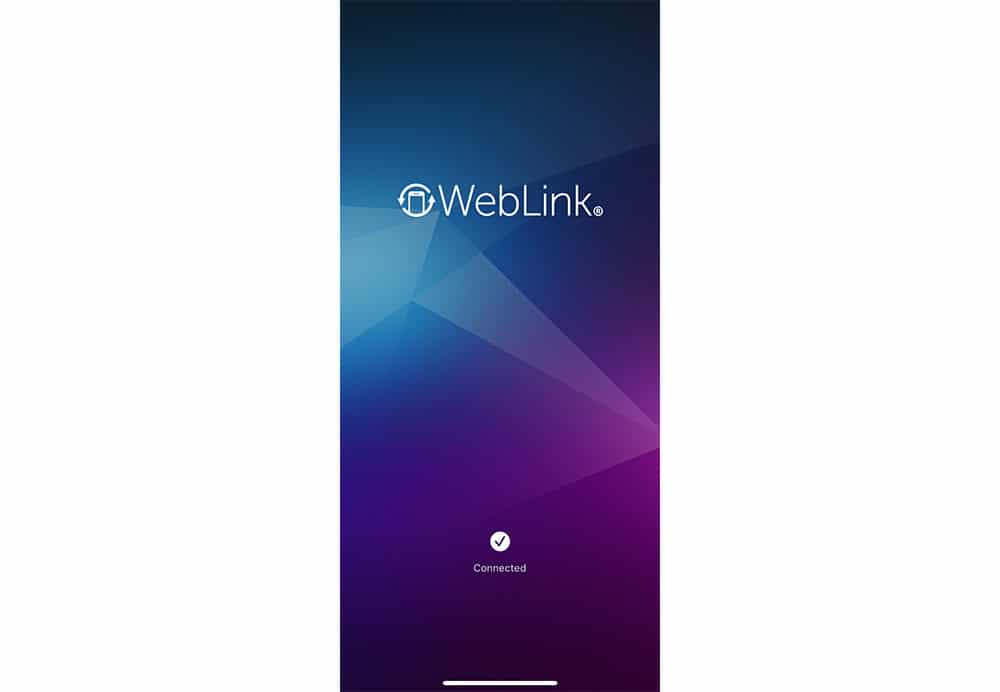
WebLink
The first thing that I tried out was WebLink. To get access to it, you'll need to download the WebLink app. Plug your phone into the unit, then scroll to the right on the home screen to access the WebLink icon and click it to open it up.
Once you've opened it up, your phone will prompt you to download the WebLink app from the app store. Download it and then re-plug your phone back into the unit, open up the app on your phone and on your head unit. You should then have access to all of the apps available via WebLink. Apps vary but on my screen the most notable apps Waze, Video (videos on your phone) and YouTube. There weren't too many options yet but I tested testing YouTube out and it worked perfectly!
You can also choose to ‘cast' your screen from your phone to the head unit as well. I found this to be less useful though. There's a bit of a delay between the screen and the actions you make on your phone. Also, somehow Netflix and ATT TV video is blocked from actually appearing on the head unit screen. You can hear audio but video is black.
All in all, a nice little upgrade. I would assume that all units that are made after March of 2020 will have this WebLink feature.
Custom Wallpaper
You can also now upload your own custom wallpaper. To do this, add some photos to a USB thumb drive, plug it into the head unit and navigate to the visual settings >> wallpaper. To the right of the pre-loaded wallpapers you'll see a new ‘+' icon that will allow you to upload a single wall paper image from your USB drive. It's pretty simple. Note you can only upload one at a time to the unit.
In Conclusion
Sony did a great job with this unit. It's a real upgrade and I prefer the size of the screen and mounting configuration of this unit over the standard double DINs. I think that the price point to feature ratio is pretty good too. It's really competitively priced considering the equivalent units with normal double DIN sized screens.
It has all of the features that you need to integrate it into your existing, stock system like I did without amplifiers and subwoofers. But it's also a great platform to upgrade your audio with aftermarket amplifiers, subwoofers and speakers with its granular audio controls via the EQ, DSO, 5V preouts, and other audio adjustments.
It has all of the latest tech too – Apple CarPlay, Android Auto. And once it features WebLink Cast in a future software update, it'll be an incredibly well rounded unit.
Installation of this type of unit might be a little more challenging than a standard single or double DIN head unit. Configuration of the screen tilt, depth and height was a little time consuming. But these configurations make it really universal and customizable for all sorts of dashes and it's worth the time to get the big screen to fit and look just right. Like any other head unit, you should always assume that there'll be extra parts needed to install it like a dash kit and vehicle-specific wire harness from Scoche or Metra (CAST in my case).
All said and done, I definitely recommend the XAV-AX8000. I find myself staring at the screen while driving and eager to use the unit features and screen. It looks incredible, sounds great and is competitively priced for the features that you get.

Real problem for me is the fact the display does not swivel left to right. In the middle of an RV (Ford E4500) the display is very hard to see.
Hey John,
Thanks for your comment. Definitely would be a nice feature add for larger, further dashes in RVs and larger trucks!