When it comes to enhancing your car's audio system, bi-amping speakers can significantly improve sound quality by dedicating separate amplifier channels to the tweeters, midranges, and woofers. This approach allows for more precise control over the frequency ranges each speaker receives, resulting in a more balanced and dynamic sound. In this post, I'll dive into how to properly configure the crossovers on an amplifier for bi-amping a three-way component system, drawing on a practical example with a Ford F-150's setup.
Watch the Video
Don't want to read the article? Watch our video instead!
Introduction to Bi-Amping with Amplifier Crossovers
Bi-amping might seem like a daunting task to many car audio enthusiasts. But with the right knowledge, research and preparation, it can be a relatively simple upgrade that could have a drastic impact on system's performance. Bi-amping involves using separate amplifier channels for the low (woofers), mid (mid-ranges), and high (tweeters) frequency speakers. This allows you to have dedicated control over each speaker's volume and frequency coverage. The technique, paired with a strategic crossover configuration on your amplifier (or DSP), can enable clean, powerful, and an improved soundstage in your vehicle.
Why Consider Bi-Amping?
For this demonstration and video, I integrated a 3-way design in a custom Ford F-150 stereo. By adding two separate 3.5″ mid-range to the dash, it significantly increased the frequency coverage and volume. So much so, that it required me to bi-amp the front component system in order to achieve a rounded sound in the front of the car. By bi-amping a 3-way setup like mine, the issue of dominant or overbearing mid-ranges can tackled head-on. If you're installing your own setup and experience either an overbearing amount of midrange (or lack thereof) this video and walkthrough will certainly help to resolve the issue.
Step-by-Step Guide to Configuring Crossovers
Understanding Your Amplifier's and Speaker's Capabilities
The first critical step is to decipher whether your amplifier and the crossovers of your speakers support bi-amping. I recommend stopping here and checking the manual for your speakers. Sony's XS-163ES serves as an excellent example of a 3-way component system with an active crossover that is capable of handling this type of configuration.
In my video, I leverage an 8 channel amplifier, Sony's XM-8ES, to demonstration. However, I only utilize six for my setup. I think the point here is also to check and make sure that your amplifier has enough channels for the configuration of speakers in your car. For example, if you plan to bi-amp two sets of 3-way component speakers, that requires 8 channels.
Evaluating Frequency Responses
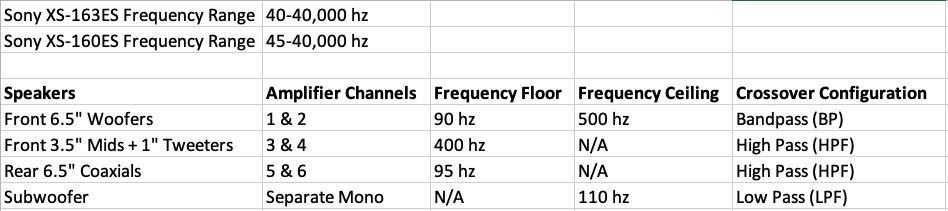
Before adjusting any settings on the amplifier, I recommend that you familiarize yourself with the frequency responses your speaker system can handle. For a three-way component system like the XS-163ES, frequency handling ranges from 40Hz to 40,000Hz are standard, each speaker type (woofers, mid-ranges, and tweeters) has its own specific range within this spectrum. Documenting these figures provides a clear roadmap for configuring the crossovers on your amplifier. I put together a spreadsheet to keep my head on straight:
Amplifier Configuration
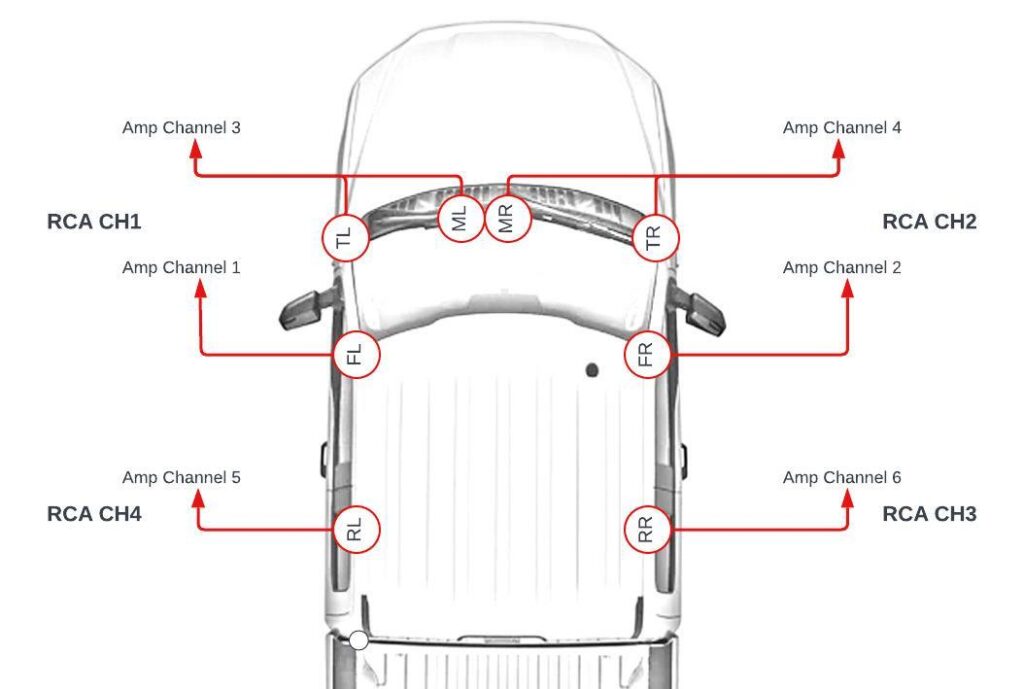
Before you begin configuring the amplifier's crossovers, I would recommend charting out your RCA and channel output setup to ensure that:
- Your amplifier has enough channels to support your goals. This should be pretty straight forward with a standard speaker setup like mine. But, in some cases with 10, 12 or more speakers you'll most definitely want to chart out your setup.
- Your input configuration (RCAs) can support the combination of channel outputs. In my case, I used 4 RCA channel inputs – front left/right and rear left/right. My amplifier was able to take those inputs and distribute them properly to support my bi-amped setup in the front.
Here's how I planned it:
- Channels 1 and 2 power the front component woofers
- Channels 3 and 4 would handle the combined mid-ranges and tweeters
- Channels 5 and 6 are reserved for the rear coaxials
Now, between my charted channel inputs and output setup and the frequency ranges from my excel chart earlier, I can easy take and set up my amplifier and set the frequencies before I install the amplifier back in the truck.
Setting the Crossovers
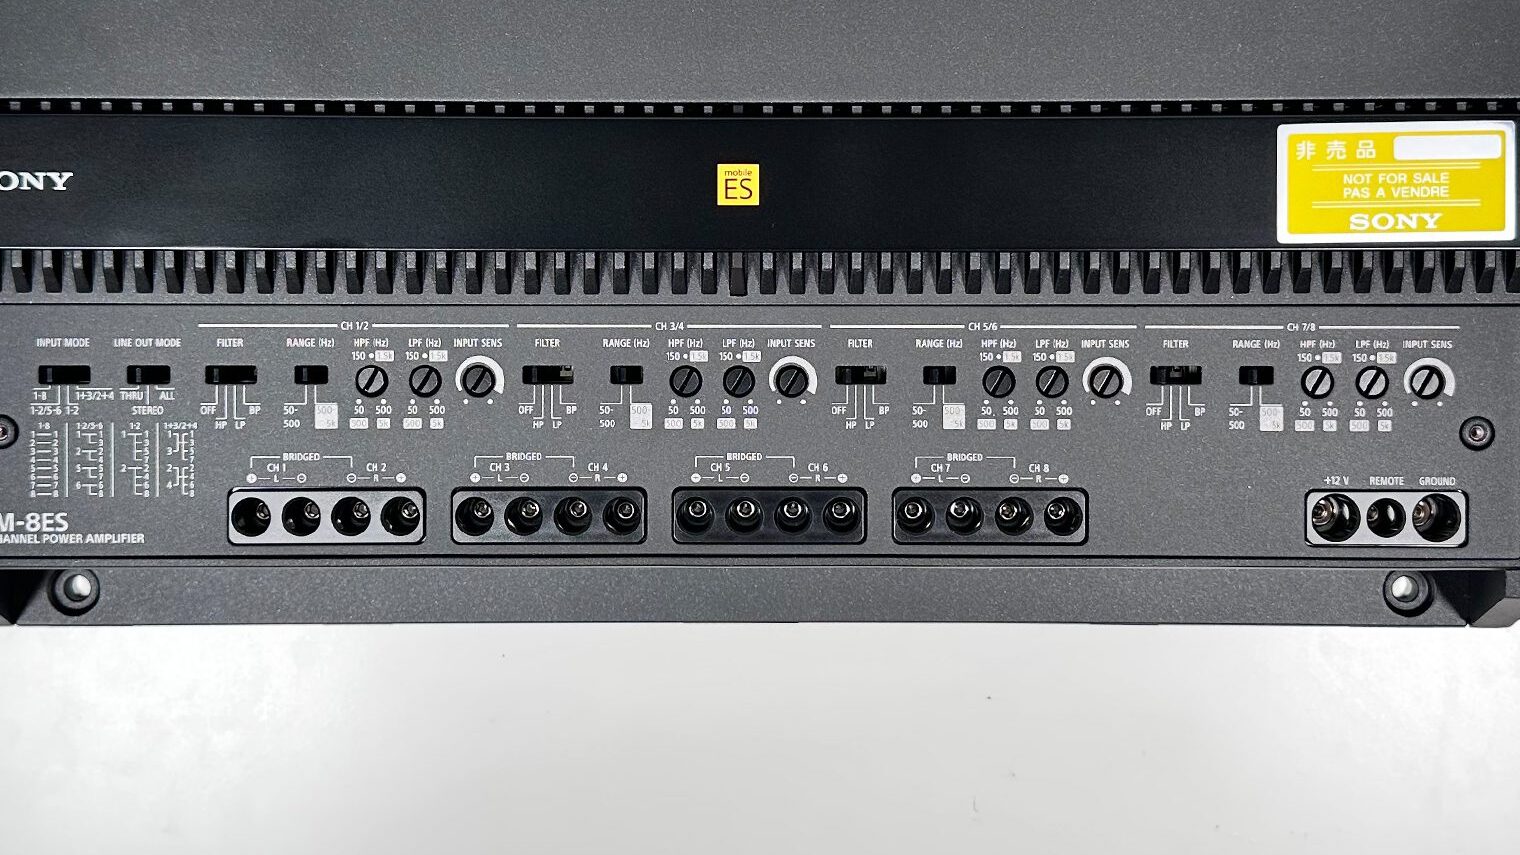
Armed with the information and research about your speaker handling, you can proceed to adjust the crossovers on the amplifier. Using my excel, I input the following setup on the amplifier crossover panel:
- For the 6.5″ Woofers: I set a bandpass from 90Hz to 500Hz, ensuring they handle only the low to mid frequencies.
- For the Mid-ranges and Tweeters: I implemented a high-pass filter at 400Hz, blocking lower frequencies from being passed to the 3.5″ and 1″ tweeters and allowing them to specialize in the mid to high range.
- For Rear Coaxials: In my system, I had coaxials in the rear. So I used another two channels with a high-pass filter around 95-100Hz. This also considered the unique characteristics of these speakers compared to the front set based on their specs.
Each adjustment requires careful consideration of the minimum and maximum frequency ranges. It's incredibly important to align them with the documented capabilities of your speakers to prevent damaging your system.
Conclusion: The Merits of Bi-Amping Your System
Configuring an amplifier's crossovers to bi-amp your component speakers may initially appear complex. But if you take some time to research and understand your speaker's frequency handling and your amplifier's crossover setup, the process is actually pretty straight forward. After bi-amping this system, the dedicated channels to separately tune the frequency ranges and gains for the mids/tweeters and woofers enabled me to dial back the overwhelming mid-range in this truck (and highs) and achieve a much more tailored and well-rounded sounding stereo.
One thing to remember/note – in this walkthrough I chose to configure the crossover network directly on the amplifier. But you could also chose to use an in-line DSP to achieve the same thing and set the crossovers to ‘full'. Regardless whether you use and amplifier or dsp though, the core principles of researching and adjusting in this guide remain the same and will provide you with a much more flexible system.
