In this article: I'll unbox and review Lumitec's new Javelin 600X underwater LED lights along with their Poco 3 and Pico C4 modules. I'll hook them up to my test bench to demonstrate their functionality and the Poco's mobile app interface, and then I'll install them on a 25ft speedboat to show you what they look like on the water!
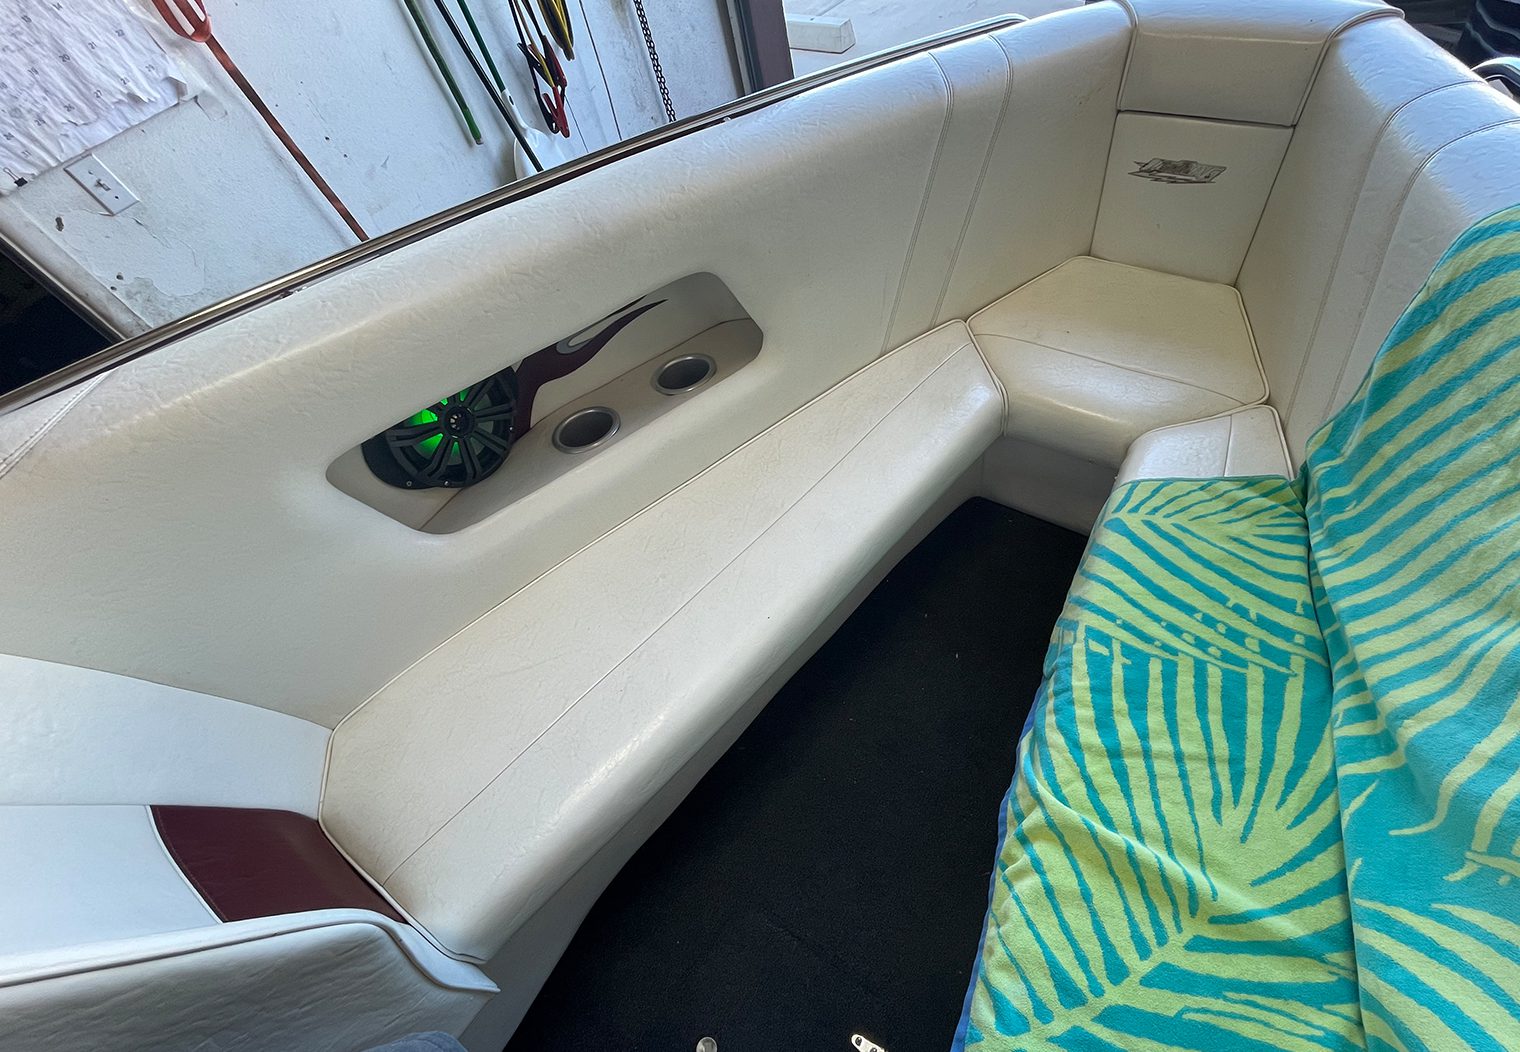
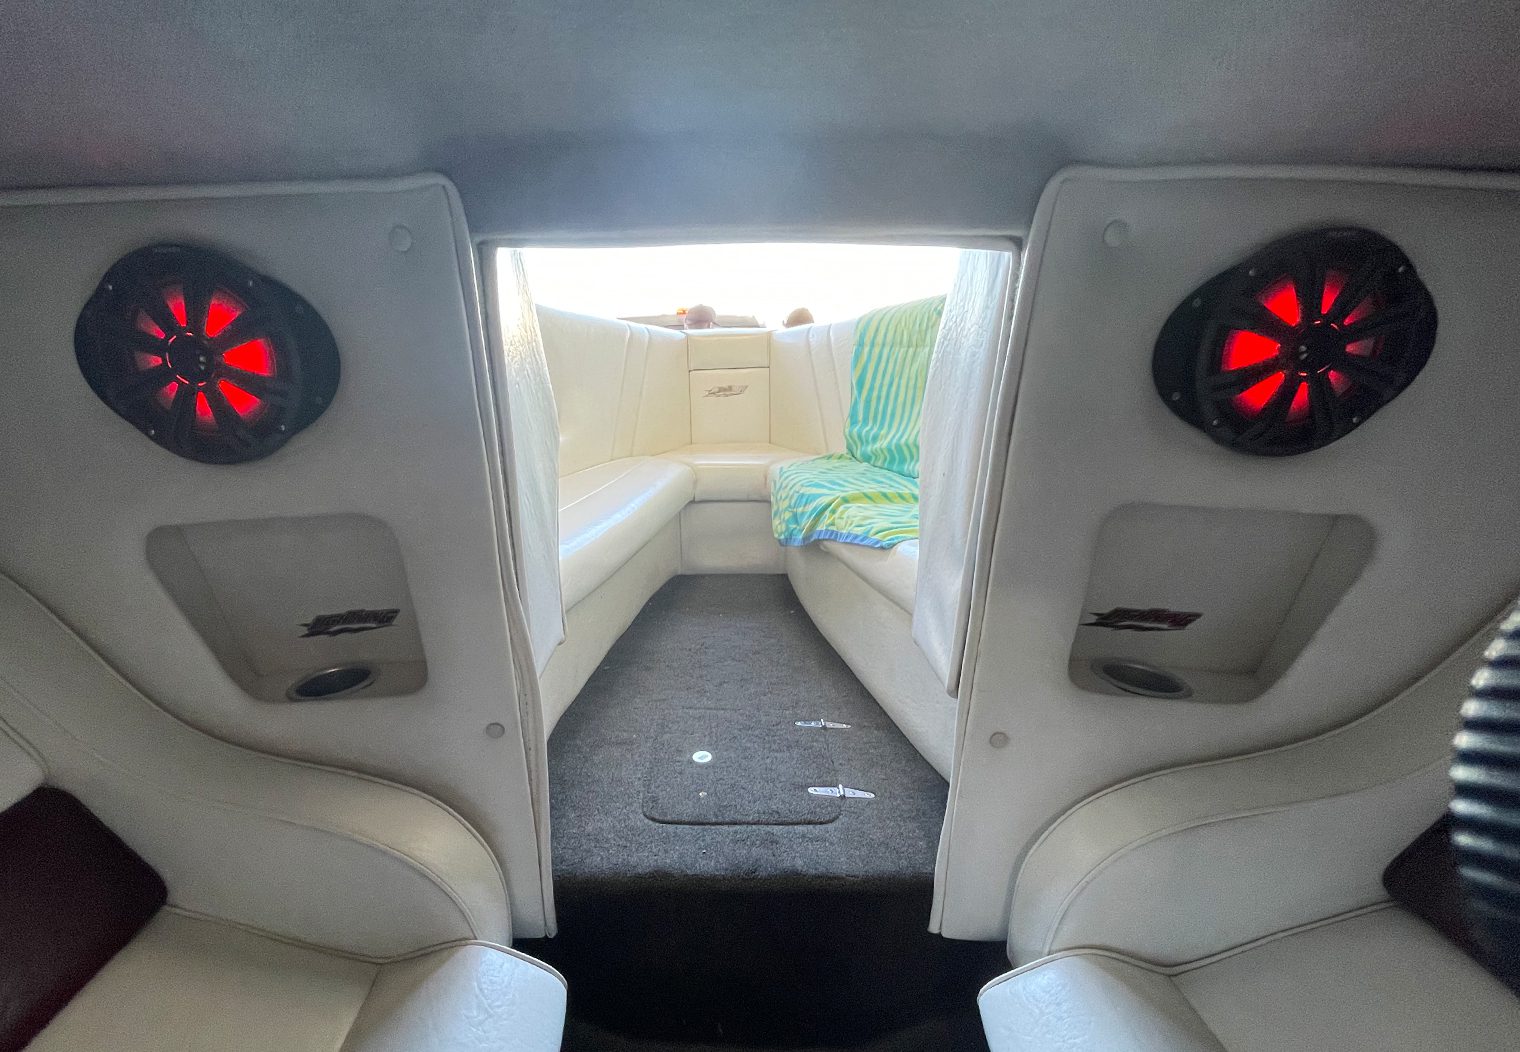
In 2020, we did a 10 speaker upgrade on a 25ft Lightning 247SX where we installed all new marine speakers, marine subwoofers, marine head unit and marine amplifiers. It was a complete overhaul of the stereo and really brought the boat to life on the water at the cove, sandbar and cruising. At night, the integrated RGB LED lighting on the Kicker KM and KMF speakers really set the mood too! When you're in the boat, it's a great experience. But why stop in the inside of the boat?
Underwater LED lighting has become increasingly popular on yachts, speedboats, fishing boats and all types of cruisers. I thought it was a great opportunity to expand on what was already a great stereo and great lighting experience on the boat, and add a pair of high-quality underwater LED lights. At the same time though, I wanted to be able to leverage the existing RGB lighting in the boat, and integrate it into a single system that would allow me to control everything with one interface/app. That's when I reached out to my friends at Lumitec.
Lumitec is a high-end, high-quality maker of LED lighting and LED control technology. They've been on our list of best underwater LED lighting for some time. We've also reviewed/installed their SeaBlaze X2s in the past and loved them. We recently had the opportunity to test and install some of Lumitec's latest and advanced lighting products on the market on the Lightning – the Javelin 600X, Poco 3 and Pico C4 and in this article, I'll walk you through my experience with them. I'll unbox and review their key features, wire them up on my test bench and install them on a Lightning 247SX speedboat to show you what they really look like in the water.
Unboxing & First Impressions
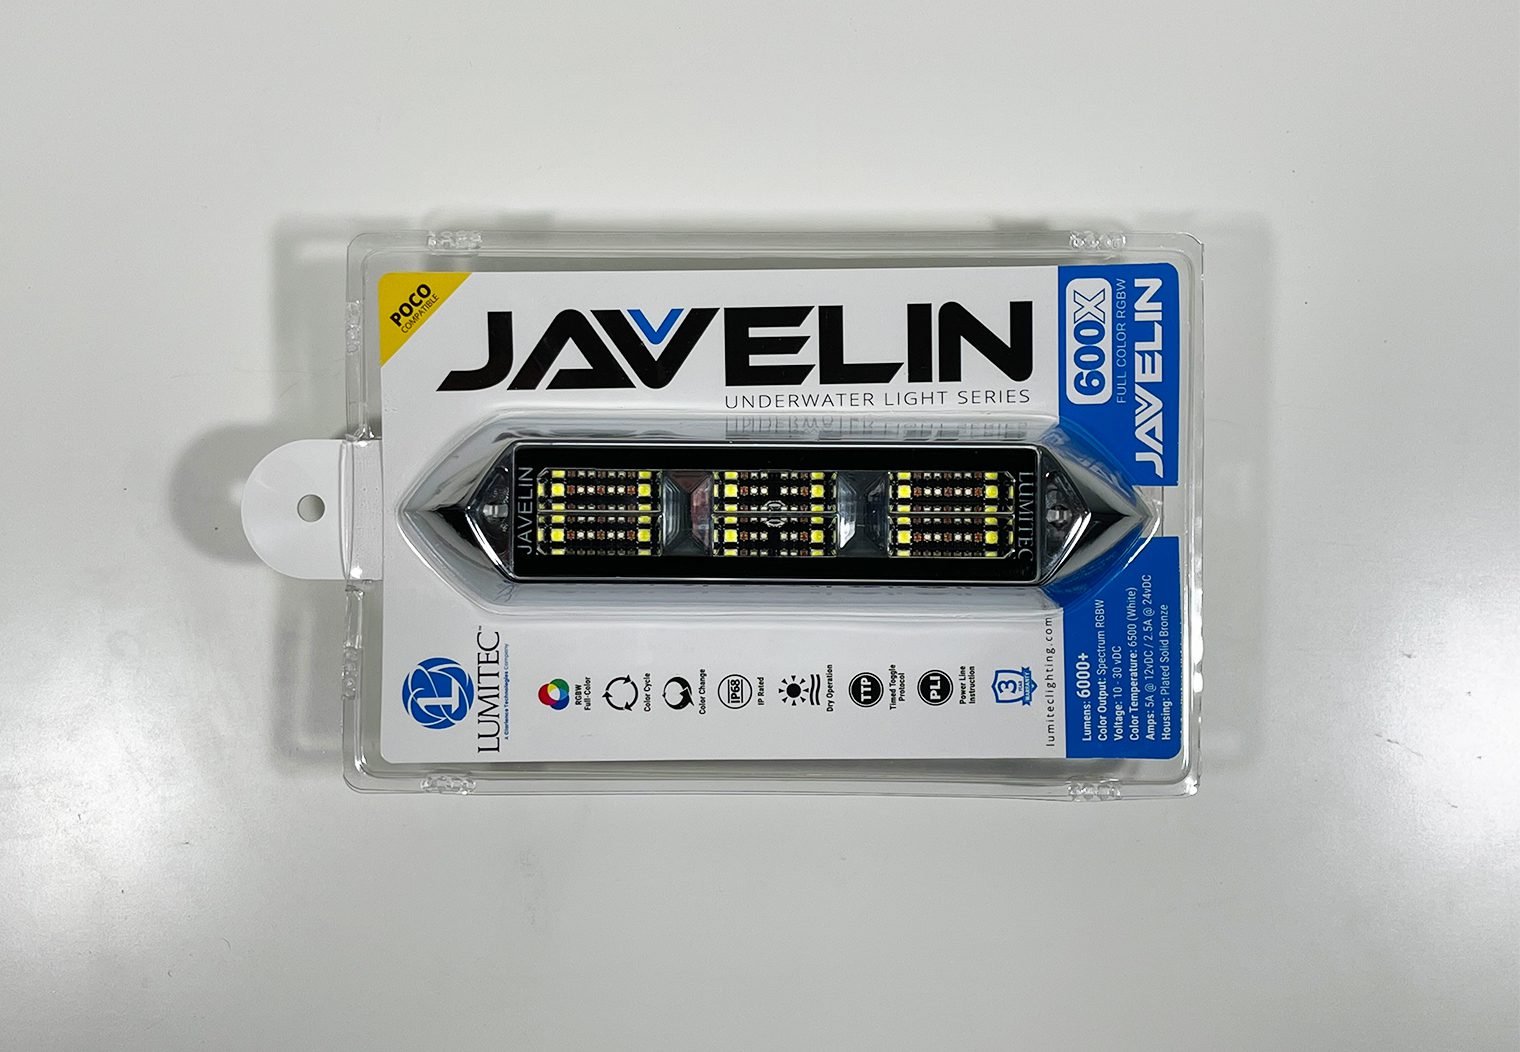
Javelin 600X Lights
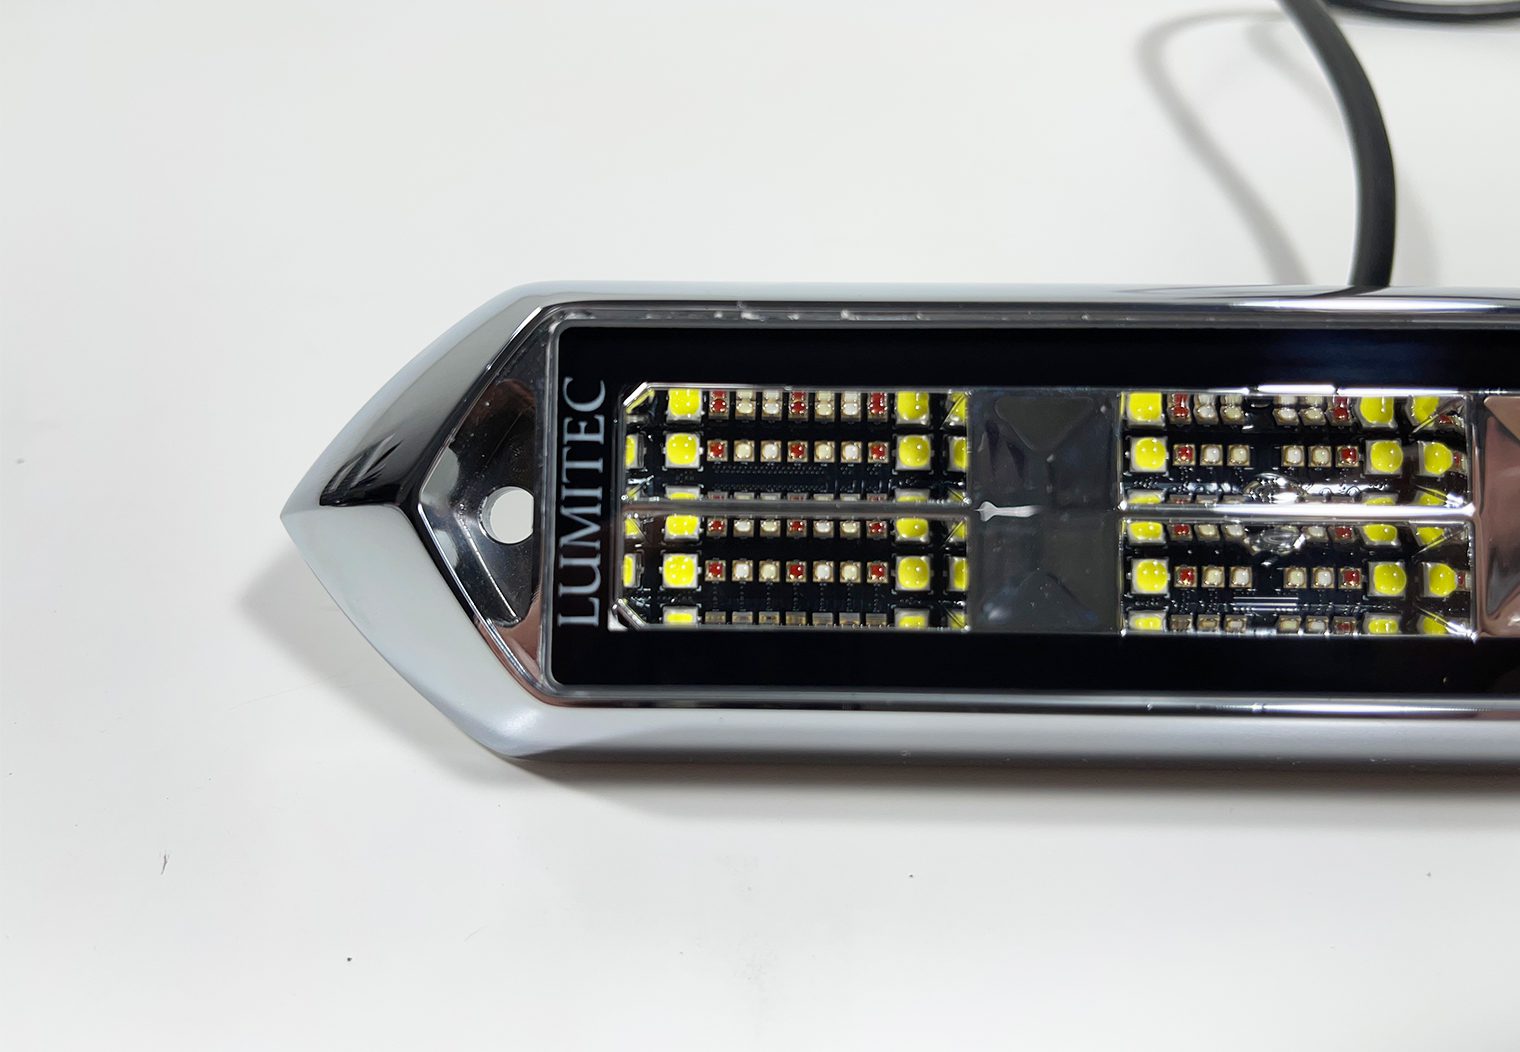
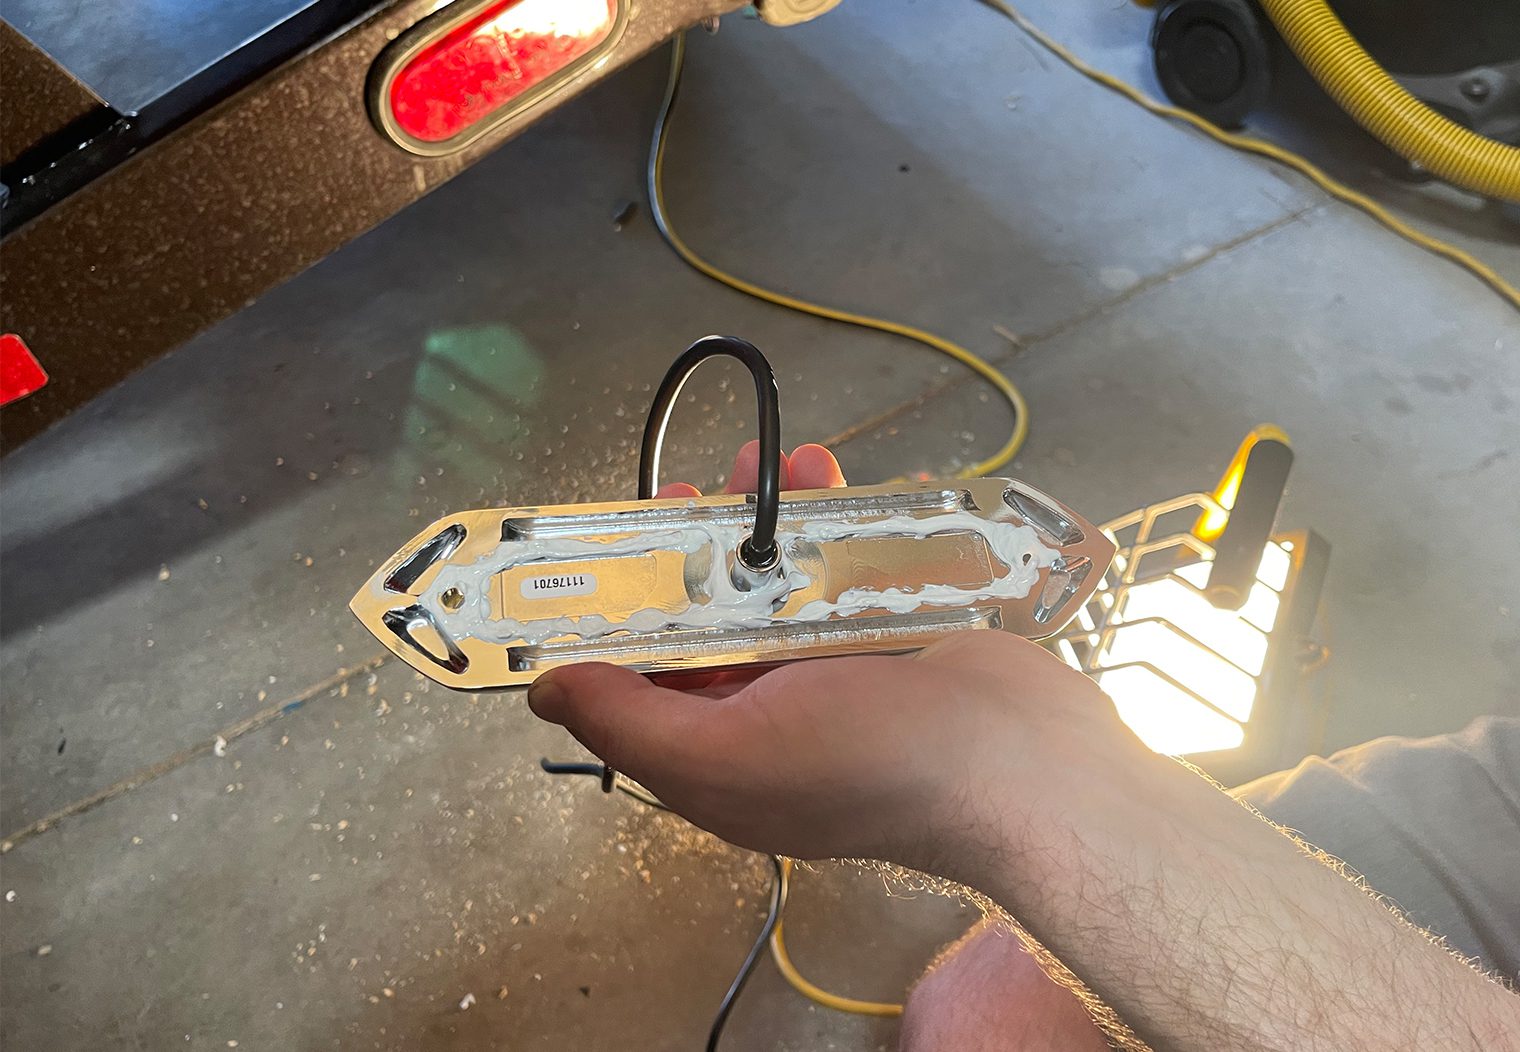
The Javelin 600X is a completely new underwater LED light design for Lumitec. Traditionally, their flagship products have been round, and use bronze casings. Bronze is arguably one of the best, most commonly used corrosion resistive metals for harsh underwater applications, but after a few dips in the water they also start to oxidize and change color. So Lumitec changed things up a bit with the Javelins and chose to use a bronze housing with a proprietary nickel-plating process, bringing a whole new sleek and modern look to the light while retaining the dependency that bronze is well known for.
When I pulled the lights out for the first time, I was really excited with the look. I almost didn't want to smudge the polished finish with my fingers and caught myself wiping them down after I picked them up. They have a stunning design, they're heavy and feel incredibly rigid and sturdy and look very well sealed as well. Only time in the water can really tell how well-sealed they really are.
They measure 2in(L) x 8in(W) x .5in(D), so they're pretty sizeable when you compare them to the traditional SeaBlaze X2s which measured about 4″ in diameter. On the front of the lights, there are 6 separate sets of LED lights with 9 diodes each.
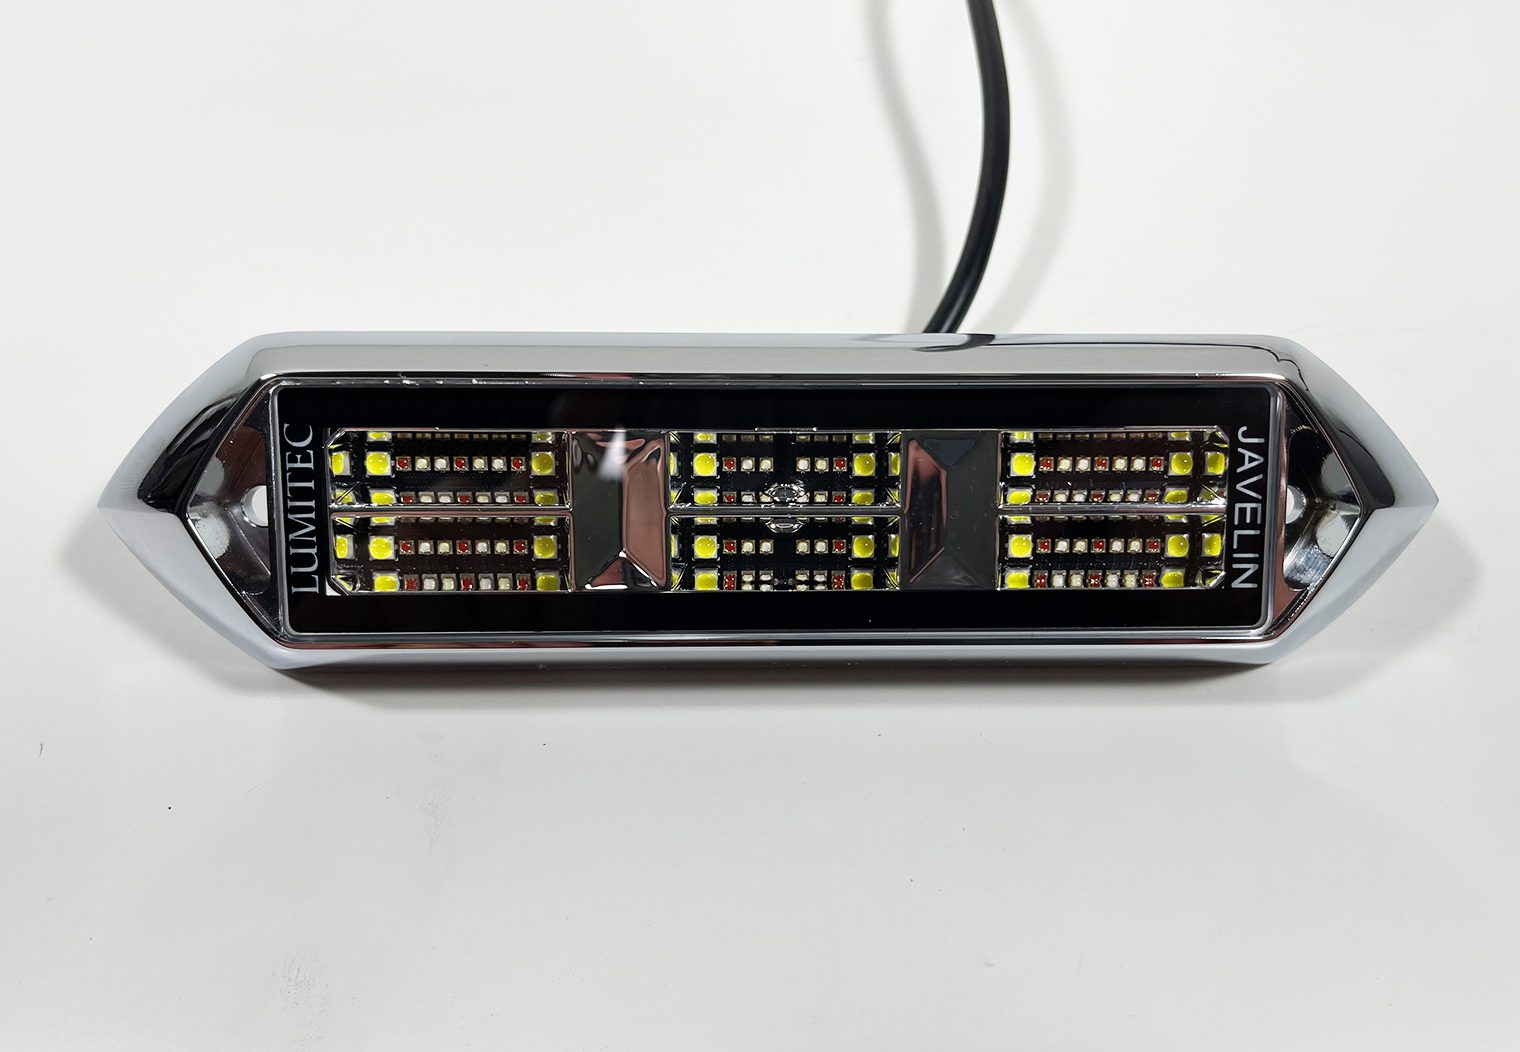
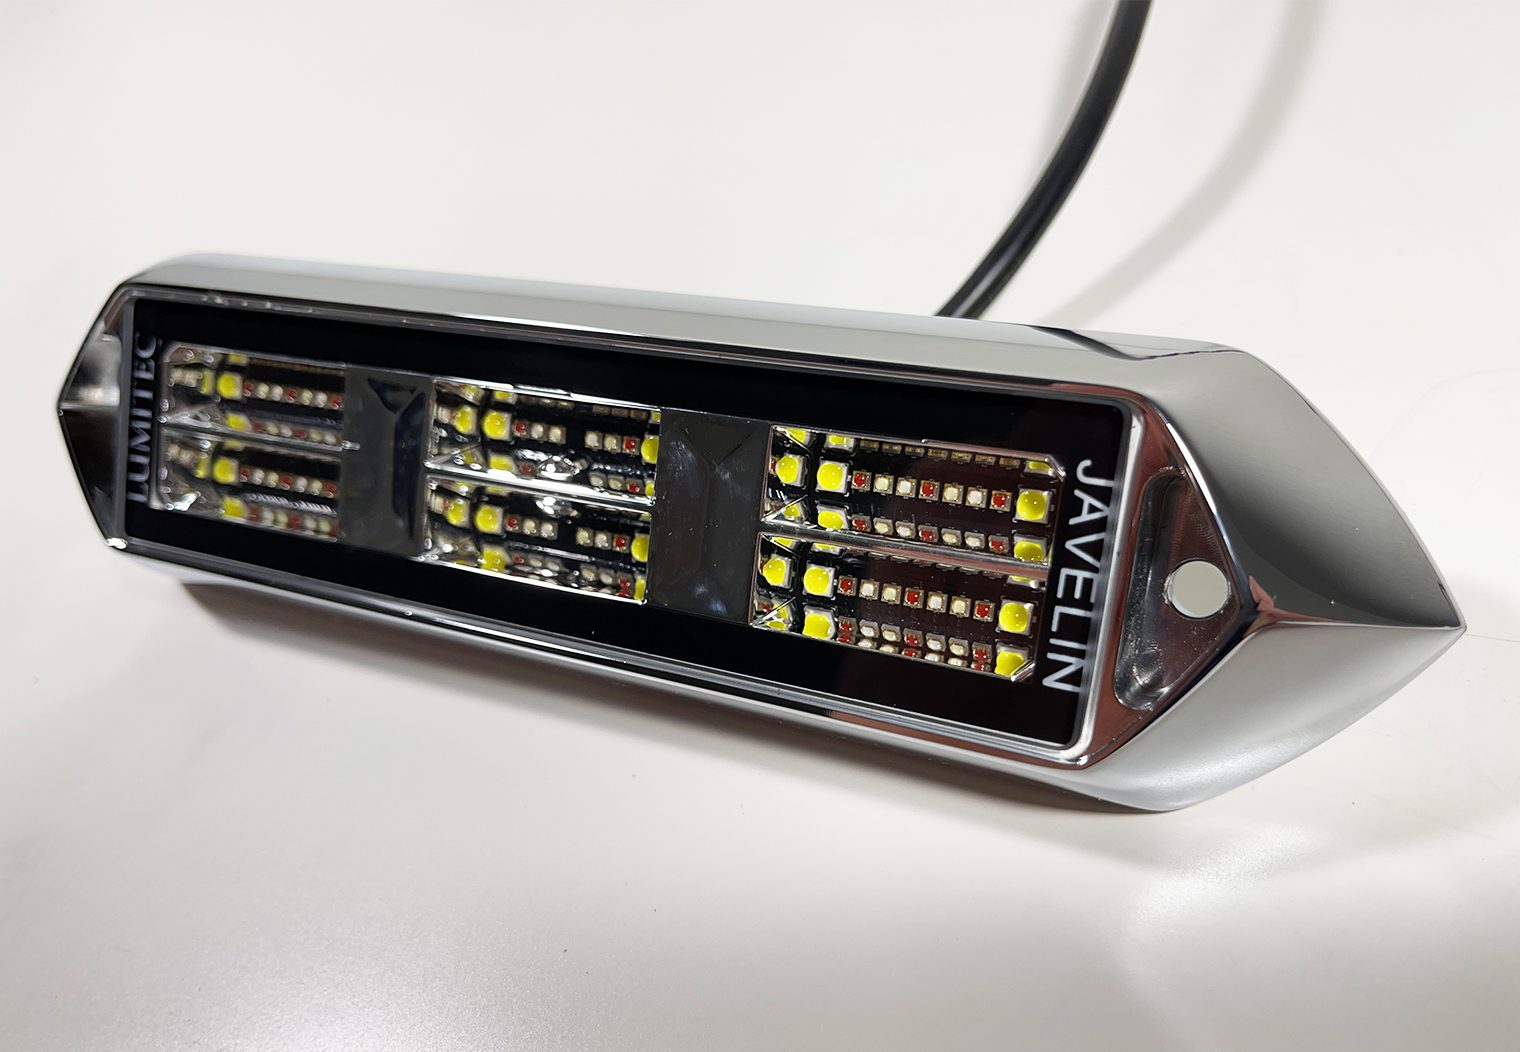
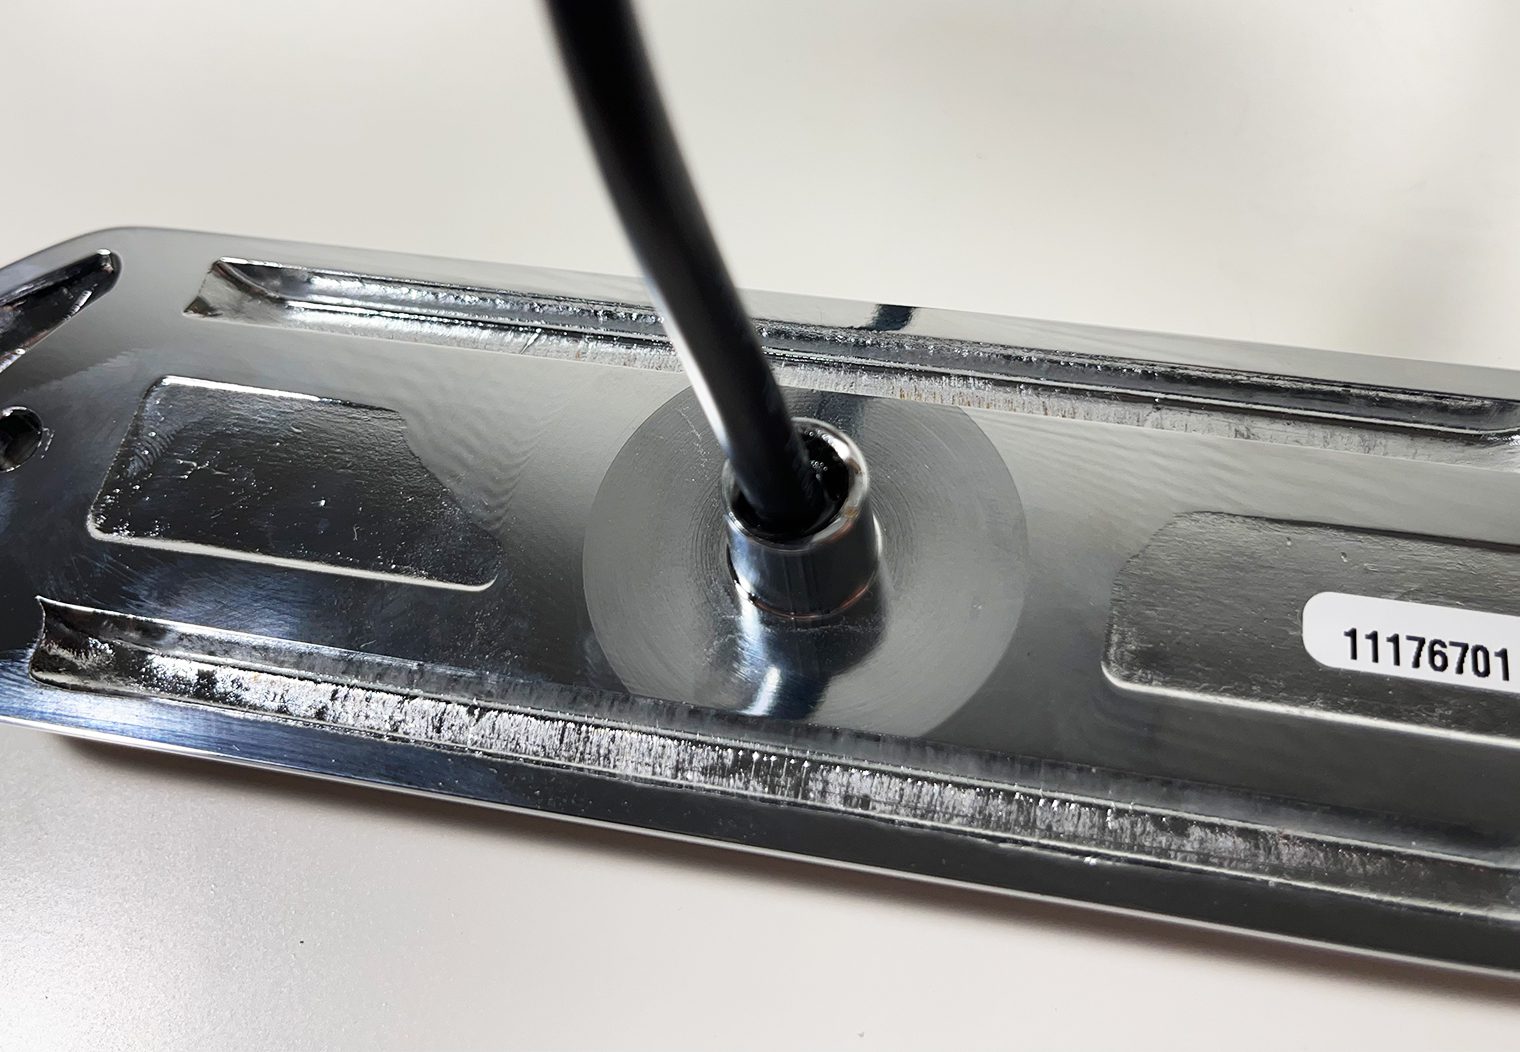
On the backside of the light is an integrated triplex wire that measures about 5 ft in length so that you can wire them up through your hull and to, for example, the Poco 3.
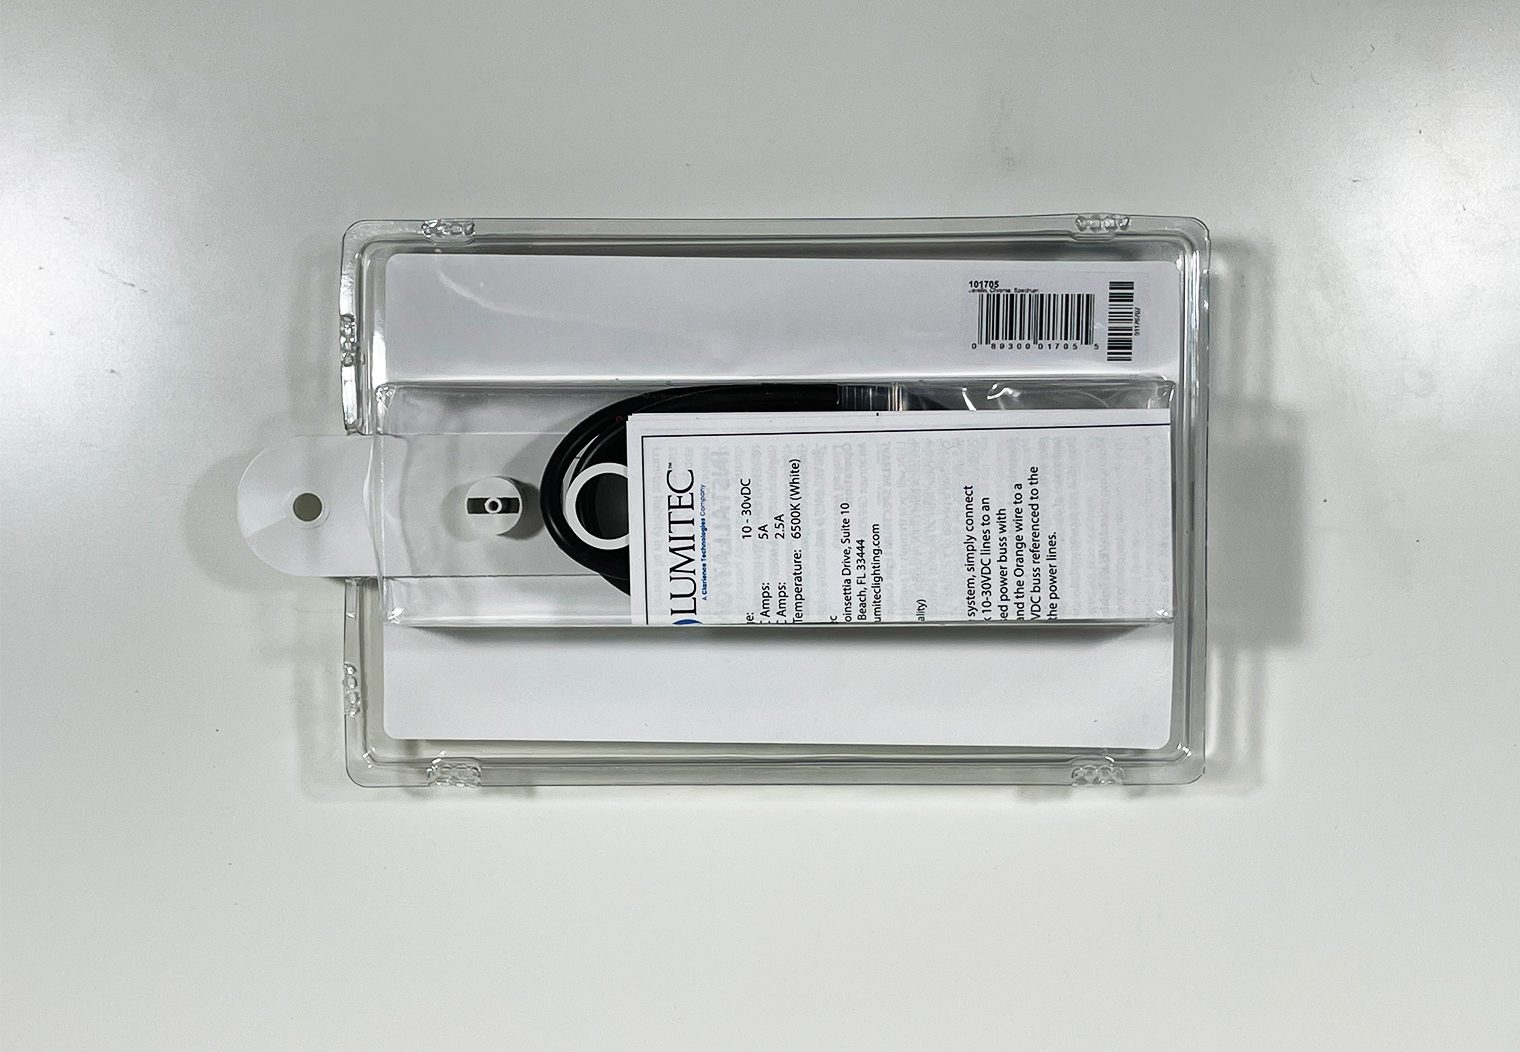

What's in the Box
- 1 LED Light
- 2 #8 316SS Screws
- 2 Screw Isolators
- 2 Screw Caps
- Installation and Mounting Instructions
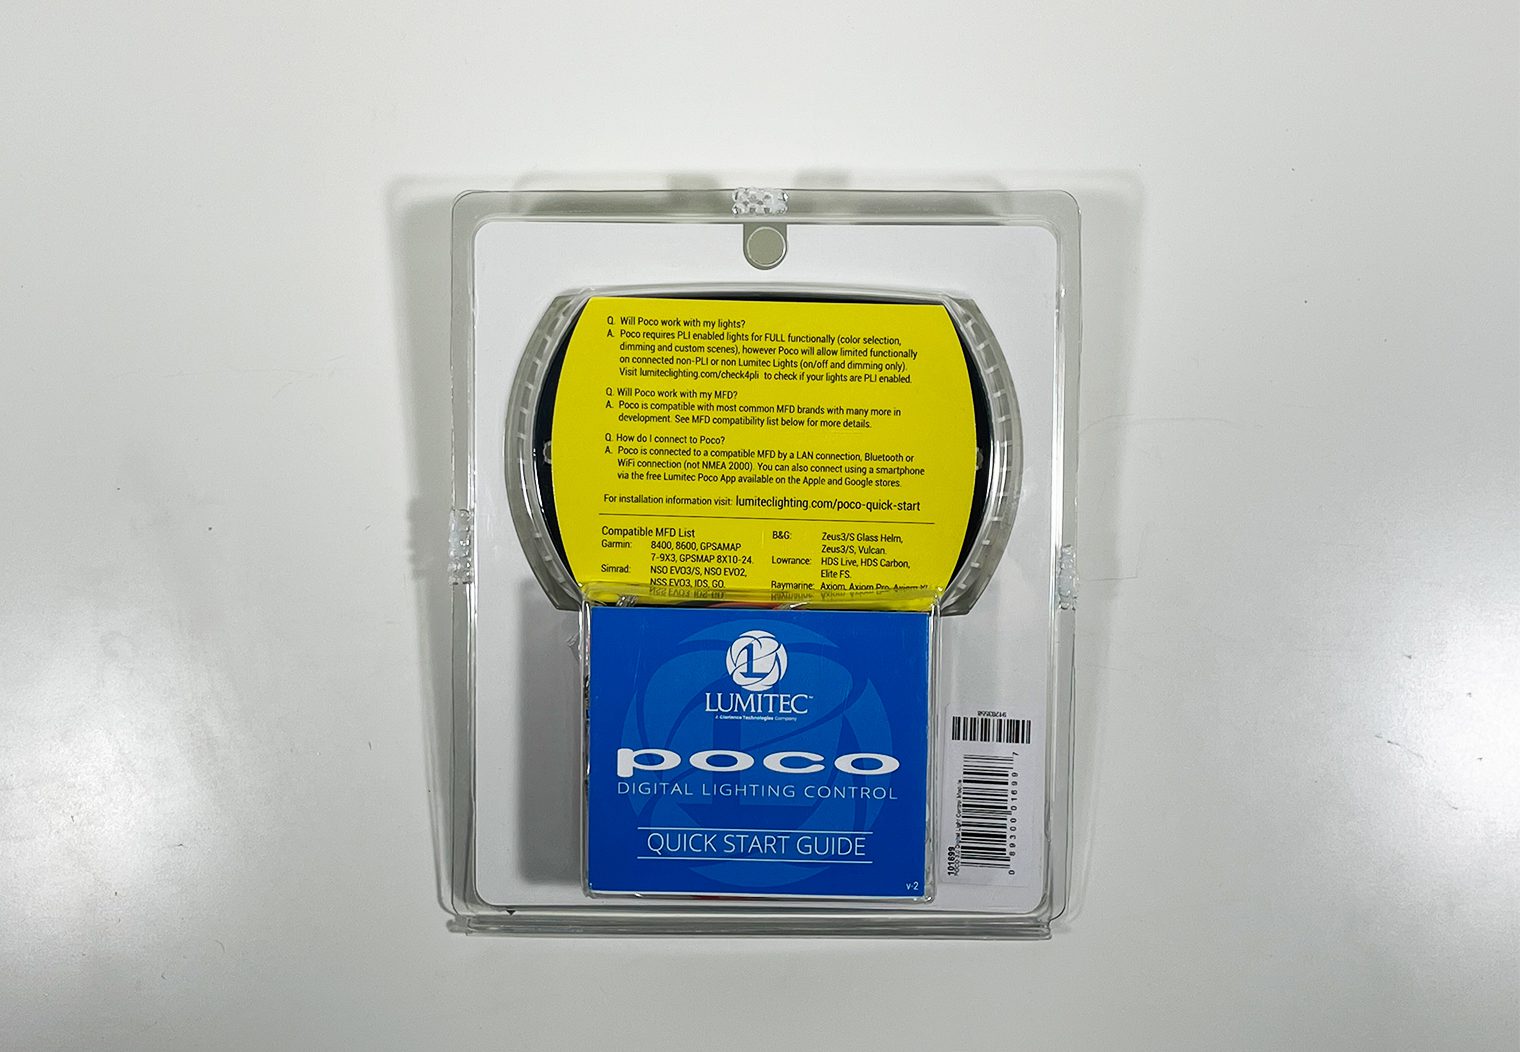
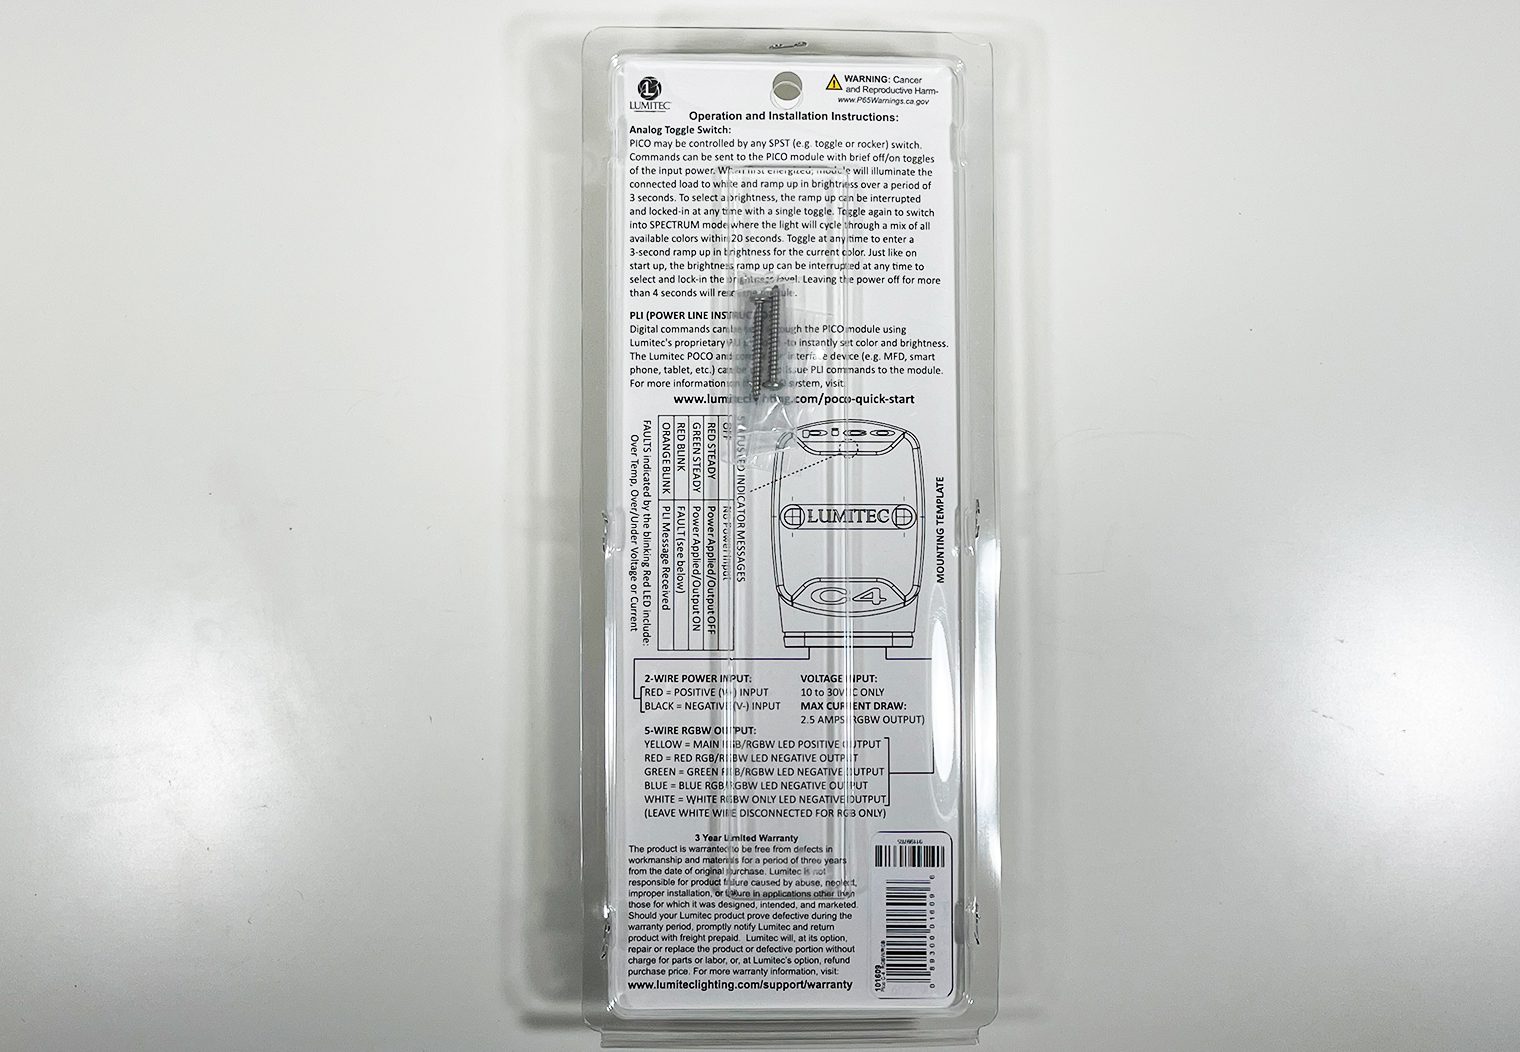
Poco 3 Module
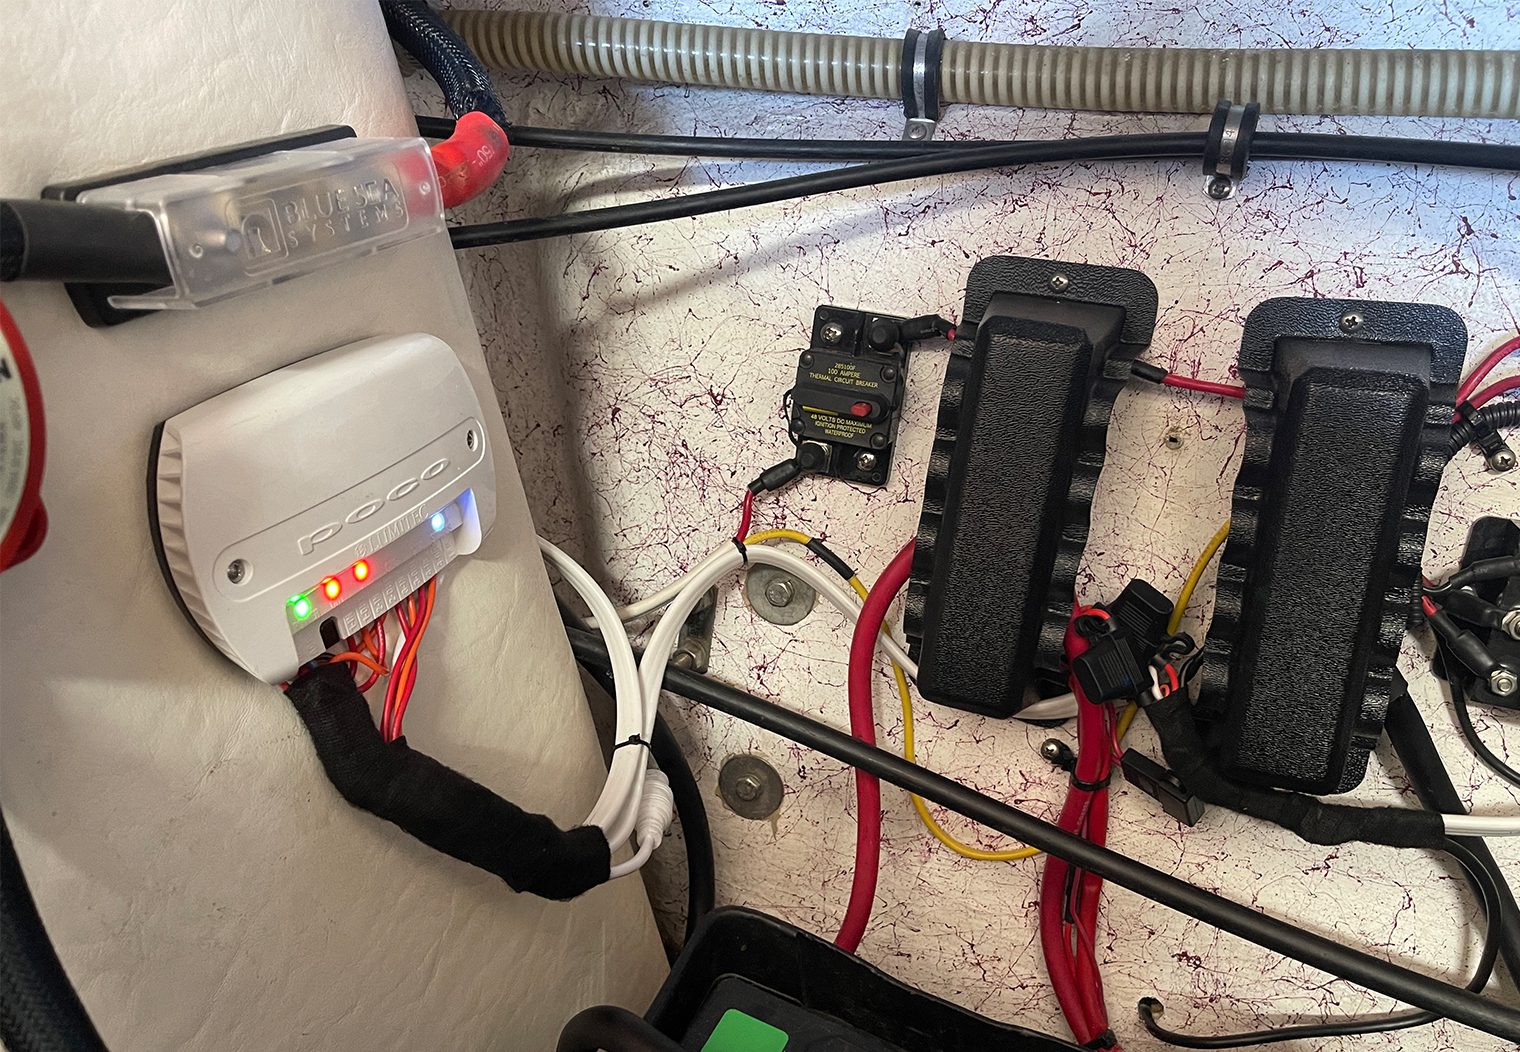
Next I opened up the Poco 3, the brains of the control system that I planned on wiring the Javelins to along with my Kicker RGB lights via the Pico C4 expansion module. With the Poco 3, I'll be able to open up the Poco app on my phone and control the Javelins via Lumitec's PLI technology (see the Smart Technology & PLI section) and also have full control over my Kicker RGB lights (grouped together as one zone).
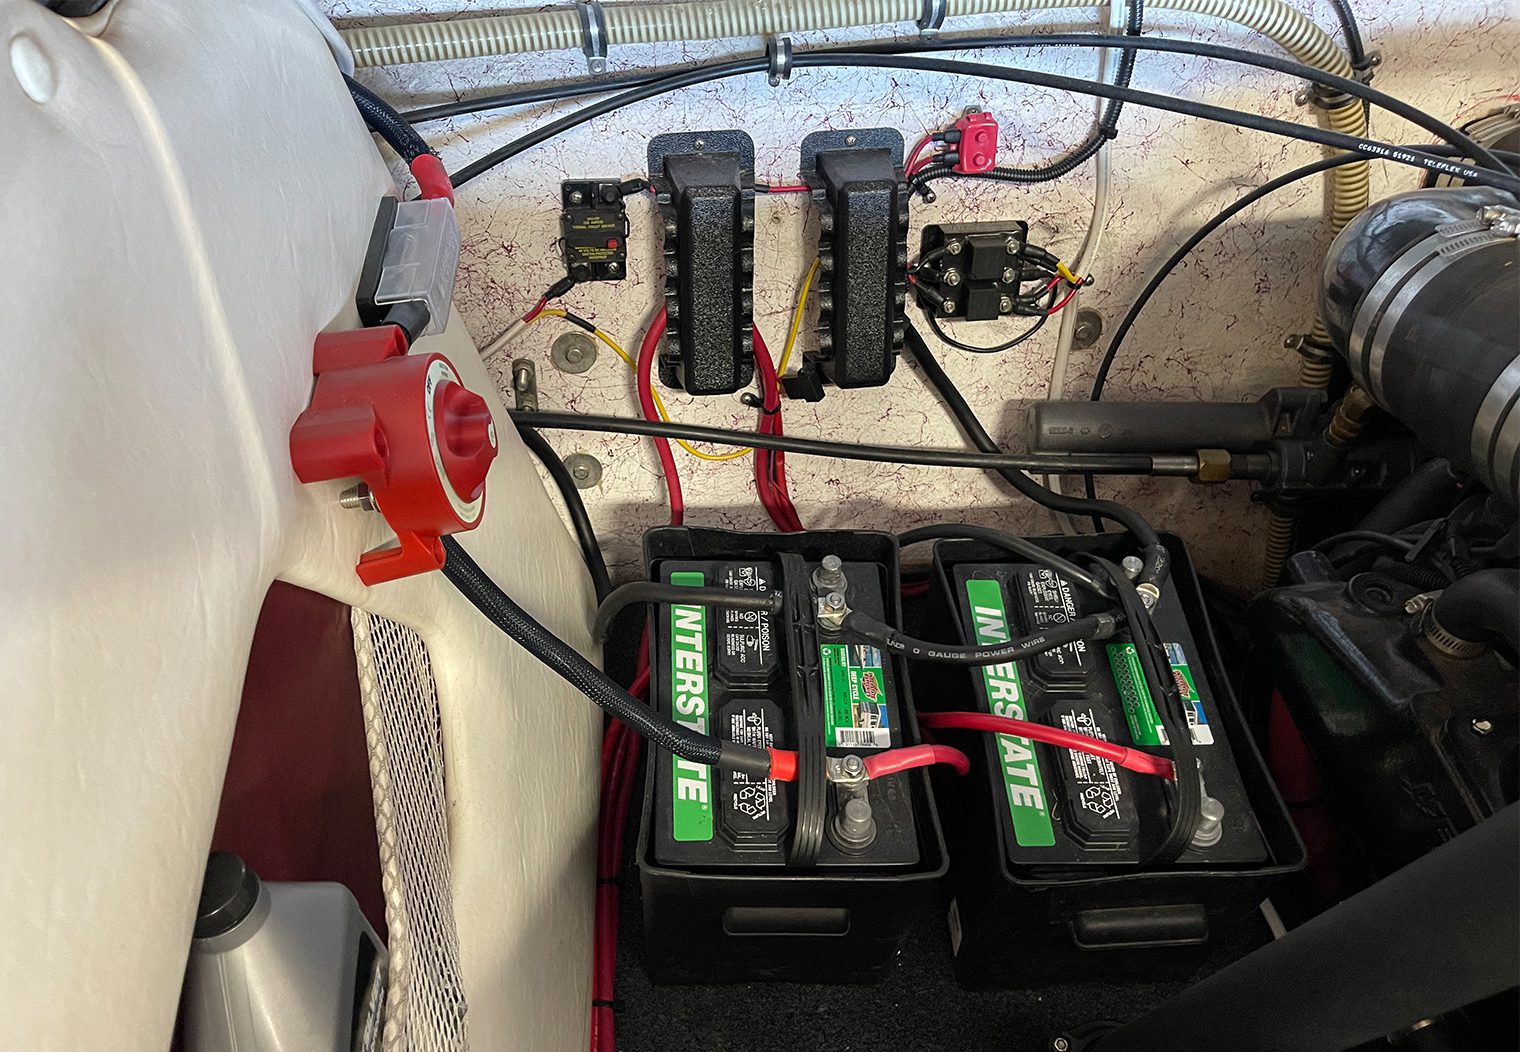
The module is noticeably well-sealed (has an IP 67 rating). What I liked about the Poco 3 is the sealed wire from the outside to the inside of the module – there aren't any stainless or exposed terminals on the outer part of the unit. This means wiring won't be a weak point between the connected lights and the Poco. It also has an RJ45 plug for a CAT5 ethernet cable, which also typically has an ~IP67 rating to match the rest of the module in terms of water resistance. Poco 3 does not use a NMEA 2000 connection.
It measures 3.5in(L) x 4.9in(W) x 1.25″(D), so I'll need to find a decent sized area on the boat to both wire and mount it. Everything was very well-labeled on the front in terms of channels, power and etc. Mounting is simple though, just two stainless screws onto any surface will do!

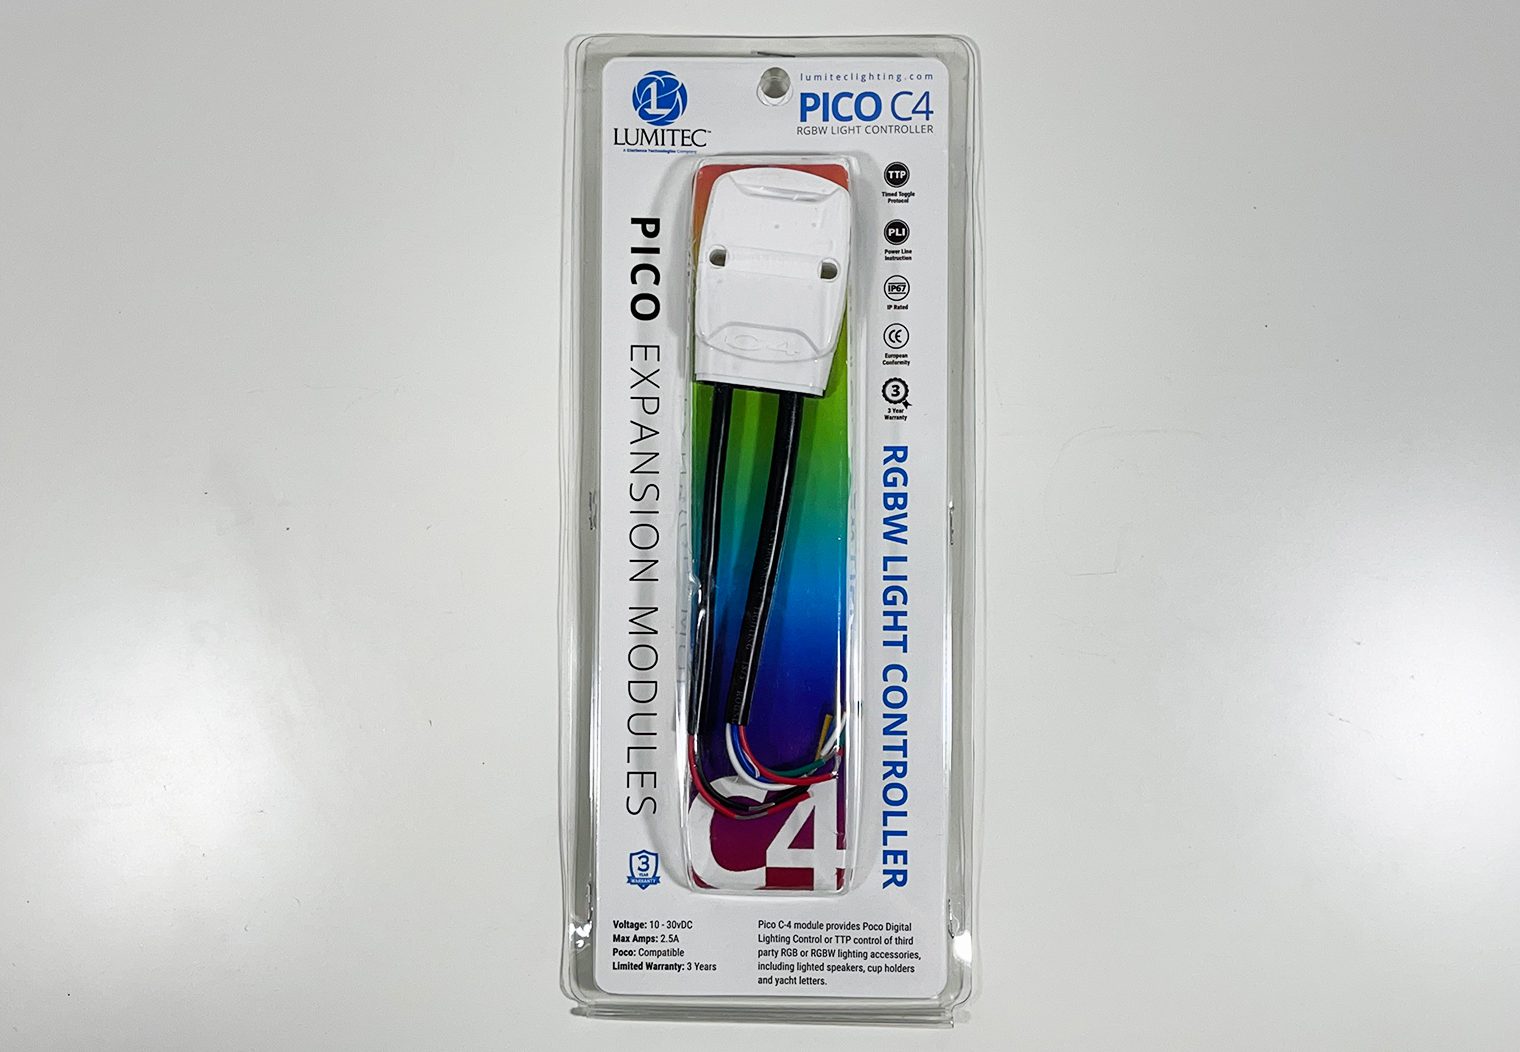
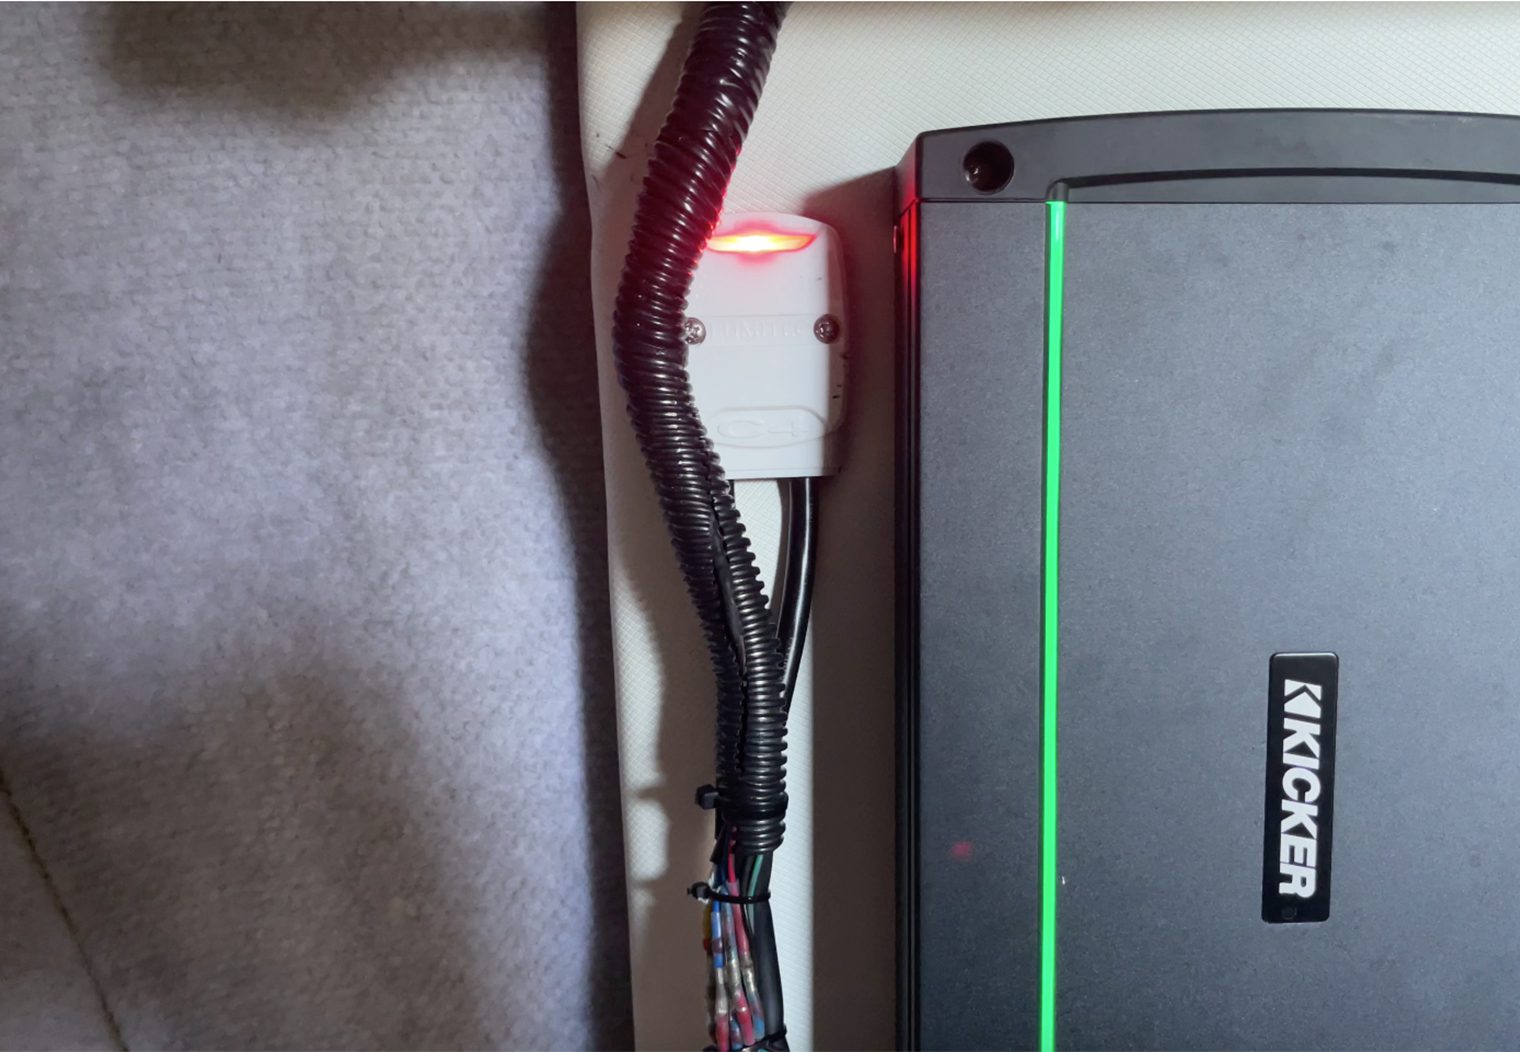
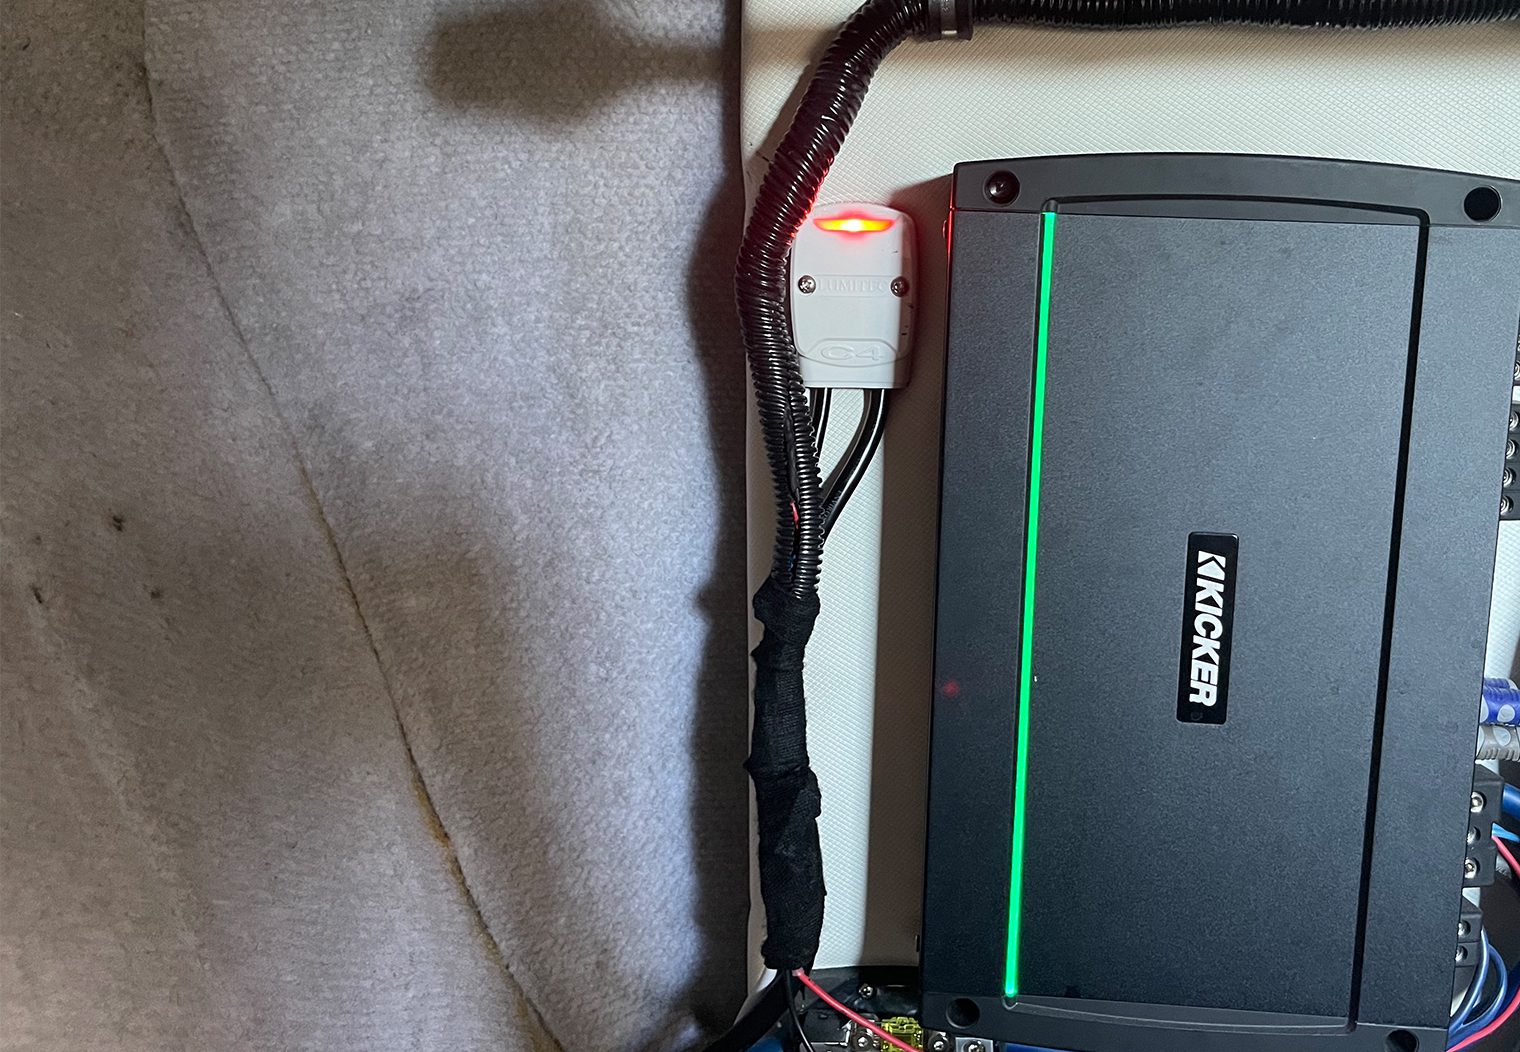
Pico C4
Finally, I opened up the Pico C4. I'll be using this module to adapt the existing Kicker RGB LEDs to the Poco 3 so that all of the lights can be controlled via one interface and I can create an independent zone for them. Similar to the Poco 3, the C4 is also IP 67 rated so it looks very well-sealed. Wiring quality and gauge is noticeably good on all of their products too, 14-16 gauge throughout. This is good because I think the Lumitec expected lengthy runs throughout a boat or yacht so higher gauge wire might be required for most applications to maintain amperage.
In addition to tying seamlessly into the Poco 3 via PLI, the Pico C4 can operate via a standard analog toggle or rocker switch, where quick toggling or switching will essentially act as commands to the module like most other RGB controllers. For this use case, you would use a single toggle command to select brightness and two toggle command to select the spectrum mode where it will cycle through the RGB spectrum. Toggling again will exit the mode and lock in the brightness or color at the time you toggled.
One thing I thought would be a nice add to this product is a simple plug between the Pico C4 and the Poco 3 to further simplify the wiring. Even though it's just ground and power, I think that realistically the majority (if not all) of the use cases that require the Pico C4 will also leverage the Poco 3 so why not simplify the wiring between the two, right?
The Pico C4 is much smaller than the Poco 3, measuring ~2.7in(L) x ~1.9in(W) x ~.7in(D). Mounting the unit is similar to the Poco 3 – just two screws.
Smart Light Technology & PLI (Power Line Instruction)
I think one of the things that makes Lumitec's products so great is the technology that integrates them together. Poco has been around for a little while now and the Poco 3, along with the supporting app/MFD compatibility (e.g. Garmin), is a system that's really built for scale. The simple setup I'm going to be putting into this Lightning really doesn't touch the capabilities that this system has to offer in terms of zone and lighting control.
PLI, or power line instruction technology, basically enables the Poco system to control and integrate with existing two or three-wire lighting and wiring on a boat. But more importantly, it enables what Lumitec refers to as “Smart Light” technology. Smart Light technology/PLI is what enables the system to have a vast amount of control over the lighting throughout a boat, while only requiring a 2-wire setup. Gone are the days where you had to run 3 or even 5 additional wires to control a large-scale lighting system.
Using PLI via the mobile app or interface on a supported MFDs, you can control groups of lights or individual lights (as long as they have Lumitec's Smart Light technology), even when they share the same channel/circuit on the Poco 3. It's pretty impressive. Lumitec does a great job explaining this on their website too if you're interested in reading/watching more about it https://www.lumiteclighting.com/support-center/pli-explained.html.
Wiring & Configuring My Setup
For my use case, wiring between the new Javelins, Poco 3, Pico C4 and Kicker LEDs was straight forward. My plan was to use two channels on the Poco 3 in order to power/control all of the lights:
- Channel one will be dedicated to the two Javelins. I'll tie both lights to the same channel.
- Channel two will be used to power the Pico C4. I'll connect all of the 10 Kicker speaker/subwoofer LED lights directly to the Pico C4.
Here's what that'll look like on the boat:
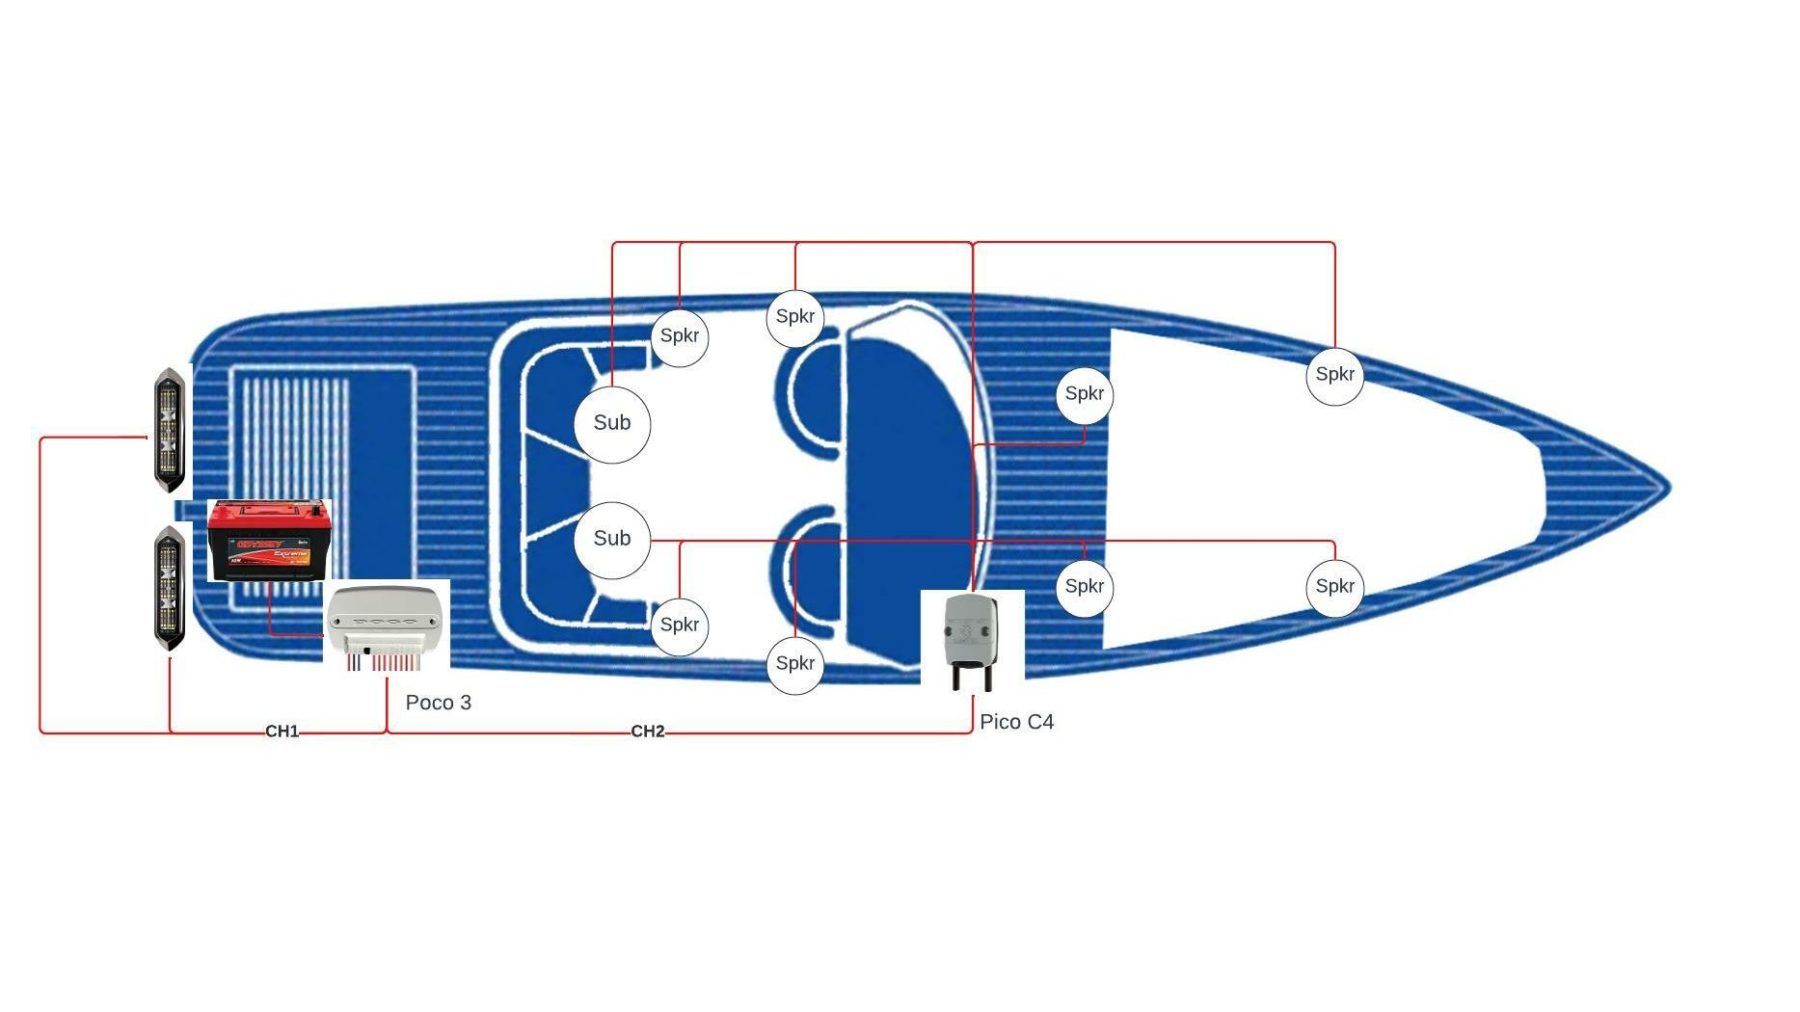
By separating out the channels like this, I will have independent control between the underwater LEDs and the interior lights via the app.
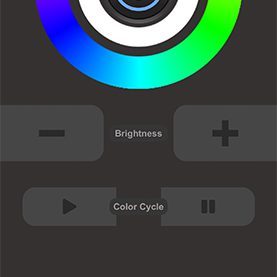
Controlling the Lights Via Lumitec Poco App
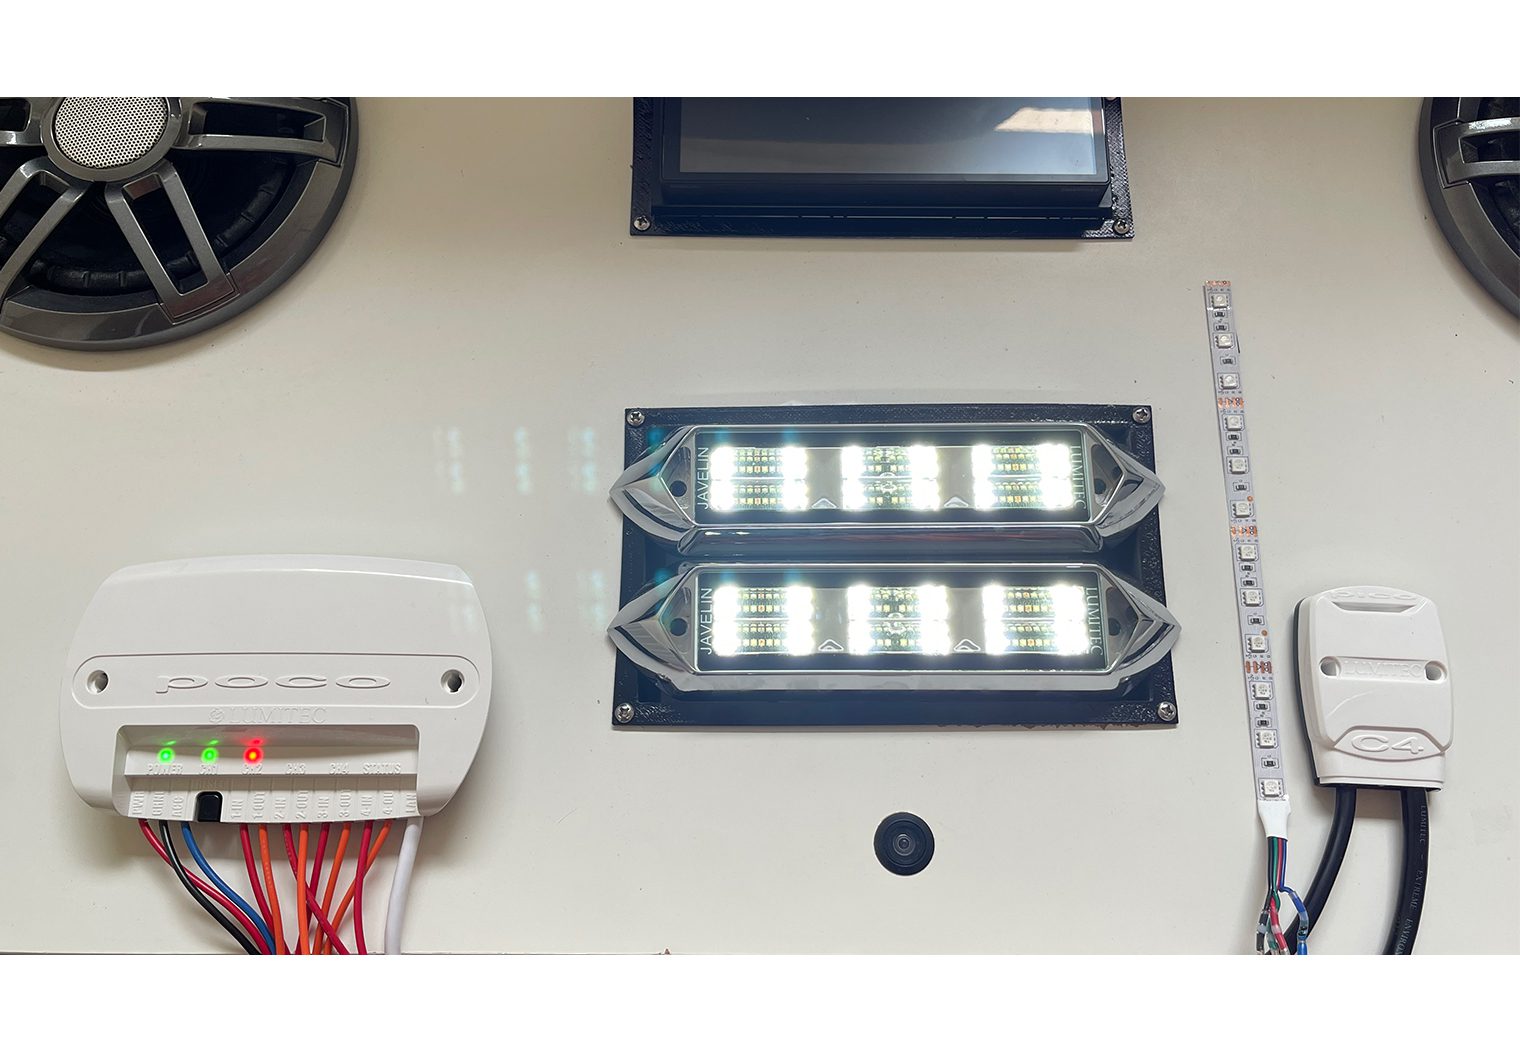
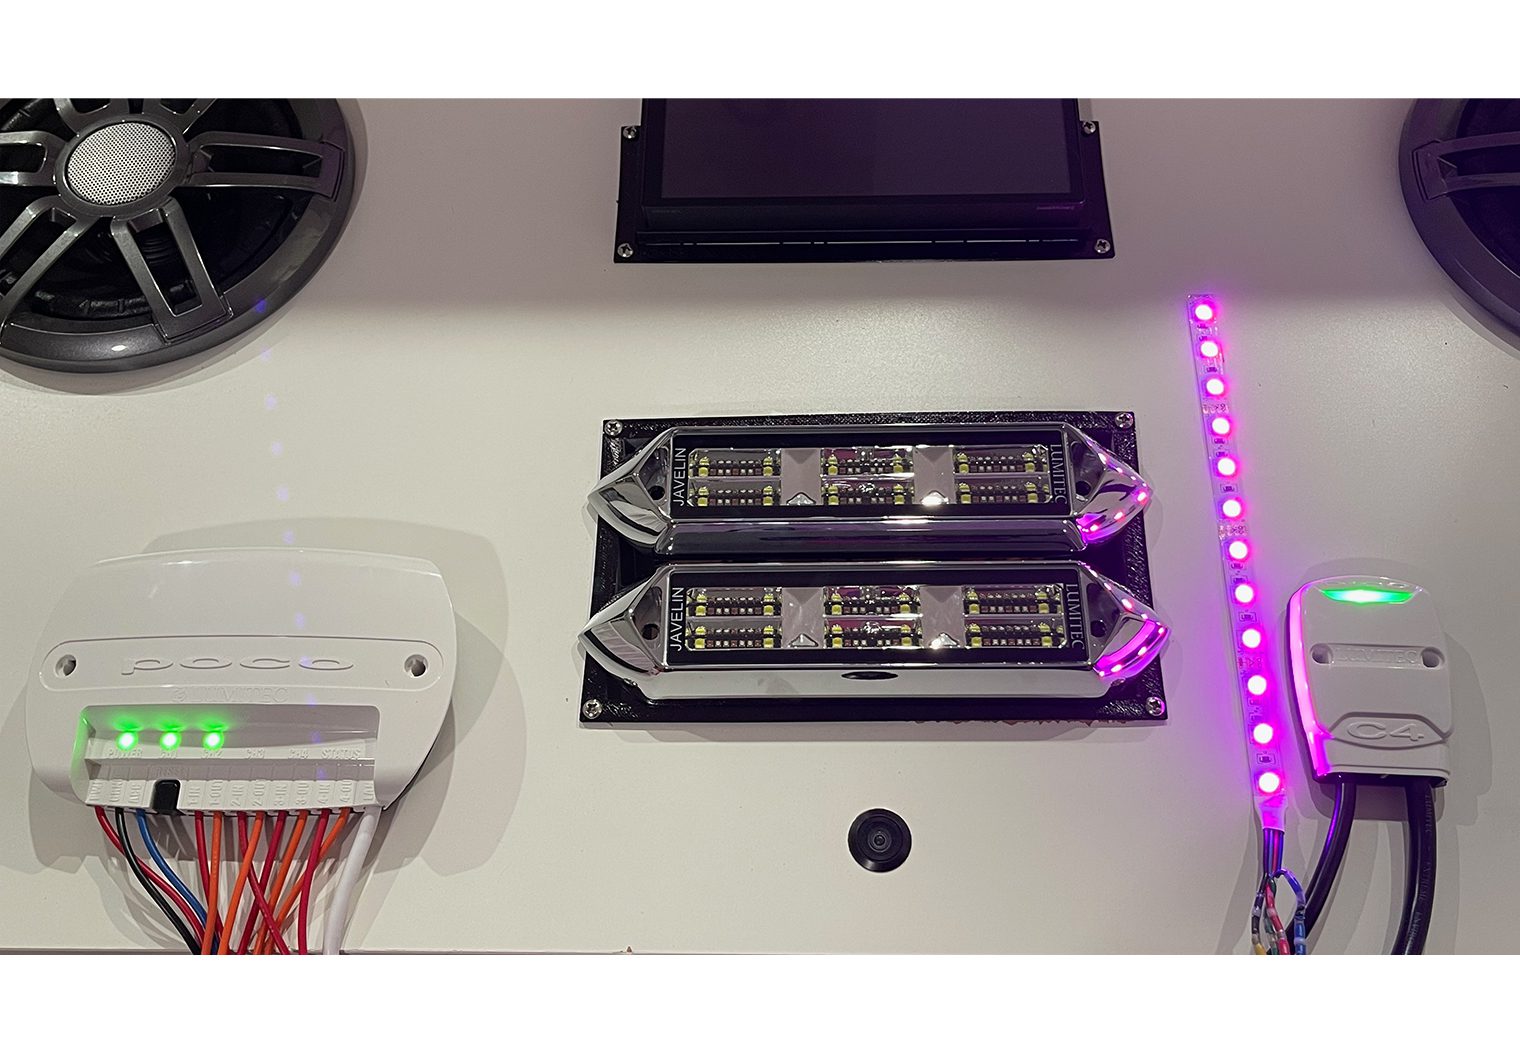
On my test bench, I mimicked this setup by wiring up both of the Javelins to channel 1 and the Pico C4 to channel 2 but instead of my Kicker LEDs, I used a single LED strip to demonstrate the control interface.
The app interface is pretty straight forward and user friendly. Connectivity and setup was a breeze, but I would recommend taking a look at the Poco Training Video beforehand just to get an overview of how you can set it up.
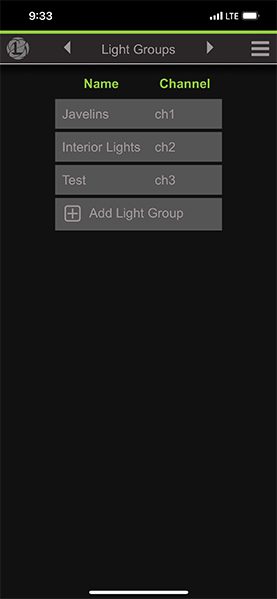
Setting up Lights in the App
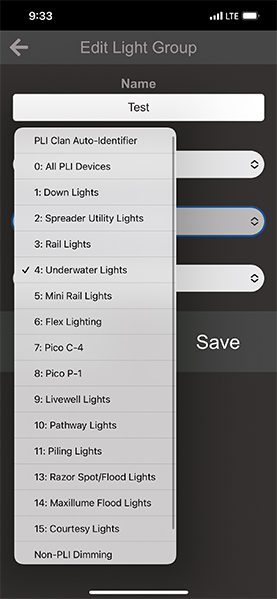
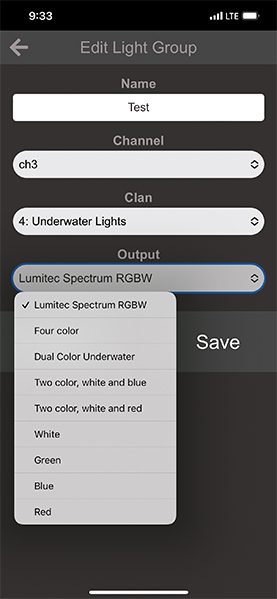
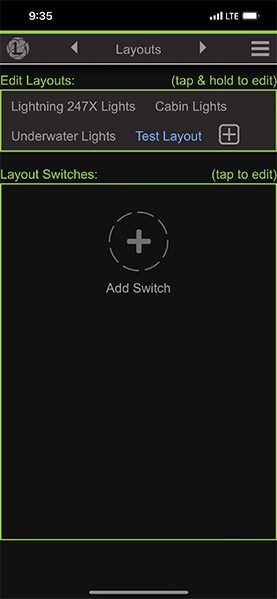
For me, my setup was simple because I only have two channels and only needed independent control of the two. The first thing I did in the configuration area of the app was set up the light groups so that I can assign different functions to the groups like switches or scenes.
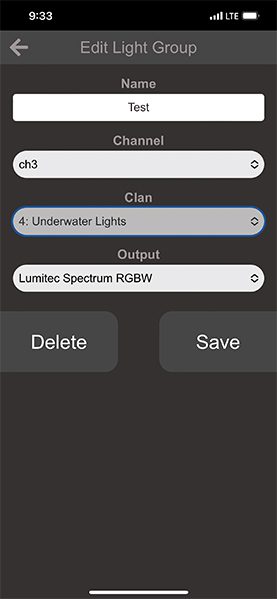
Once the groups were setup I could create switches. Switches are what will allow me to configure preset functions for things like:
- Turning on the Javelins (only) at 50% intensity and white color.
- Turning on both the Javelins and interior lights at 100% intensity with a red color.
- And so on.
There are a few types of switches available in the app that have different impacts on the lights:
- Latching On/Off & Momentary: I'm grouping these two together even though they are separate options in the app. Both can be used to switch a lights or group of lights on/off.
- Omnillume: This allows you to turn on and off your lights but also adjust light attributes like color and intensity in the interface.
- Switch Chooser: This is for more advanced setups and allows for multiple switches to be grouped under a ‘parent' switch.

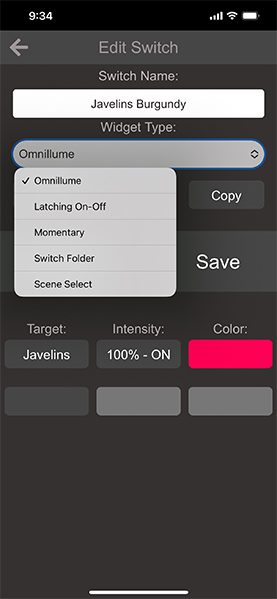
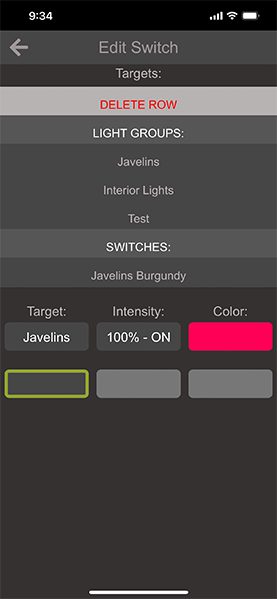

Since I only wanted independent control over the two ‘zones', the switches were simple for me. Note that this boat has a burgundy color scheme which is why I chose this color for some of the configurations in the app. You can preset your switches to any color at any intensity. Here's how I did it:
- I created an Omnillume switch that defaulted to burgundy for the Javelins
- I created an Omnillume switch defaulted to burgundy for the interior Kicker LEDs
- I created an Omnillume switch defaulted to burgundy for both the Javelins AND the Kicker LEDs.
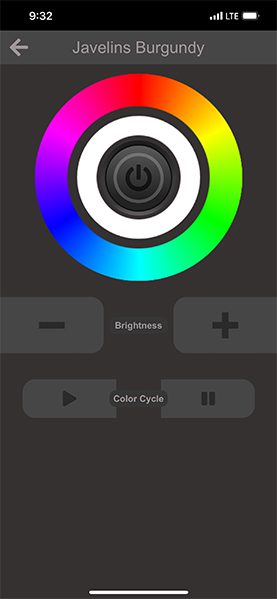
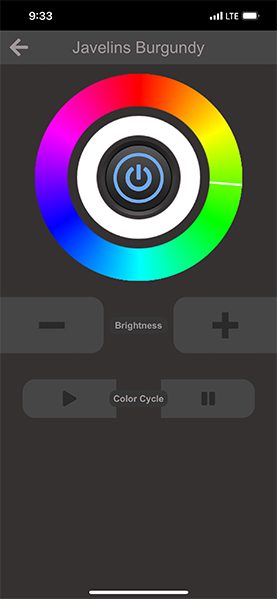
Pretty plain and simple. If I wanted to switch both on I could just tap the switch that was tied to both light groups. Or, if I wanted to independently control one zone instead of both, I could just use the respective switch to turn on Javelins or Kicker LEDs separately. And if I wanted to change the color or intensity, I could also do this via the Omnillume feature by tapping and holding the respective switch. This would take me to the Omnillume interface where I could control everything.
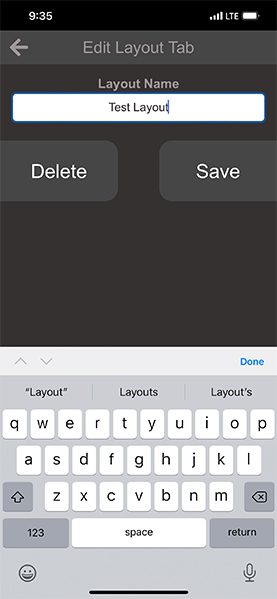
Once my switches were complete, I could then customize my layout. This is a really cool feature and is where someone with a larger boat and more complex system can really organize the structure of their lights, create zones and etc. For me it was, again, pretty simple since I don't have different rooms or areas of the boat that would warrant creating other layouts. I renamed one of the existing menu layouts and deleted everything else.

Testing the Lights – On the Bench
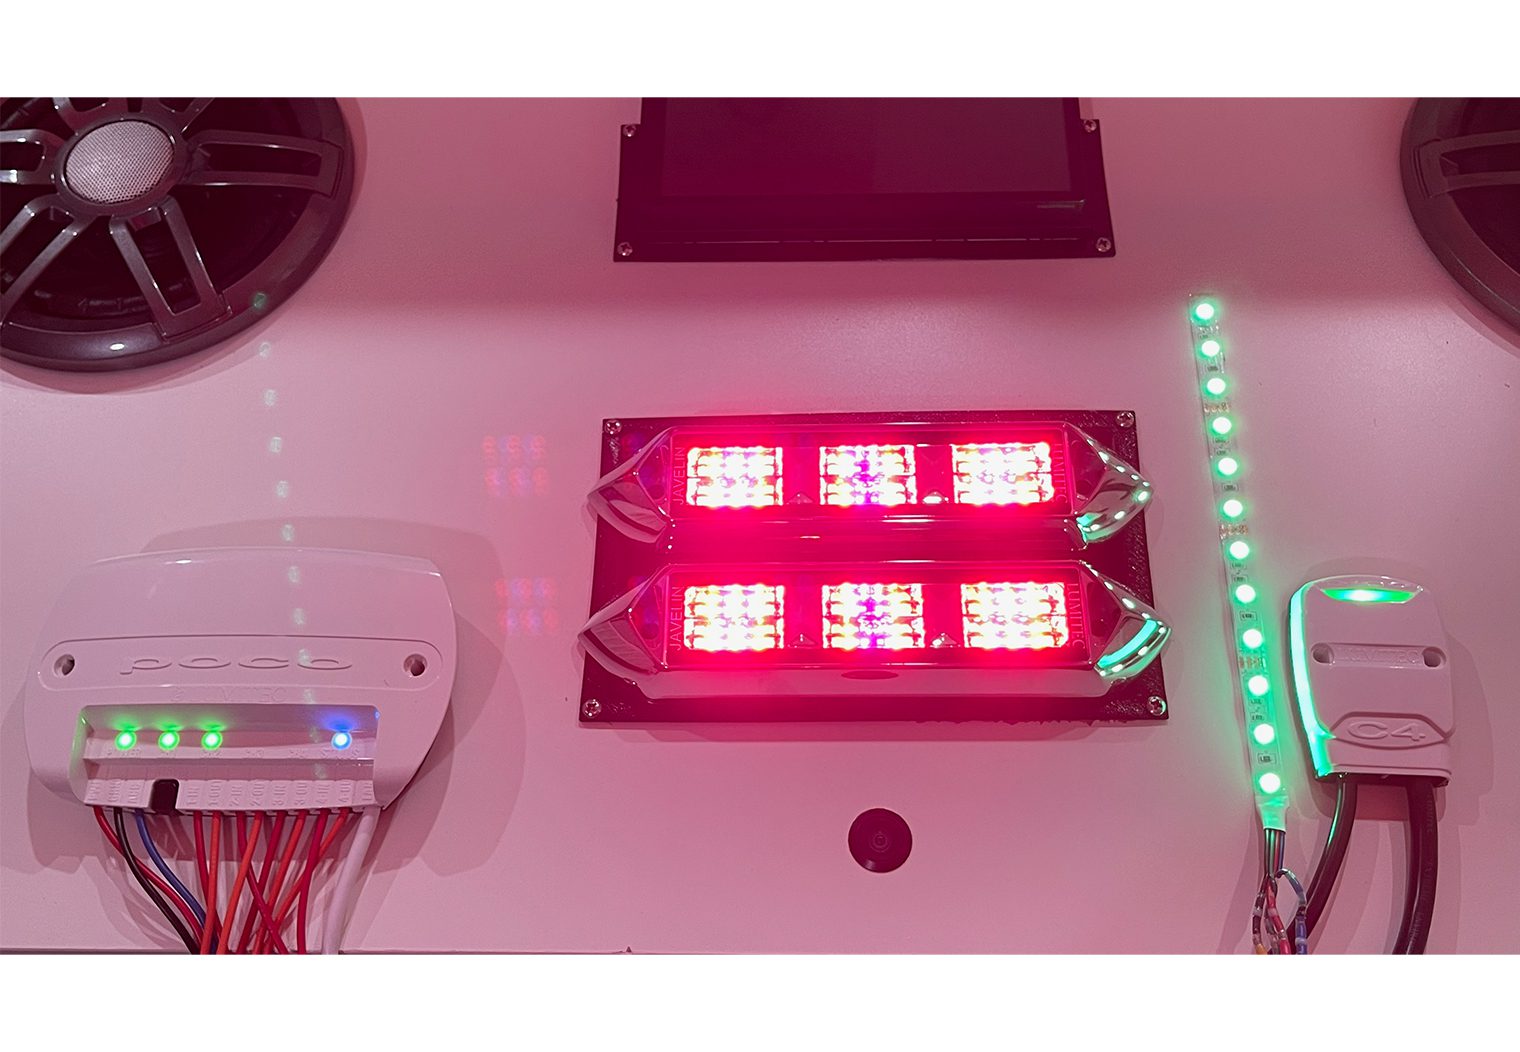
With the Poco app setup and everything wired, I tested out my configuration on my test bench and observed the quality and brightness of the lights along with the features of the app and how well they applied to the lights. I used the app to test three key features – light color, light intensity/brightness and light switches (aka independent control of the lights).
Light Color
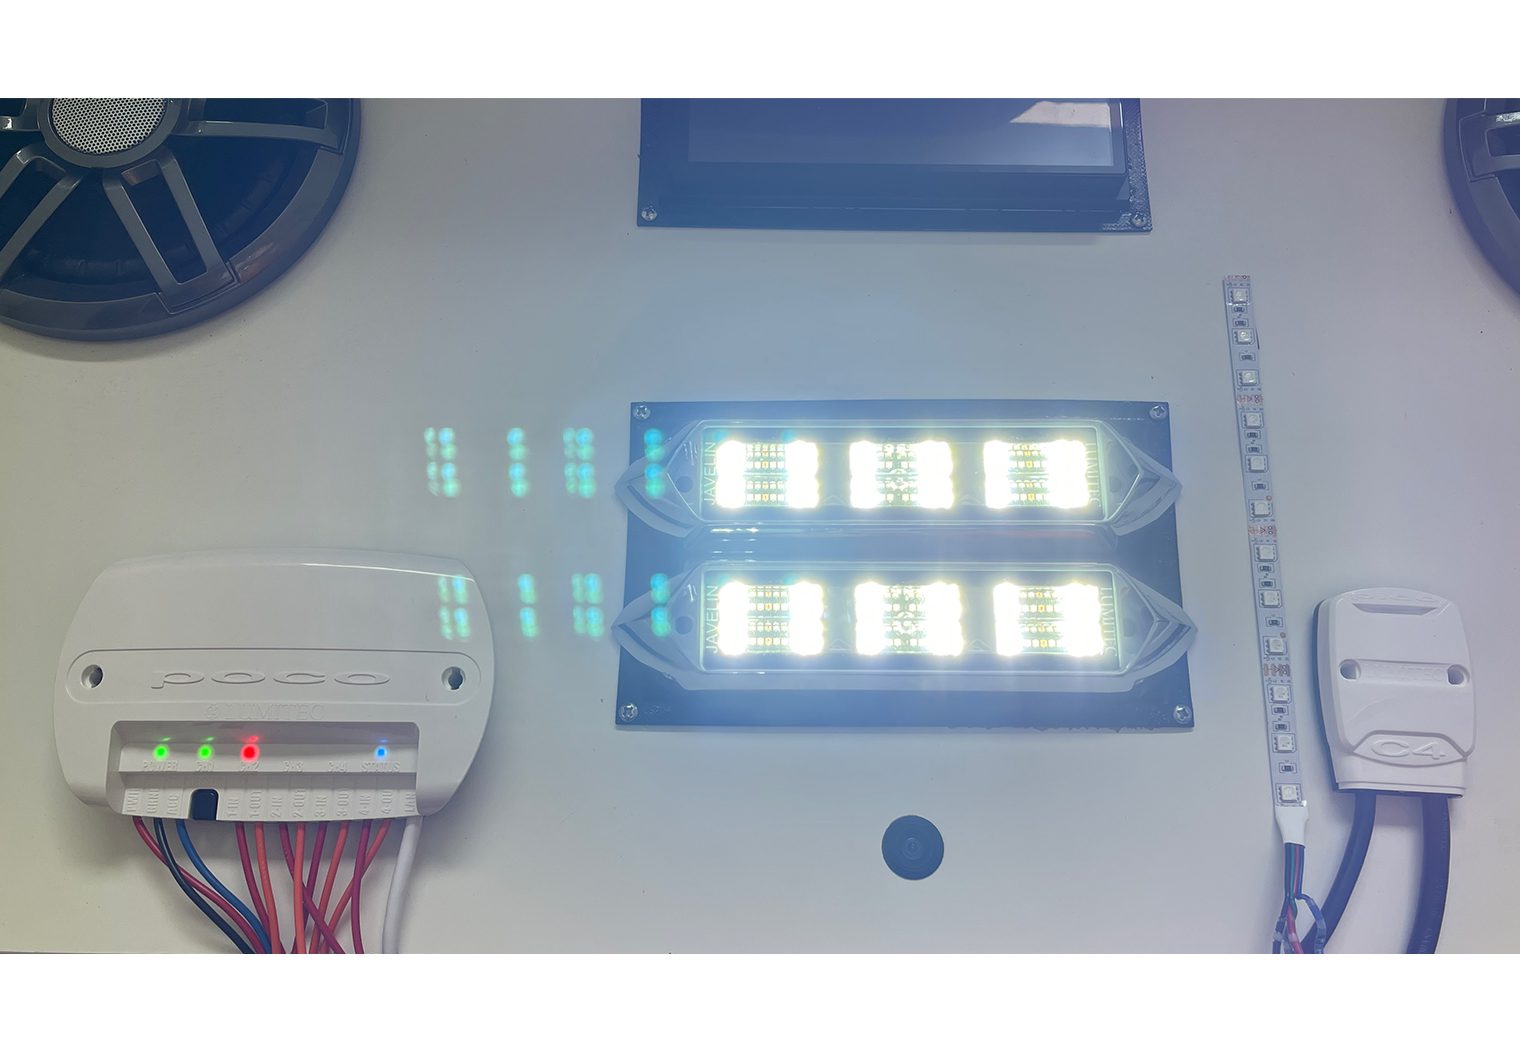
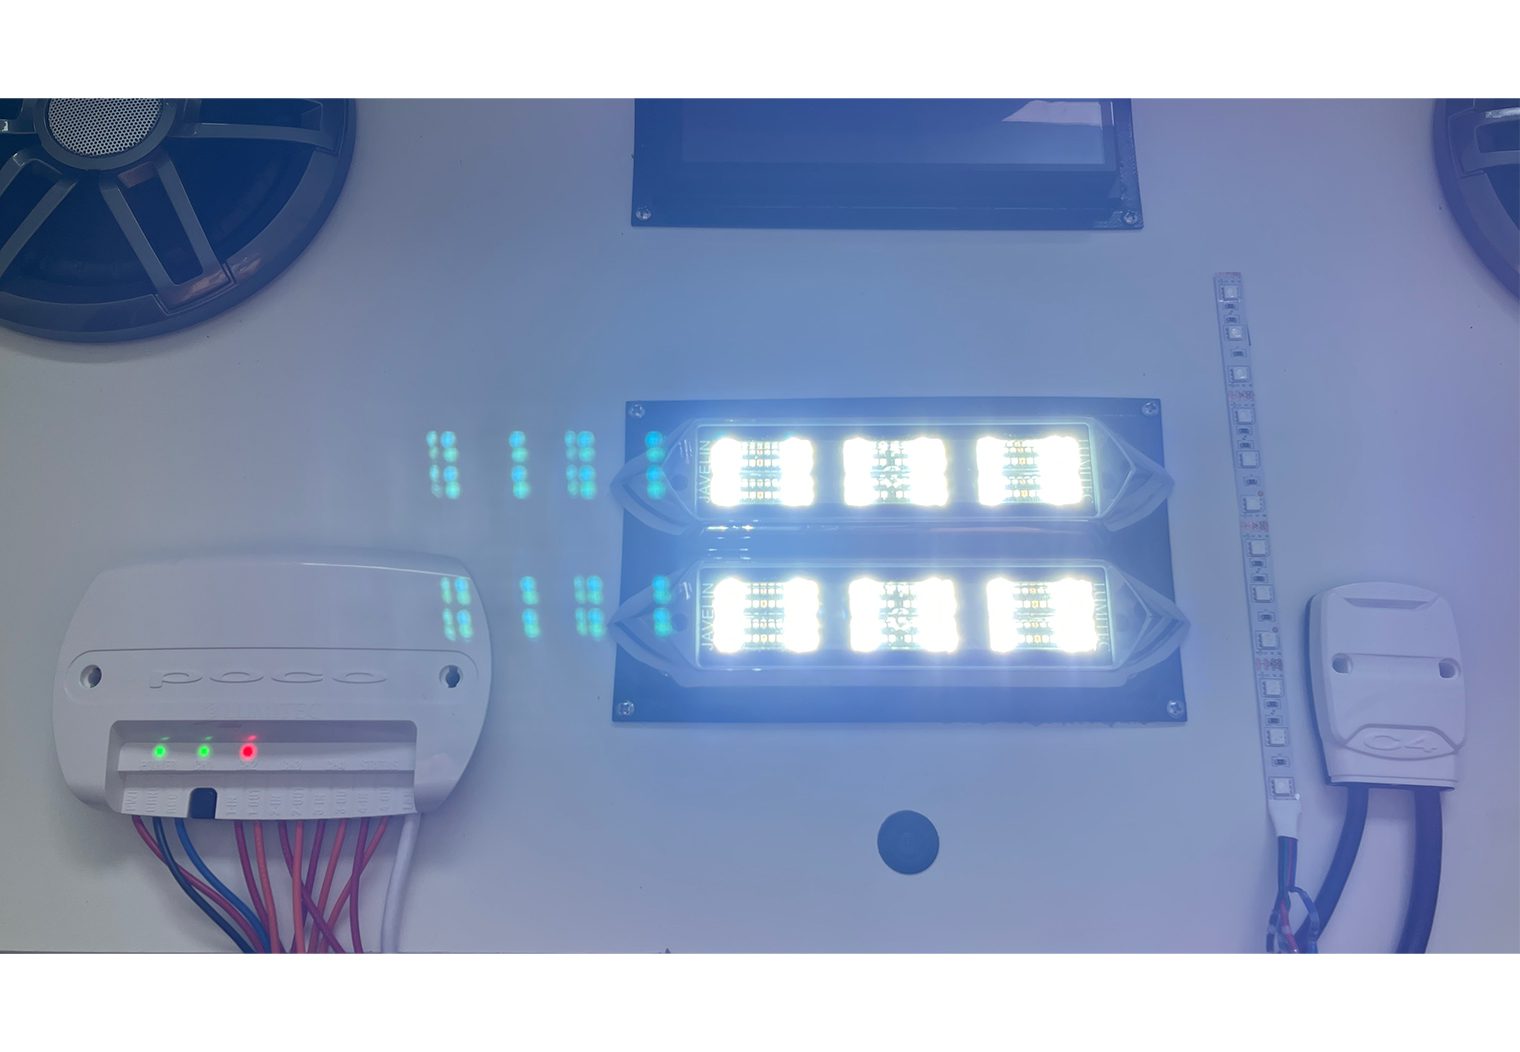
Via the Poco app, I had a full spectrum of colors to choose from. I cycled through a number of colors to see how they looked. *Note that capturing color and brightness via a camera on LED lights is always difficult. Please take these photos with a grain of salt in terms of color and clarity.
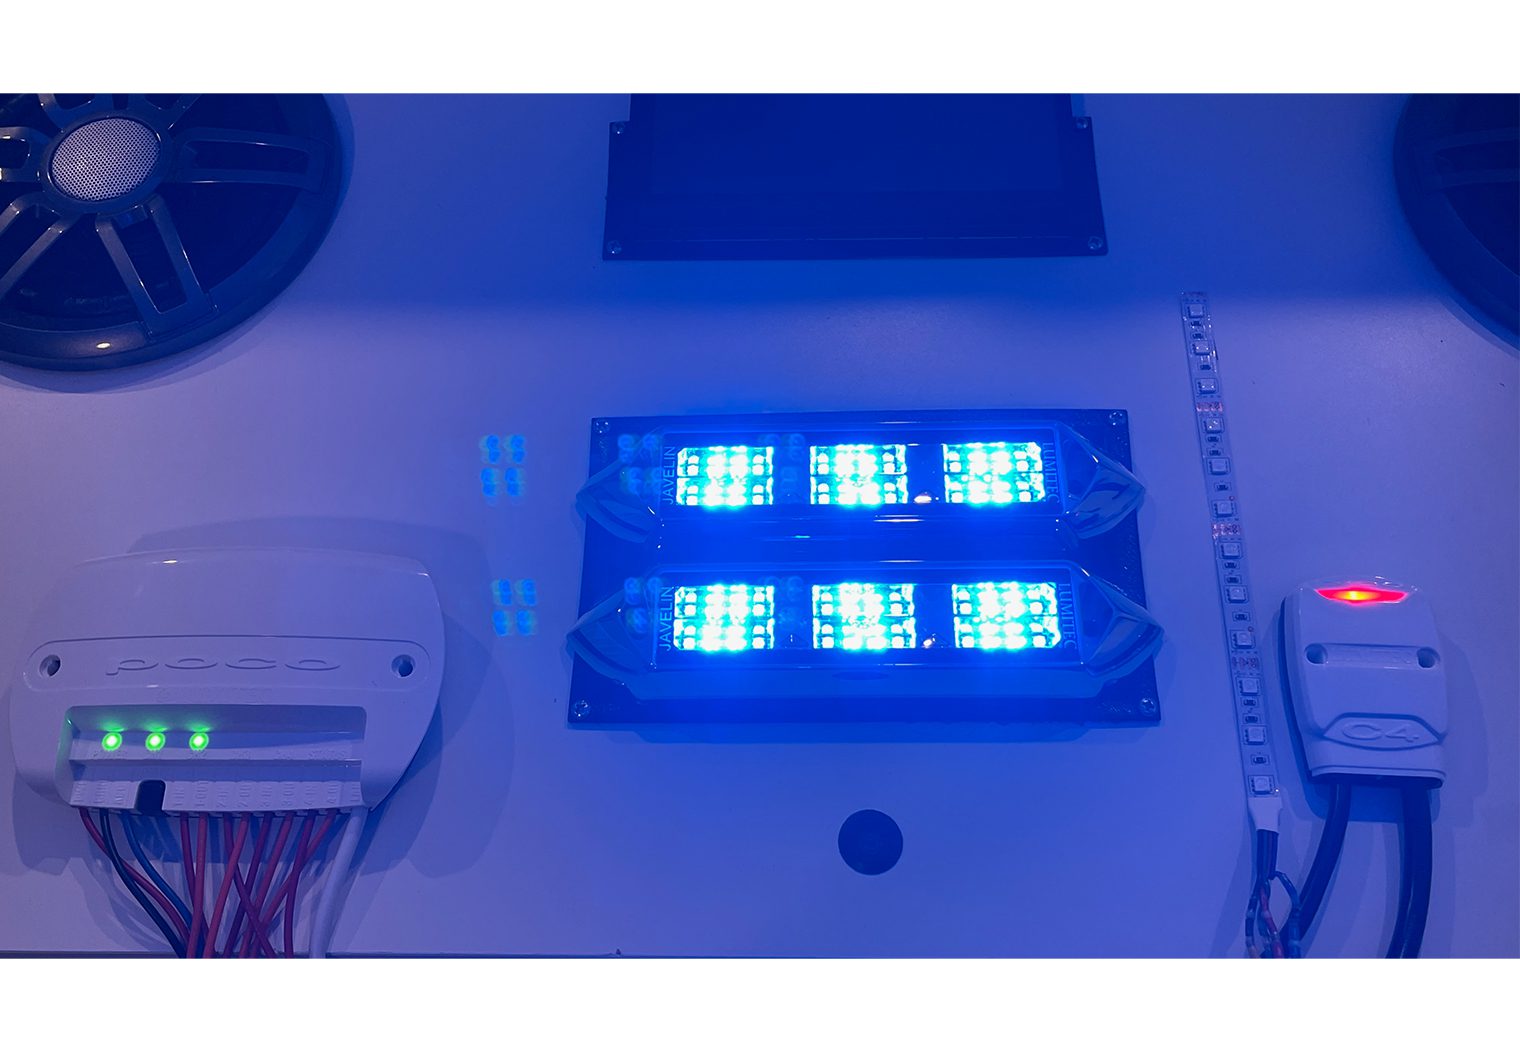
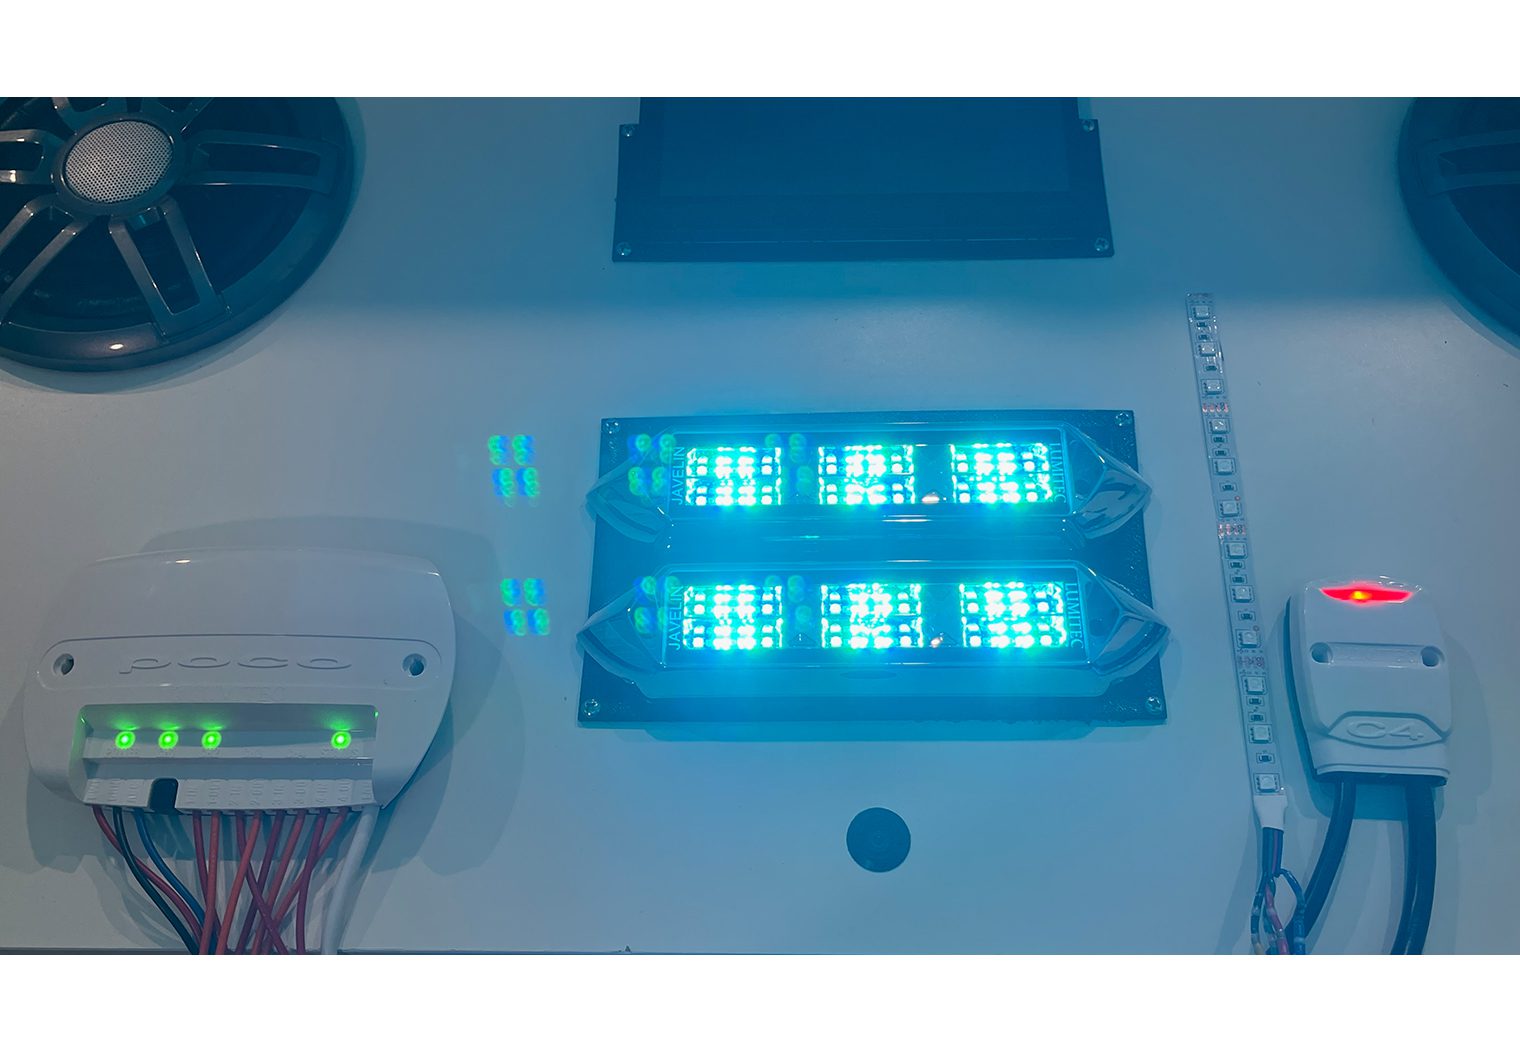
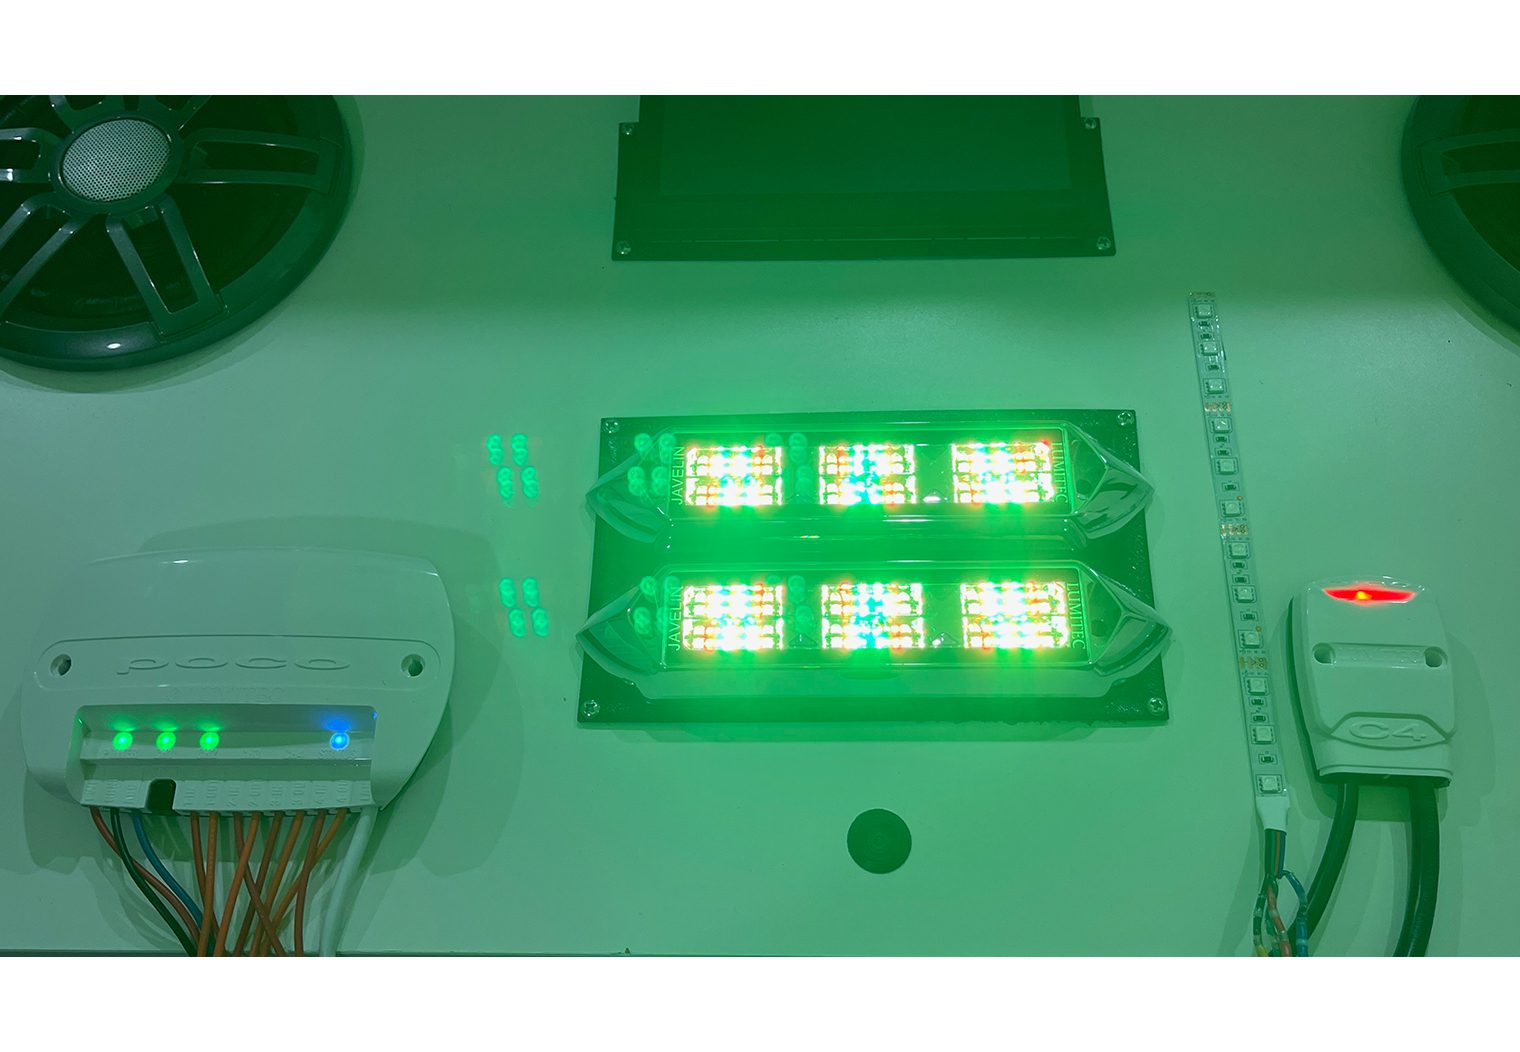
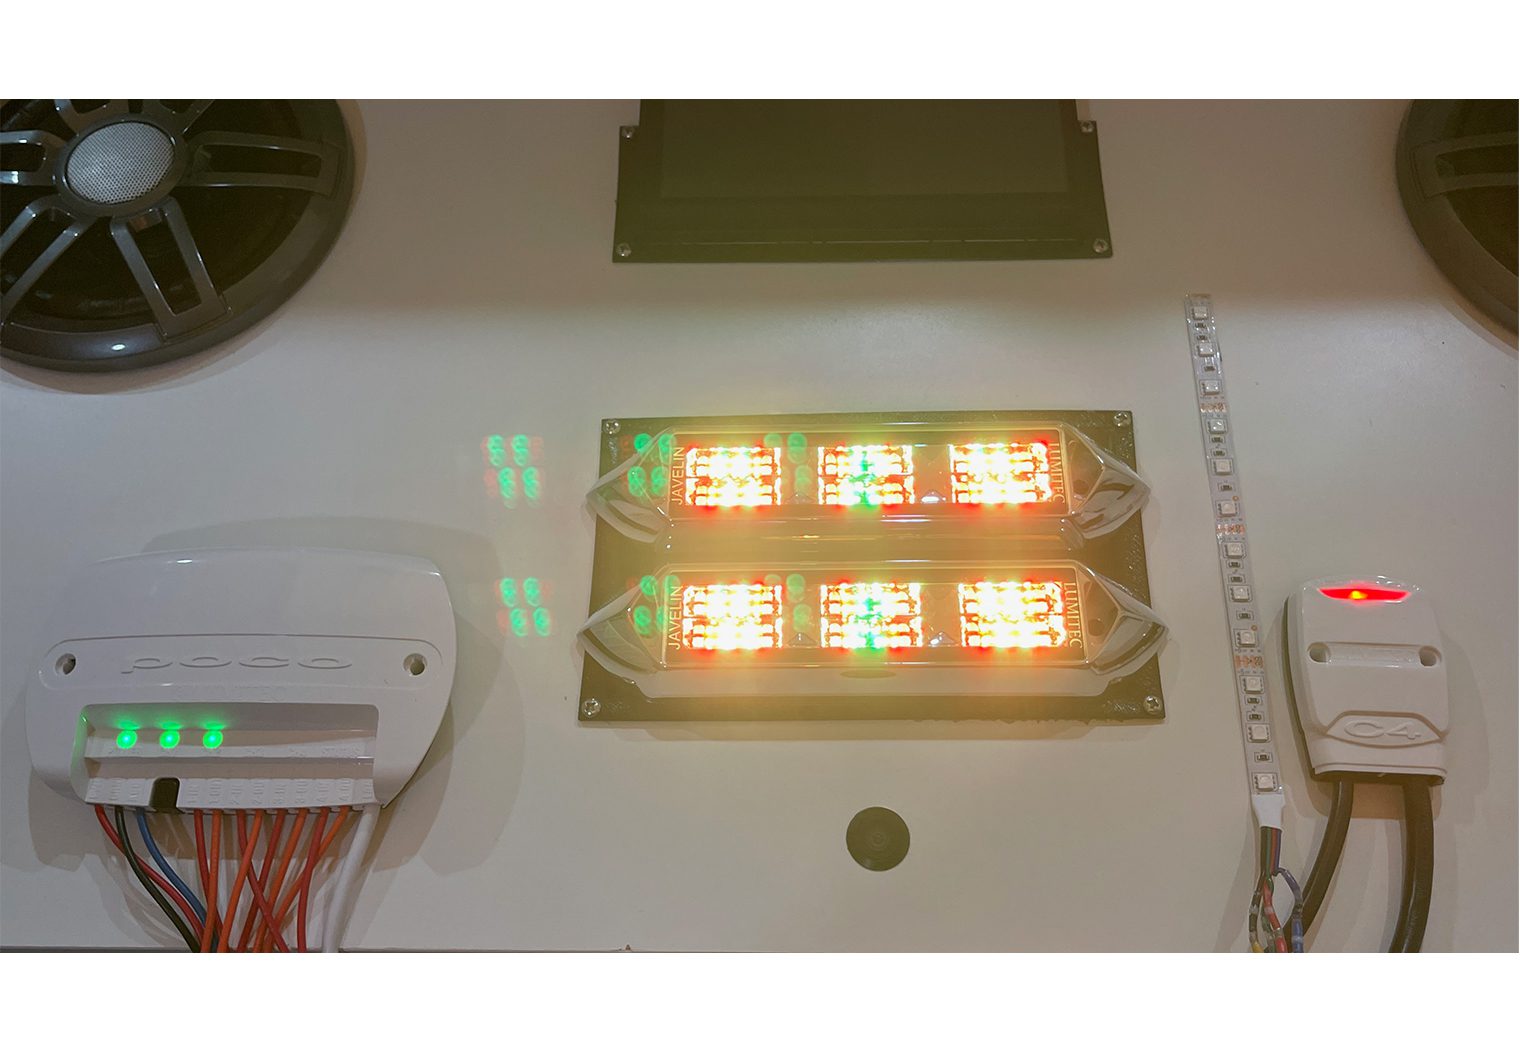
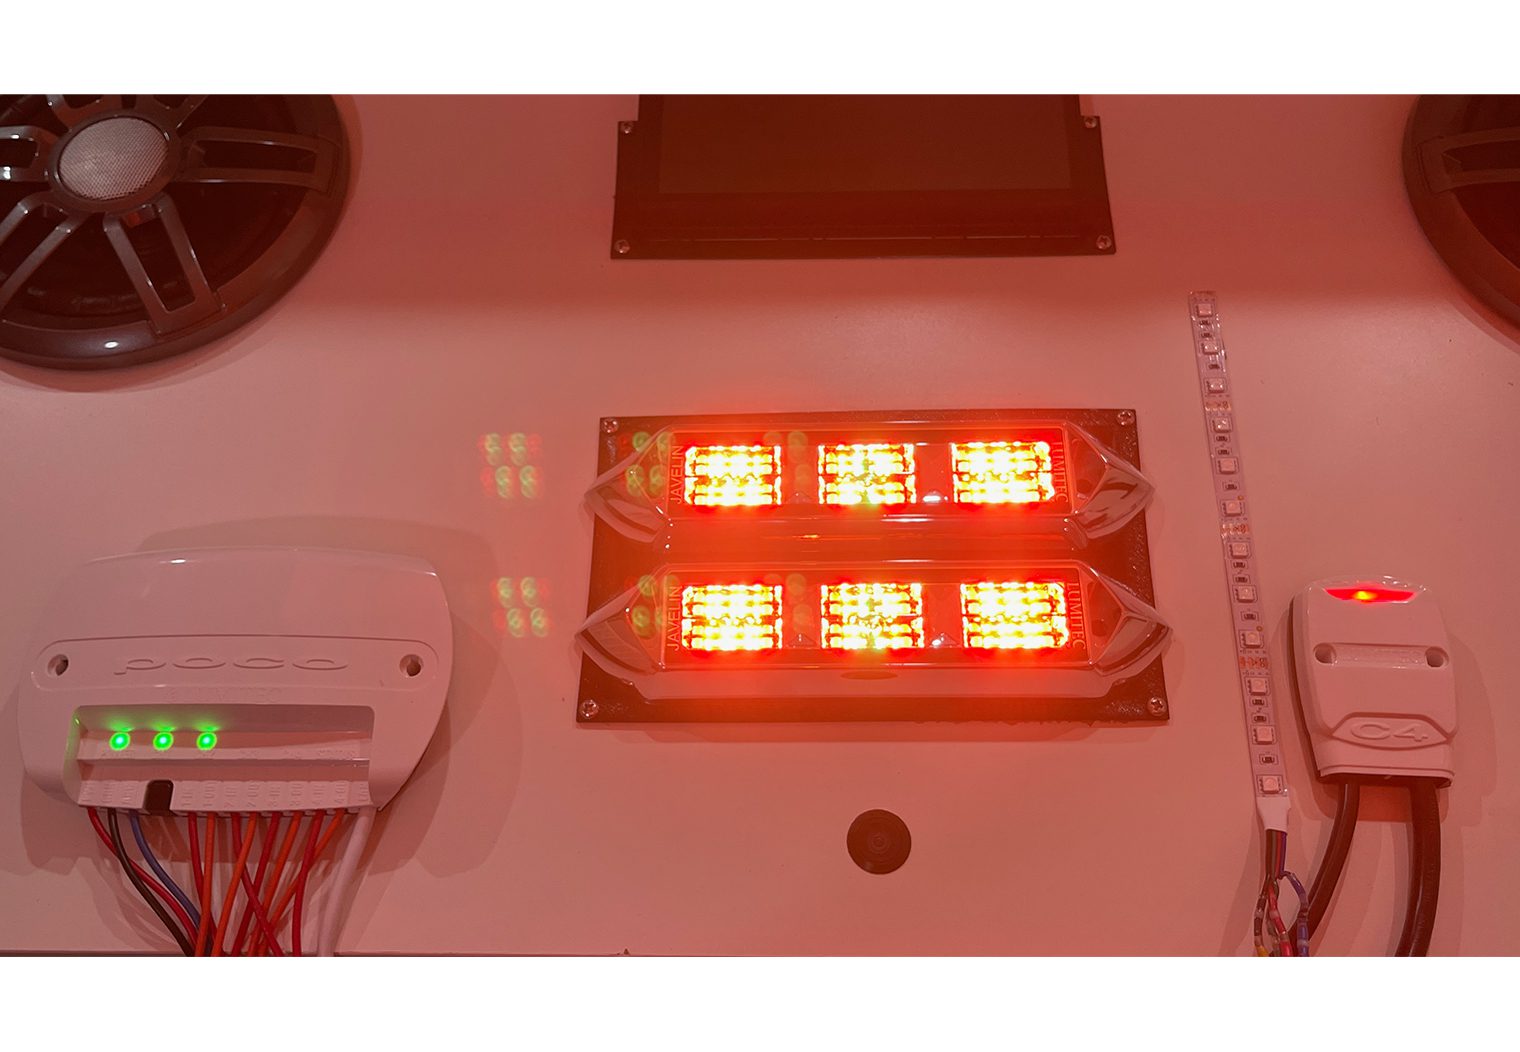
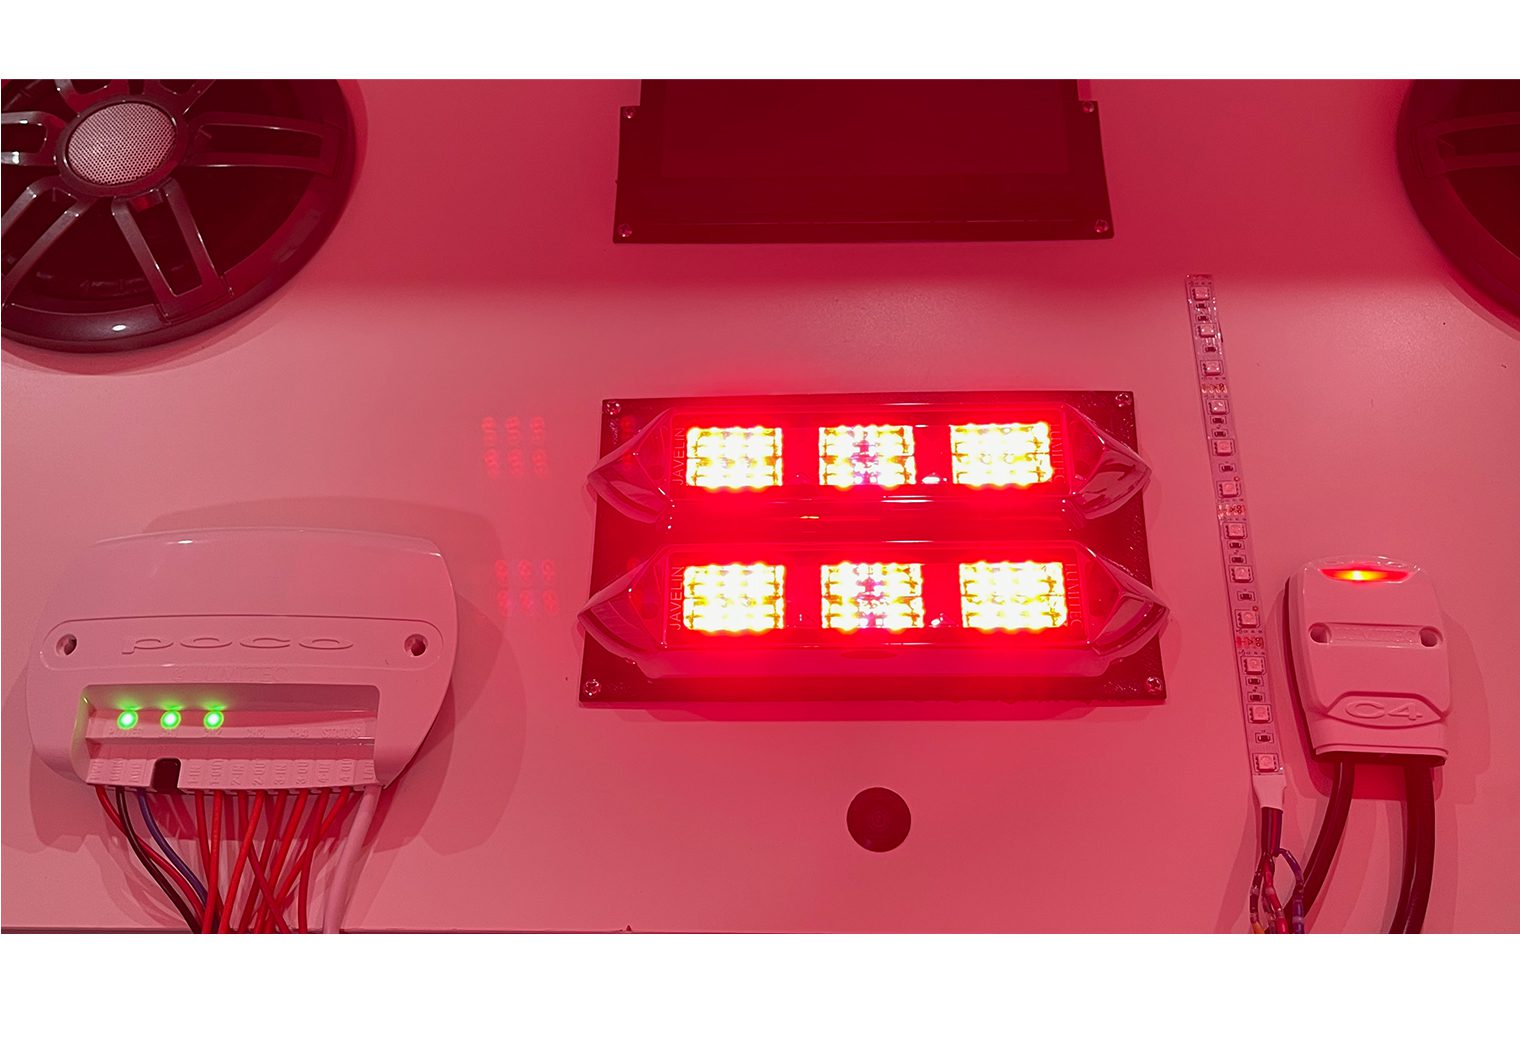
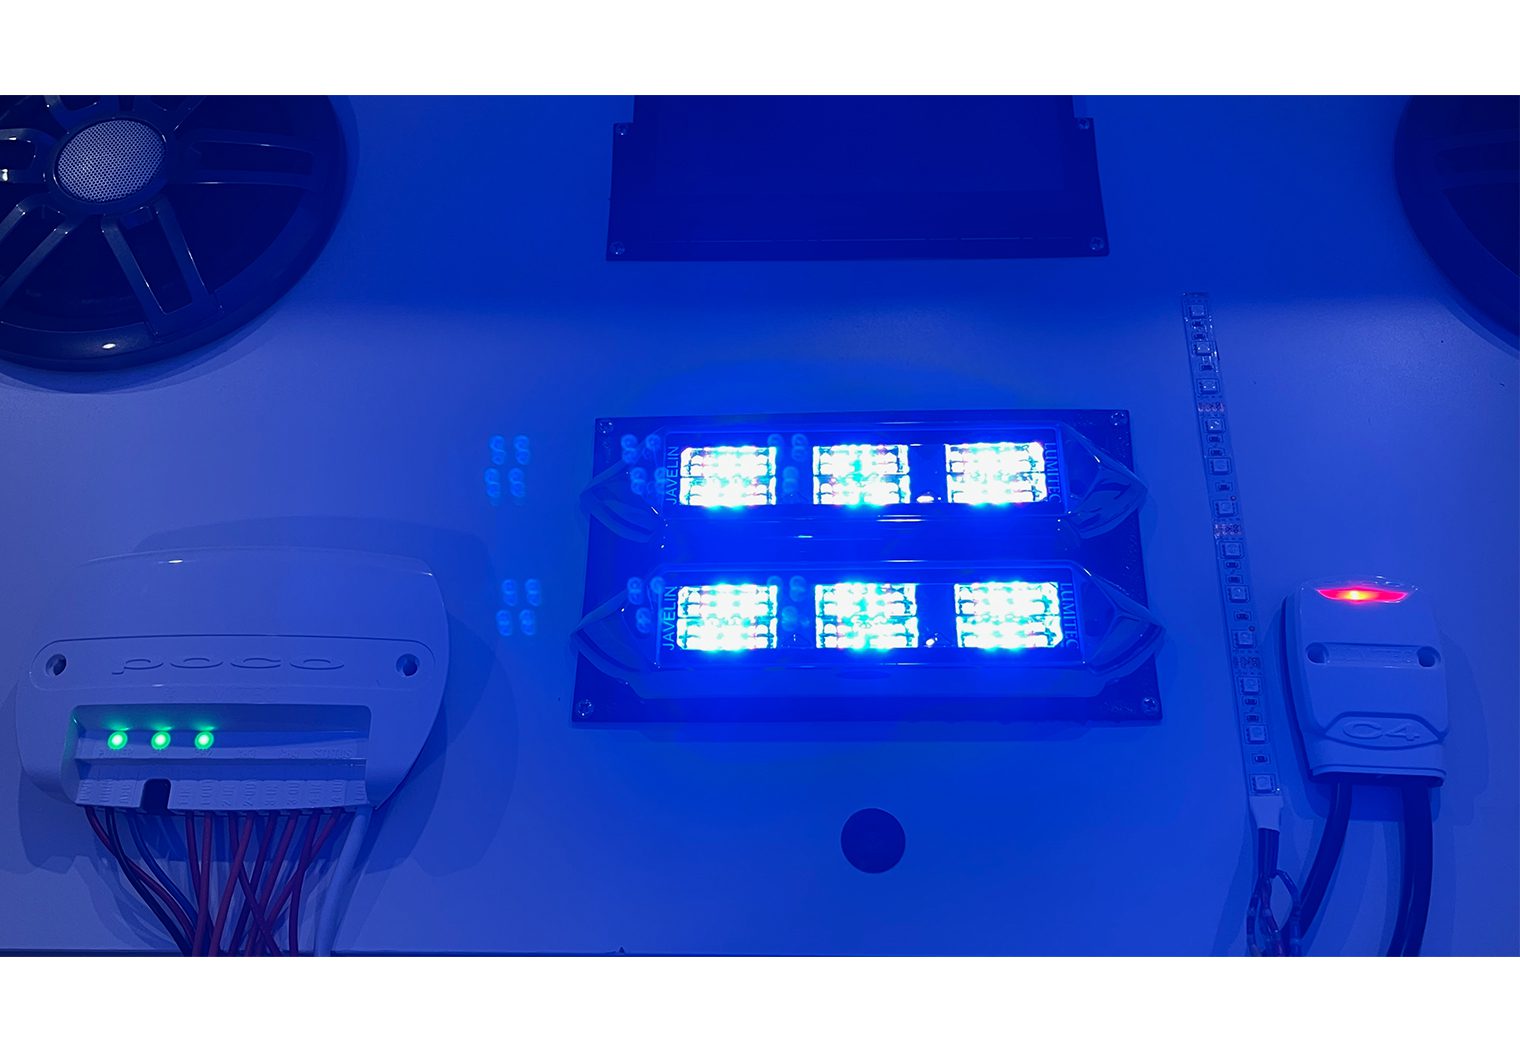

The first adjective that came to mind when I was flipping through the various colors on these lights was ‘true' – true to the color that I was selecting on my screen. They represented the color I wanted/expected with incredible accuracy as I went through the spectrum on the app. This was particularly noticeable when I compared the same color selection on the app between the Javelins and the low-quality LED light strip that I had for demonstration purposes.
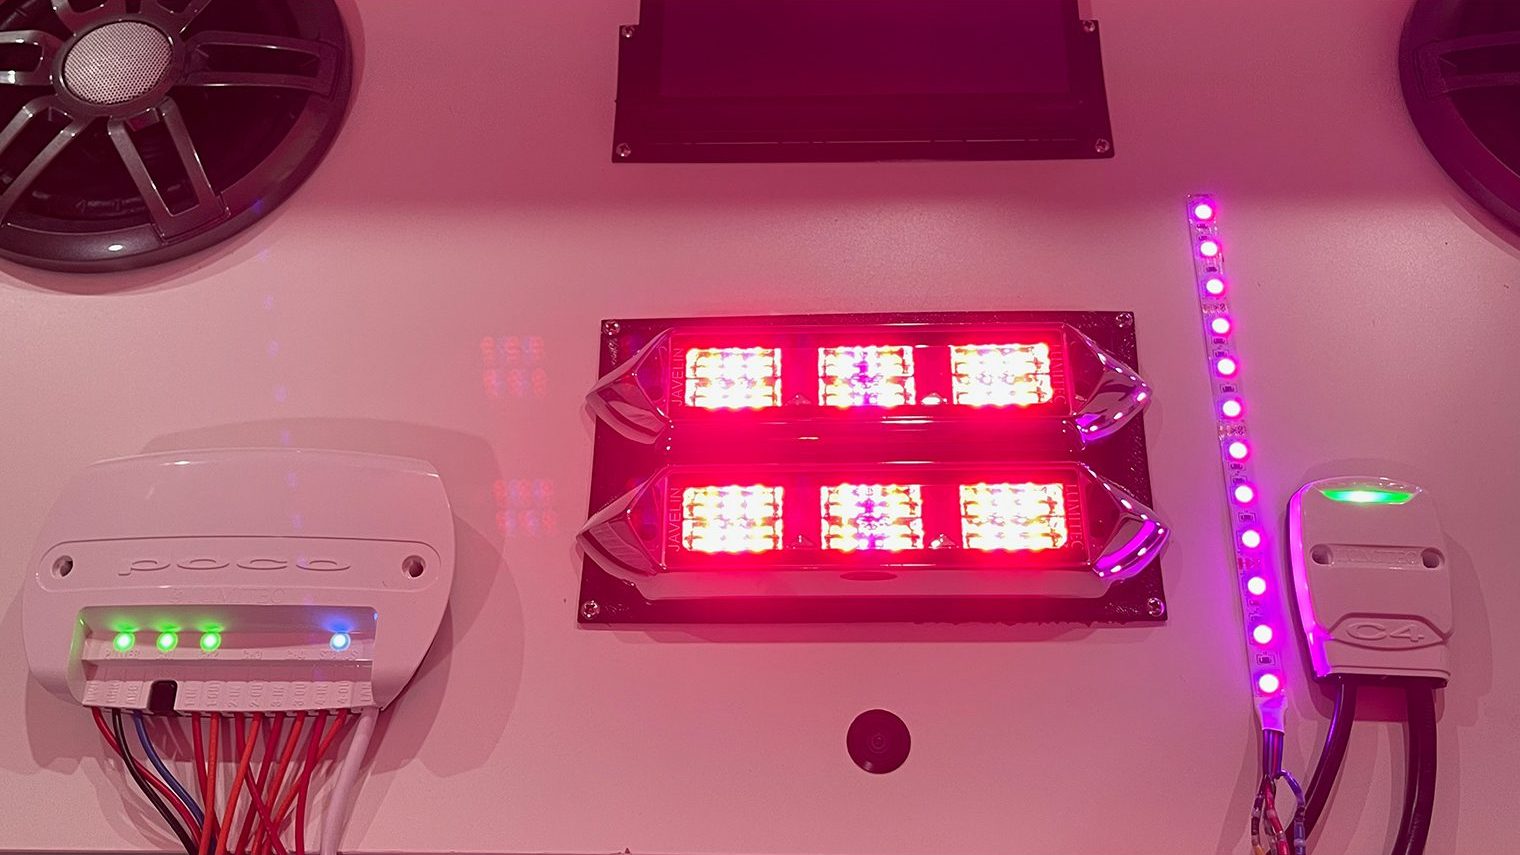
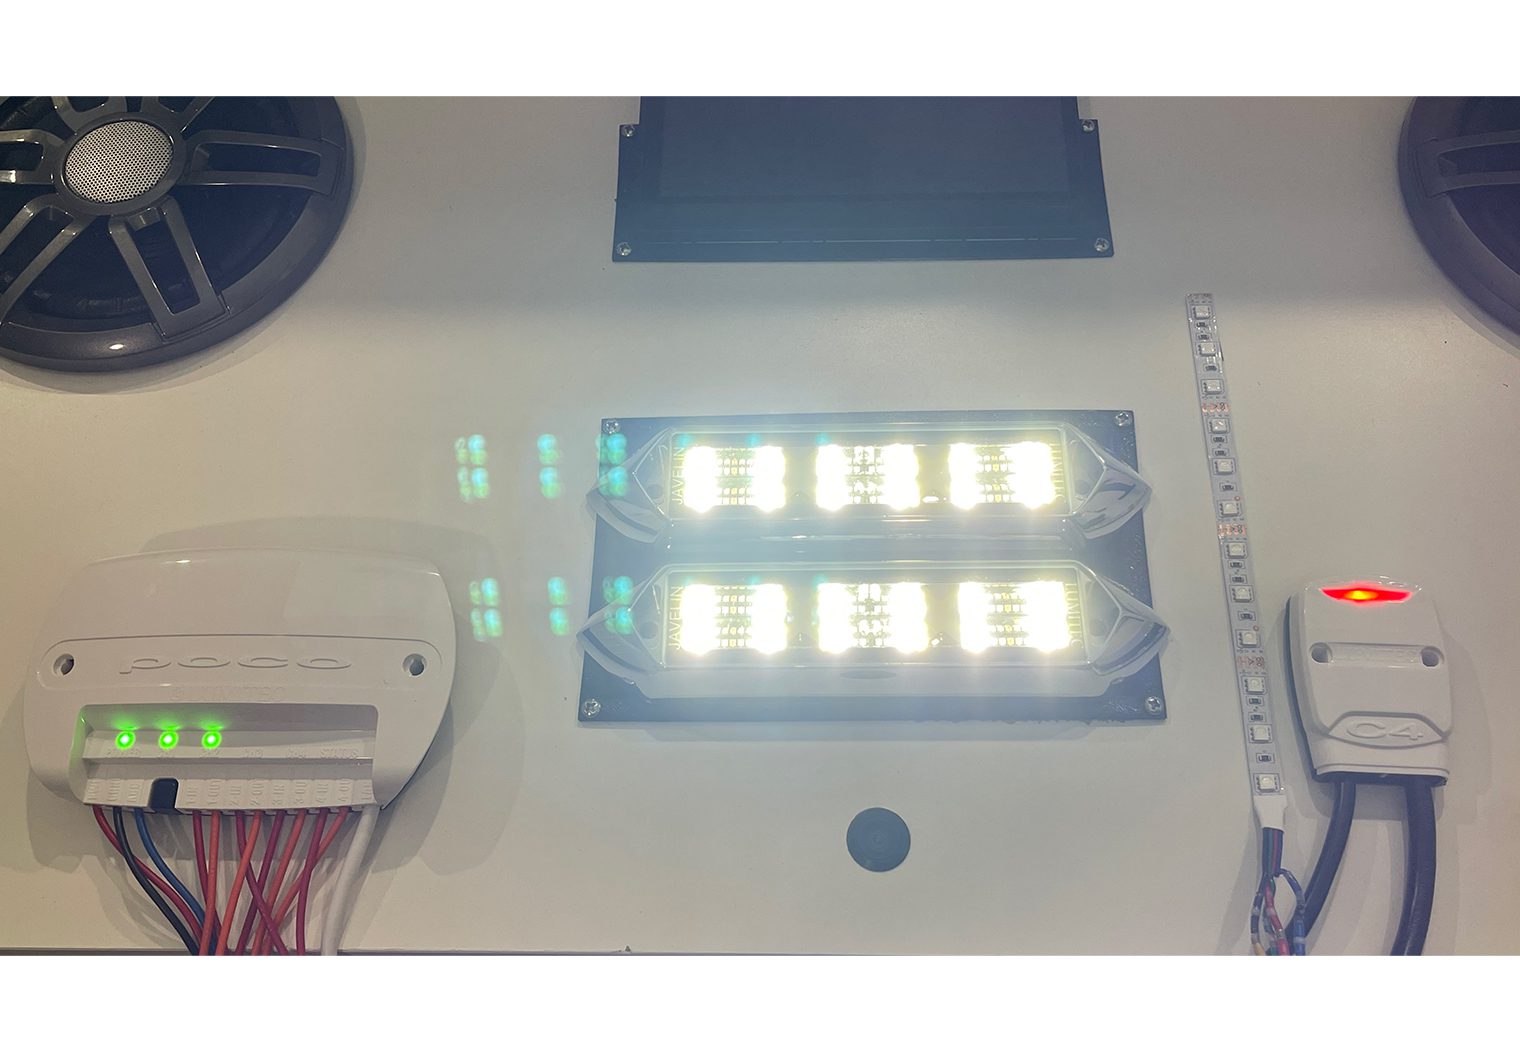
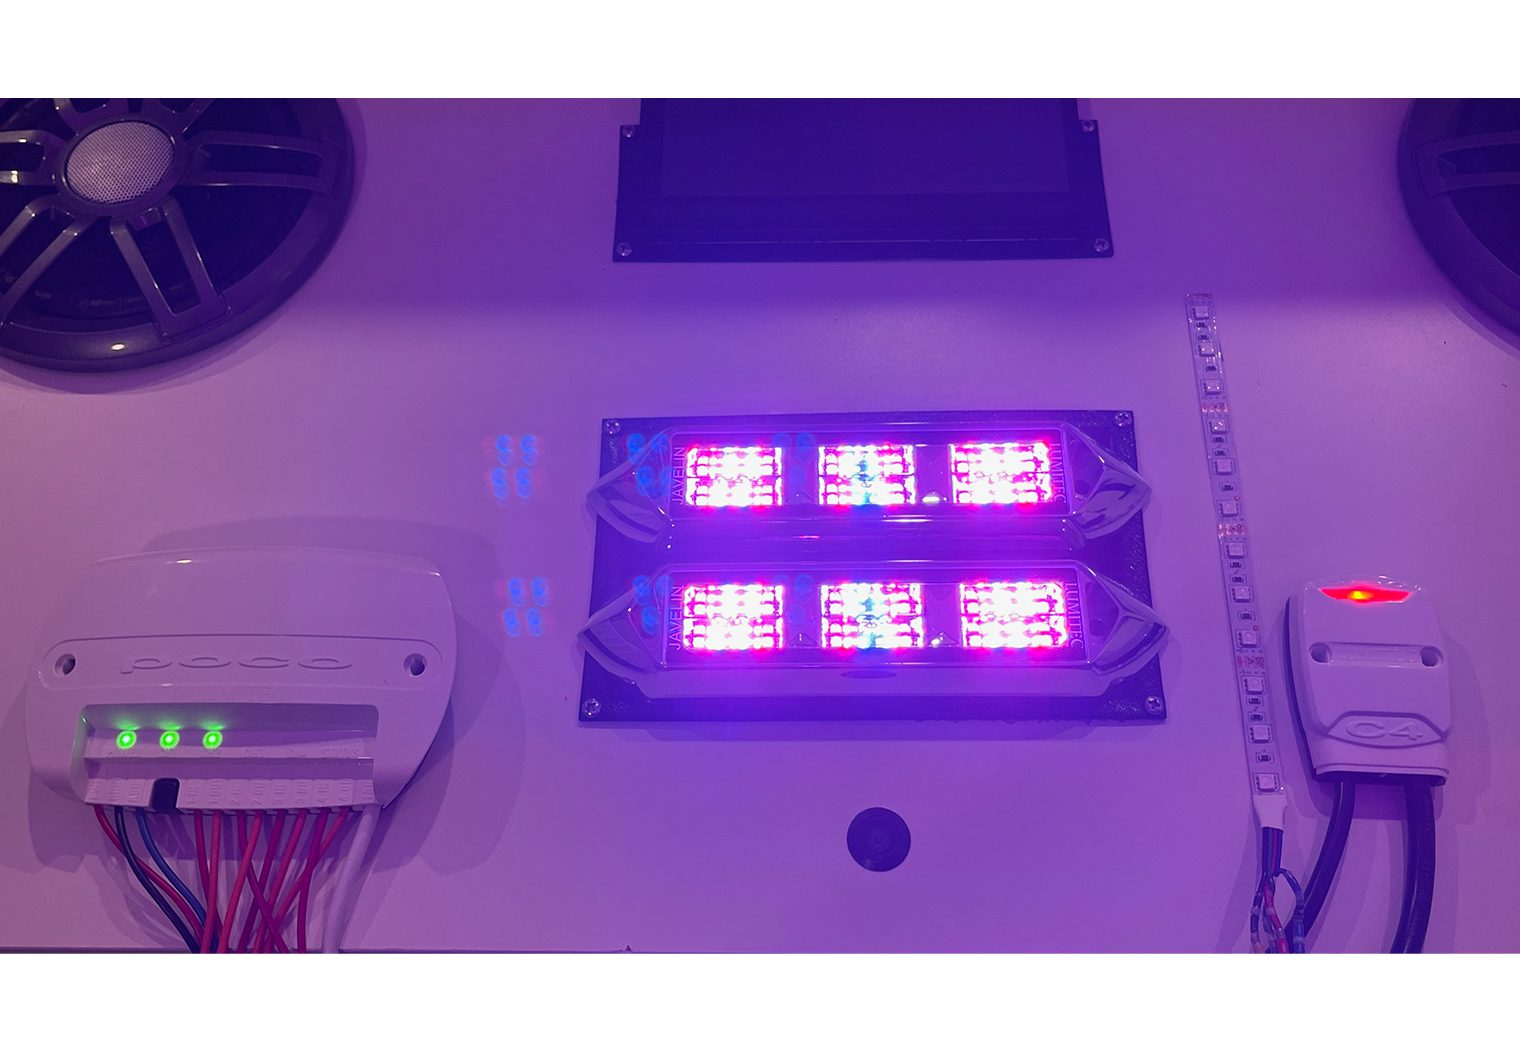
The lower quality LEDs that I had were noticeably inaccurate when it came to color while the Javelins were spot on. In the picture above, the color on the Javelins matched precisely to the color I had selected in the app while the lower quality LEDs looked totally different.
But I also have to say that the LED and reflective design made the color/light very well distributed. I didn't feel like I was just looking into colorful led diodes. I've tested a few underwater LED lights and these are among the most vividly colored lights that I have seen. And if you're using the Poco App, there's a wide range of colors to choose from.
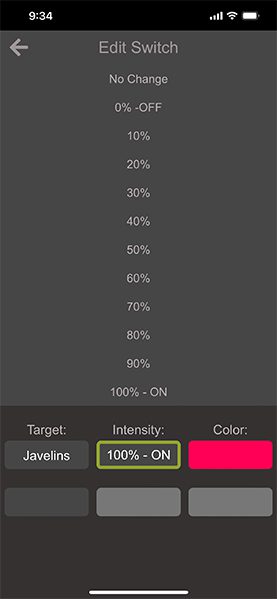
Brightness/Intensity
The next thing I tested out was the brightness and intensity functionality. It's tough to describe how bright these things are. The average headlight on a car emits between 4,000 to 5,000 lumens for a total of 8 to 10k lumens. With 6k lumens each, for a total of 12k between the two, they're certainly as bright if not brighter than my 2021's F-150's head lights. Bright enough to make them tough to test in a room via my test bench and to take pictures for demonstration purposes. In comparison to the two Shadow Caster SCM-10-EXT-CC lights that I installed on a Nautique G23 which emitted 3750 lumens per light, these are absolutely brighter. On paper, they're about 60% brighter. I would rank these Lumitecs among the brightest RGB Underwater LED lights on the market for their size.
While testing out the brightness on the app, the transitions were noticeably smooth and the app provided a very simplistic way to have full control over the intensity of the lights.
Switching On/Off
This is pretty straight forward. But what I was looking for in the app was how responsive the switches were, if there were any unnecessary delays, flickers or unexpected transitions between white and the preset color (burgundy) that I had for the switch. I was also looking for the capability to turn one zone/channel on and off independently of others. Flawless.
Installing the Javelins, Poco & Pico
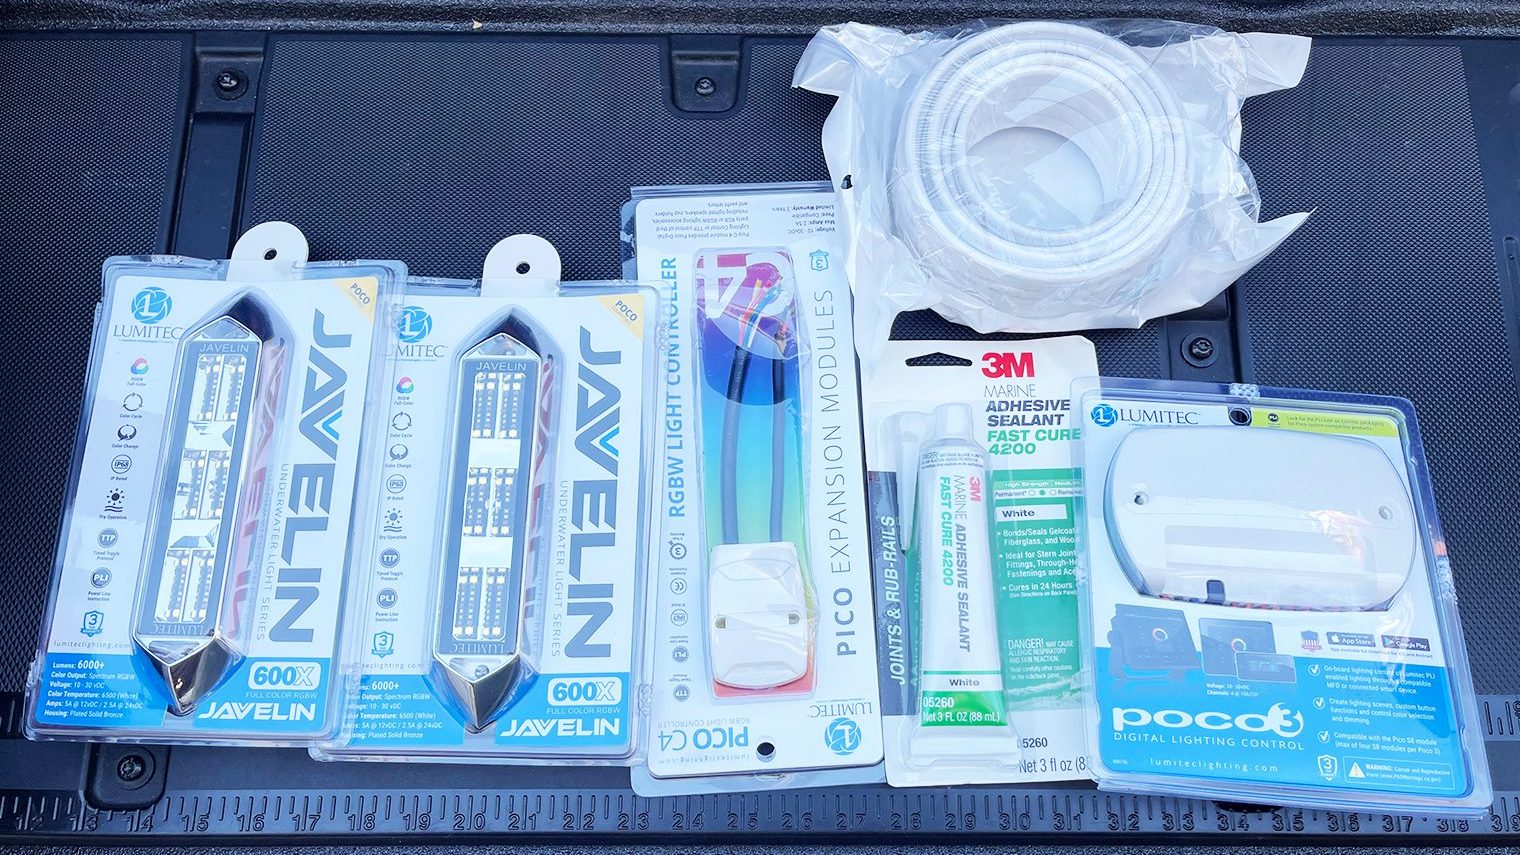
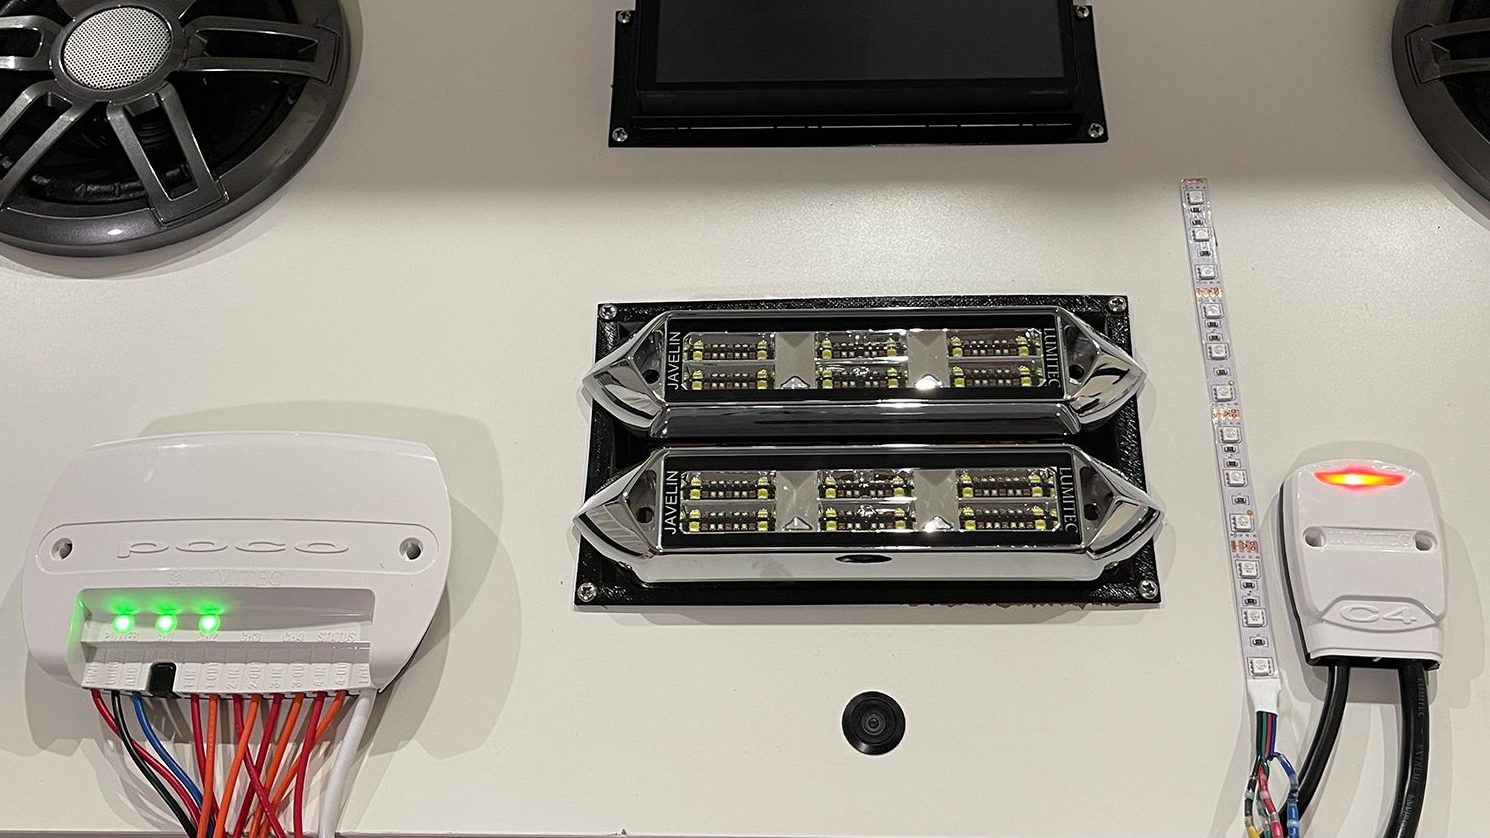
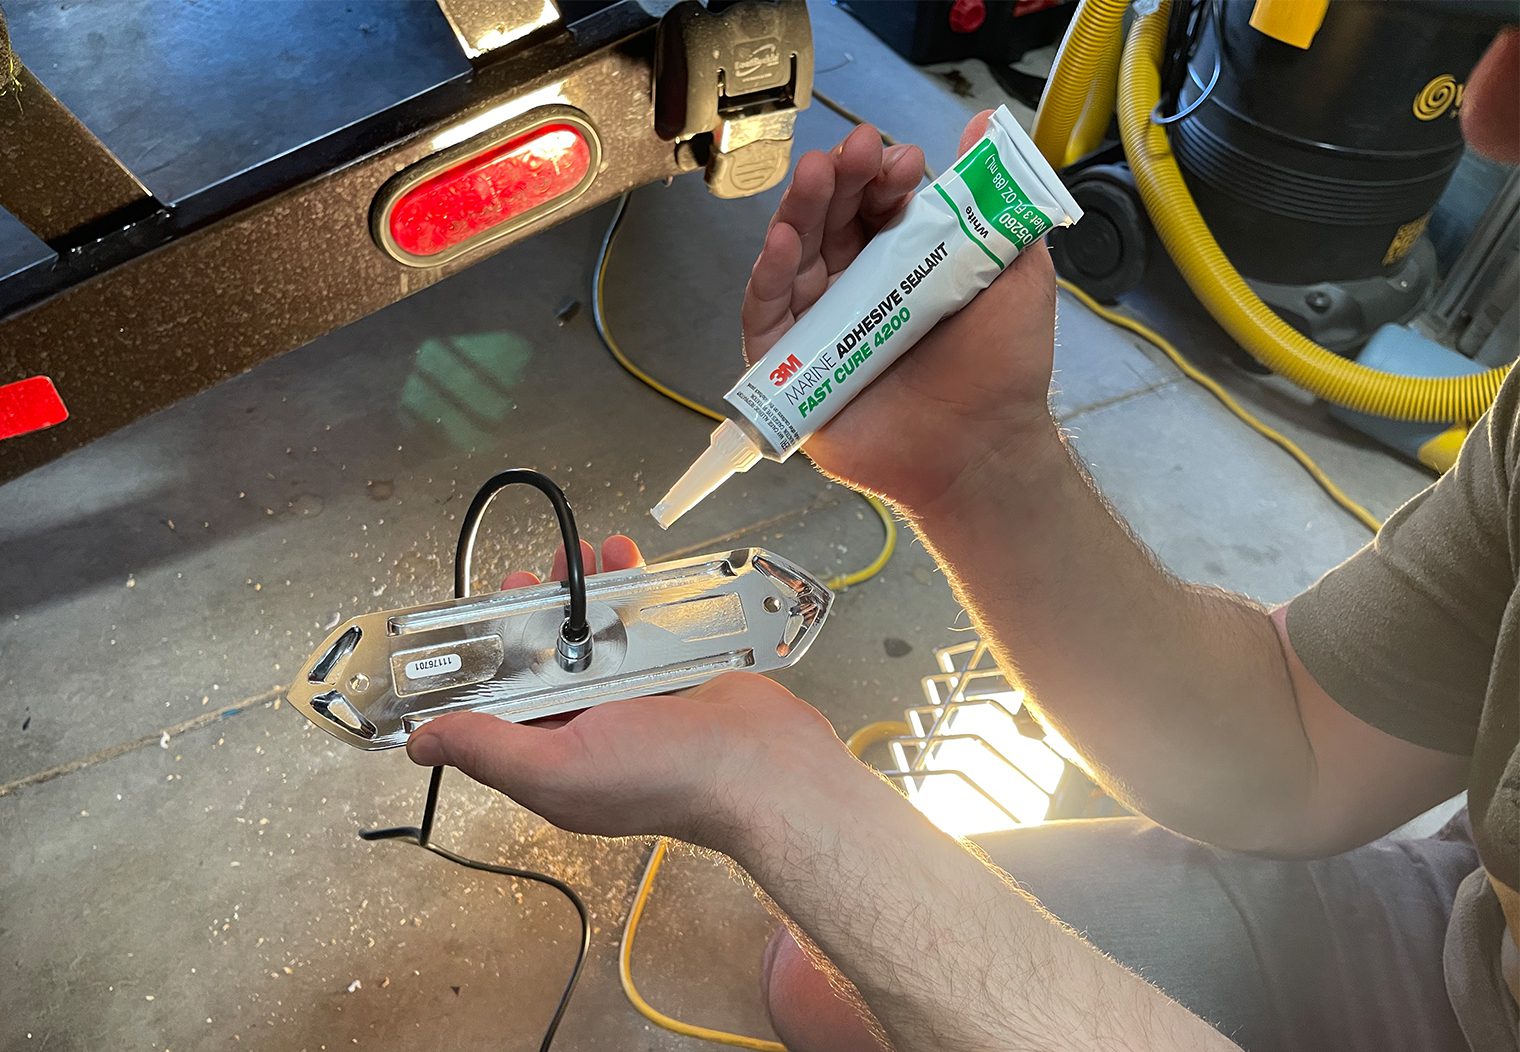
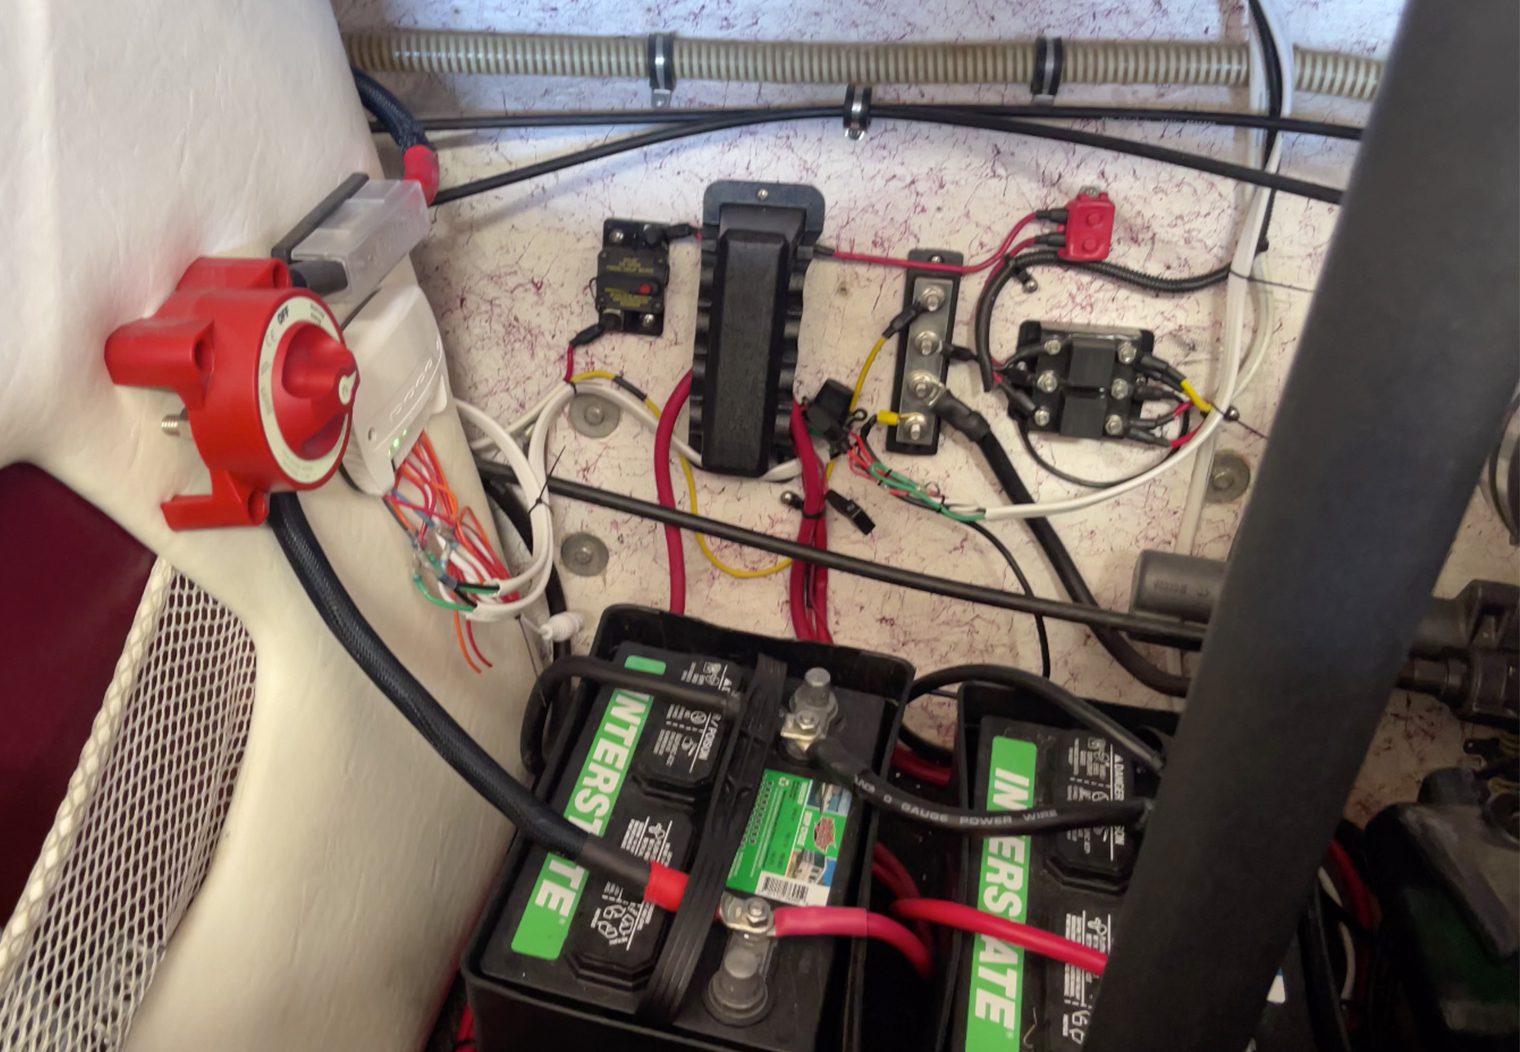
After testing the system on my bench, I went out to the boat to mount and wire them. In general, installation of the Javelins, Poco 3 and Pico C4 is a straight forward task if you have access to 12V power, ground and accessory. You can essentially install all three components with a set of drill bits, drill, a few solder seal connectors, some 14 awg marine grade trimex wire and 3M 4200 Fast Cure Sealant. In total, the installation took me 4 hours from start to finish.
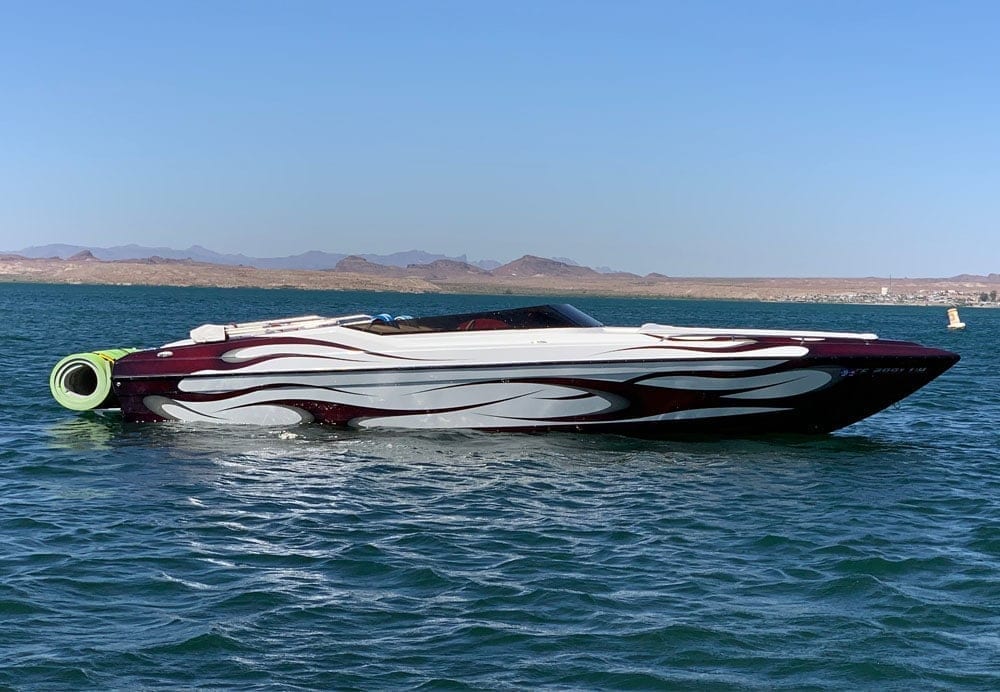
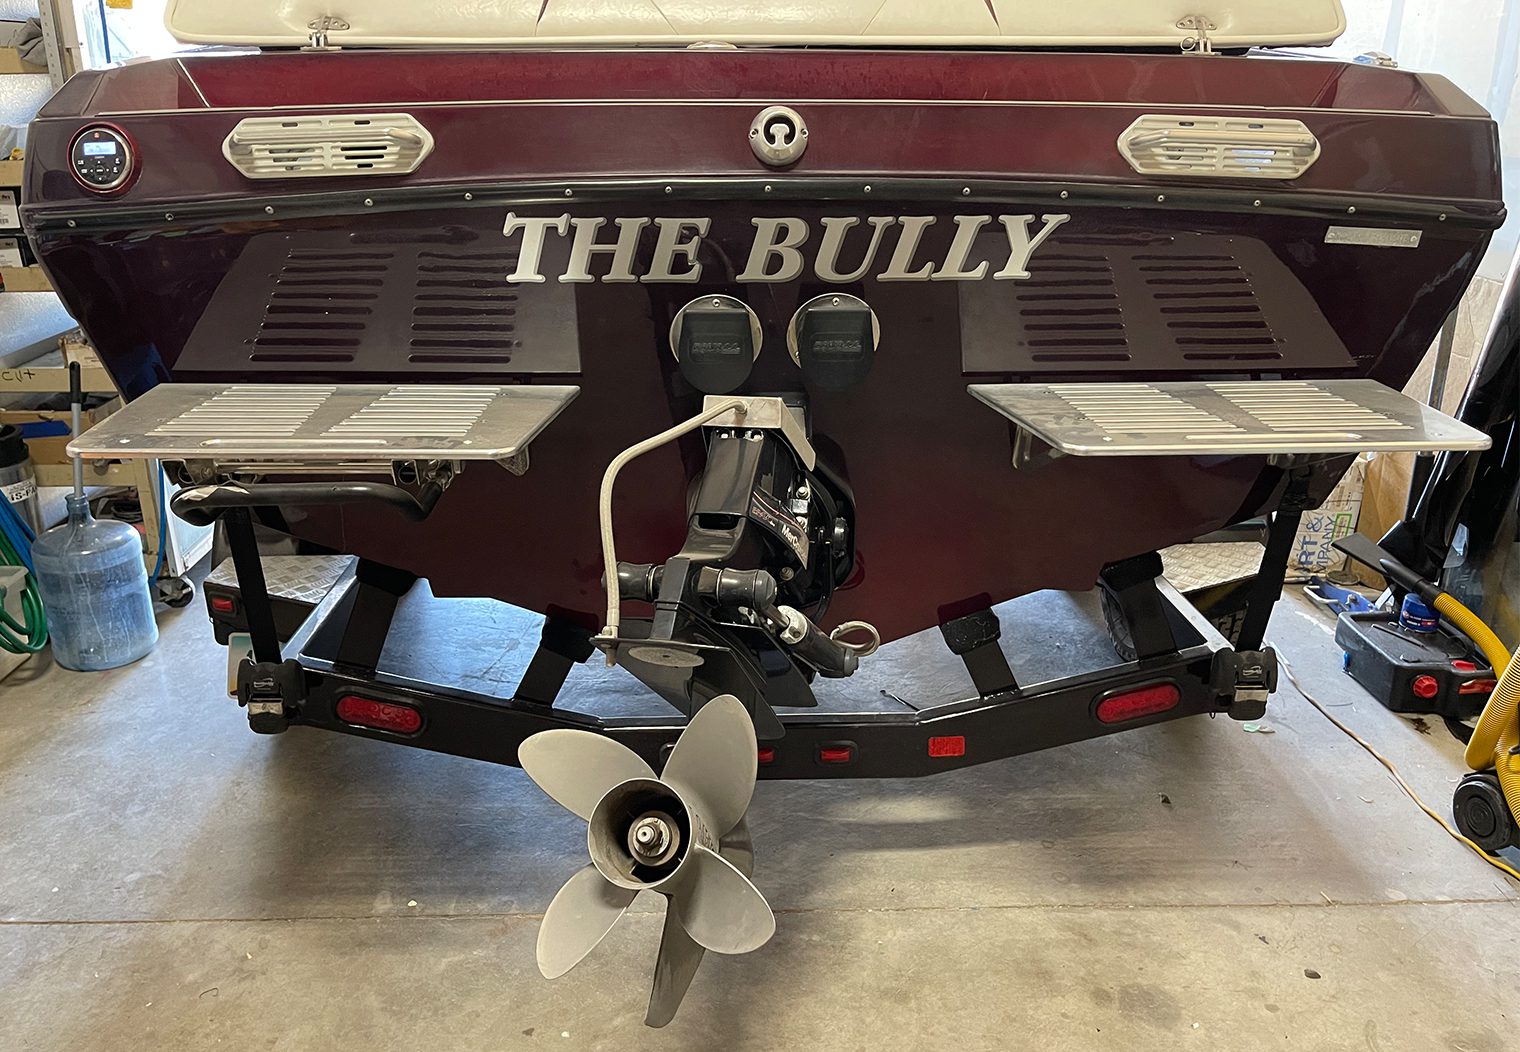
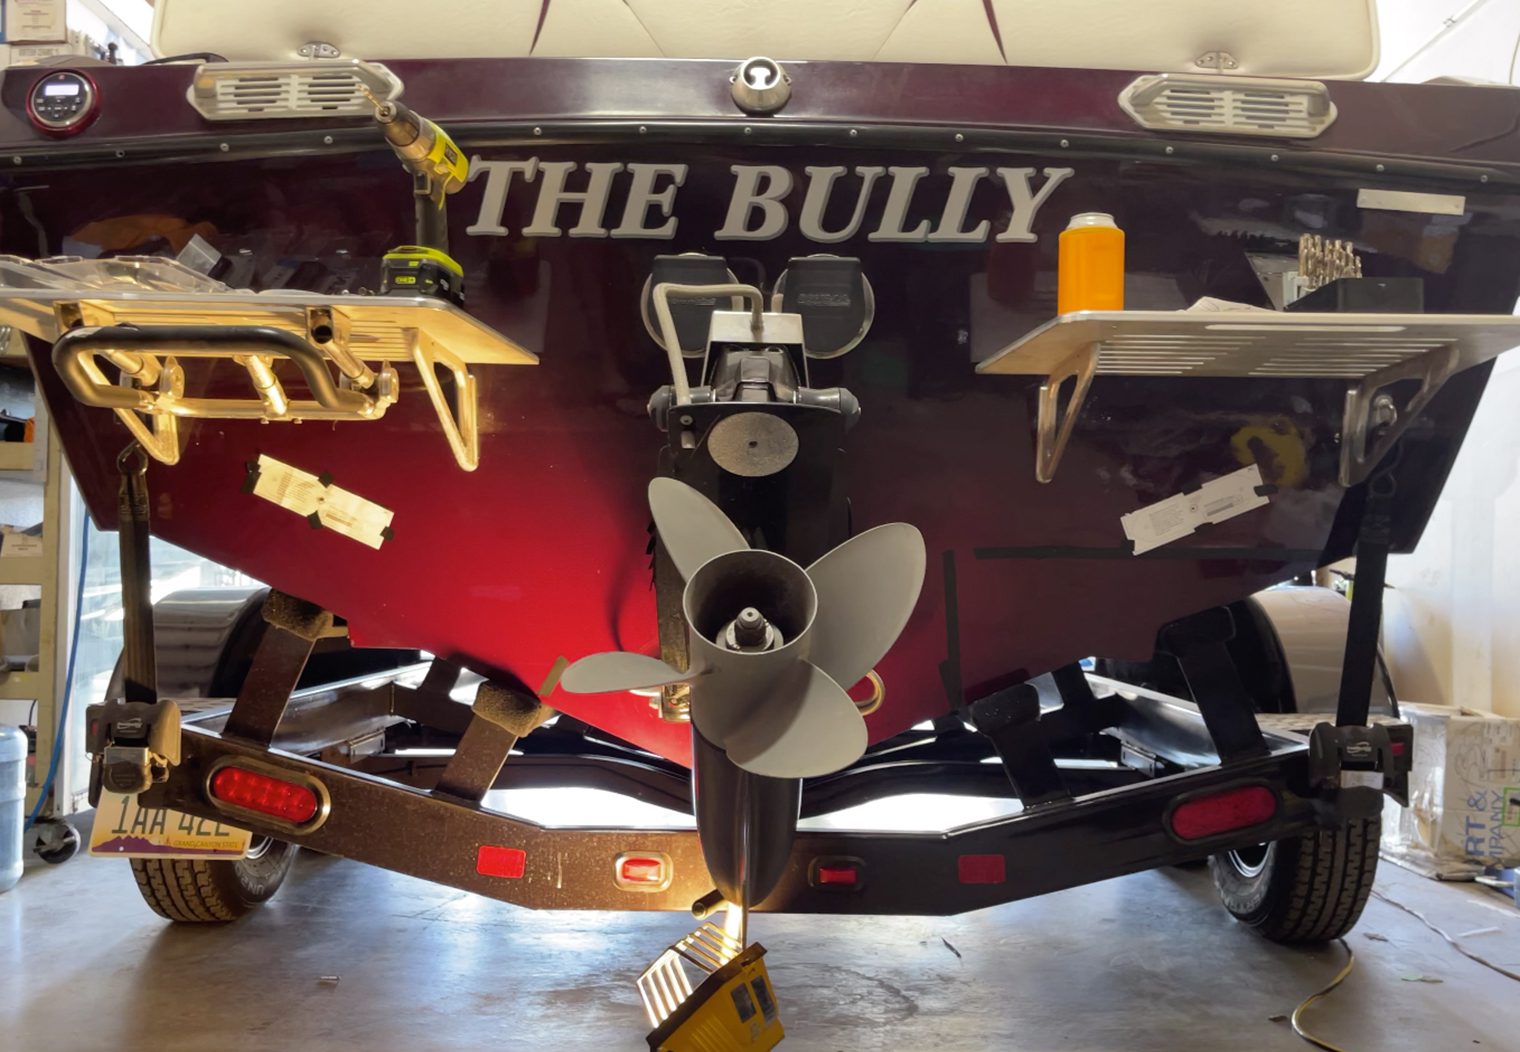
This setup went into a 2007 Lightning 247SX. Here are a few snapshots of the boat prior to the installation to show you the existing interior lights and the transom in which the lights were to be mounted.


Step 1: Drilling and Mounting the Javelin 600X
The first component of this system that I installed was the Javelins. I chose to install them on the transom along the outer edge of the hull.
I started in the engine bay, measuring the location of any obstacle or component that would interfere with where the Javelin wire would feed through the hull. On this boat, there is a sub floor along the inner part of the transom that I needed to account for.

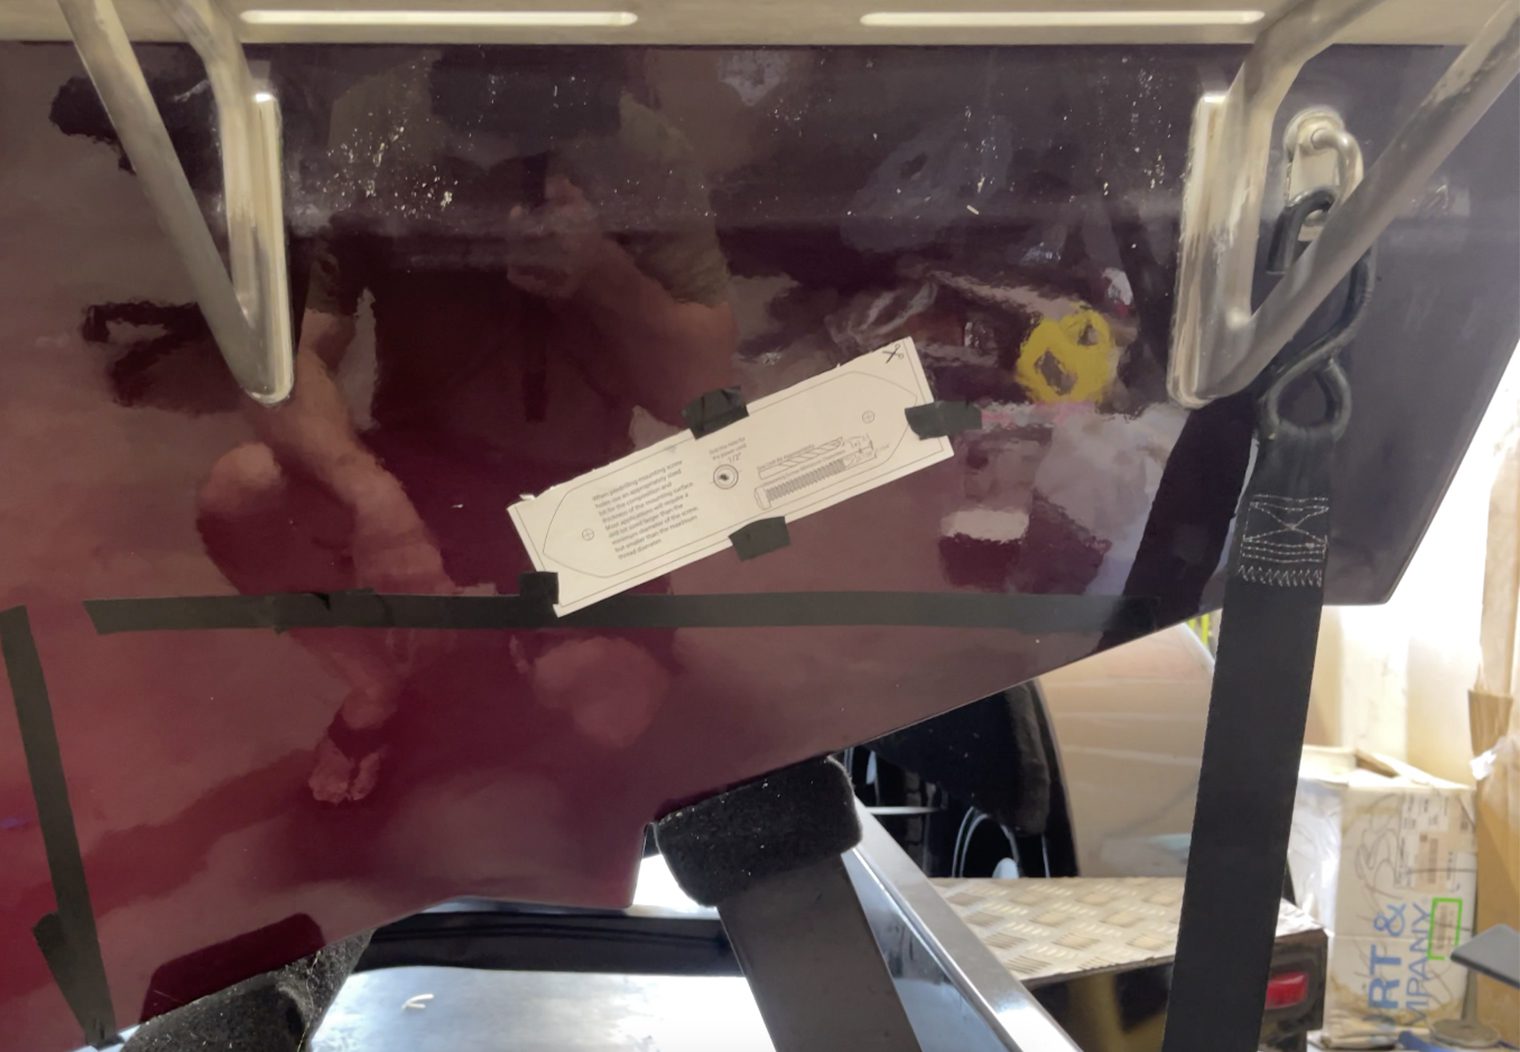
I then taped the included drill templates onto the transom in a location would sit between 4-6 inches under the waterline and wouldn't interfere with anything in the engine bay come time to drill and wire. Once the templates were in place, I could then begin the process of drilling.
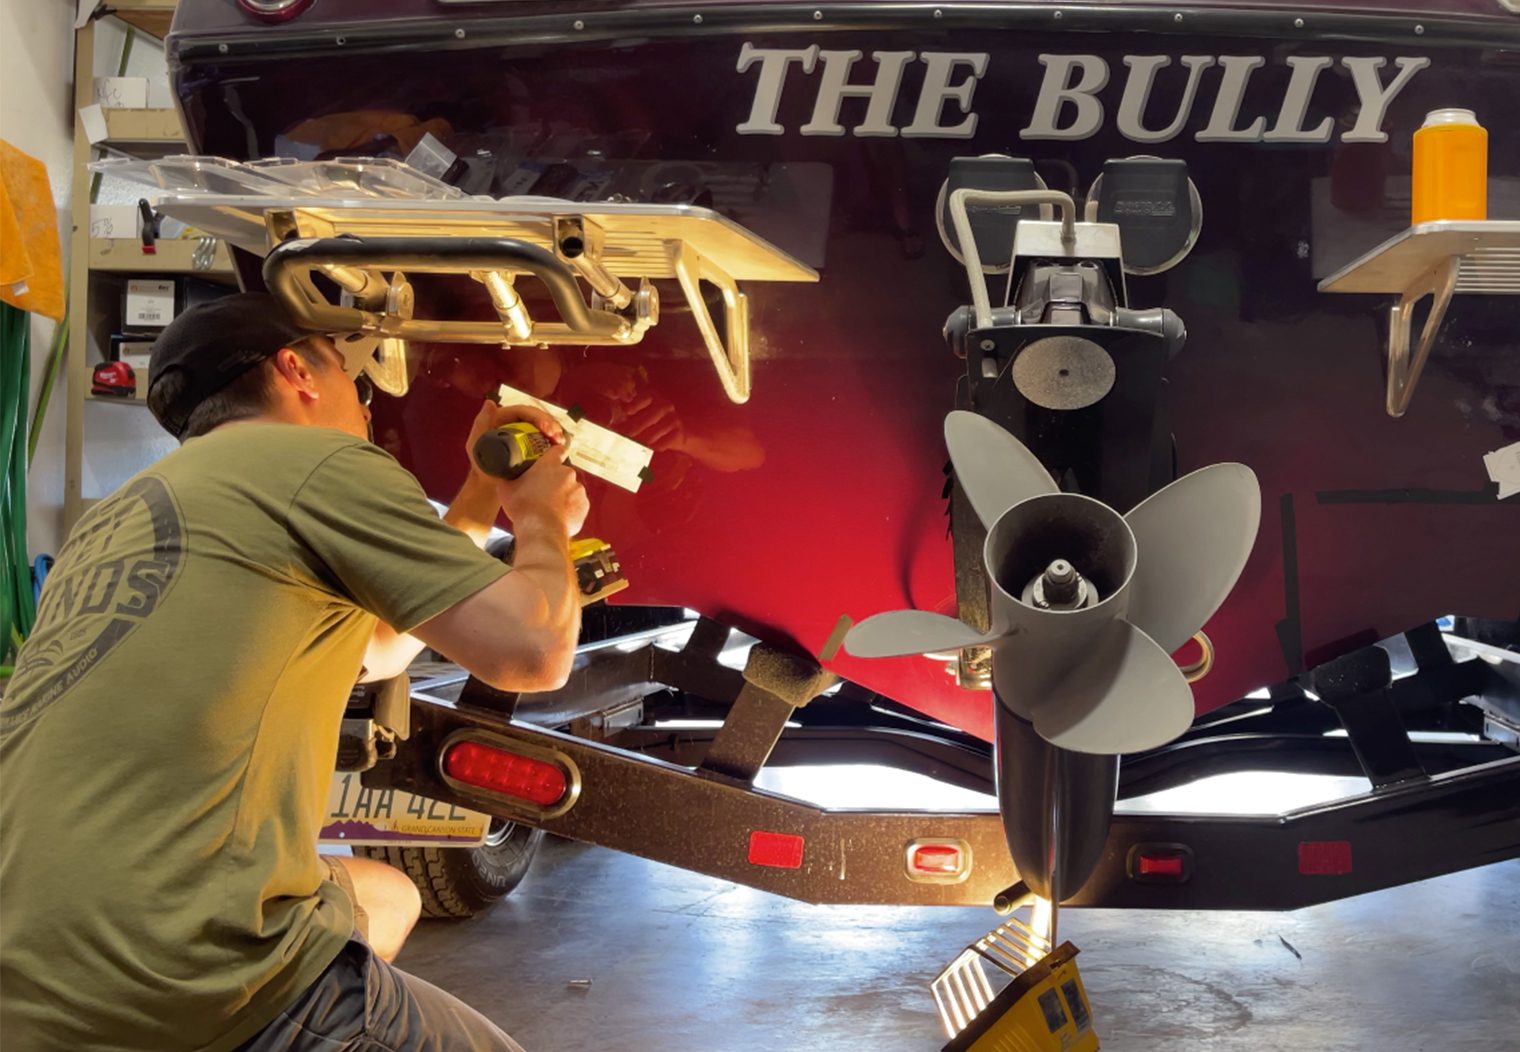

After the holes were drilled, I fed the Javelin 600X wiring through the hull, sealed and mounted the lights to the transom using 3M's 4200 Sealant. I would recommend the 4200 sealant, or the 5200 if you want something even more permanent.
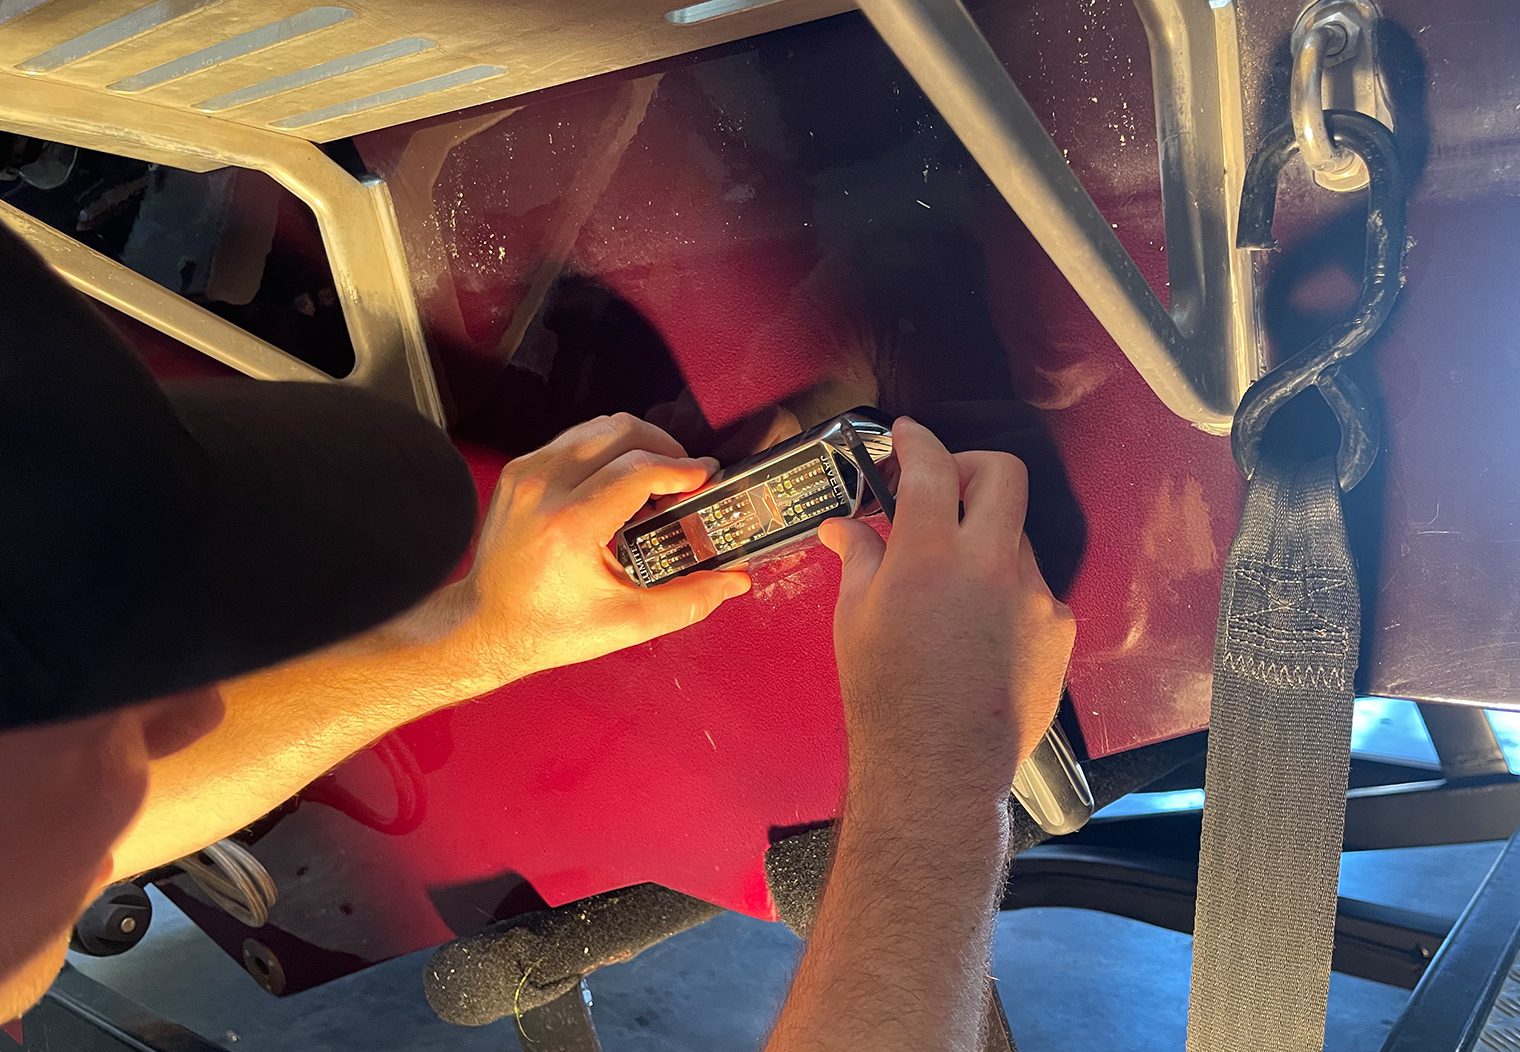
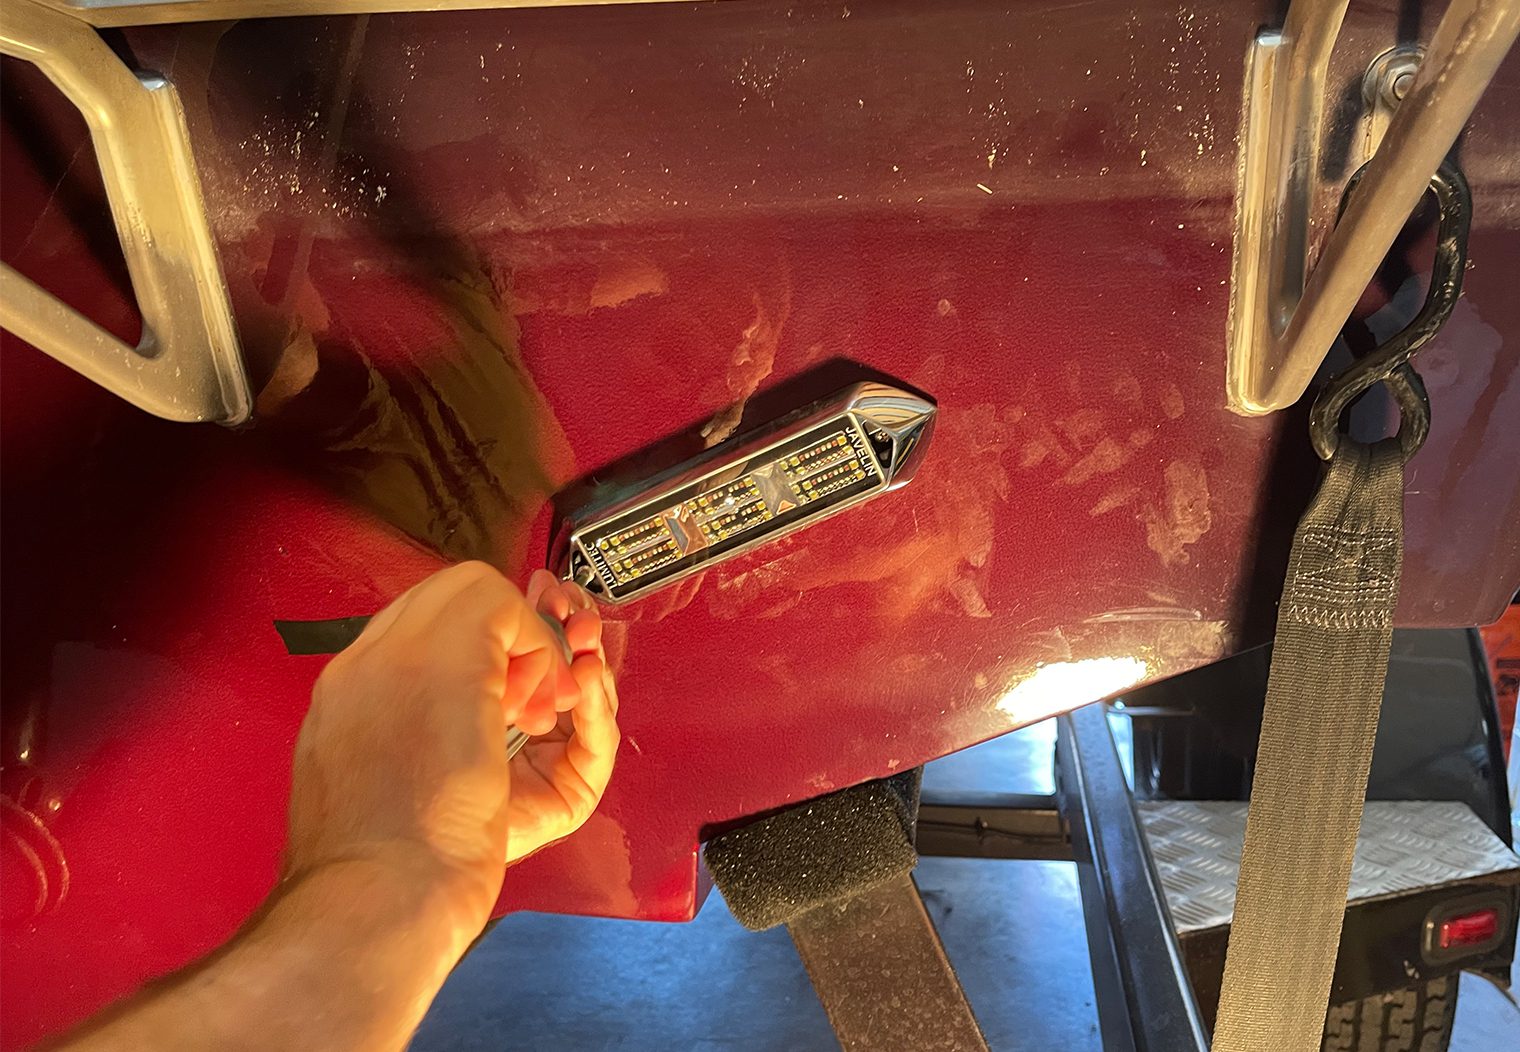
The end result was exactly as I expected in terms of location and wiring. By measuring and ensuring that there were no interfering components in the engine bay, the mounting process went without a hitch.

Step 2: Wiring the Javelin 600X, Poco 3 and Pico C4
Earlier in the Wiring & Configuring My Setup section, I outlined how I planned to wire this setup come time to install on the boat. Before arriving at the boat to begin the install, I knew exactly where I wanted place each of the components, how they would be wired to power, ground and even which channel of the Poco 3 the Javelins and Pico C4 would use. Take a look at the section above to review the details.
And since I had already mock-configured all of the components of this setup on my test bench, I was able to breeze through the wiring and mounting on the boat pretty quickly.
I wired the Javelins to power, ground and to channel 1 of the Poco 3. Then, I wired the Poco 3 to accessory power (that would turn the system on/off with the boat) and ground. Finally, I wired the Pico C4 to channel 2 of the Poco 3, and to the existing internal Kicker LED lights. Done! And since I had already configured the Poco 3 via the app during testing on my test bench, the app was already pre-configured for the setup too!

After a quick round of testing to ensure power, ground and accessory was wired properly and the lights were functional, I set out to the launch ramp to drop the boat in the water for final testing.
Testing the Lights on the Water
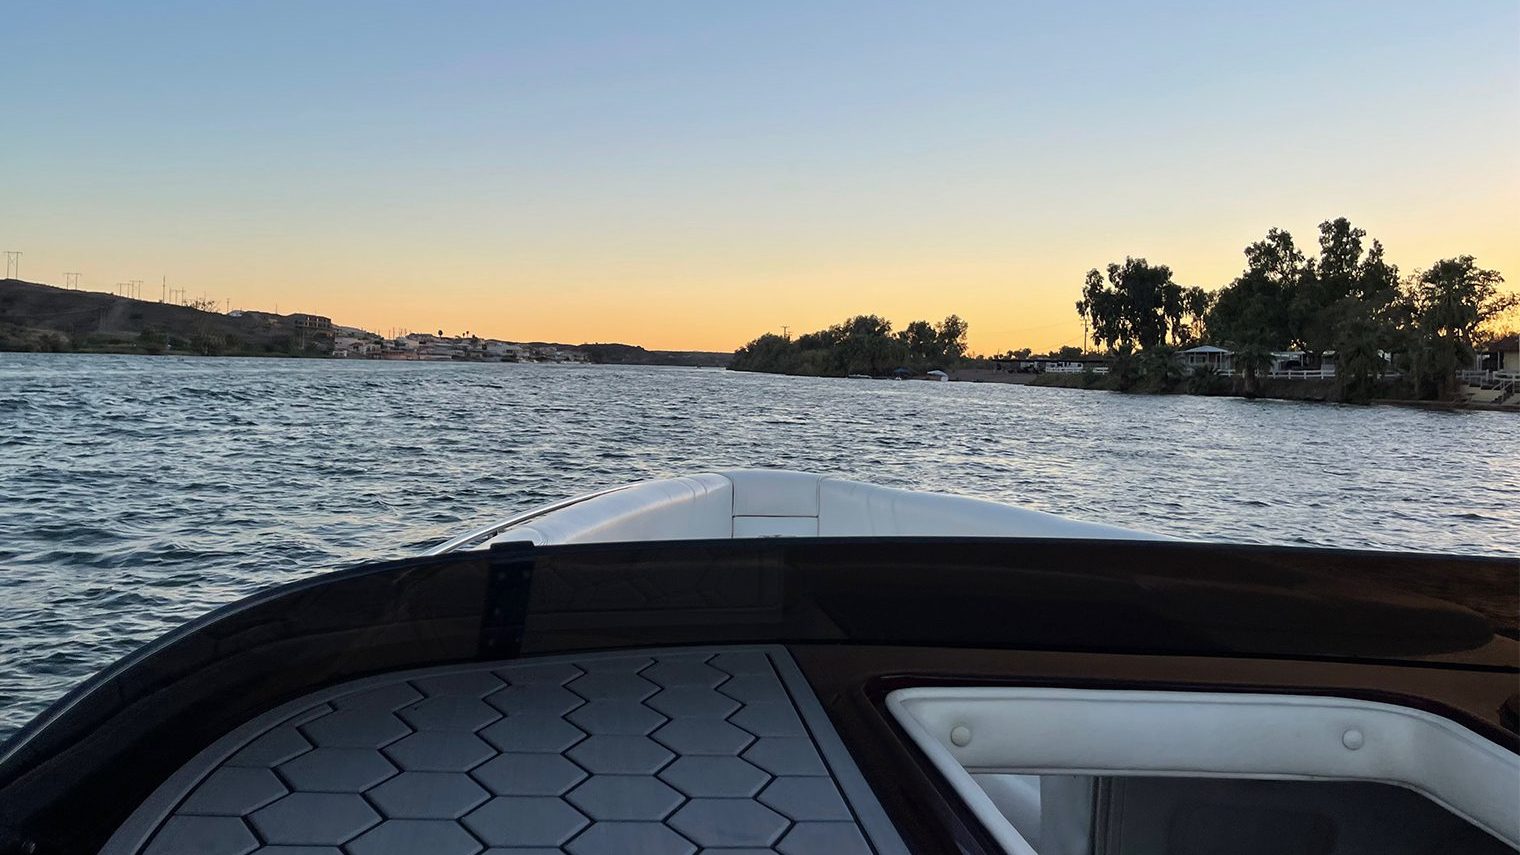
Now for the real test! With the lights, Pico C4 and Poco 3 installed on the Lightning 247SX, I launched the boat to get a true sense of what the lights would look like in the water at night and how well they integrated with the Kicker LEDs.
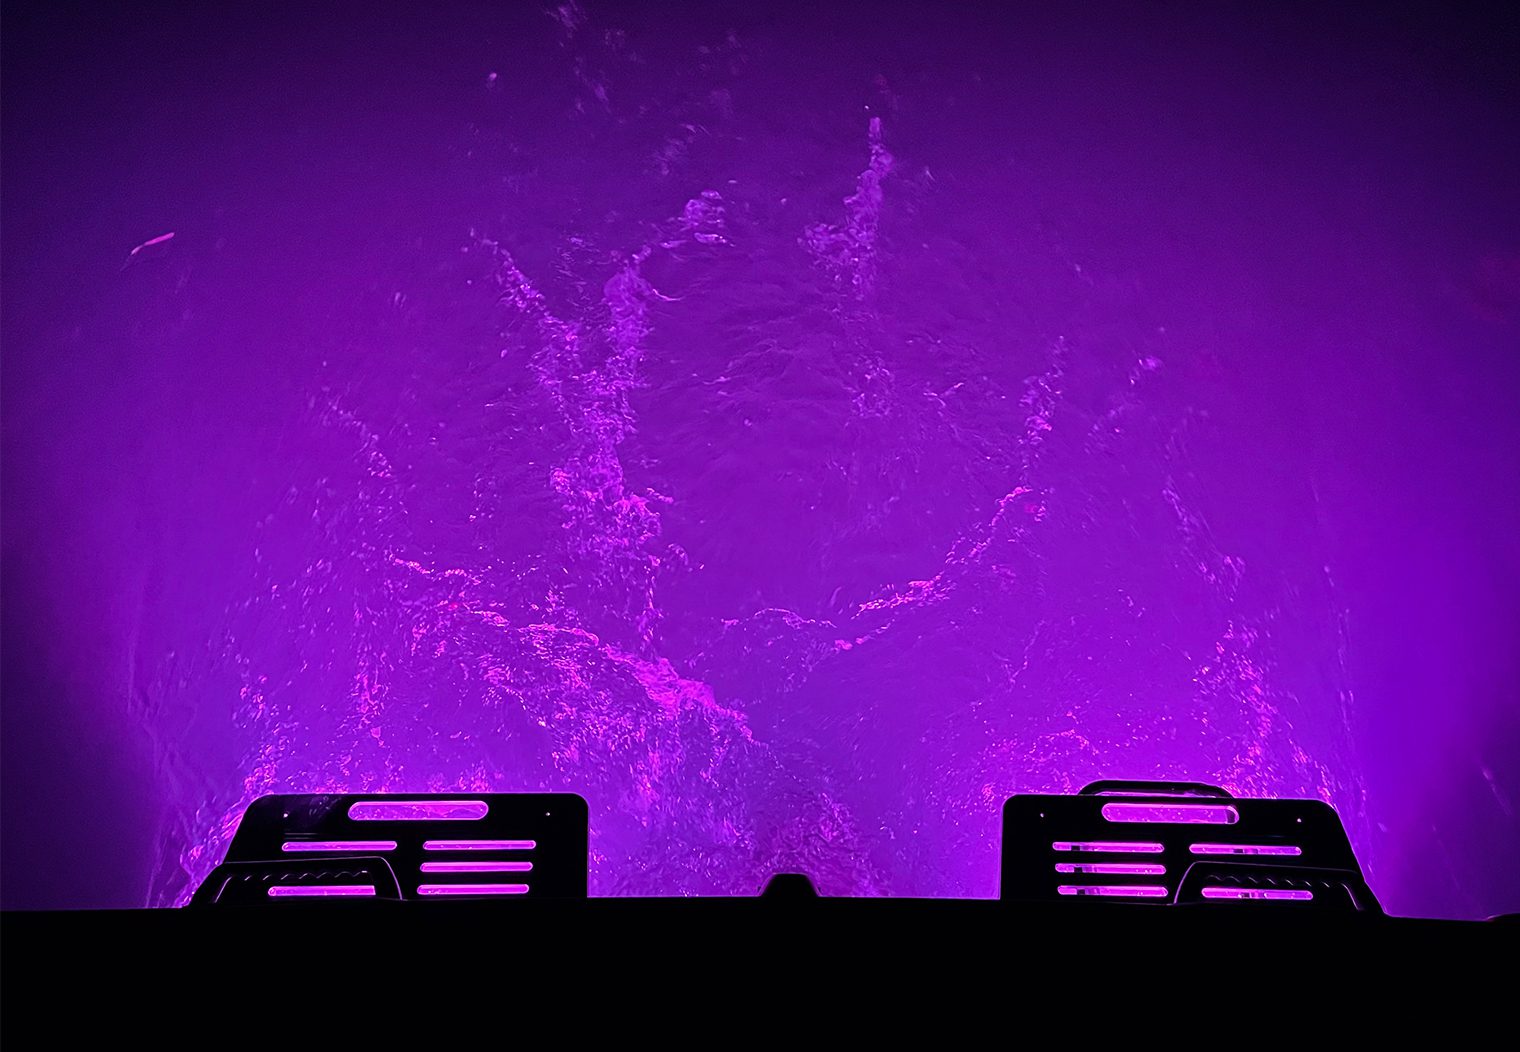
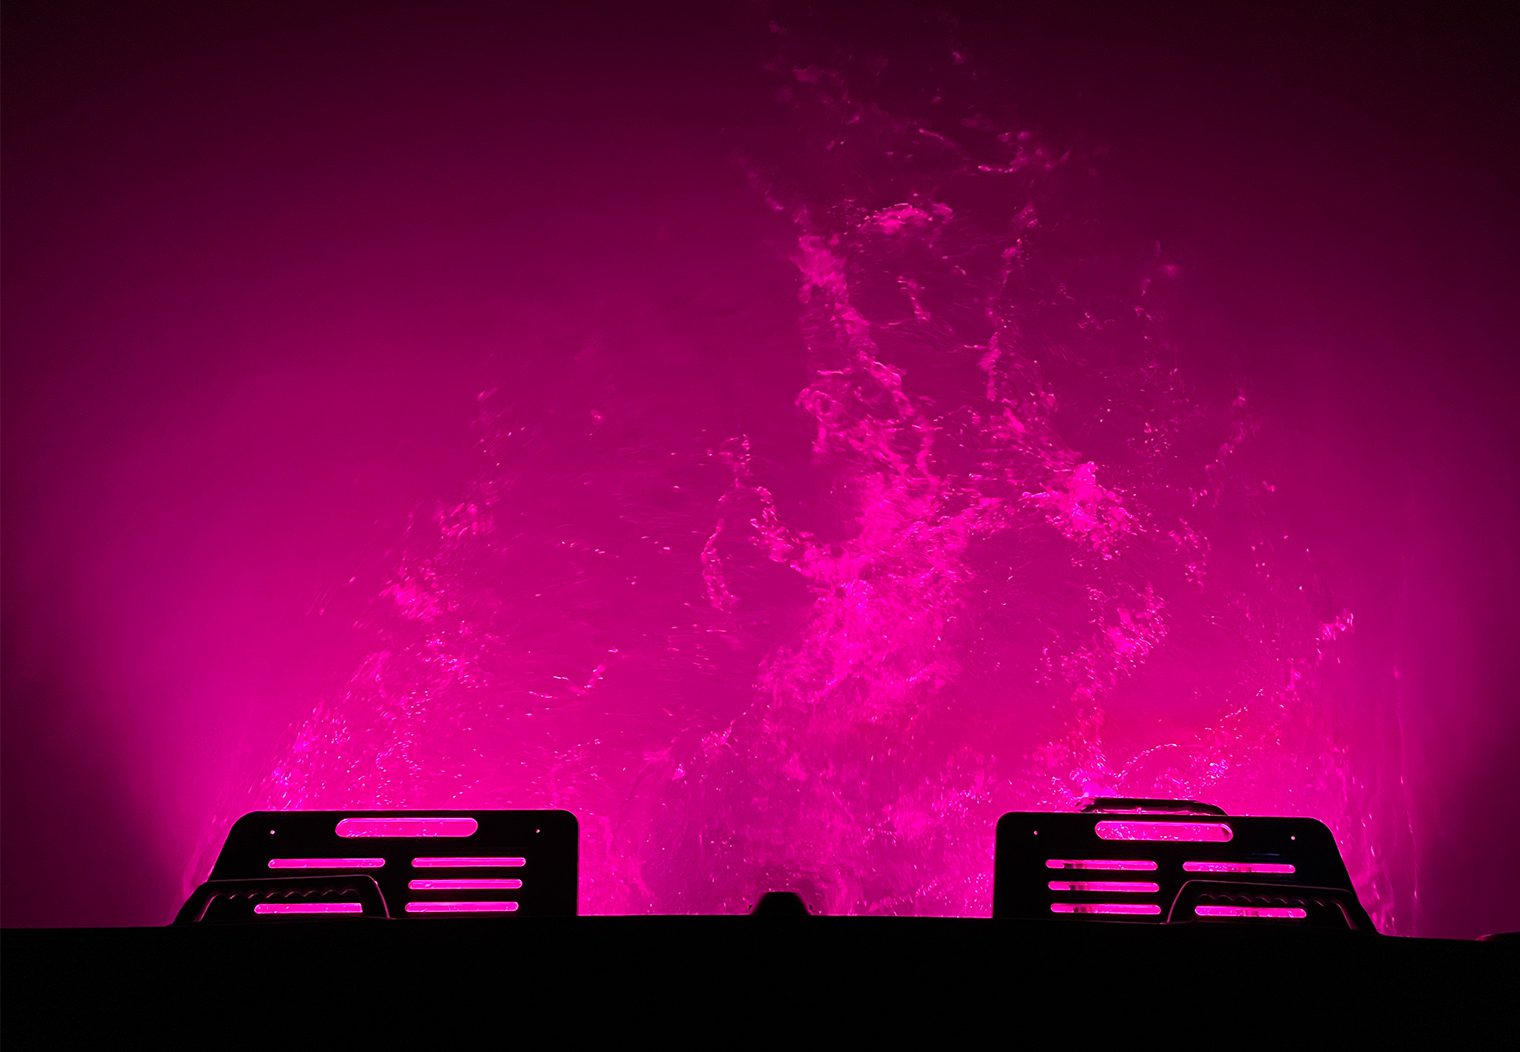
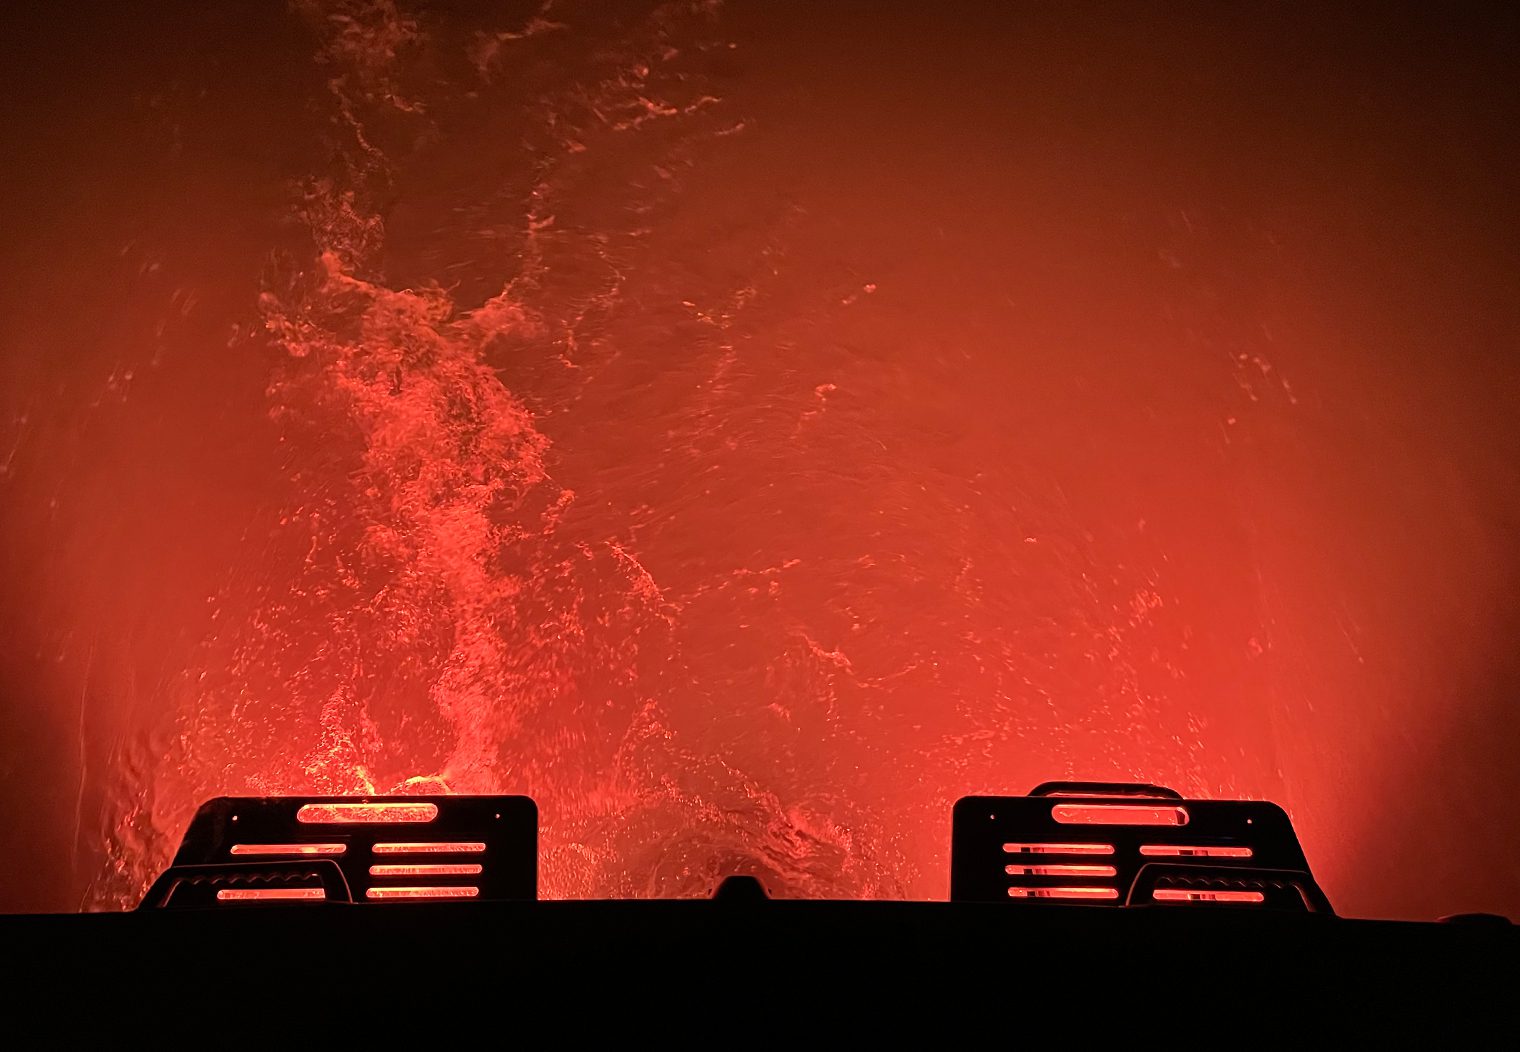
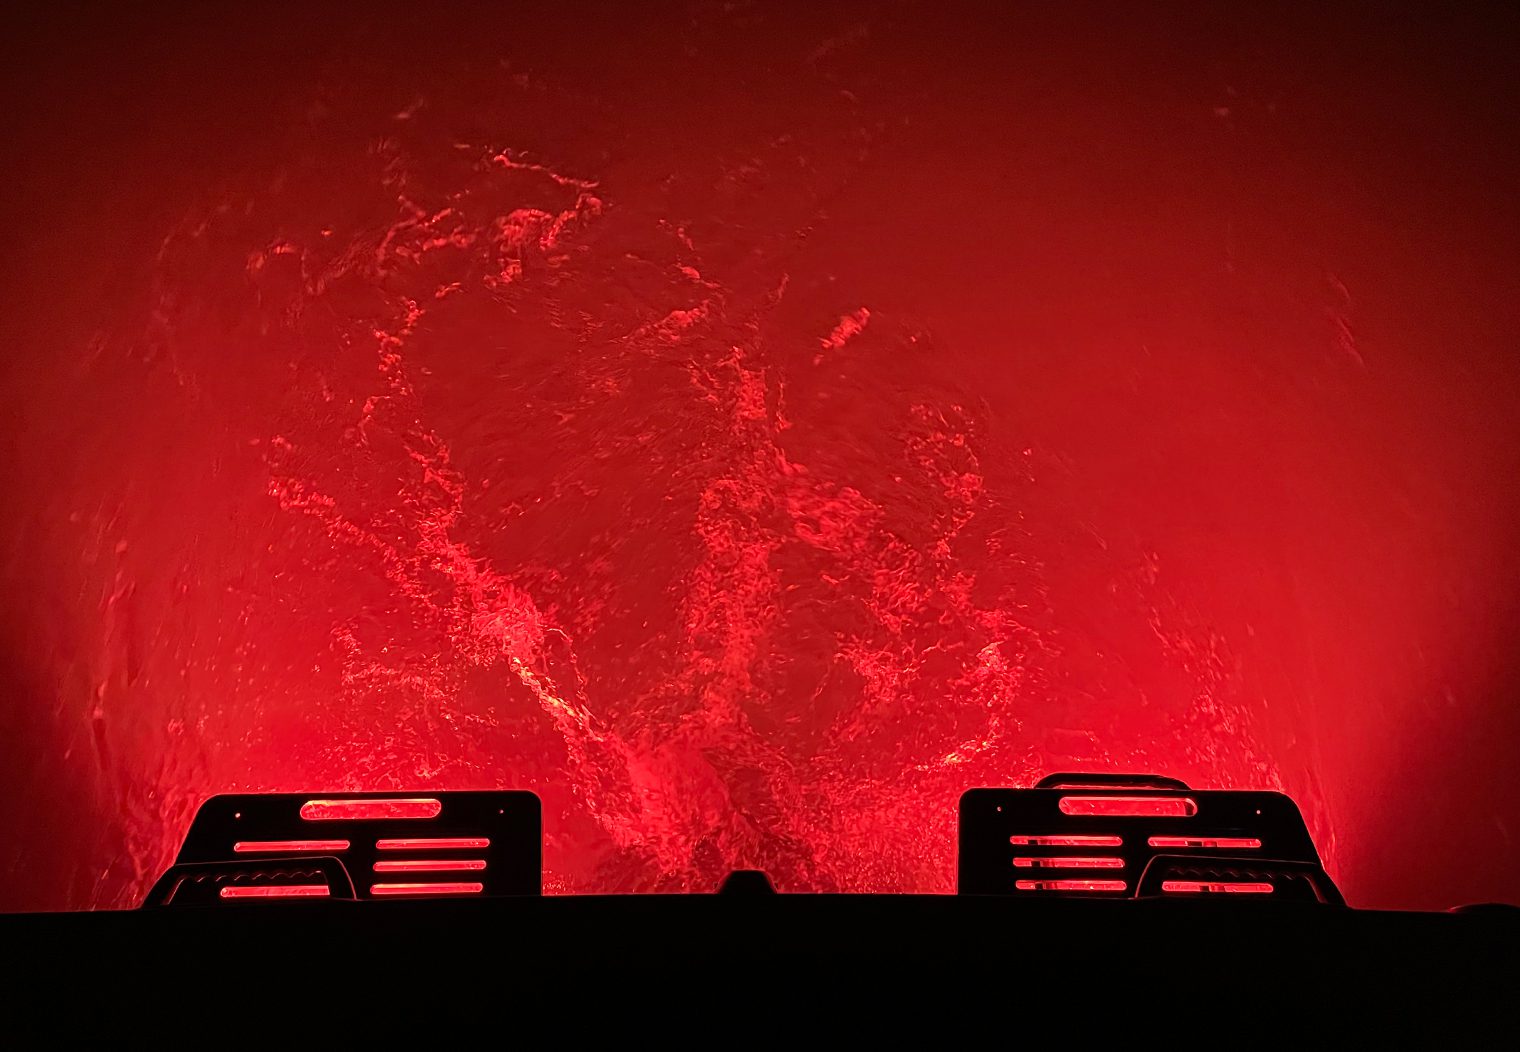
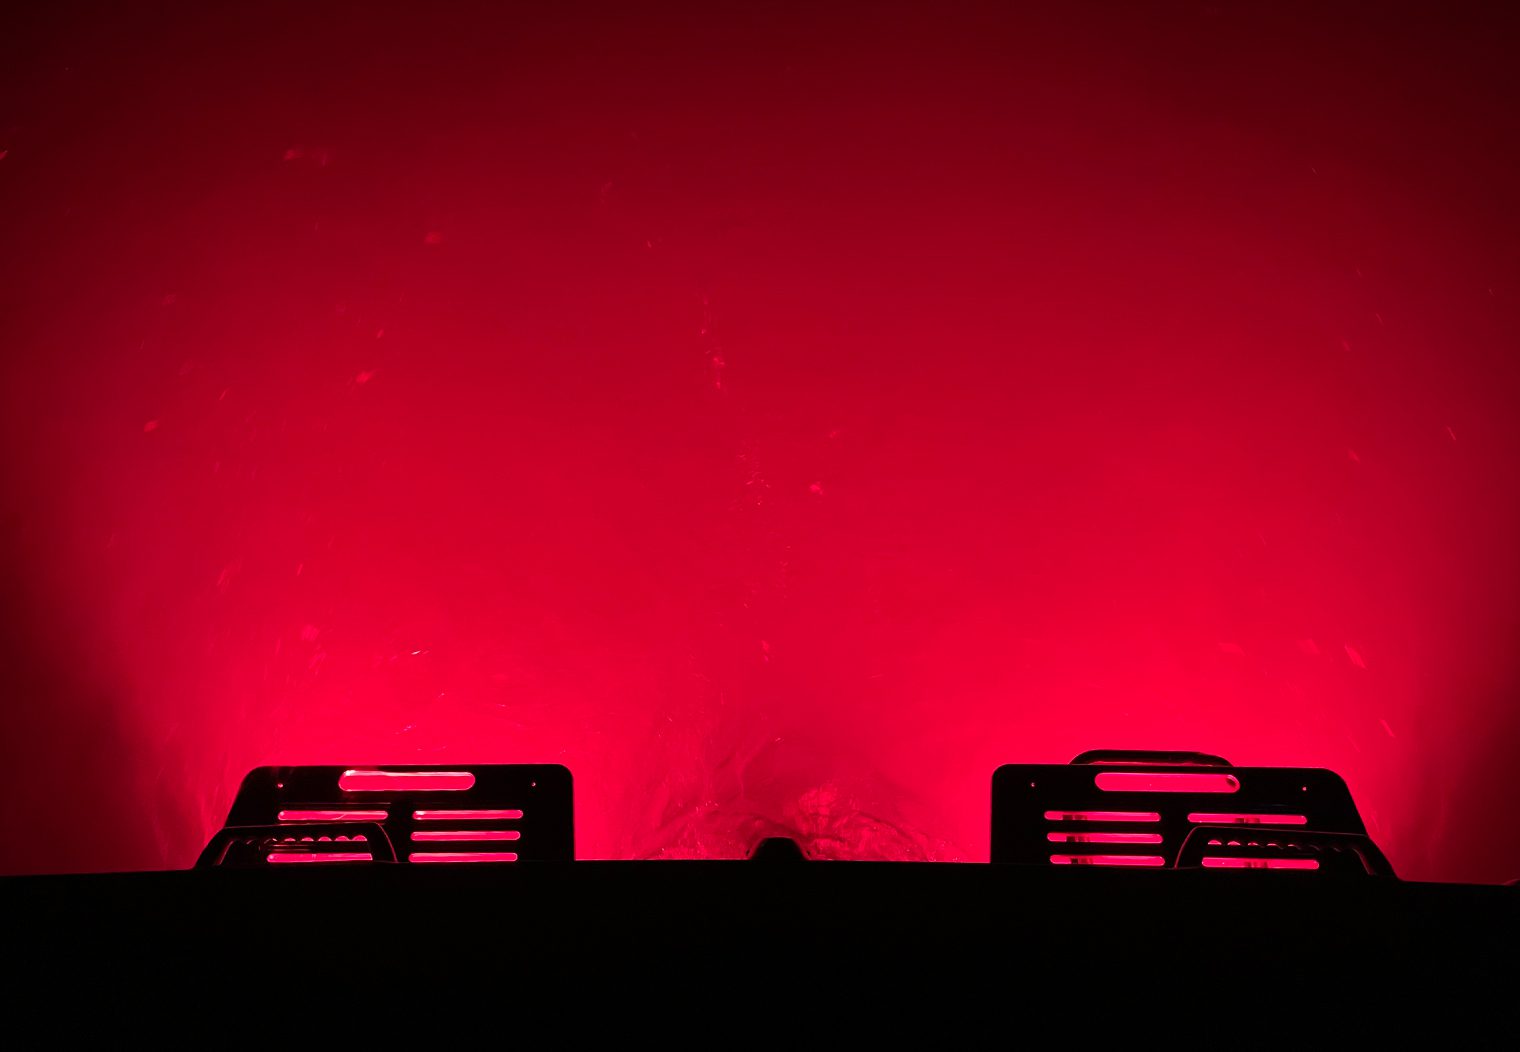
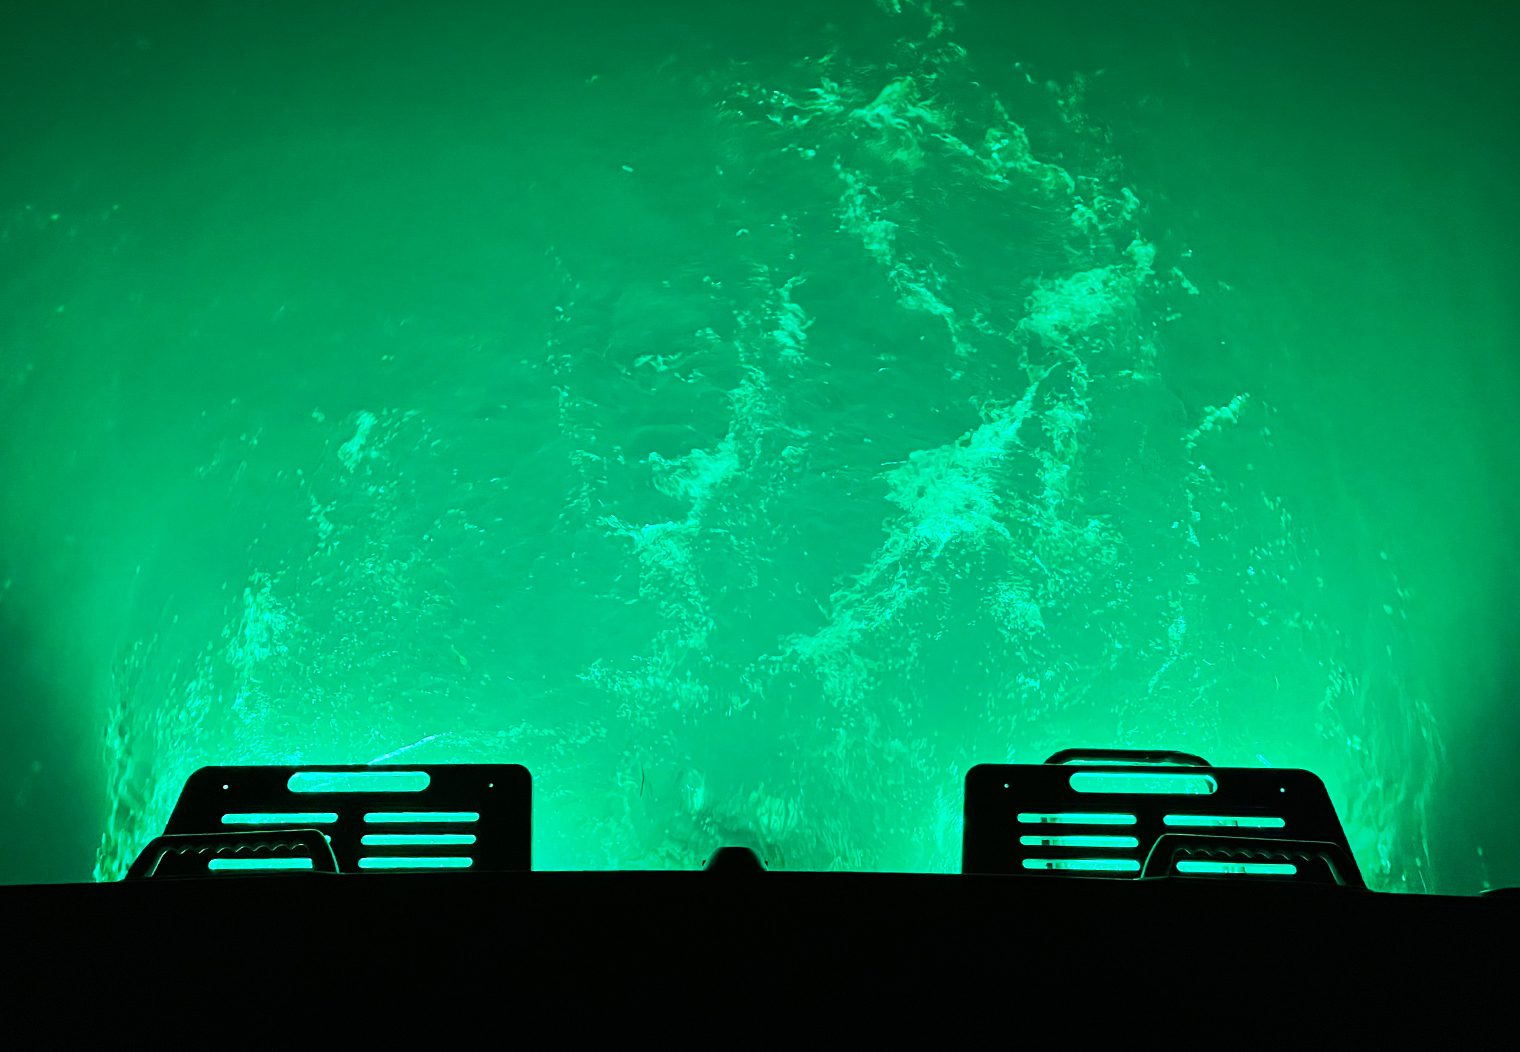
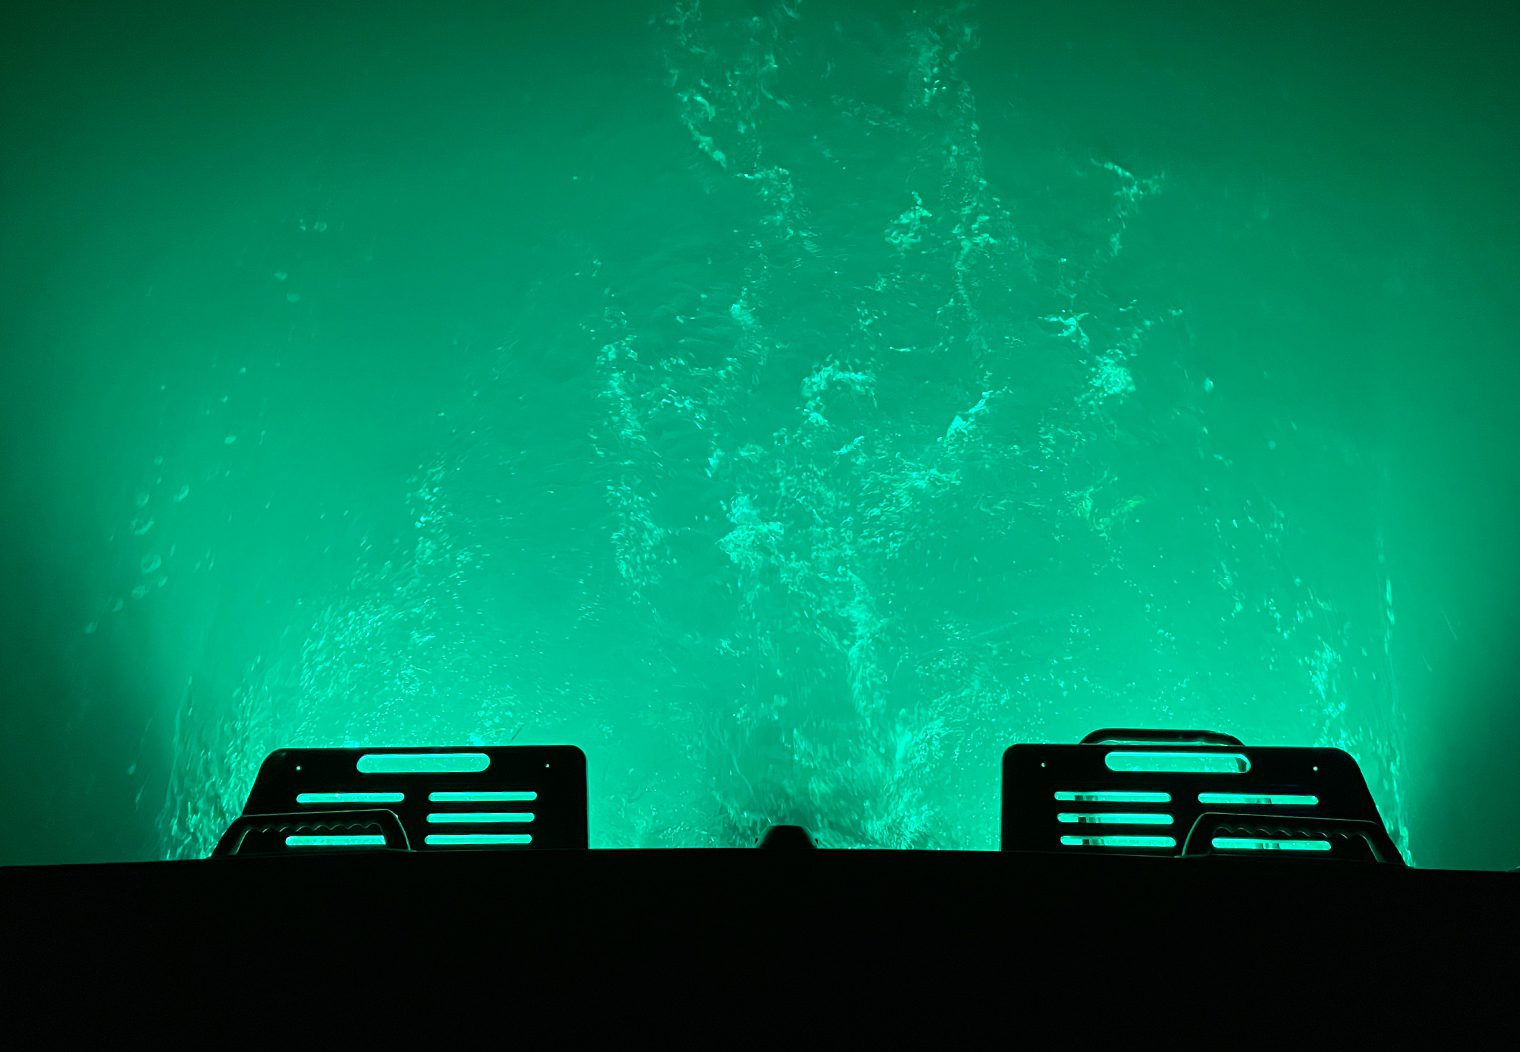
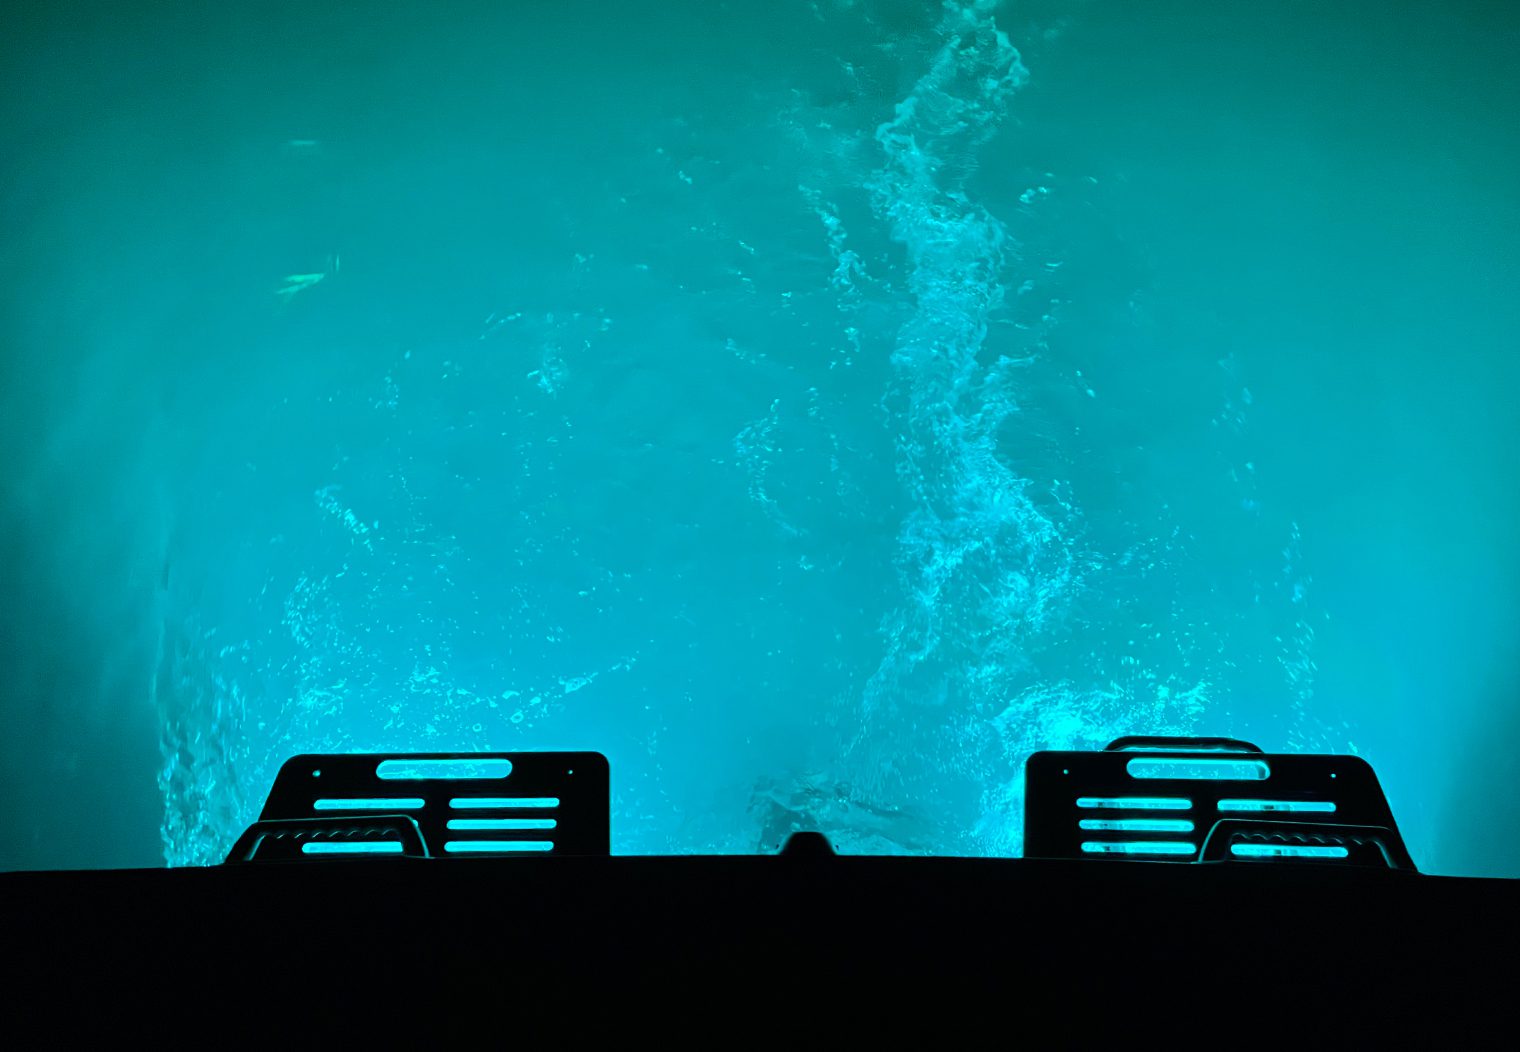
Here are a few series of photos showcasing the brightness, color and overall look of the boat with the Javelins and Kicker LEDs. *Note – On some waterways, certain shades/colors of lights are illegal. For example red and blue. Be sure to check with your local authorities before purchasing/installing these lights.
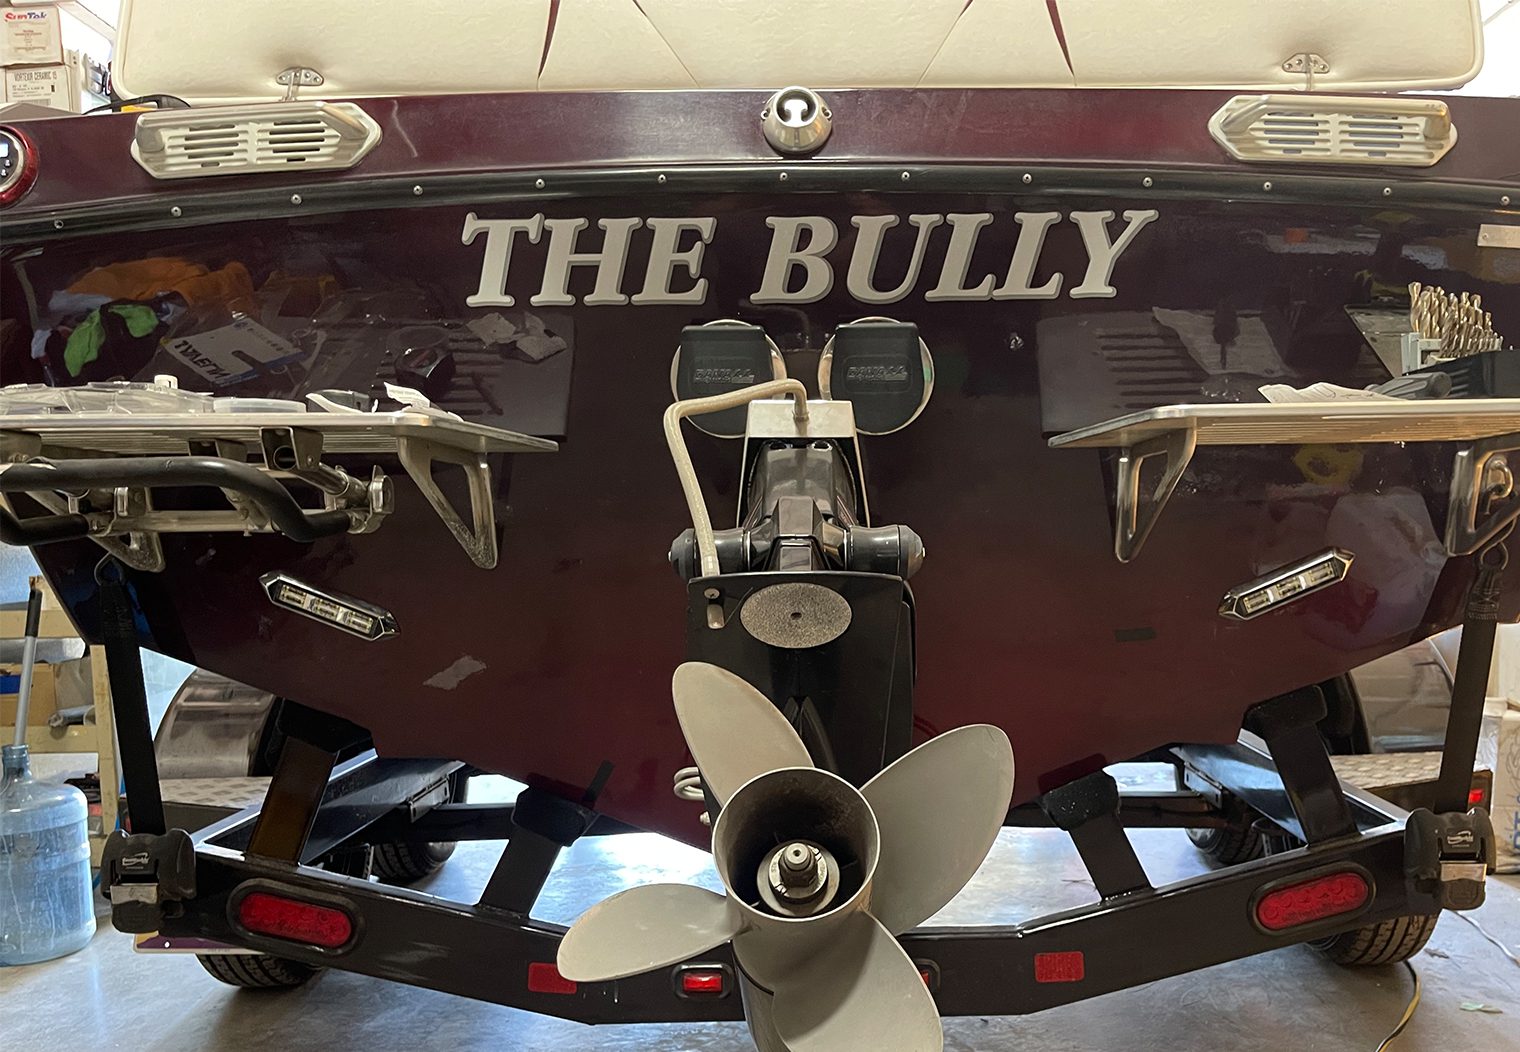
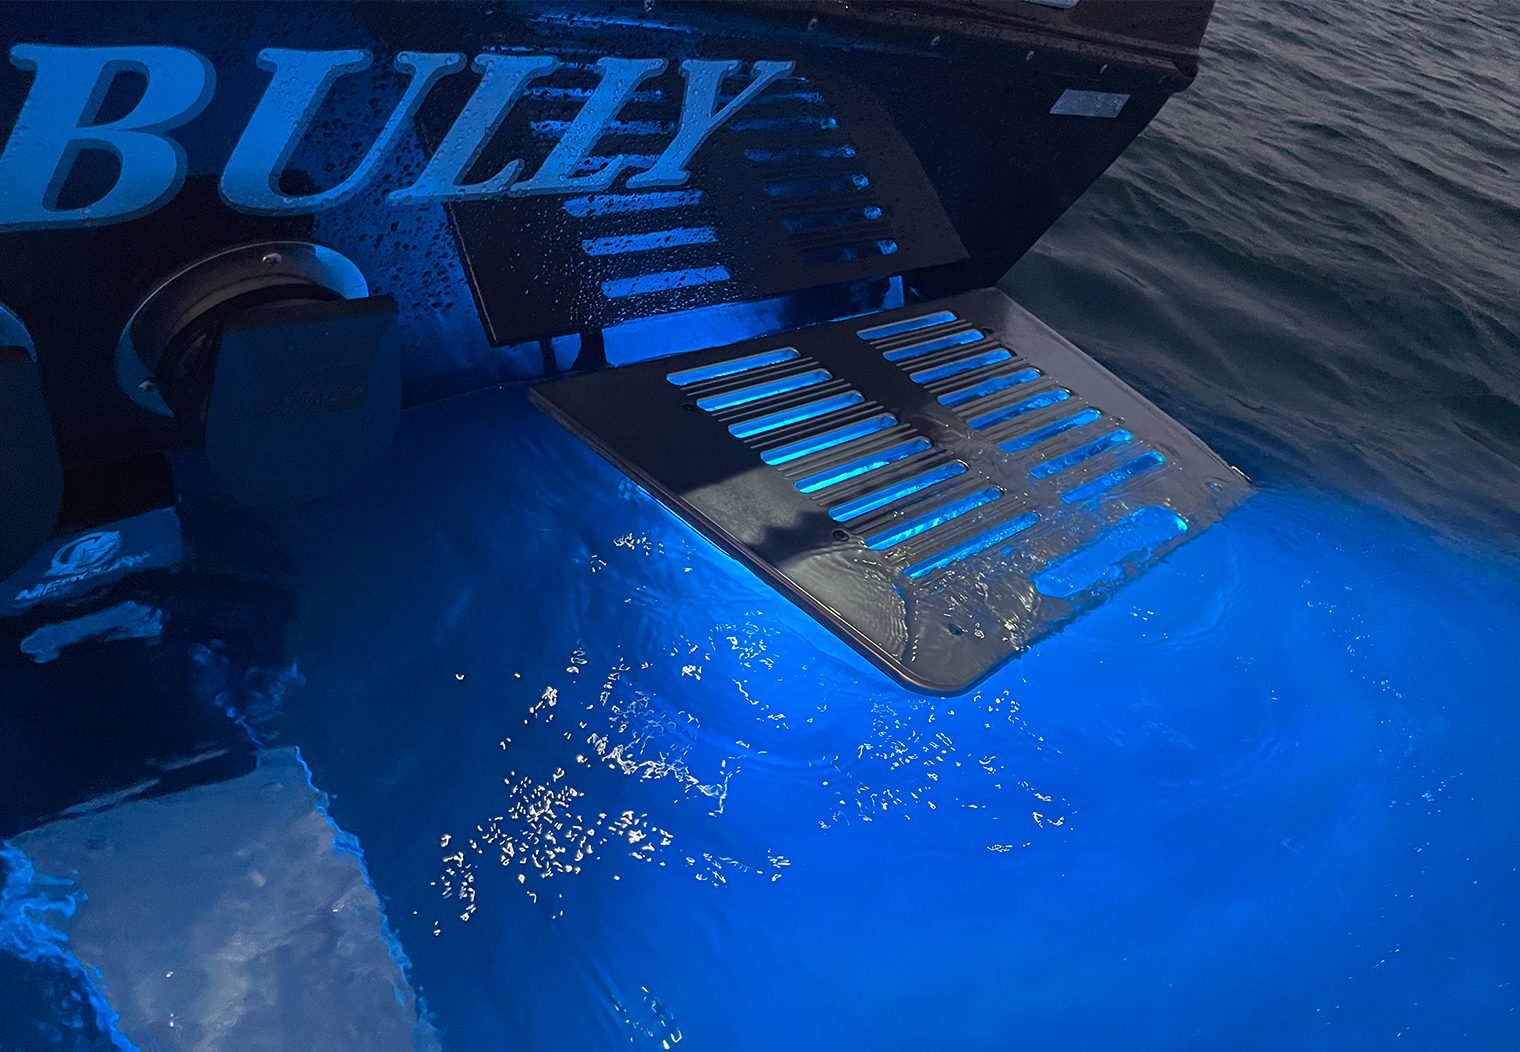
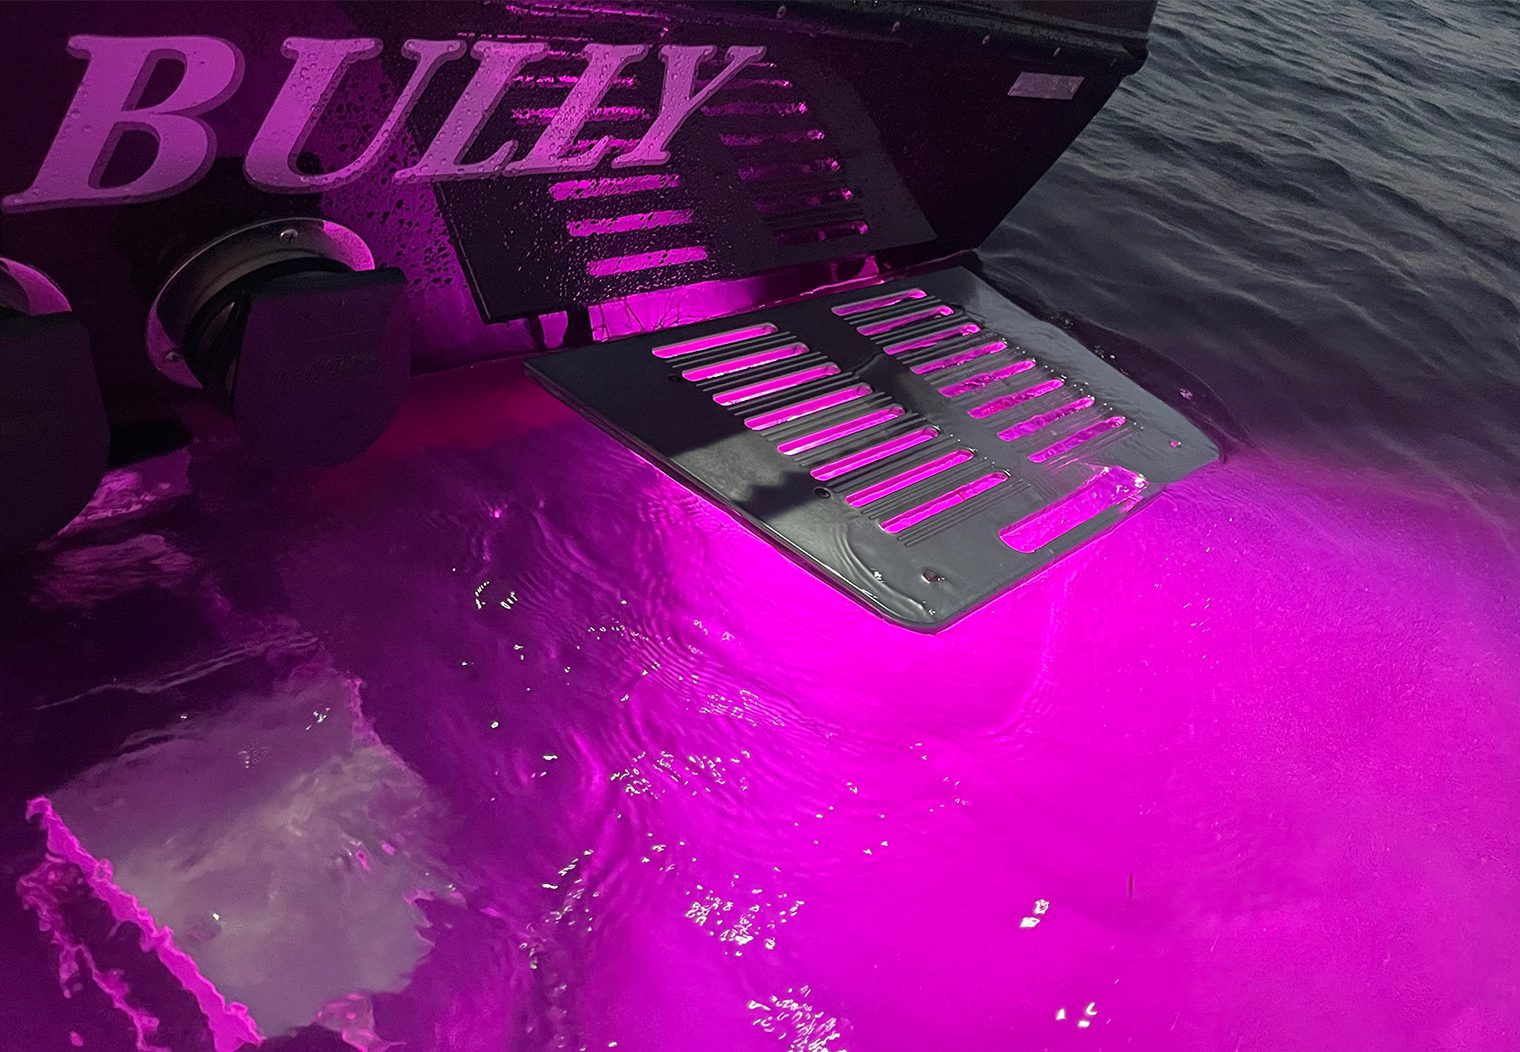
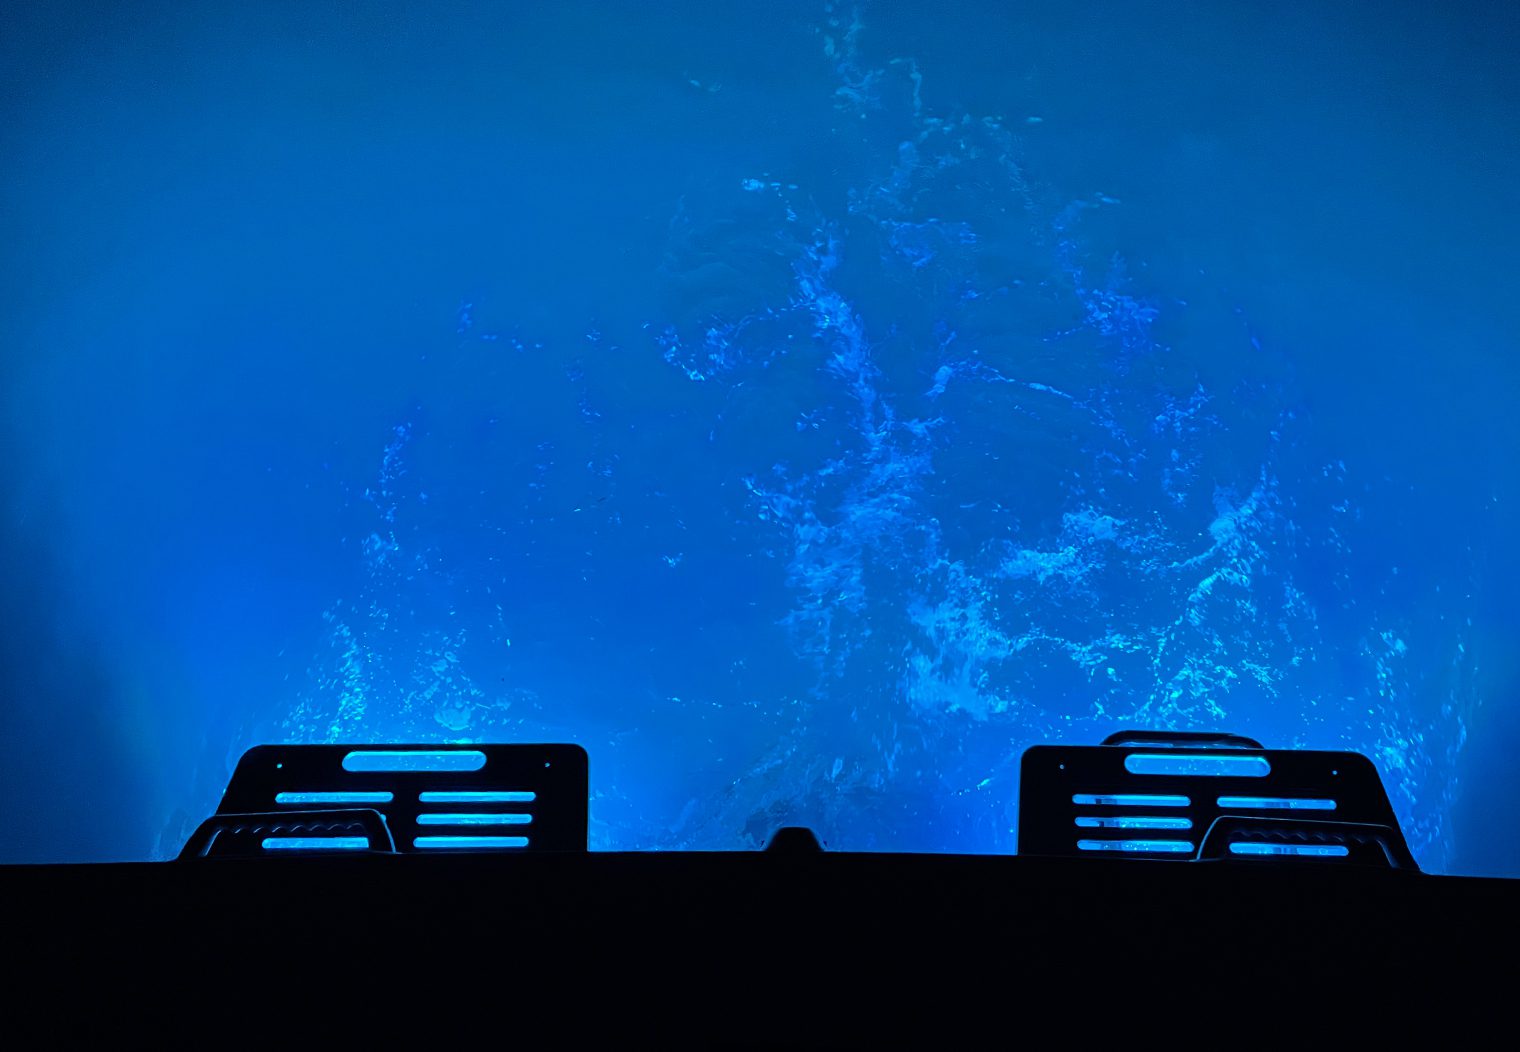
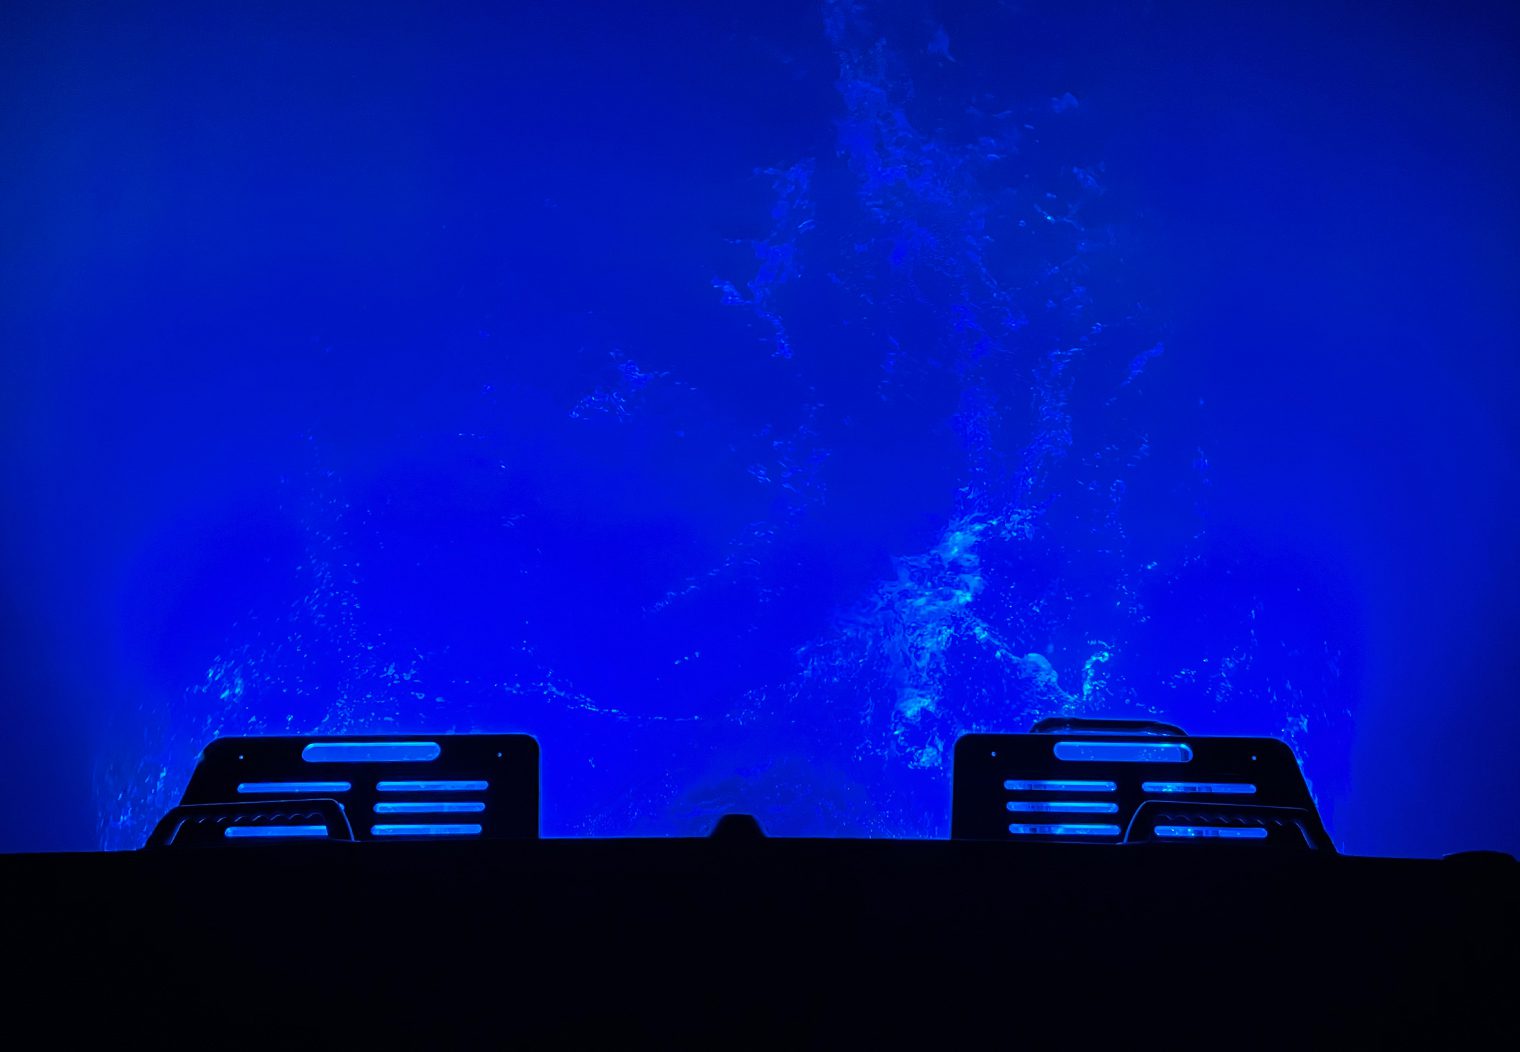
Javelins (boat not in motion)
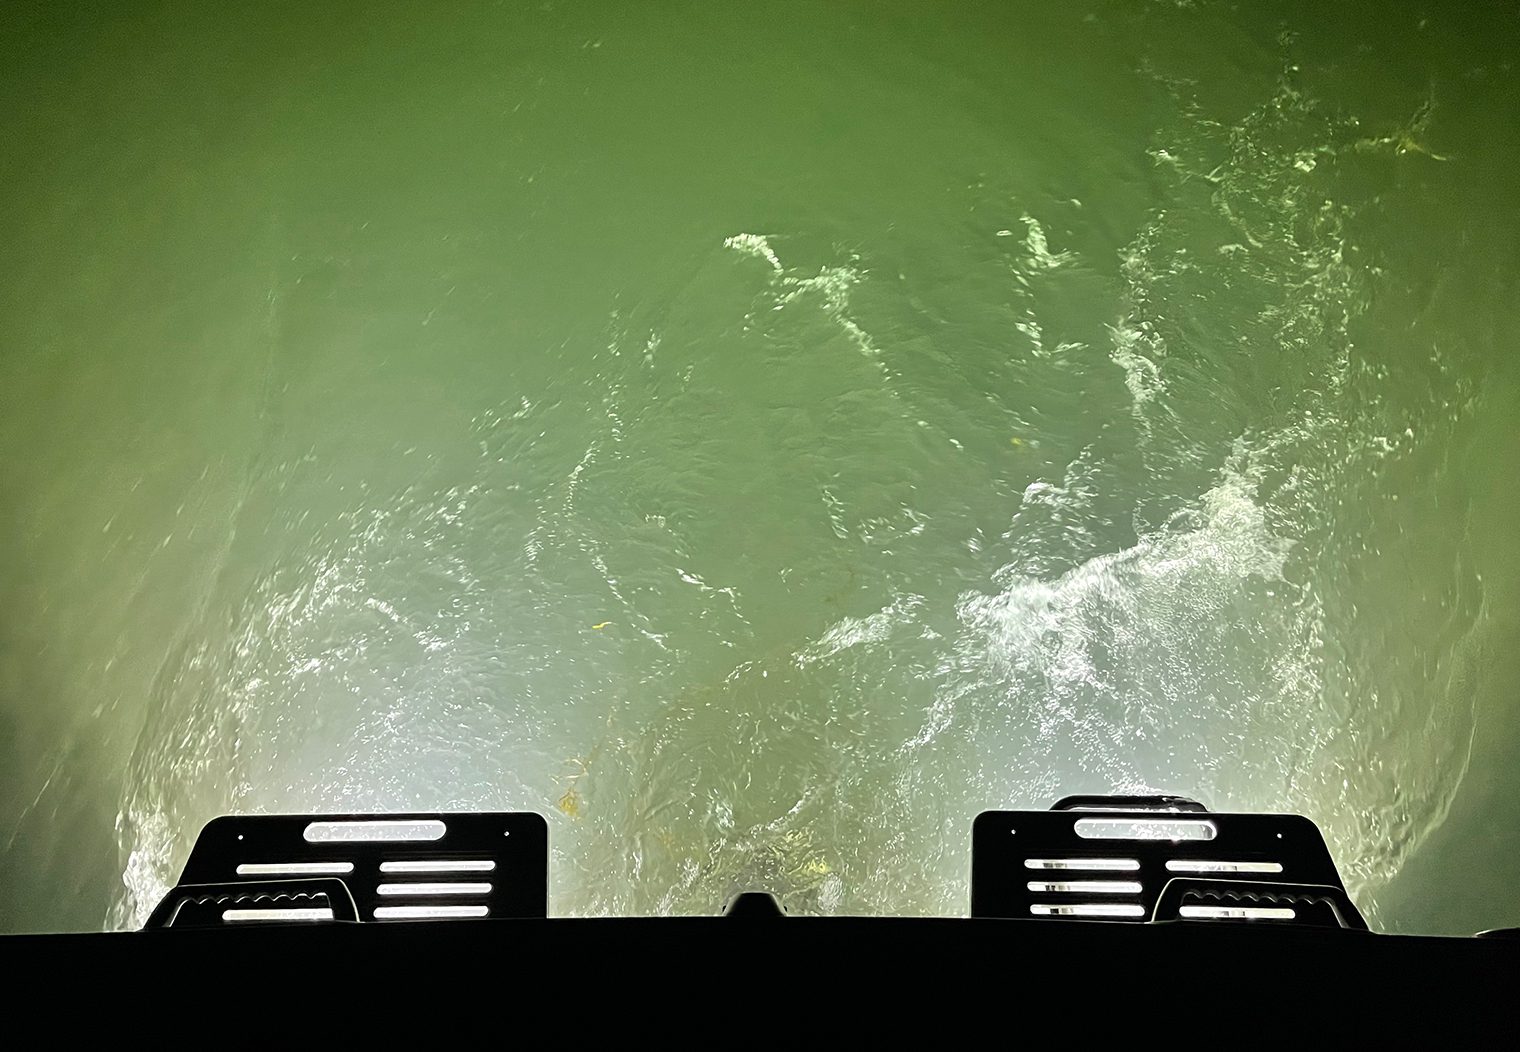
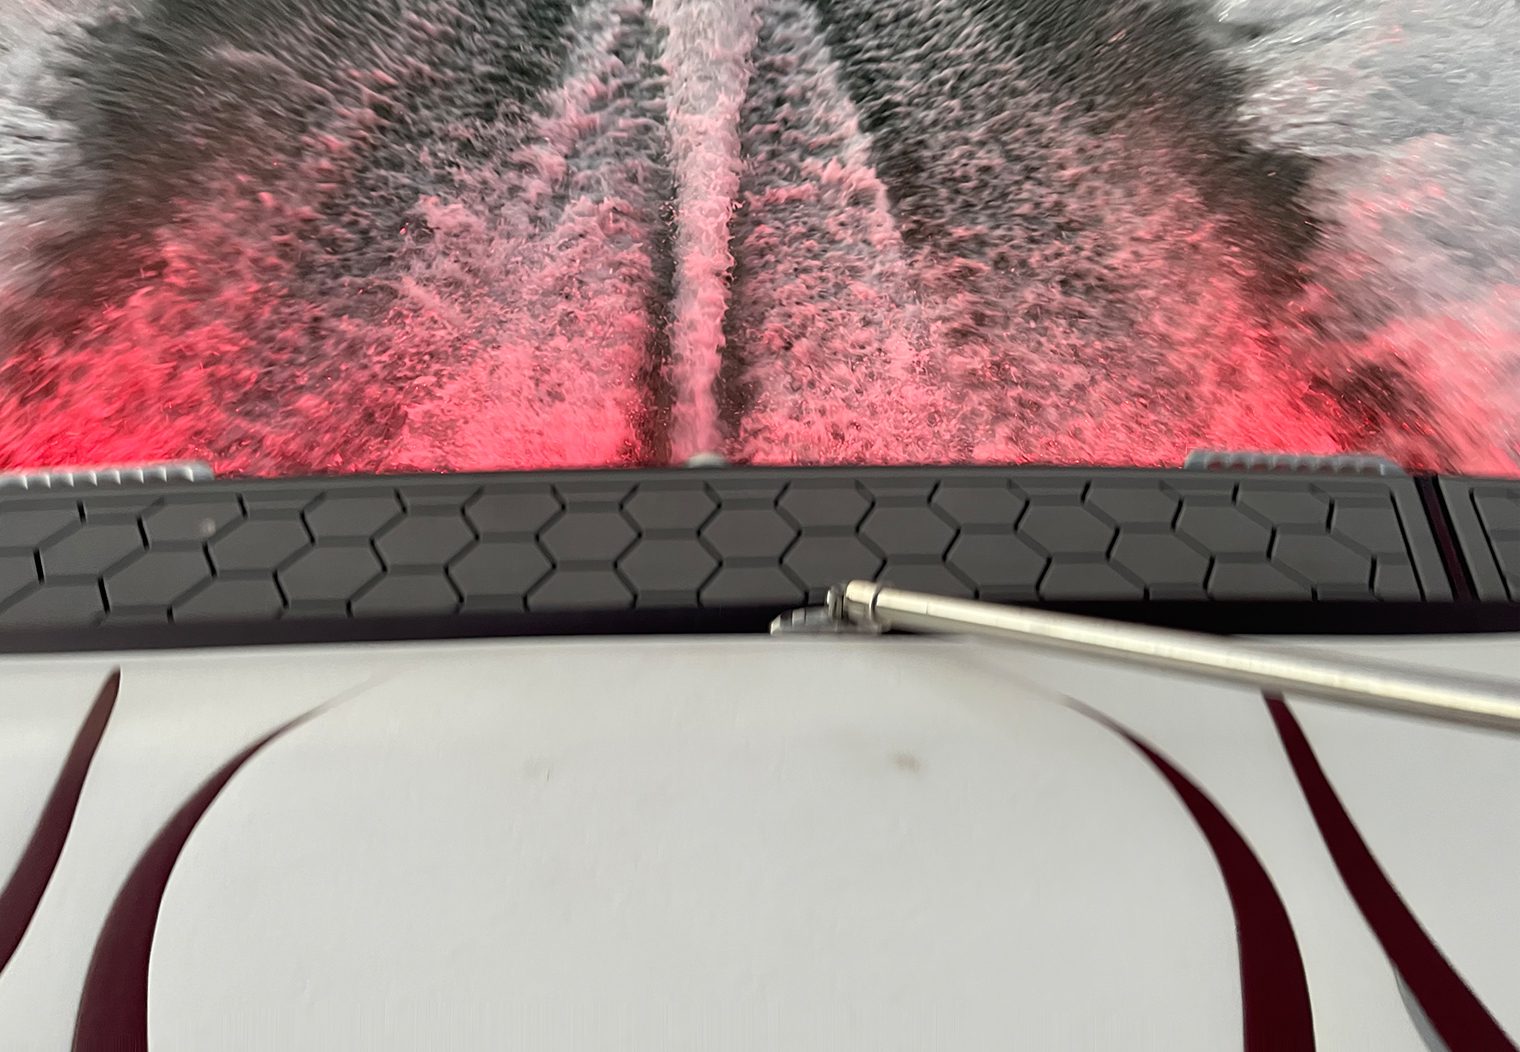
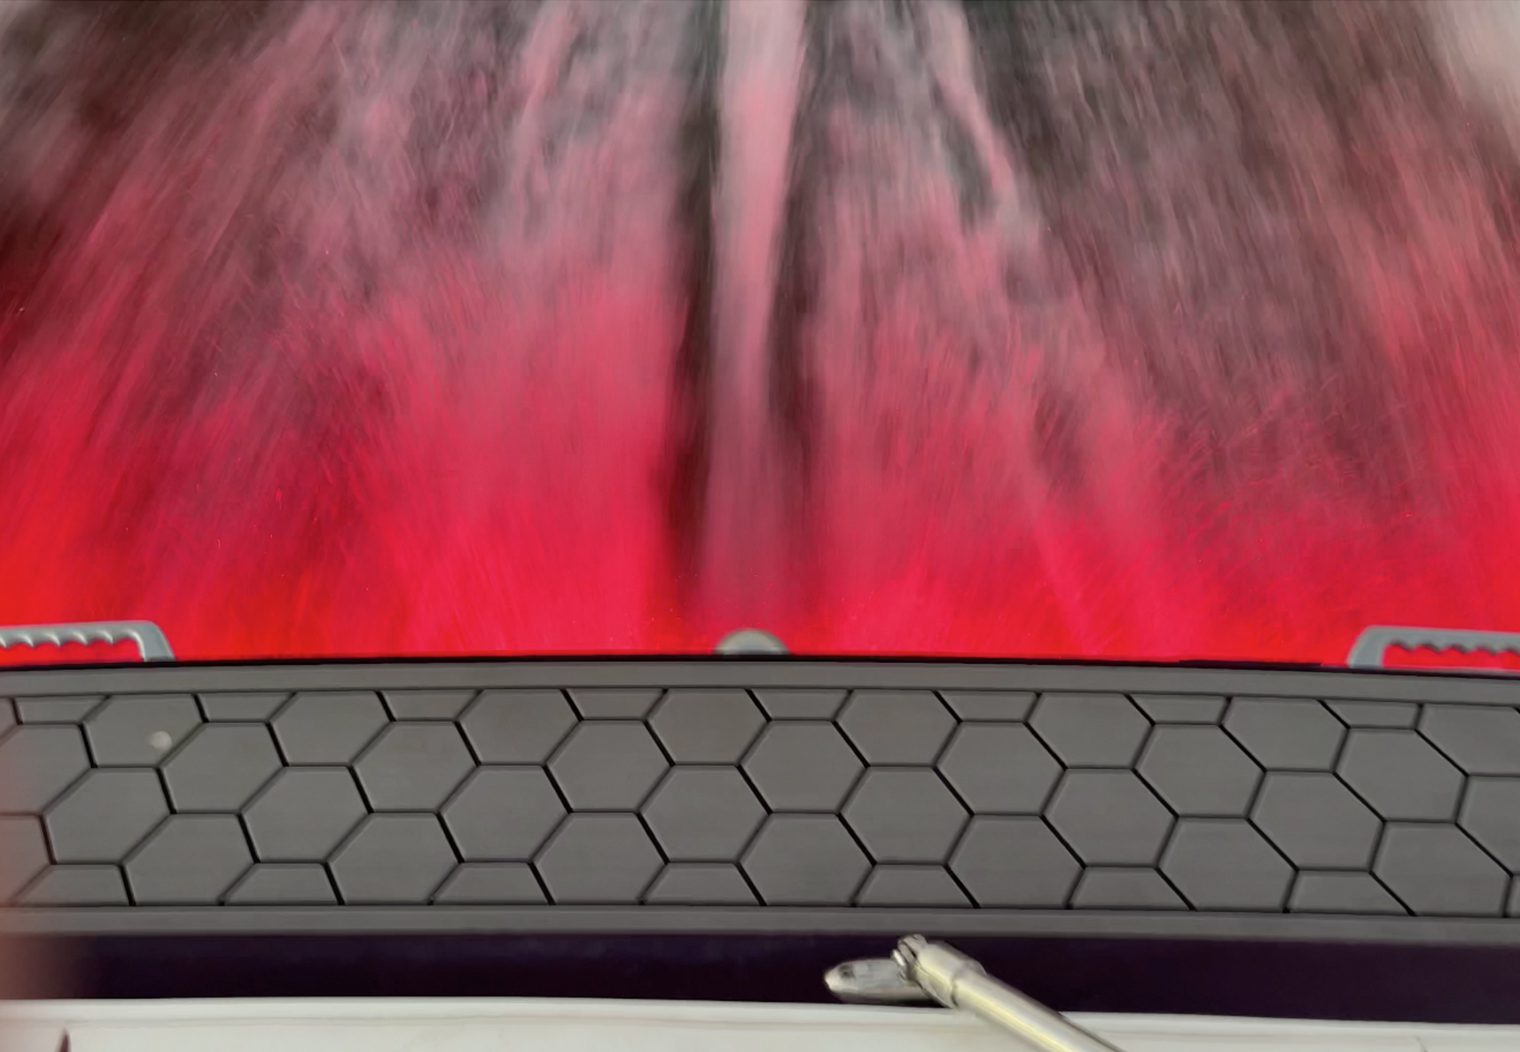
Javelins (boat in motion)
Full Boat (Kicker LEDs & Javelins)
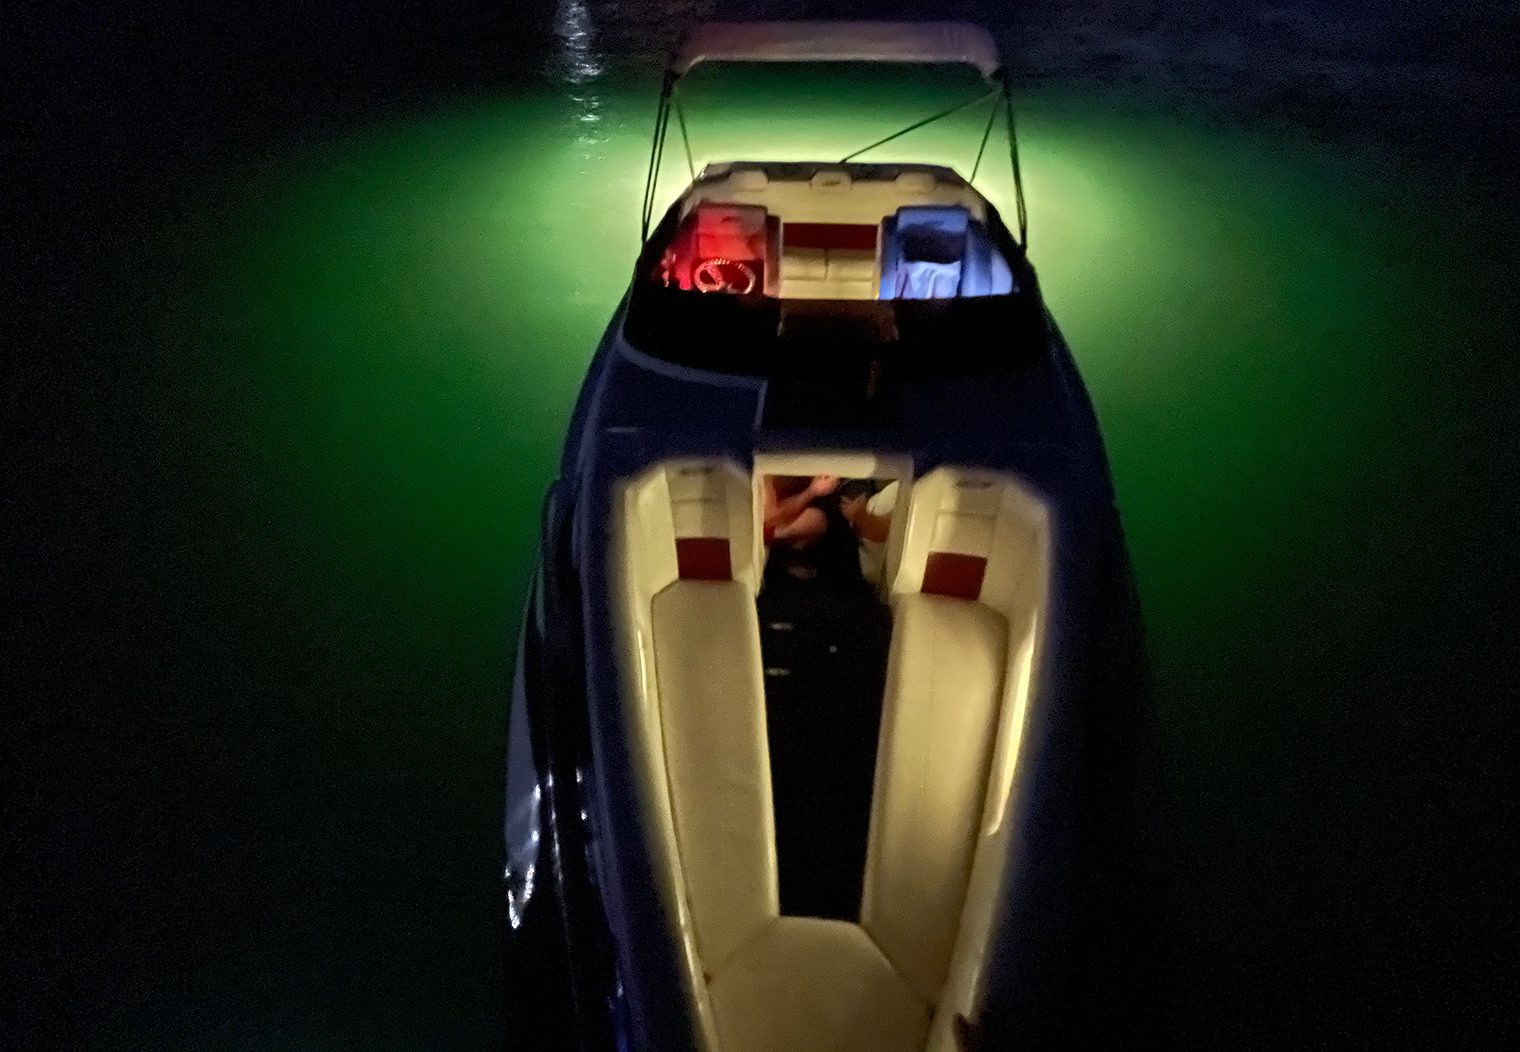
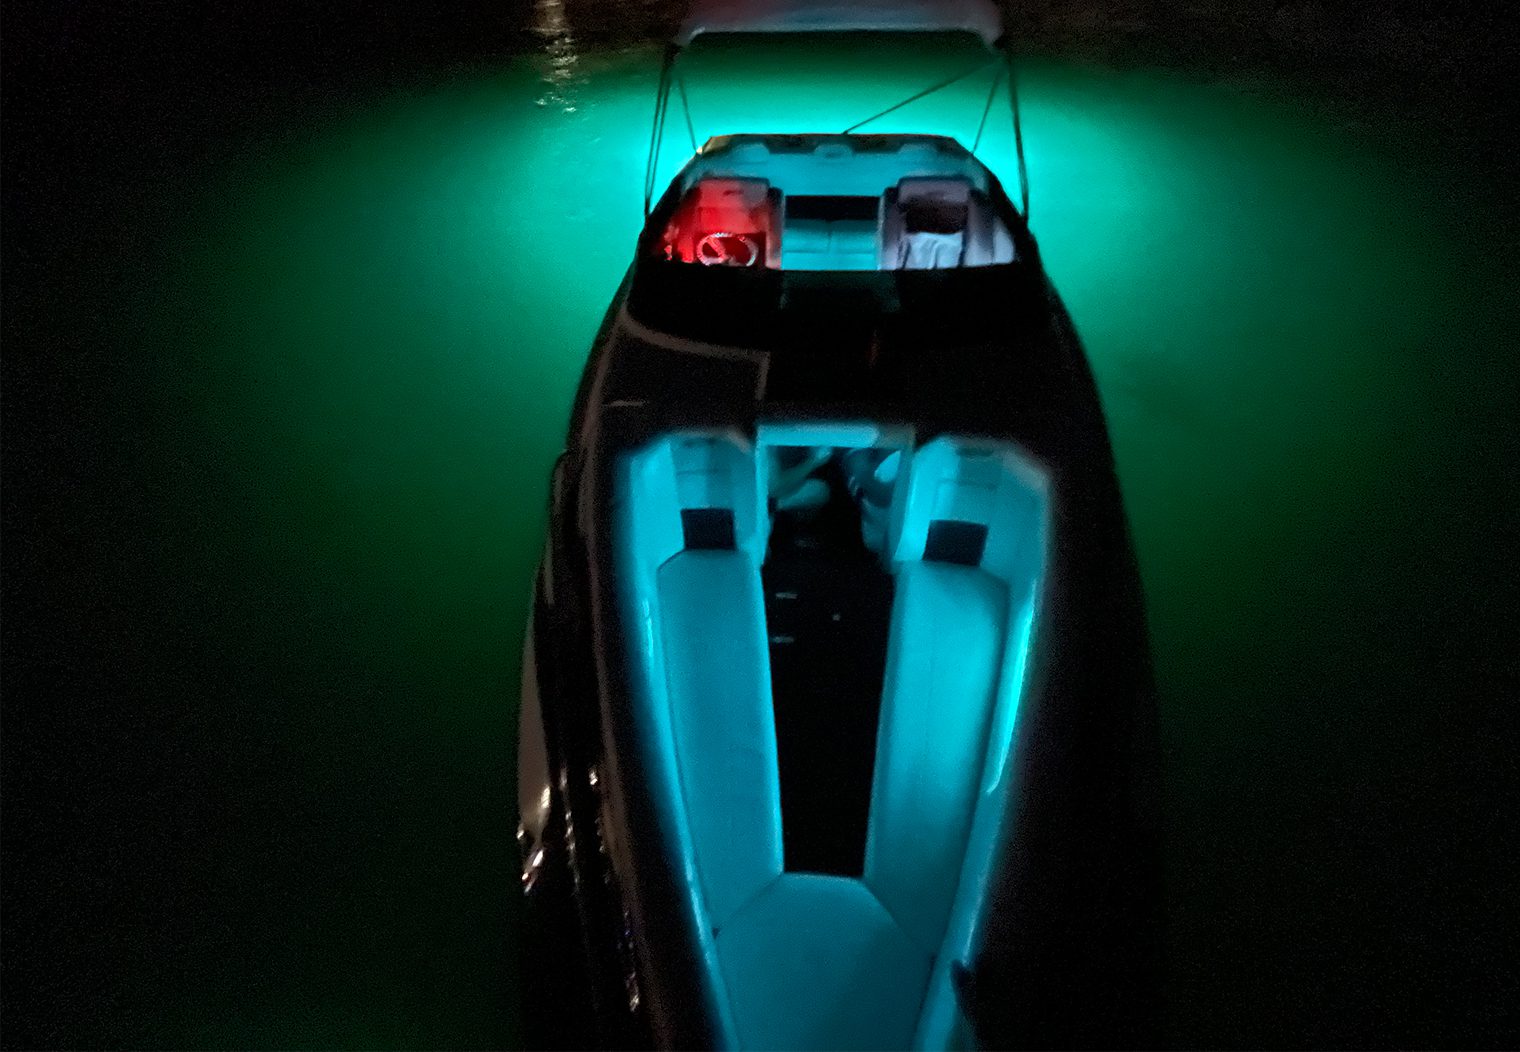
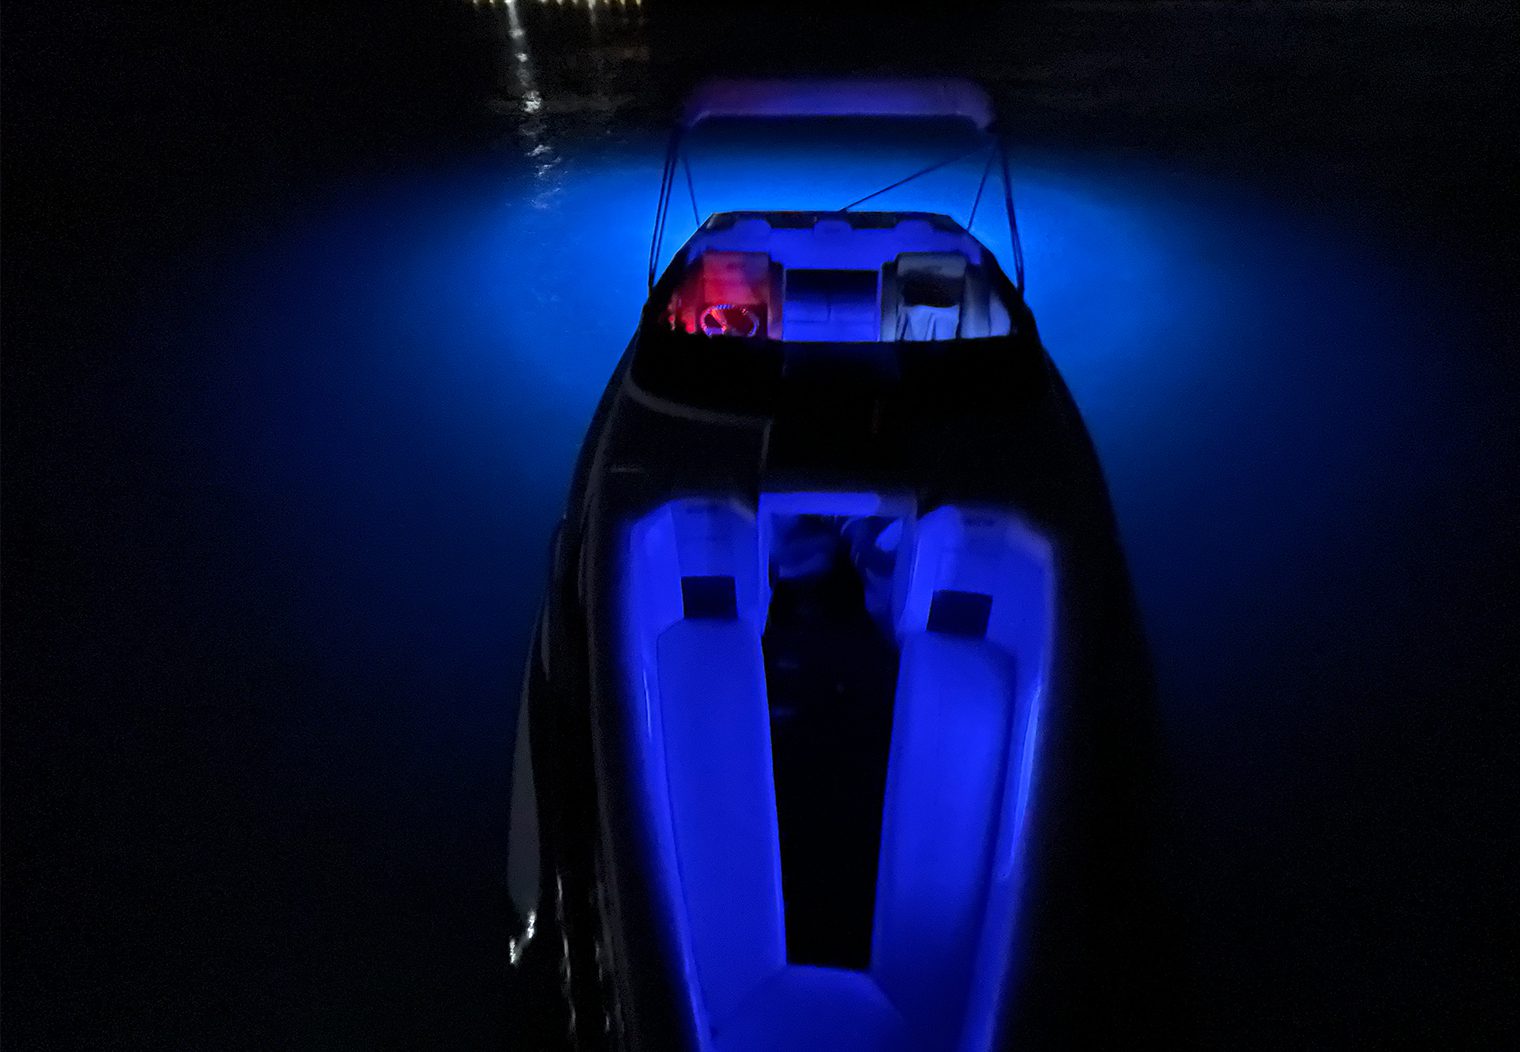
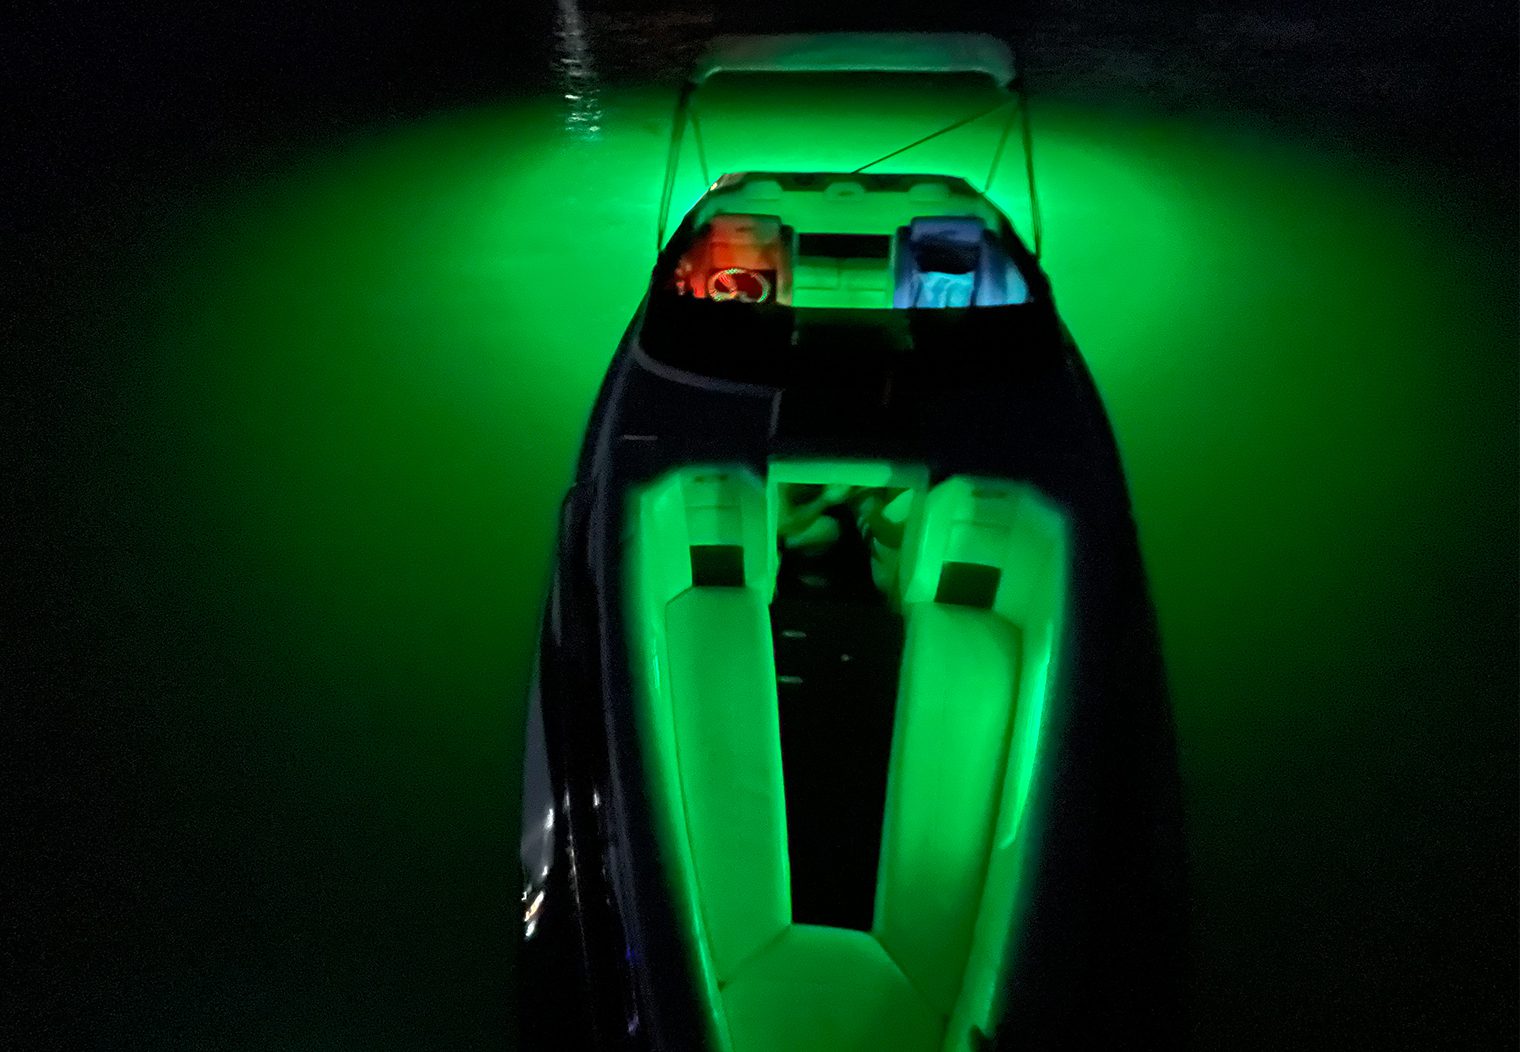
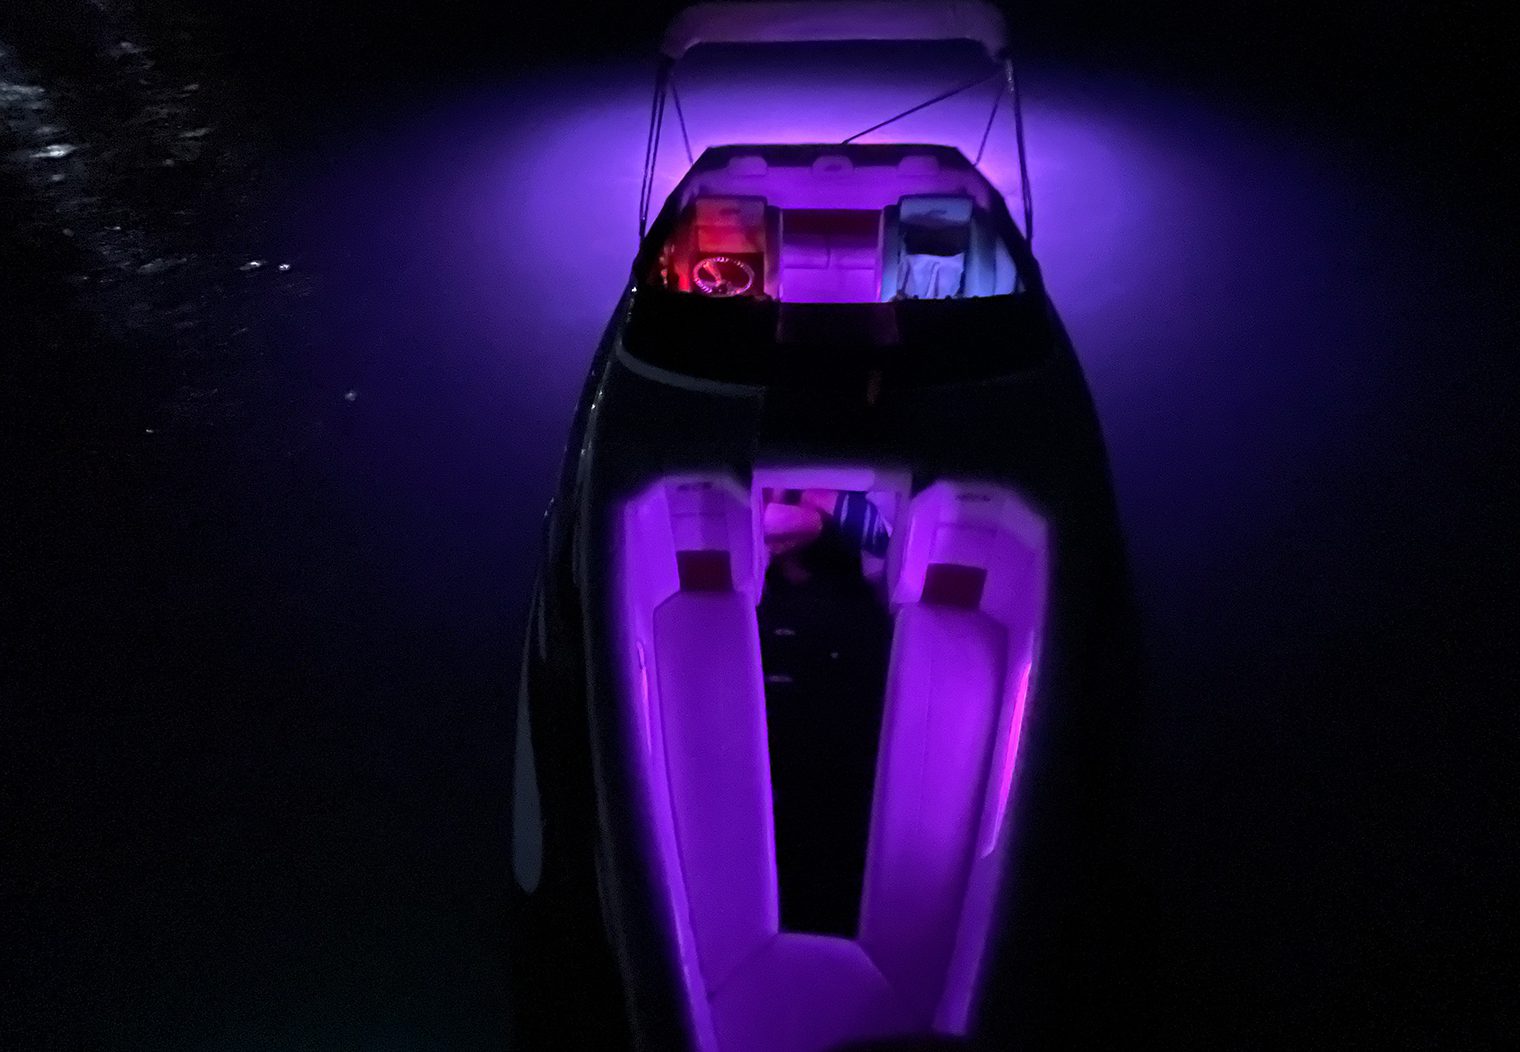
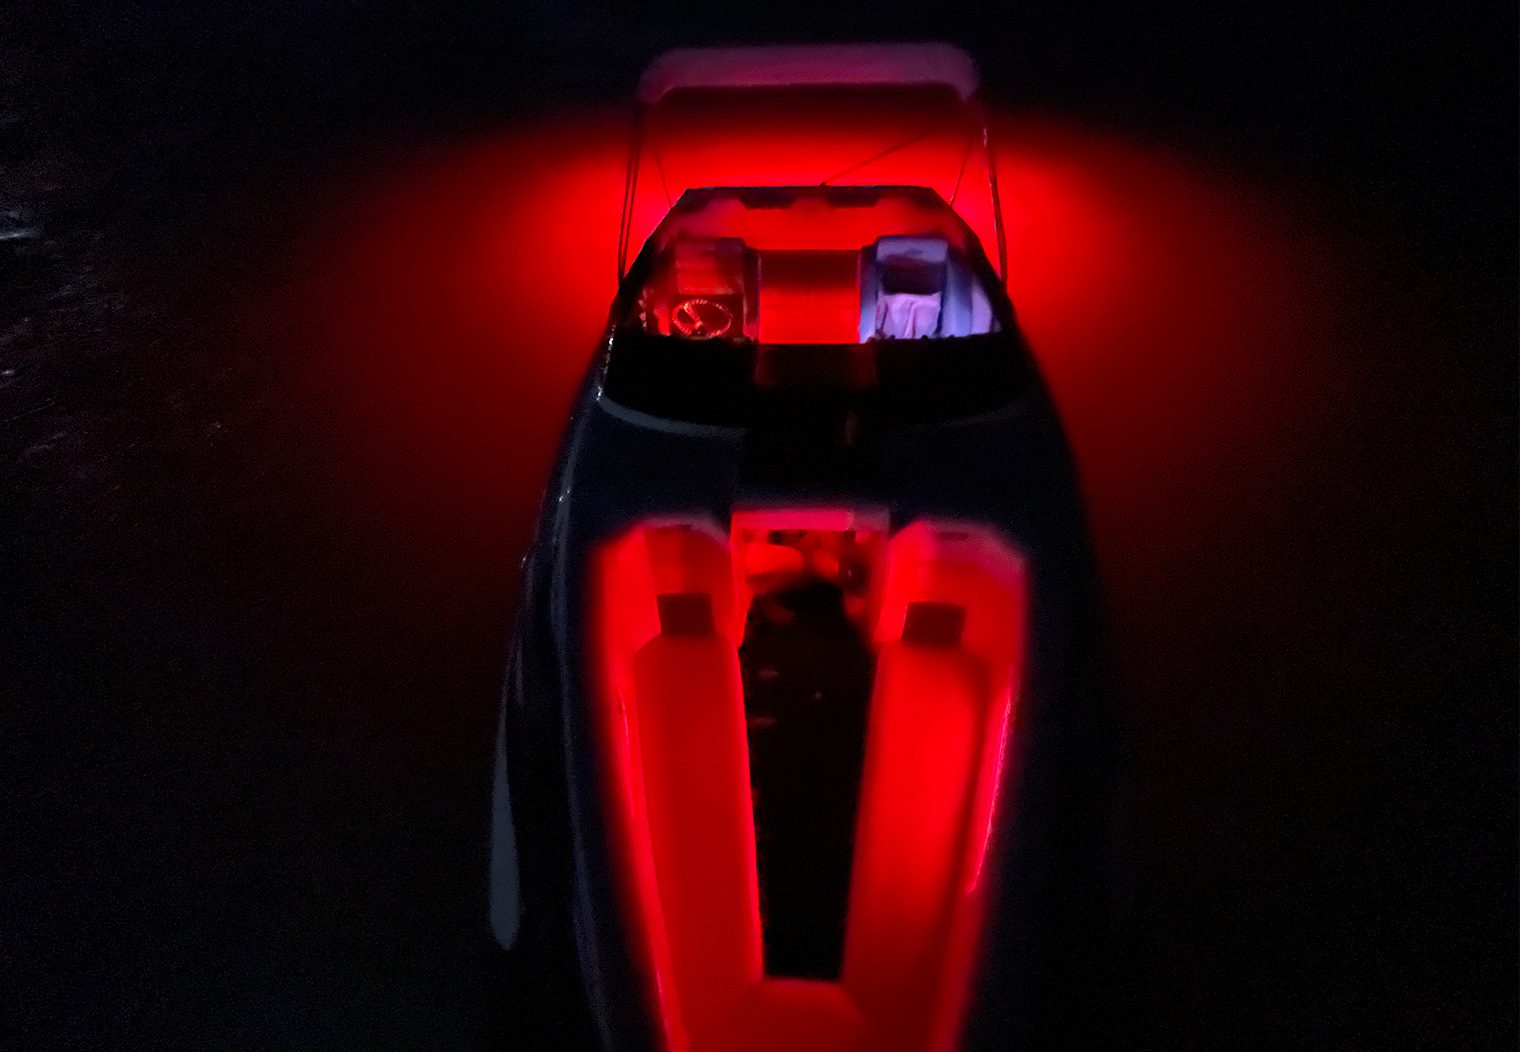
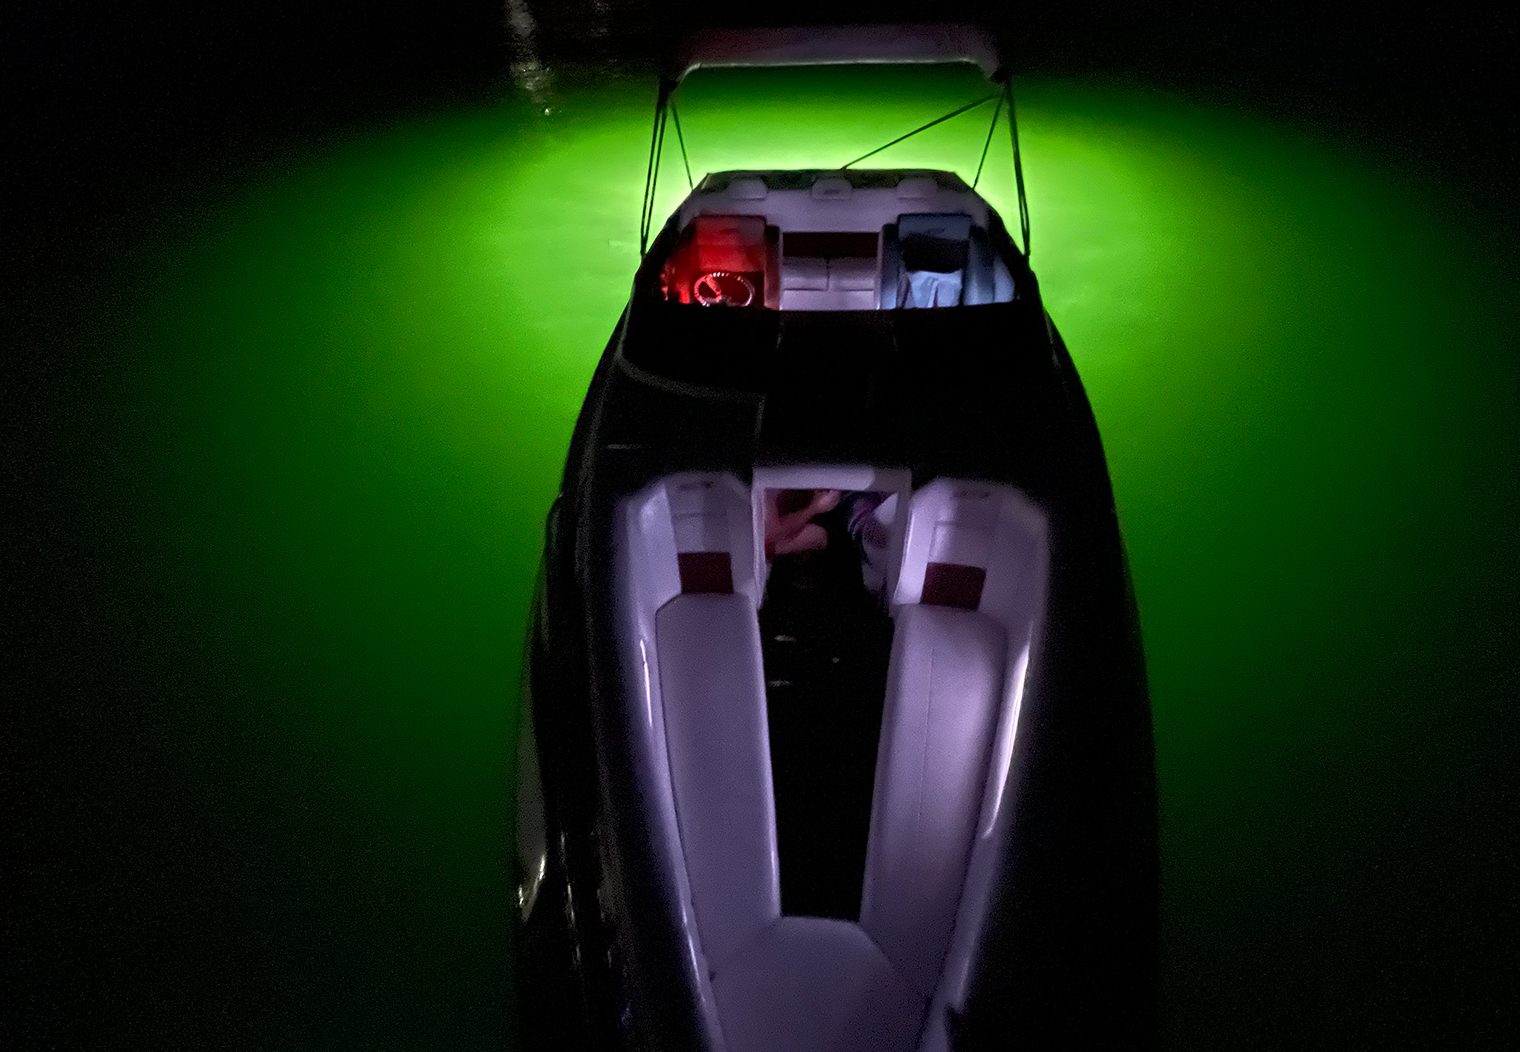
Water testing went smoothly. No leaks or wiring issues and the lights worked flawlessly. I was very happy with the positioning of the lights on the transom and where they sat under the water line both at idle and in motion.
The interior lights tied incredibly well with the look and color of the Javelins and the app made it easy to control them. Success.
Conclusion & Observations
I really enjoyed testing and installing Lumitec's Javelin 600X, Poco 3 and Pico C4. This was the highest quality, brightest and most universal underwater LED setup I've worked with so far. I highly recommend this setup if you have the budget.
The Poco app is incredibly versatile and designed for larger, more complex boats but also worked great for this simple two channel system. After the initial setup of the lights, switches and layouts, the app was really intuitive and easy to use for controlling the lights. I also loved the ability to create switches for the Javelins and interior Kicker LEDs independently, or tied together as one. The one thing I thought was missing for the river boat application like this was different modes for the RGB light groups – strobing, pulsing or cycling through colors. The app only supports on/off, brightness and color at this time.
The Pico C4 unit was necessary to integrate the Kicker RGB lighting that was already installed on the boat. But the integration between the Poco 3, Pico C4 and the Kicker LEDs was seamless. I particularly loved how integrated everything felt within the app. The color match between the Kicker LEDs and the Javelins was an almost identical match too (compared to the cheap test LED strip I used on my test bench that didn't match well). You can see this in the full boat images in the section above.
And as for the Javelins – wow. Unbelievably bright, clear and vibrant. They look just as beautiful when the boat is on the trailer too. Two thumbs up for this setup and Lumitec's new 600X lights along with their integrated modules.
Thanks for reading! I you have any questions or comments on this install, leave us a comment below!
