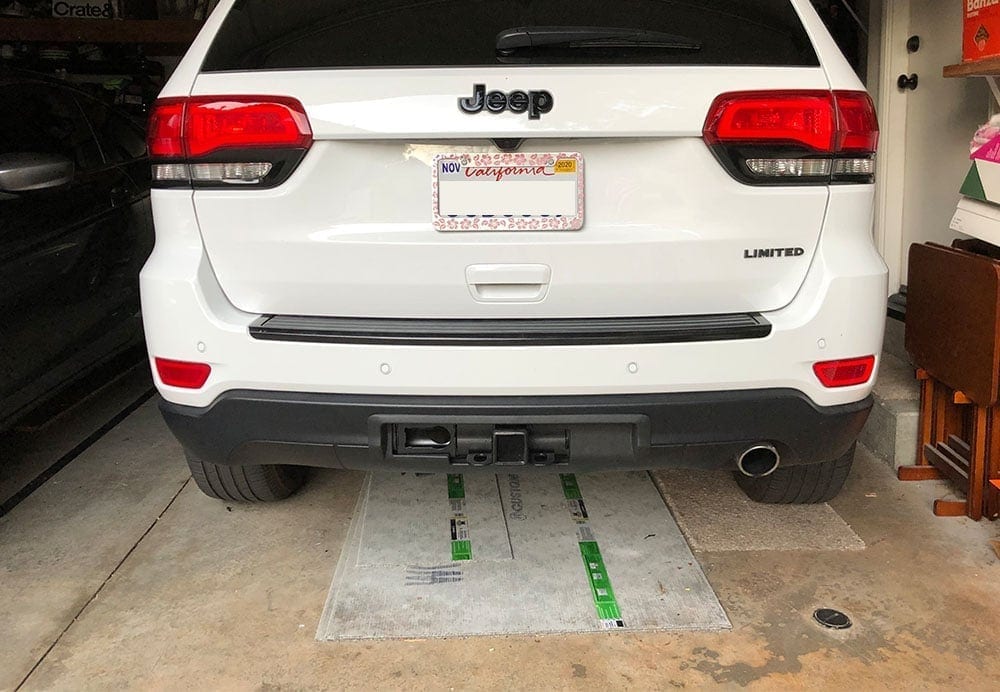
In this article: We'll walk you through how to install an OEM style, in-bumper hitch on a 2018 Jeep Grand Cherokee Limited with tons of photos.
- Project Difficulty: Medium-High (wiring & programming needed)
- Time taken: 8 hours
- Cost using the method in this writeup: $535.00
So I set out on what I thought was going to be a relatively straight forward tow hitch installation on my 2018 Jeep Grand Cherokee Limited 3.6L V6, but was shocked at the level of complexity and lack of resources to complete the job the right way. I finally figured it out, at the expense of my own wallet so I figured I'd do a quick writeup for those who are looking to do the same installation on a similar (or same) year Grand Cherokee. In this writeup, I'll go through the hitch that I used, wiring along with the programming software to enable everything on the computer.
My original plan was to tap into the tail light leads using a universal 7 pin/4 pin adapter and place it in the aftermarket hitch that I purchased that has a factory-look and built into the bumper. The hitch and bumper installation was simple enough but I decided to do this the proper way and integrate it into the existing wire harness of the car like the dealer would. I'm not saying you can't use the taillight leads to do this installation but I'm not sure it's going to get you what you need. Jeep has made this process a complete nightmare in my opinion, especially for those who don't have the built-in wiring.
Apparently mid 2018 and later models of the Grand Cherokee that don't have the tow package no longer have the wiring either which added to my frustration. And even the folks who do have the wiring built in on older models still have to program/enable the pins in the ECU which is a $185 trip to the dealer. Or at least my dealer. I've read of charges as low as $40. So let's get to it.
Tools & Parts List:
Apart from your standard tool set with sockets and such, here's a list of the products and some of the special tools I'd recommend, with links to the parts on Amazon:
Parts:
Tools:
- FORScan OBDII Scanner – $18
- ORXPLUS Tools Plastic Rivet Tool (for putting the rivets back on your fenderwell trim) – $30
- Dremel Tool (optional but handy if you don't want to spend a couple hours cutting out the bezel in your bumper with a knife) – $36
Tow Hitch Installation
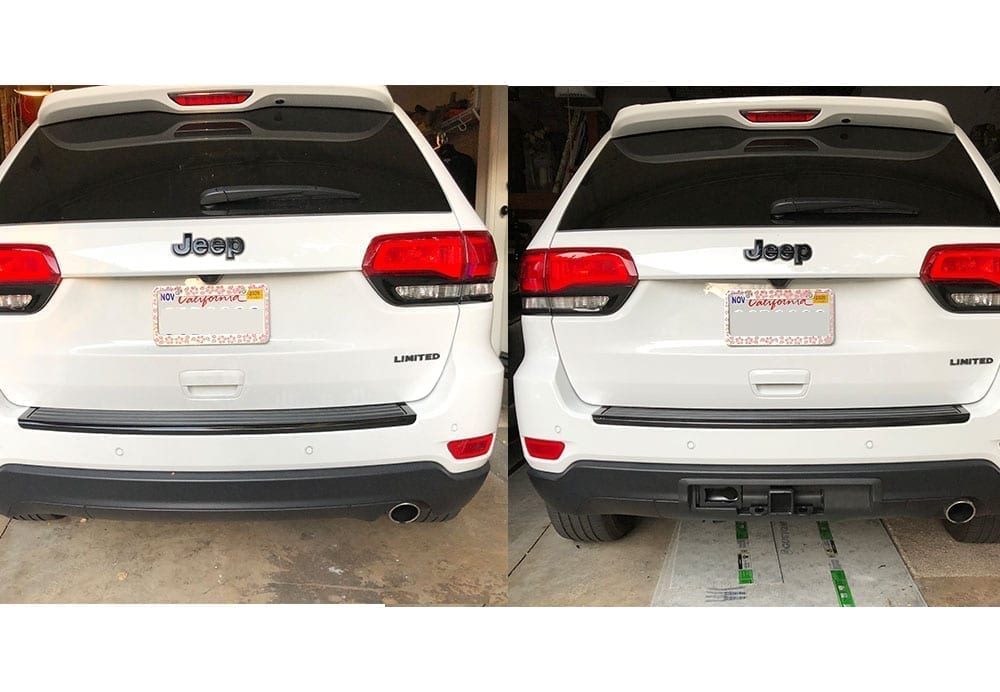
For the hitch installation, I chose a class IV hitch receiver that included the bumper bezel. You have two options for a hitch on the Jeep:
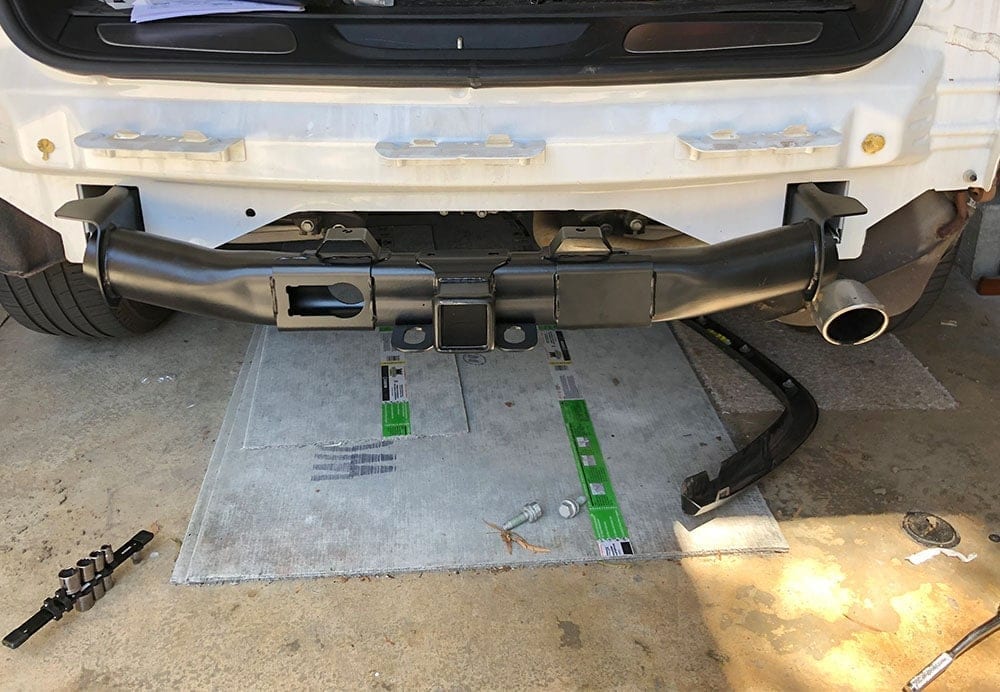
- OEM look – This is the hitch that I chose to use. It replaces the existing bumper support and the hitch itself goes directly through the bumper. It typically comes with a bezel. Using this type of hitch will add to the time of your project because you have to remove the rear bumper and cut the bezel manually. Here's the one I used.
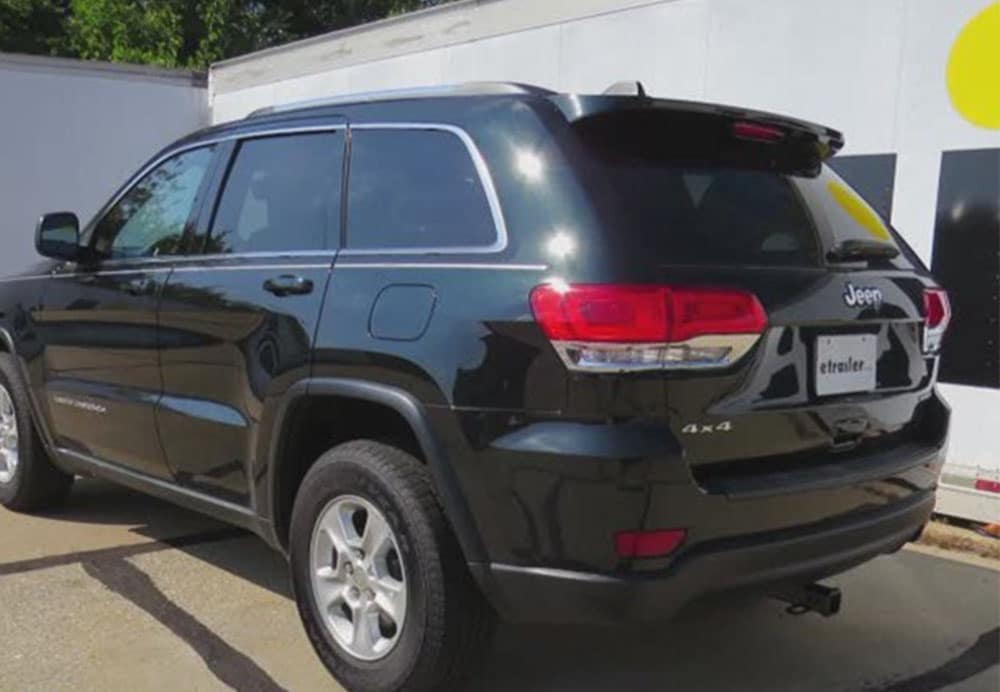
- Under the bumper look – I personally don't like this look. The hitch sits below the entire bumper which would likely put it in a place that would require you to have to get a hitch raise too if you want your trailer to be level. This, to me, just looked cheaper.. and it is. It's cheaper to install, cheaper to buy and easier to install if you're doing it yourself. It simply mounts to the bottom of the existing frame so you don't need to pull the bumper off and replace the bumper support bar. You can find an example of this type of hitch here.
To install the OEM-style hitch you'll need to do a few things:
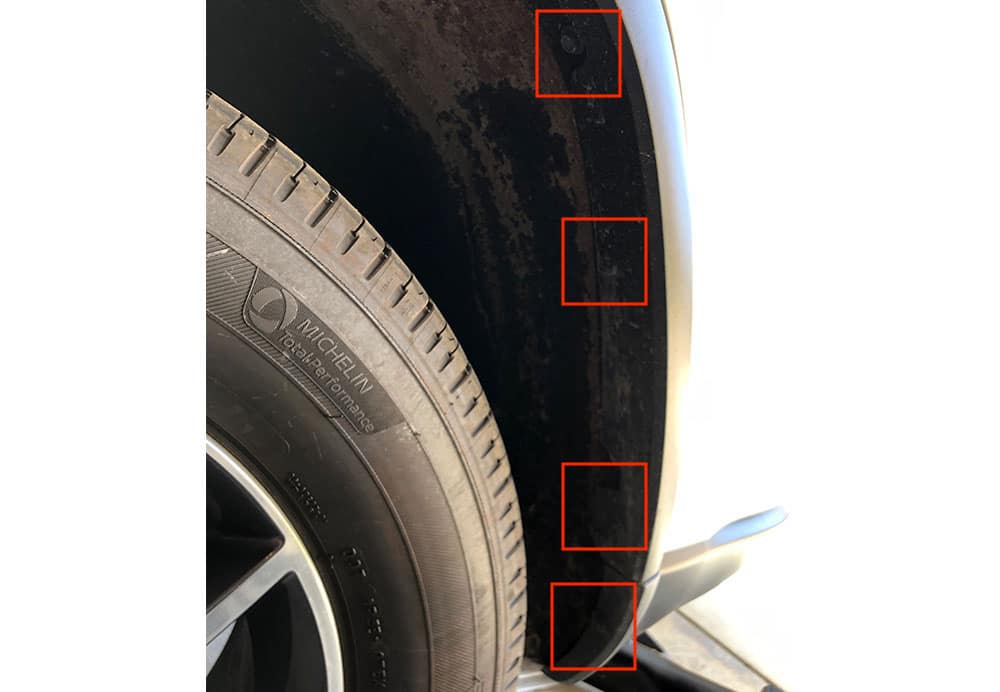
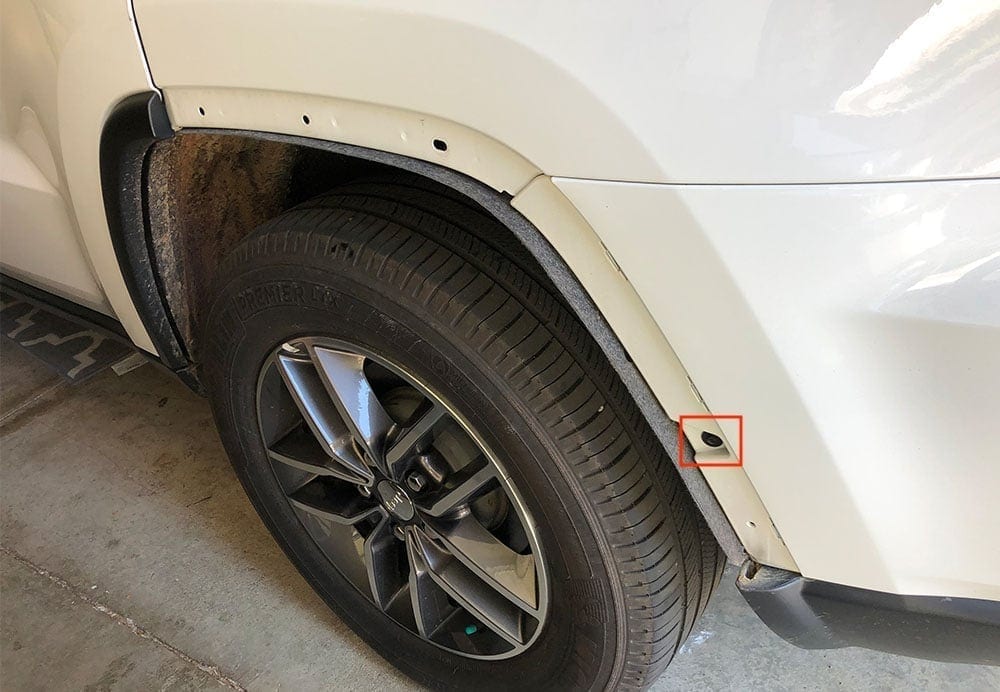
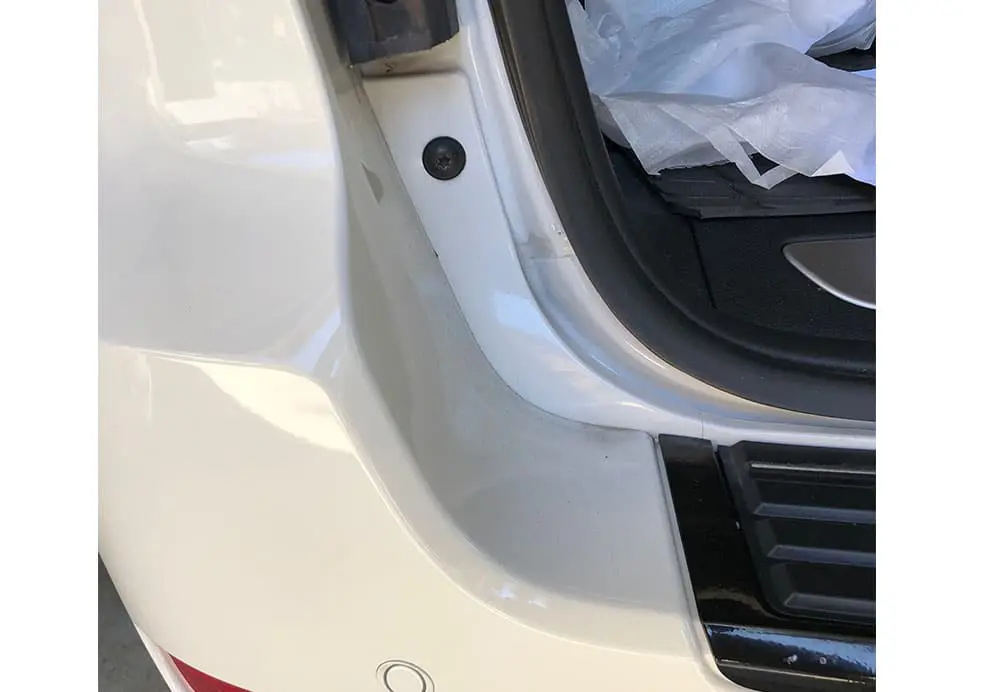
- Partially remove the rear fenderwell trim pieces. This is to access the screws to the bumper. There are a few push-style clips along with plastic rivets that you'll need to drill out to get the trim piece off.
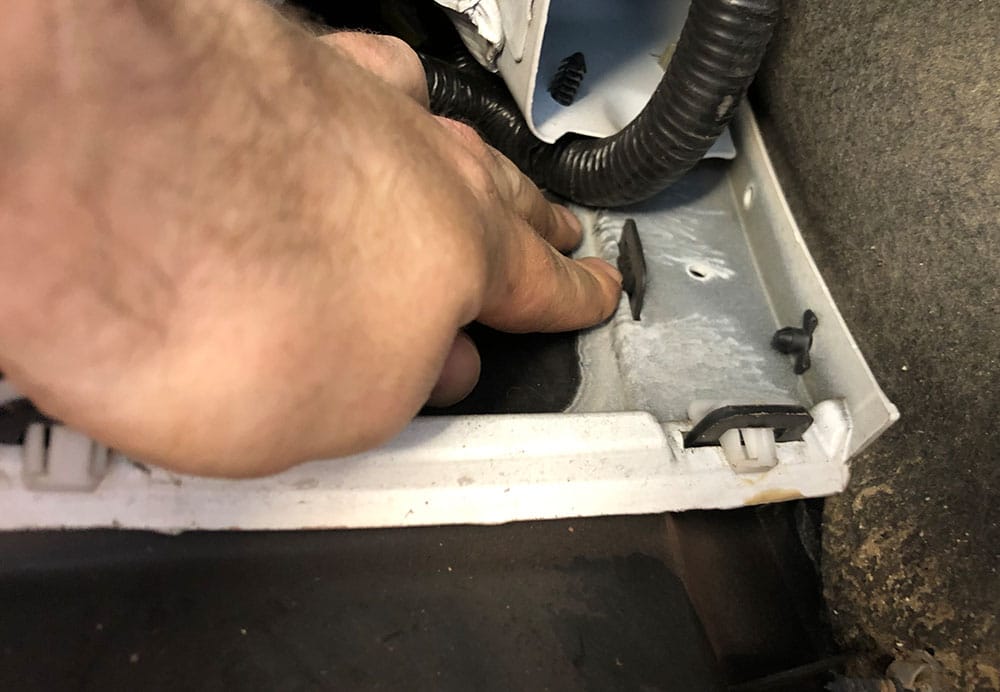
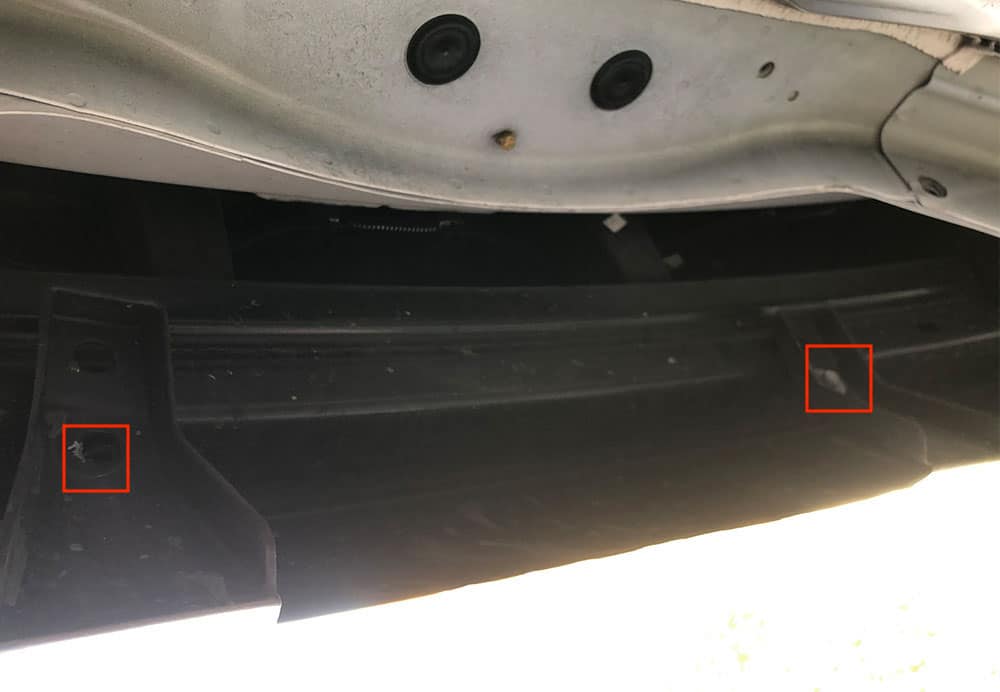
- Remove the bumper. There are screws on the inner side of the hatch, behind the fenderwell and two underneath on the bottom side of the bumper. Once this is removed, you can replace the bumper support frame piece.
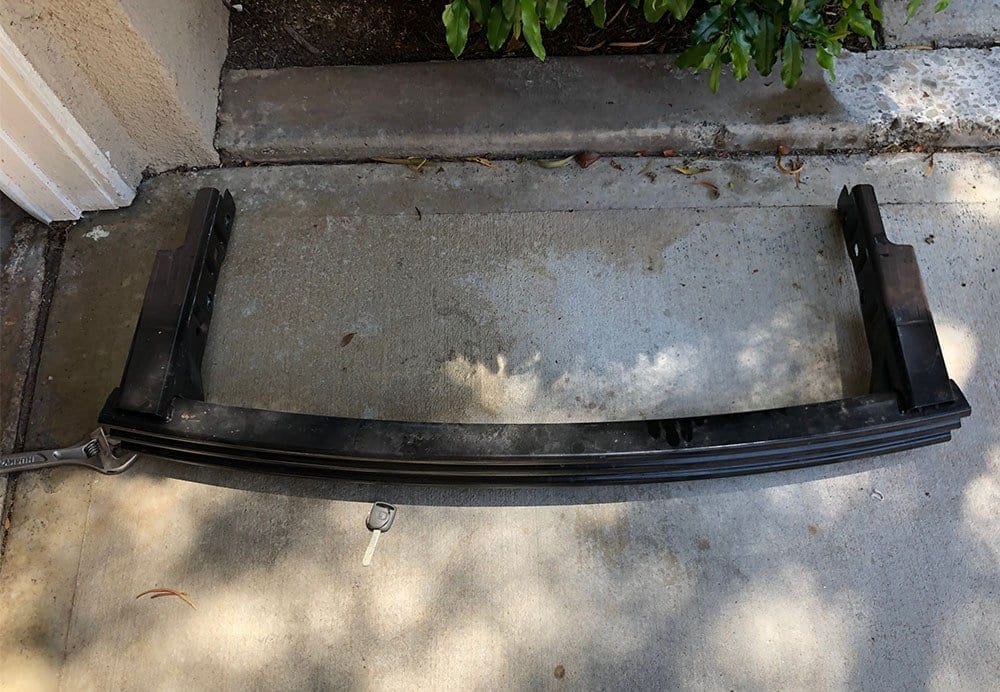
- Remove the bumper support by removing the 6 large bolts that hold it in.
- Cut out out the rectangular hole in the bumper to make room for the new hitch and the bumper. If you purchase the hitch that I did here, you can actually use the template that's already pre-built into the back of the bumper. This was a surprise for me. There's an actual light imprinted template for where the factory would cut out the OEM bumper to make room for the factory bezel. It just so happened to work perfectly for this bezel too. Sorry in advance but I didn't get pictures of this or the process to cut it out of the bumper. I just used a combination of a sharp drywall knife and a dremel to do it and it came out perfect.
- Install the new hitch where the old bumper support was.
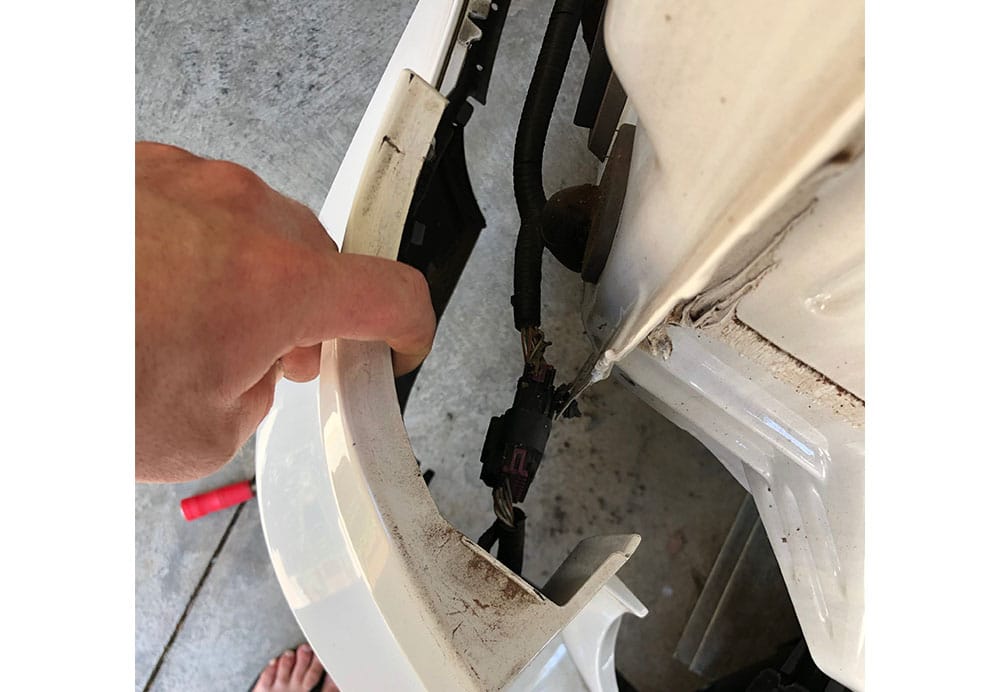
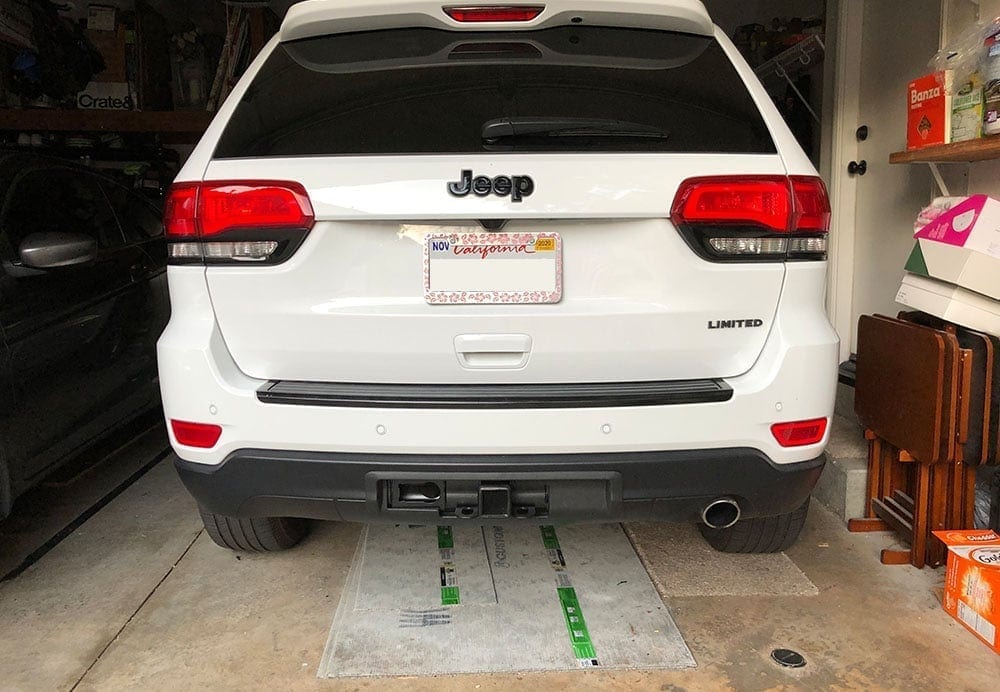
- Reinstall the bumper and the fenderwell trim pieces.
Here's a few photos to help explain.

Wiring the Mopar Harness
Wiring the Mopar from the rear to the front of the vehicle was straight forward. It comes with instructions, but I also uploaded them here for you to look at them. The kit comes with the wire harness, zip ties and a new ‘PDC' box that you'll replace in the engine bay. Here's the instructions.
Mopar 82216005AB Trailer Hitch Wiring Instructions
The instructions are pretty thorough in terms of where to wire it and the different harness clips to tap into. It was pretty helpful. I'll let you review it instead of me duplicating the instructions, however, there are a couple things to call out specifically that I found in terms of discrepancies between the instructions and the wires in my vehicle.
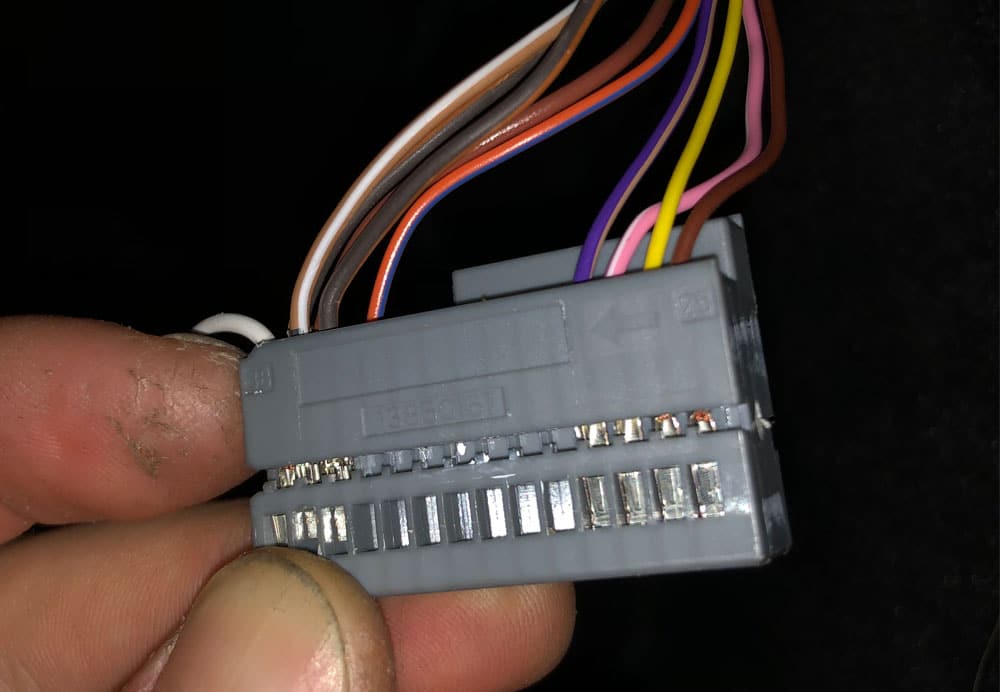
- In step 29, the C5 harness visual is NOT correct. The pins 24, 23 and 22 are not located on that side of the harness when you're looking at it from the wire side. Rather, they're on the other side. Use the pin numbers that are on the harness to place your wires and NOT the visual in the instructions.
- There is a WH/DG (white and green striped) wire in the harness, but there is not a WH/GN wire. Rather, there's a solid white at least in the harness I got. This doesn't necessarily matter though. As long as you map the same wires labeled as WH/DG or WH/BN, etc that's in step 29 with the same labeled wires in step 44 and 45 you'll be fine. For example, I used the solid white wire that was in my harness as the “WH/DG” in pin 22 on the step 29, and then wired it to the location that the “WH/DG” was in step 44.
- If there are pins that exist in the harness where the wire is supposed to go, take a picture of the harness as it is, then remove and replace them. Take a picture so that if you mess up, you know where to put them back. I took pictures of everything before.
Apart from those callouts it worked great. I wouldn't be too intimidated by the instructions either, once you have each of the harness clips in your hand, they have pin #s labeled (in fine print but it's there).
Programming/Enabling the Tow Wiring on Your Grand Cherokee
This is honestly where I felt Jeep went overboard with the amount of control that they wanted with these cars. Not only do you have to wire the harness for ‘mid 2018 and newer' Grand Cherokees (with the slight mistakes in the directions), you have to actually connect to the car with software and enable the pins to have power. And even IF your Jeep was prewired, if you don't have a tow hitch installed or the 4 or 7 pin connector you'll likely need to program yours as well.
Worry not though. I found a way to do this with a cheap alternative instead of paying $150 – $200 bucks at the dealer. At the time of this article, I searched for HOURS to figure out how to do this and I didn't find any instructions. You can do it in your garage with your own laptop, and for about $65 bucks.
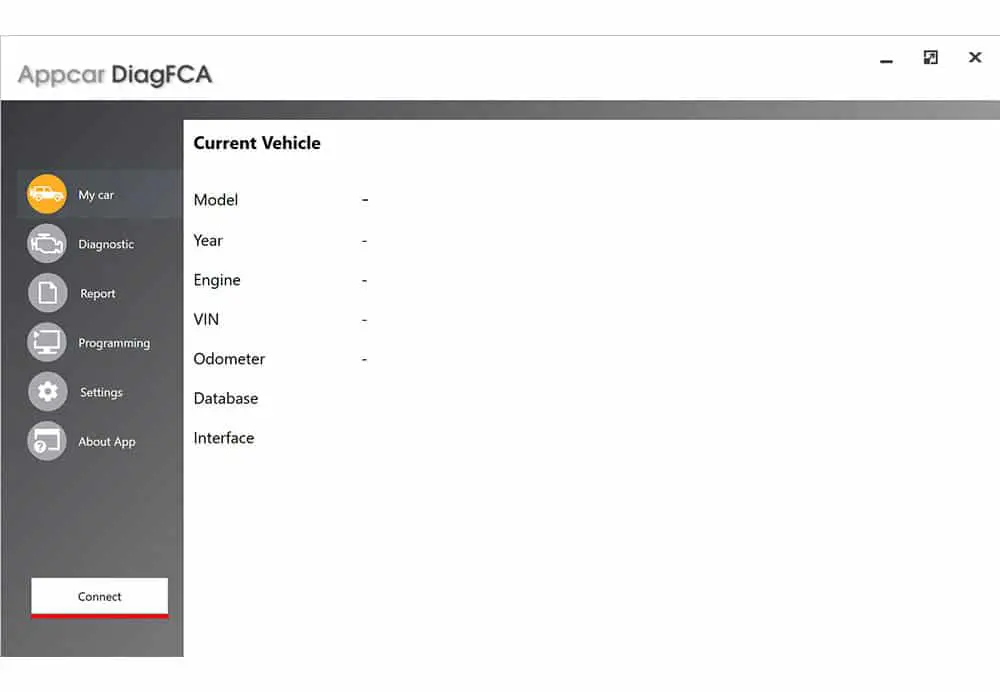
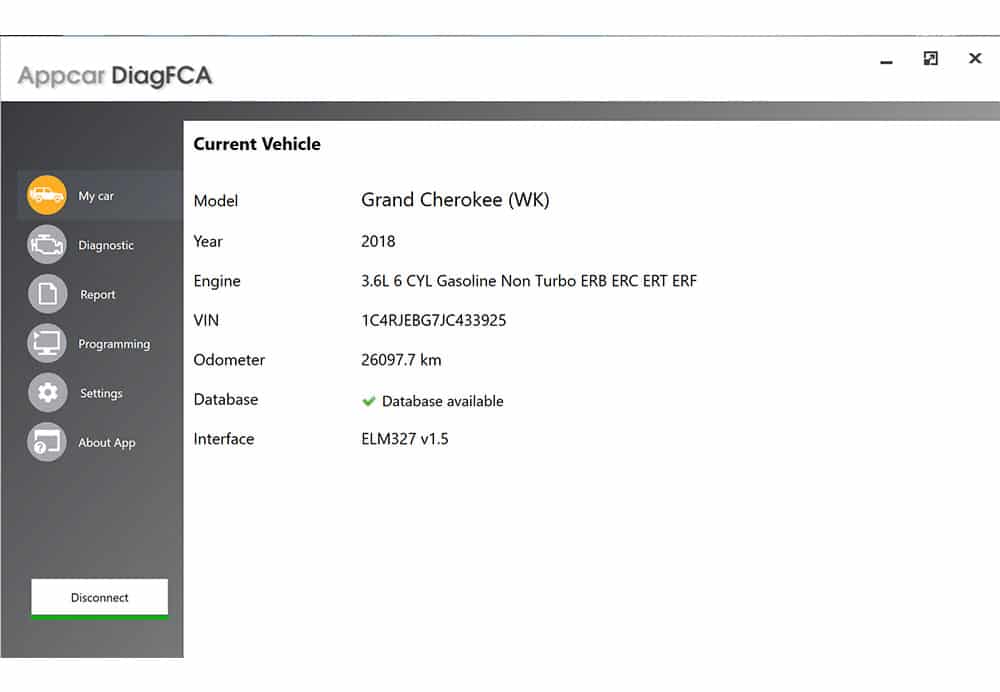
The program is called Appcar DiagFCA. Their website: https://appcar-diagfca.com/en/. For $49 dollars you'll get access to the program, but it's only for Windows devices. I actually have a Mac and used a program called Parallels to run Windows 10 on my mac computer at the same time and it worked fine for me (that's another article in its own if you're not familiar with virtual machines).
You'll also need an OBDII to USB device. It needs to be ELM327 compatible, the one that I purchased is here. At the time it was $18 bucks. Once you have the software, the OBDII device and your wiring is installed in your Jeep, you're ready to start to program. Plug your OBDII chord into the vehicle, turn your key (or push your button) till the car is in accessory mode, then plug your USB into your computer and let the drivers install. On my computer it registered immediately and installed the drivers automatically.
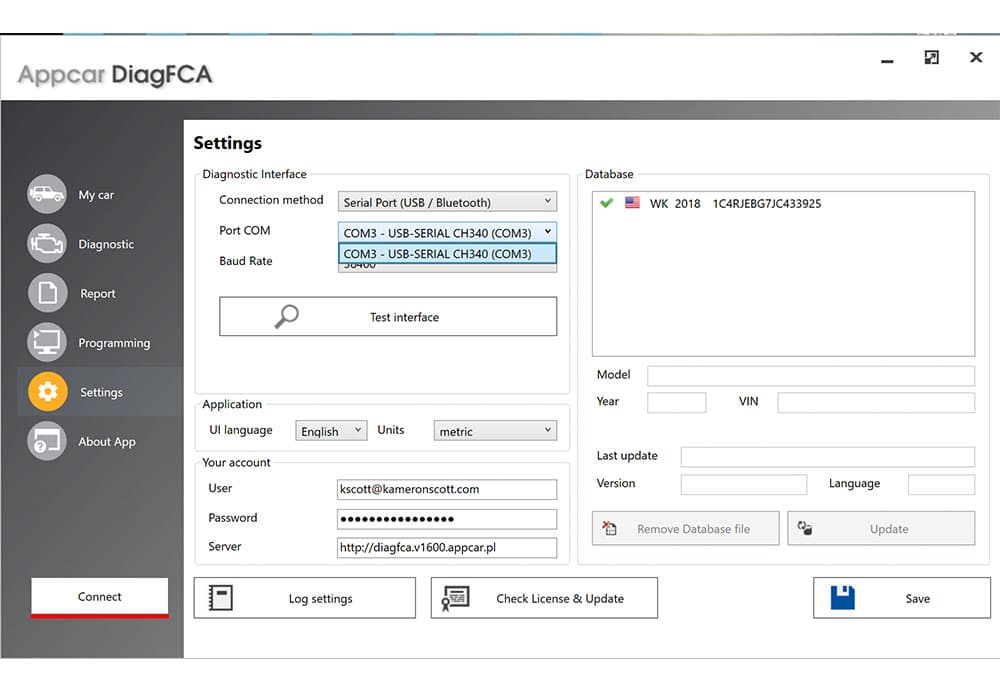
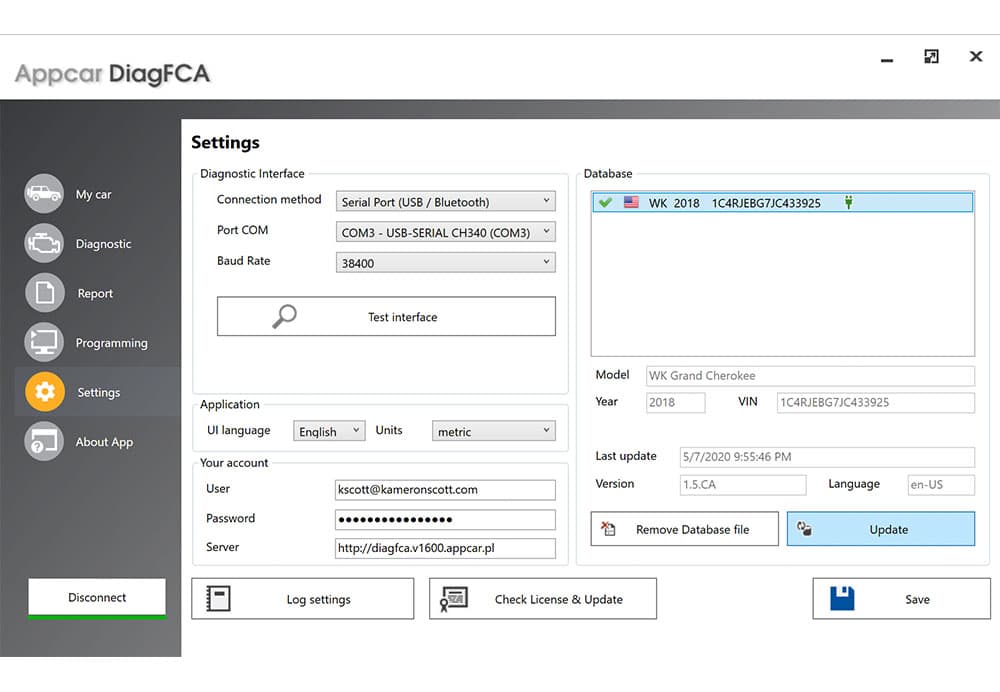
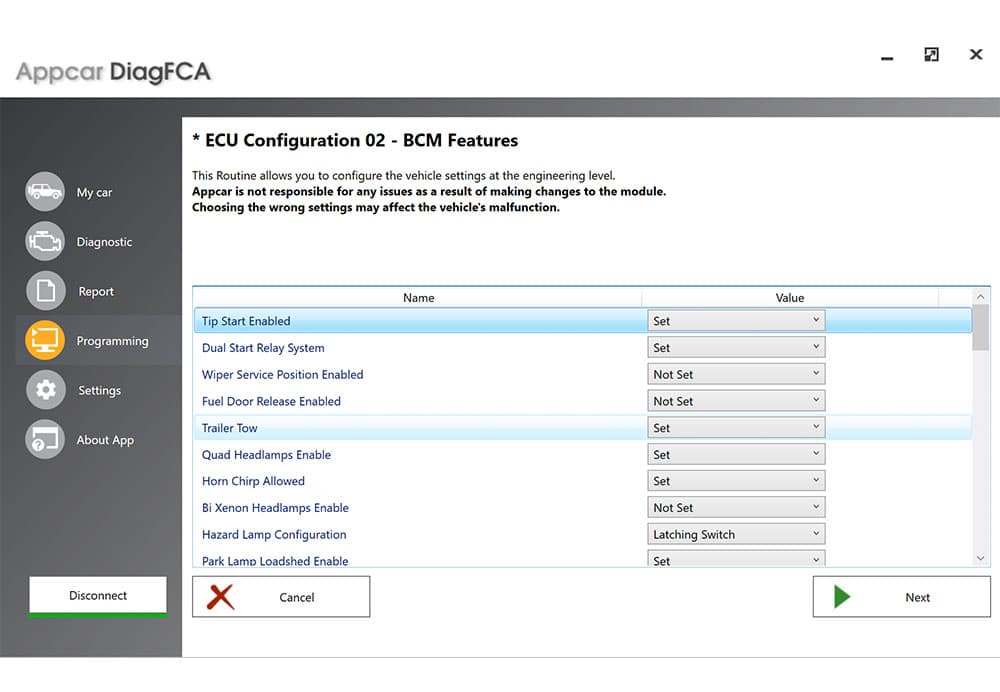
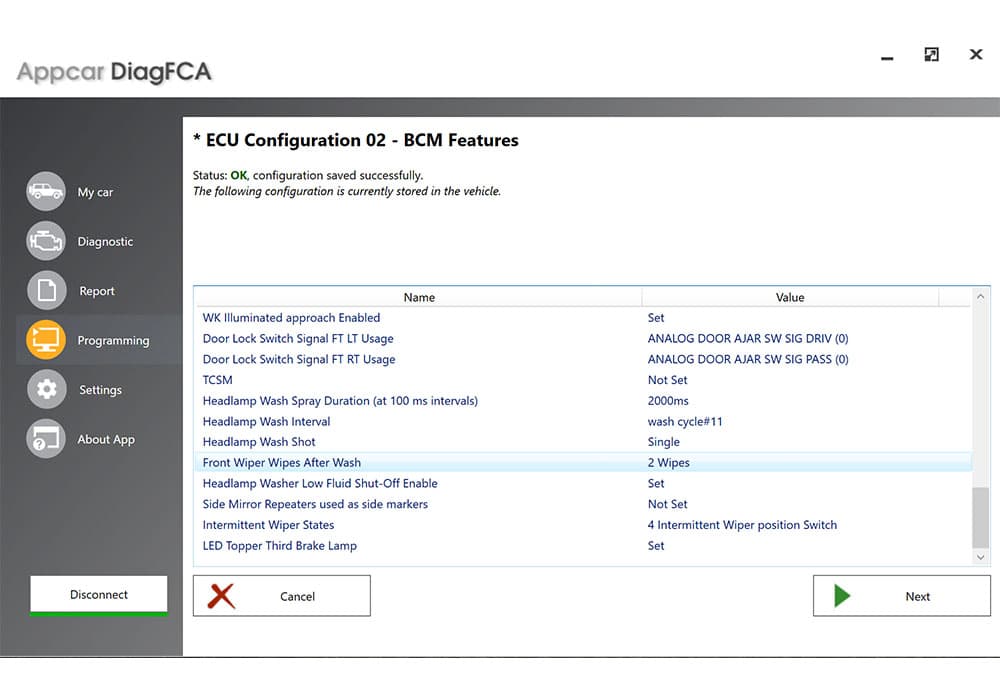
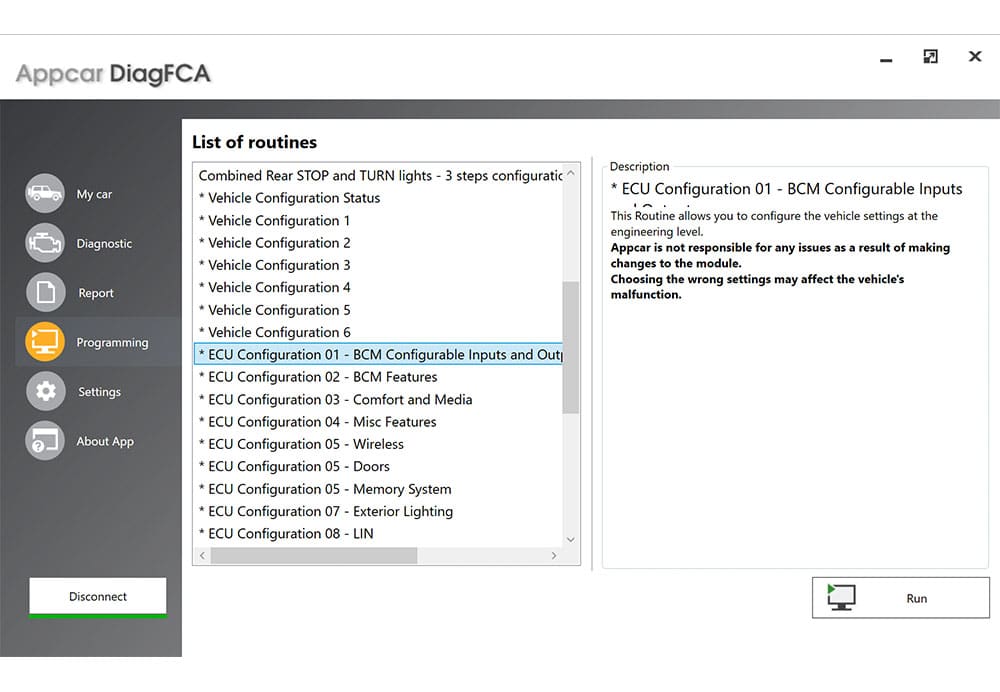
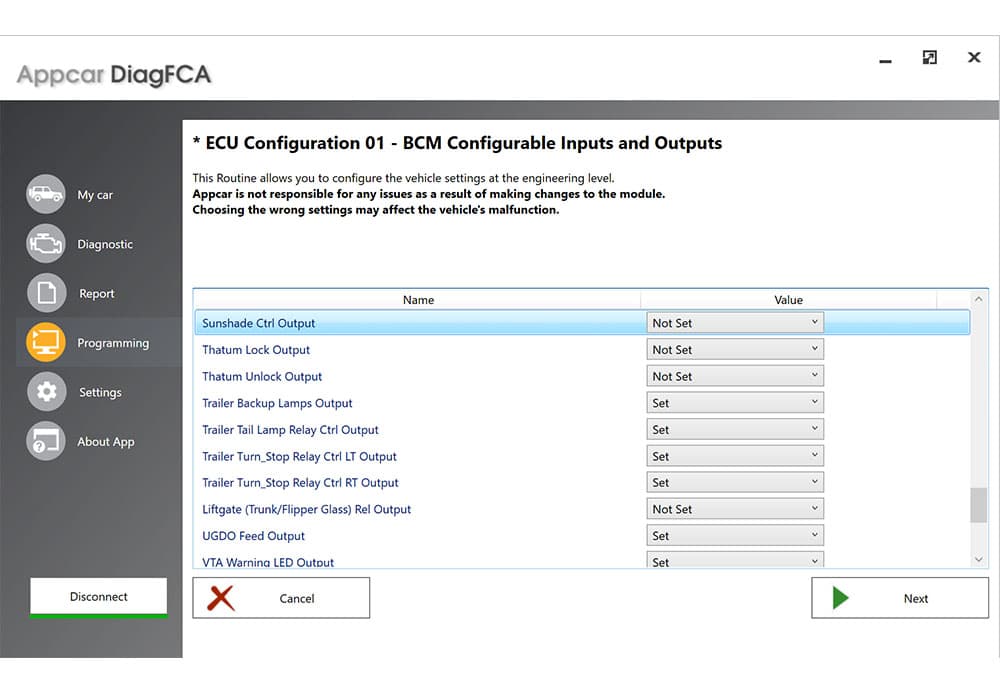
Once your drivers are installed, open up your Appcar DiagFCA program and follow the steps below. Scroll through the images to see the steps in the gallery below:
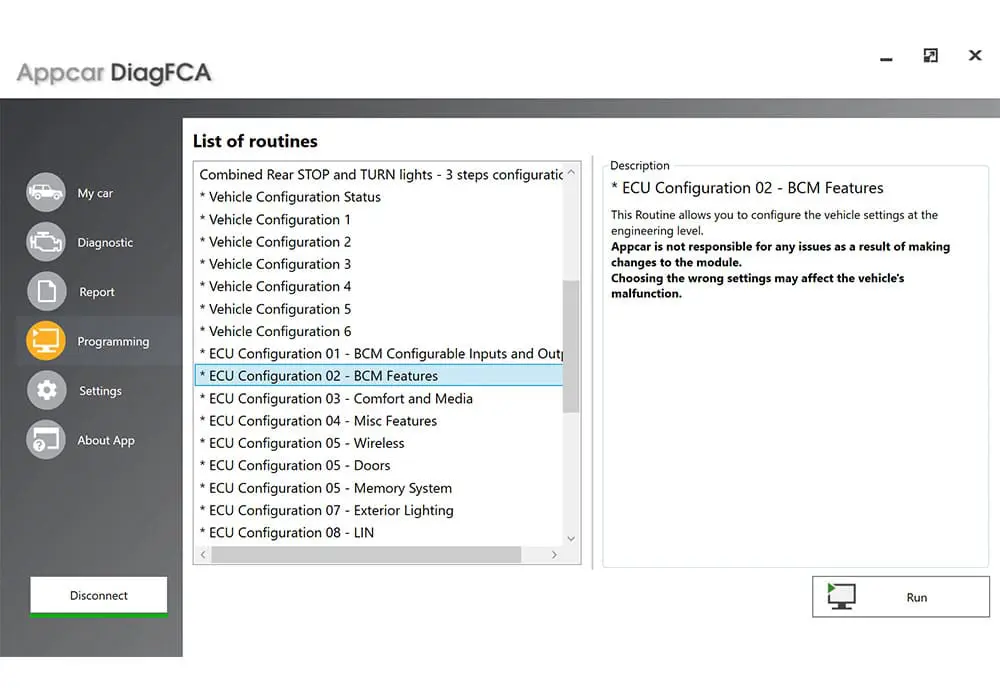
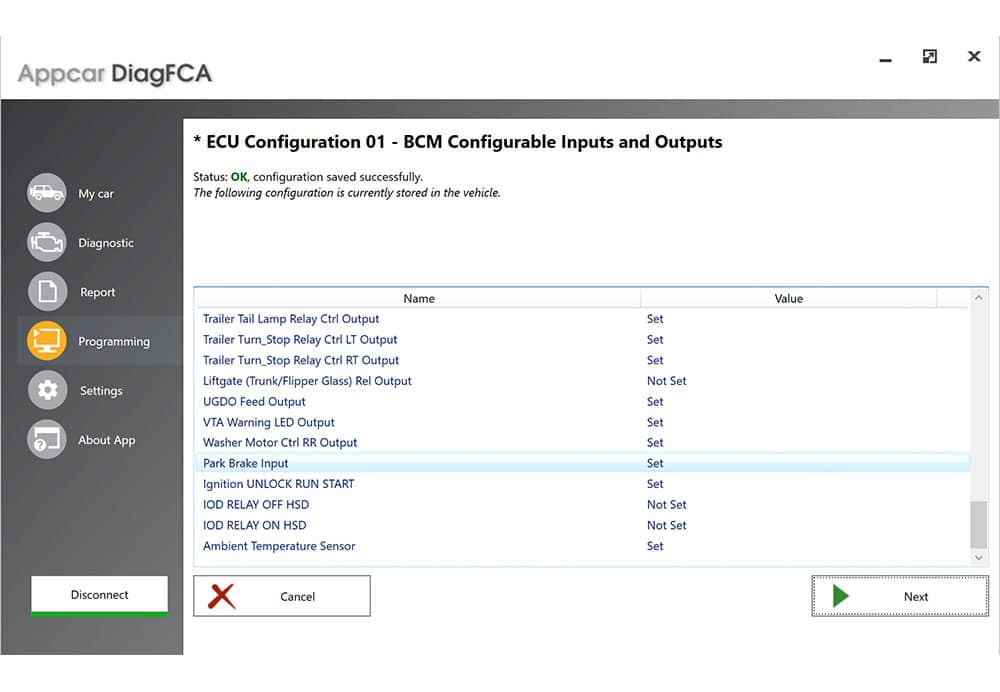
Boom! You're done. I would unhook the battery for a couple minutes to reset the system, then begin checking your 7 pin harness in the rear to make sure that everything is ok. The signals are labeled on the 7 pin cover to make it easy for you to hook your volt meter. Note, I've heard that the left and right turn signal may become mixed up for some reason. If, for any reason one or two of your pins are mixed up you can always just unpin the harness at the hitch and move them around to make them match the correct setup.
Good luck!
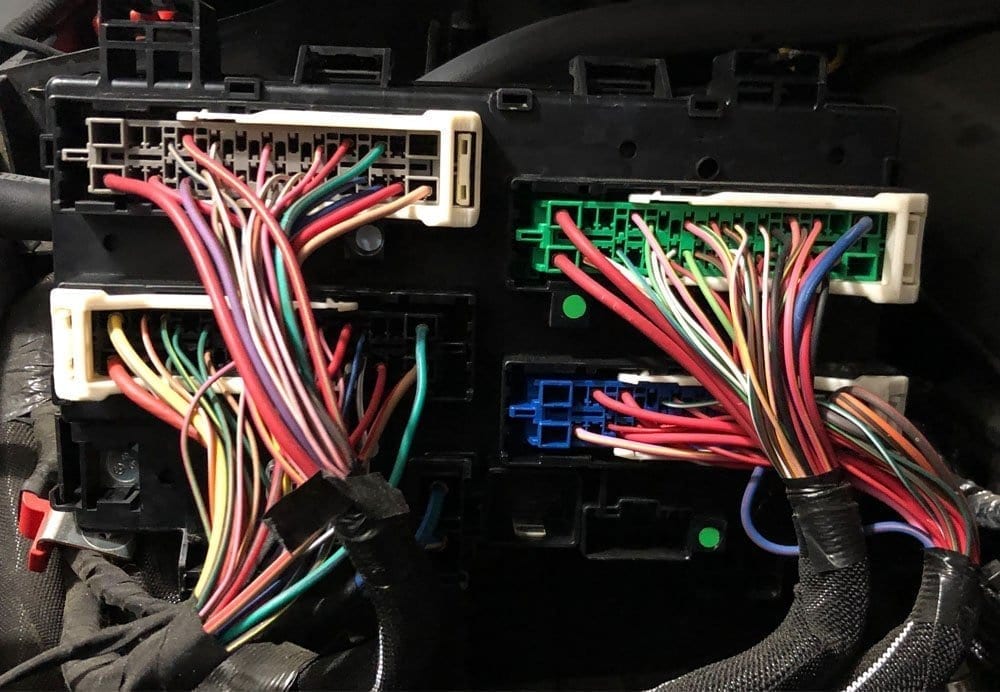
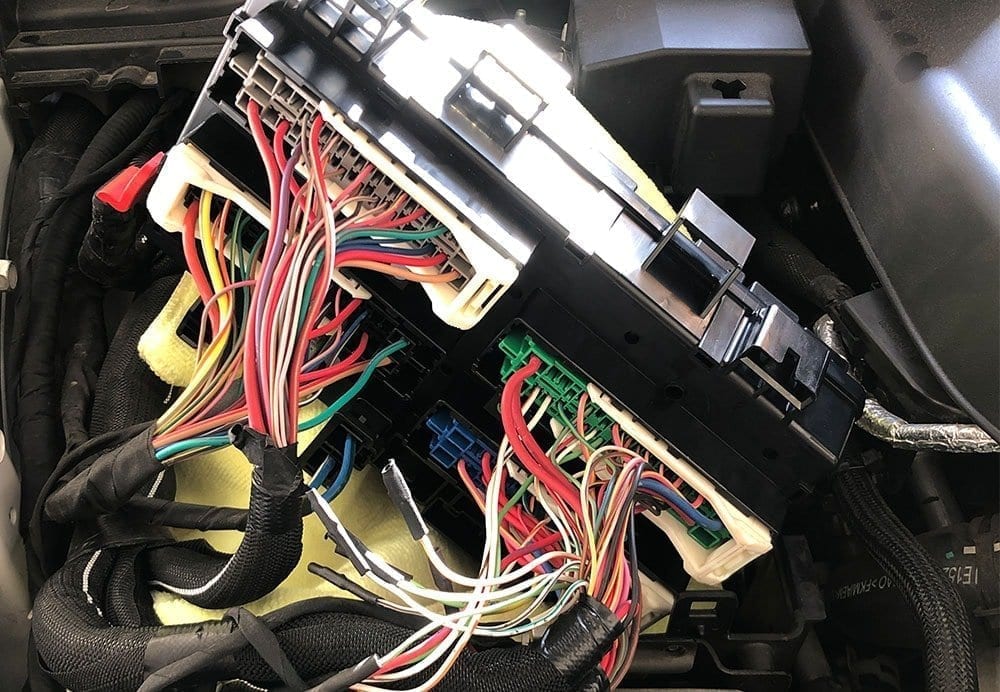
Update 6/23 – Per some requests, I've uploaded all of the original photos of the harnesses that I took in case I accidentally needed to revert or pinned a wire incorrectly and needed to start fresh. See below.

Thanks for reading! Please use the comments below if you have any questions/comments!

Hi Kameron, great article. I’m trying to enable the tow wiring in my 2014 Grand Cherokee Limited 2×4.
Will the same process with Appcar DiagFCA and the ODBII cord work for 2014 models?
Hi Tom. Thanks!
I would assume so.. I think the DiagFCA only will show features that the vehicle can be enabled for (don’t quote me) so if the features are on the list you should be good. Just in case, you should probably email them. The person I was chatting with’s email is kontakt@appcar.pl
Hope that helps. Let us know what you find!
Hi Kameron, It works!
Pulled out a dusty old PC to download AppCar software (no Mac version), bought the OBDII on amazon and the whole thing took me about 45min. That’s less the the roundtrip to the dealer alone. And dealer was quoting me $200 to activate the tow light outputs. Your solution: < $70.
Thanks for the guidance!
Great to hear! Thanks for commenting back!
How did you get it to work because when I try it I get a bunch of icons
Hey is there anyway you can send pictures to me of the c5 connector? I ended up wiring the 3 wires that are supposed to go on the opposite side of the connector and I de pinned 2 wores but don’t remember which two holes they go into out of the 3.
Hi Jose. I added all the additional photos I could find of the harnesses. To be honest I’m not entirely sure which one is C5 anymore but take a look at the images I added at the bottom of the article. Hopefully this helps!
Hey Kameron, do you remember if you pulled wires out of the connector in the BCM and taped them back? Pins 24,23,22 specifically. You specify the directions visuals are incorrect but when I use pins 24-22 the right turn signal is hot all the time and does not switch the relay.
Hi Andy, just to clarify you’re referring to the C5 connector in the BCM that’s located in the passenger kick panel, right? I did have to tape wires back for those connectors in the kick panel as well as wires under the hood at the main PDC.
Hey I got a summit with the plastic cover that hides the hitch…Do you think this hitch will work with that cover or does it stick out pass the bumper?
Hello. It does stick out about a half inch at the top of the bumper and even more towards the bottom so I’m not sure if it will work or not. It’s not 100% recessed but to be honest I don’t know how any of them would be with the chain connections at the bottom of the hitch. Let us know what you find out!
Hello, thank you for the informative article, I am sure there are a lot of GC owners out there who appreciate the info on the app. That said, it didn’t fix my issue because the outputs were all already enabled and I have no output on my tail light feed. Do you happen to know where the relays are that are referenced as the tow relays?
Hi Simon. Thanks for your comment. The relays are located in the relay box that’s located on the passenger side of the vehicle under the hood. On the back side of the relay lid, there’s a list of all of the fuses and relays with a description. On mine the locations were:
Trailer Tow Brake: F11 (30A)
Trailer Tow B/U: F28 (20A)
Trailer Tow Park: F29 (20A)
Trailer Tow Power: F30 (30A)
Trailer Tow Left Turn / Stop: F53 (20A)
Trailer Tow Right Turn / Stop: F81 (20A)
If yours is the same as mine, I’d check F11, F53 and F81 specifically but run through all of them and see if any of the fuses are popped. Hope this helps.
Love the tutorial! Having issues writing the changes in my 2018 GC. Seems the FCA Secure Gateway Module poses a problem now! Any ideas on how to get around that?
I’d like to get a hitch that goes through the bumper so it looks more smooth. I mean the bumper is important but you could make it even more useful by putting a hitch through it. Then I could easily haul a bunch of trailers without the worry of the hitch falling off underneath my car.
Hi Cameron, Thank-you so much for the great write-up! I am certain it has helped out many folks.
I directed myself to the app software link, I when I clicked purchase it mentions: 2018-2020 MODELS WARNING: Many 2018+ vehicles have a Security Gateway module (SGW) which works like a firewall. For active diagnostics and programming you must use the SGW bypass cable!
i have a 2019 GC Trailhawk, do I require this SGW bypass cable? If so can you recommend one?
Thanks again.
Chris
Hi Chris. Thanks for the comment. I personally did this on my 2018 Grand Cherokee with the OBDII scanner listed and had no problem so I’m not familiar with the SGW. But, I did find this cable which appears to have worked well for some folks that were trying to access the features/data functions of their 2018+ cars. Take a look through the reviews and see if it’s what you’re looking for. https://amzn.to/2E1ODWj
If this works for me, I’d like to buy you a beverage! You got a donation venmo or a tip jar or something I can give you? I just found out from the garage that Chrysler wants 200 bucks to go enable these options in my Jeep Grand Cherokee 2015 (pre wired). So 65 bucks in equipment and software, plus a little nod to you would be great for me.
Lol thanks Chris. I hope this works for you. No donation necessary, the best way to help us out is to share our articles! Let us know how it works out for you or if you have any questions.
Would this work for 2018+ Trackhawks? I heard it’s different from 3.6L Grand Cherokees. If different, where can I find some instructions on 2018+ Trackhawks. I know the part # is 82216006AB and for 3.6L it’s 82216005AB
I read the manual of MOPAR 82216005AB, my 3.6L GC Limited need to replace the PDC.
Article was a life saver! I greatly appreciate the work you put into this. Thank you
Kameron,
Thanks for this write up! I was wondering if this process would work for a 2014 Cherokee KL Trailhawk? I purchased it used and already had the factory tow package installed from the original dealership it was first sold. I assumed since it was a 2014 it had already been activated, but it hasn’t. If I would download the software and the tool, would this process work to enable power to my harness?
Thanks for your time!
Hi Seth,
No problem! To be honest I’m not 100% sure but I’m pretty confident it would work. I’ve used this same tool for my 2012 Ram 1500 as well and the functionality is the same within the tool. If the feature is available to your 2014, I’m pretty sure it’ll show up in the tool. You could always email their support before you buy it and double check!
Thanks!
Unbelievable, The app and the interface actually work and is easy to use. Thank you for this write up on what you do. My Grand Cherokee was a little easier as it is a 2012 and already had the factory wiring back there. Super easy. it works and I am very thankful. Too bad it’s not easier to do since the wires should have already been activated from the factory.
Thanks for commenting Joe! Glad it worked out on your 2012. Good confirmation for folks who have earlier year models and for those who already have the wiring back there. Jeep just wants you to come into the dealer and pay $300 bucks to activate the wiring in the ECU. Unfortunate that they play that kind of game. In my case though, it didn’t even have the wiring which was 50% of the work here.
Kameron, you’re the best! Imagine my disappointment when I realized my 2018 Jeep Grand Cherokee did not have a wiring harness, and my delight when I found your site. I’m pretty handy but had never done anything like it. Because of your post I decided to tackle this on my own. I moved at a snail’s pace, partly because it was extremely hot in my garage and because I was being extra careful interpreting the instruction/drawings, looking for the most suitable tools at times, and trying not to break anything. I eventually completed the entire job over 2 days and everything works (didn’t have to go in and reconnect any pins!). I did opt for the under the bumper towing hitch—I don’t mind the look at all. Feeling very accomplished, thanks to you.
Appreciate the comment! Glad it worked out well. I was pretty disappointed myself when I found the same thing! Were the pin numbers on the harness incorrect for you when you were following the instructions?
Yes, just like you said they might be, the pin numbers were incorrect.
One last thing: I did also have to purchase the SGW bypass cable to finalize the programming but thanks to a really great YouTube video I found, that too was a walk in the park
That’s interesting. I thought that the cable I recommended in the post, FORScan OBD2 Adapter, VINT-TT55502, worked well. Did you try this cable?
I had to use both the cable you recommended and the SGW bypass cable, together. One connects to the other: the SGW end plugs into two ports underneath the glove compartment (had to take some paneling back out) and the FORScan OBD2 Adapter VINT-TT55502 cable’s USB end plugs into the laptop. Here’s the video I watched to locate the SGW ports: https://youtu.be/cEF2Sja5S-w. That did the trick!
I’m triple checking but I’ve installed the same kit and had to replace the Fusebox, which was included, and now my Jeep won’t start? I have no idea what I’ve done lol can you think of anything? I’ve checked fuses, battery and everything but it seems like a security issue bc the brake pedal is stiff and will not start at all
Hello,
That’s a tough one. You’re replacing the fusebox, which touches every component in your electrical system. If everything else works properly except for your vehicle starting it’s tough to narrow down. I would start by ensuring all of the connections on the Fusebox are clipped and secured properly. Then, try re-installing the original fusebox to see if that resolves the issue.
The only other thing I can think of is the harness plugs that are in the passenger side kick panel. If you followed the instructions from Jeep, it will likely be wired incorrectly. Instead, follow the instructions I mention in the article for these two plugs.
Brian,
I had the same issue, check the seating on the connectors in the passenger side kick panel.
You have the click the latches in the up position and then push them in and then bring the latch down. If you can wiggle the connector loose it is not latched correctly.
This is great follow instructions and it will work .. I bought the same adapter ob2 to usb and got the program $50 $20 adapter
And boom … also I installed the towing myself … man you are great I hope good things go your way
This worked for my 2014 Jeep Grand Cherokee limited
I am glad I didn’t have to deal with that wiring mess .. Jeep is an ass for that
Do you know if this product will work on a 2011 Jeep Wrangler Sahara? I’ve got a factory installed hitch, and the Jeep dealership wants $175 to activate the electrical .
Thanks
Very unlikely that this will work on a 2011 Sahara. I would assume not.
Hi Kameron,
I want to thank you! Very helpful article. I have a 2017 Jeep GC, that has the pre-wired OEM trailer wiring connector, but was not active. The OBDII to USB device and Appcar DiagFCA program were available through the links you provided, and worked perfectly! Thanks again!
Glad this helped!
Great write up but ran into a little issue on step 31. I have a 2019 GC 3.6L and C6 already has a pin in 36. If I remove the pin that was already there and put in the WH/OG wire then the backup camera stops working (I get a blue screen when reversing or when manually selecting the backup camera). Any advice? Do I put the original pin or the WH/OG wire in a different location? Thanks
As a follow-up, apparently the backup camera pin can be placed in a different slot because it still worked when I put it in pin 37. However, even with the WH/OG seater in pin 36, I still get nothing from the tow harness. I paid $200 for the dealer to activate it so hopefully it was in fact activated. Is there anyway to test this besides using a voltage tester or multimeter? I may just disconnect the PDC and double check that the pins from the harness are seated correctly.
I’m running into the same issue
My 18 grand Cherokee came with the harness, it was just not activated nor did it have the hitch receiver. I had the receiver installed and the car flashed to activate the harness (at jeep dealership.)
Problem is, i have power at all pins, but the ground is bad.
I removed the ground from the harness in the engine bay and used a wire brush to get better contact where it mounts to the vehicle.
Still, no luck.
Any ideas?
How do you get existing wires out from the C5 and C7 connectors?
Hey mate, I have the fuses in fuse box, but can’t locate the plug to patch wires into.
Leaving my thanks and appreciation as well! Got a new-to-us 2015 GC and it did not have the tow package from factory (but they did route the wiring!) Uhaul and the dealership wanted an absurd amount of money to do what was described here. Followed the steps and it went great! Now our GC can tow with electrical hookups for a tiny fraction of the price and an afternoon of work in the driveway.
Super appreciate what you do and allowing people to work on their cars without being forced to take it to a shop.