In this article: I'll unbox and review Sony's XAV-9000ES receiver, walk through its key features and then hook it up to my test bench to give you a demo of its interface and functionality.
Sony's XAV-9000ES is the latest head unit (at the time of this review) apart of the growing lineup of Sony's Mobile ES products. I've been covering the launch of virtually every Sony Mobile ES product since the re-launch of this lineup in 2021 including their speakers, amplifiers, 9500ES head unit and more. I even used their amps and speakers in a custom stereo upgrade on an F-150 and was pleasantly surprised with their performance.
The 9000ES is a continuation of the lineup's expansion, and closely aligns with the features of its sister unit, the 9500ES with the exception of the screen size and installation. I'll point out some other differences that I find later in the review as well. In general, the Mobile ES head units are geared towards audio control and quality and less geared towards multimedia and video. You'll notice this throughout the review. If you're looking for a multimedia head unit with more video connectivity features from Sony, I'd recommend one of their other models like the AX6000 that we reviewed.
In this article, I'll unbox a brand new XAV-9000ES for you and give you a closeup of the unit. I'll walk through some of the key features that I personally look for in a head unit and call out some of the unique things I notice. I'll also hook it up to power on my test bench and give you a walkthrough of the interface so that you know exactly what you're getting into if you decide to purchase the 9000ES. Let's dive in!
Unbox, Overview & First Impressions
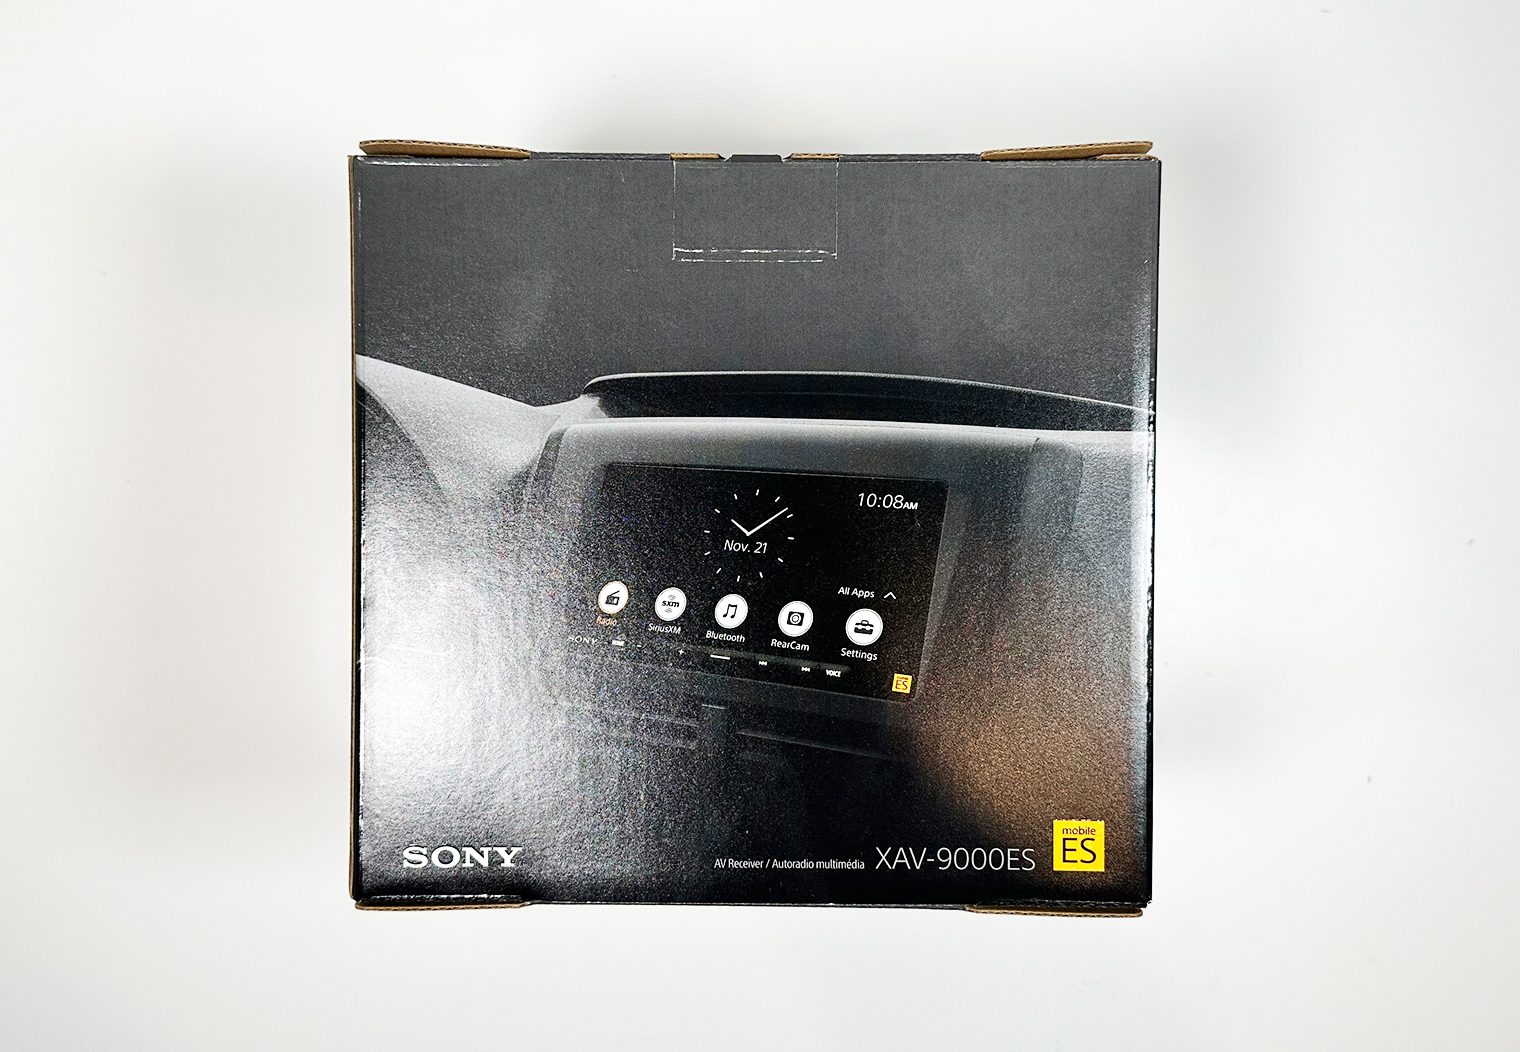
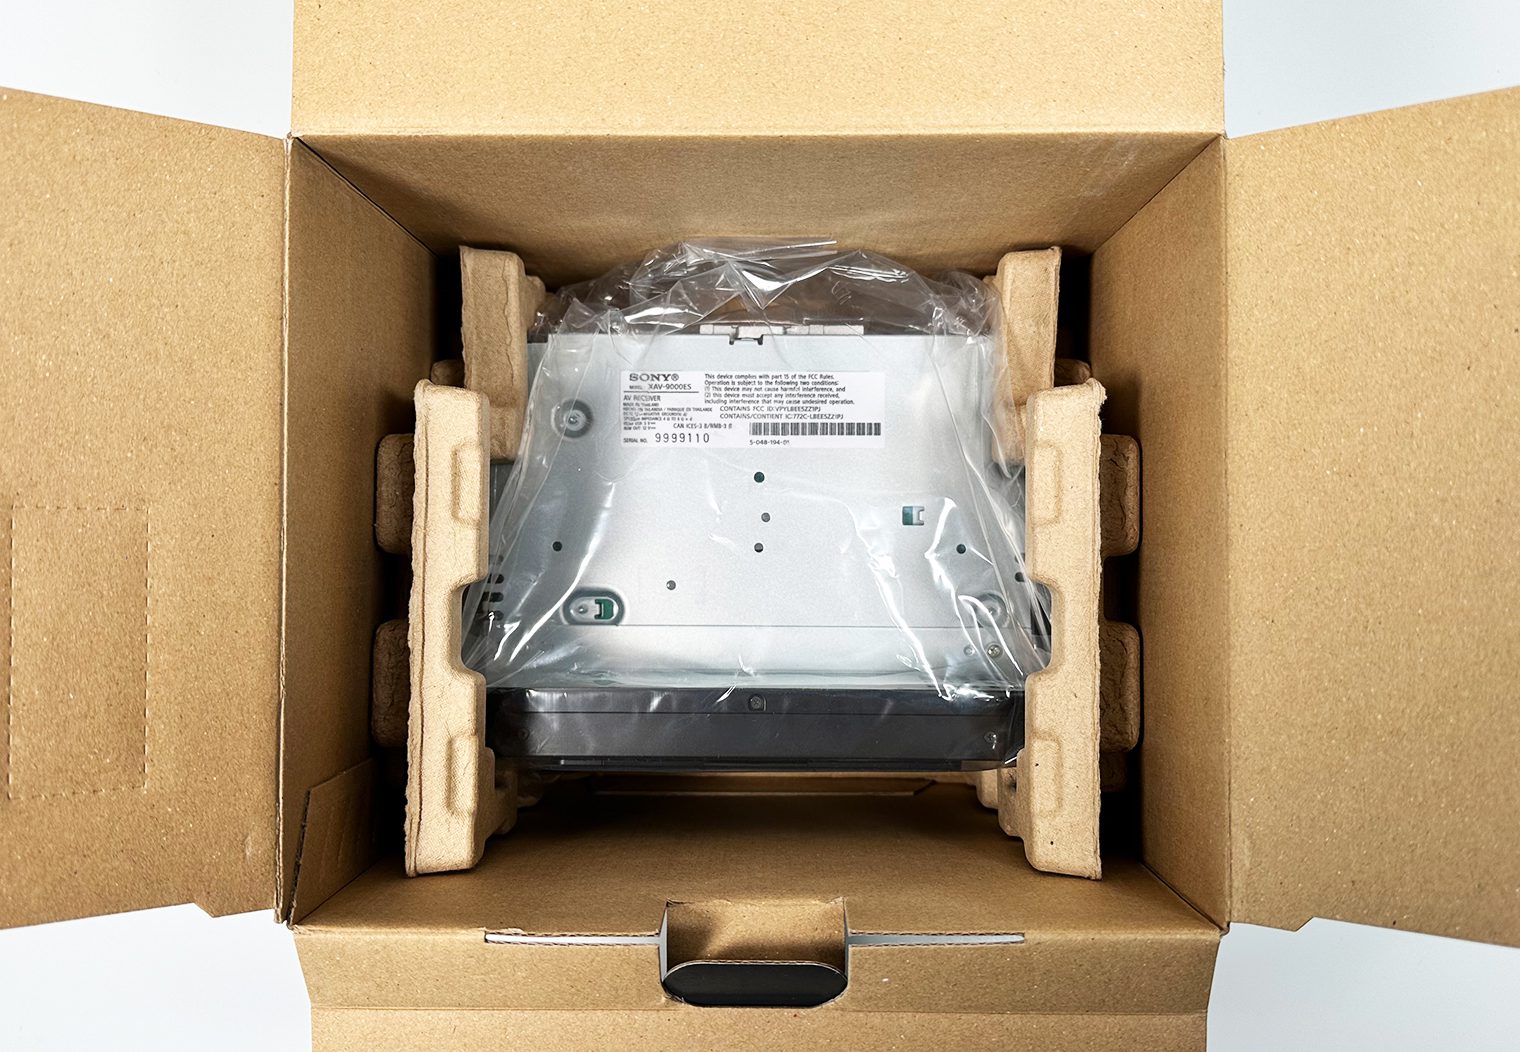
The packaging for Sony's XAV-9000ES is the consistent with the look and feel of the rest of the lineup. It's sleek, simple and has a high-end look and feel before you even open the box. Simple design, but also provides you with a number of key details about the unit if you were in the store looking for something specific. Before opening it up, I could probably tell you all of the high level information you'd need to know about the unit.
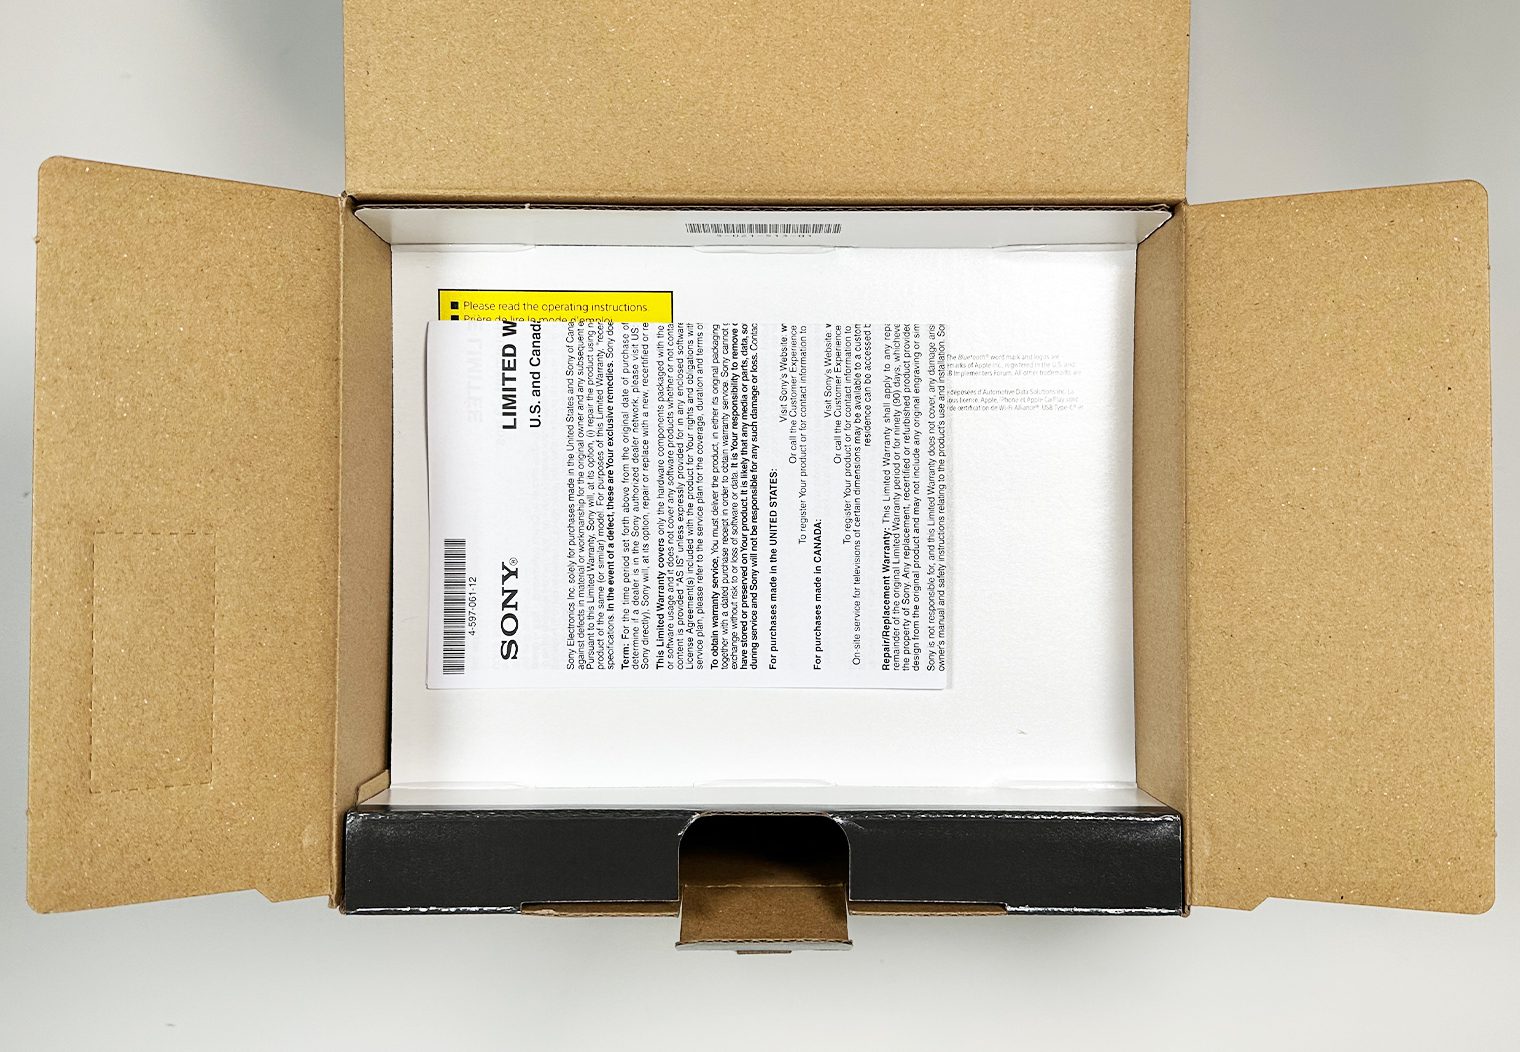
Opening up the box is pretty consistent with any other Sony head unit in terms of the packaging, contents, moulding, etc. You're greeted with a manual at first. It almost looks like a box within a box at first glance but underneath the tab you'll find the components and the receiver neatly tucked within. No concerns about the packaging or damage necessarily from shipping. The screen is wrapped in plastic with an additional plastic film cover to protect from scratches from anything that might come loose and from installation.

Chassis & Screen
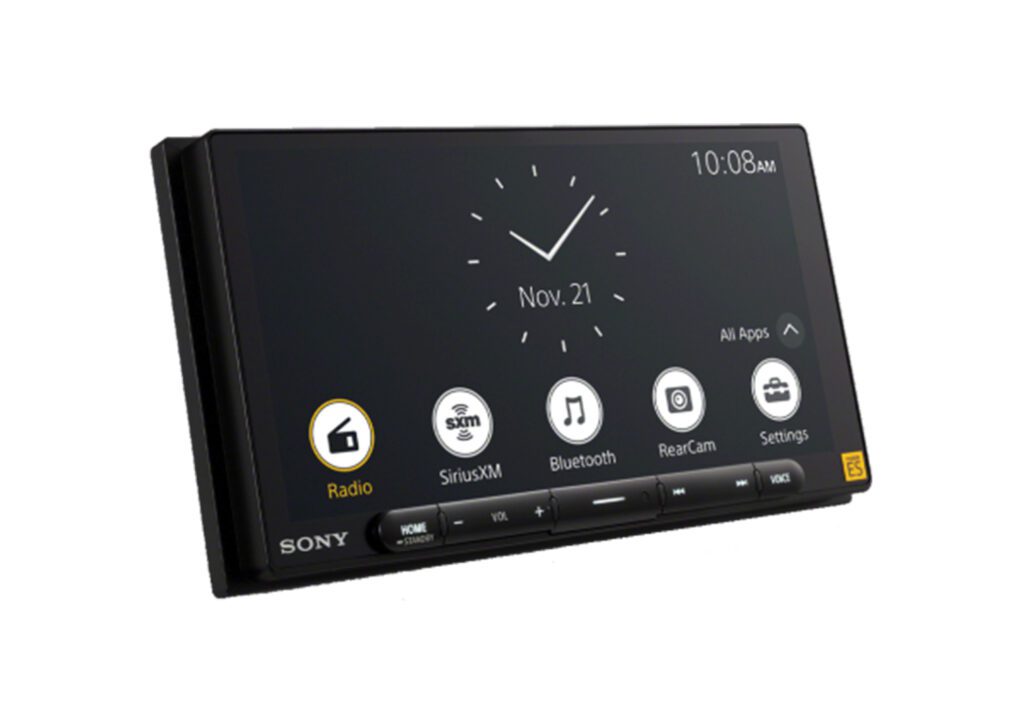
When you pull the unit out of the box, the first thing you probably gravitate towards is the screen. The 9000ES features a 6.75″ capacitive touchscreen with a 1280×720 resolution. In comparison, the XAV-AX4000 has a 800×480 resolution which is considered standard. 1280×720 is typically found on higher-end (and higher priced) units.
And if you're wondering what a capacitive screen is, there are two main types of touchscreens that manufacturers use for car stereos – capacitive and resistive. Capacitive touchscreens use a layer of ‘capacitive' material to recognize electrical field changes when a conductive object like your finger touches the screen. They're typically more sensitive and allow for multi-touch support. They frequently have higher clarity and durability than resistive screens as well. However, they only respond to conductive input and may require a special conductive stylus.
On the other hand, resistive touchscreens work by detecting physical pressure when the top layer is pressed, allowing for input with any object. They normally have lower sensitivity than capacitive and primarily support single-touch inputs. Sometimes, they're more resistant to scratches but may have an impact on visibility due to additional resistive layers.
Moving on.. The touchscreen also leverages an anti-glare film that helps with glare from the sun at certain angles. Anti-glare, in my experience, cuts down on maybe 20-30% of the glare during the worst times of the day but doesn't completely resolve glare. But it's definitely nice to have and you can tell a difference.
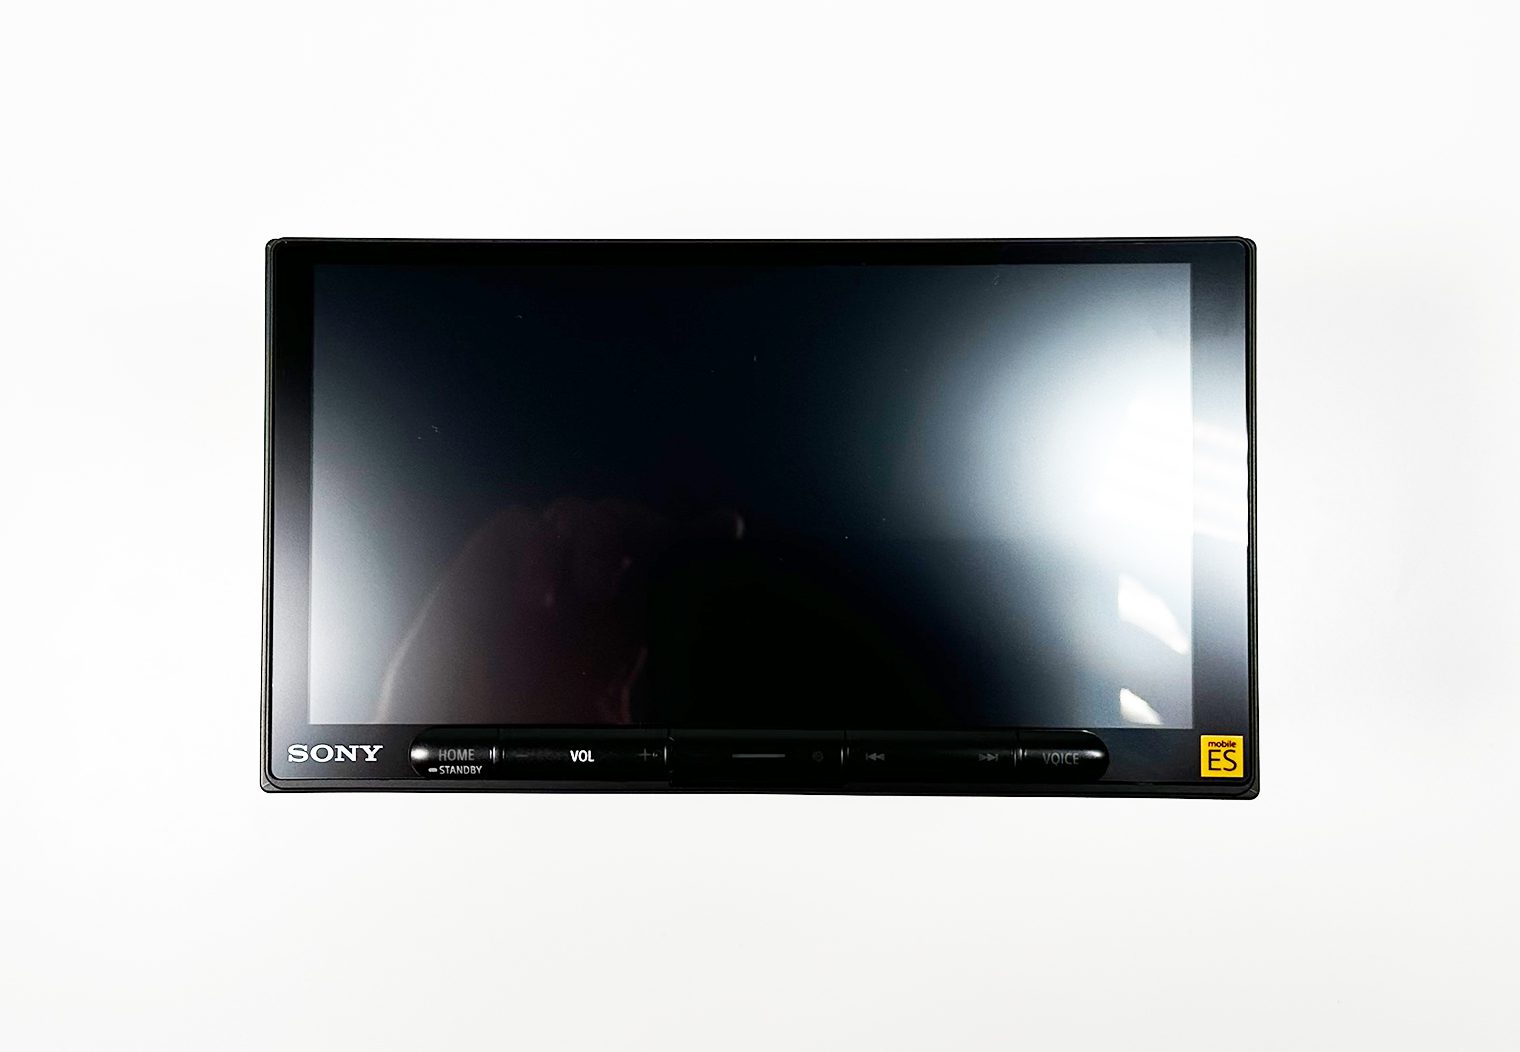
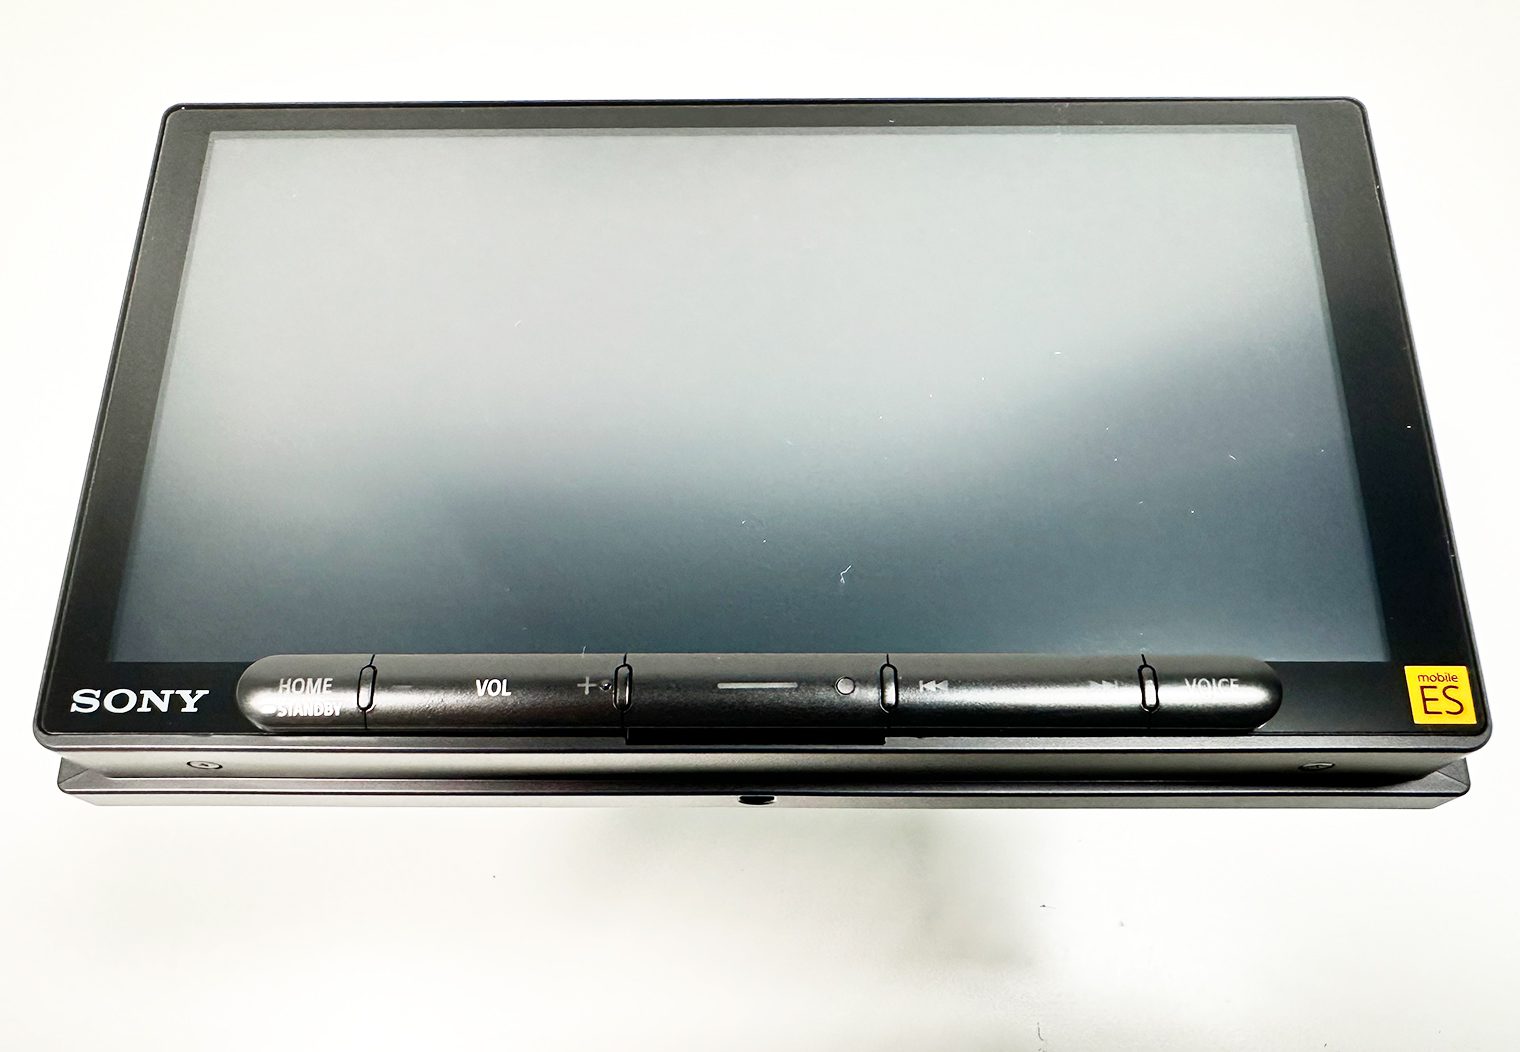
The other noteworthy feature related to the screen is the bezel-less design. Along the outer edge of the screen you'll notice it's flush without a raised ridge or bezel. Many of the Sony units have this, and it creates a seamless look when installed. If you're looking for a clean finish in your dash, I recommend a bezel-less design like this because it looks more OEM.
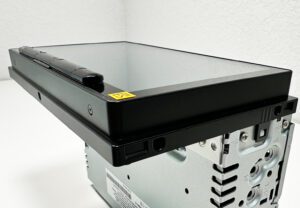
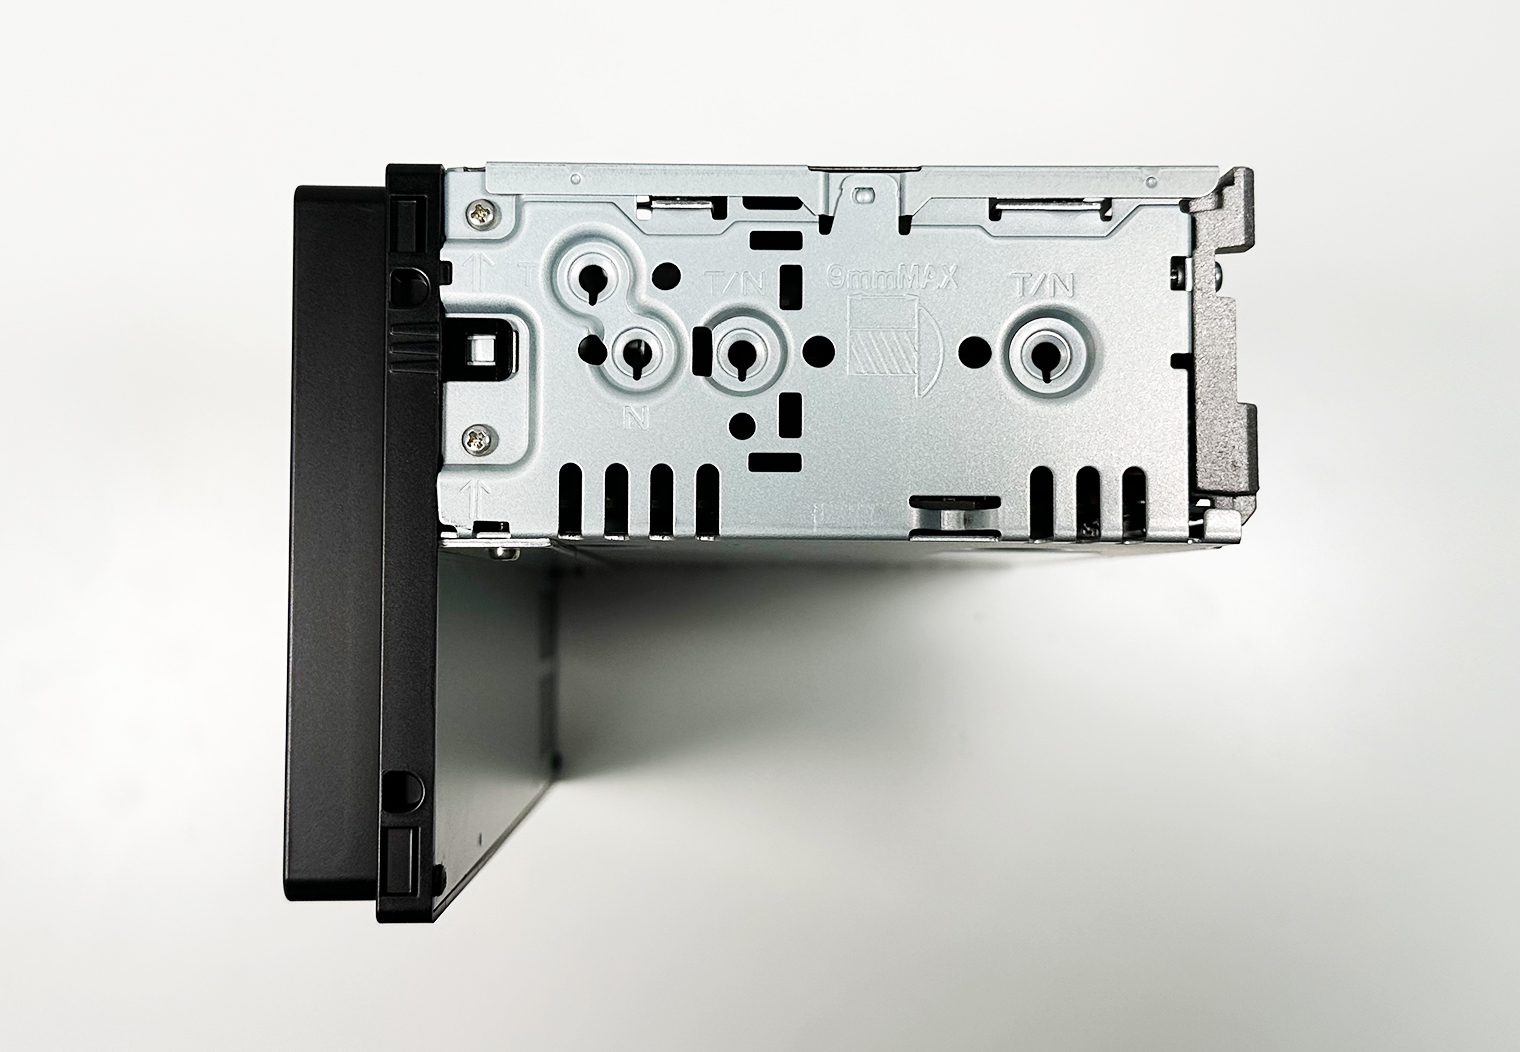
Turn the unit on its side and you'll notice the shallow-depth single DIN looking chassis. This is a nice feature for installers and allows for more room in the dash – it's both thinner and more shallow than a traditional double DIN. For example, if you wanted to install a SiriusXM module or iDatalink, the design allows you to easily tuck additional wires and modules along the bottom side of the chassis making installation much quicker without the hassle of mounting it deep within the dash. This is particularly helpful for vehicles that don't have much room behind the head unit to begin with. Notably some of the older European cars like Mercedes and VW.
This doesn't always mean you can install this double DIN head unit in a single DIN opening though. The main point of concern is the lower part of the screen and how well that fits flush with your dash and whether or not it will cover up any functionality or buttons. It's possible though and Sony promotes it as a single DIN unit when compatible.
What's in the Box
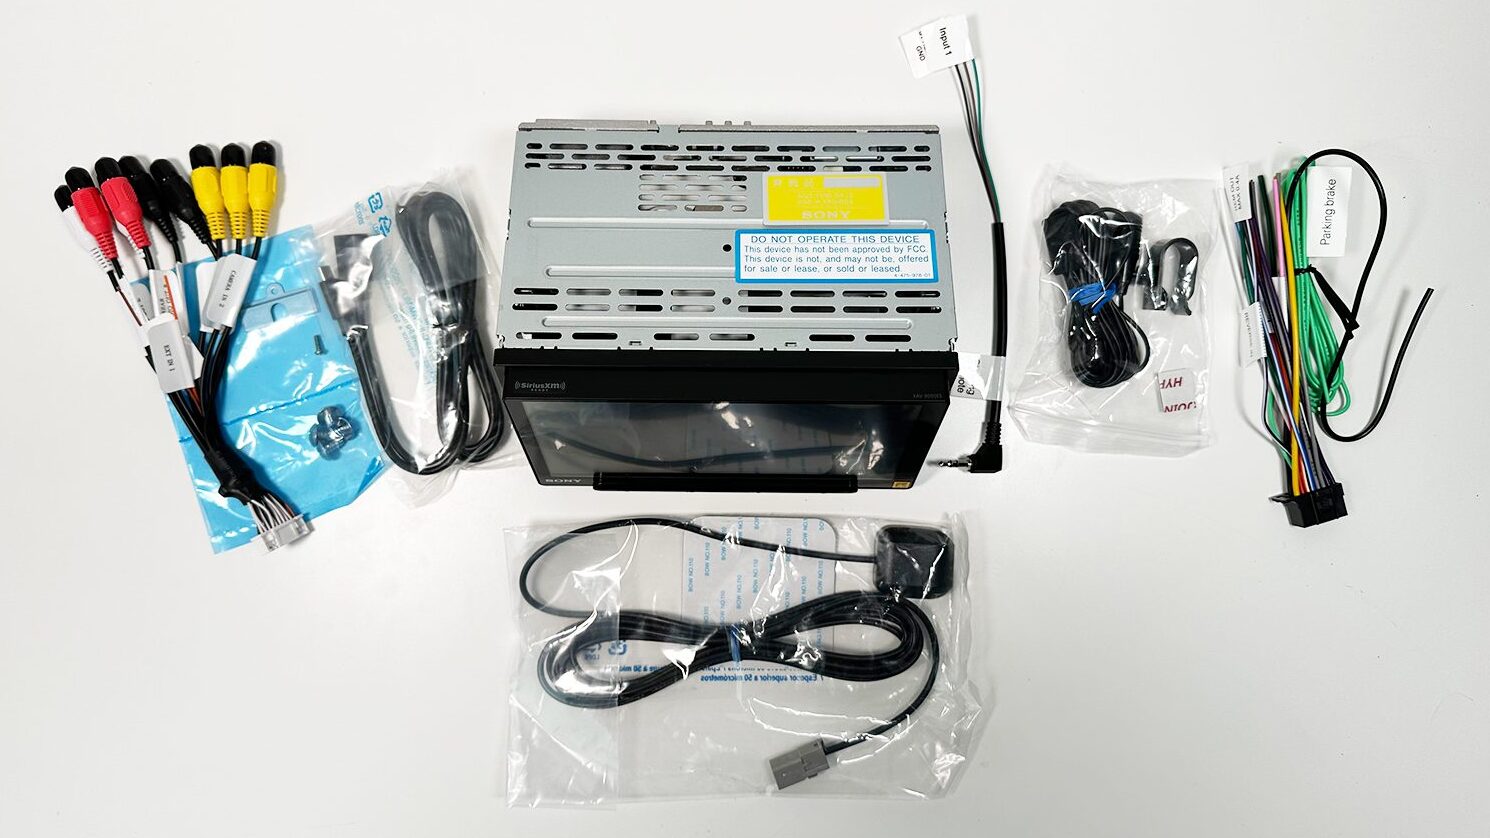
One piece of information I wish was on the box – contents. From the factory, the 9000ES includes:
- Double-DIN source unit (10A fuse)
- Wiring harness (attached 6.5′ parking brake wire)
- Camera/Preout harness
- 3-Wire to 3.5mm SWC adapter
- 59″ USB-C extension cable
- GPS antenna (attached 10′ cable terminated by a FAKRA connector)
- GPS Antenna mounting plate
- Microphone with visor-bracket (attached 12′ cable terminated by a right-angle mono-3.5mm connector)
- Surface bracket
- Four M5x9mm ISO-screws
- Operating Instructions
- Warranty Information
- Installation Note
Expandability & Connectivity
Sony's 9000ES comes with all of the expandability and connectivity features, inputs and outputs to make this a great option for a high-quality, high performance stereo receiver. This includes the latest Bluetooth tech, wireless CarPlay and Android Auto, USB, 5V preamp outputs and more.
The only callout I'll make up front before diving deeper into the connectivity is that this is not really a multimedia head unit and is not designed for video playback. Although it can support MOV, ASF, WMV, AVI, MKV and MPEG-4 video files via a USB drive, it does not have an HDMI input nor does it have an A/V input. I recommend taking a look at the XAV-AX6000 if that's what you're interested in or check out our list of best rated multimedia and video head units.
Wireless CarPlay & Android Auto
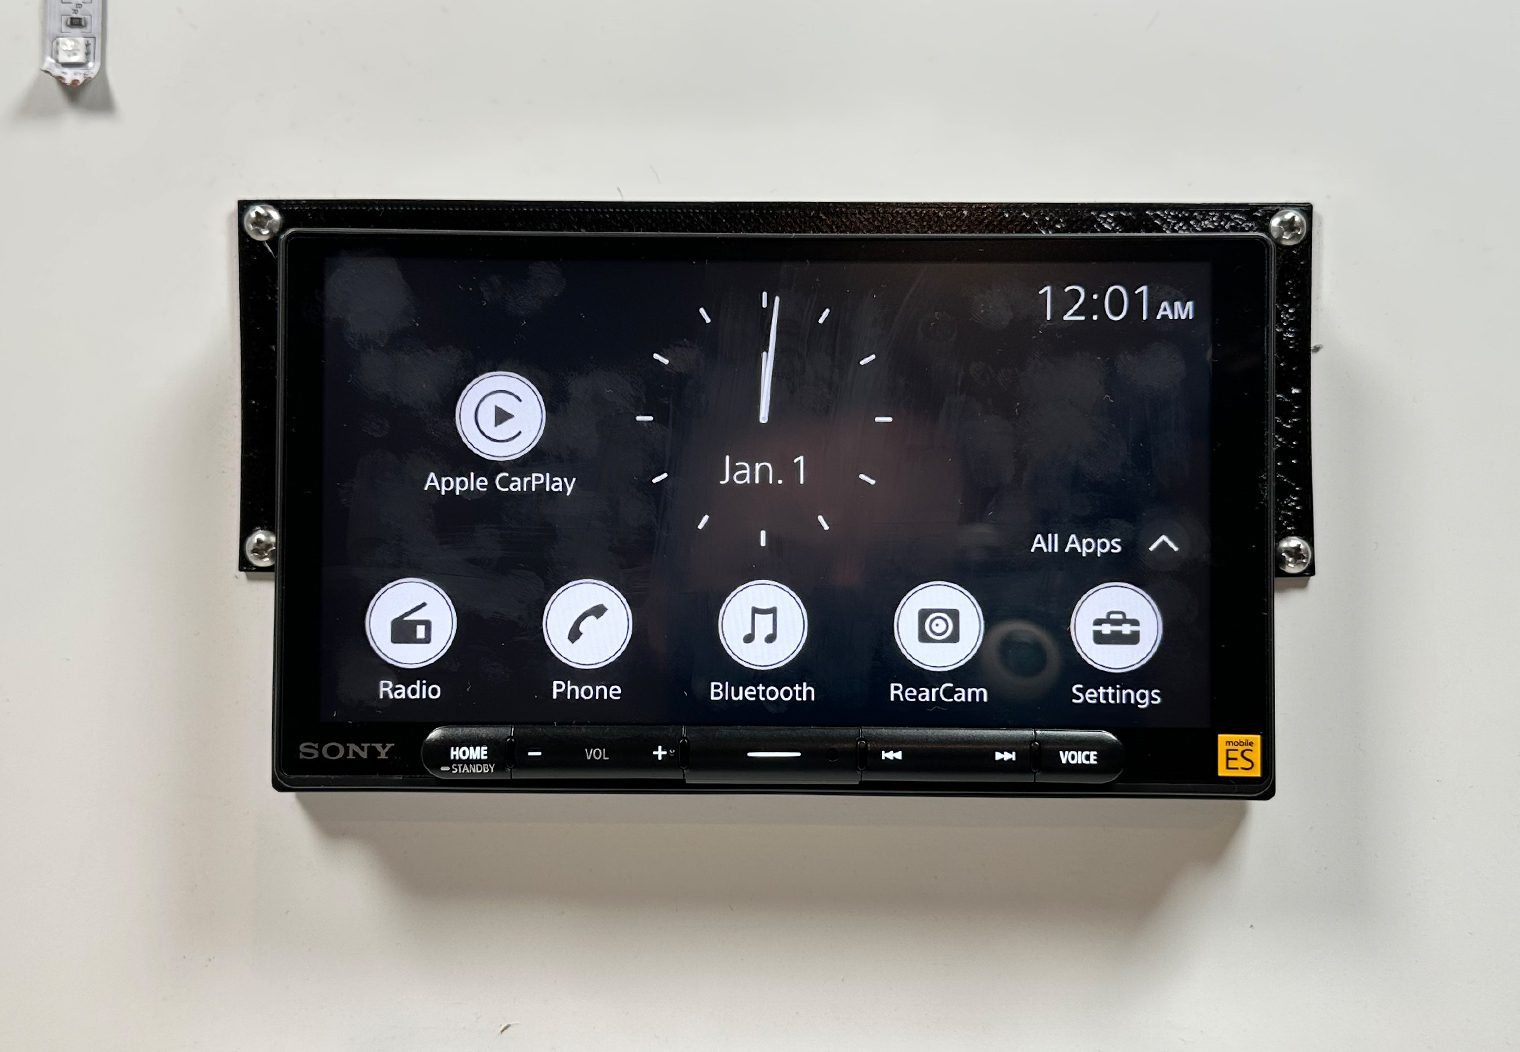
To kick it off, Sony extended the Wireless CarPlay and Android Auto that they originally launched with the 9500ES, AX4000 and AX6000 to the 9000ES as well. Wireless CarPlay and Android Auto is an essential in my book if you plan on using the feature. Just like Bluetooth was the next iteration of wired auxiliary inputs, wireless CarPlay and Android Auto make an inconvenient wired feature standard and easy to use. Gone are the days you have to plug into the head unit for anything but charging your phone. In fact, that's all the USB will do for your phone. The connection is always wireless.
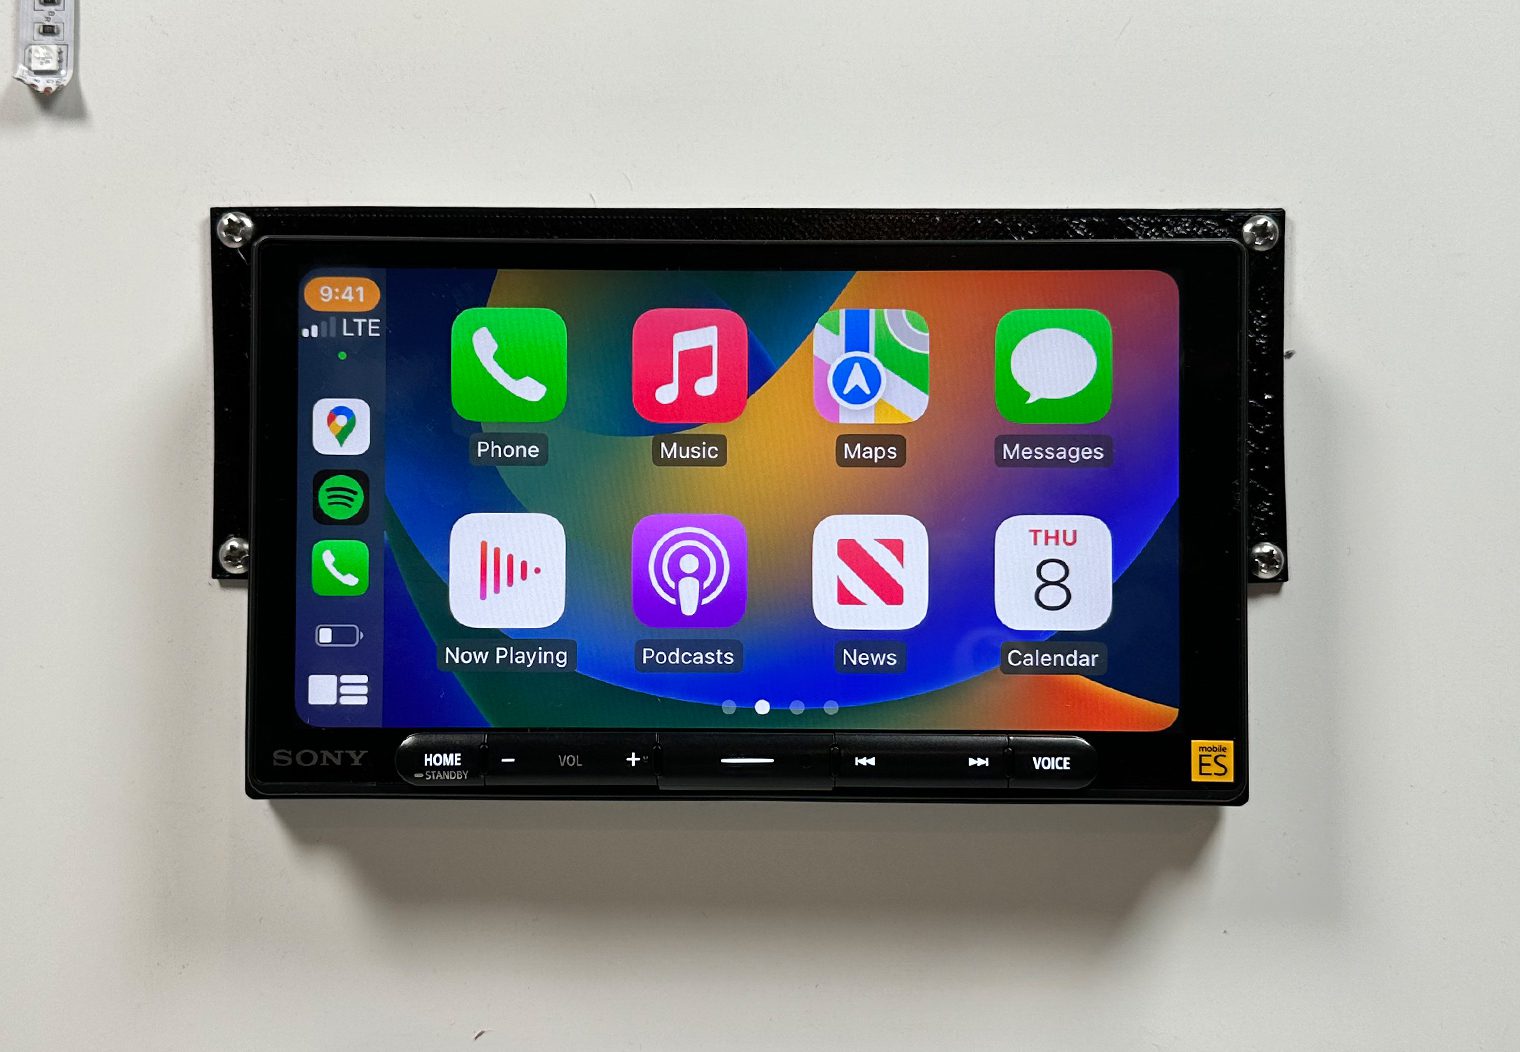
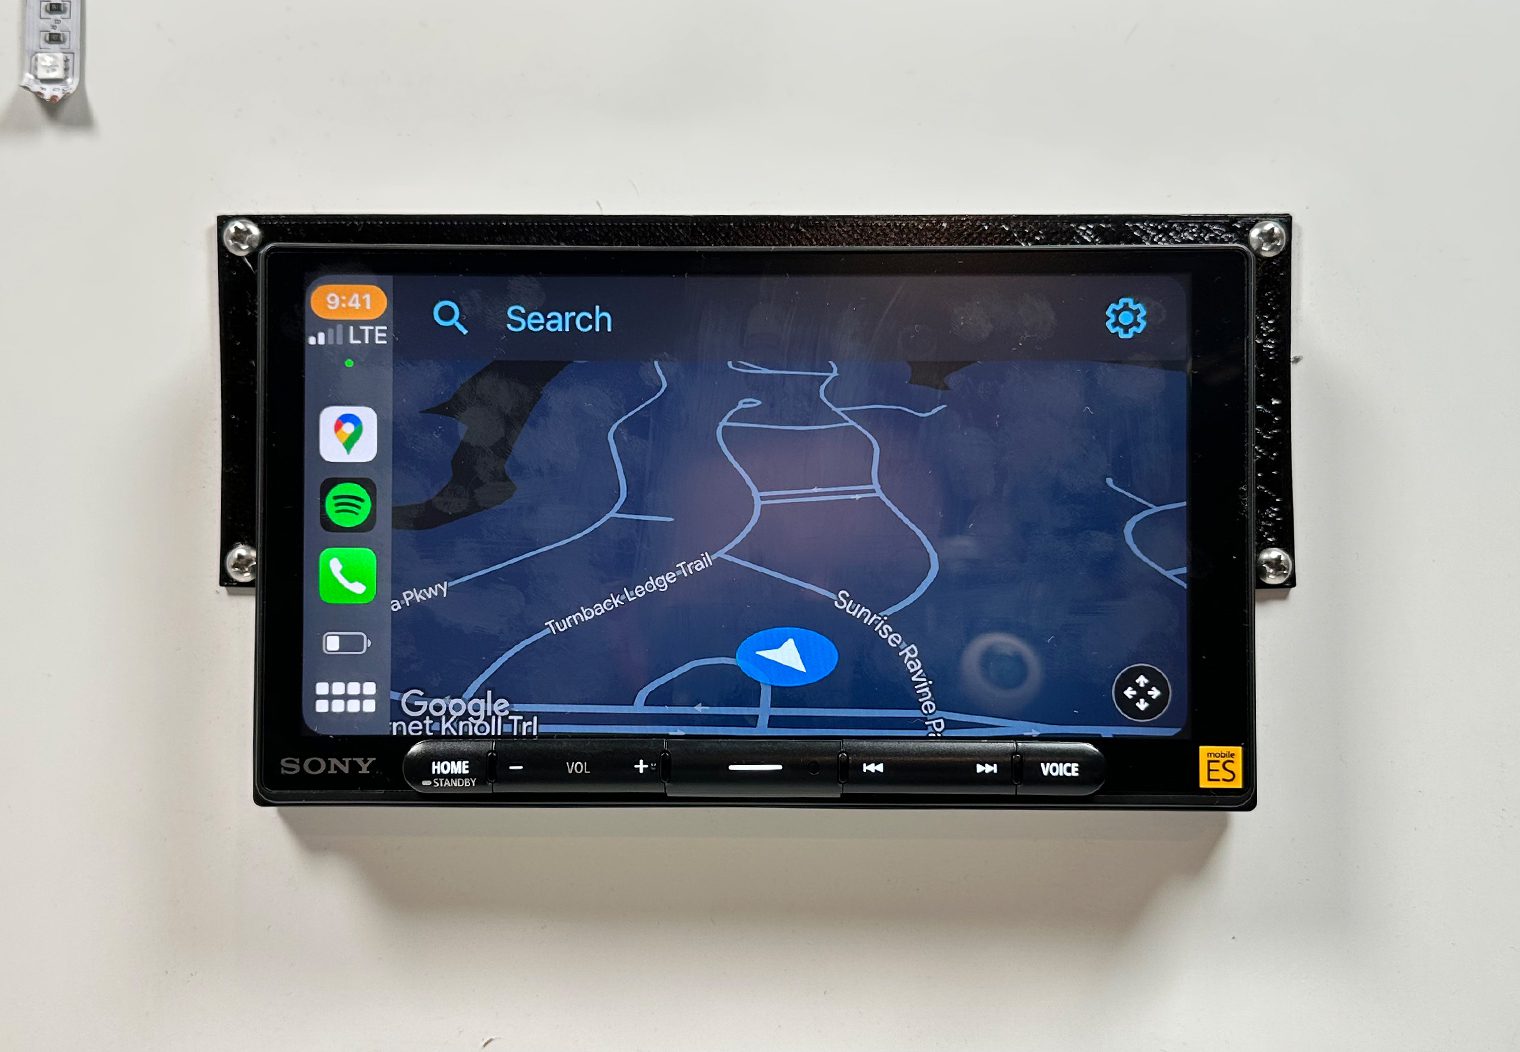
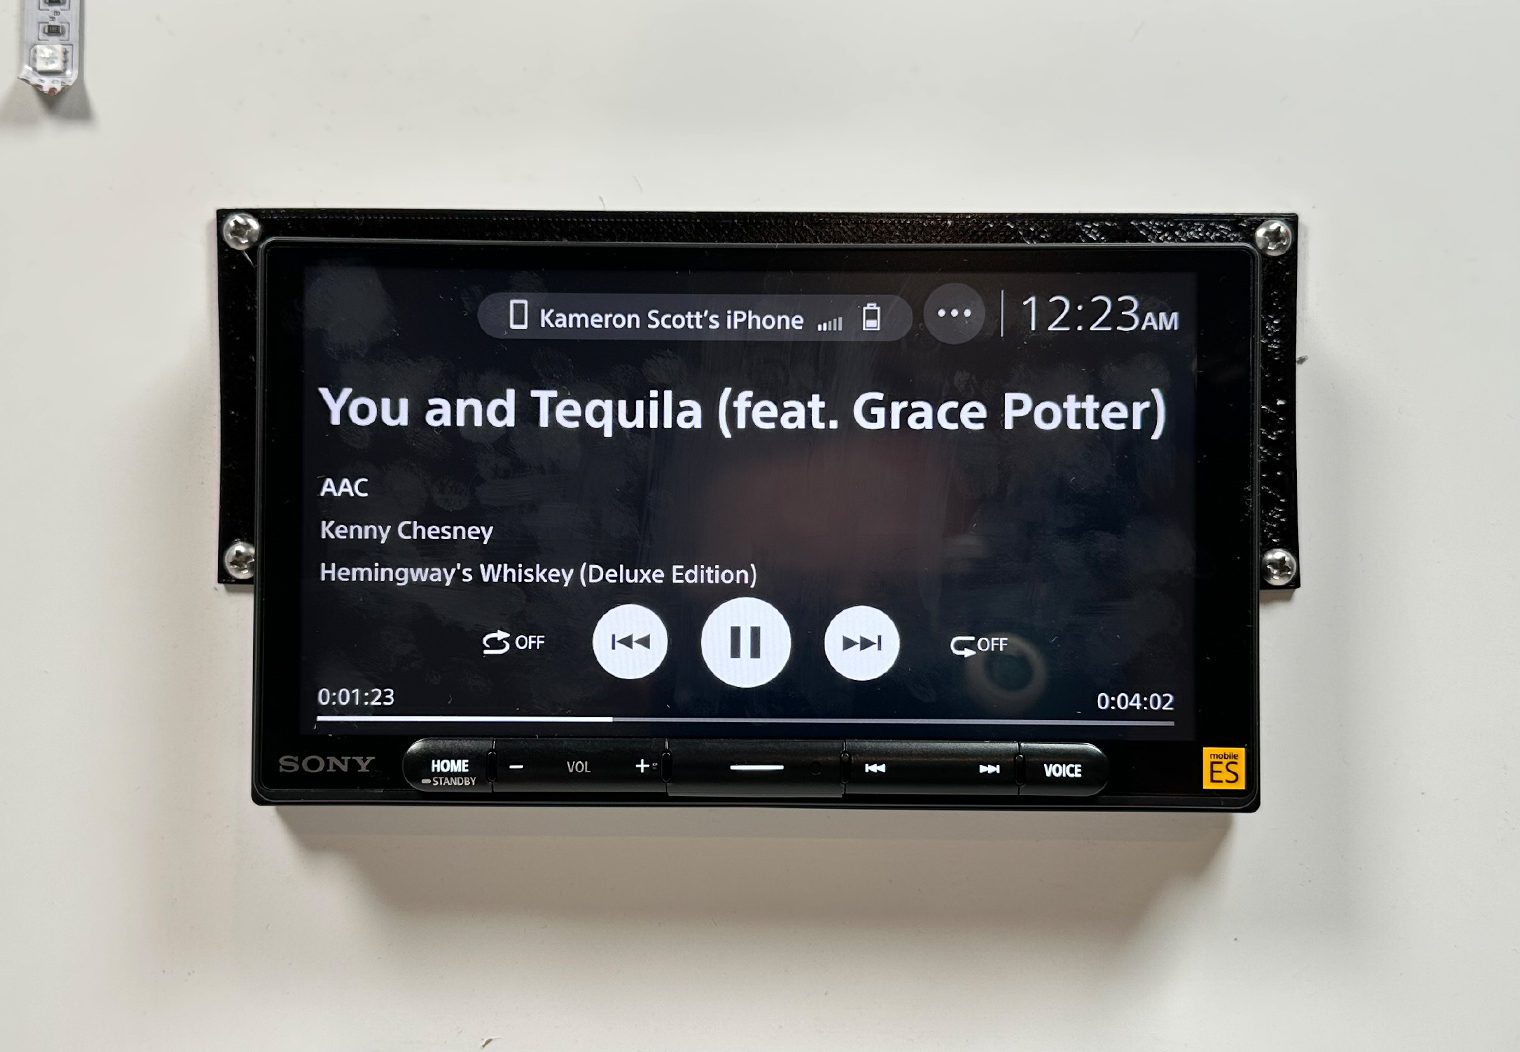
I won't get too into detail about the Android Auto and Apple CarPlay interface because it's pretty standard across all units. Even OEM units. I will say that the interface was consistent with most every other unit I've used. There were no unnecessary delays and the audio quality is superior to Bluetooth. Here's a few snapshots of the Apple CarPlay interface while I tested it out though:
Apple CarPlay
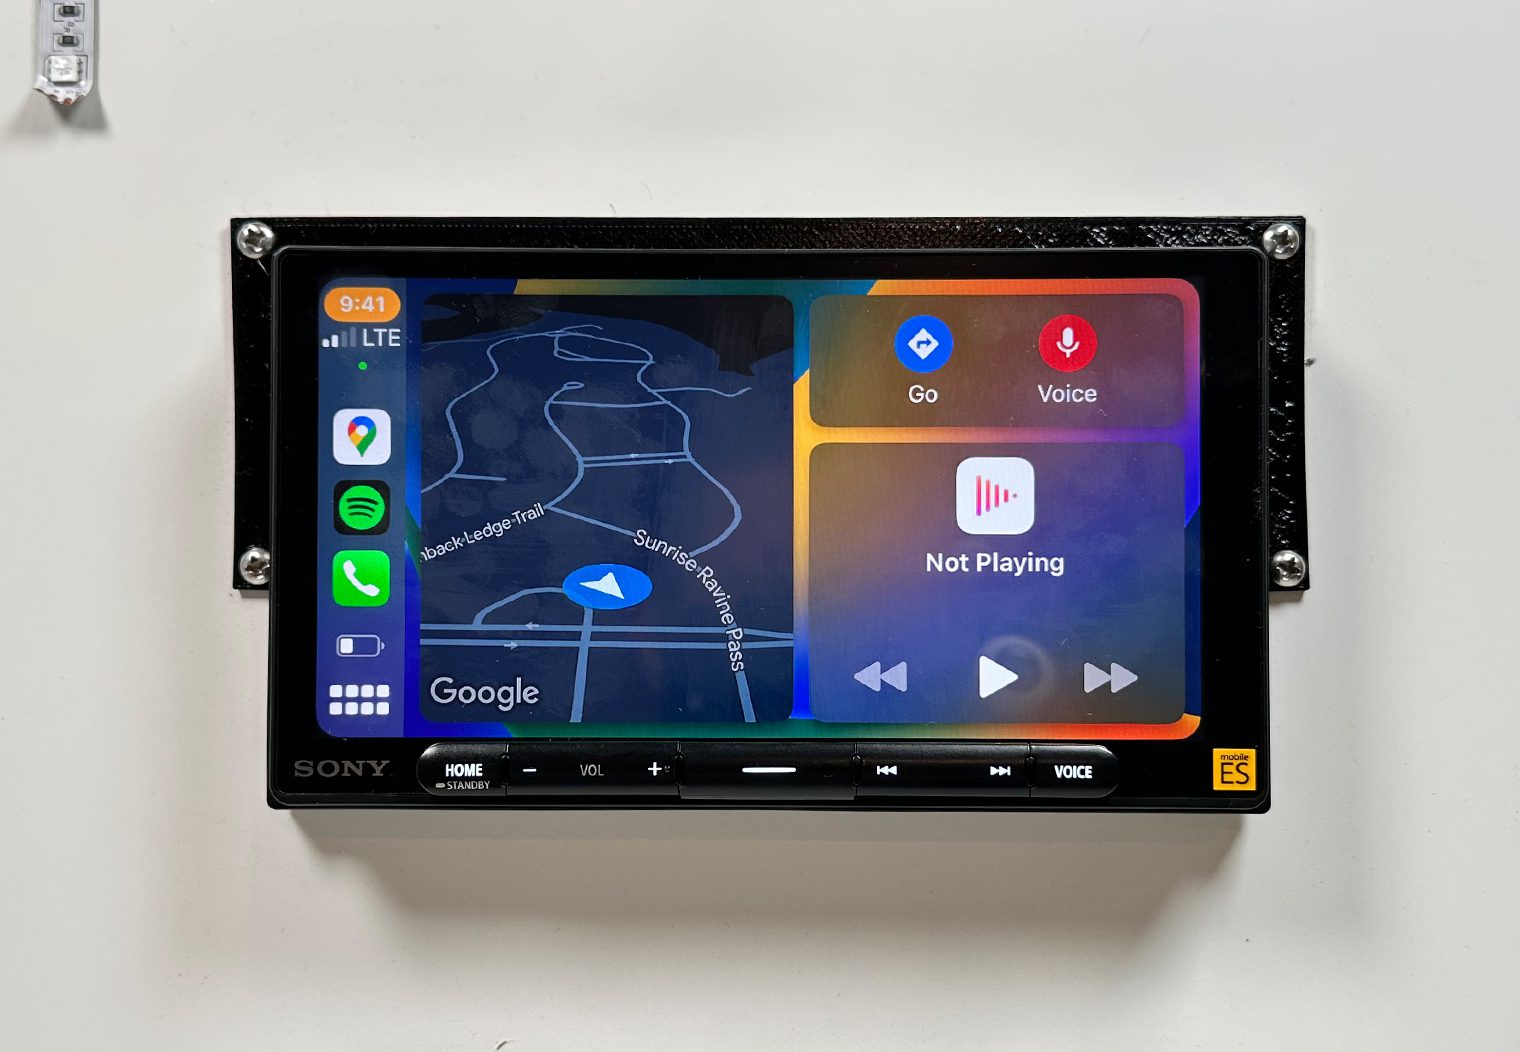
One note to installers – you must use the provided GPS antenna in order for this to work properly. If you don't, you'll get an error. Be sure to install the GPS antenna. I asked Sony about this error while I was reviewing another of their head units, they said it helps to improve the location accuracy when you're using map apps in CarPlay and Android Auto.
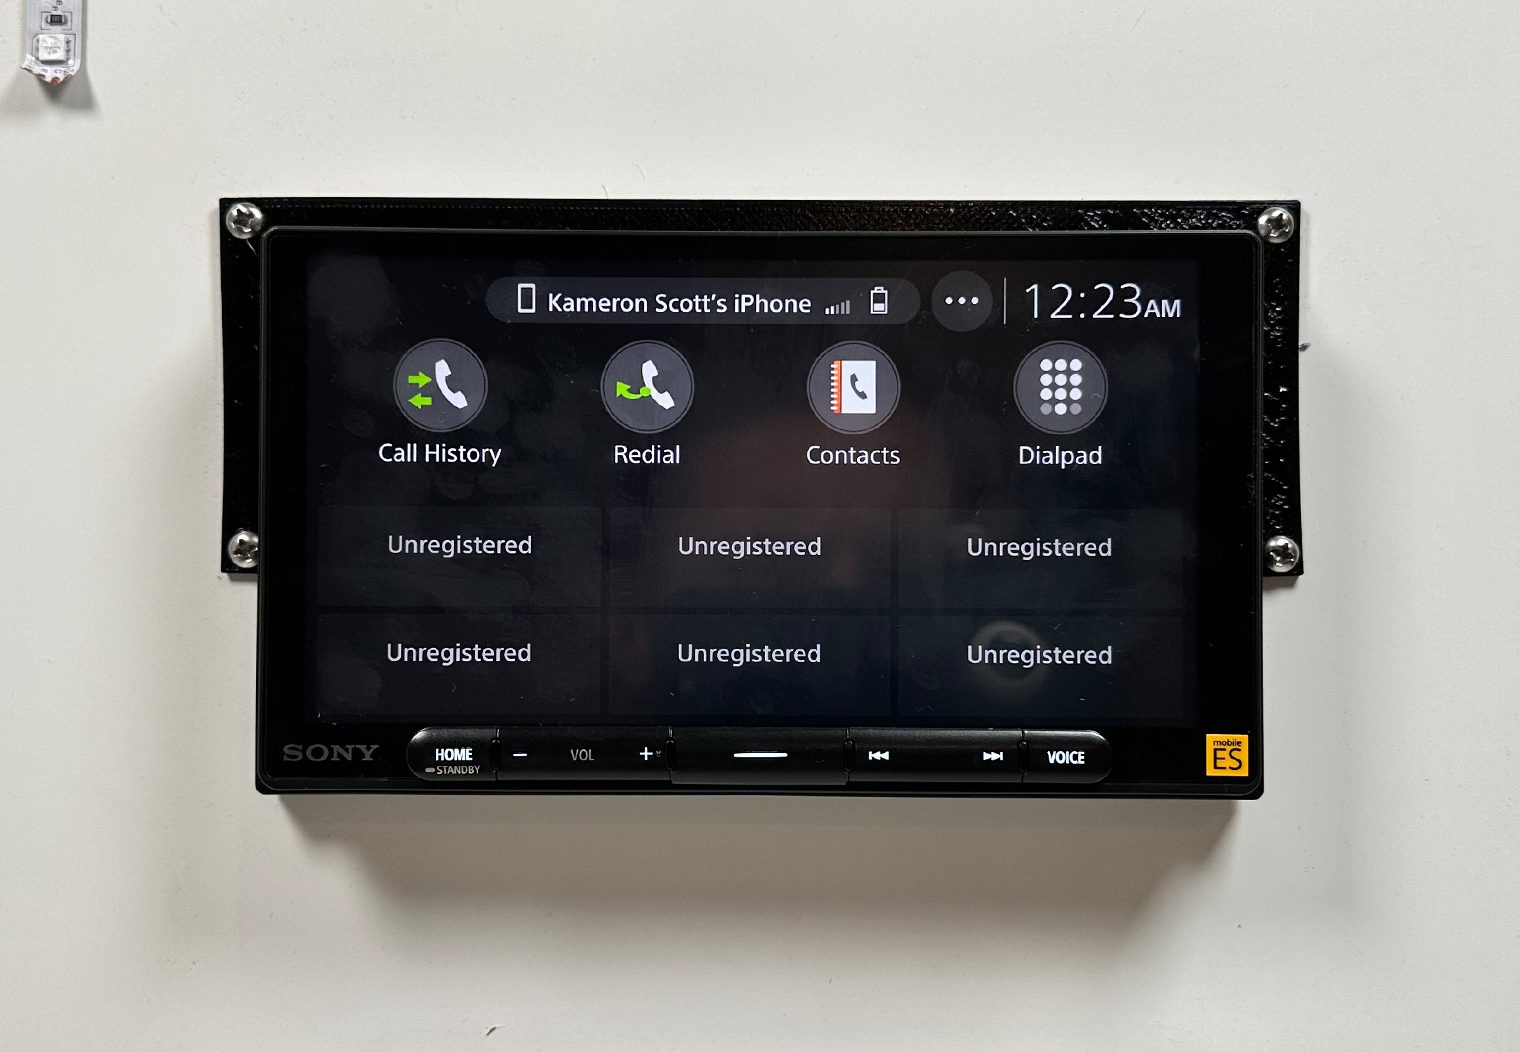
Bluetooth
Standard in almost all head units now, Bluetooth is also available on the XAV-9000ES. Bluetooth 5.0 specifically. It also has Sony's LDAC compatibility for high resolution audio over Bluetooth. So if you have a device that is not compatible with Apple CarPlay or Android Auto you can still make wireless calls and stream wireless music via your favorite streaming app.
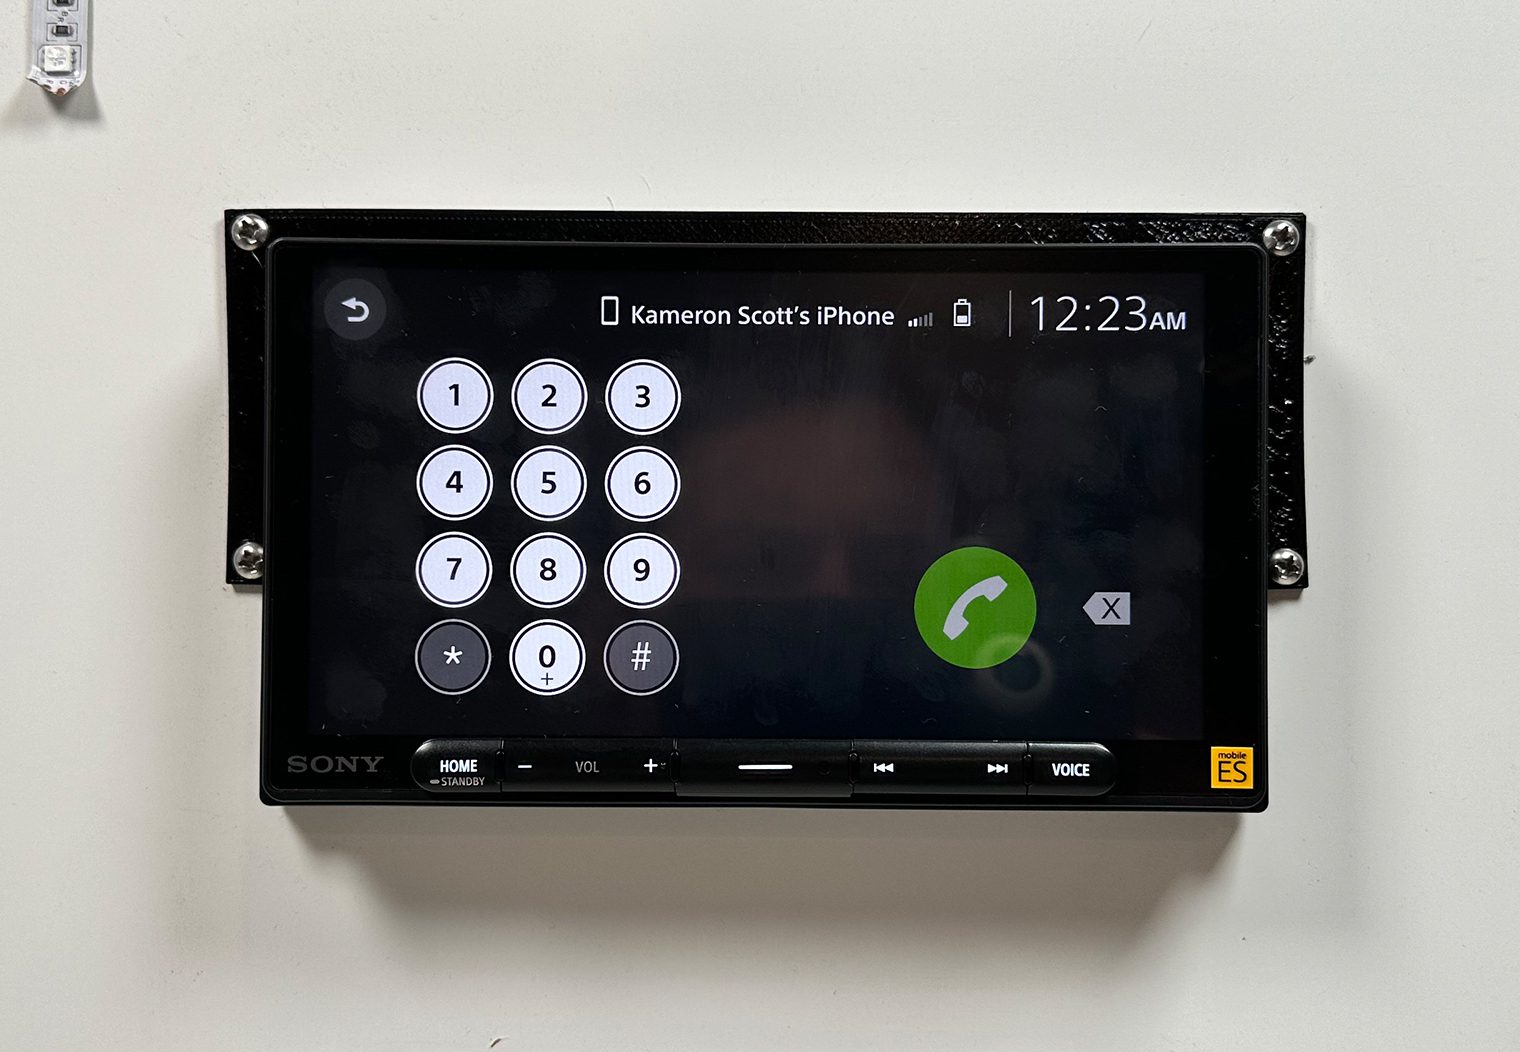
The phone interface is straight forward enough with the standard features such as call history, redial, contacts, dial pad and favorites to save your favorite contacts.
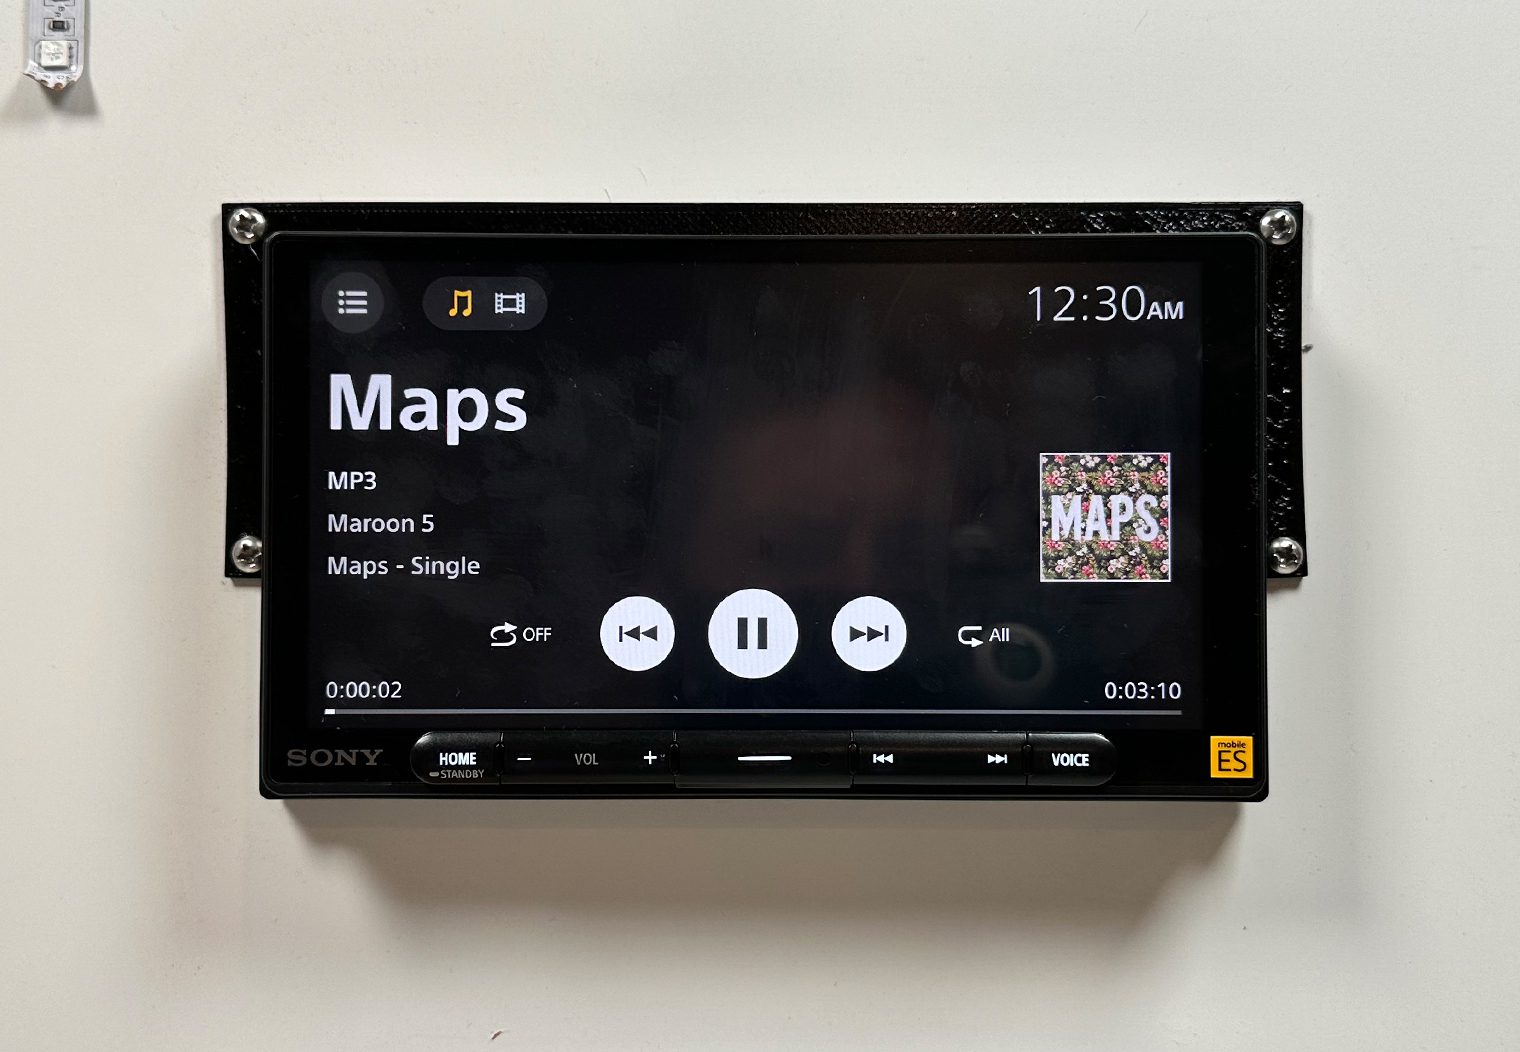
The music interface is simple as well. Depending on the app that you're streaming from – Apple Music, Amazon Music, Pandora, Spotify, SoundCloud, YouTube and more – the screen will display the song details such as song title, artist, album and album art (if available). It also gives you standard features such as previous, next, pause/play, shuffle and repeat. In most cases though if you're using a streaming app like Spotify or Pandora you'll need to search/find your songs directly on your smartphone instead of the unit.
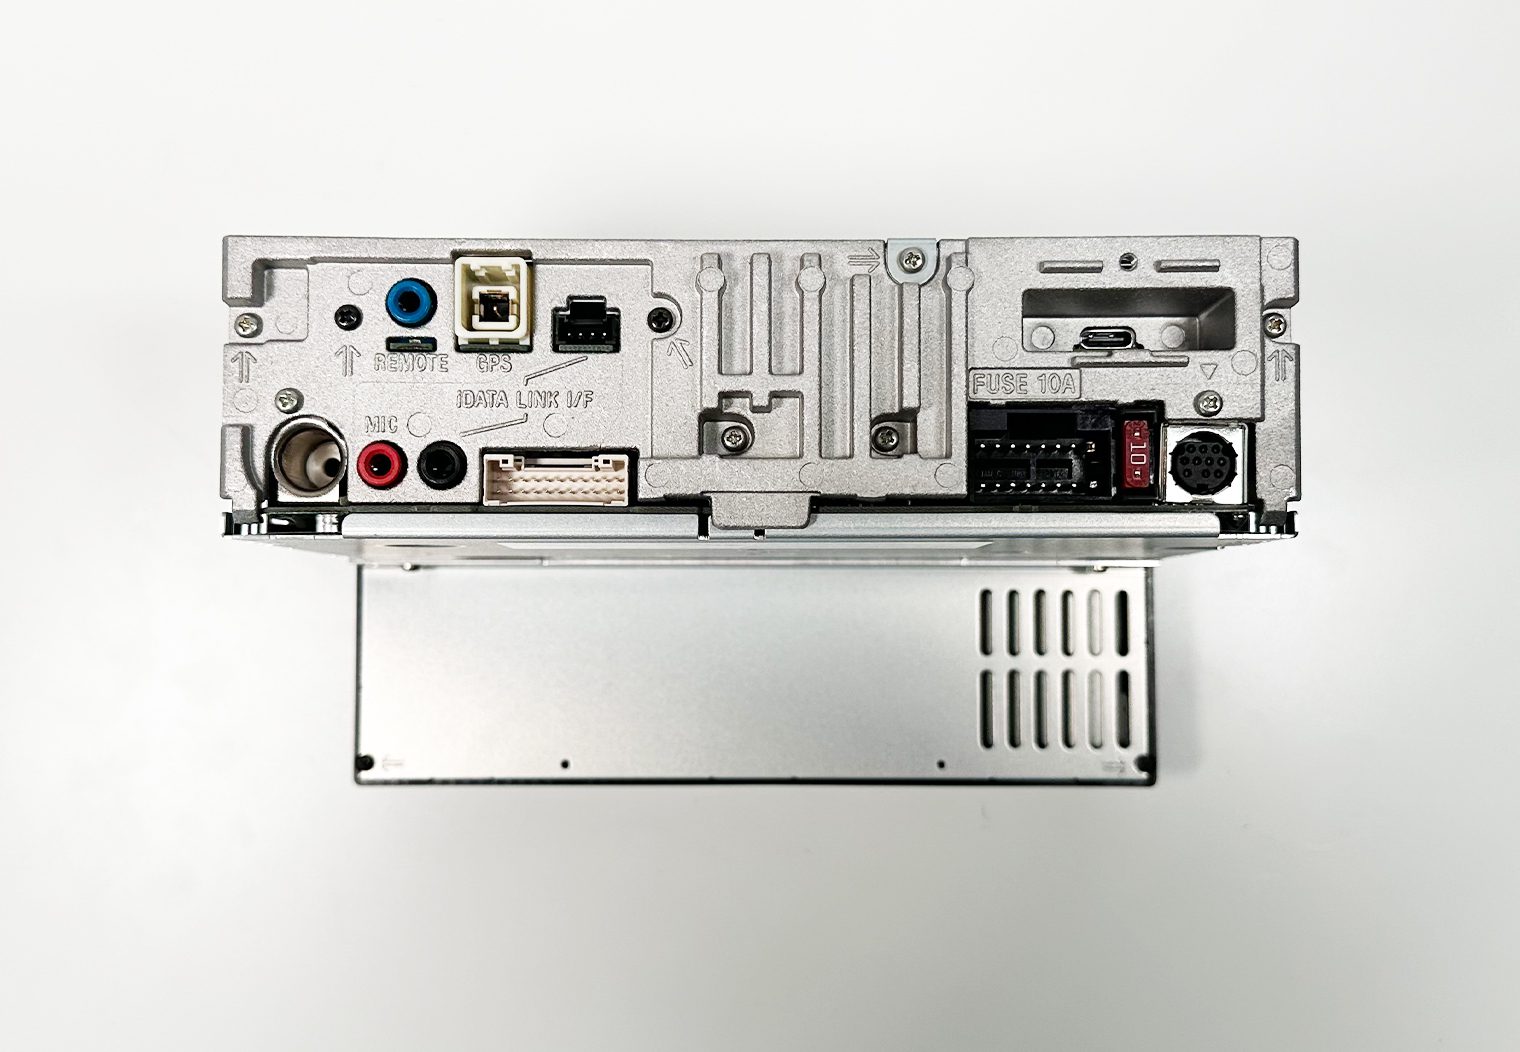
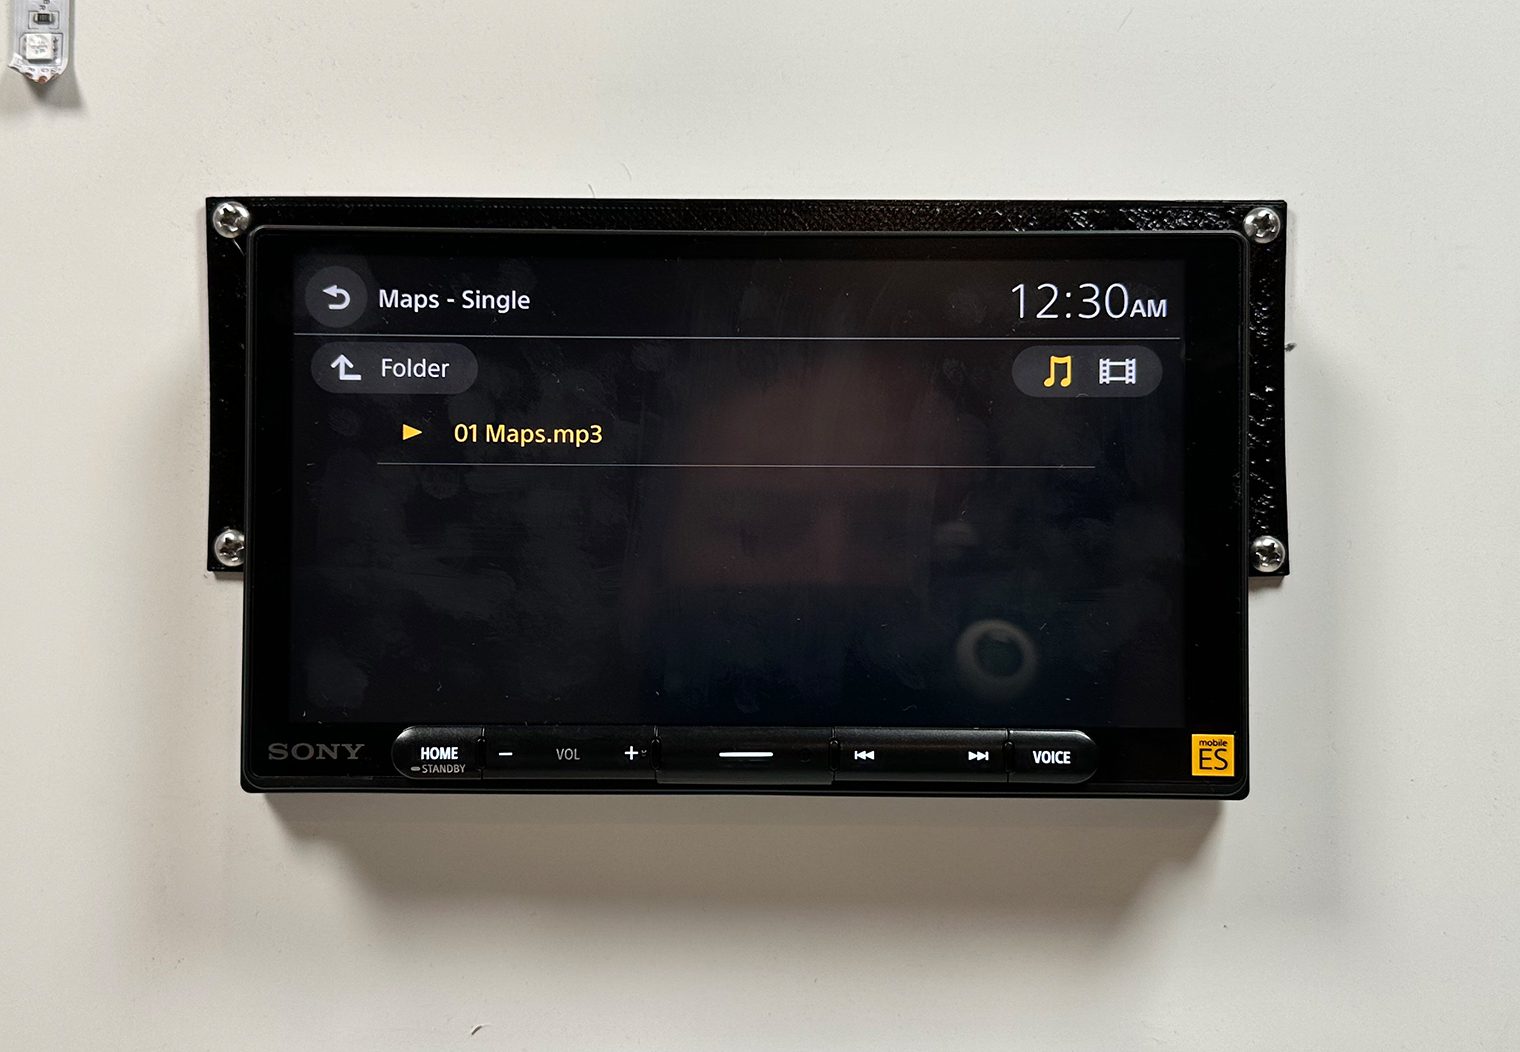
USB Input & Thumb Drive Control
On the back of the unit, the 9000ES features a USB-C input along with a 59″ USB-C extension cable for you to wire USB from wherever you'd like in the dash area. The USB-C does four main things:
- Charges your smartphone or other device. It's a 3A charging port.
- Enables you to play music from an MSC (mass storage device) like a thumb drive or hard drive. It supports MP3, WMA, AAC, ALAC, FLAC, WAV and DSD.
- Enables you to play video files from an MSC (mass storage device) like a thumb drive or hard drive. It supports MOV, ASF, WMV, AVI, MKV and MPEG-4 video files.
- Allows you to upload files. Particularly images for the background and software updates in the settings.
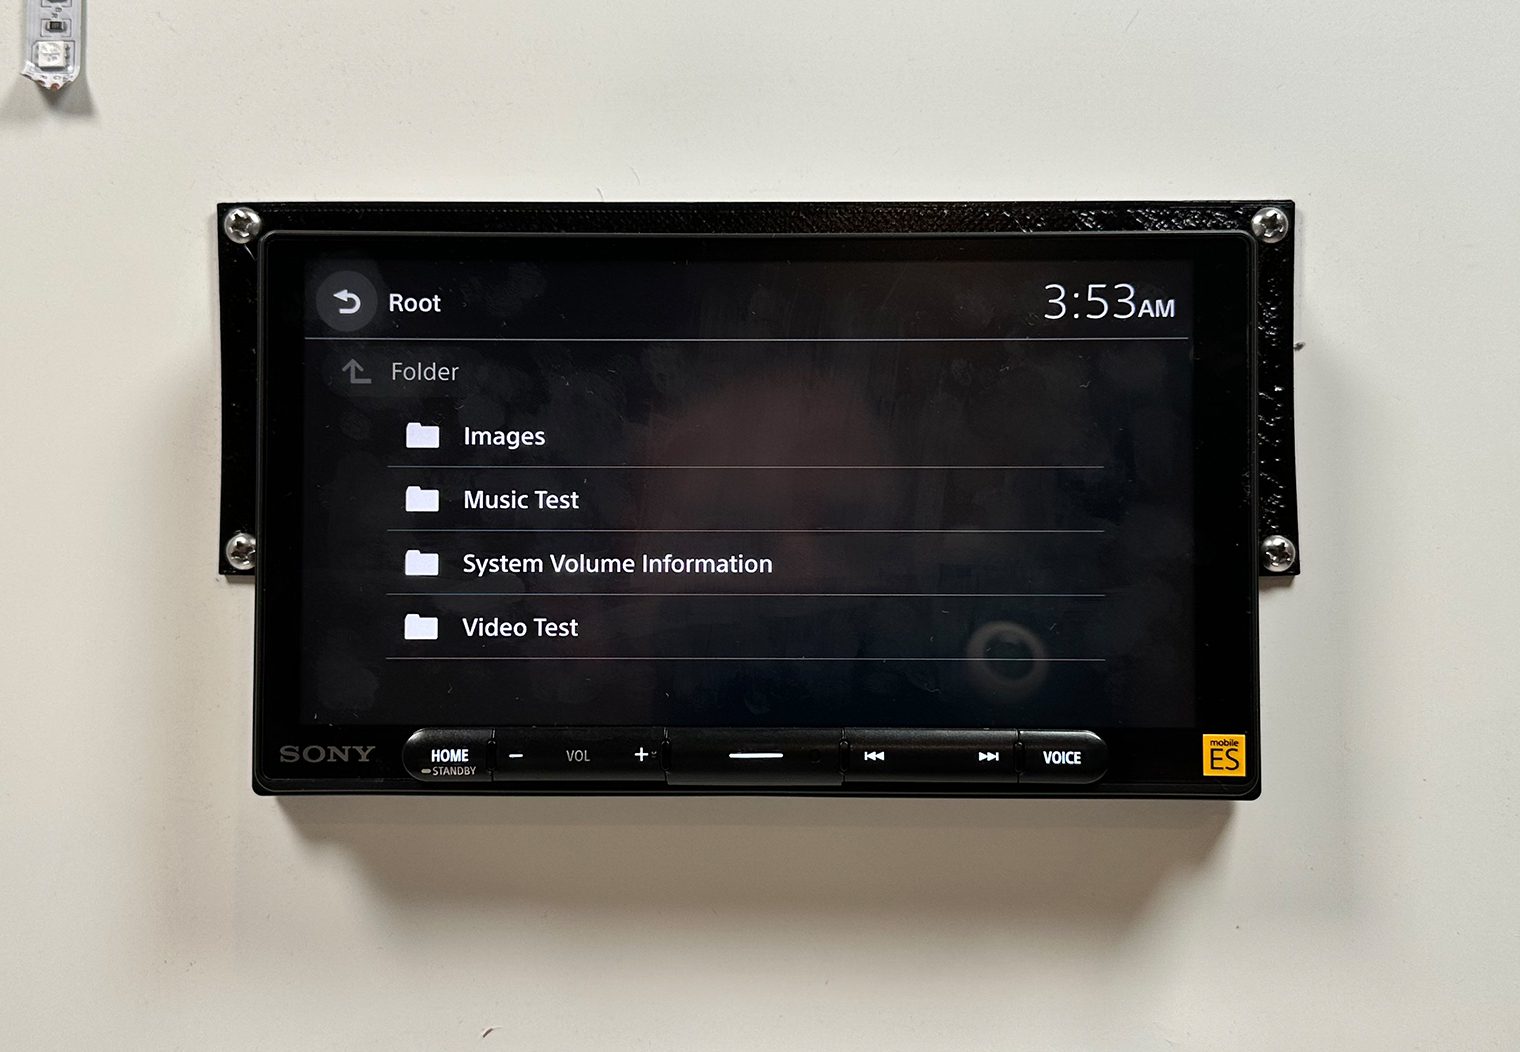
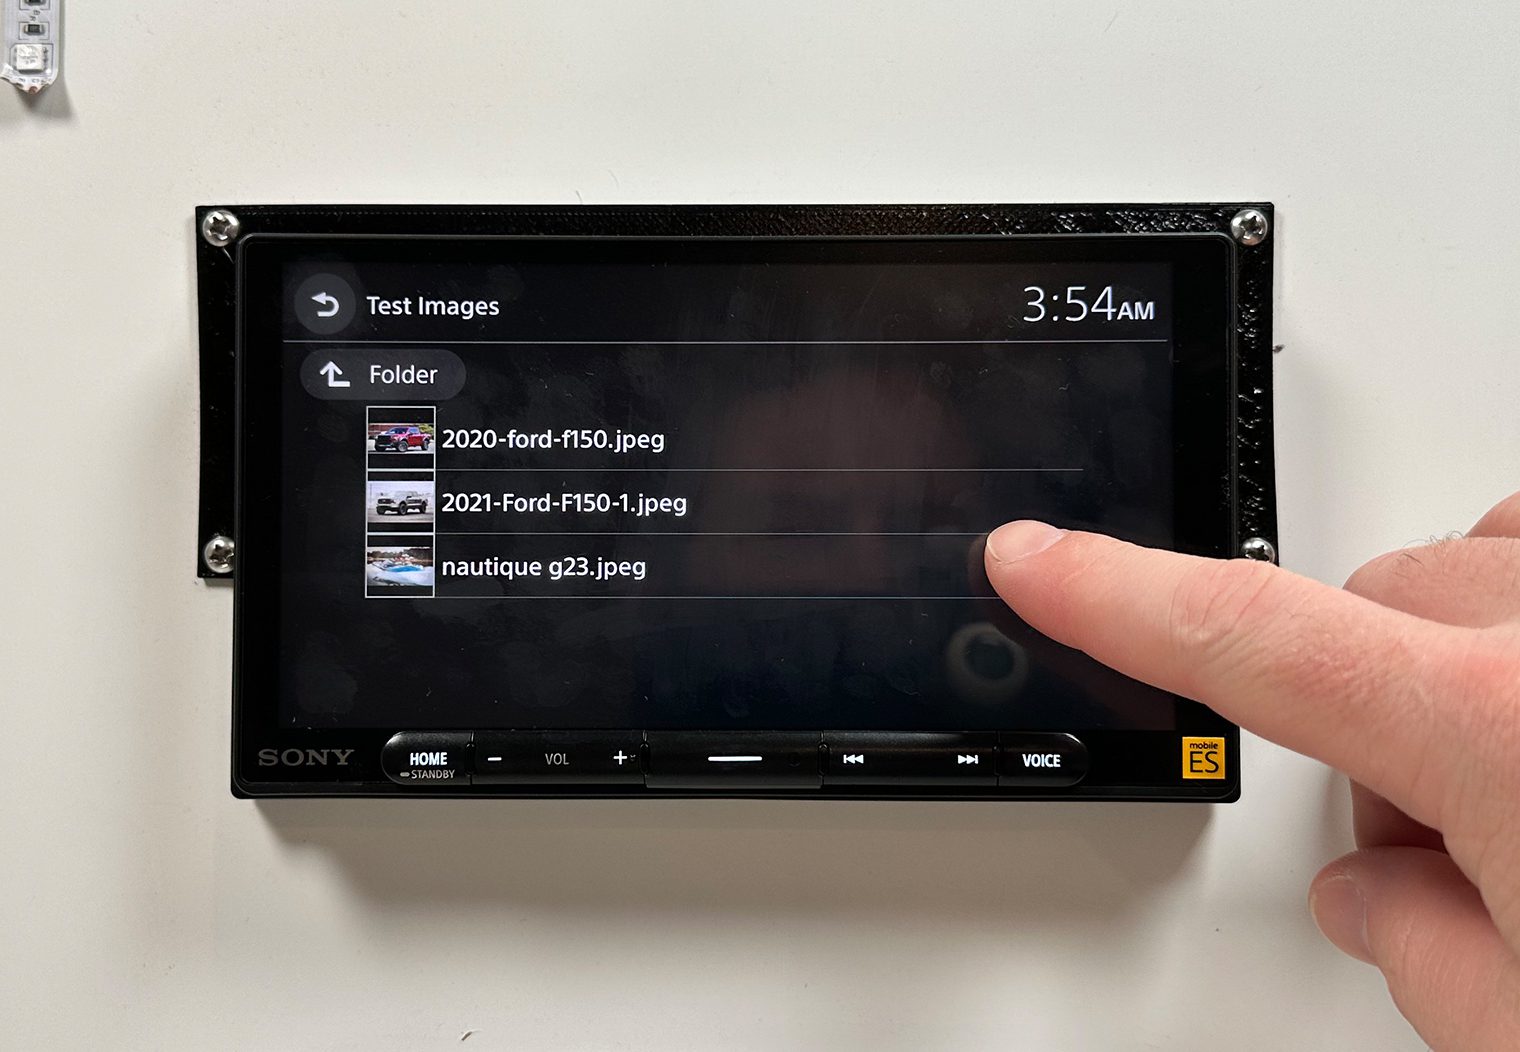
The music interface is identical to that of Bluetooth. But what's important to demonstrate, in my opinion, is the folder navigation user experience if you're planning on using an MSC to play music. Here are a few photos of the folder interface and me navigating through the folder structure on my thumb drive to find a song.


If your connected USB drive has compatible video files, you'll notice an additional icon displays on the top of the screen that indicates a media file. Click on this button to access your video files and navigate through your video-related directories on your thumb drive.
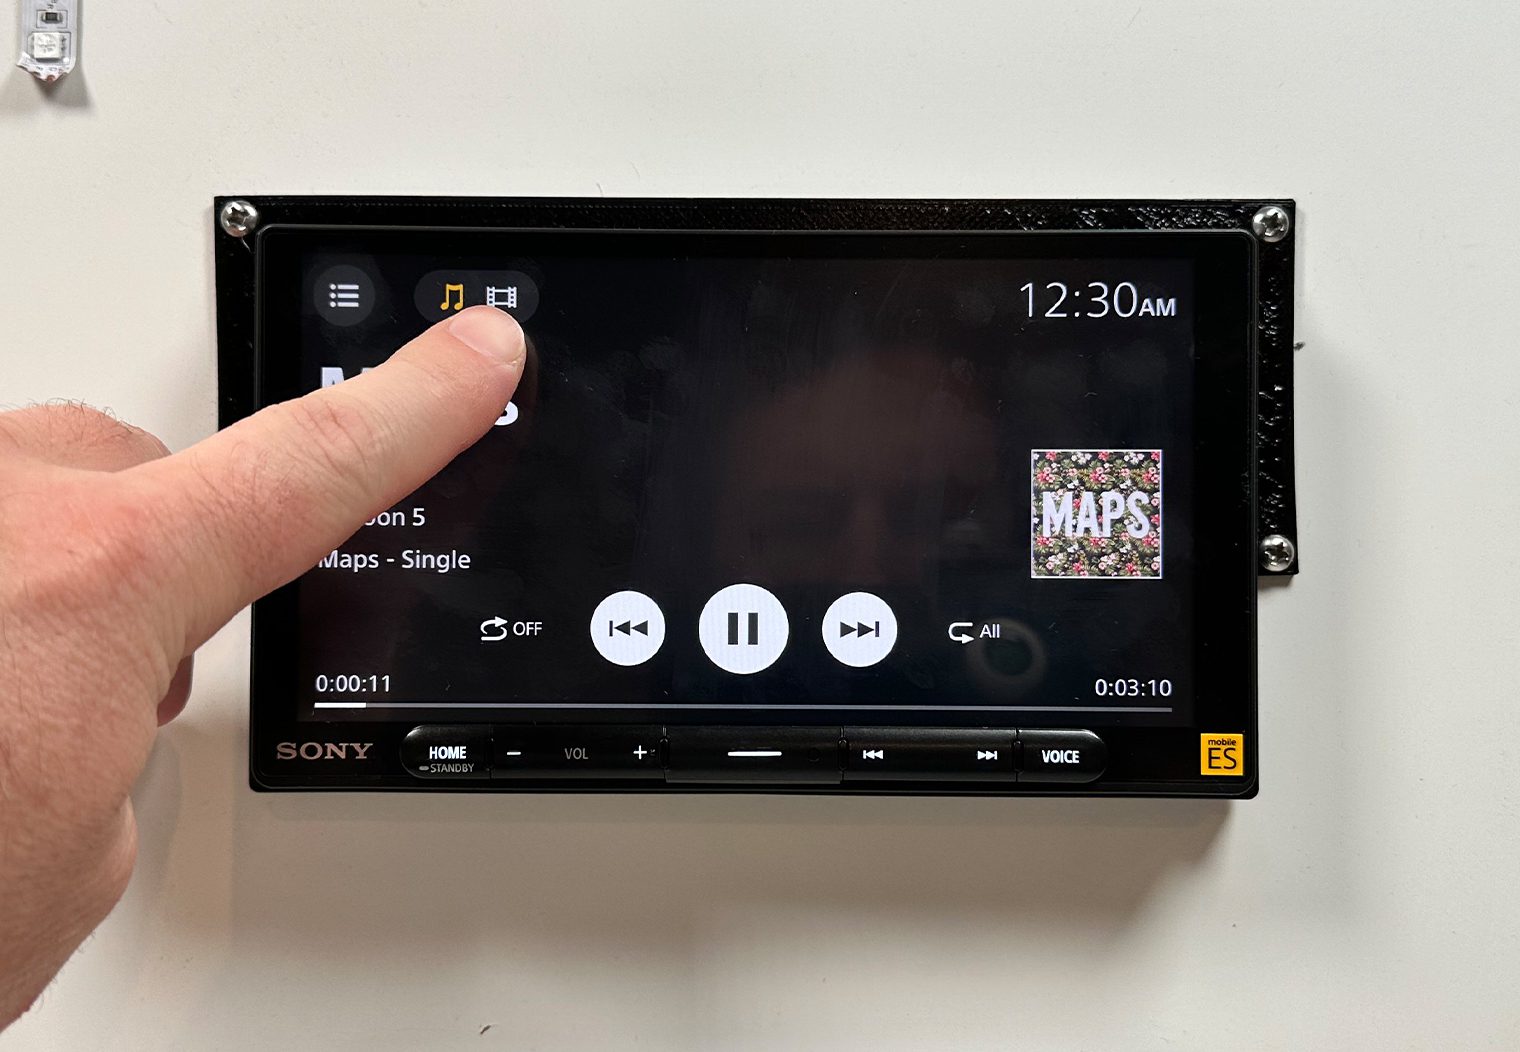
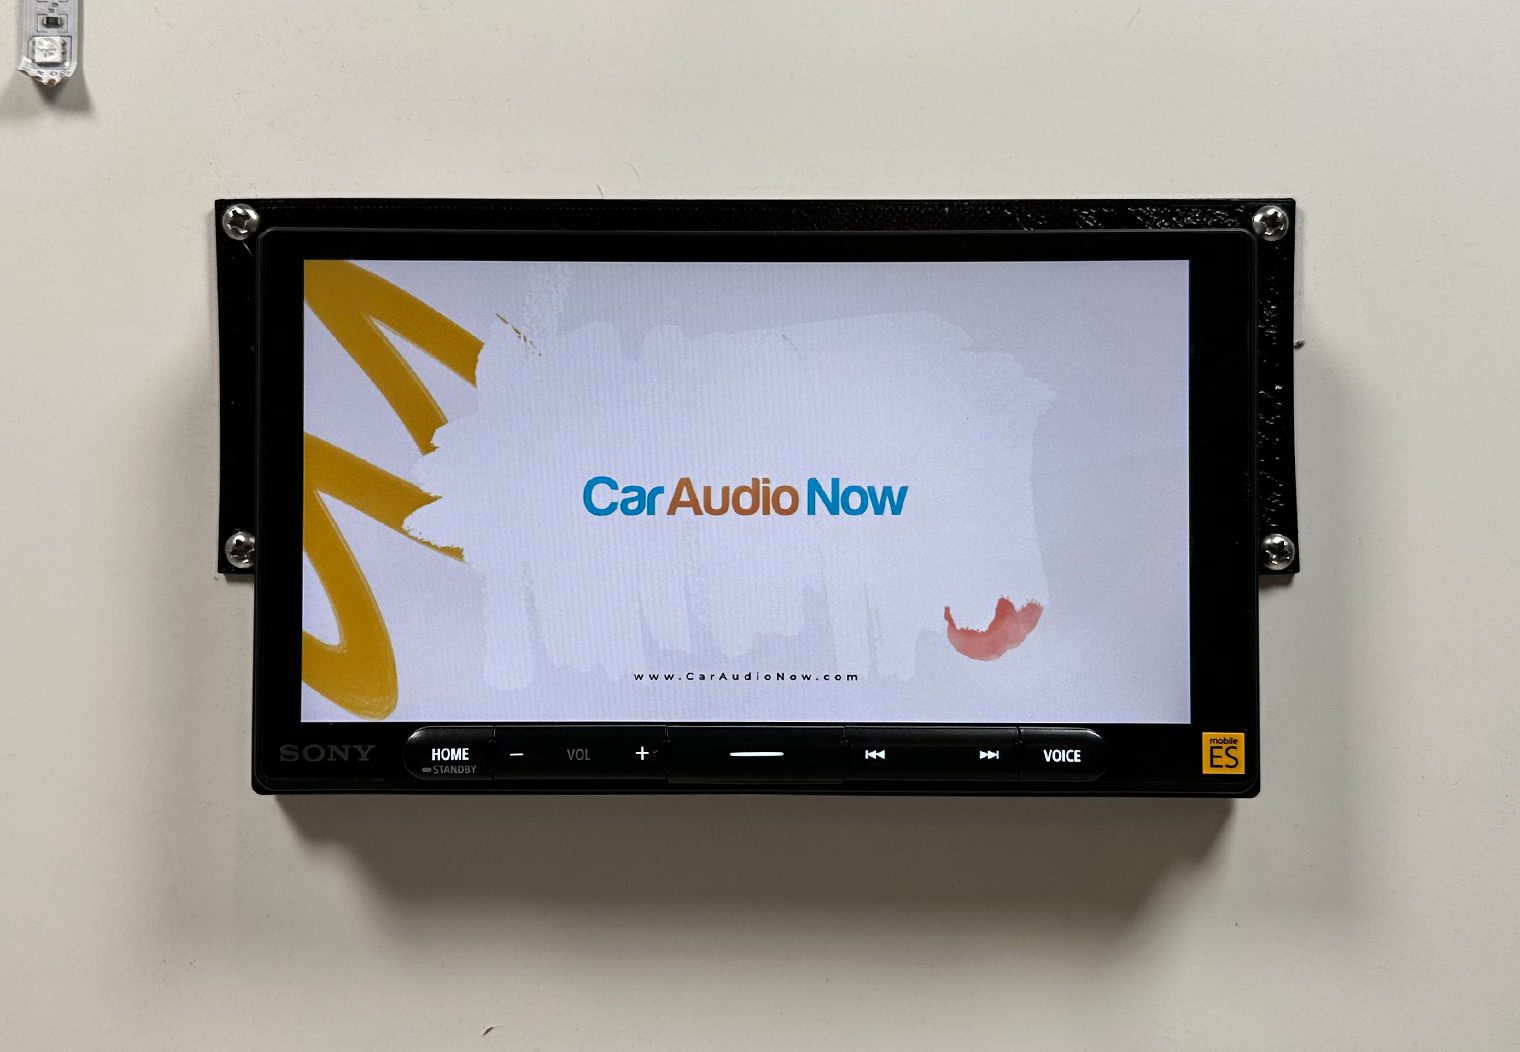
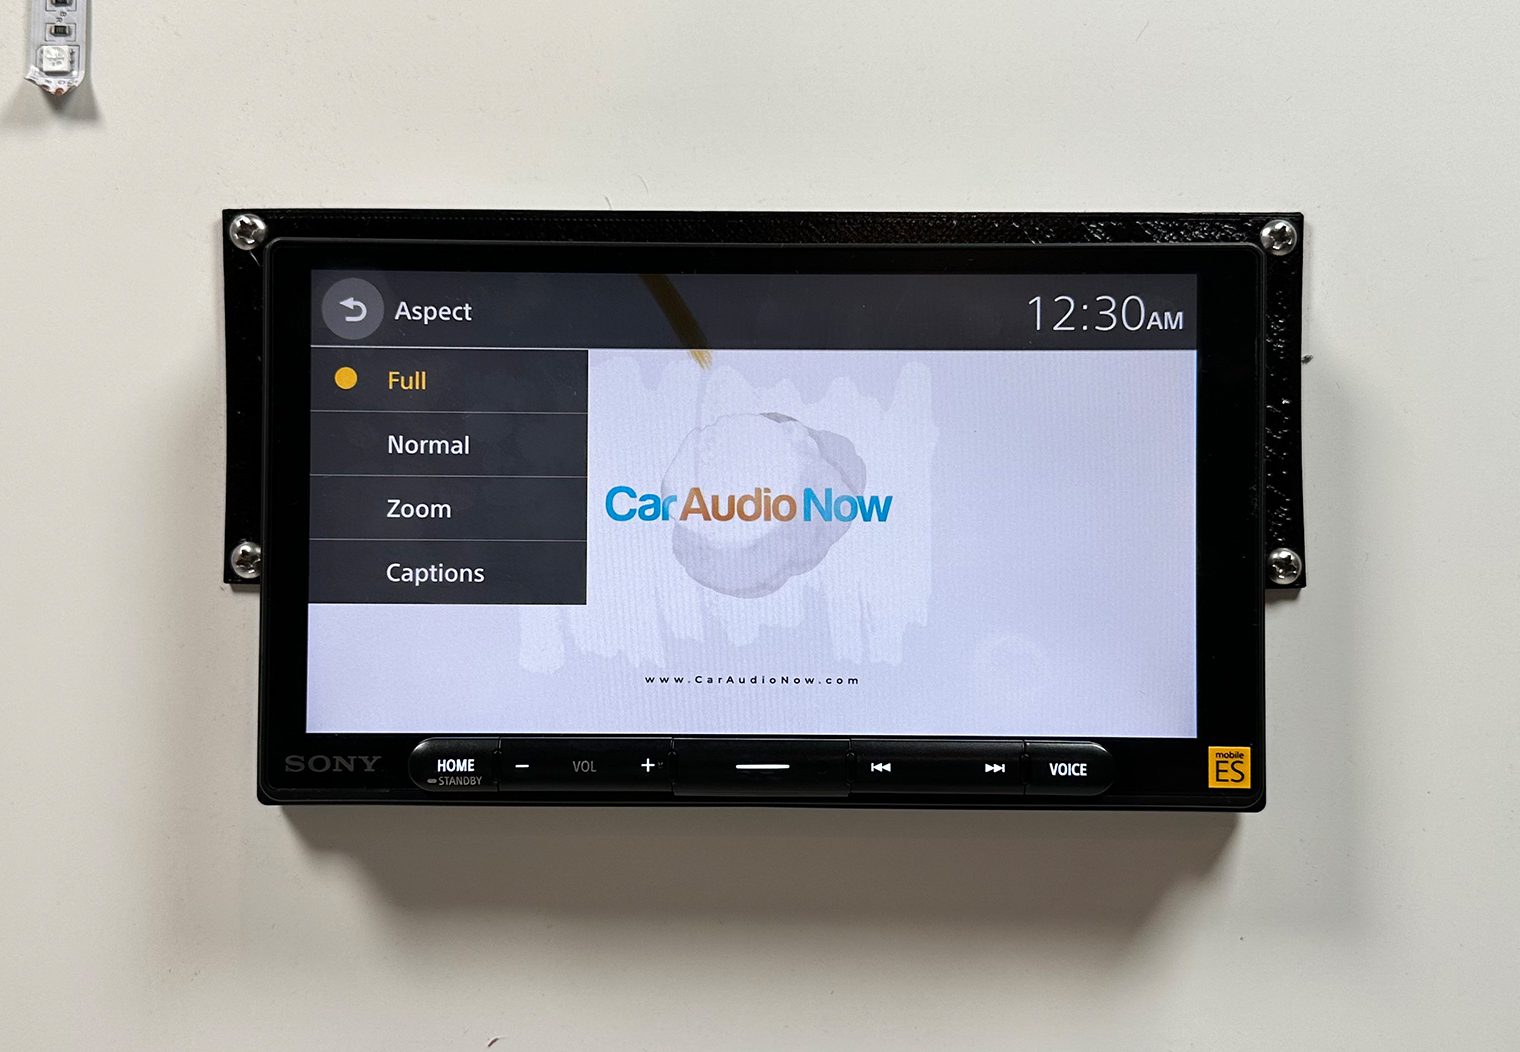
Overall, I thought that the interface was incredibly easy and intuitive. If your folder structure is organized, finding the artist, album and song or video on your usb device is incredibly easy. And when playing video, the resolution and image was crisp and clear.
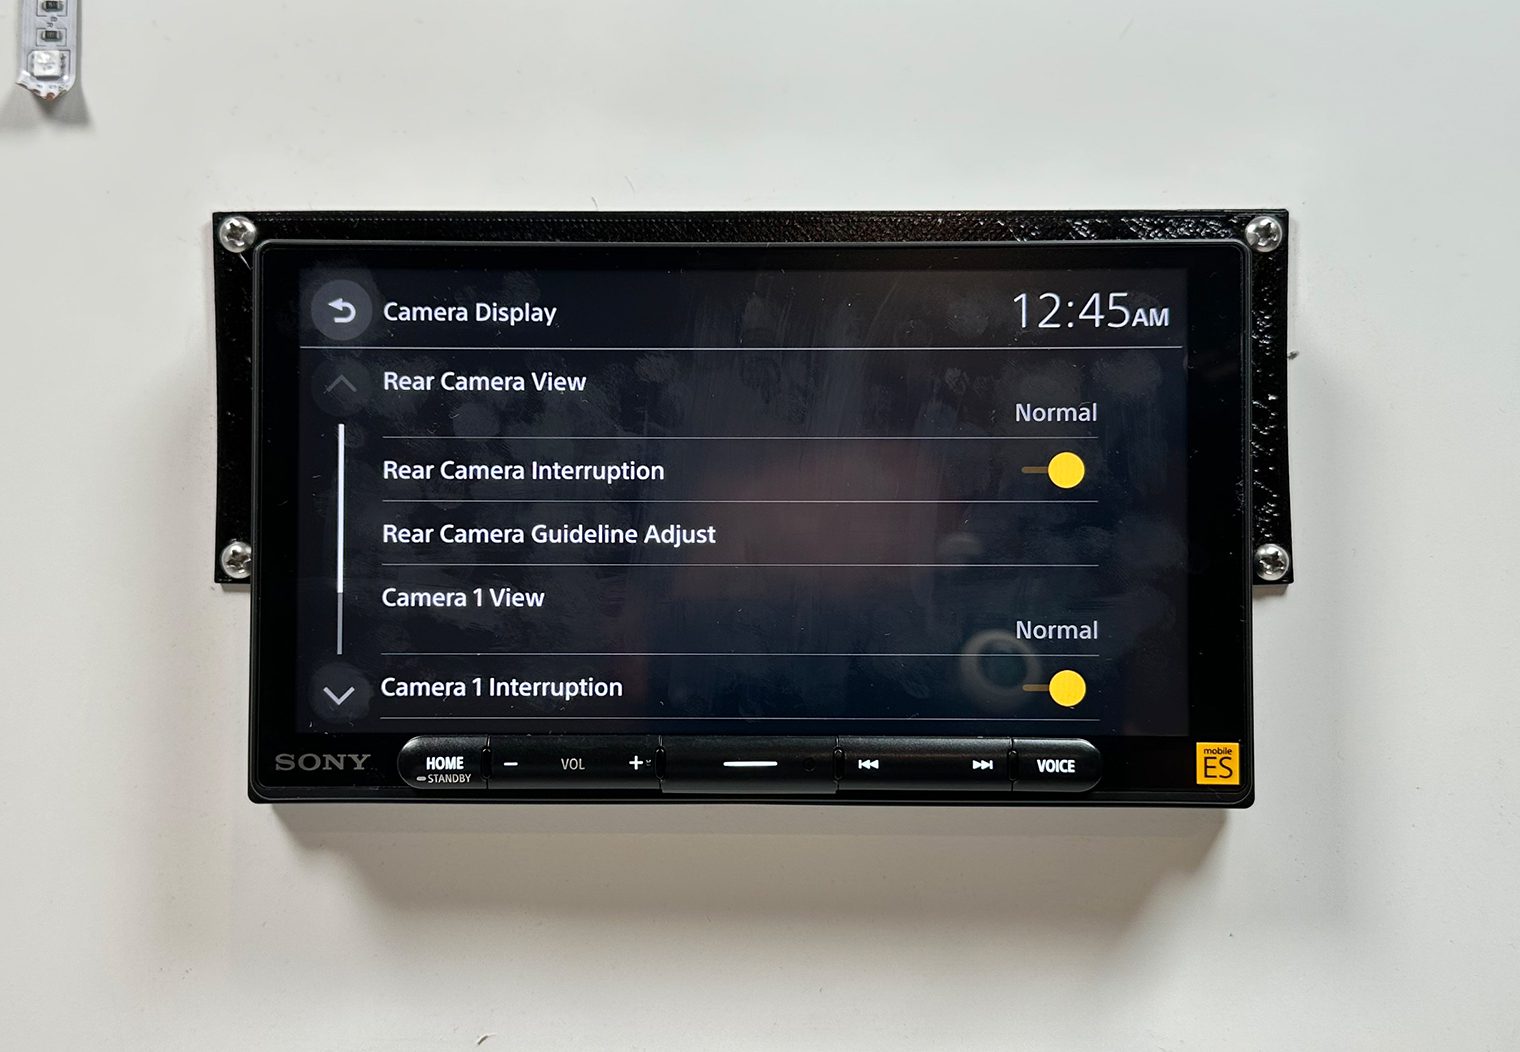
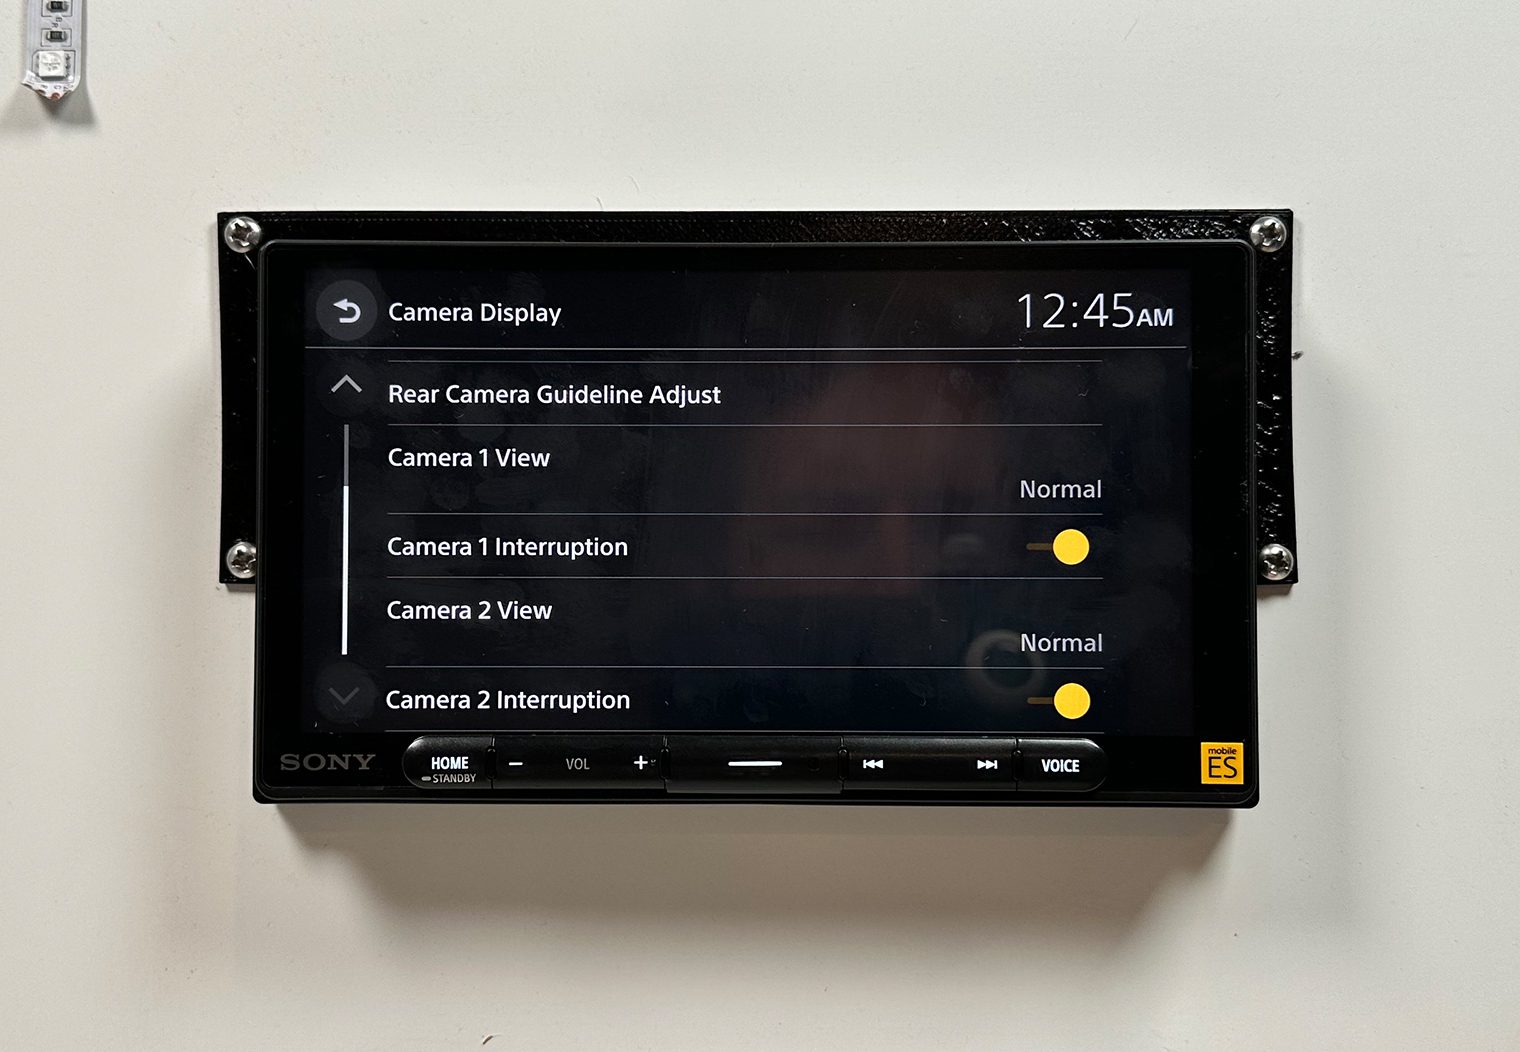
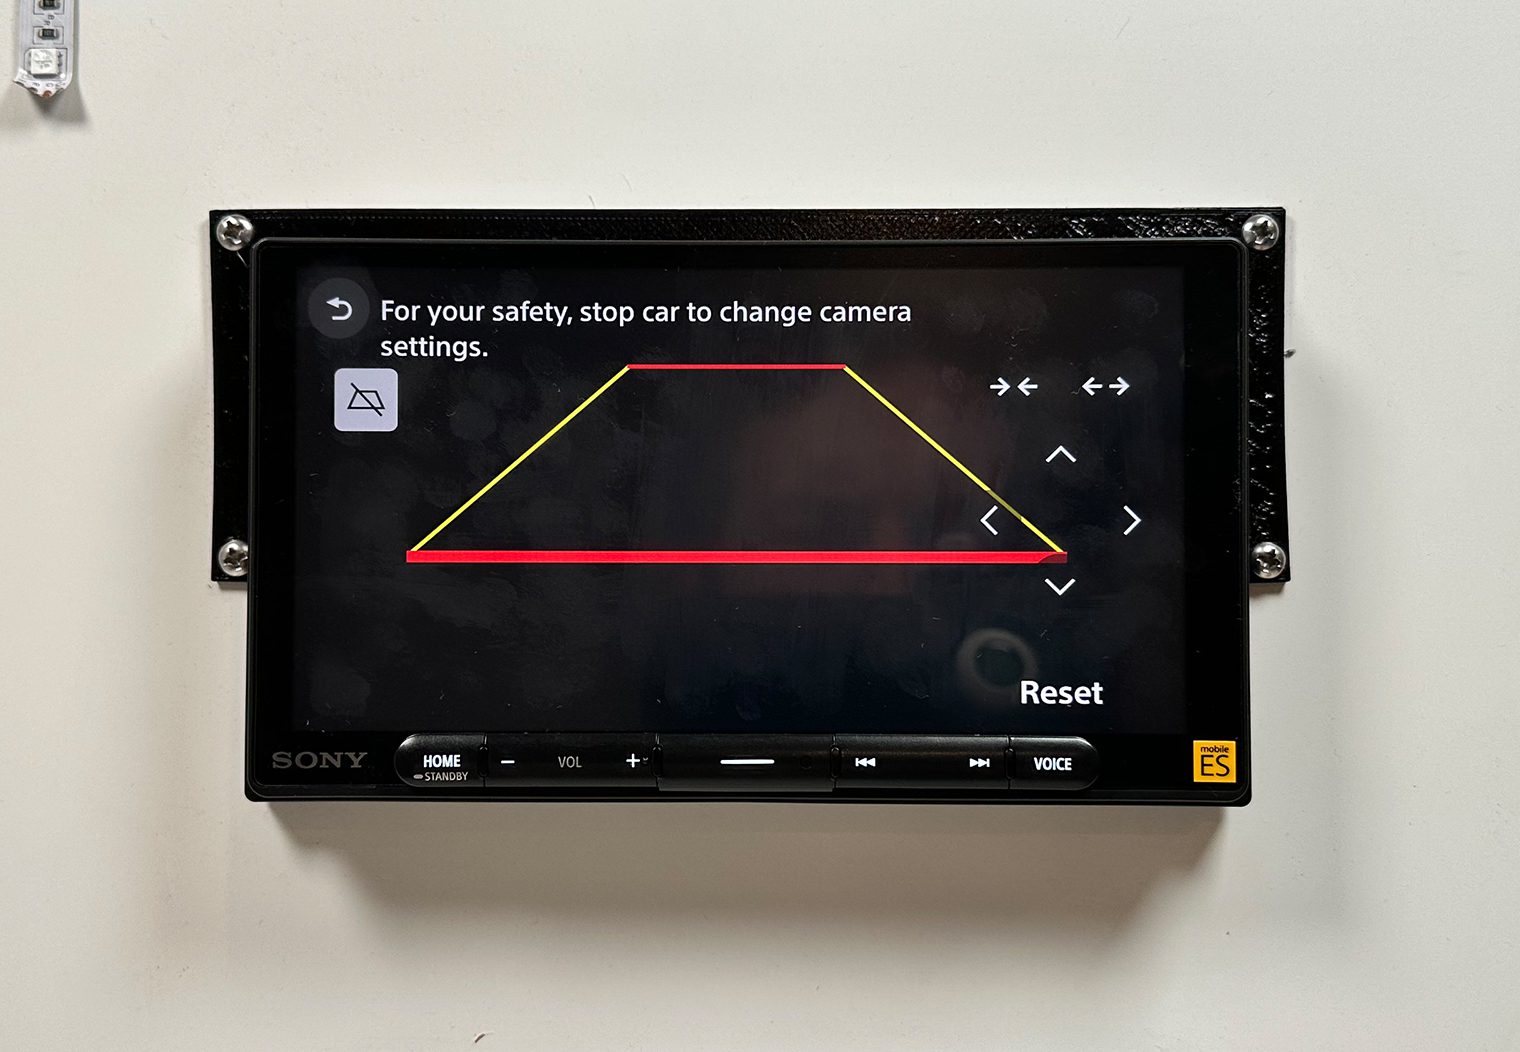
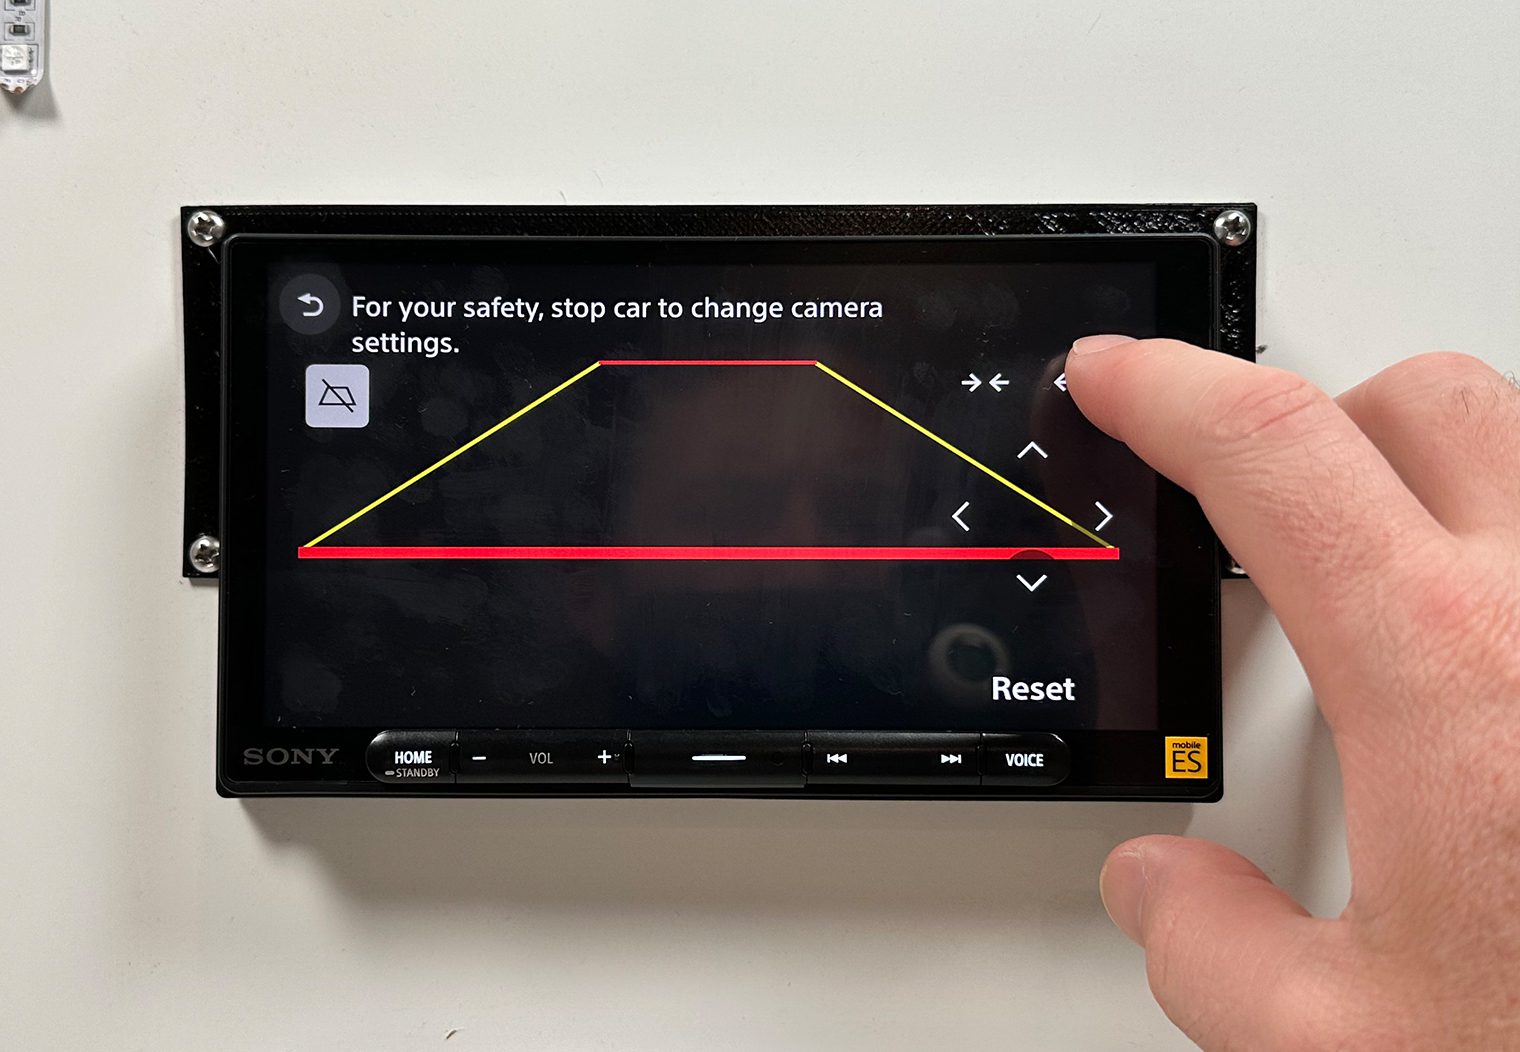
Camera Inputs
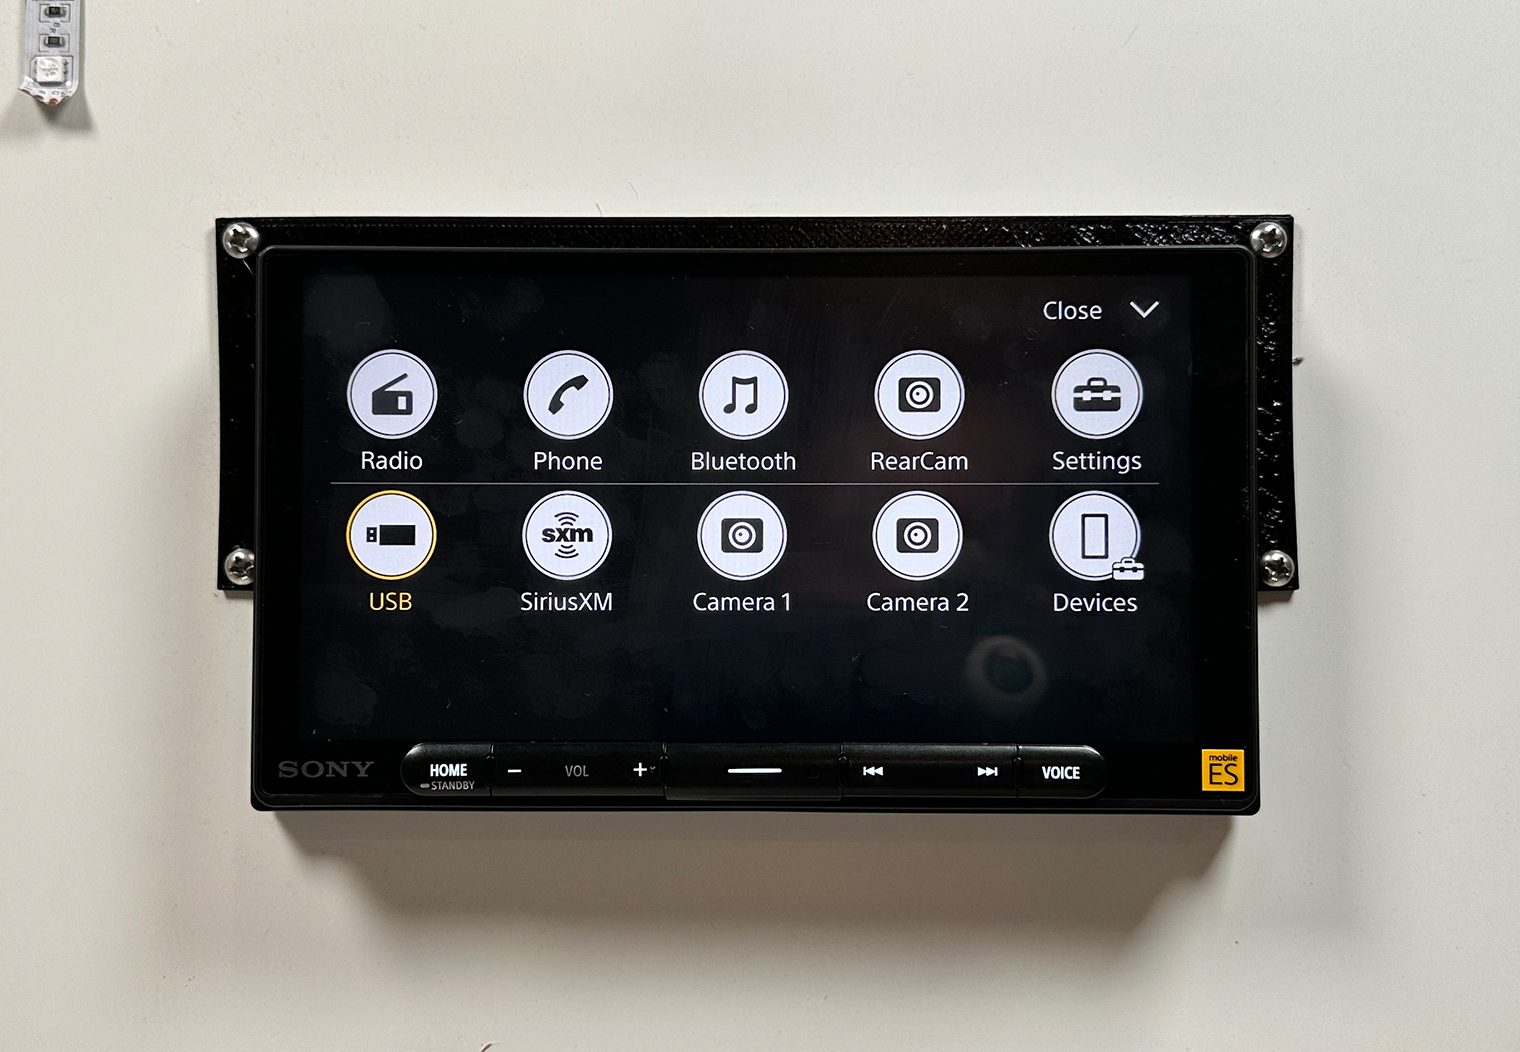
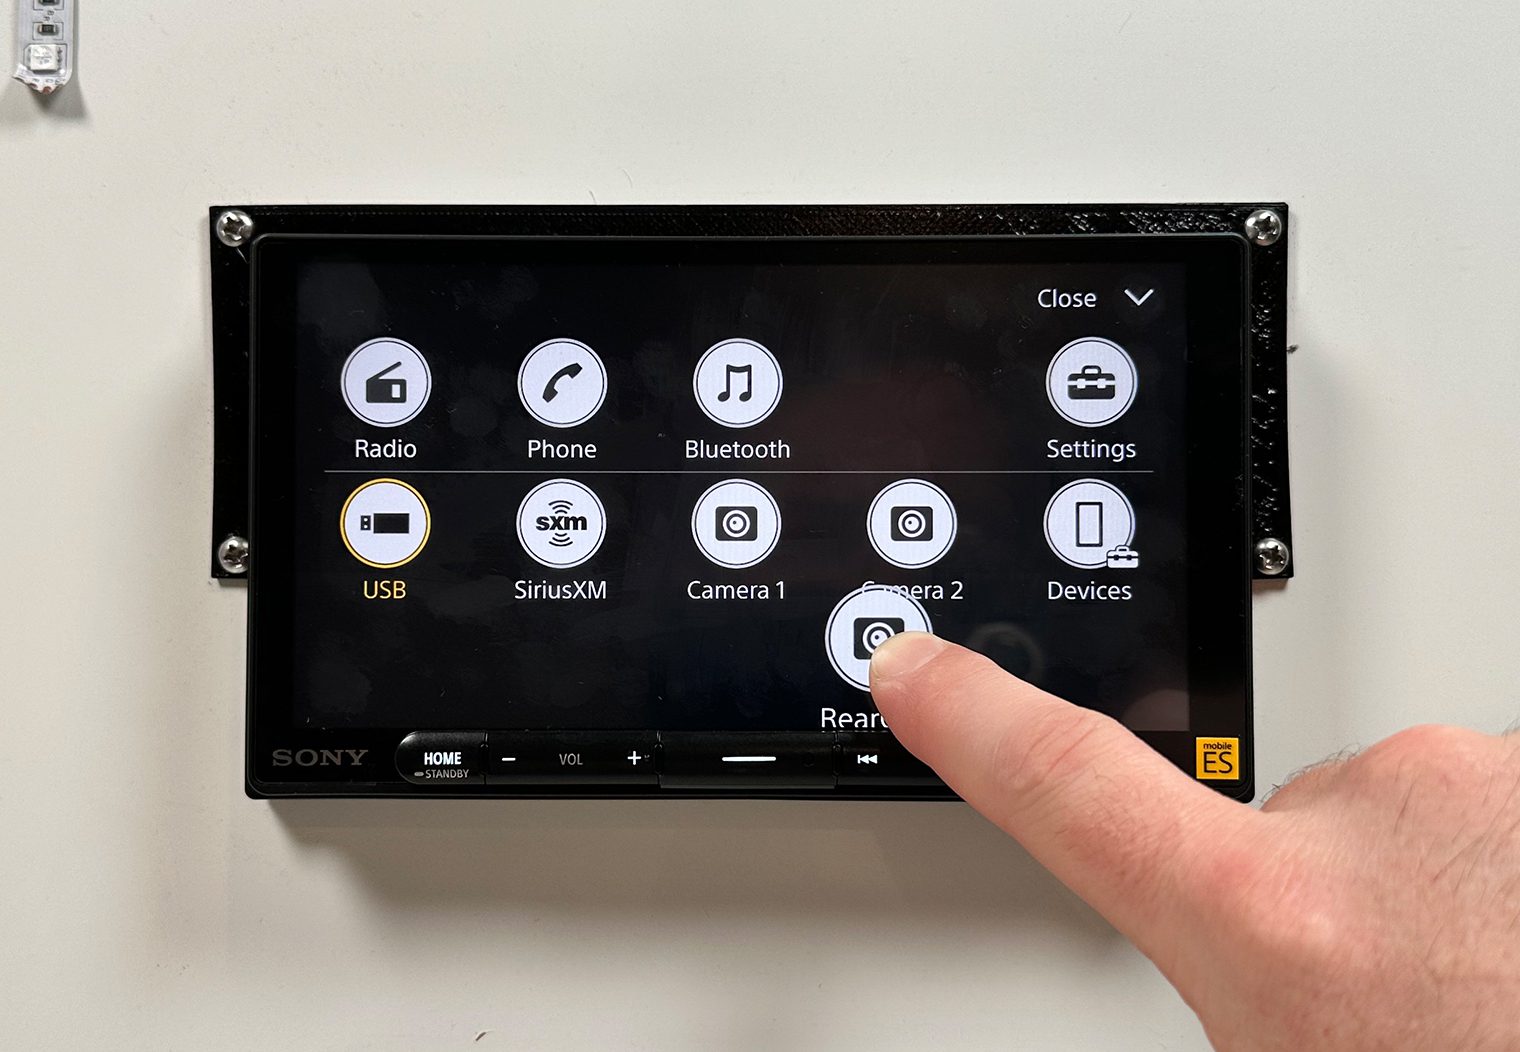
One of the cool features I really liked about the 9000ES was its camera setup. Out of the box, it supports a total of three camera inputs – one that's dedicated for the backup camera and two other auxiliary camera inputs. You can use these three camera inputs in any way that you want though. I'll show you how.
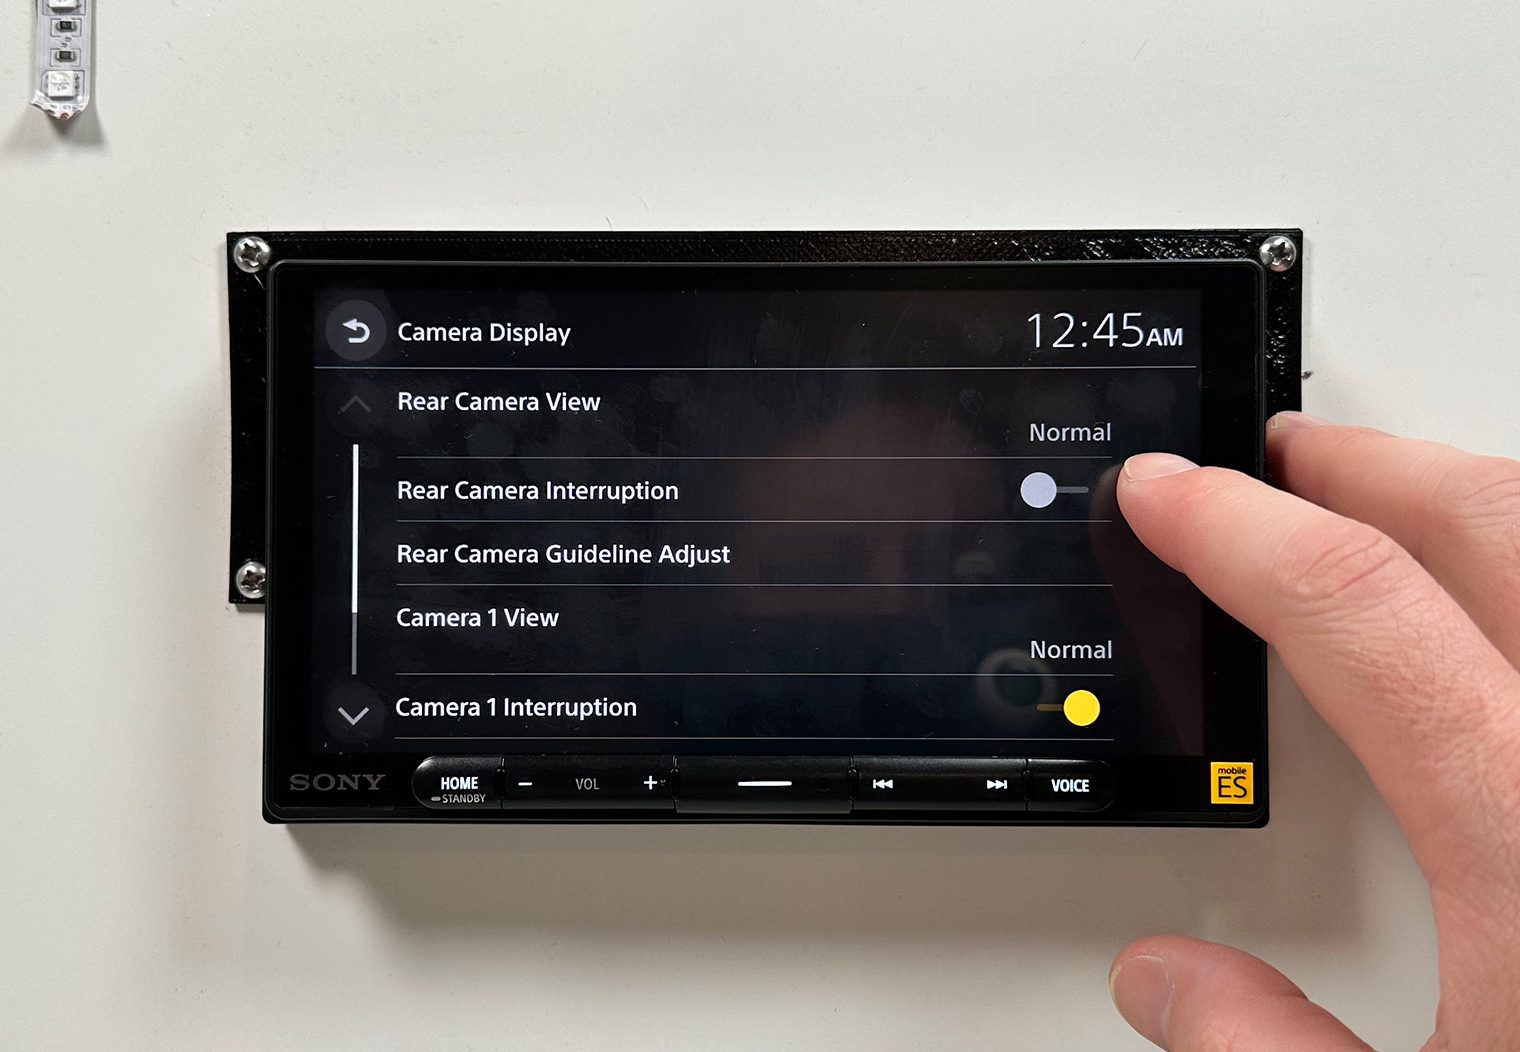
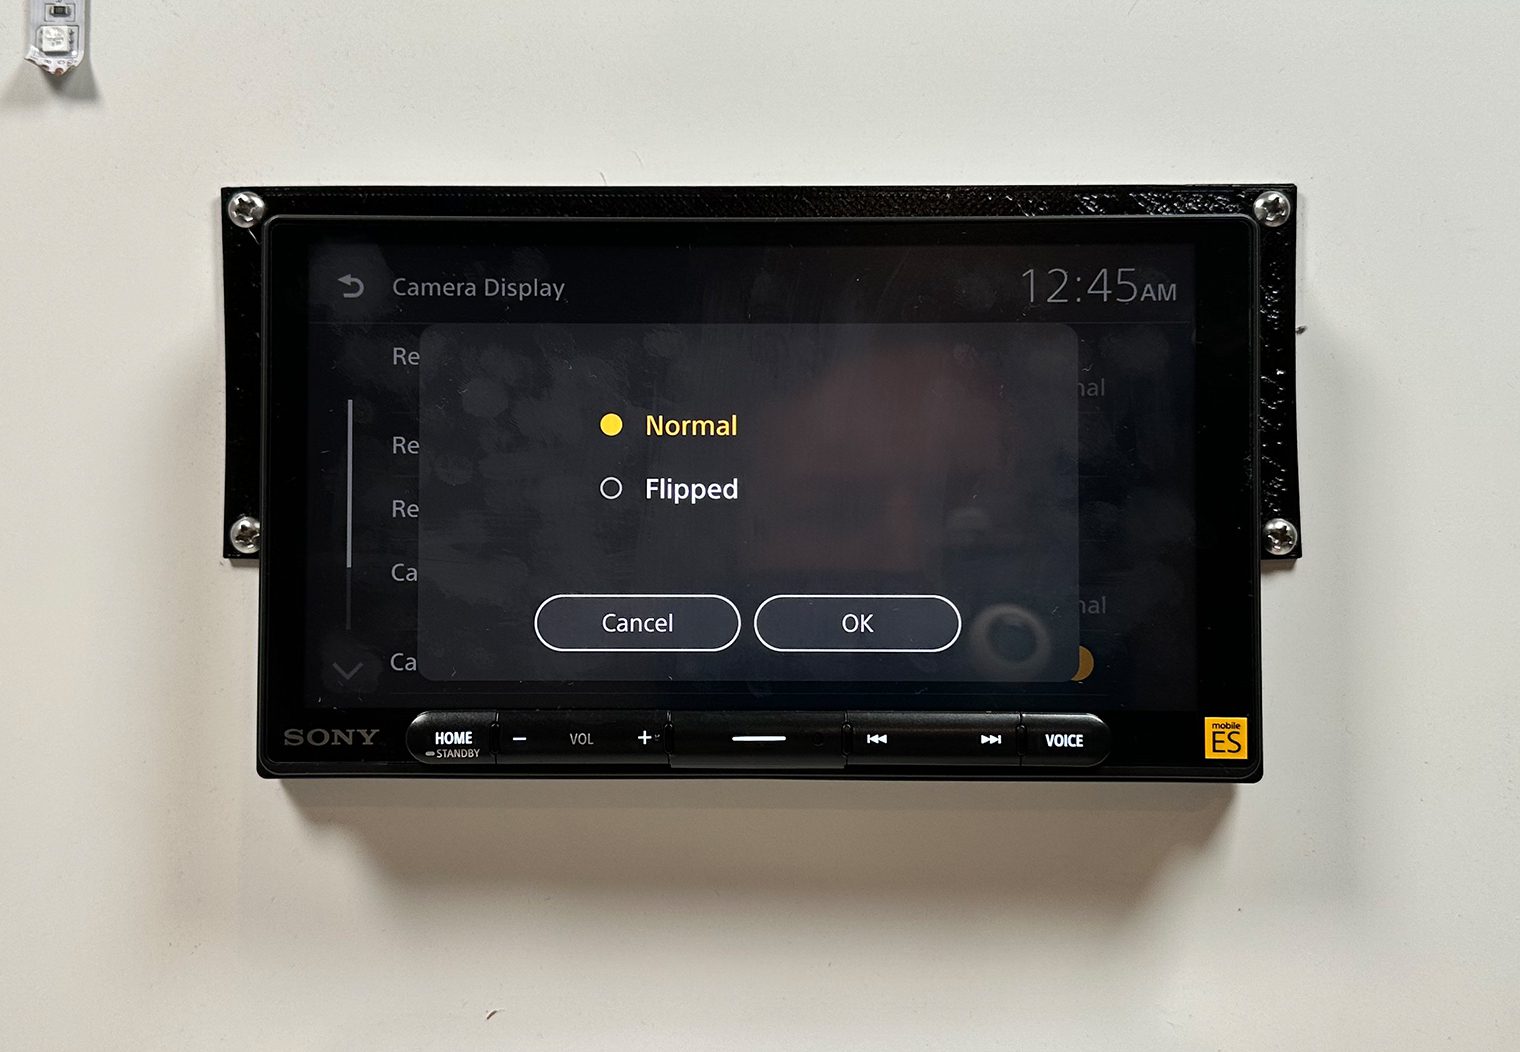
In the camera settings, you can control two main configurations for all three camera inputs:
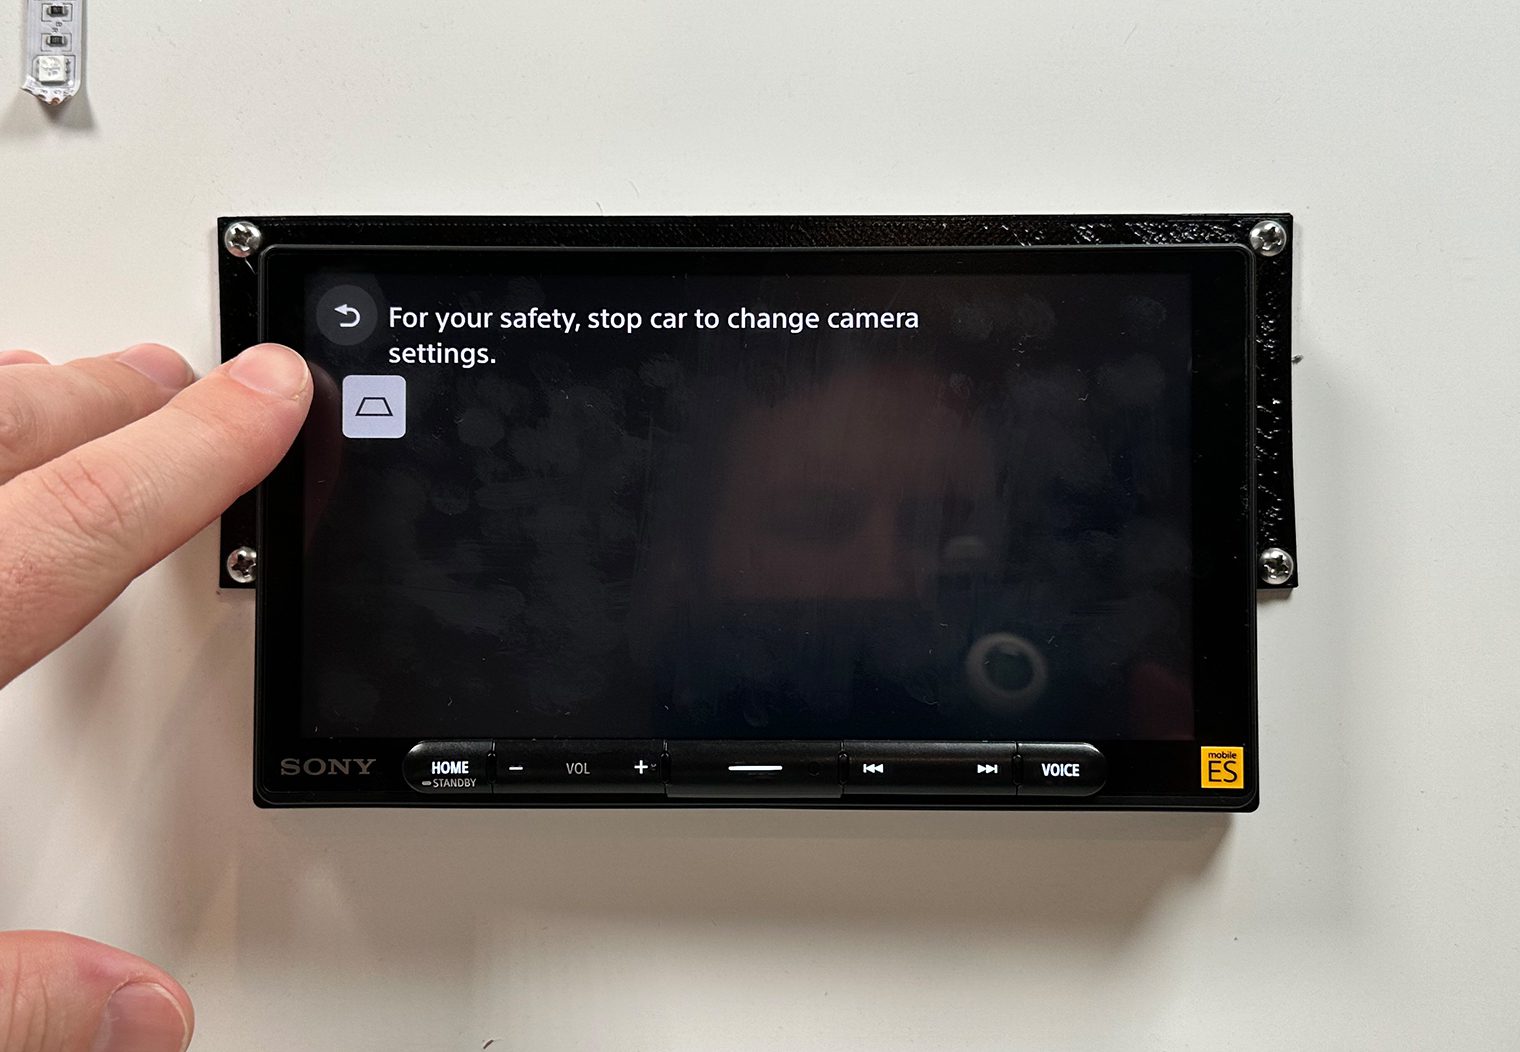
- Camera feed orientation/view – depending on the camera and how you install it, you may need to switch the image/mirror it. The settings allow for you to do this.
- Triggers/Interruption – this is the cool part. The input harness for the unit includes three triggers (or at least what I like to call triggers) that will tell the head unit when to “interrupt” the display to show a camera feed on the screen. You can use the interface to turn these triggers on or off and ultimately use it to either disable the screen override from the backup camera (and other cameras) or you can use it to hook up auxiliary switches to tell the unit when to display either of the three screens.
Let me give you two examples of how you might use this interruption feature.
Example 1 (Camera On Demand) – Let's say you would prefer not to have the backup camera appear when you put the car into reverse. Or, you hooked up the other two cameras and you'd like to access them at any time using the icons on the homescreen. If your cameras and the trigger wires on the Sony's harness are both wired to constant (ideally accessory) power, you can turn the interruption feature off for the camera(s) and simply use the icon on the homescreen to access the camera feed at any time while driving. One common use case is to place a camera on your front bumper to see the distance at the front of your vehicle while pulling into a parking spot.
Example 2 (Switched Cameras) – Maybe you have Bronco or a Wrangler, or any vehicle that comes with built-in auxiliary switches in the cab. Or maybe you want to install an aftermarket switch. That works too. Let's say you wanted to wire up a few extra cameras to keep an eye on things like clearance, distances from the bumper or even keep an eye on the bed of your truck. You can wire your additional cameras AND trigger wires on the Sony's harness both up to your auxiliary switch so that when you flip the switch it'll turn the camera on and display it directly on the screen, “interrupting” the display.
I've seen this in some of the offroading head units like the Stinger HEIGH10 as well but it's a nice feature to have on a unit like this as well and gives a lot of flexibility to a camera install.
For the rear view camera, you can also adjust the guidelines depending on where you install the camera and how big the vehicle is. The settings interface allows you to make the lines wider, thinner or move them to the left or right.
Audio & Sound Control/Features
The entire Mobile ES lineup is really tailored and marketed towards the audio enthusiast. I mentioned this earlier, but Sony focused less on things like entertainment and video compatibility with the ES series head units and more on audio quality and control. The interface on the 9000ES proves that in my opinion.
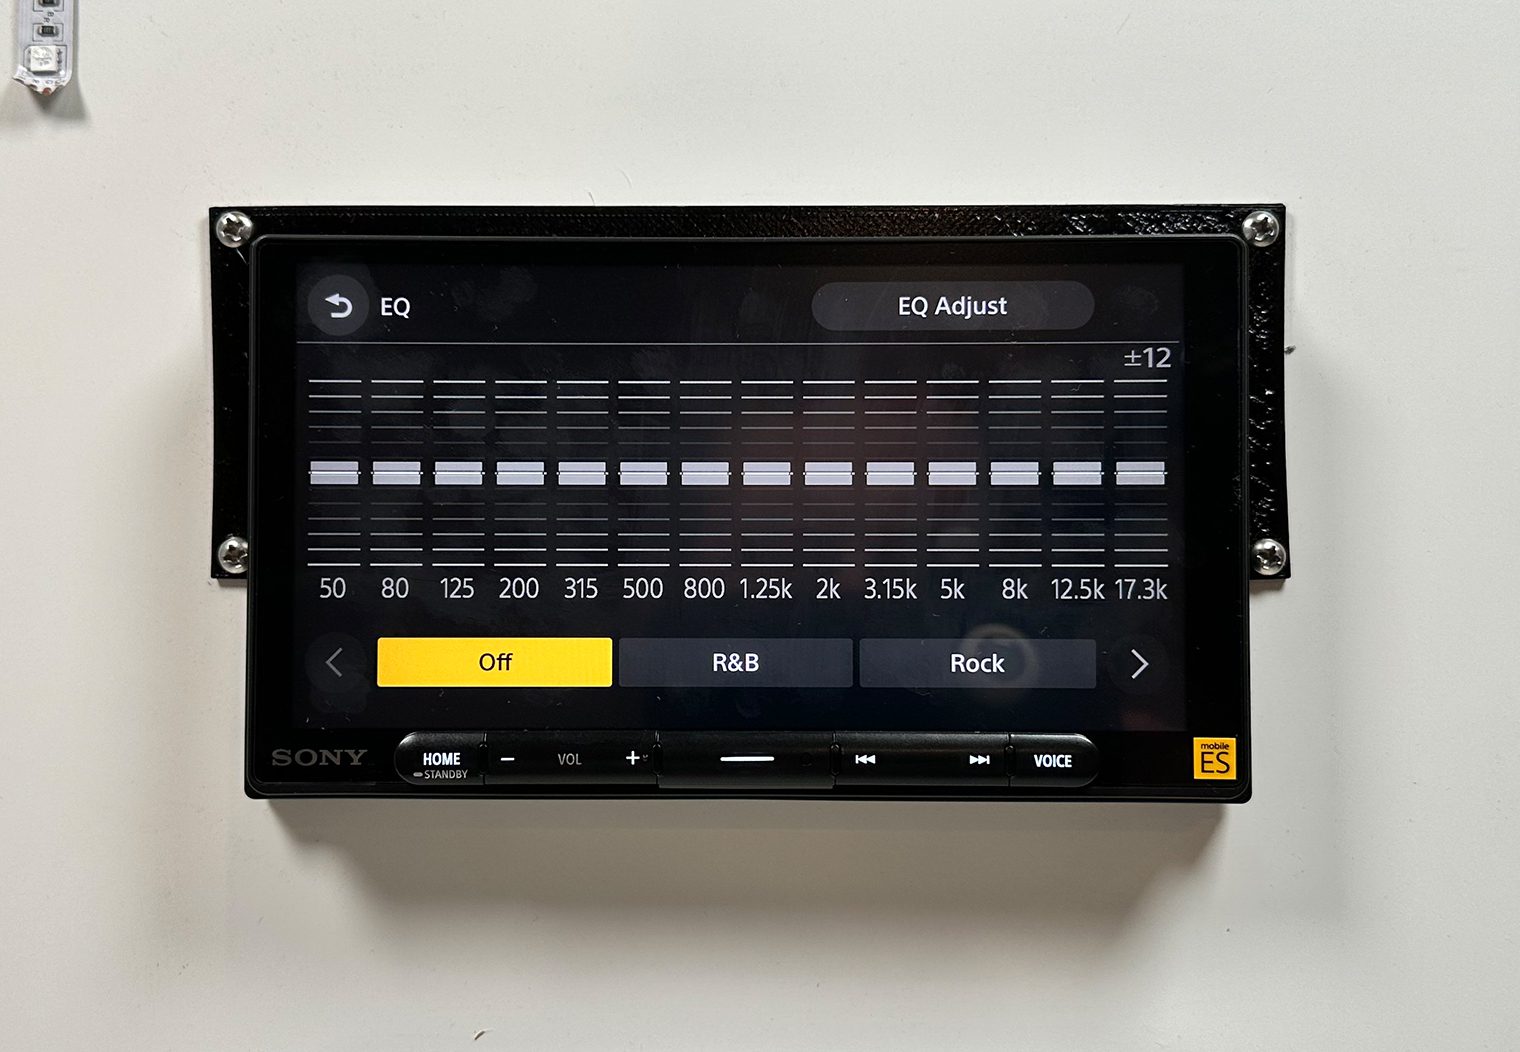
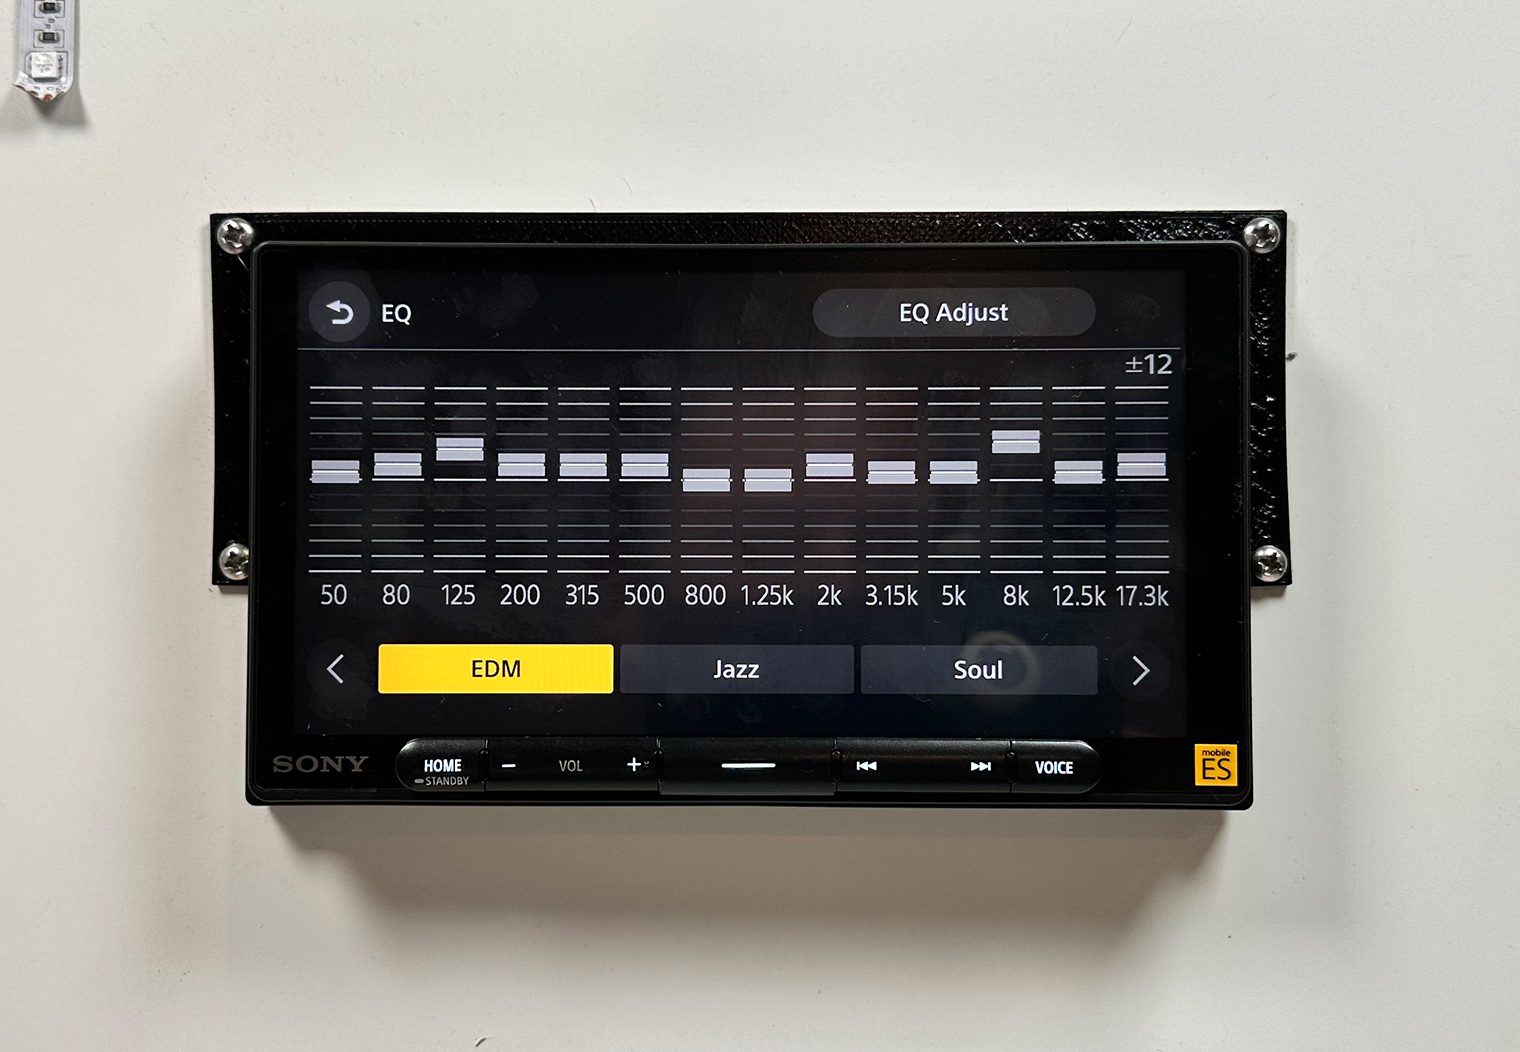
14-Band Graphic Equalizer
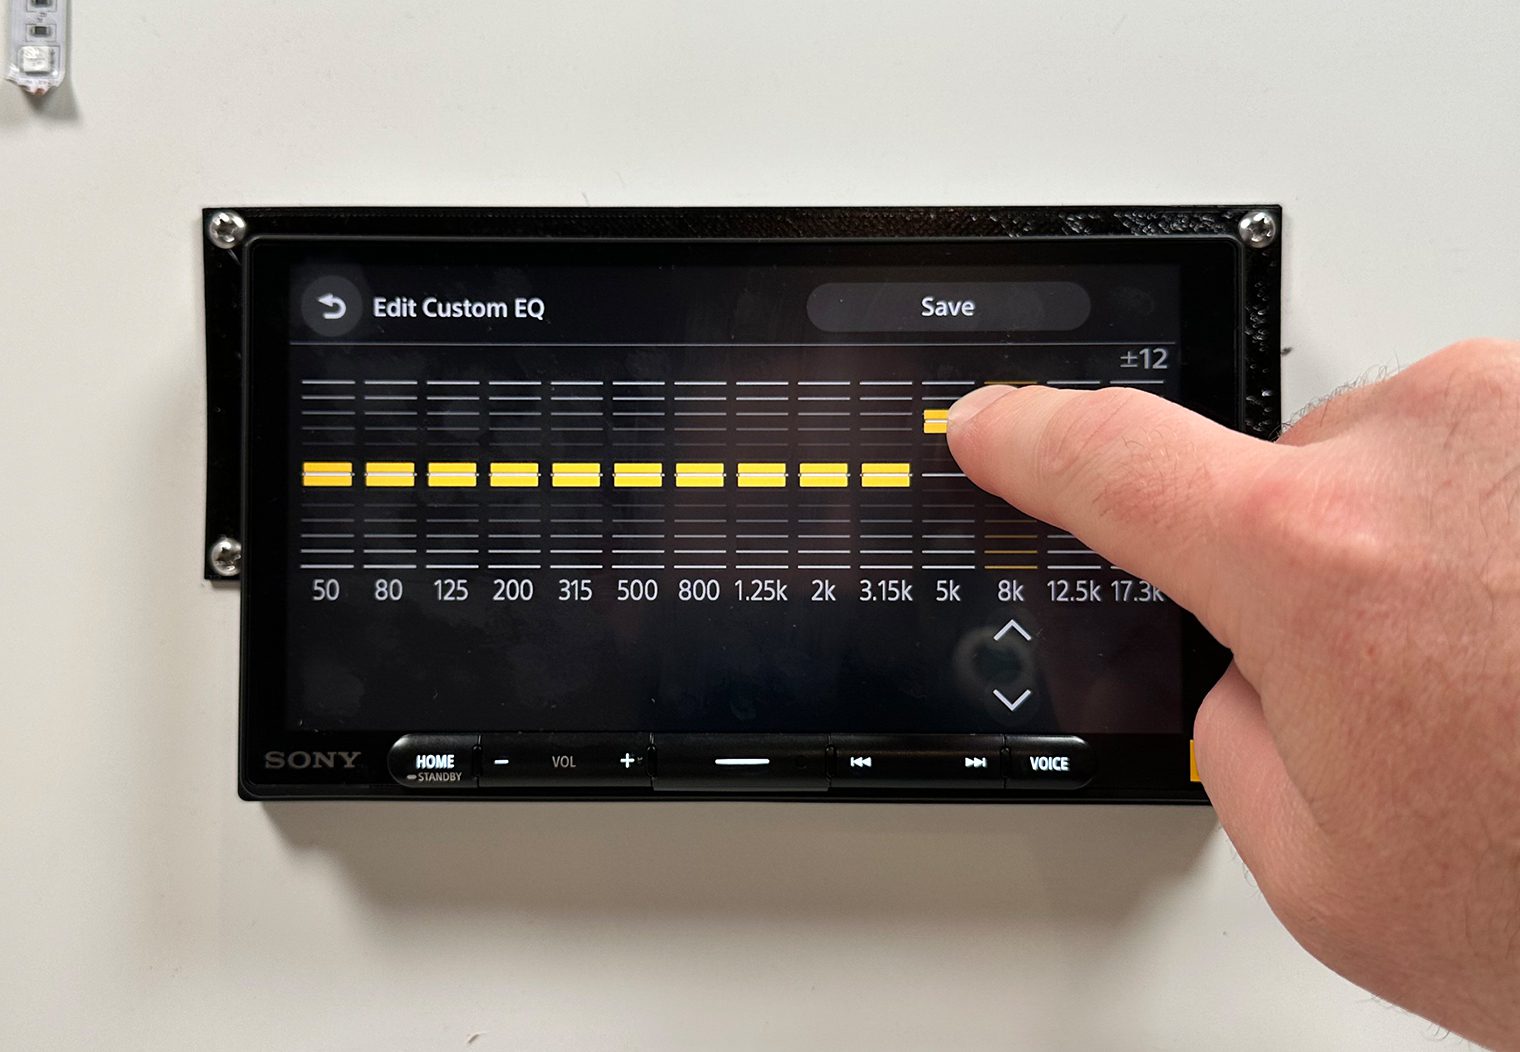
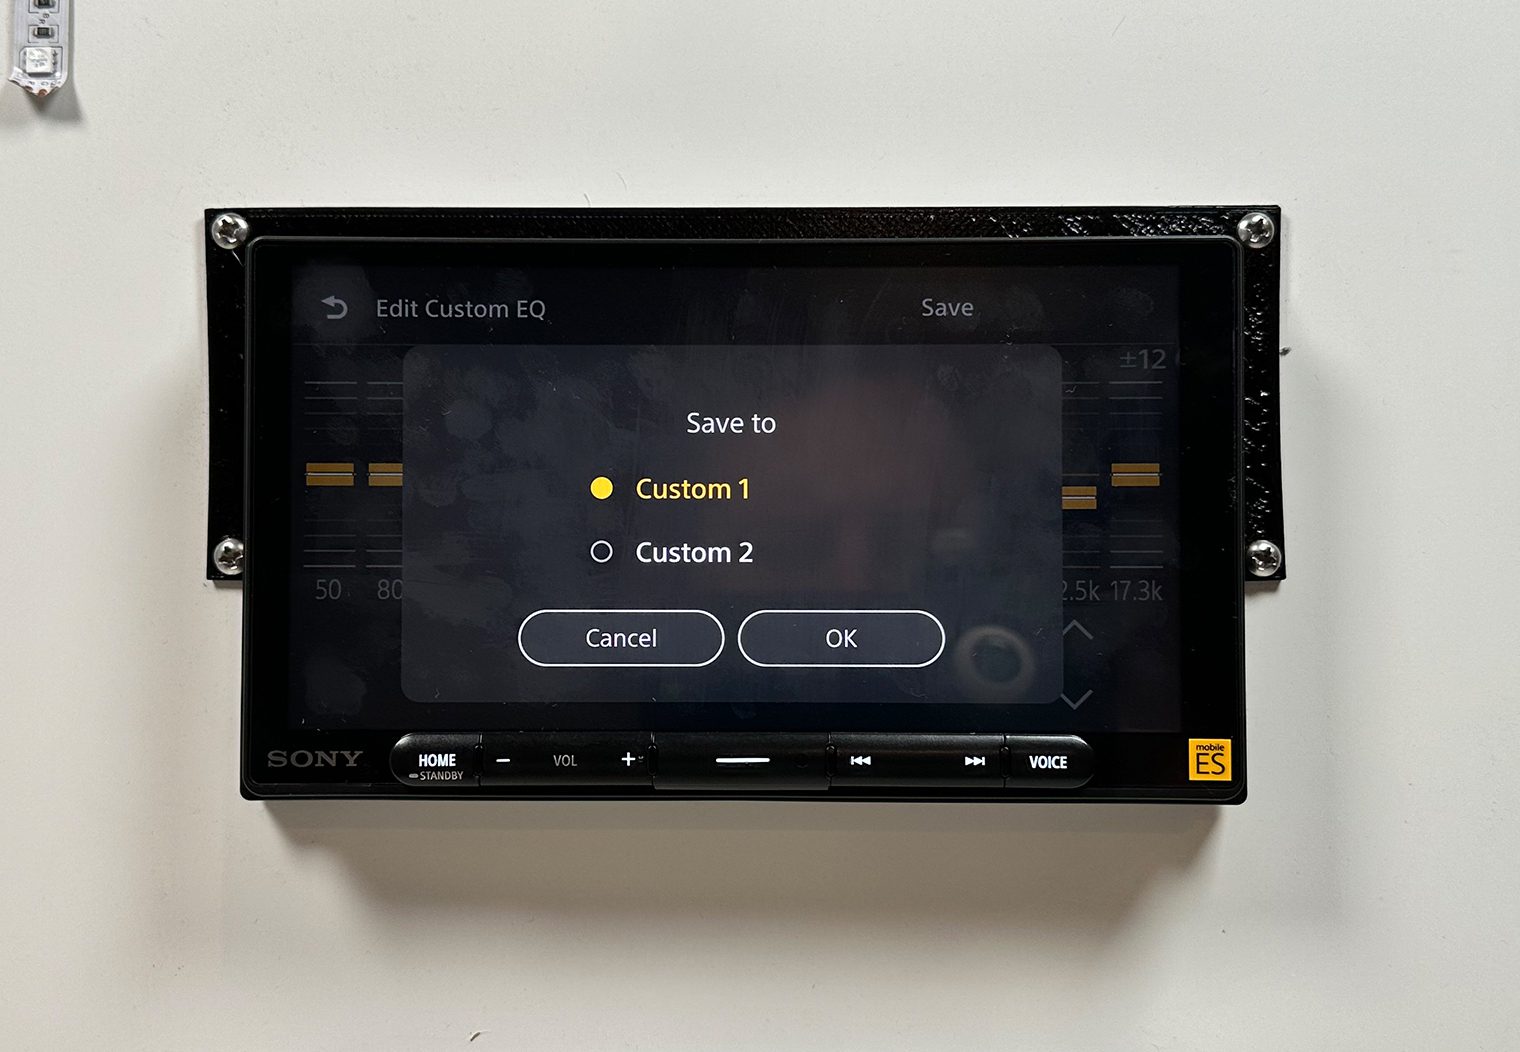
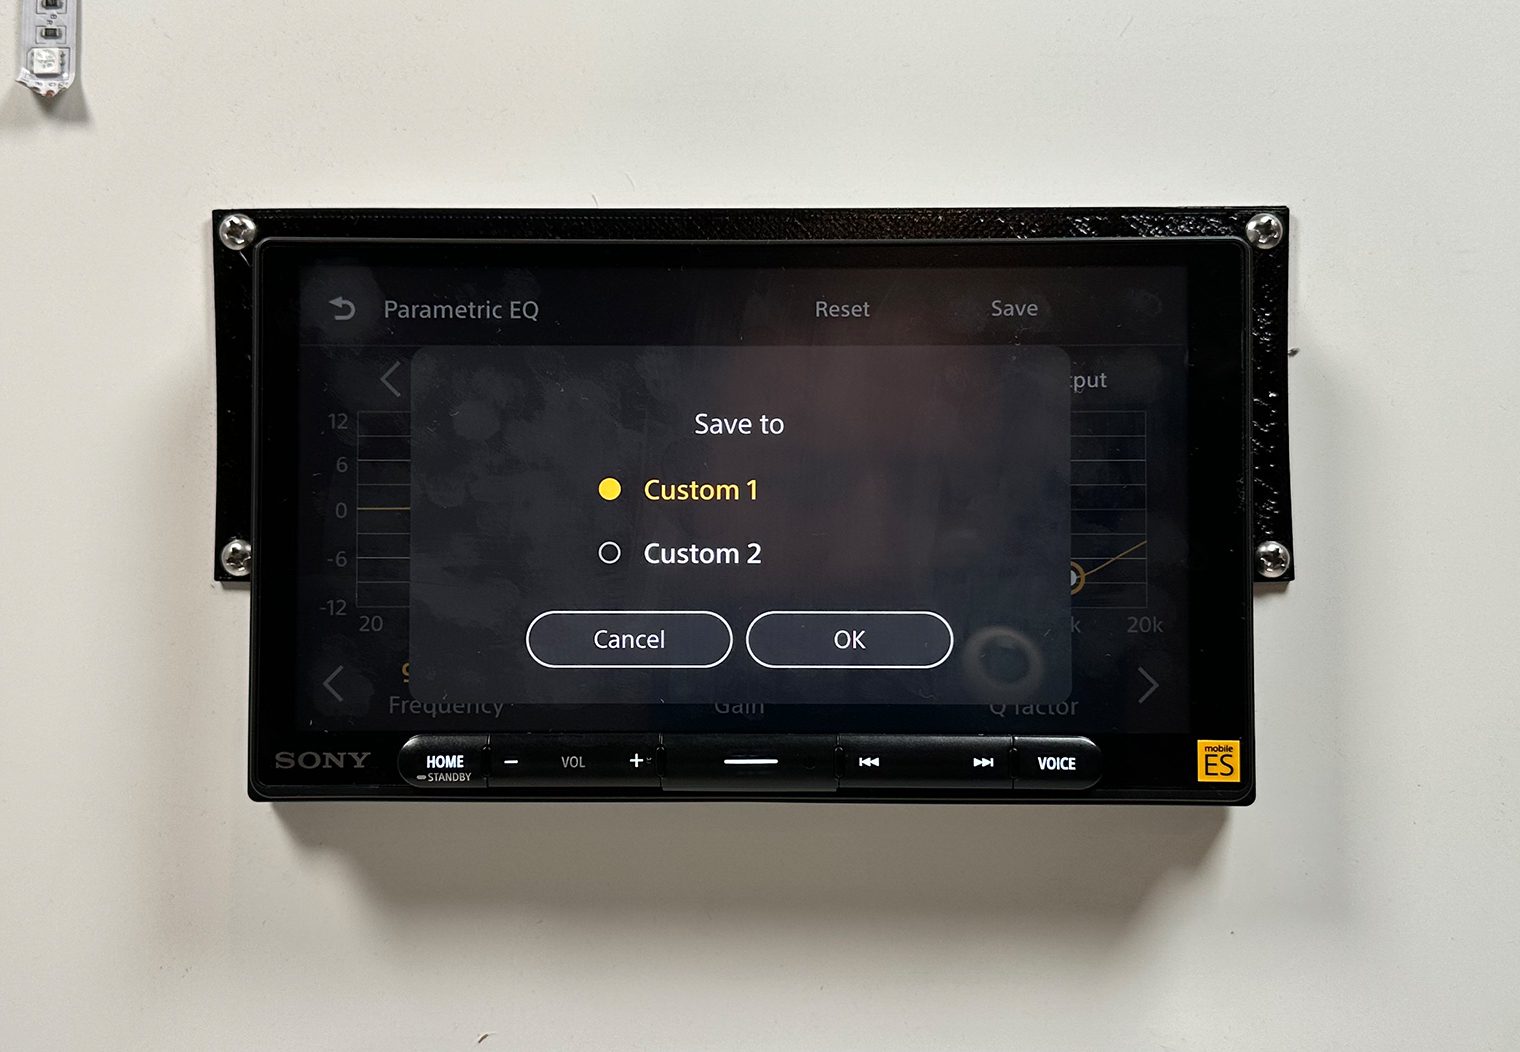
Similar to the XAV-AX6000 and XAV-9500ES, the 9000ES features a 14-band graphic equalizer, surpassing some of their previous models like the XAV-AX8100 and AX5600 models which offer 10-band control. Having more bands in the EQ provides you with greater control in fine-tuning the sound according to your preferences. The graphic EQ interface is intuitive with a clean design. It allows you to easily and accurately make adjustments across various frequency bands by simply clicking and dragging your finger. What I liked is that you could save two custom EQ settings to access later.
If you didn't want to create your own custom EQ though, the interface offers a wide range of presets, such as R&B, Rock, Pop, Dance, Hip Hop, Country, and more, further expanding the customization options. The other cool feature that I liked here was that you could find one of these presets that you liked the most, and tweak it a little bit to make it your own without having to start from scratch.
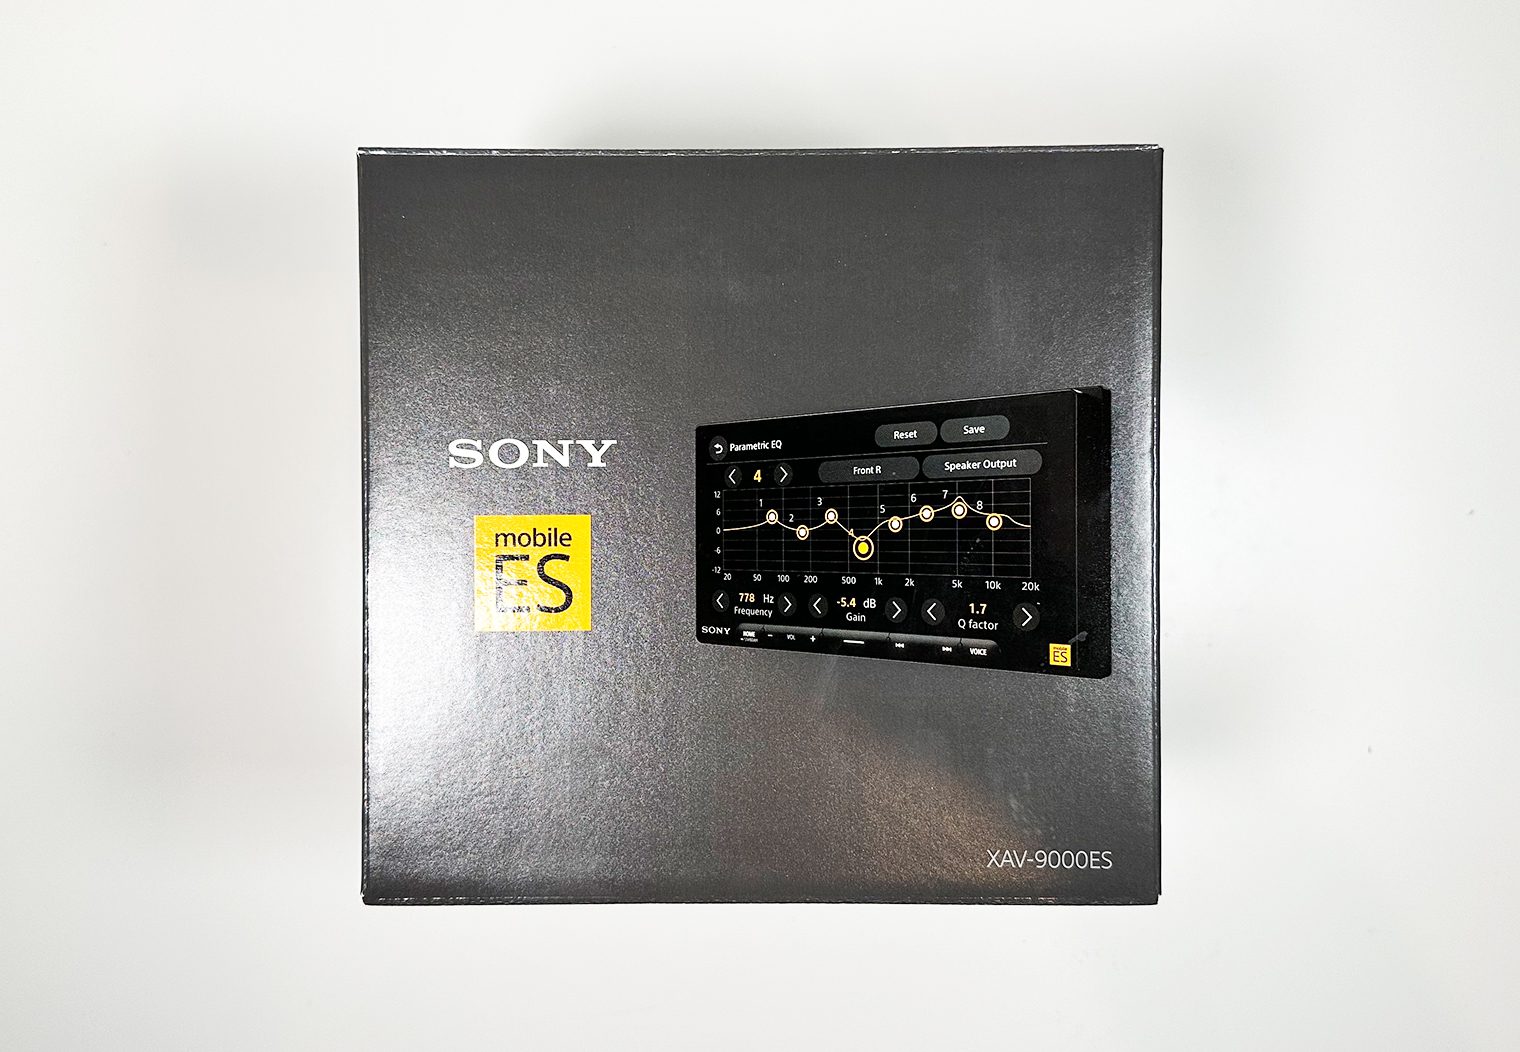
Parametric EQ
The XAV-9000ES also features a Parametric equalizer for those who want even more control and tuning capabilities. I would recommend letting a professional leverage this feature unless you have experience with parametric EQs and RTAs.
The Parametric equalizer gives you a much more granular level of control over the sound of your stereo. The graphic equalizer is a little more intuitive and applies the configuration across the entire set of outputs (to all speakers). The Parametric EQ lets you dive deep into the gains for a much more specific range of frequencies and for each of the channel outputs (e.g. Front Left vs Front Right – you can tune them individually). You can also tune the Q factor.

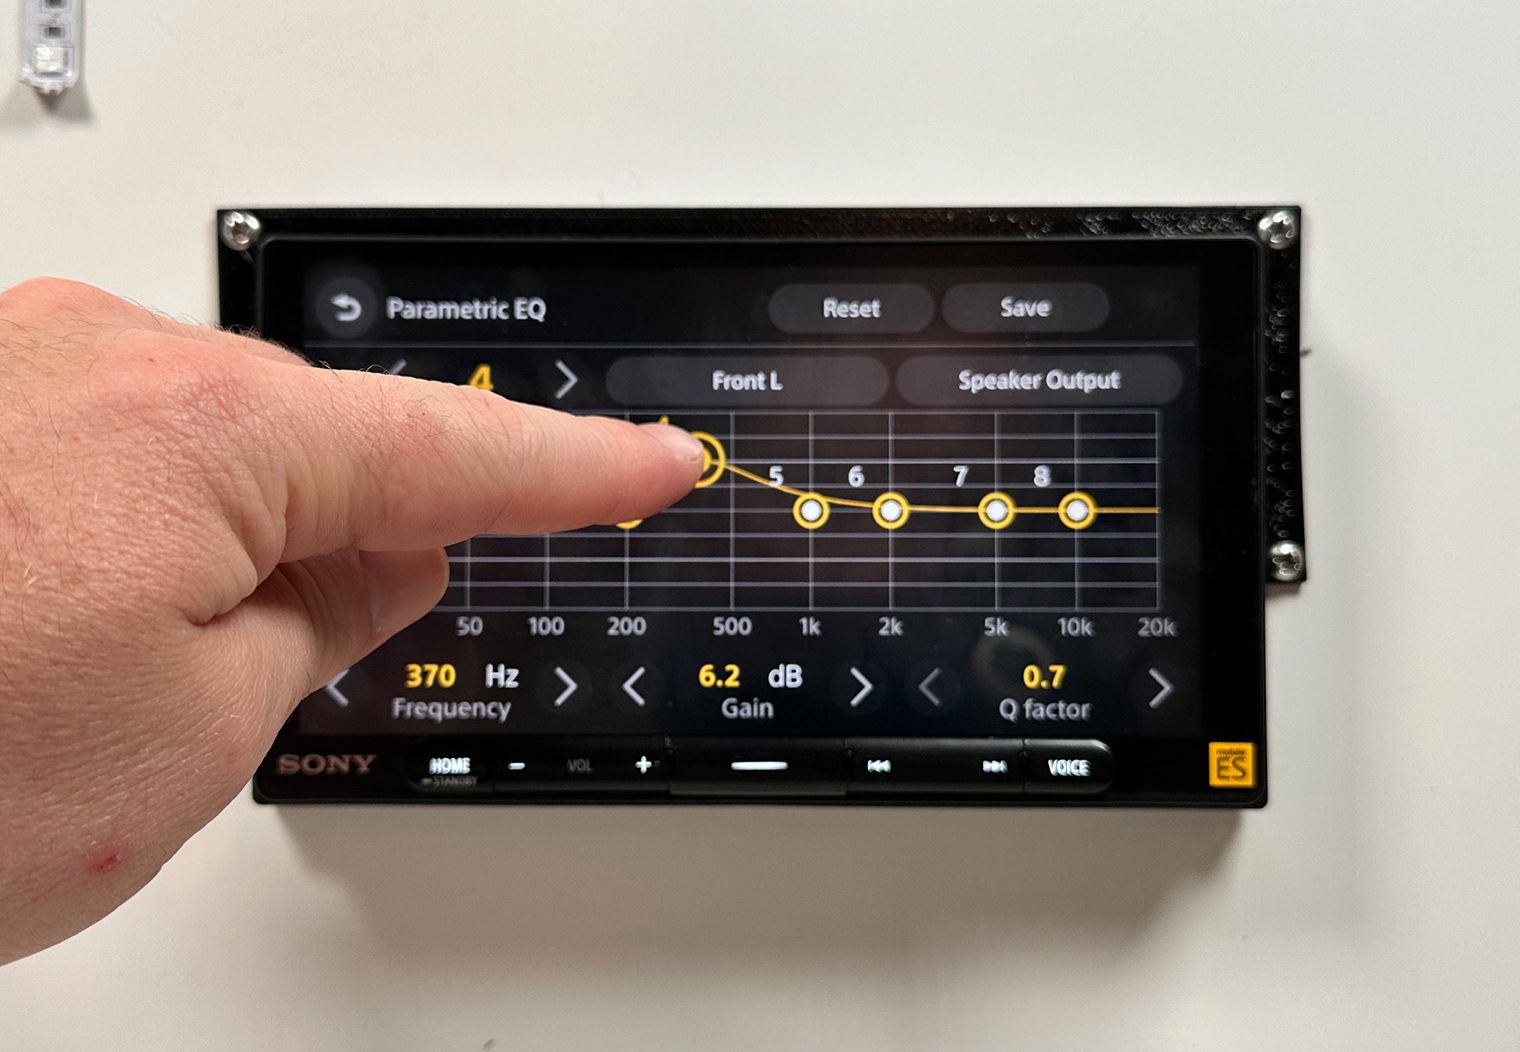
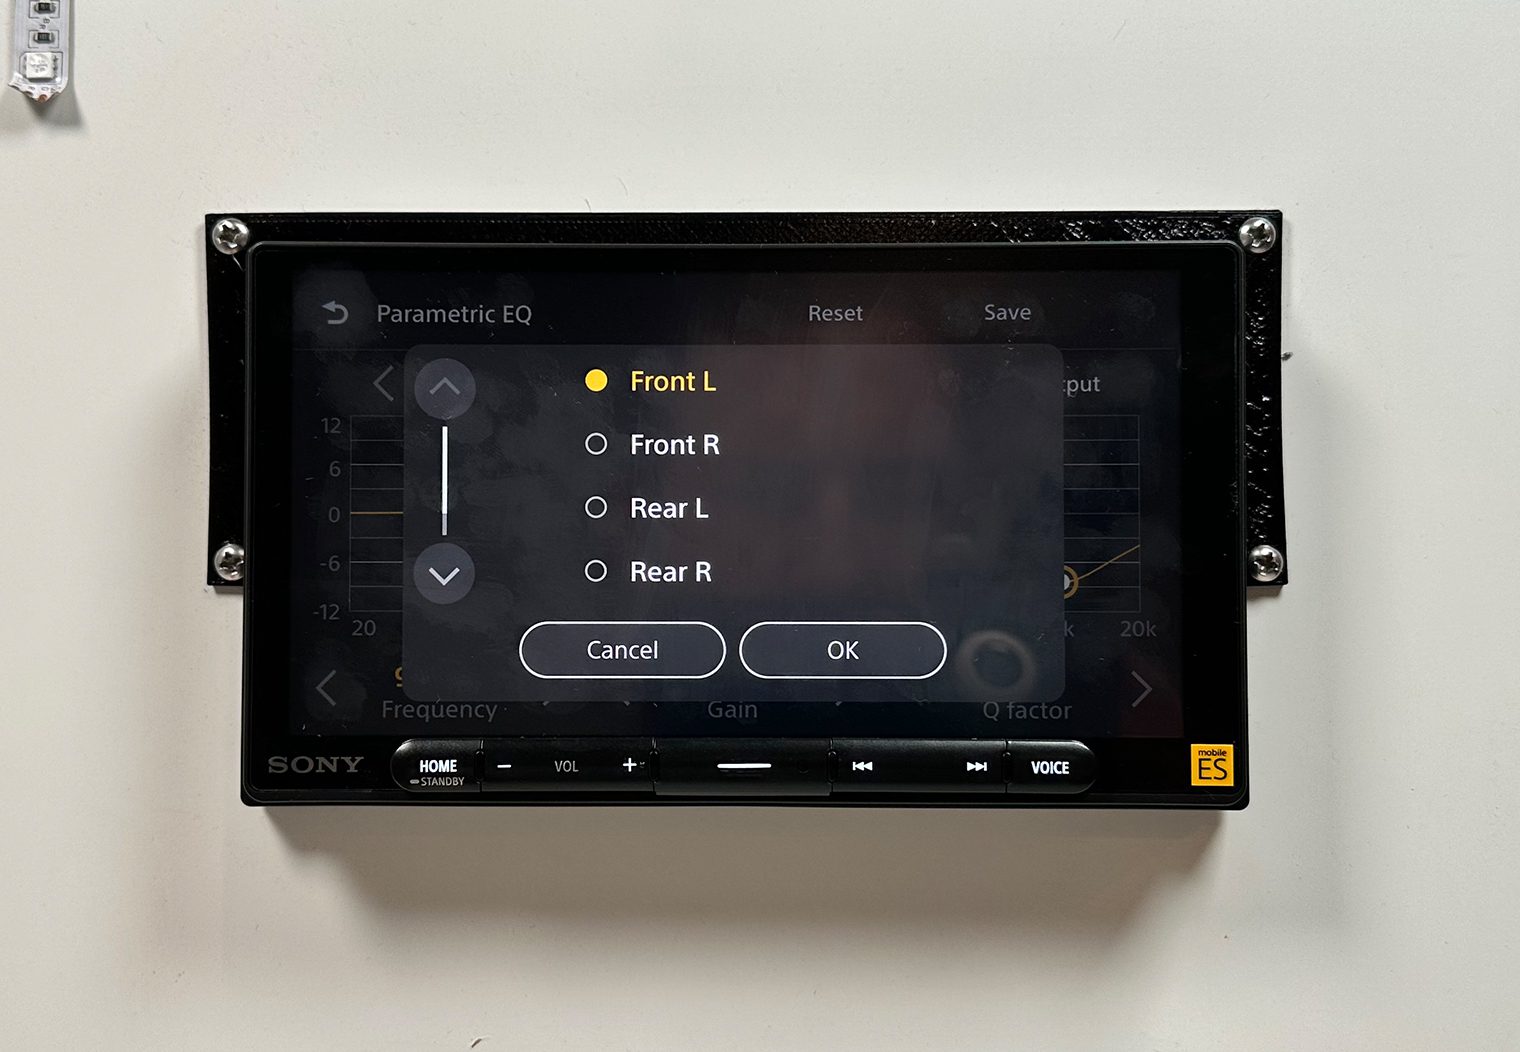
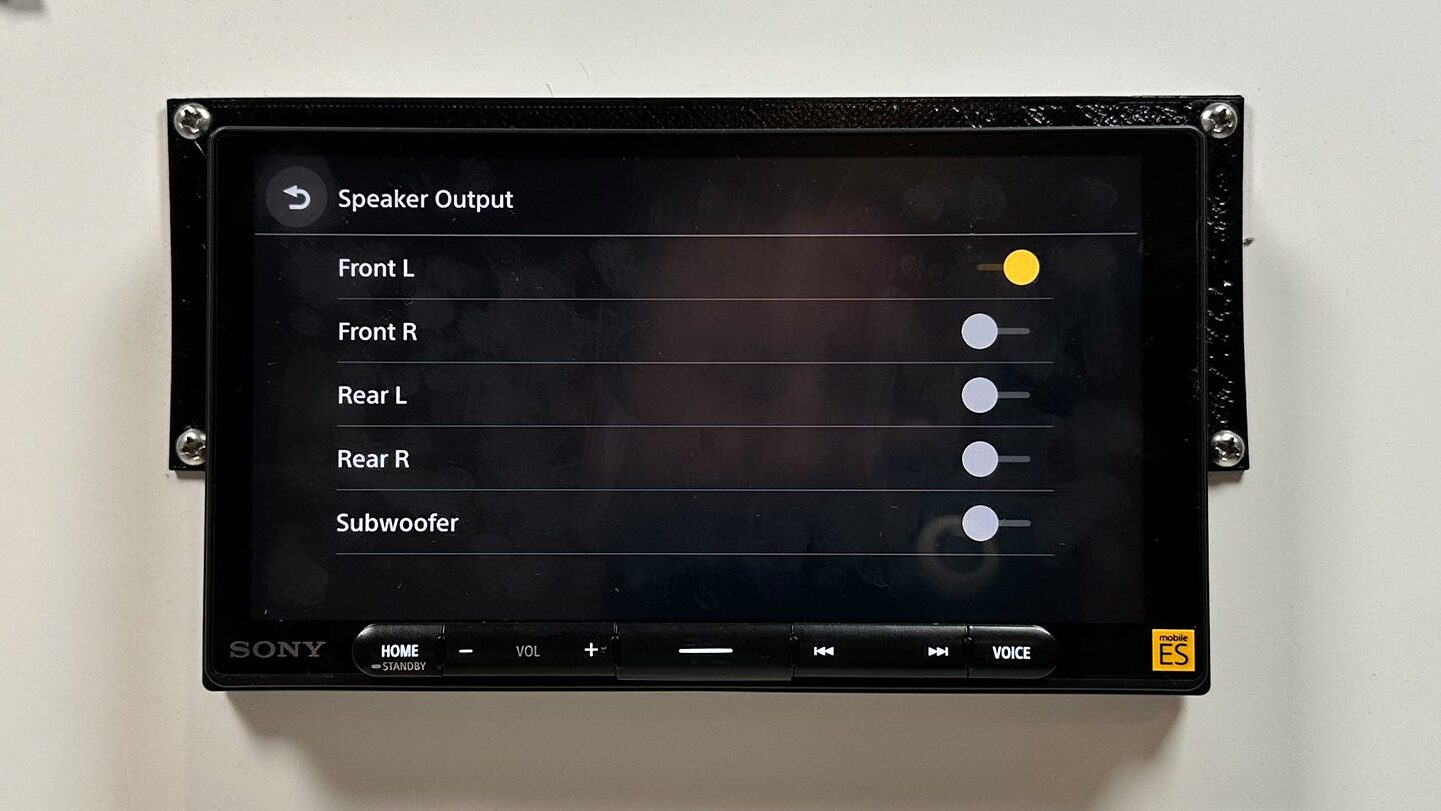
The other cool part about the Parametric EQ that I like was the Speaker Output control. In this section, you can turn off each channel output to allow you to tune one channel at a time. This is necessary for tuners since you don't always have the same speaker or same installation location for all channels and when you're using an RTA to tune, you want the output to only play sound on the speaker(s) you're tuning. This is something you normally only see on DSPs too.
Advanced Crossover Control
Crossover tuning is another essential for a high performance system with aftermarket amplifiers and high performance component speakers. Crossover controls are normally built-in to an amplifier or an in-line DSP. But you might be able to simplify your amplifier installation by using the graphic crossover control on the 9000ES.
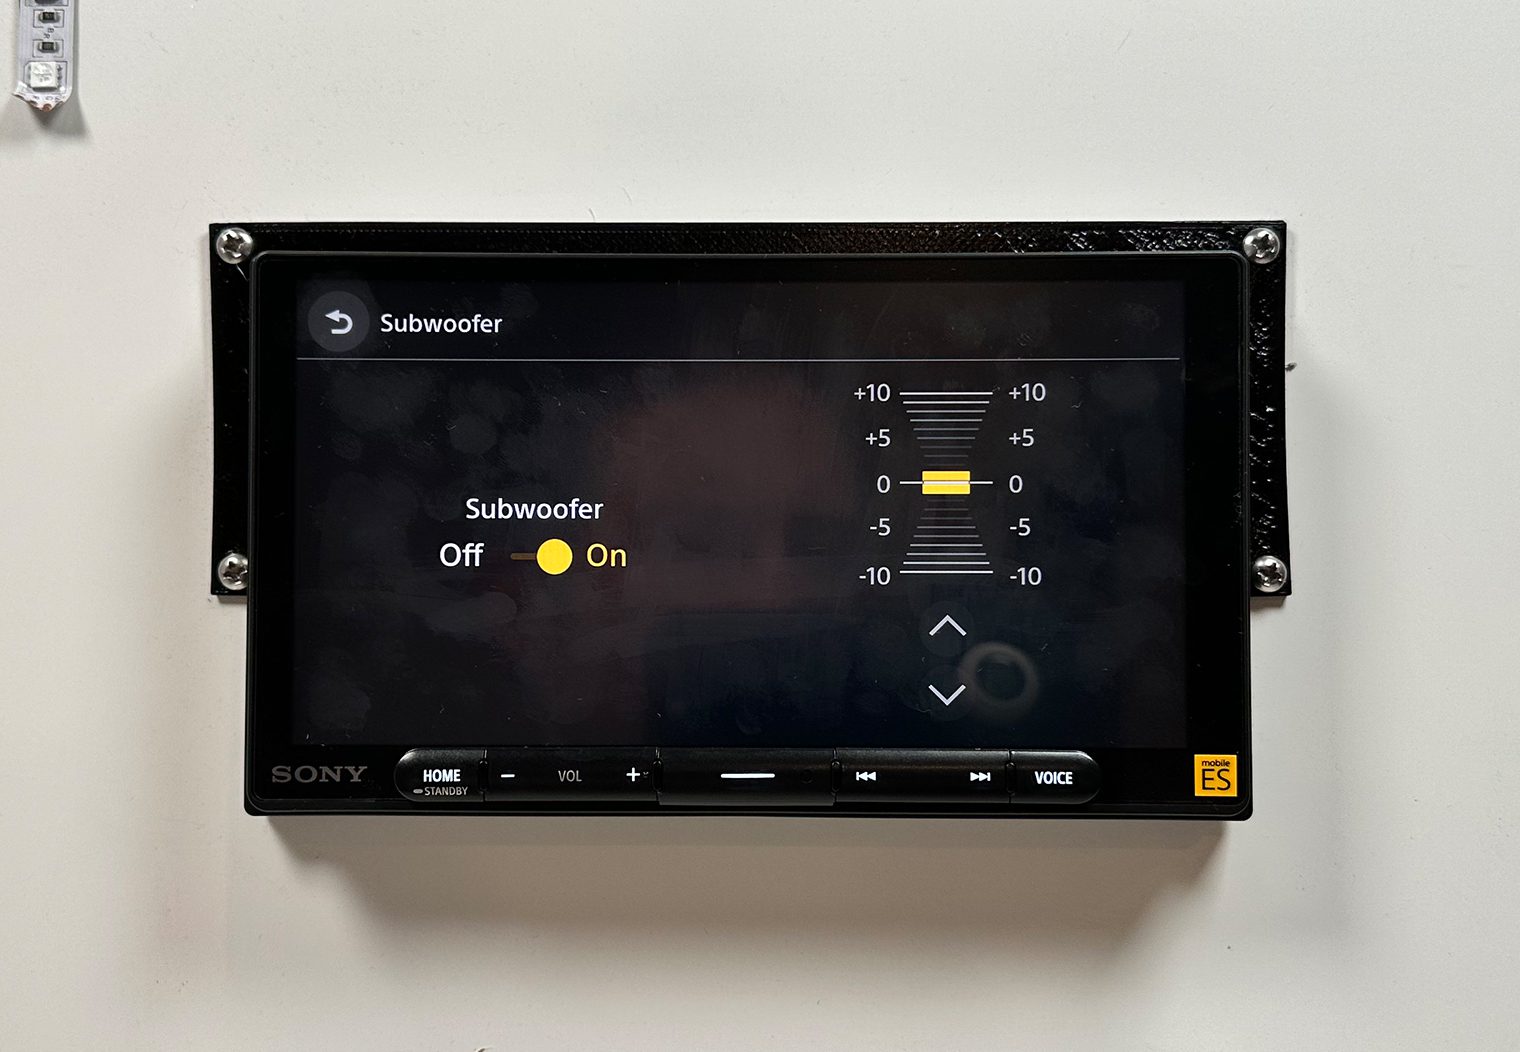
In the Advanced Crossover settings you can control the high pass filter for both the front and the rear channel outputs. And on the subwoofer output you can set the low pass filter. You can also adjust the slope for all three outputs.
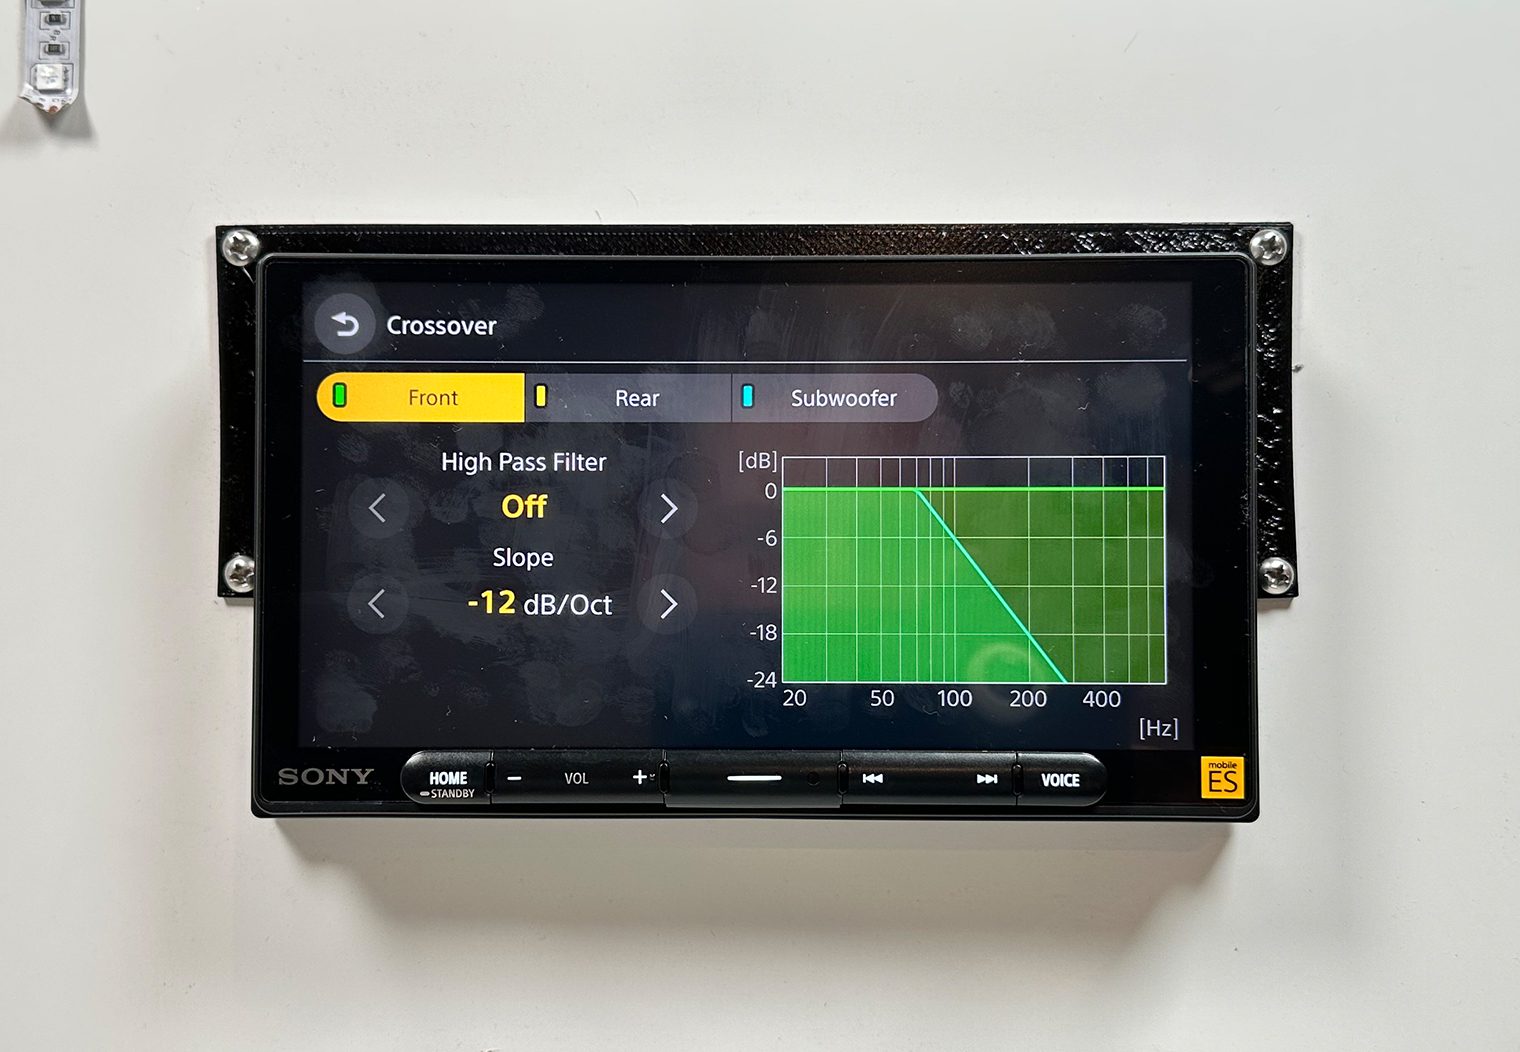

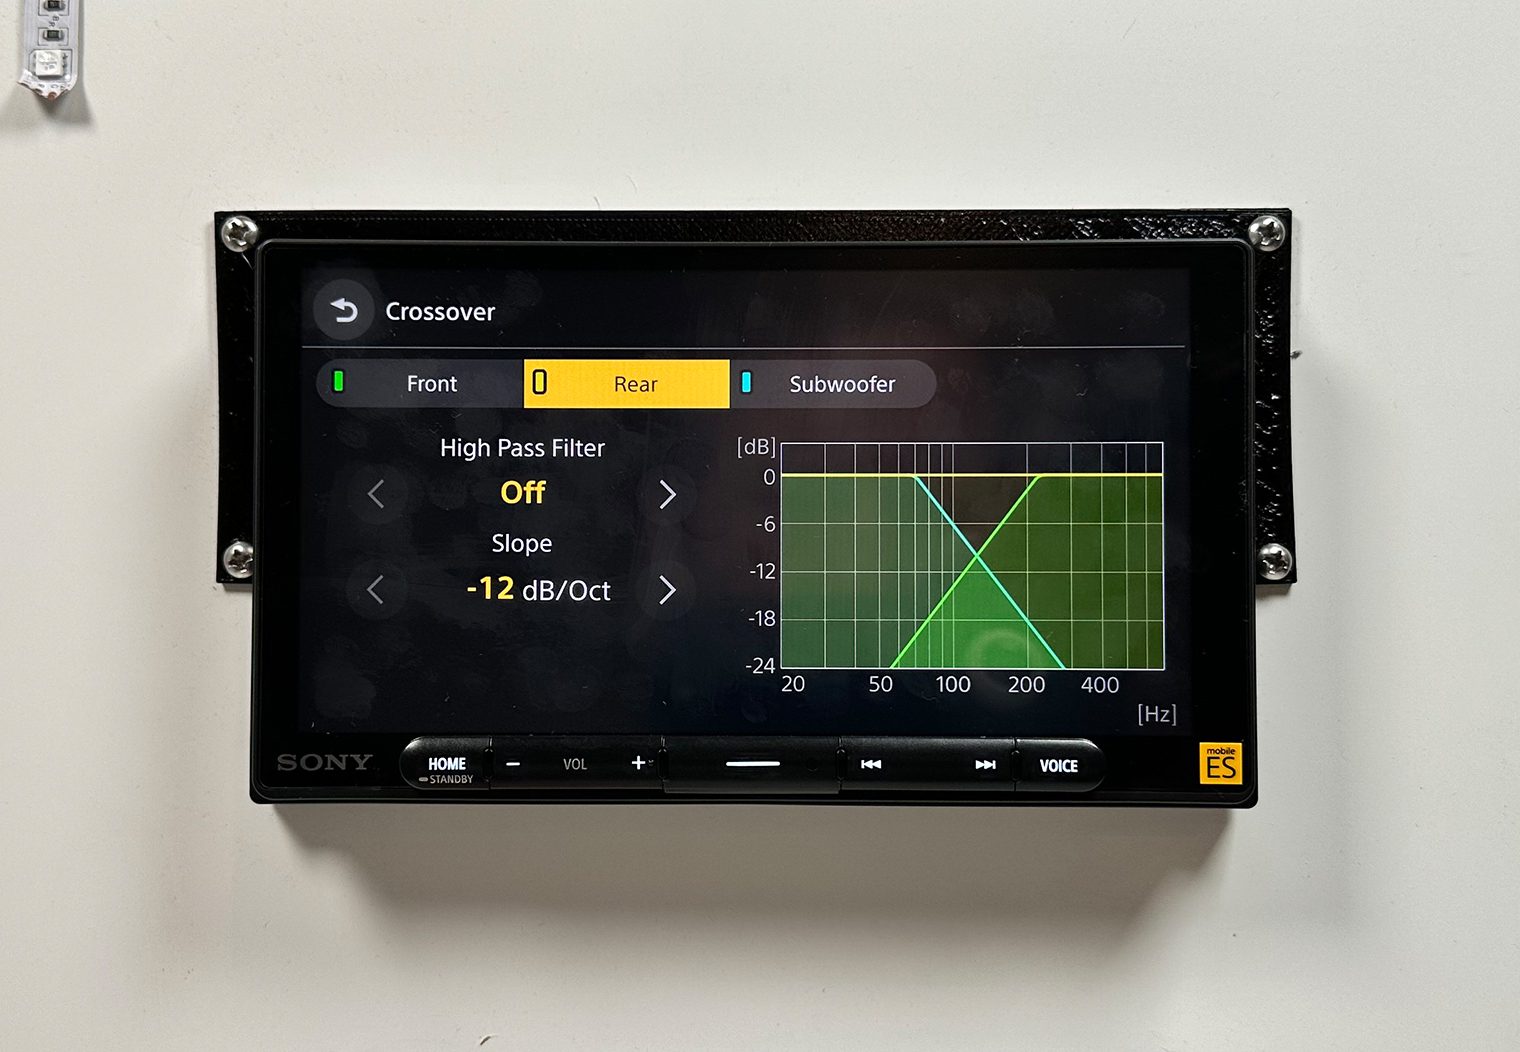

The only thing I thought Sony could potentially incorporate here is a bandpass functionality that would allow you to adjust both the high pass and low pass for the Front and Reach channels. Nonetheless, 99% of the time you should be able to set your amplifier crossover to ‘full' and just fine tune your high and low pass filters directly from the interface on the 9000ES!
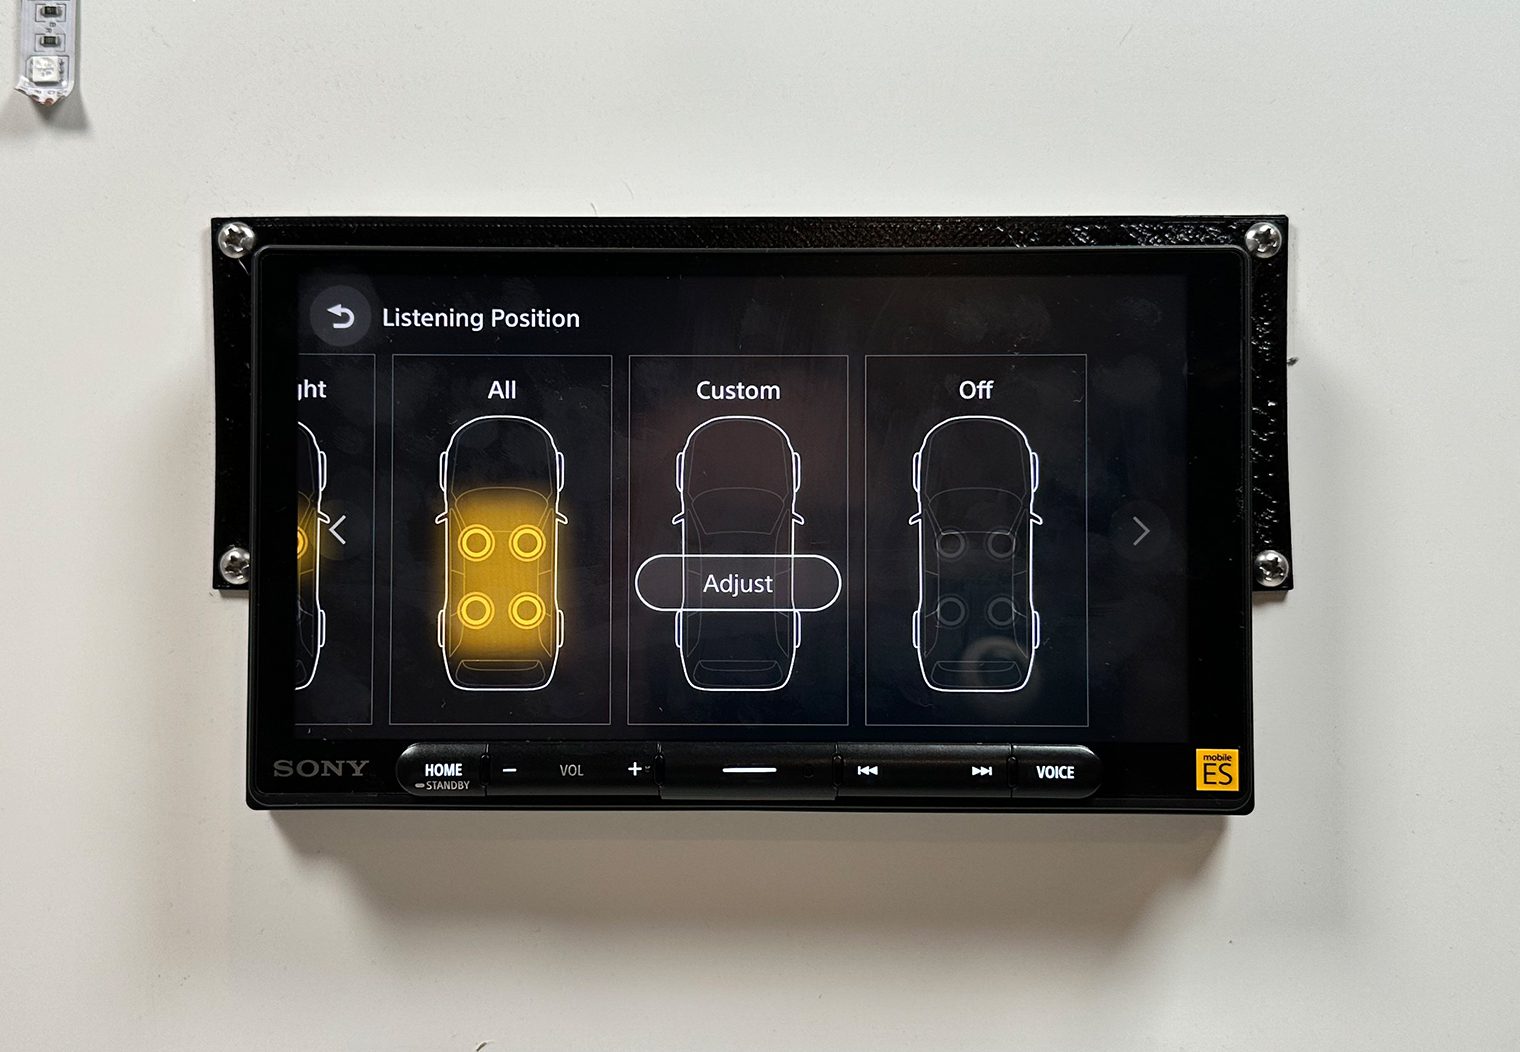
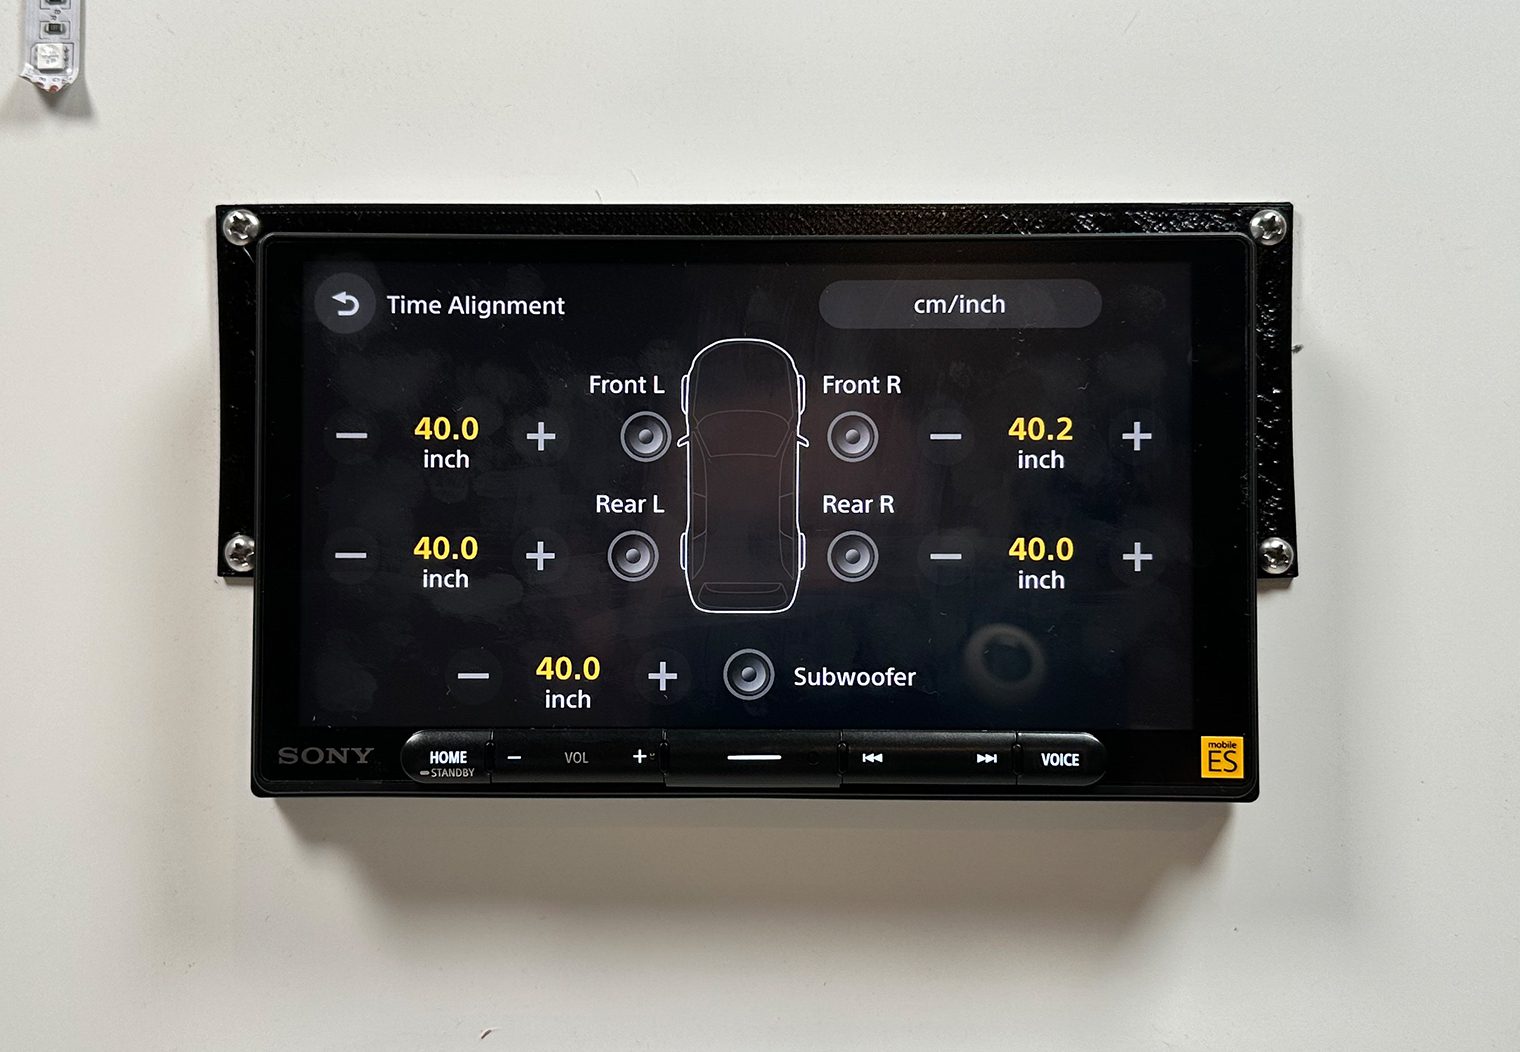
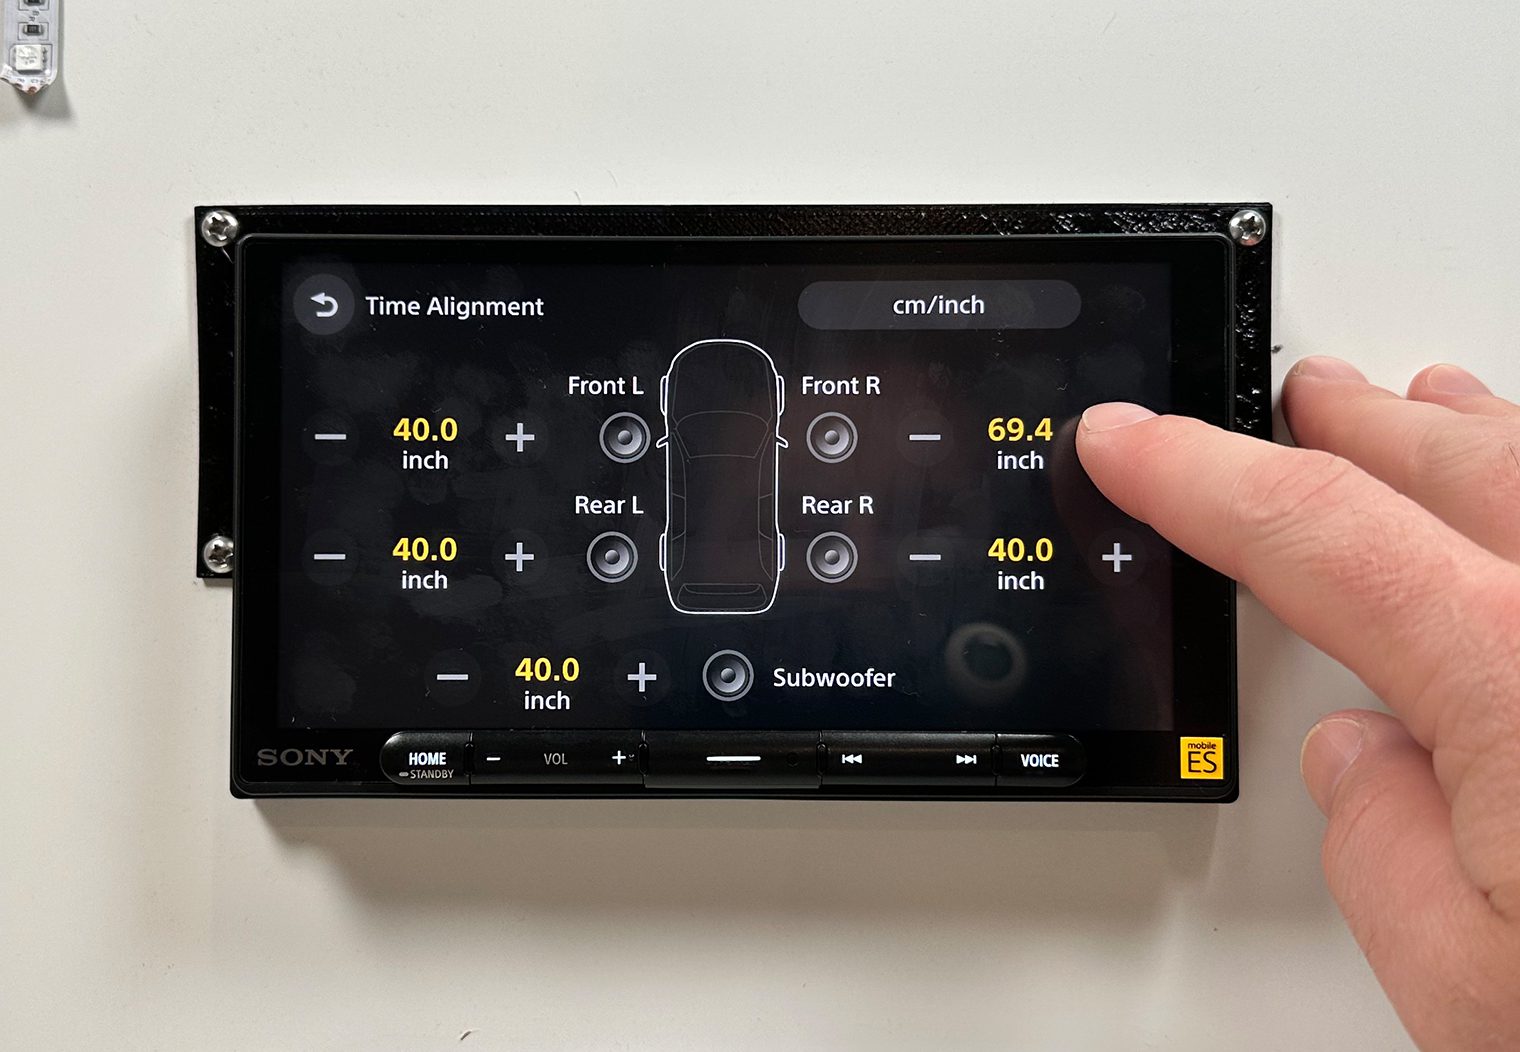
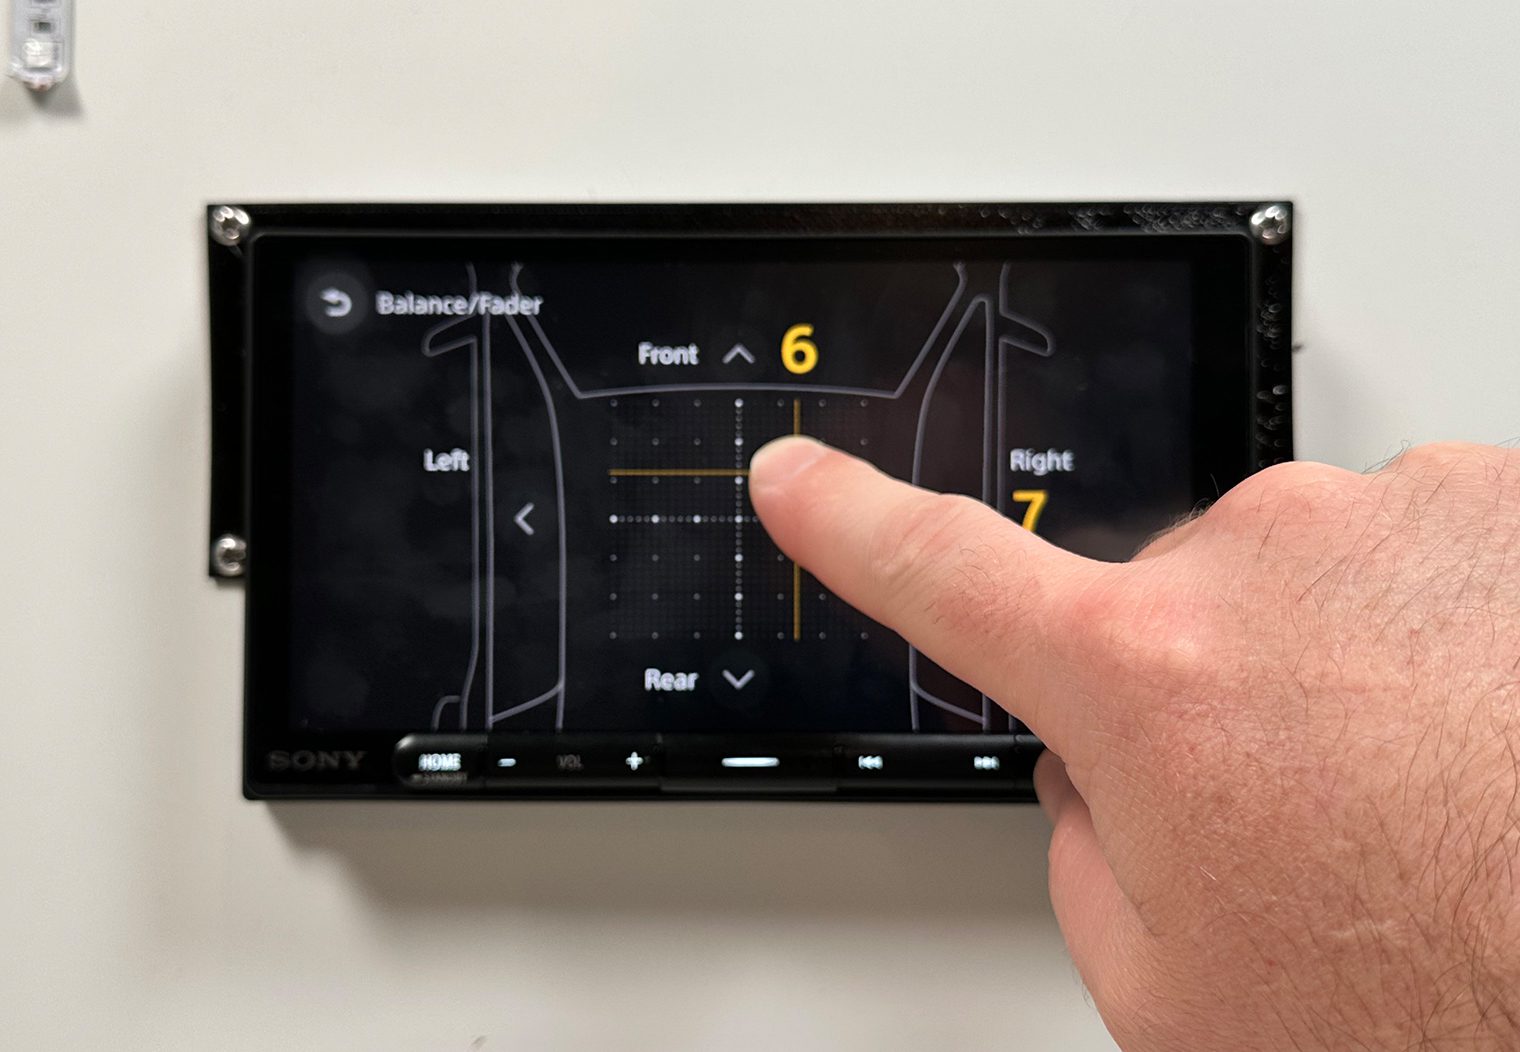
Timing & Listening Position
Each speaker in your car measures a different distance to your ear. Listening position and timing are important when trying to tune the sound for a specific position (or focal point) in the vehicle. It ensures that the sound from the speakers reach your listening position at the exact same time and that all of the speakers are in sync when the sound reaches your ear.
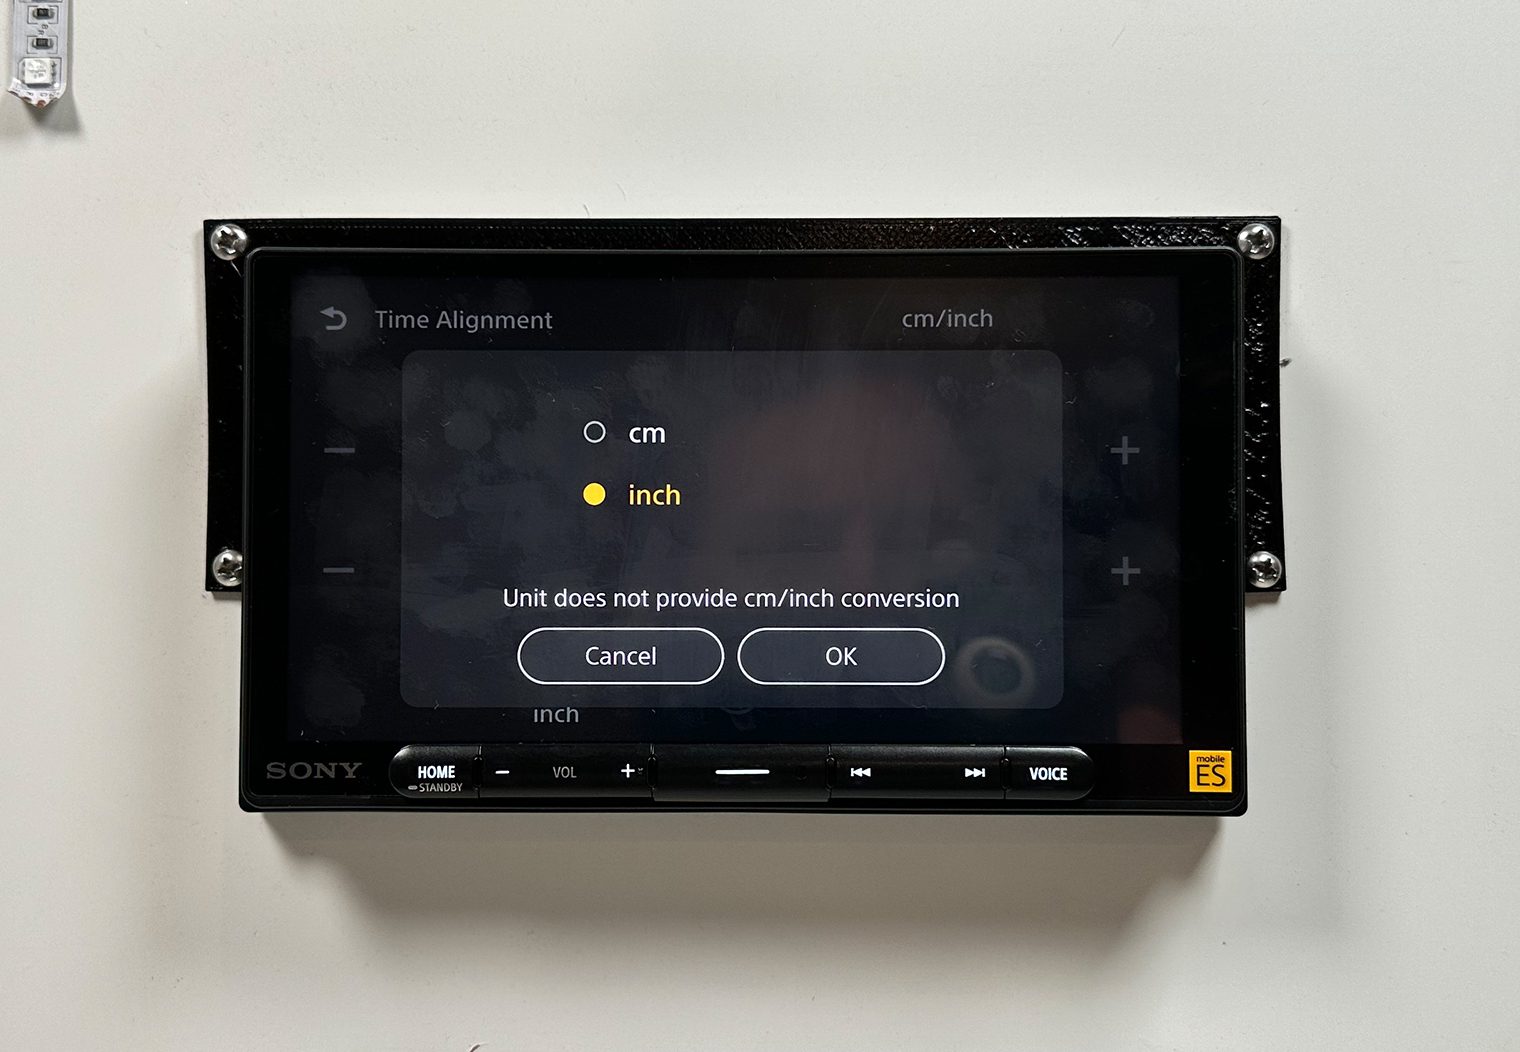
The XAV-9000ES lets you control this in two ways: with presets or manually configured. You can navigate to the settings and select from 6 different options: Front, Front Right, Front Left, All, Custom or Off. With the exception of the custom option, the rest are pretty self explanatory and use average measurements in order to estimate the distance of the preset position you select.
But, if you really want to get to an additional level of precision, you can go into the custom settings and set the distance from the speaker to your focal position (for example the driver headrest) manually speaker by speaker, including the subwoofers. For edge cases and large vehicles like a Suburban, I would probably recommend using these custom settings.

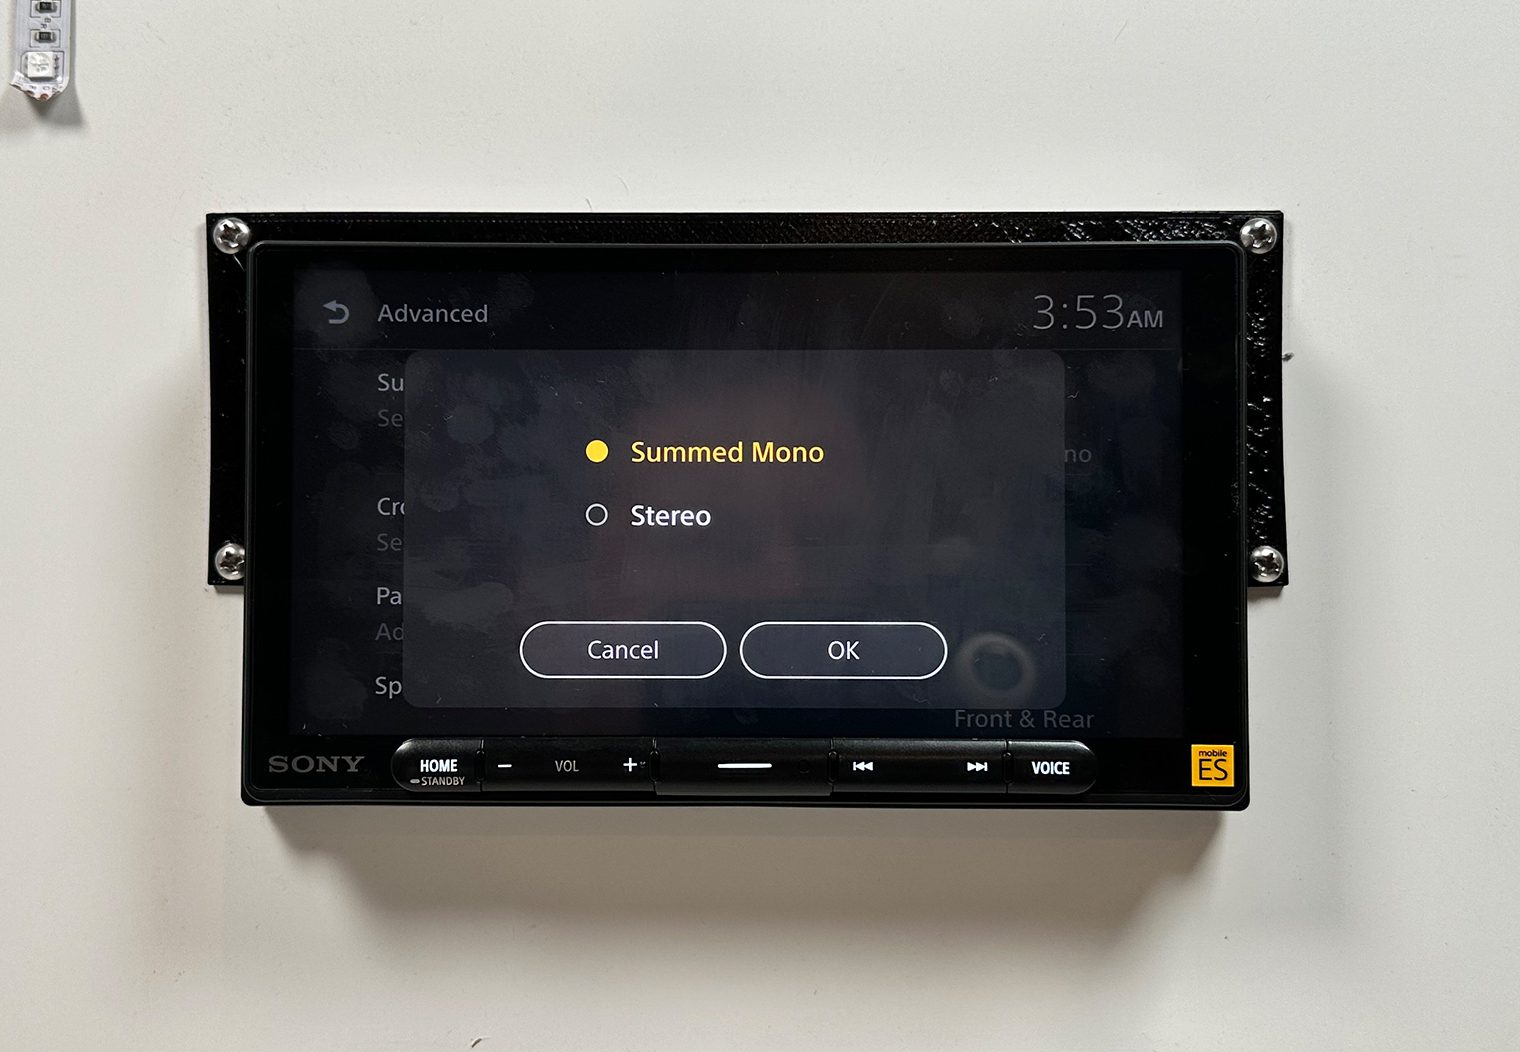
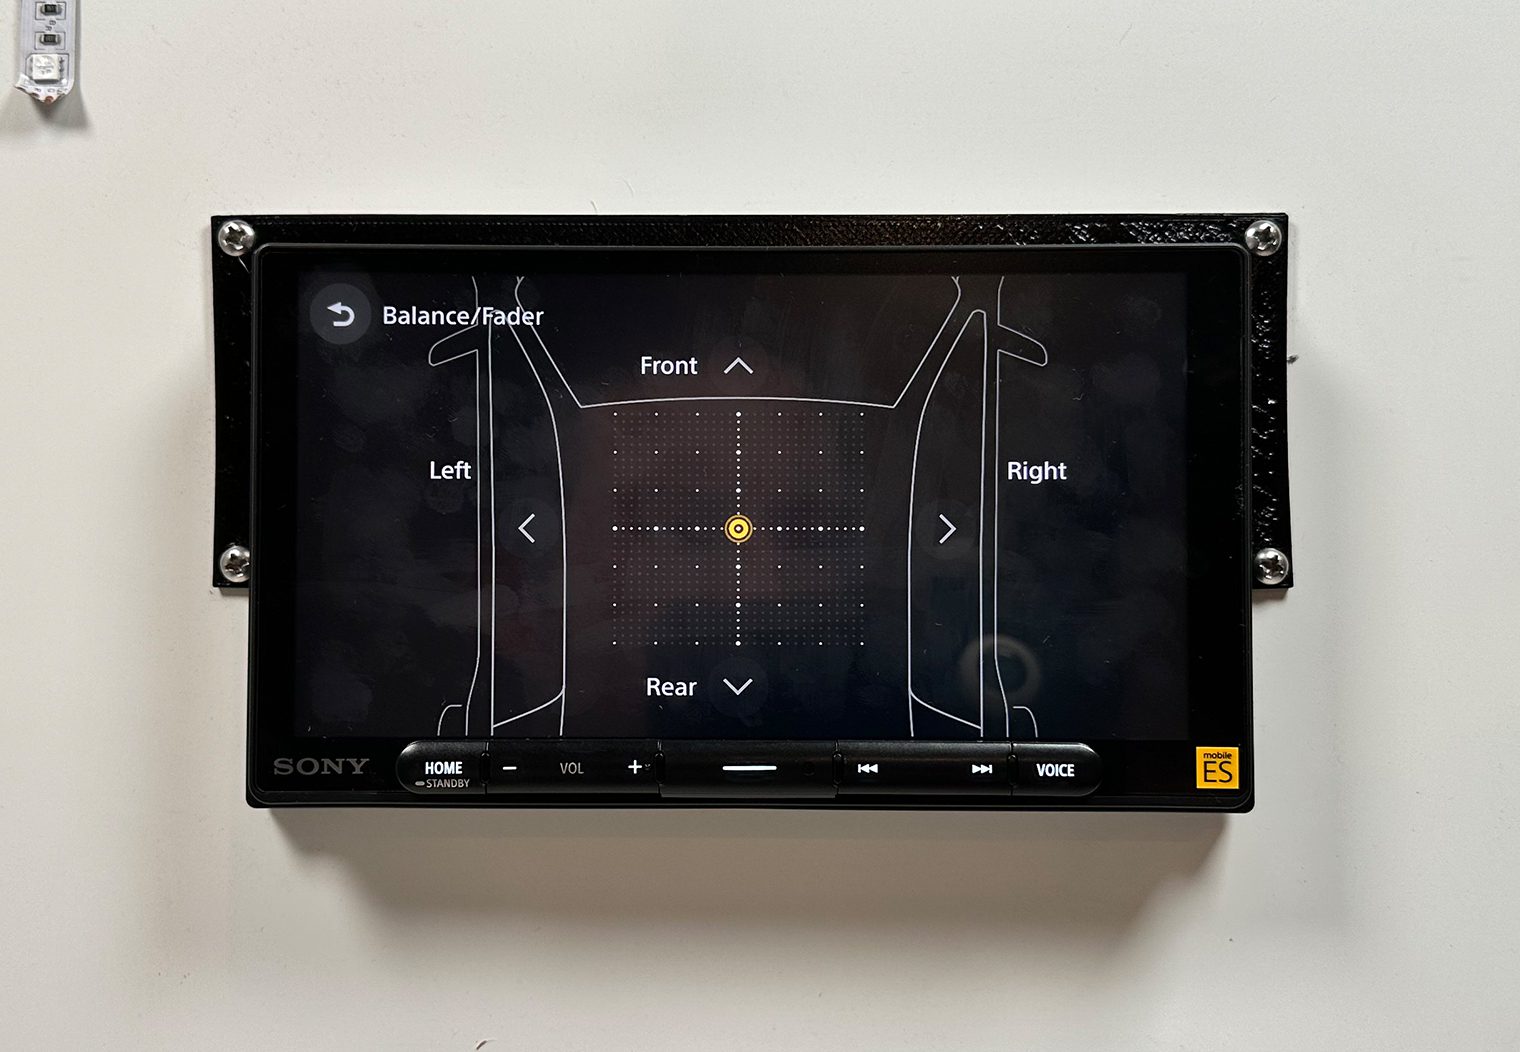
Other Noteworthy Audio Features
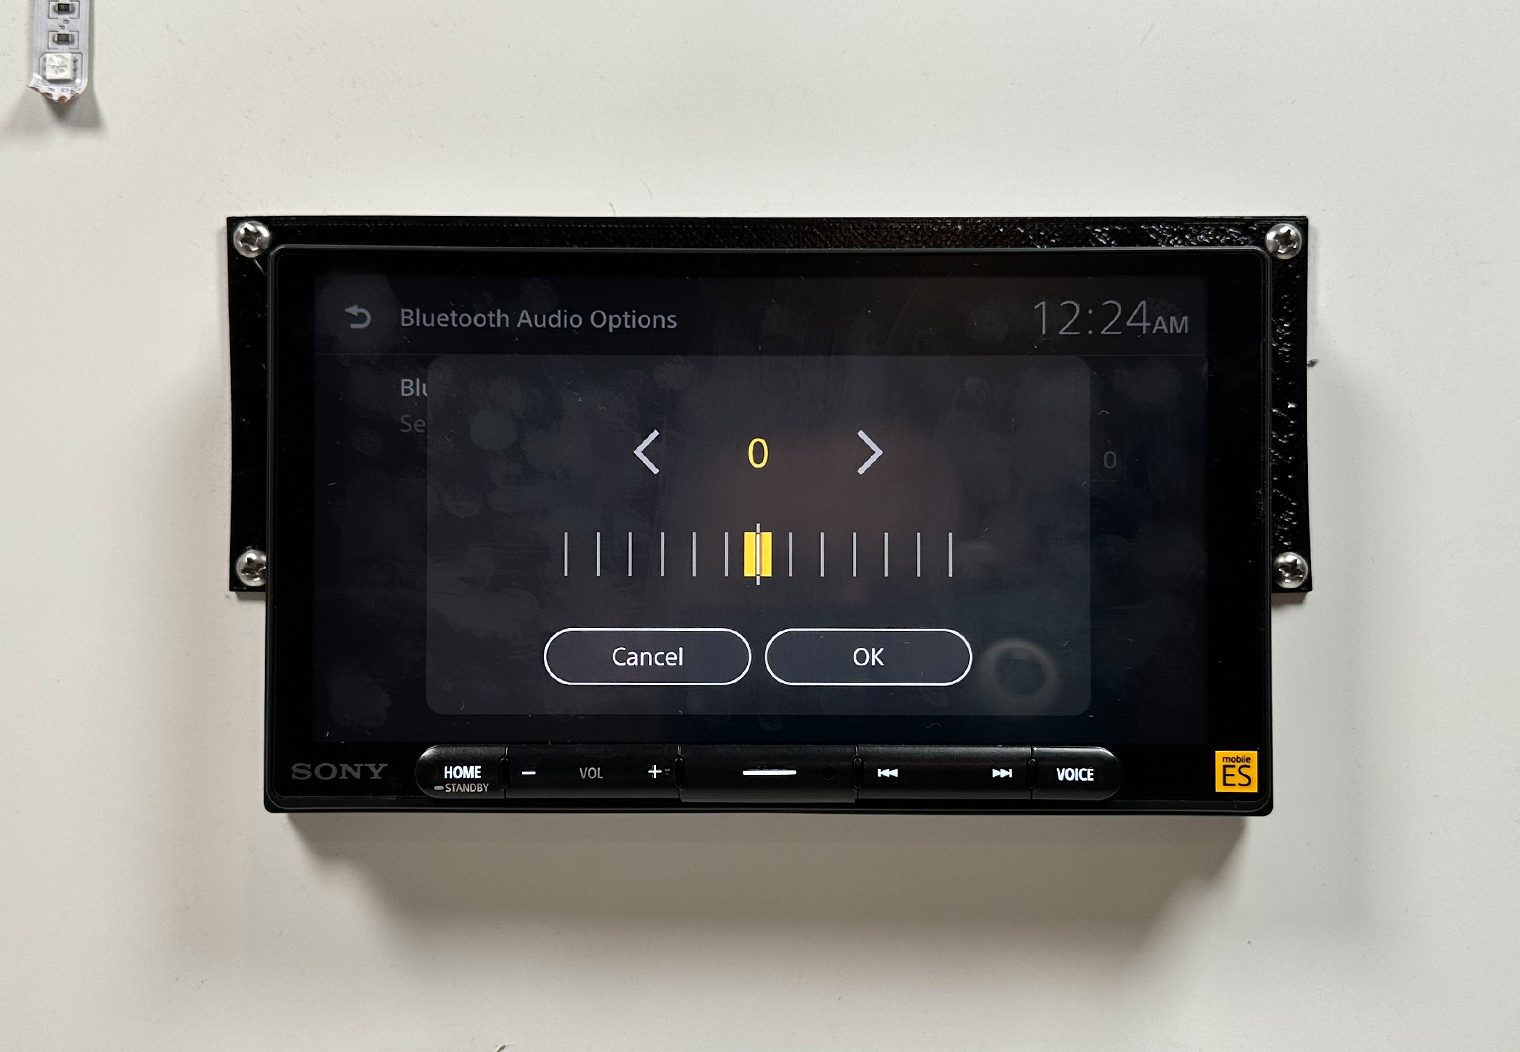
A couple additional audio-related features and configurations that are pretty mainstream:
Customization Features
Custom Background
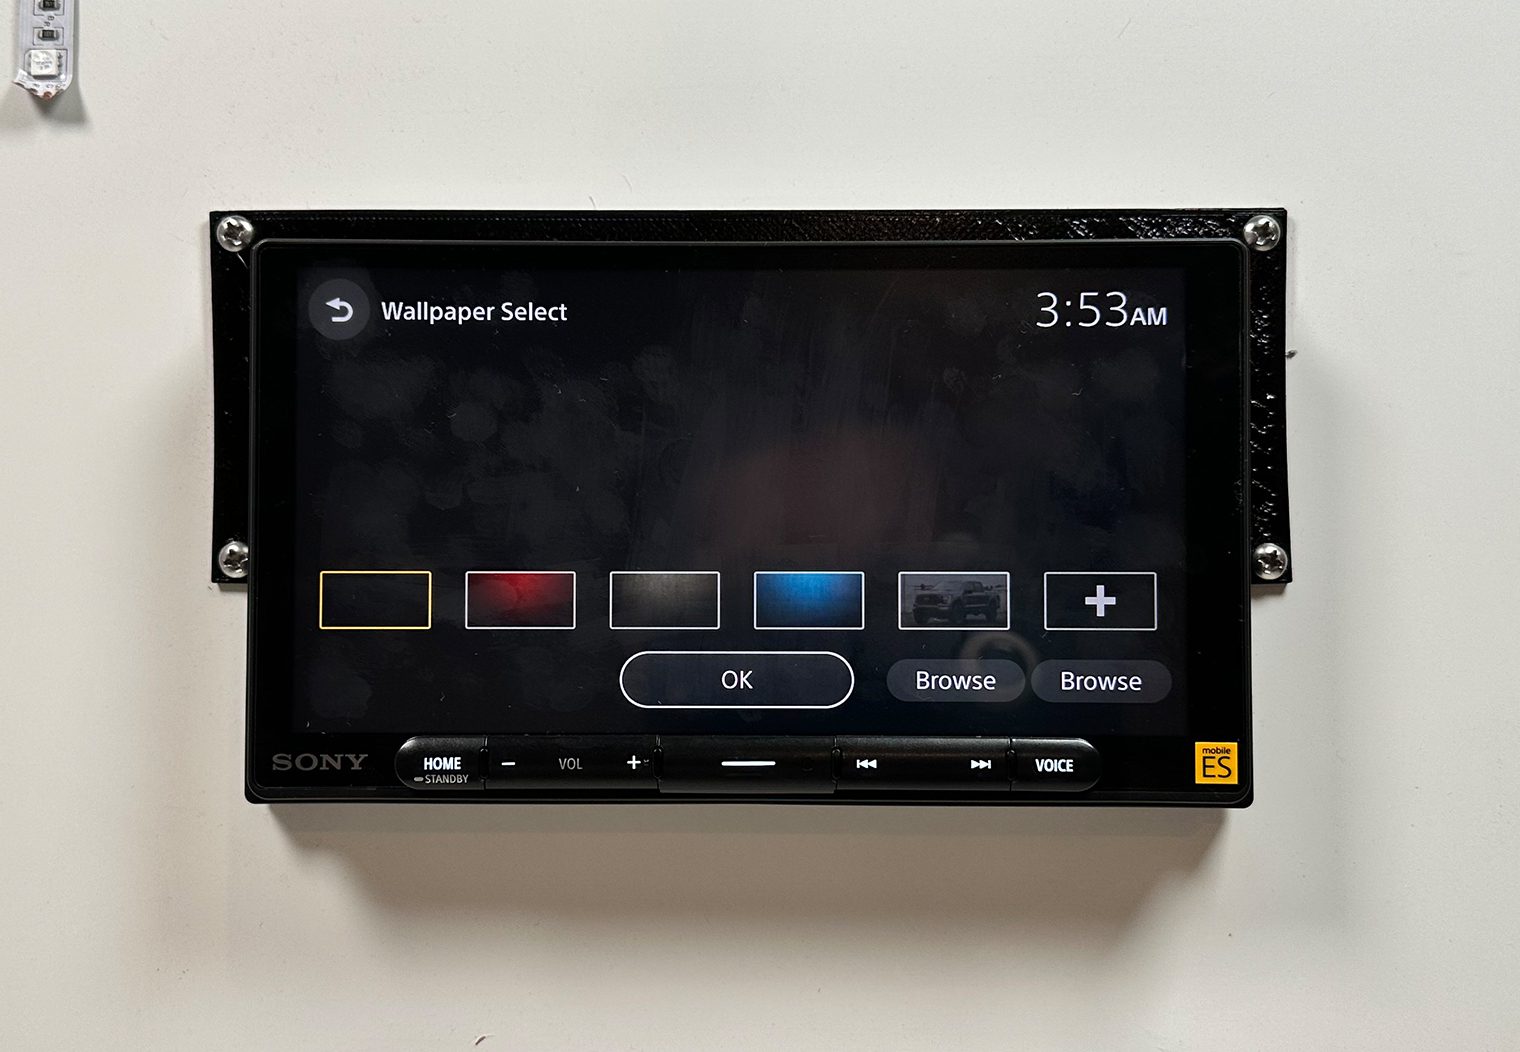
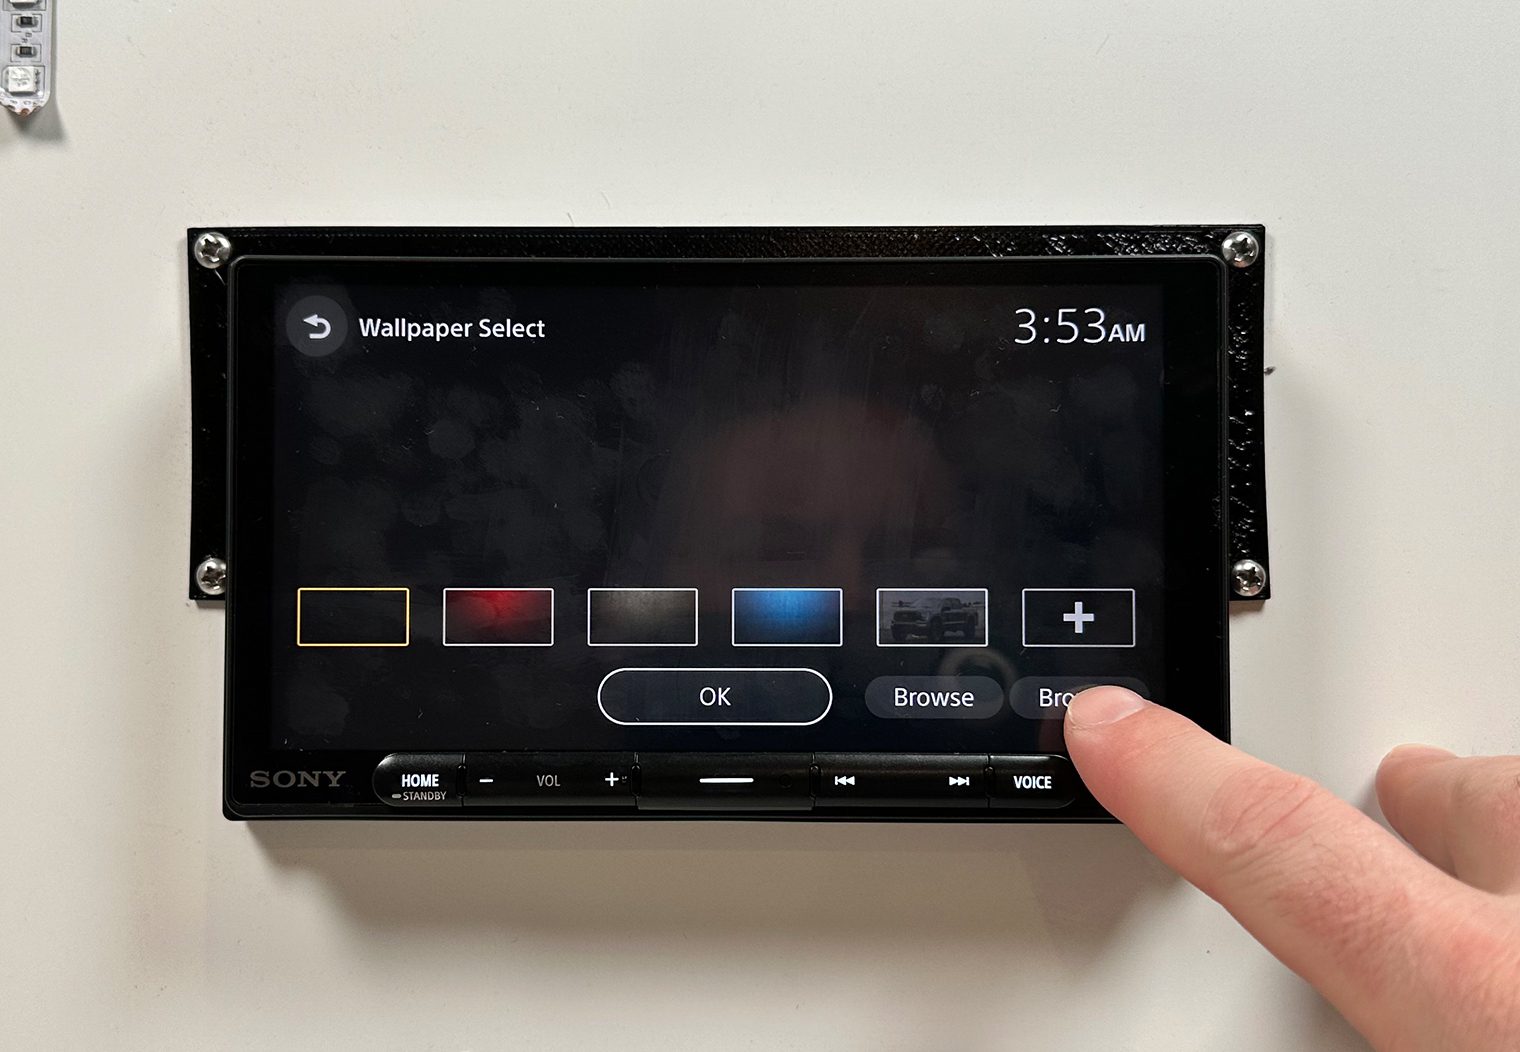
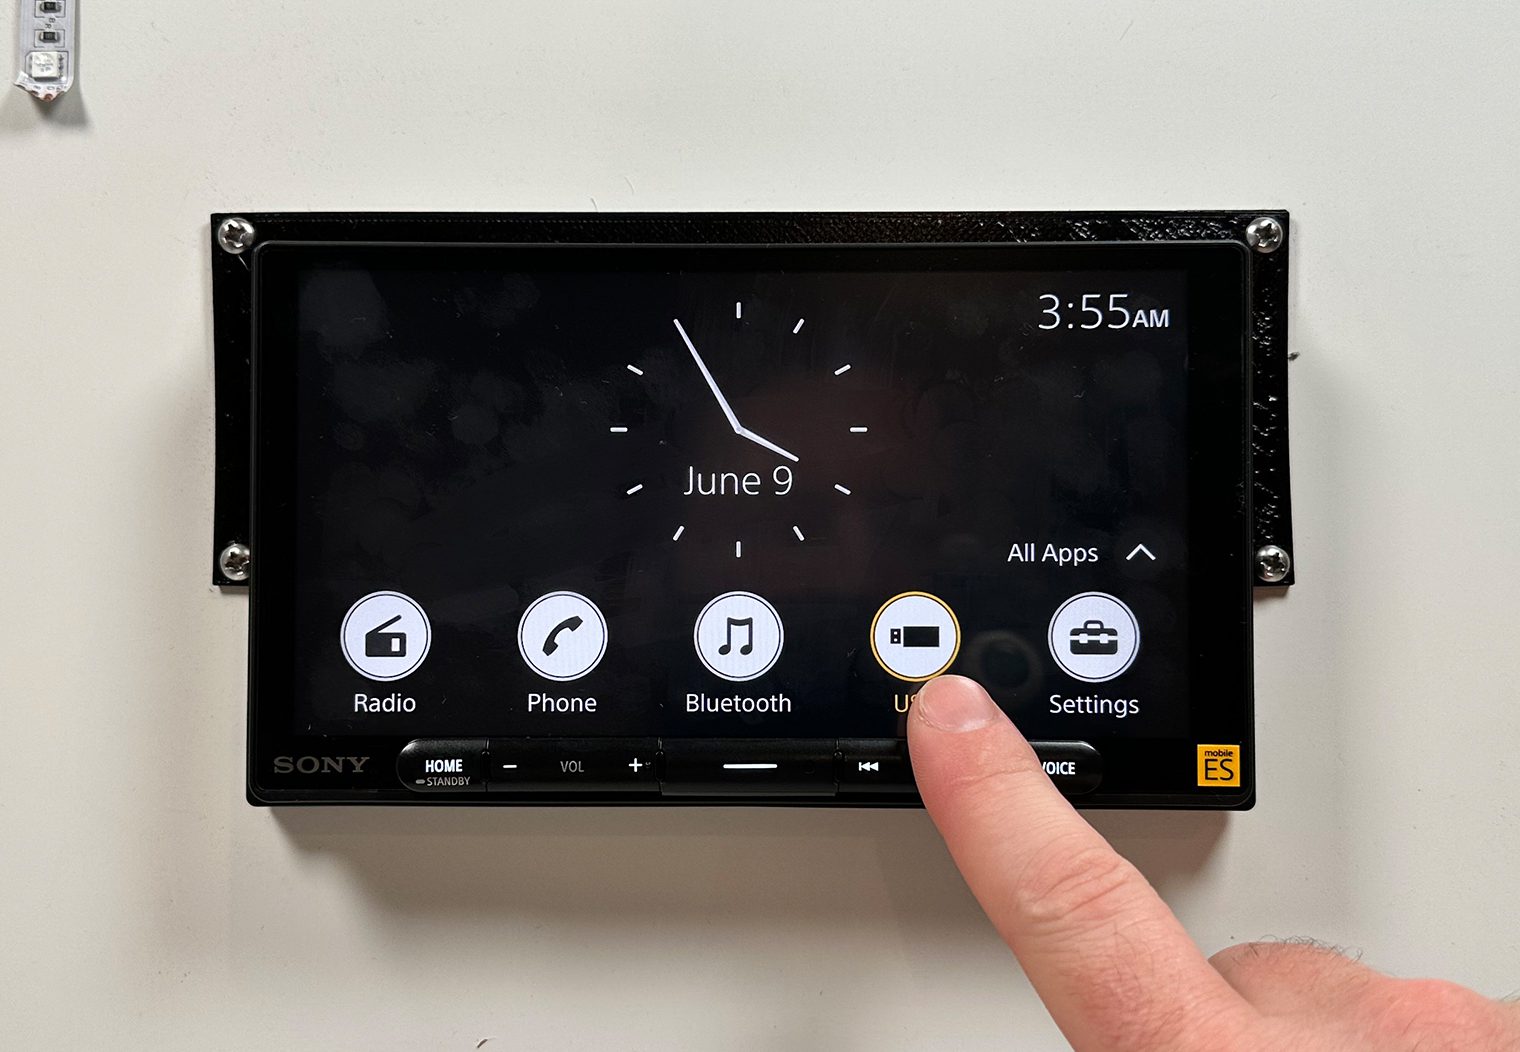
As of now, the clock on the homescreen background is fixed. However, you can add a custom background image in the settings or change it to one of the included presets. The process is simple – load your compatible image onto a USB thumb drive, plug it in, then navigate to the Wallpaper Select settings and then select and load your image.

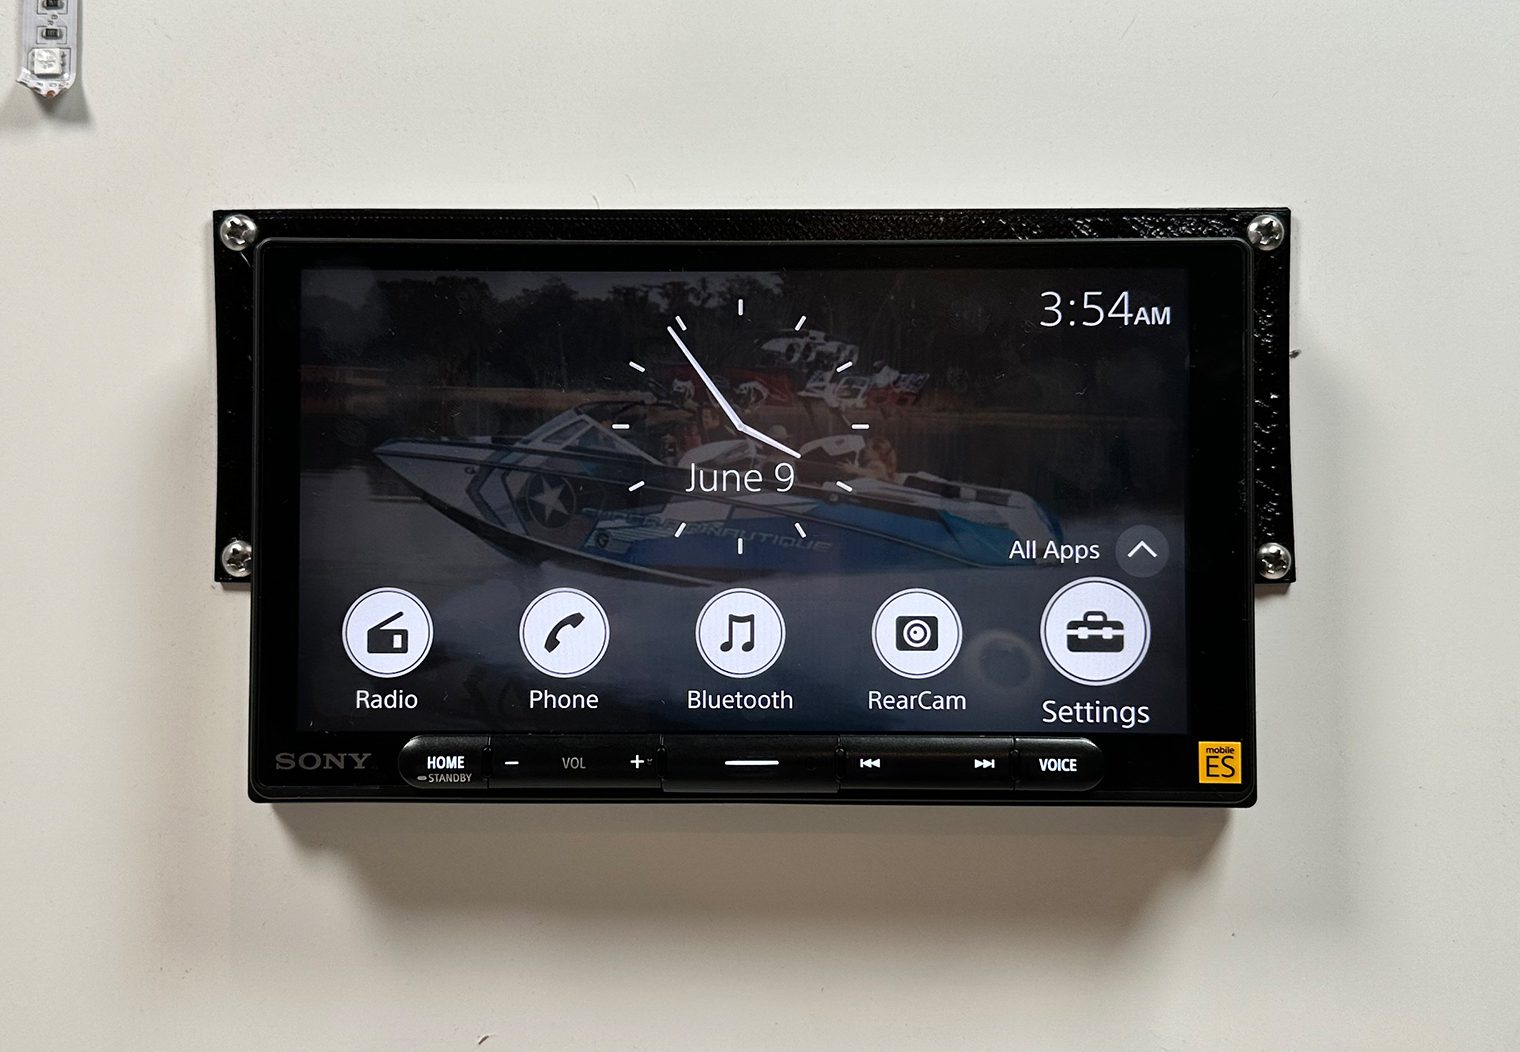
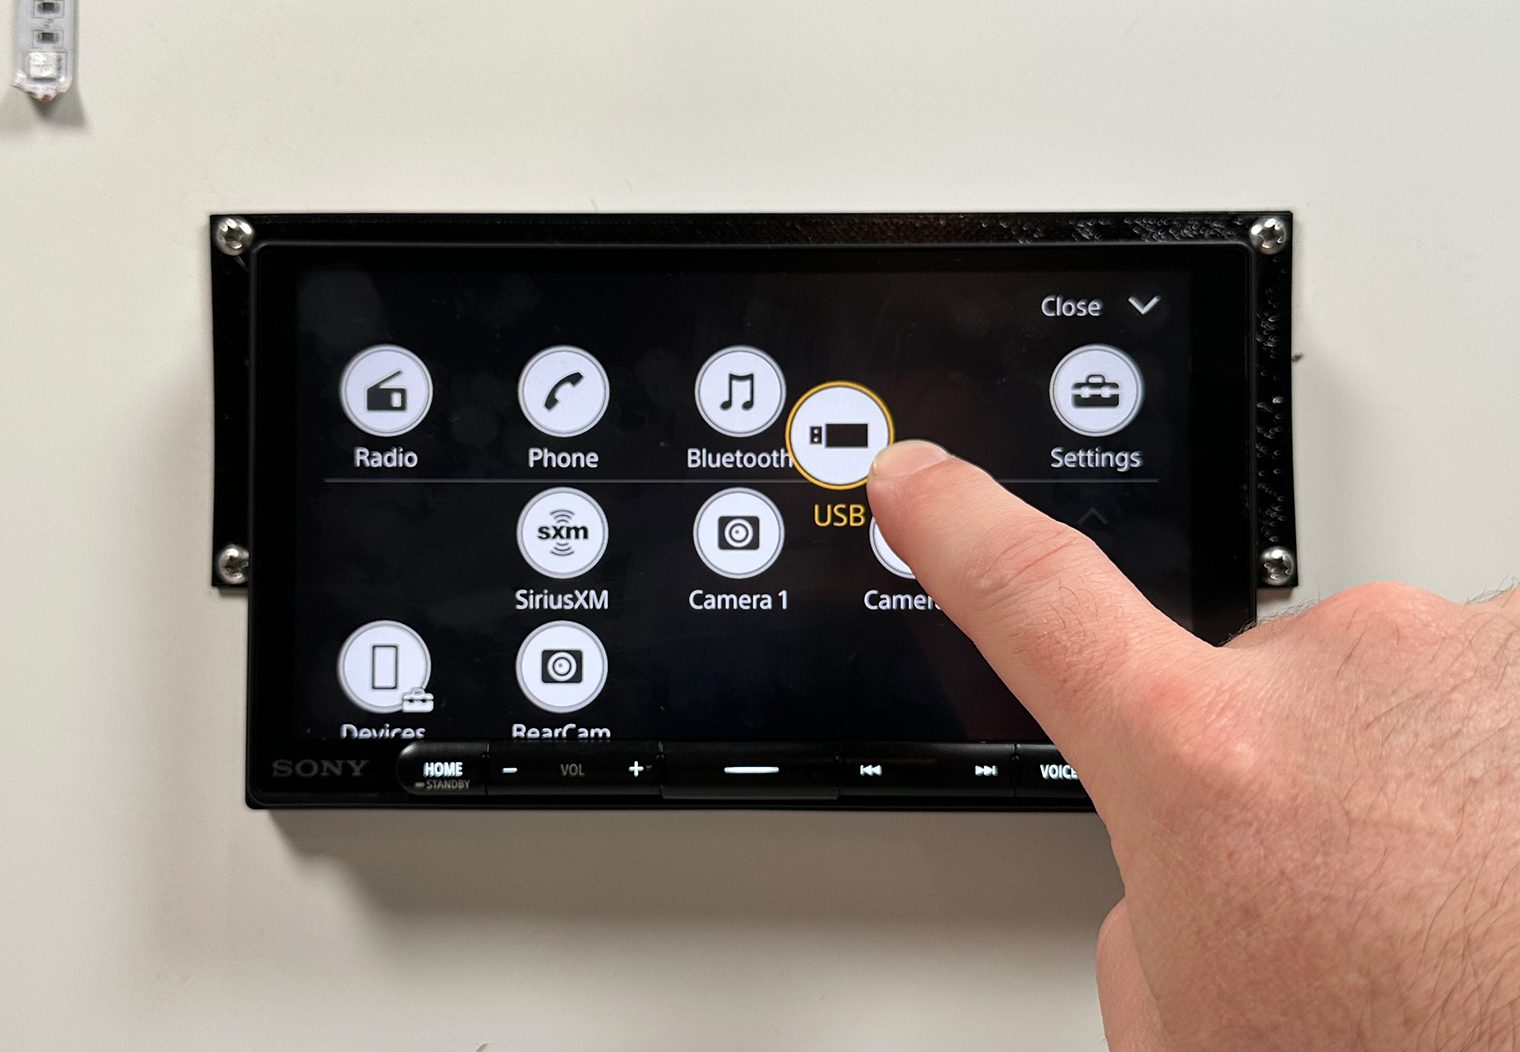
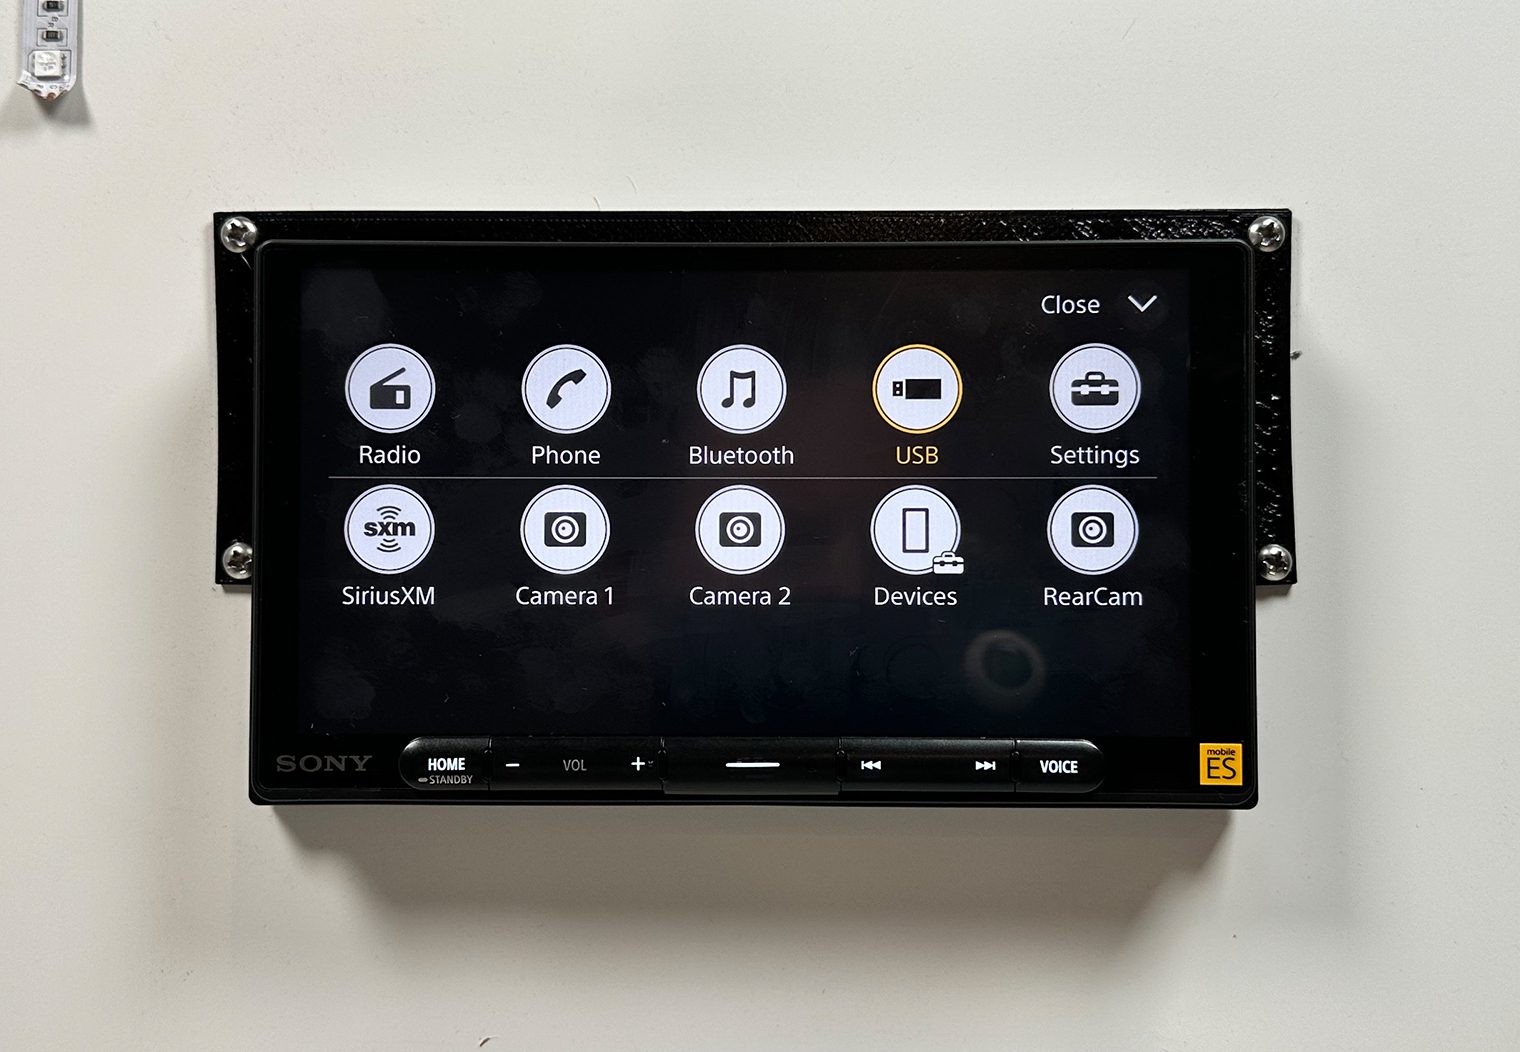
Quick Source Keys
Speaking of the homescreen, at the bottom of the screen you'll find five shortcut icons that will take you directly to a source or feature. This includes things like Bluetooth, Radio, Rear Camera, Settings and so on.
These icons are interchangeable. You can place any combination and order of sources/features along this icon bar by clicking on the “All Apps” and then holding and dragging the source to the location you want it to be in.
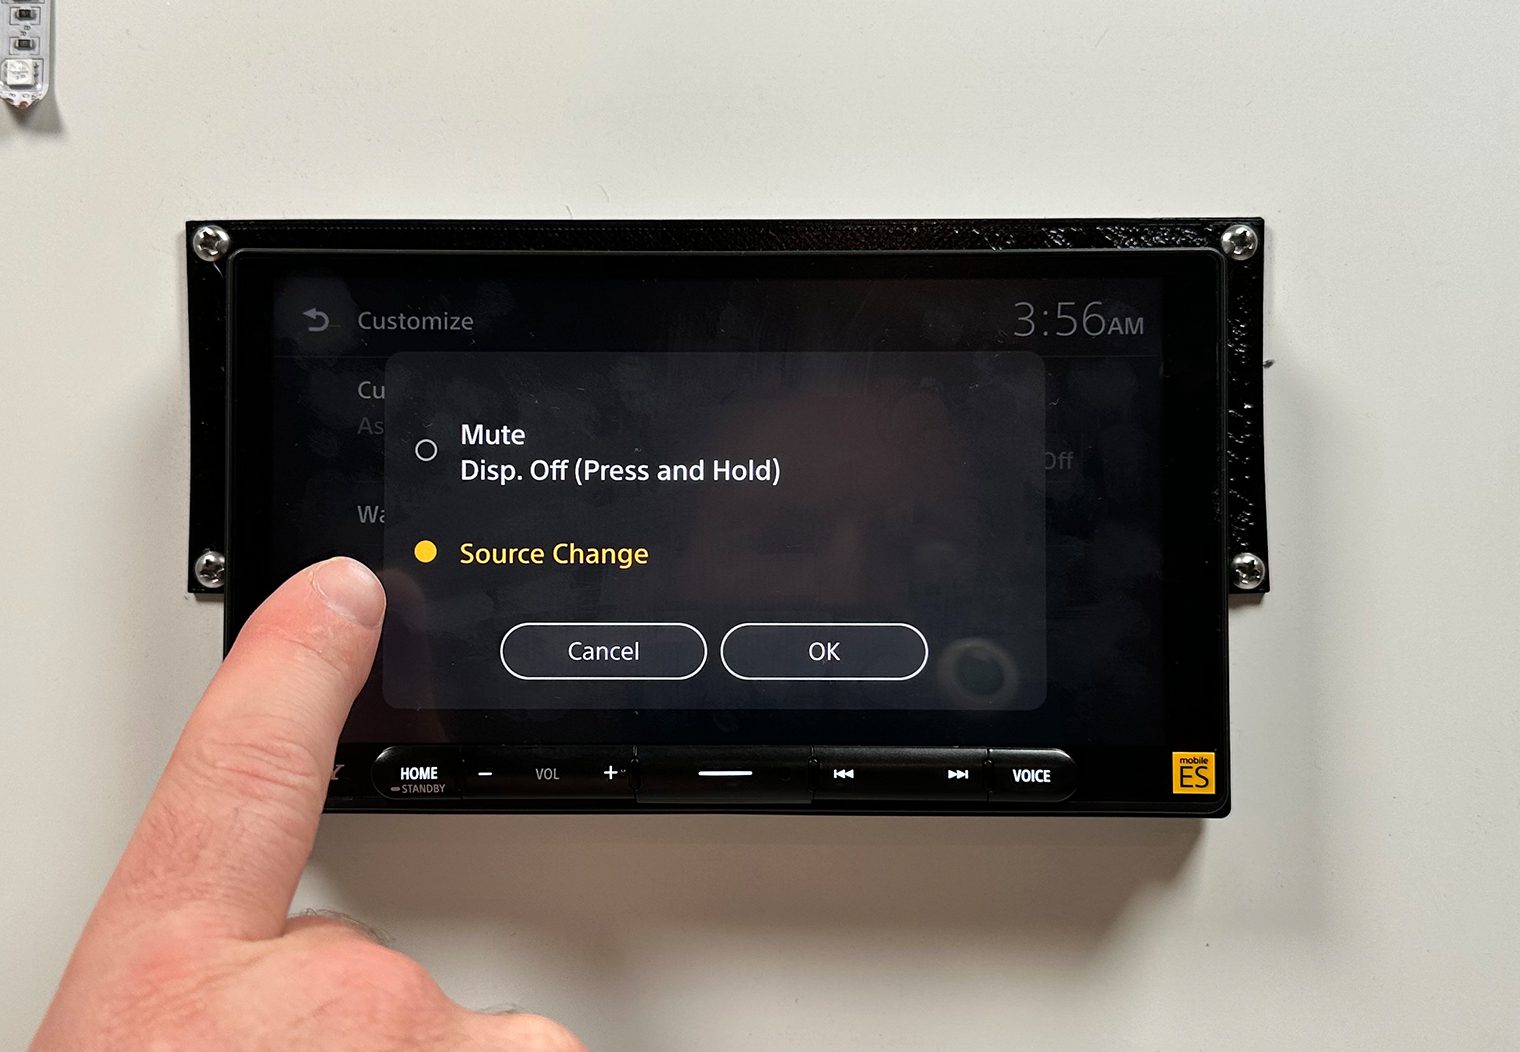
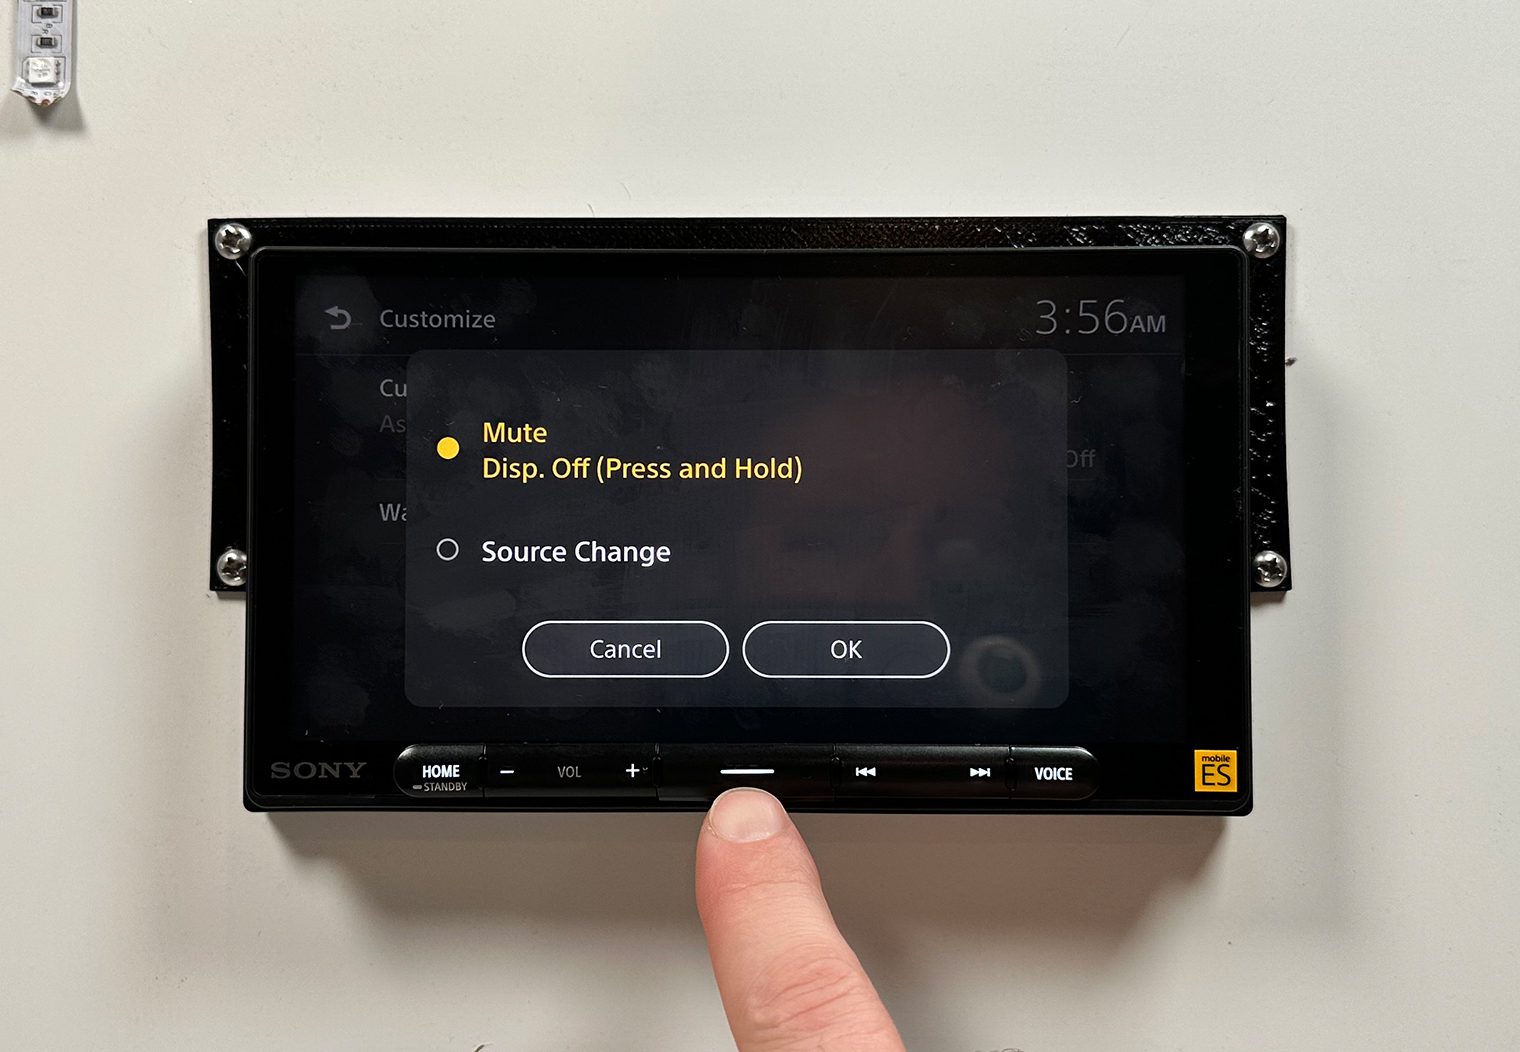
Custom Key
One of the features that's unique to the newer lineup of Sony's head units is a customizable button along the bottom of the unit. It's directly in the middle – notice it's not labeled as well. In the Customize settings, you can interchange the function of this button to either Mute/Display Off or Source Change. Once set, selecting the button will operate based on the function you choose.
Steering Wheel Control (SWC)
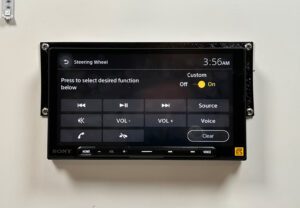
Most head units that we've tested in recent years come with steering wheel control compatibility. Many provide you with the capability to customize what each button on your steering wheel does on the head unit too. Similarly, the XAV-9000ES has a dedicated configuration interface that will allow you to program each of the buttons that are on your steering wheel.
There are two approaches to adding steering wheel control to this head unit:
- You can get a vehicle specific adaptive module that will plug into your OEM wire harness. This adapter will pre-configure all of the functions on your steering wheel to the appropriate functions on the head unit by default. The downside to this is that you'll have to buy an additional adapter that typically costs between $30 and $60 dollars but it will simplify the installation.
- You can use the included SWC adapting wire harness (basically looks like a headphone jack), find the appropriate wires in your vehicle's harness that send the steering wheel control signals and then use the program functionality to program each key manually. It's a little harder but saves you the few extra bucks. Note this wiring method is only compatible with some vehicles.
iDatalink Maestro
iDatalink is a universal system that was created to bridge the connection between your vehicle's computer and the aftermarket stereo. On many newer vehicles on the market, data like RPM, Speed, Boost, and other vehicle related information is displayed directly on the screen. Many OEM head units also control things like climate control and heated/cooled seats. Without an adaptive interface, these vehicles would likely loose those controls if the head unit was replaced with an aftermarket. Without iDataLink that is.
A head unit that's compatible with iDatalink Maestro creates a connection with the vehicle and provides the XAV-9000ES with the vehicle information like MPH, RPM, Fuel, tire pressure, battery voltage, check engine light, door alerts, and more. You can select the different gauges you want to view, and can customize the look and feel too. It's a great way to bring your vehicle into the modern age. It will also incorporate some of the functions that you would otherwise lose if you removed the OEM head unit like climate control.
Unfortunately, I wasn't able to hook iDatalink Maestro to the unit in my demo box, but it comes fully capable. You'll need to purchase a vehicle-specific iDatalink Maestro adapter and install it separately. I'd recommend finding the appropriate product directly at iDatalink's Website.
What is High-Res Audio?
One of the features Sony calls out on their Mobile ES head units is High-Res audio compatibility. High-resolution audio in a car head unit refers to the ability to play and decode high-quality audio files with higher sampling rates and bit depths than standard formats. It captures more detail and provides improved clarity, instrument separation, and dynamic range. To support high-res audio, the head unit requires a high-quality DAC and support for formats like FLAC or DSD. Other audio system components and the source quality also impact the listening experience. The standard format is a CD which has a sampling rate of 44.1 kHz and bit depth of 16 bits. The High-Res audio formats can reach up to a sampling rate of 192 kHz and a bit depth of 24 bits
Conclusion
Like it's sister unit, the 9500ES, Sony's XAV-9000ES digital media player was designed for audio quality and control. It has a lot of great tuning features like a parametric EQ, advanced crossover control, 5V preamp outputs (with two separate subwoofer output RCAs for stereo sub outputs), and much more, making it a great option for those who want all of the tuning and DSP capabilities integrated directly into their head unit's interface.
This wouldn't be my first choice for a multimedia, video playing head unit. The only way it can play video is via a USB drive and it must be one of the compatible formats. It doesn't feature an A/V or HDMI input. I'd recommend their XAV-AX6000 if those features are more important to you than audio control and quality.
One of my favorite features, and game changer while you're in your car, is the wireless Apple CarPlay and Android Auto. I would upgrade from one of their previous units just to have this feature. CarPlay and Android Auto is a definite improvement over standard Bluetooth and enables Google Maps (and other navigation apps).
One complaint that I've seen frequently about the interface on this unit is the static clock that's on the homescreen background. You can't remove it, but you can put a custom background image behind it. Personally, I don't mind the clock at all but I think it would be a nice option to have a quick “remove clock” option in the customize settings.
All in all, this head unit ranks among my top pics for powering a high-performance stereo. Particularly for the DIYer or casual enthusiast that's looking to amplify their system and wants a high level of control over their audio without purchasing separate DSPs or Equalizers.
