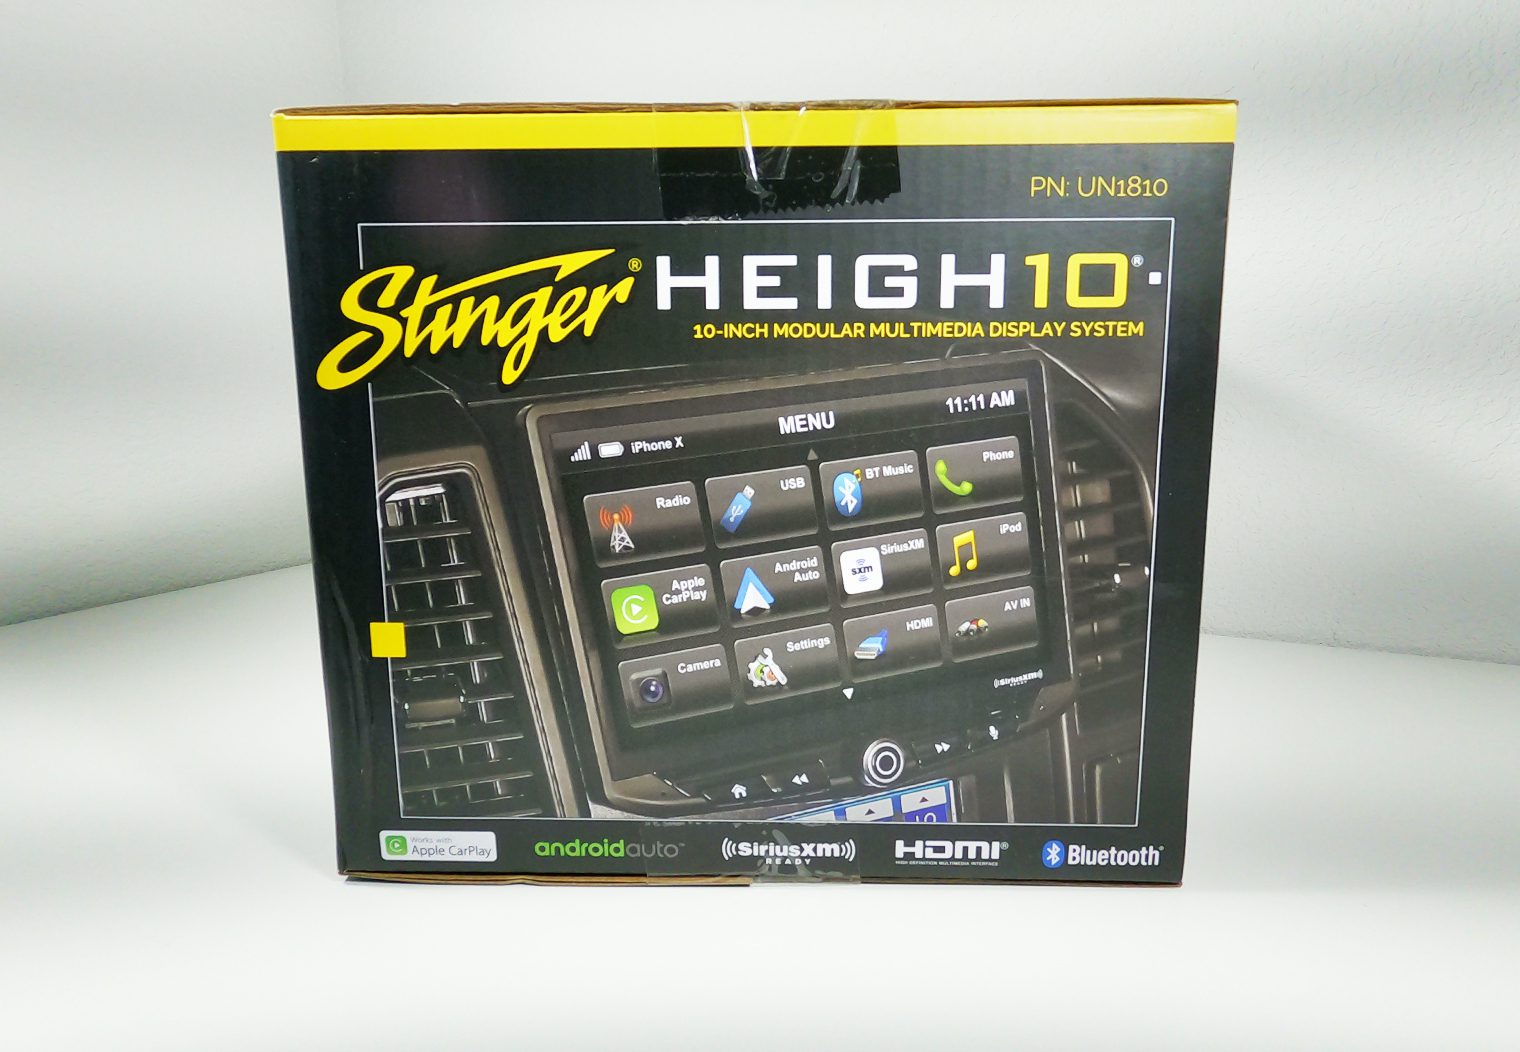
In this article: I'll unbox Stinger's HEIGH10 10″ head unit and review its specs. I'll show you how to install it in a 2014-2021 Toyota Tundra using Stinger's plug and play install kit too, and demo some of the head unit's key features while its in the dash.
Modern factory head units integrate into so many more systems than just your stereo. Climate control, backup cameras, heated seats, steering wheel control – just to name a few. 2014 -2021 Toyota Tundras are no exception to that. The reality with most newer vehicles is that if you want to upgrade your head unit to add in something like Apple CarPlay, Android Auto or video playback, you'll need to find a head unit that integrates well with your dash, and with the rest of your vehicle's wiring. Stinger's solution to a 2014 – 2021 Toyota Tundra factory head unit upgrade is their RB10TUN14 HEIGH10 kit.
Out of the box, this head unit is designed to be plug and play. From the wiring to the head unit's interface. It's a complete package that fully integrates an aftermarket head unit into your Tundra's dash.
Stinger Offroad sent us a demo unit to unbox and install in a Tundra, so in this article I'm going to unbox it and walk through all of its key specs. I'll show you what it takes to install it and then walk through some of the key features of the head unit that I think are important. Let's dive on in!
Parts & Products Used in This Installation
- 2014-2021 Toyota Tundra Stinger HEIGH10 Head Unit Replacement Kit
- Toyota HDMI/USB Socket Adapter
- HDMI to Lightning Adapter
HEIGH10 Overview & Unbox
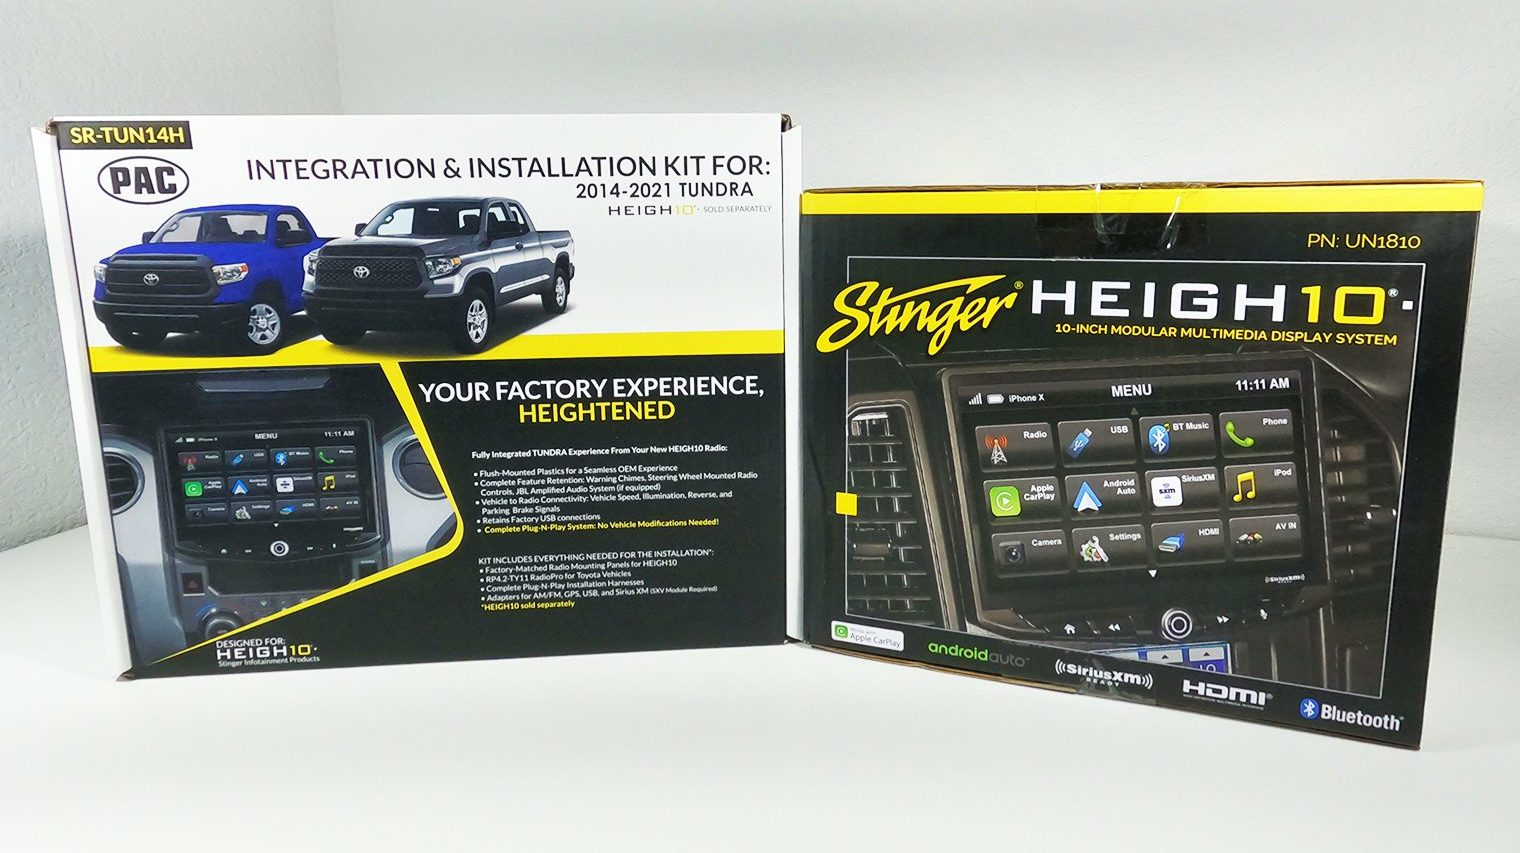
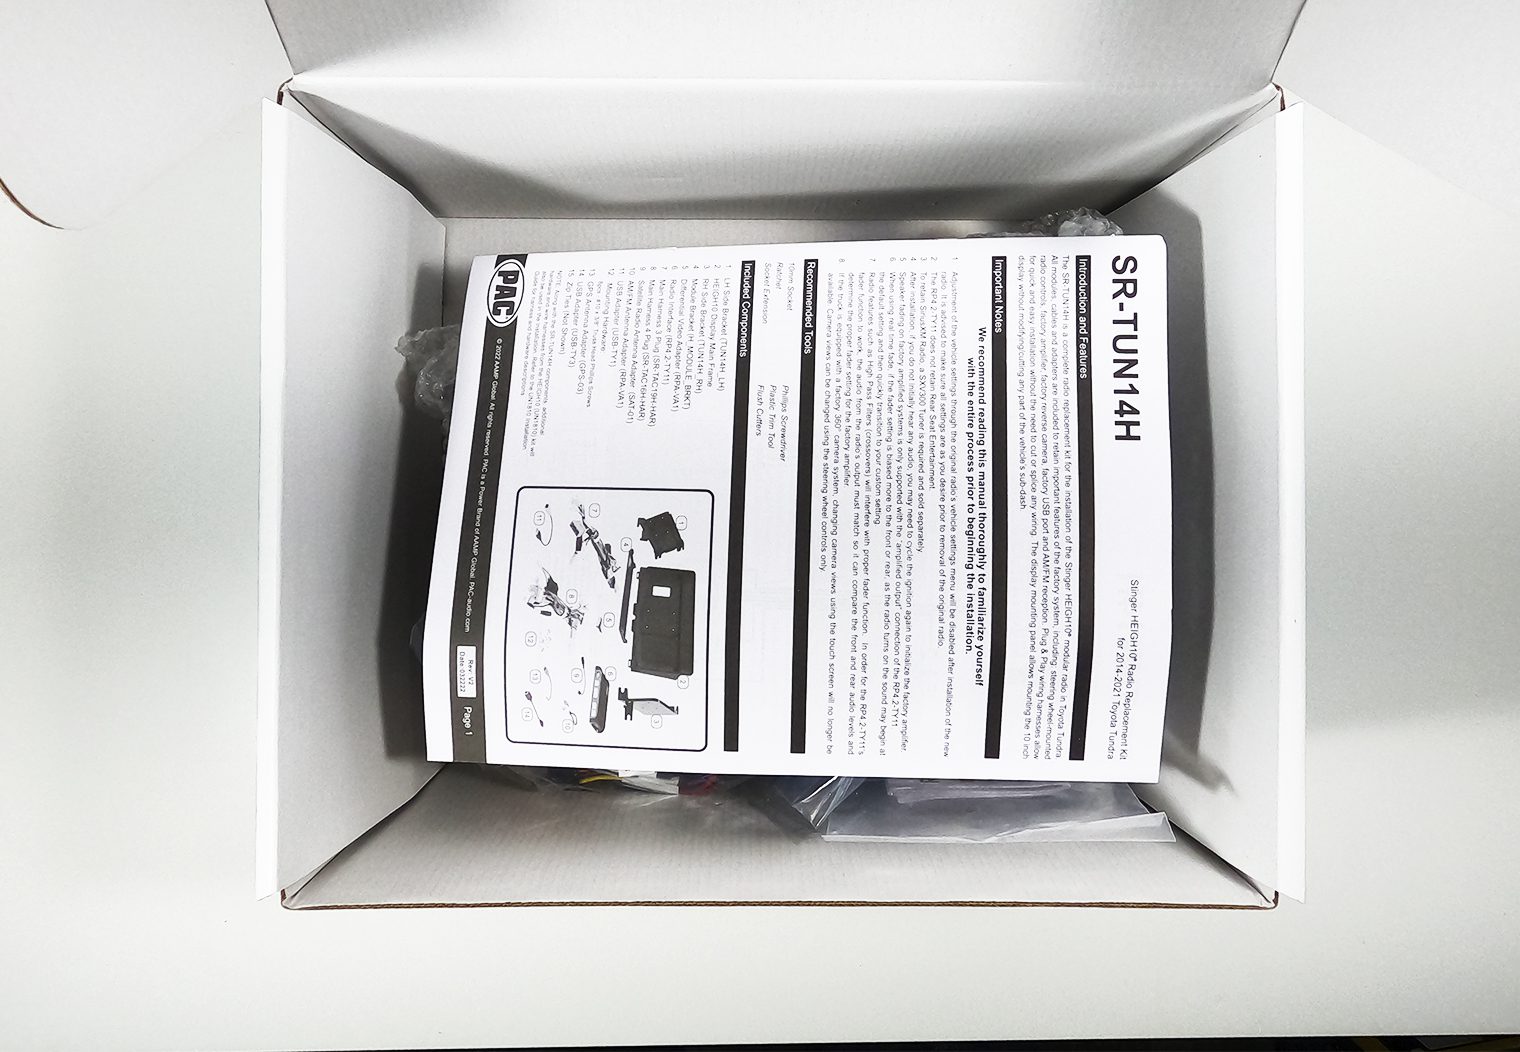
If you order the vehicle-specific 2014-2021 HEIGH10 from StingerOffroad.com, you'll receive a complete plug and play kit. It comes in two separate boxes:
- The Stinger HEIGH10 head unit and all of the components related to the unit.
- The PAC-based SR-TUN14H, which is a complete kit with all of the required wiring and dash components to adapt the HEIGH10 to your Tundra. This is what makes the unit plug and play!
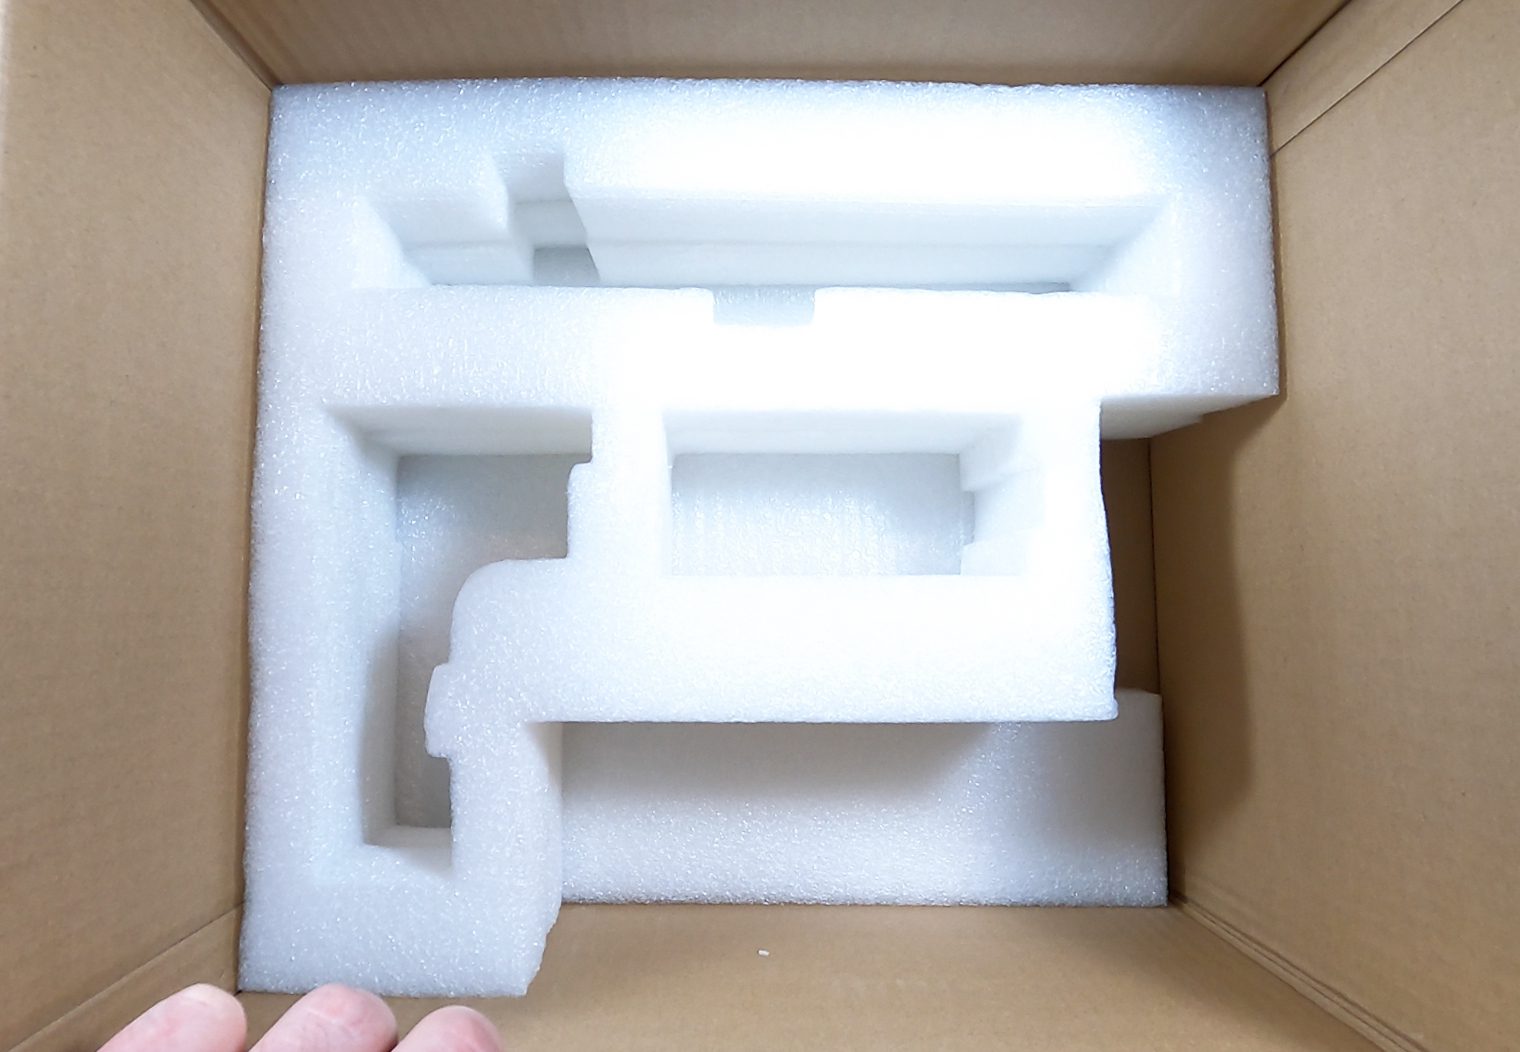
Starting with the HEIGH10, the head unit comes neatly packaged and sealed in the box. It is protected from the elements, and from damage that might result from shipping via fitted foam that keeps all of the components snug in the box.

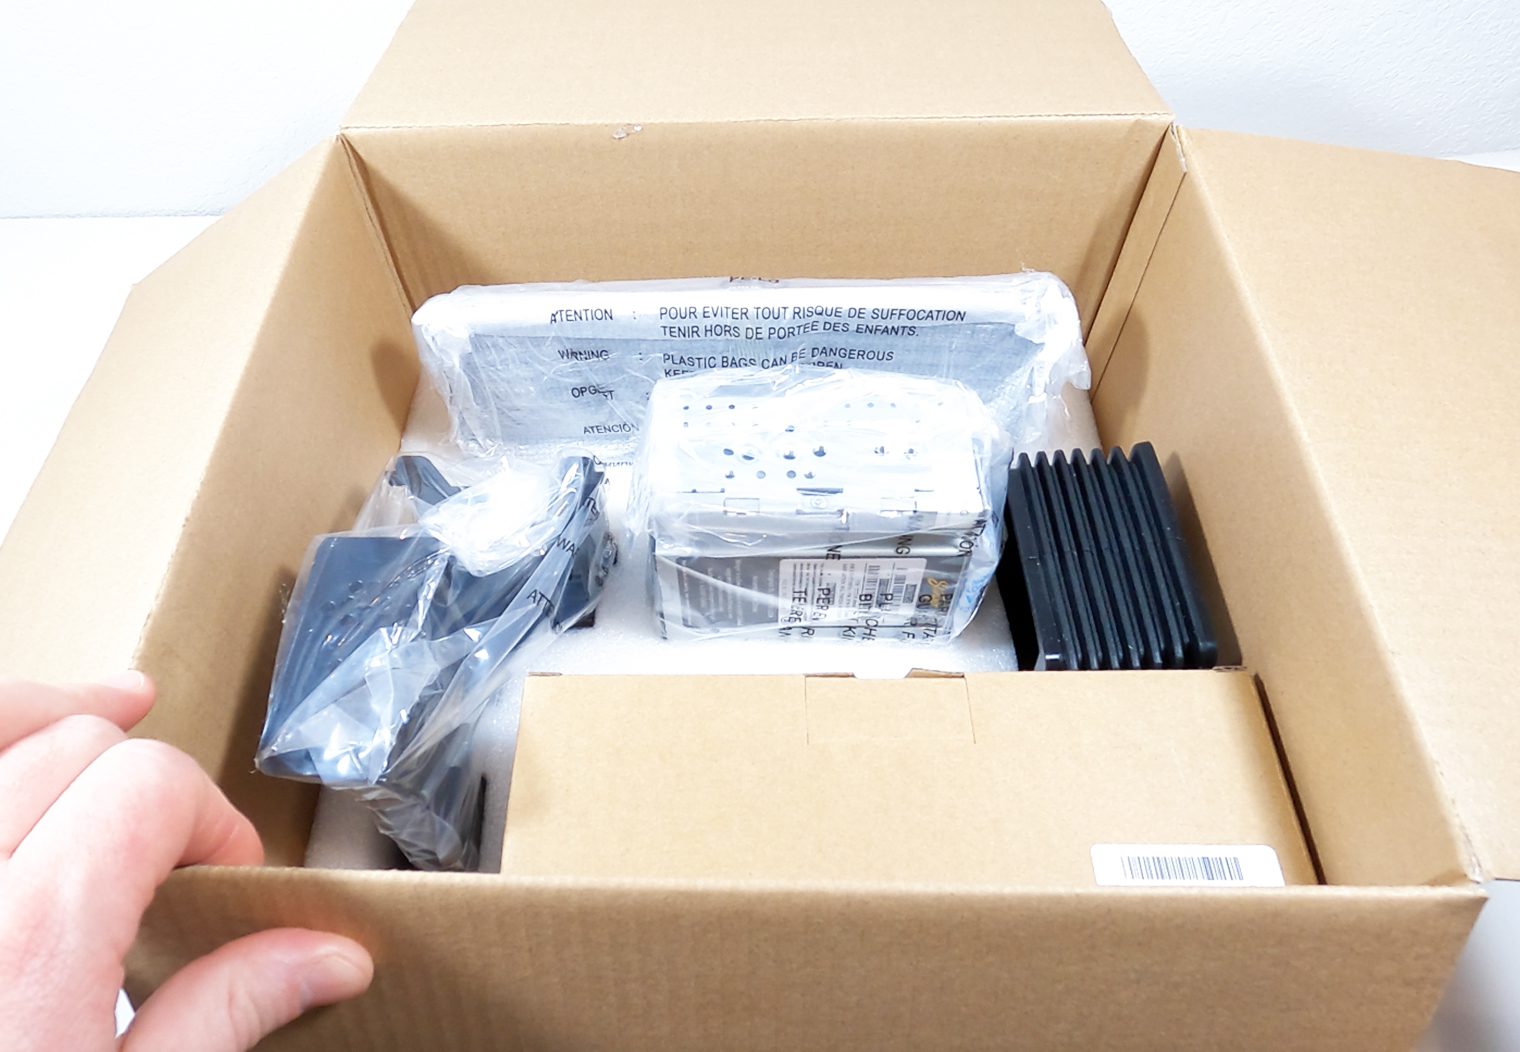
What's in the HEIGH10 Box:
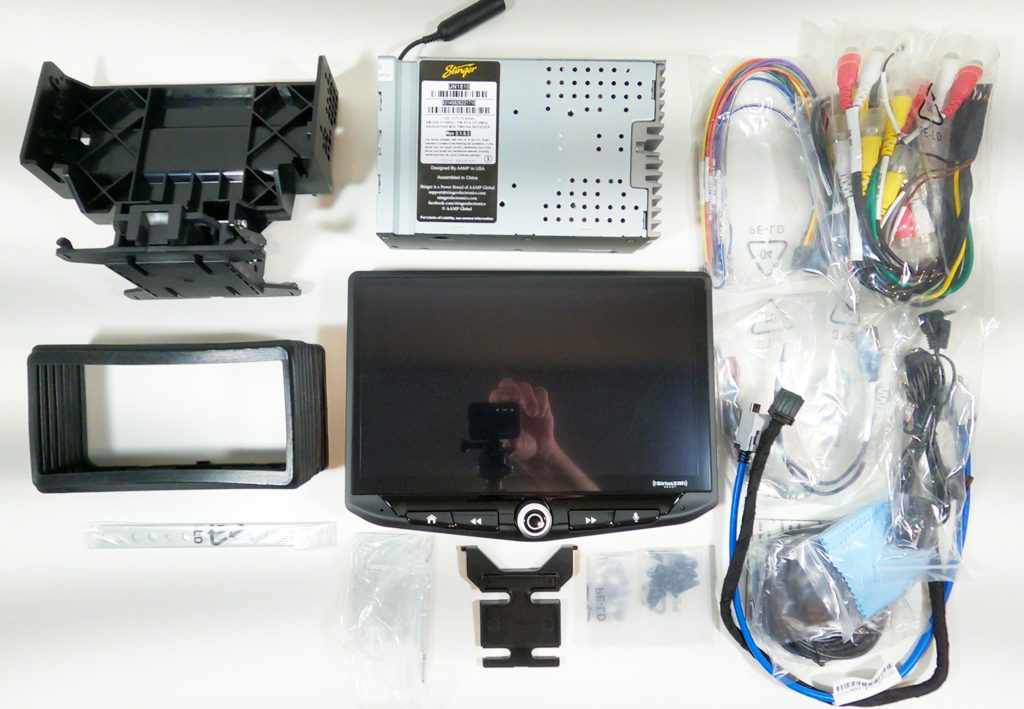
The HEIGH10 comes with a lot of components, wires and hardware ranging from microphones, wire harnesses and plugs to brackets covers and of course the screen and chassis. Even though I received the vehicle specific kit from Stinger for a Tundra, the head unit still comes with all of the stand alone parts to install it in any vehicle. When I get to showing you the components of the SR-TUN14H, you'll notice that most of the wiring components that come with the HEIGH10 are actually redundant or will be replaced by components in the SR-TUN14H box. That said, here's what comes in the box with all HEIGH10 head units:
- 10″ Touchscreen monitor
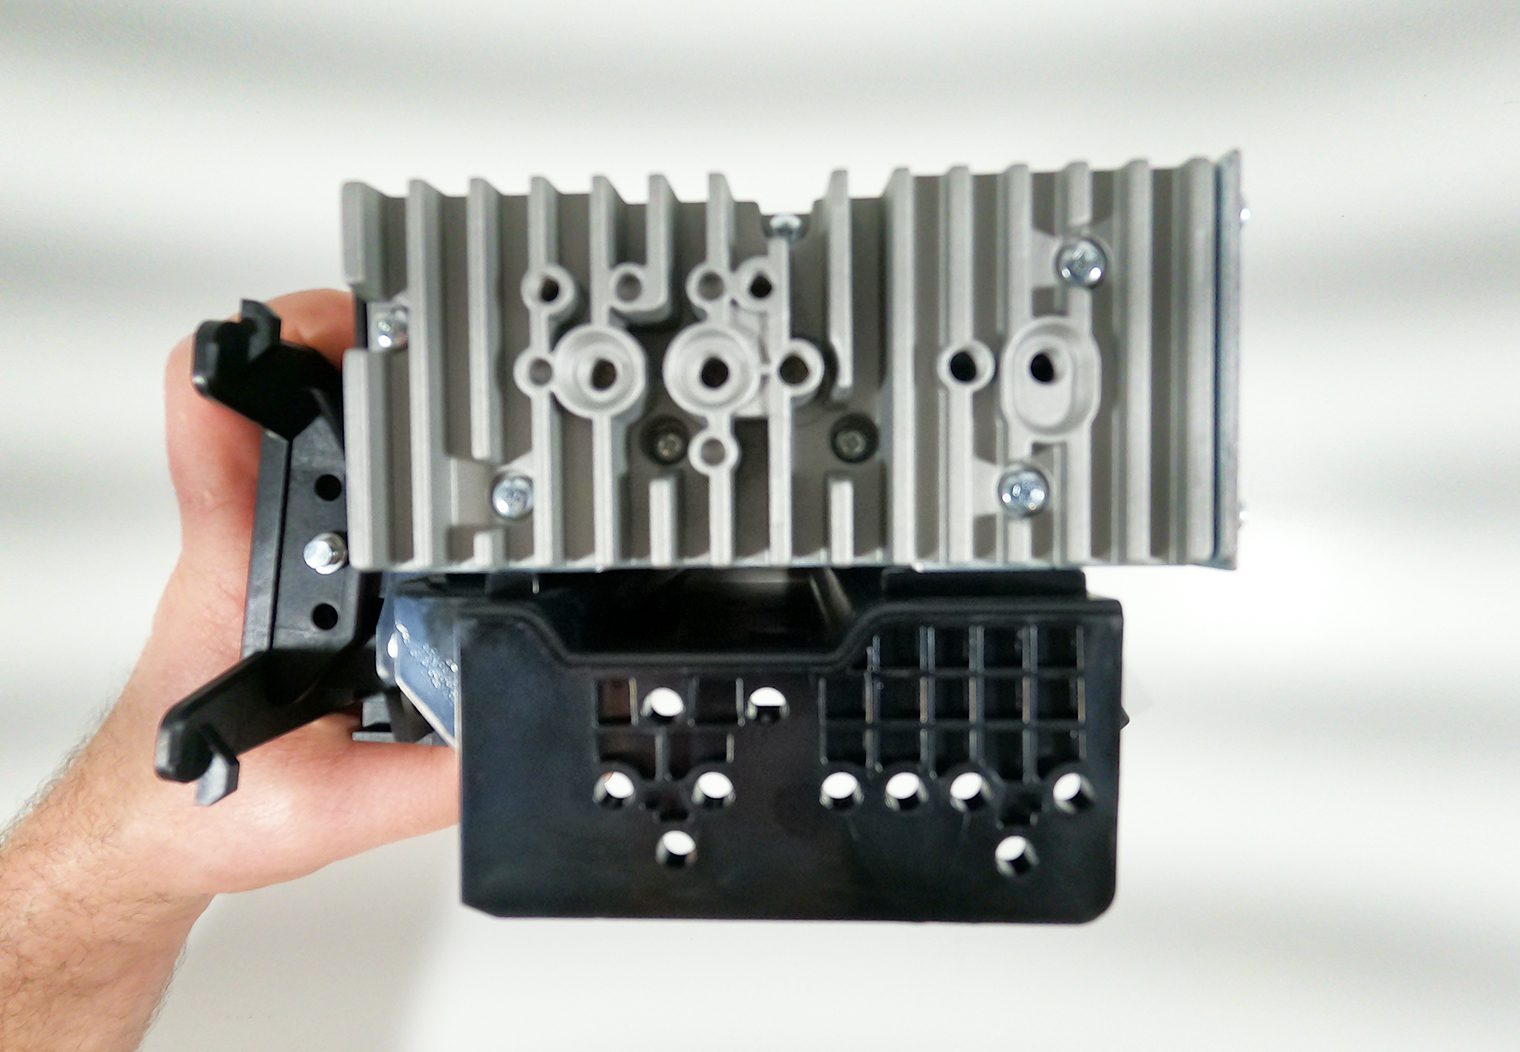
- 1DIN source unit/chassis with 15A fuse
- 19″ Video display harness
- 19″ Power display harness
- Wiring harness
- Mic harness
- Multi-camera harness
- SWC harness
- SiriusXM harness
- GPS antenna (attached 16.5′ cable terminated by fakra connector)
- Microphone (attached 9.75′ cable terminated by a male mono-minijack connector)
- Self-adhesive bracket
- Visor-clamp
- Self-adhesive magnetic pad
- Display bracket
- Angle bracket
- Metal L-bracket
- Rubber-boot
- 2 Backstraps
- Four M4x6mm screws
- Four M4x10mm screws
- Four M4x12mm screws
- Two M4x14mm screws
- Two M4x12mm screws
- Six M6x10mm screws
- Six #10×3/8″ screws
- Cleaning cloth
- Installation Guide
- Warranty Registration Card
- User Guide Download Card
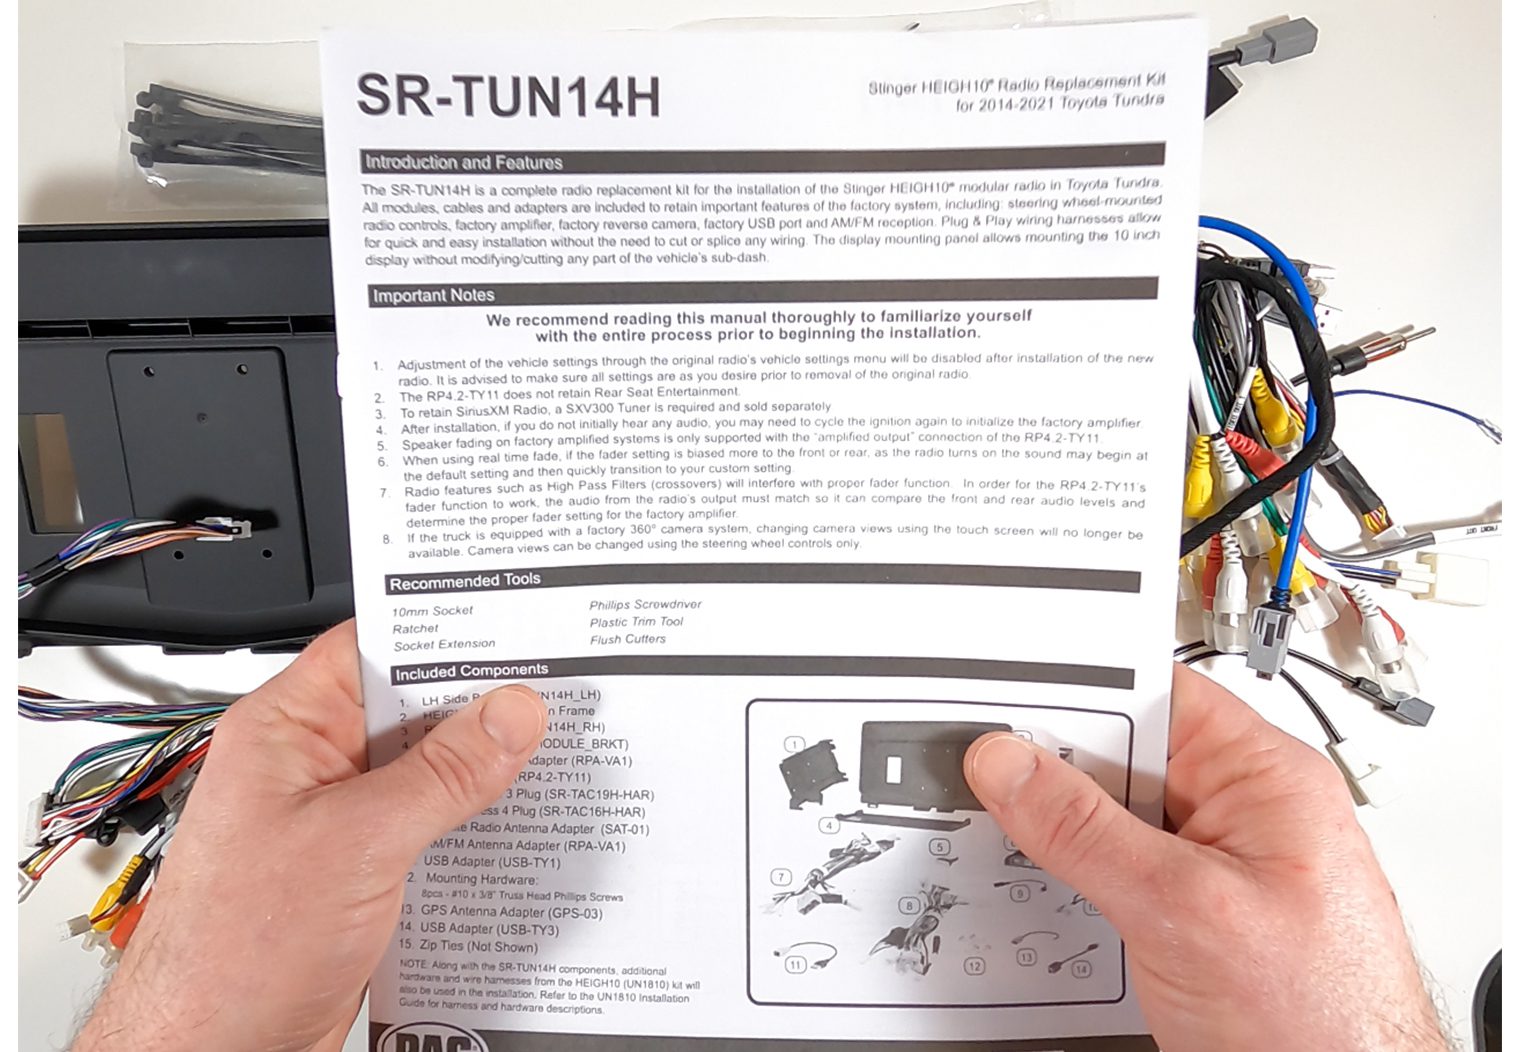
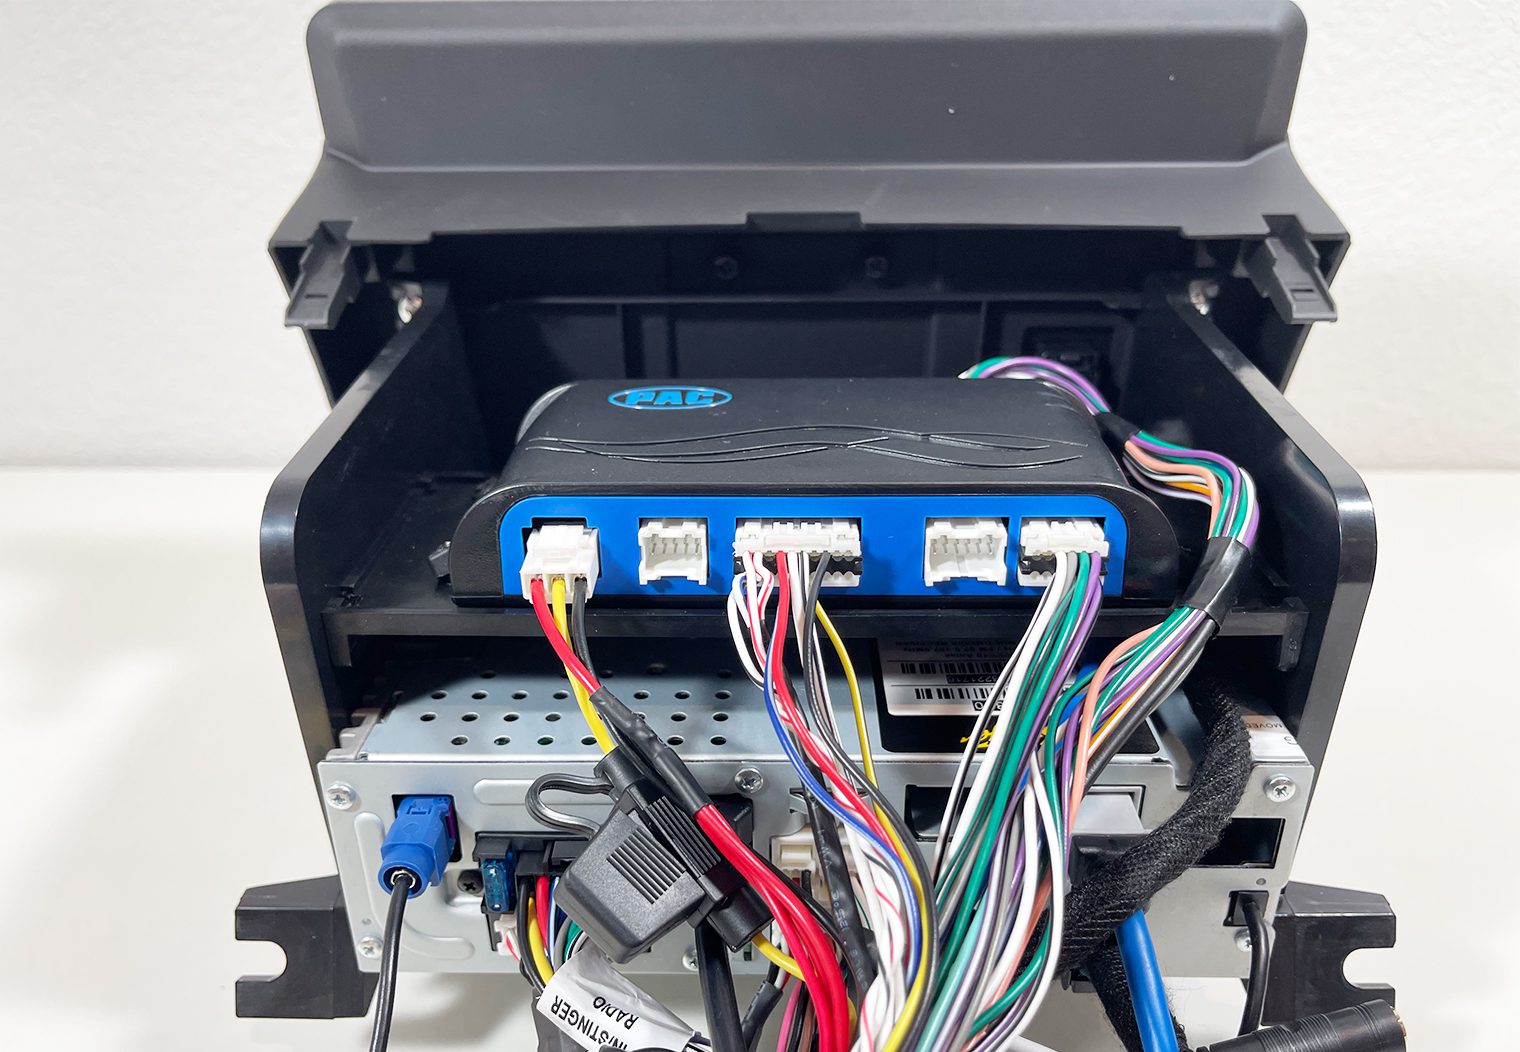
Stinger SR-TUN14H Toyota Tundra Installation Kit
When you order a vehicle specific HEIGH10 from Stinger, you're actually ordering two separate components – one is the HEIGH10 unit (of course) and the other is an independent kit with all of the necessary vehicle-specific wire harnesses and dash kits to make the HEIGH10 fit in your vehicle in a plug and play fashion. Since I'm installing this unit in a 2017 Toyota Tundra, the kit that Stinger sent me was the SR-TUN14H which is compatible with all Tundras from 2014 – 2021.
When you open this box up, it's loosely filled with sealed wire harnesses and some installation hardware (aka the dash kit). It's a bit daunting at first, but once you take a look at each of the components and cross reference the comprehensive installation guide that Stinger provides, it will all start to make sense.
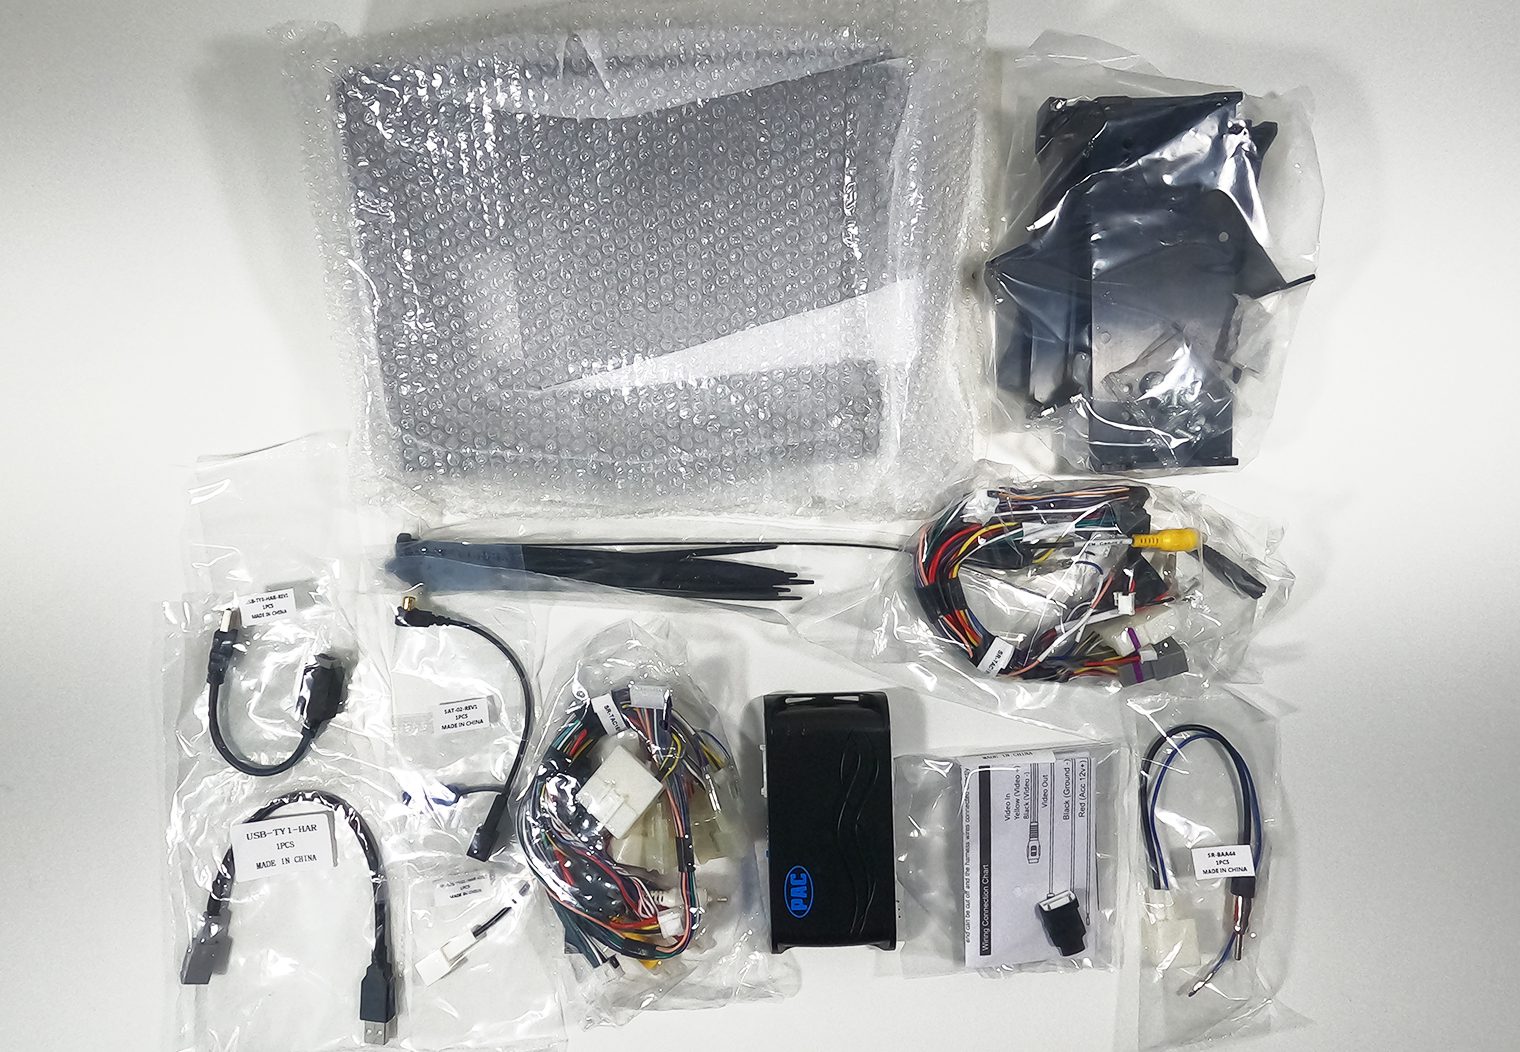
Part of what makes this kit look so daunting at first (if you've never seen one of these vehicle-specific kits before) is three things:
- There's an integrated radio replacement and SWC control module that adds more harness plugs and connections.
- There's duplicate harnesses and plugs. One of the cool thing I like about this kit is that instead of making a trim-specific kit, Stinger just includes two sets of adapters (e.g. GPS adapter and USB adapter) so that regardless of your trim and setup, there's going to be a plug/harness adapter for your vehicle. At least this was how it was with the Tundra kit. You're only going to use half of what's in the box.
- There's a lot of inputs for this head unit. From 4 different camera inputs, A/V, GPS and USB to RCA signal and A/V outputs – there's just a ton of wiring in general. Not necessarily a bad thing.
But don't worry. Everything is clearly labeled and Stinger's installation guide does a great job at detailing out the installation process.
Display and User Interface
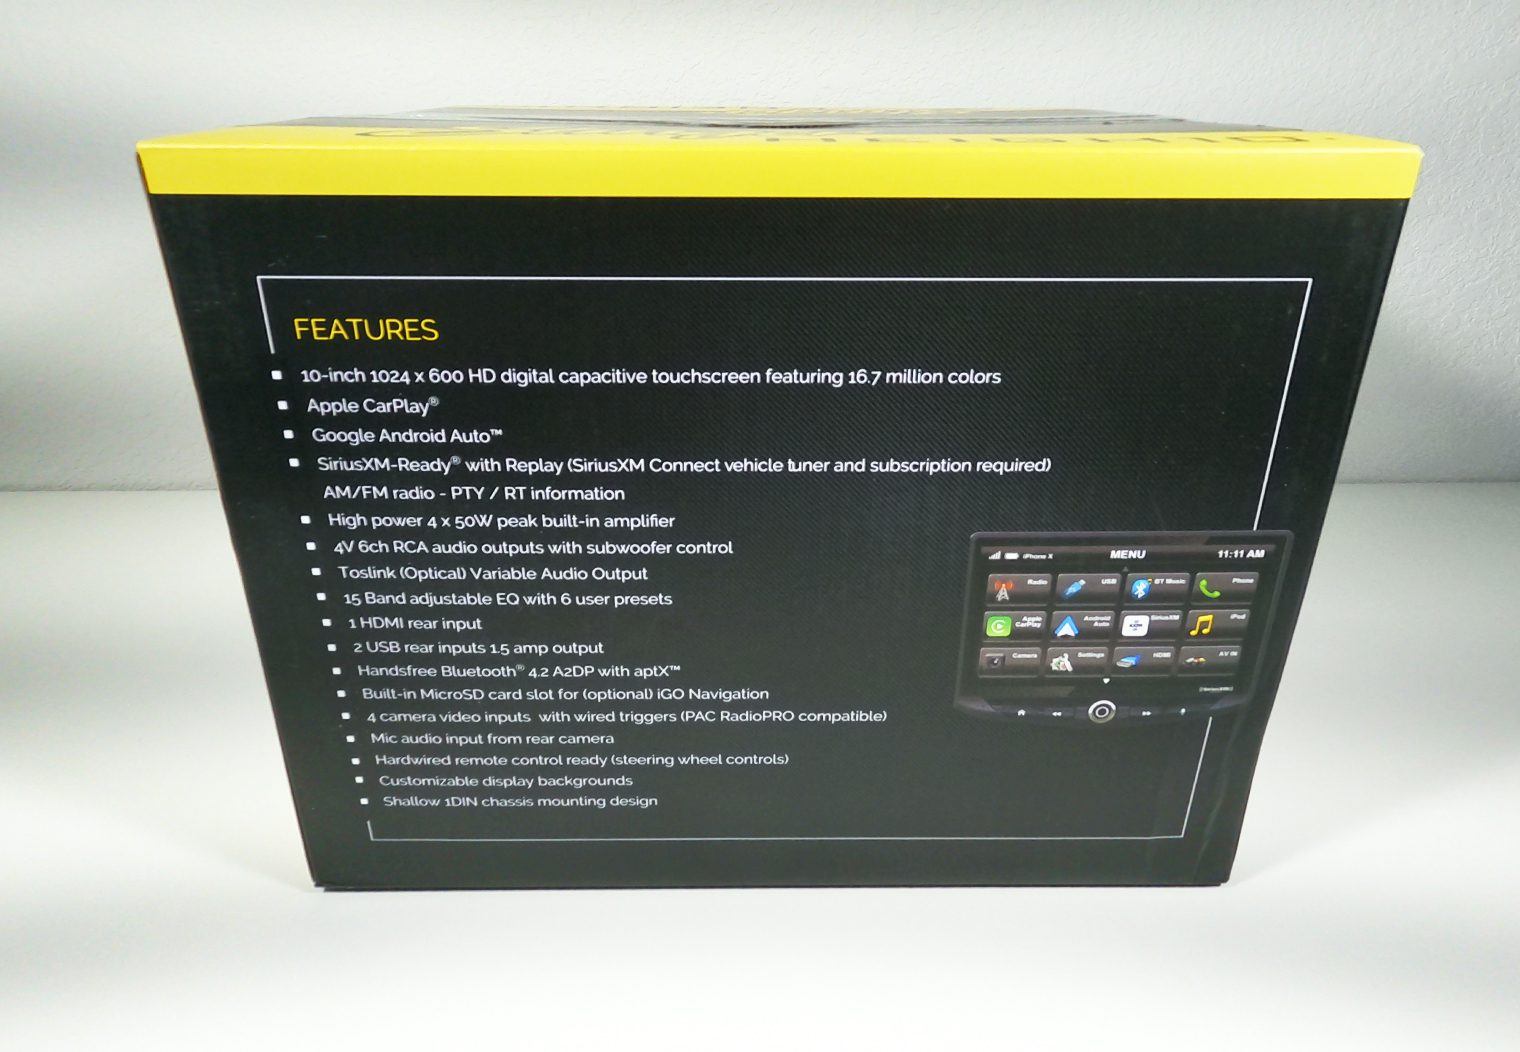
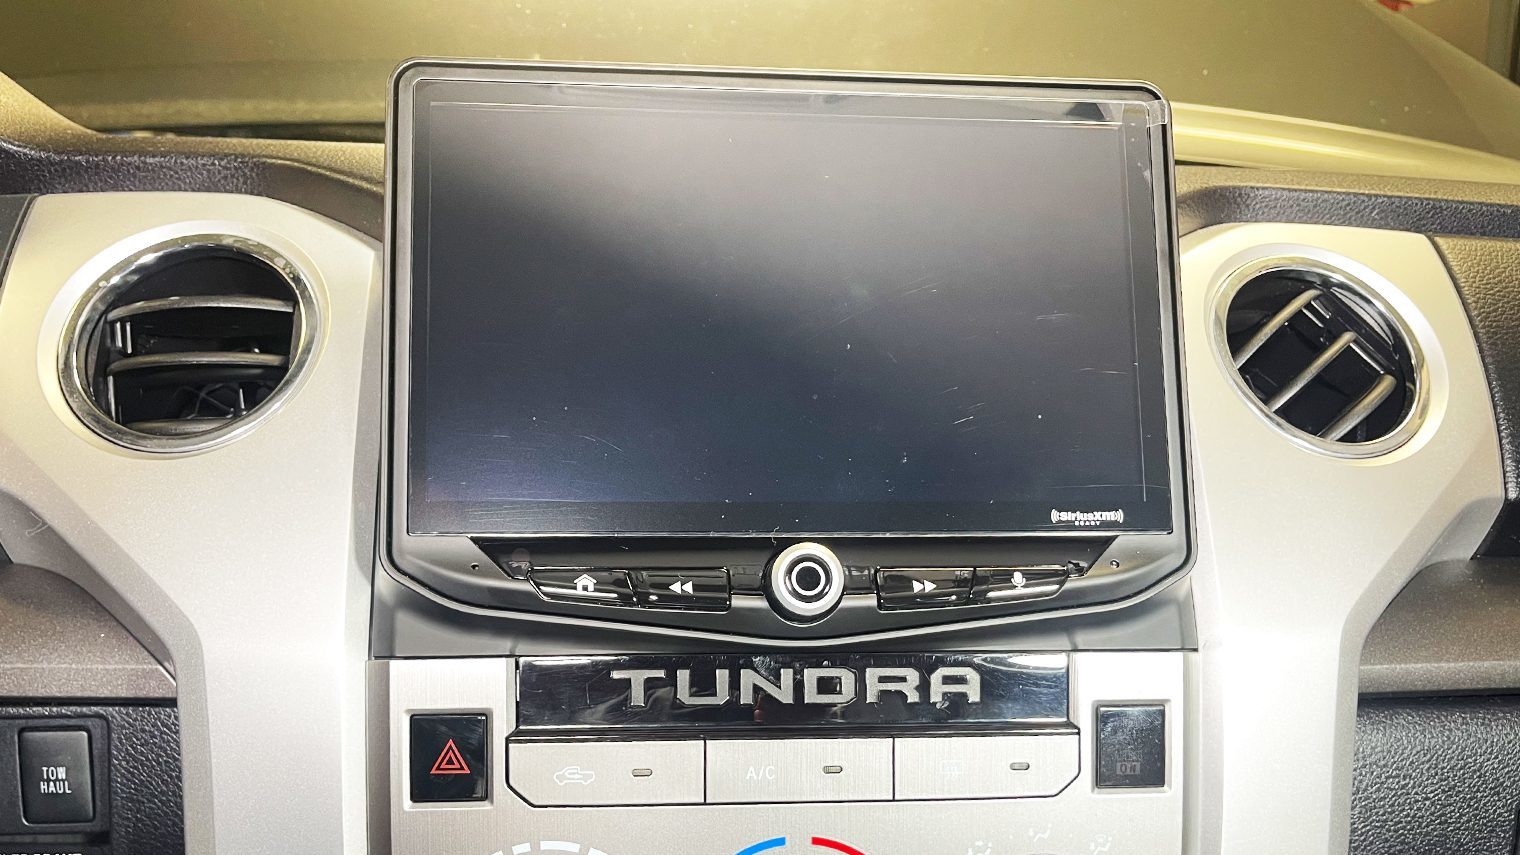
So let's get into the fun stuff! One of the first things you'll notice about the Stinger HEIGH10 is its oversized, high-resolution touchscreen display. At 10+ inches, it's one of the largest displays I've reviewed on the market right now. And with a 1024 x 600 resolution, it has a crisp, clear picture that makes it easy to see and navigate through the head unit's features and settings (among other things!).
Screen Mounting Mechanism
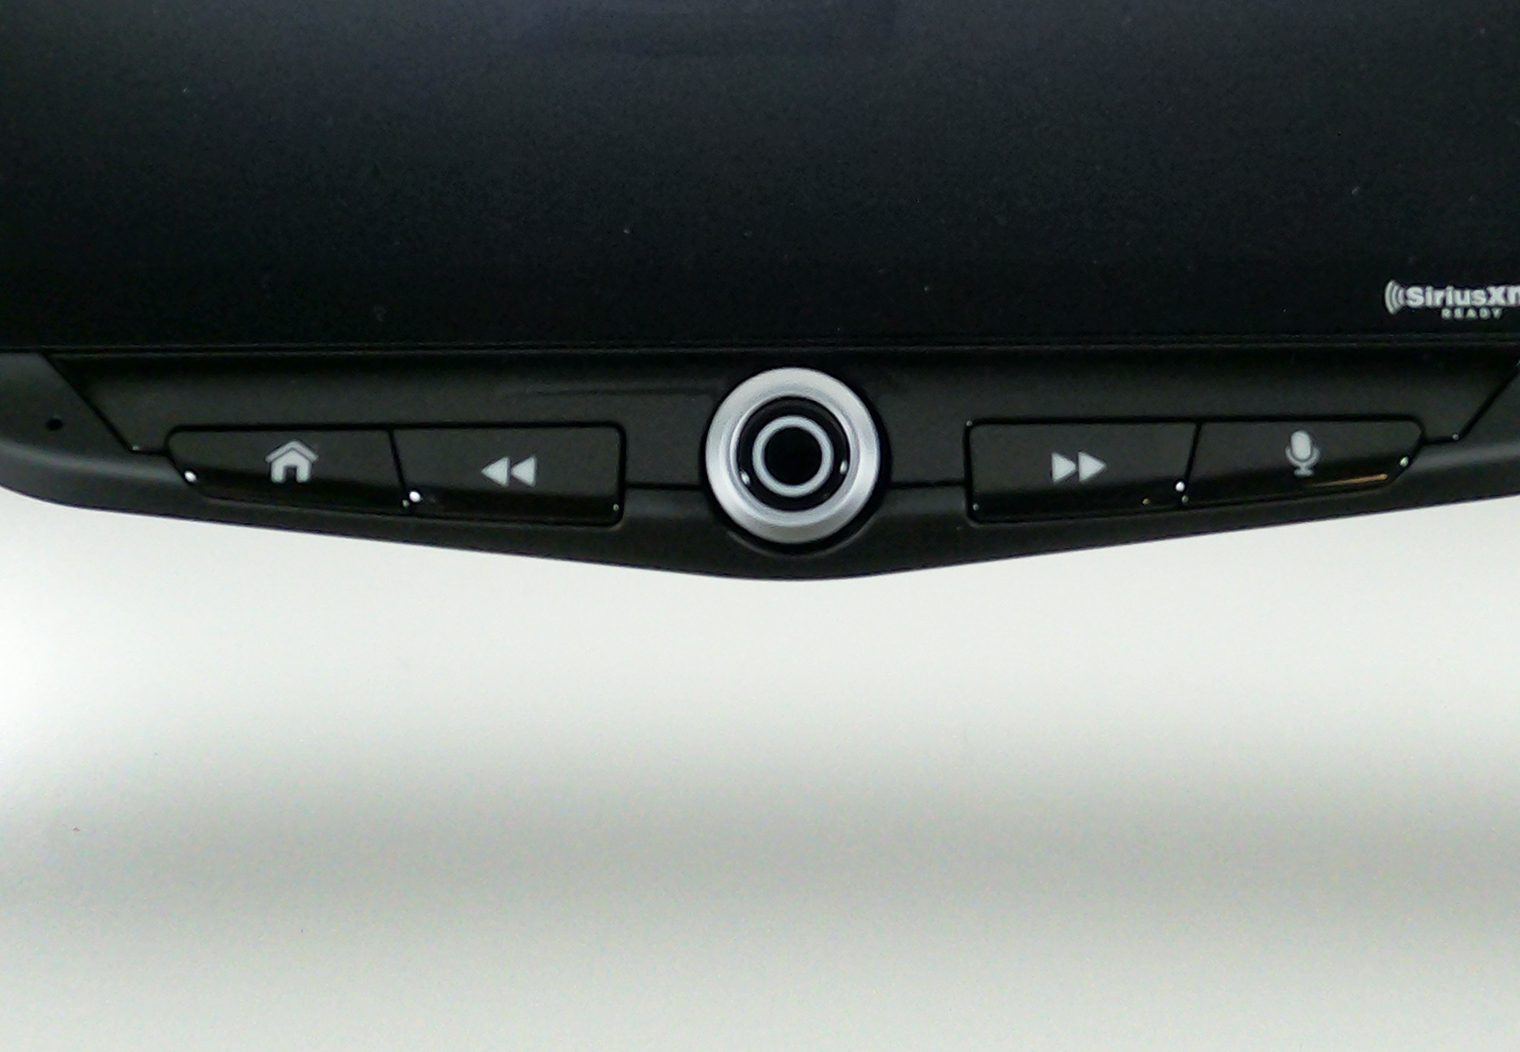
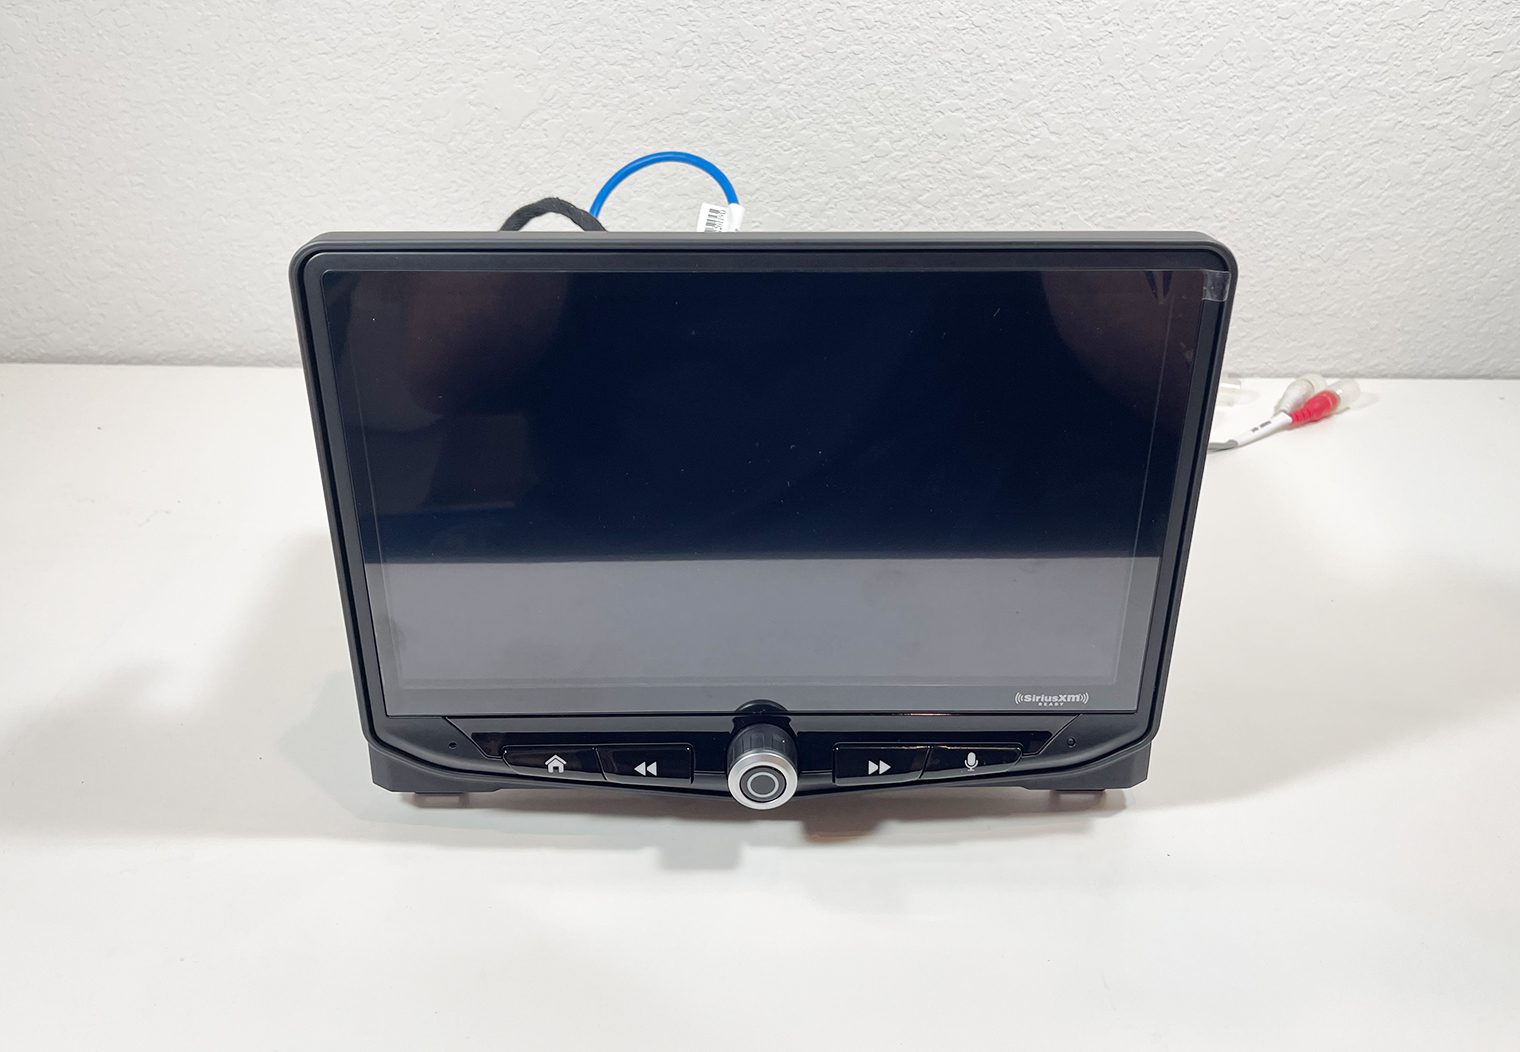
The 10 inch screen is a ‘floating' screen, meaning it's not actually secured permanently to the chassis like a traditional single din or double din head unit. It has all of the necessary buttons with clear, large icons on them including home, previous, next, a scroll knob with select button and a mic button. I particularly liked how clear and large these buttons are. Many head units with oversized screens like this will have small buttons that are hard to see (and to use) while you're driving.
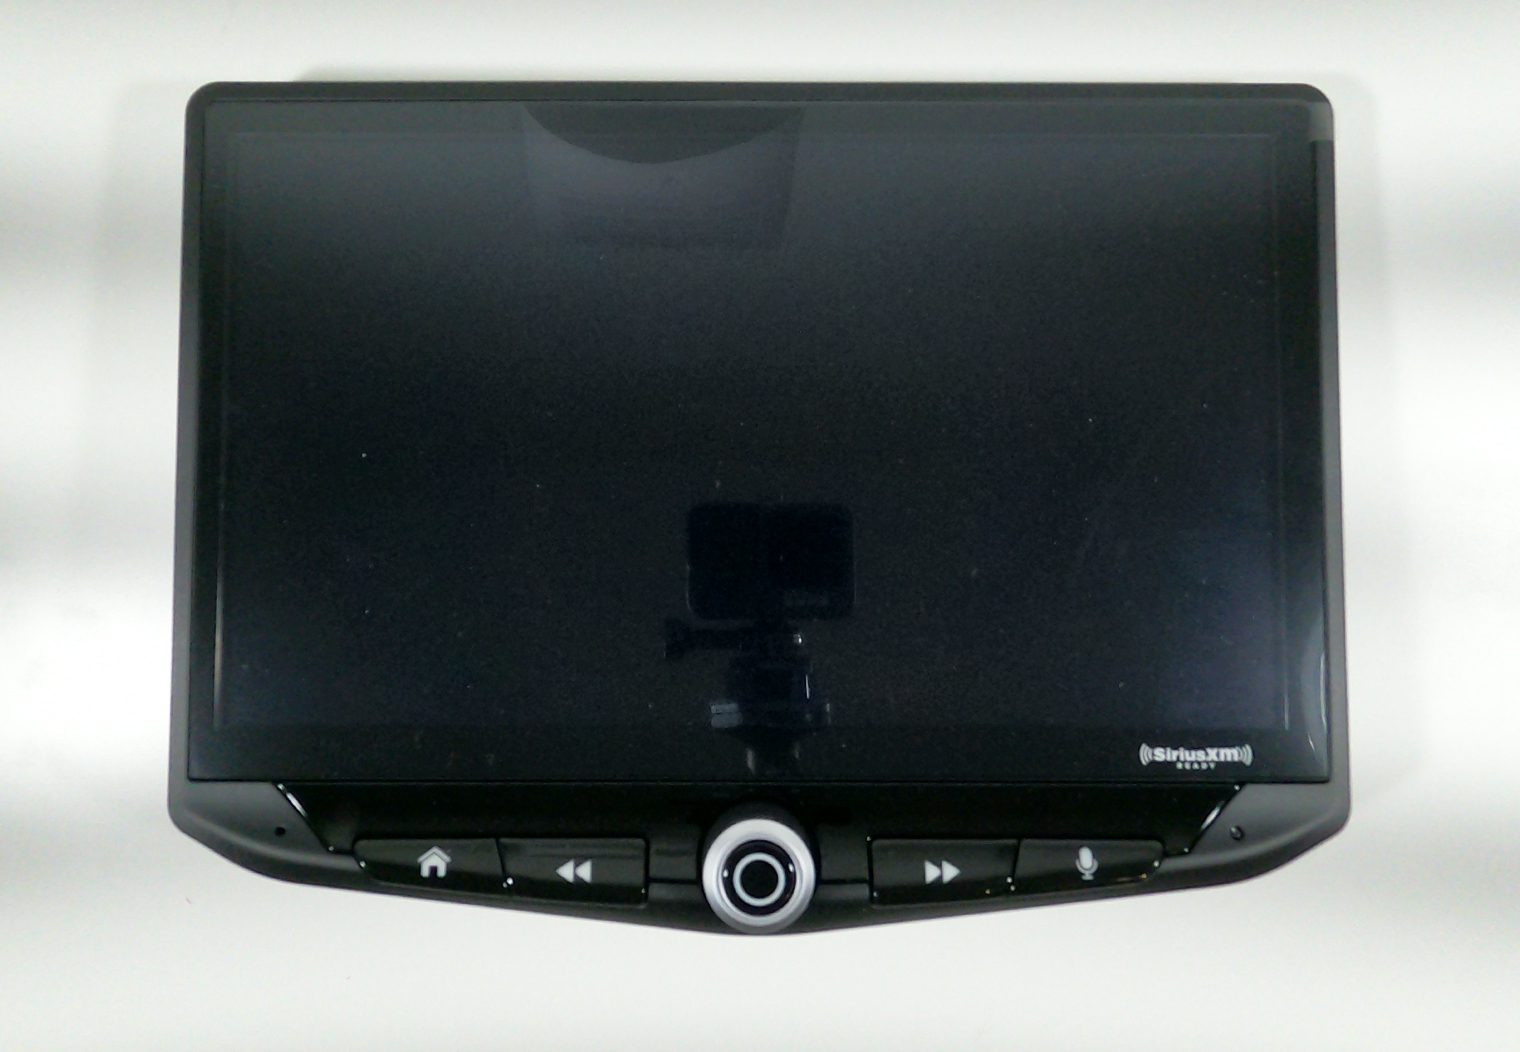
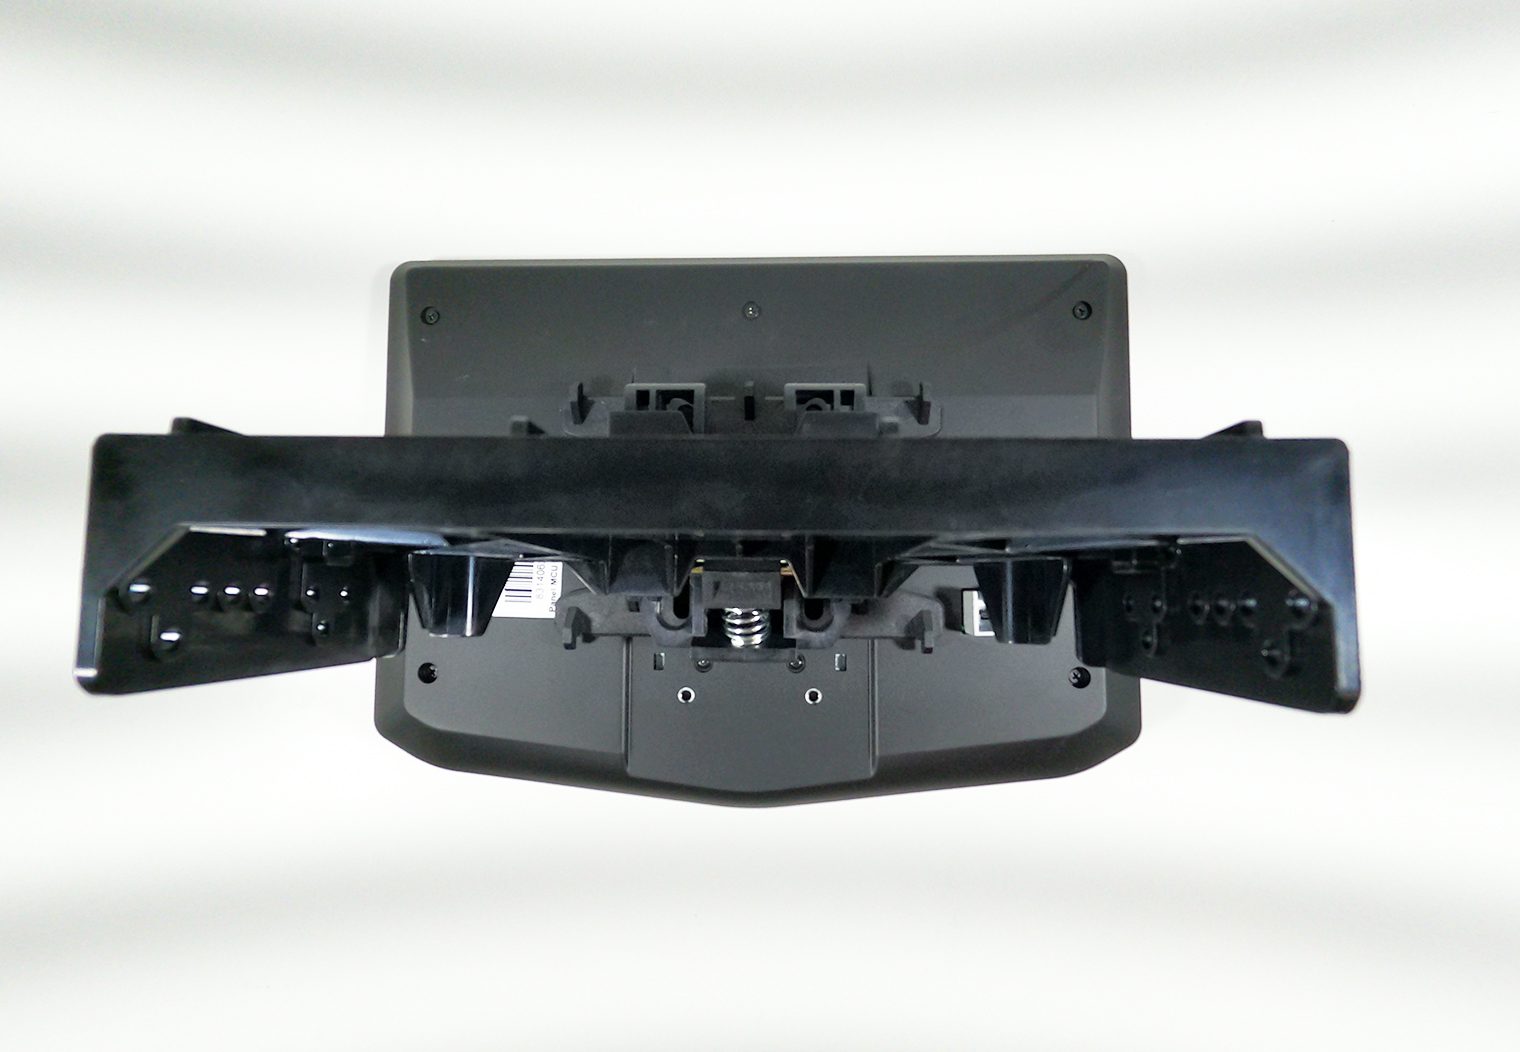
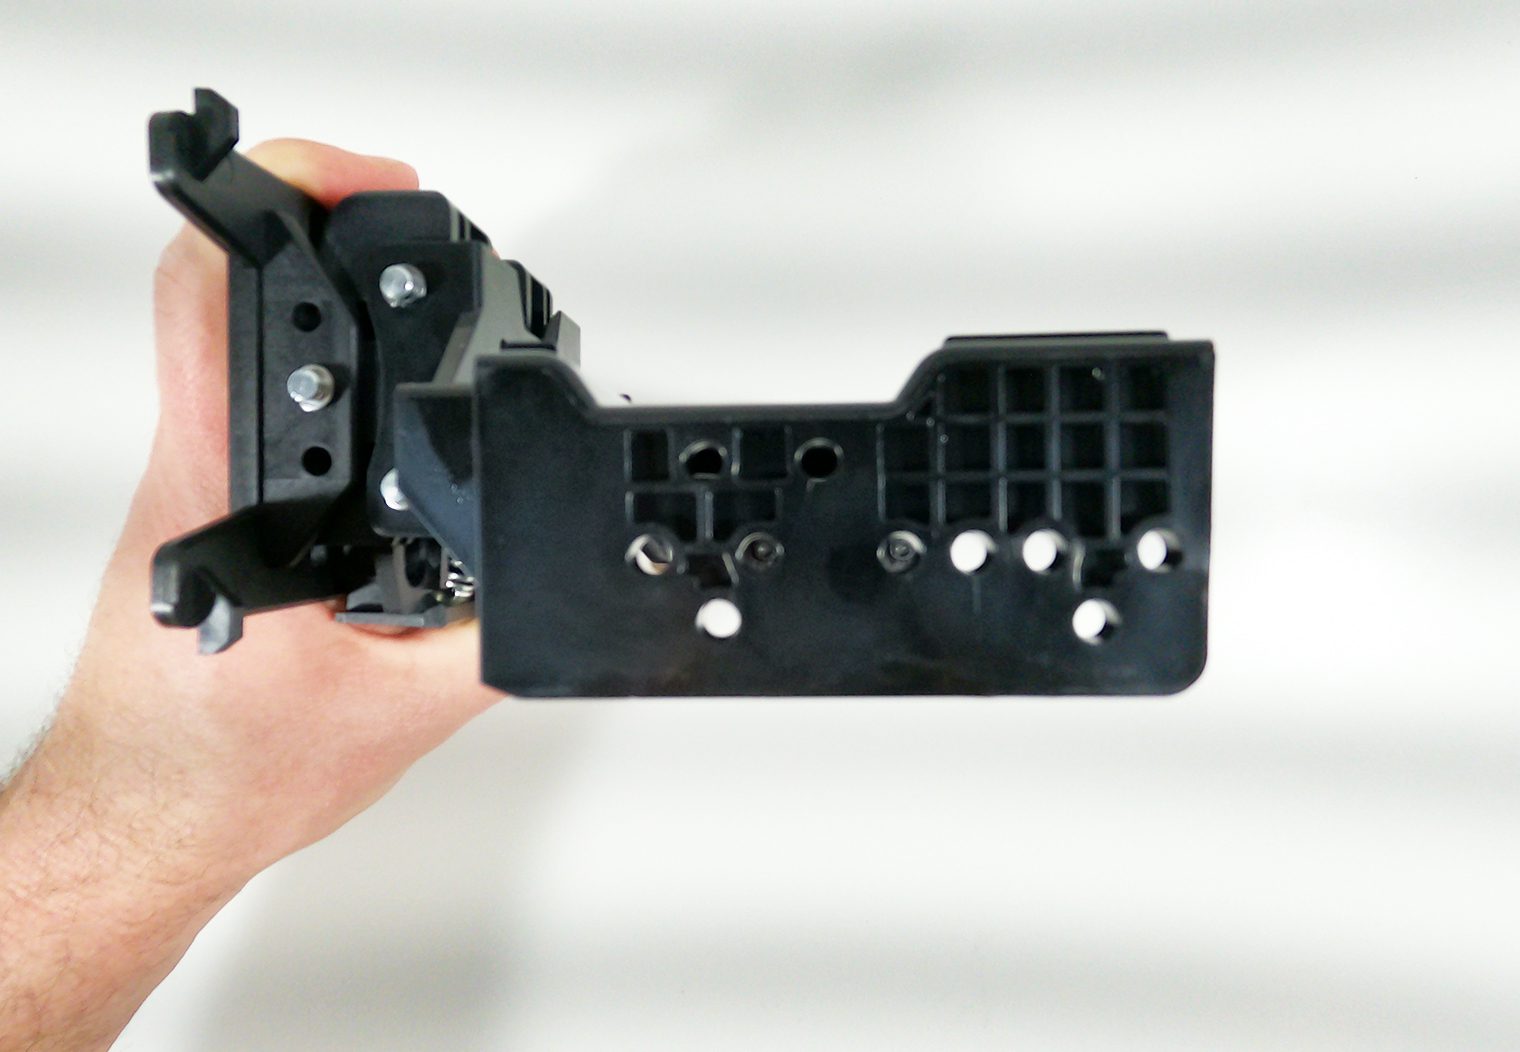
On the backside, you can clearly see why it's ‘floating' – there are two plugs and a few screw holes for the mount to screw into the back of the screen.
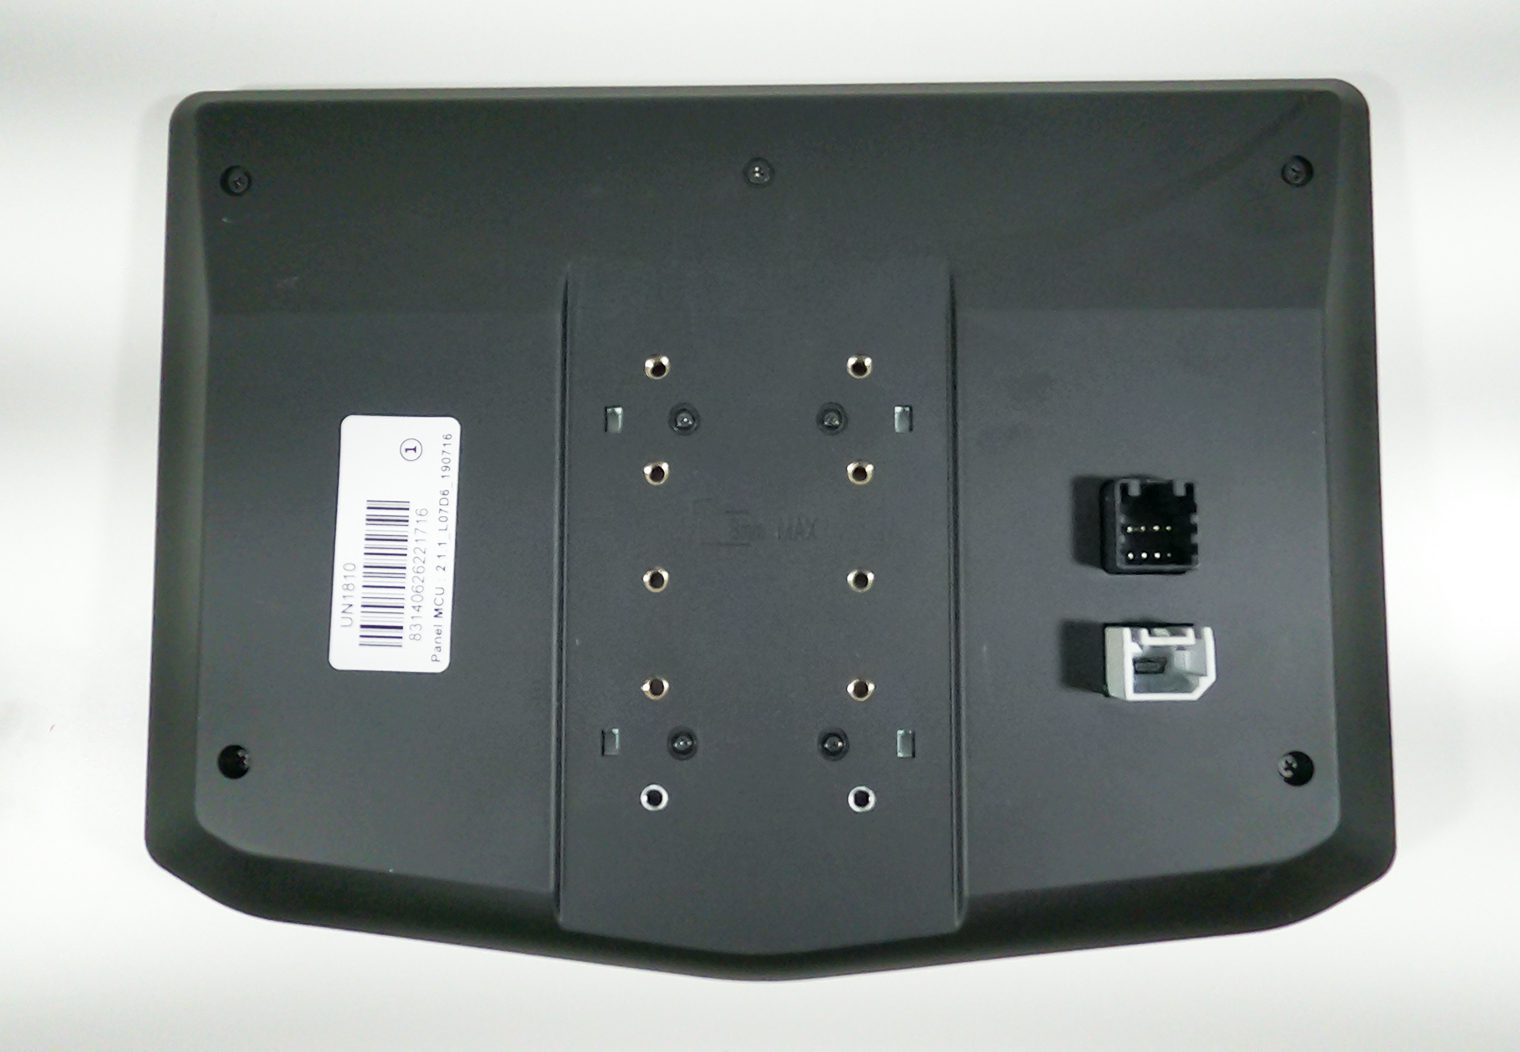
The HEIGH10 uses an adjustable (vertical tilt and vertical position) mounting bracket in which both the screen and the separate chassis mounts to if you're installing it in a double din size dash. If you have a single din dash opening, the chassis will mount separate from the mounting bracket. Per the instructions, the mount is compatible with:
- Double DIN Dash Kits
- Double DIN Sub-Dash Kits
- Double DIN Factory Radio Mounting Brackets
- Single DIN ISO Mountable Dash
For our use case in the Tundra, we're opting for the Double DIN Dash Kit via the SR-TUN14H which'll adapt the mounting bracket to the Stinger dash kit. I'll detail this out more when I get to the installation later in the article.
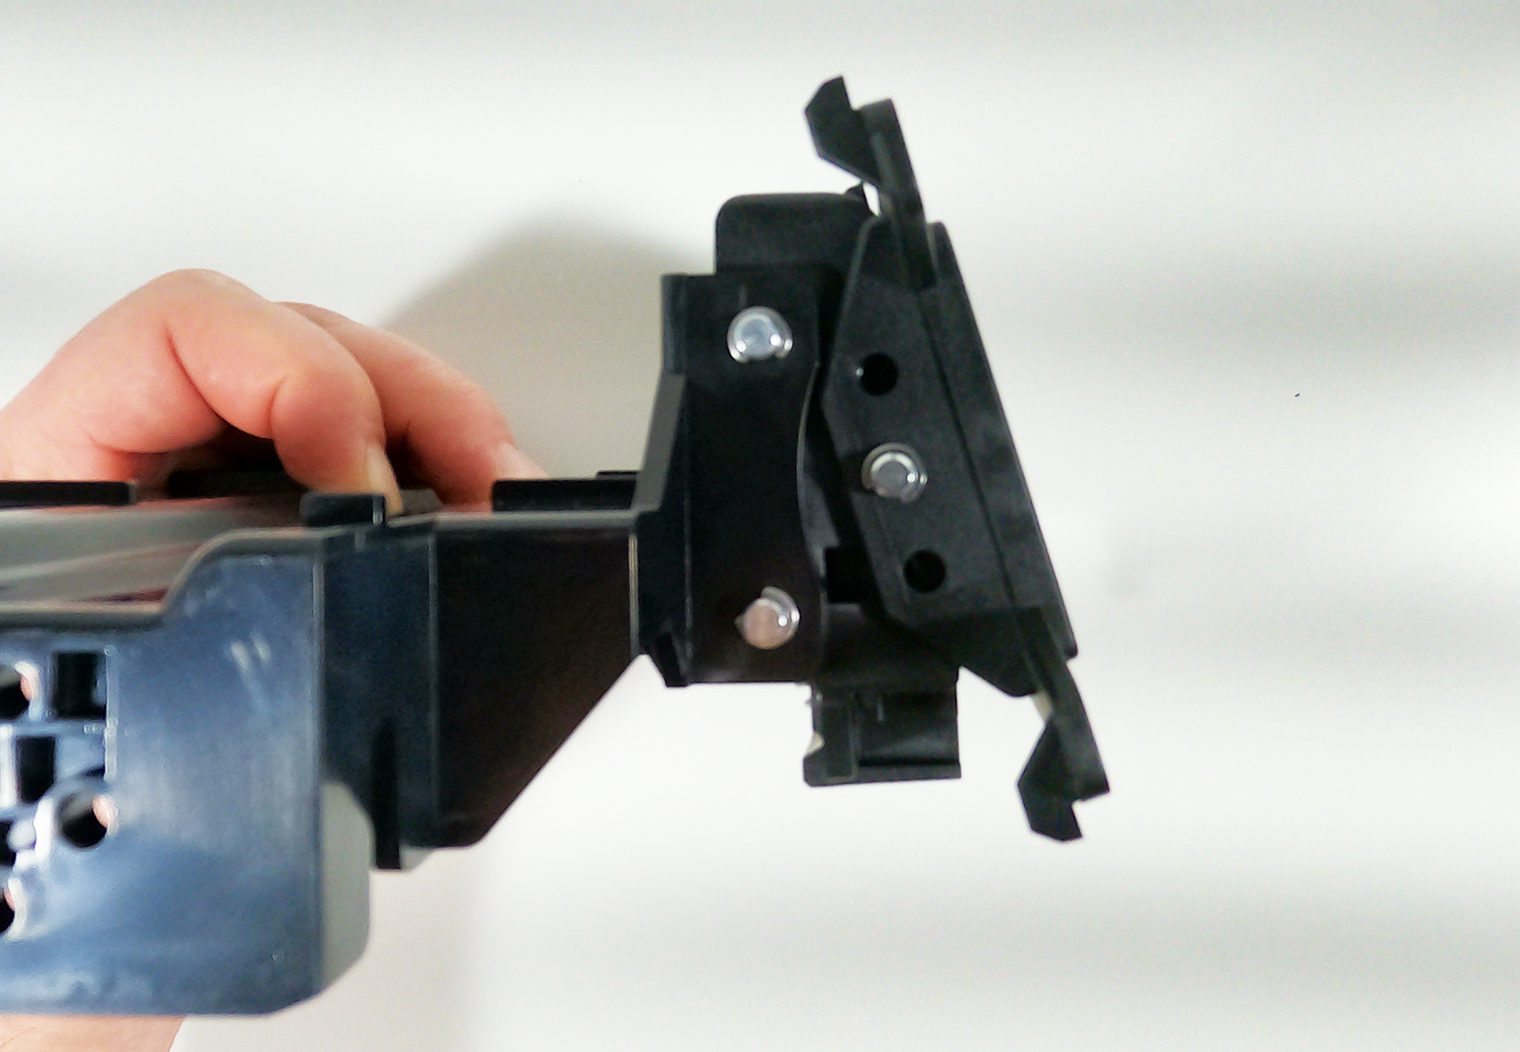
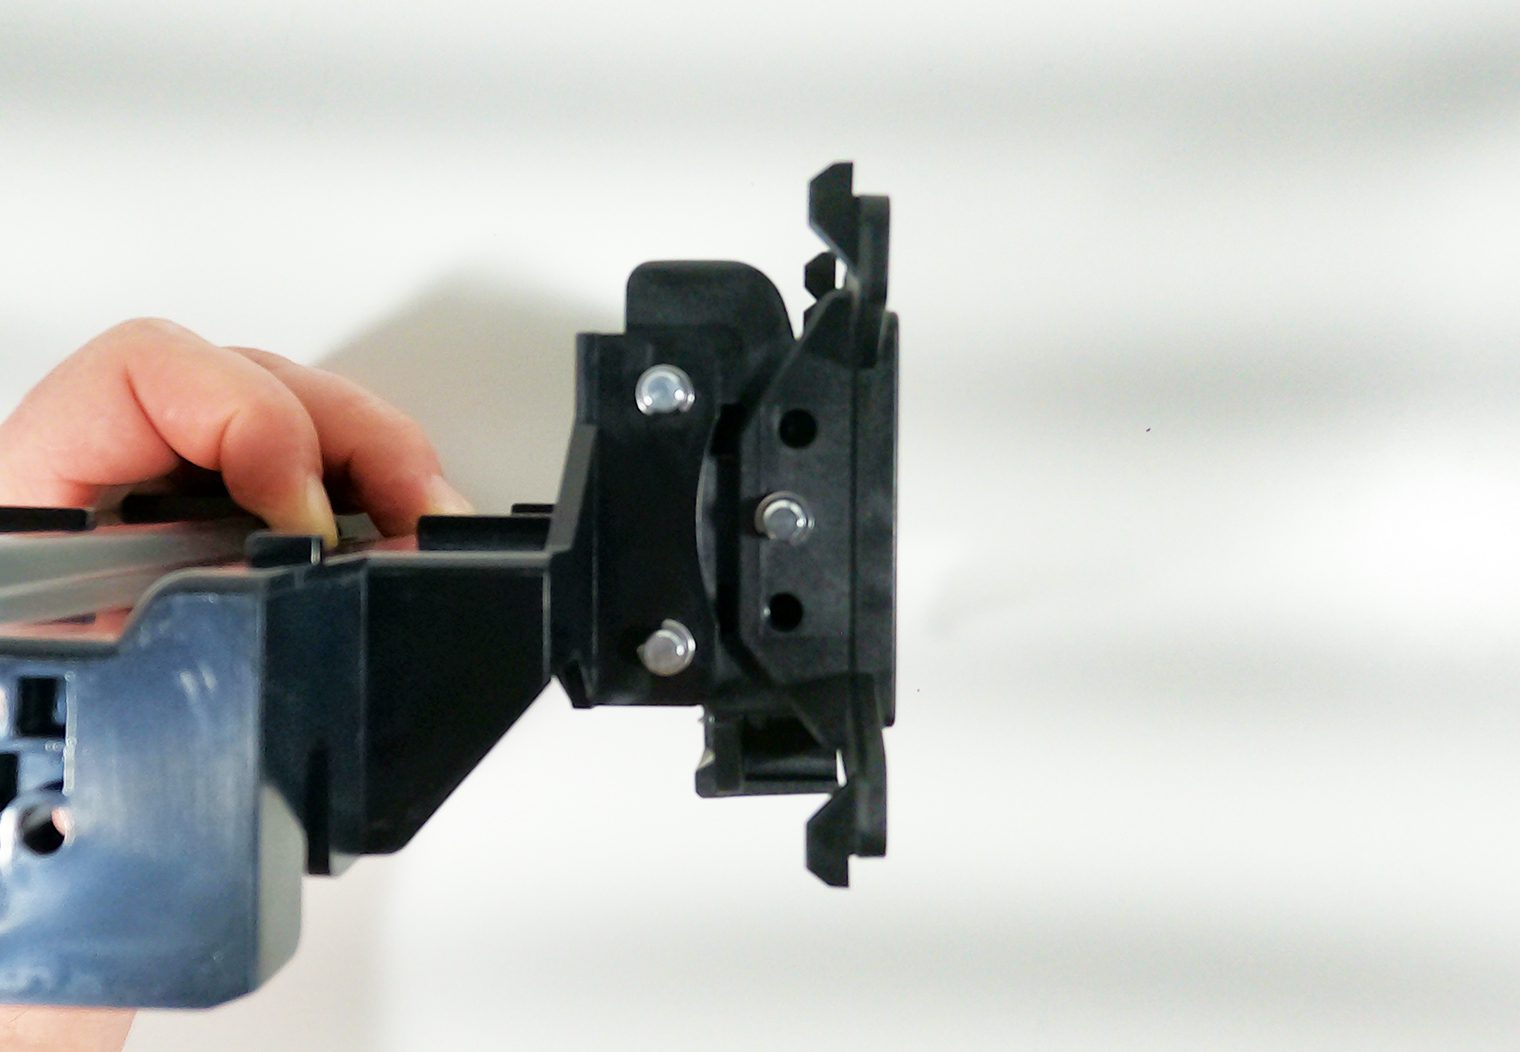
What I like about this mounting mechanism is that it really simplifies the installation. It has a spring hook design that allows you to simply hook and clip the screen on once you've mounted the clamp assembly to the back of the screen. This makes it easy to install and remove if you're leaving the vehicle in a questionable area. On the downside though, if someone were to break into your car and you didn't screen, it's a 10 second removal (for someone who knows exactly what they're doing).
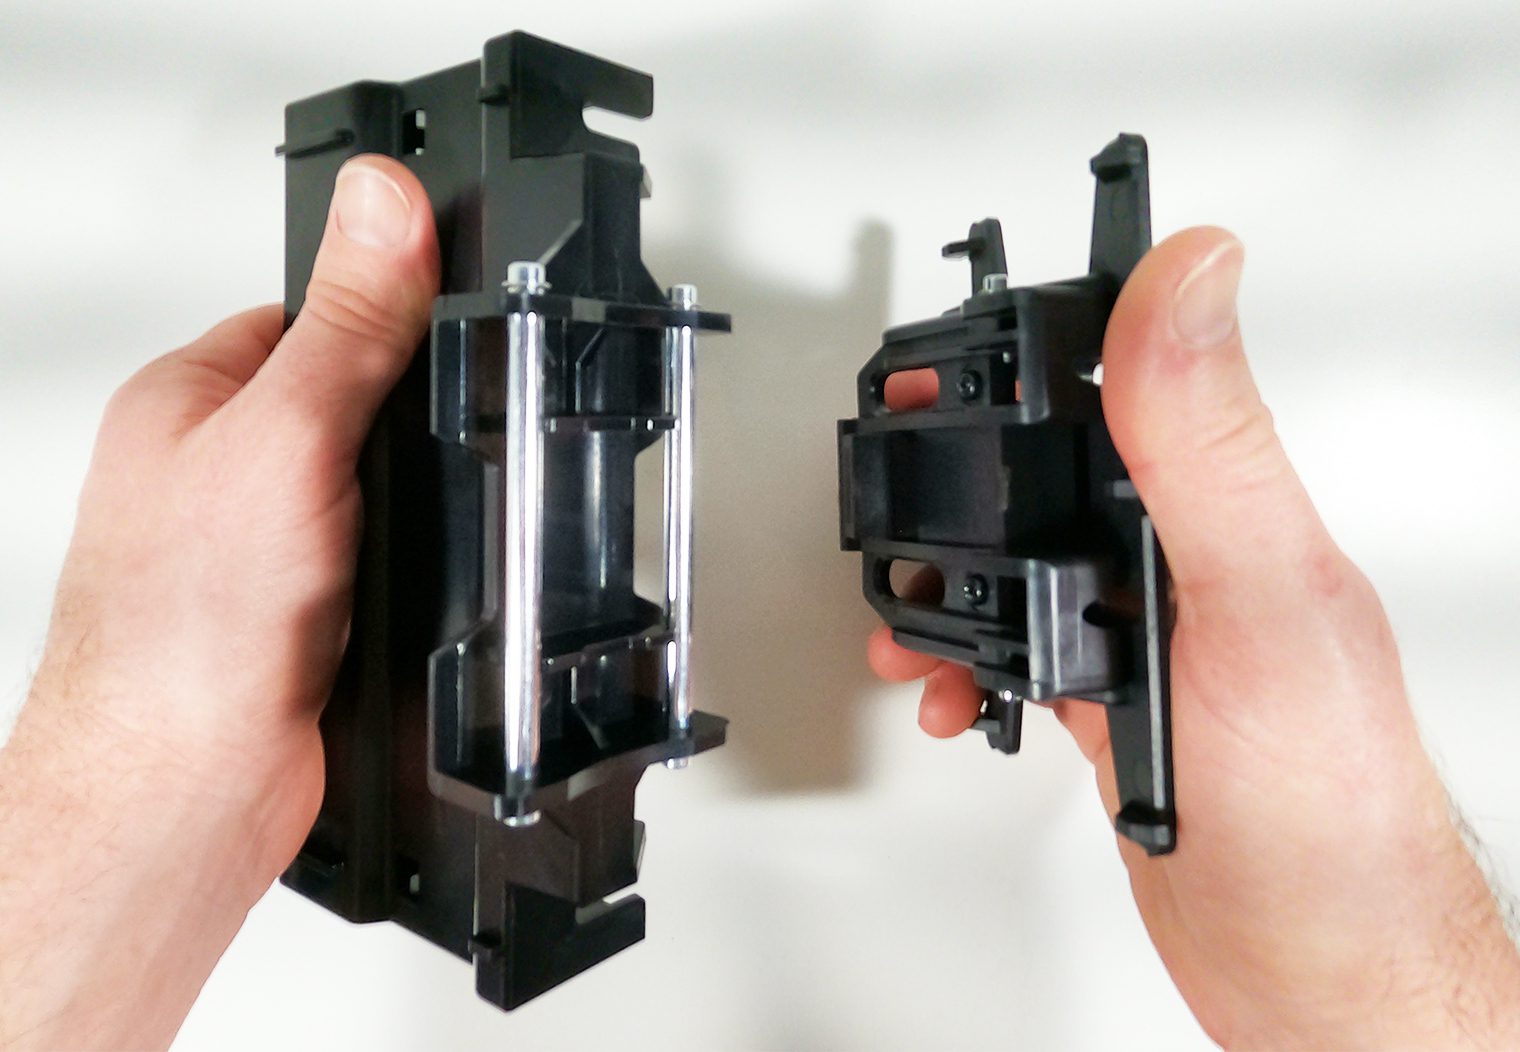

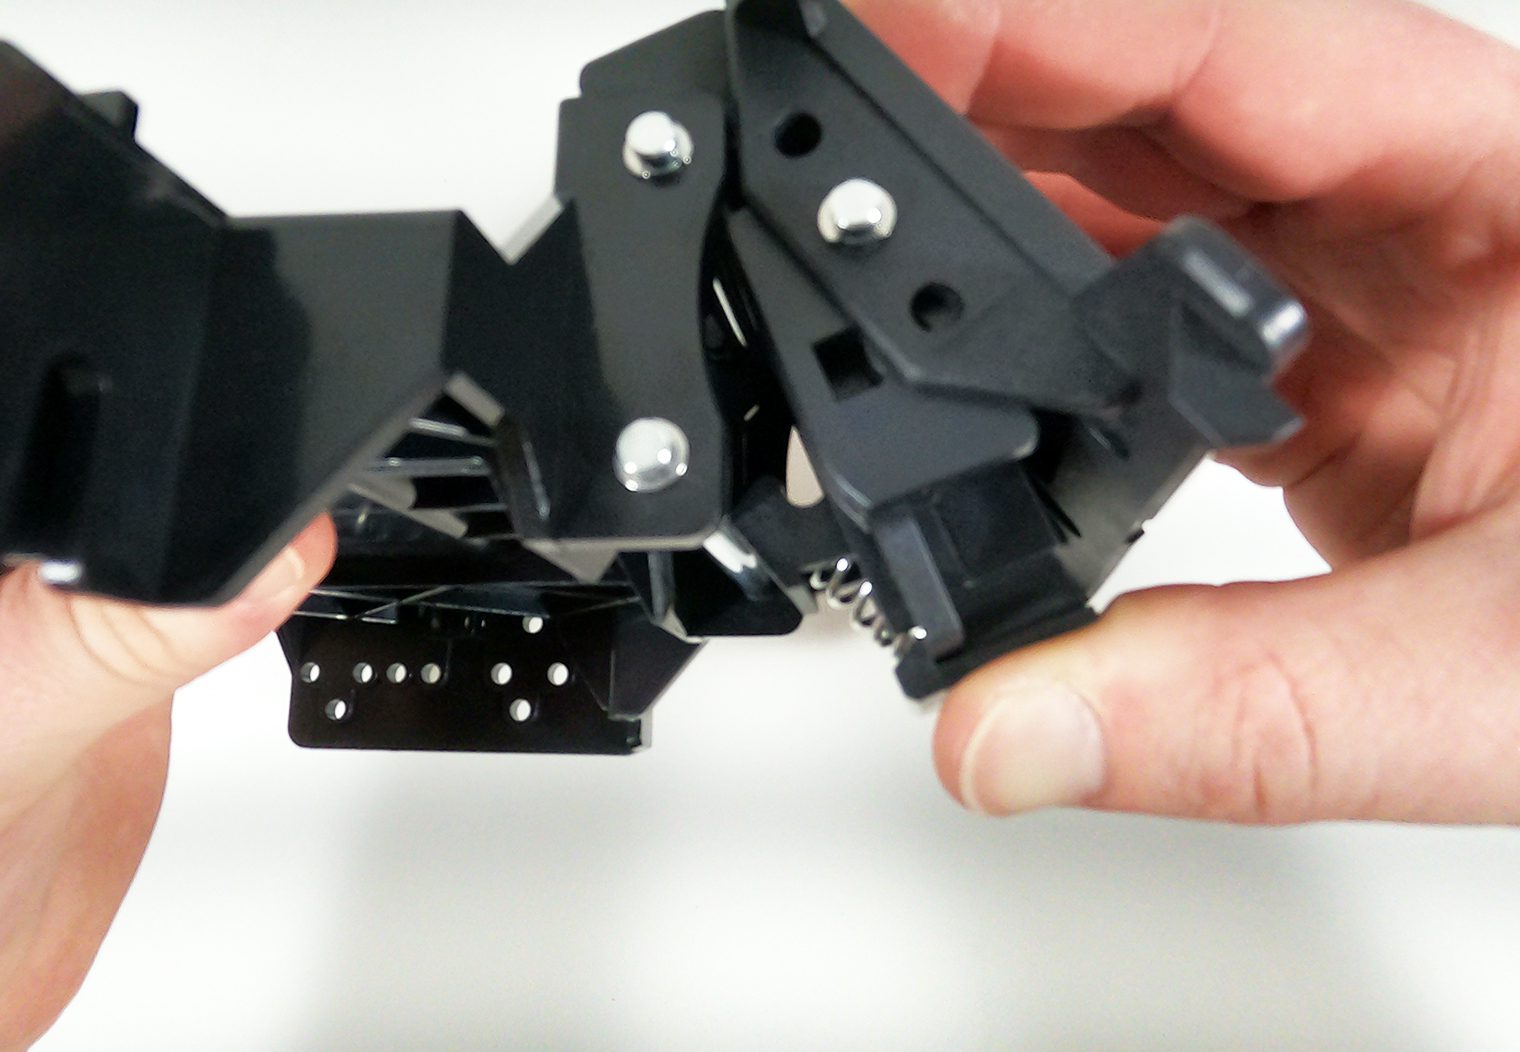
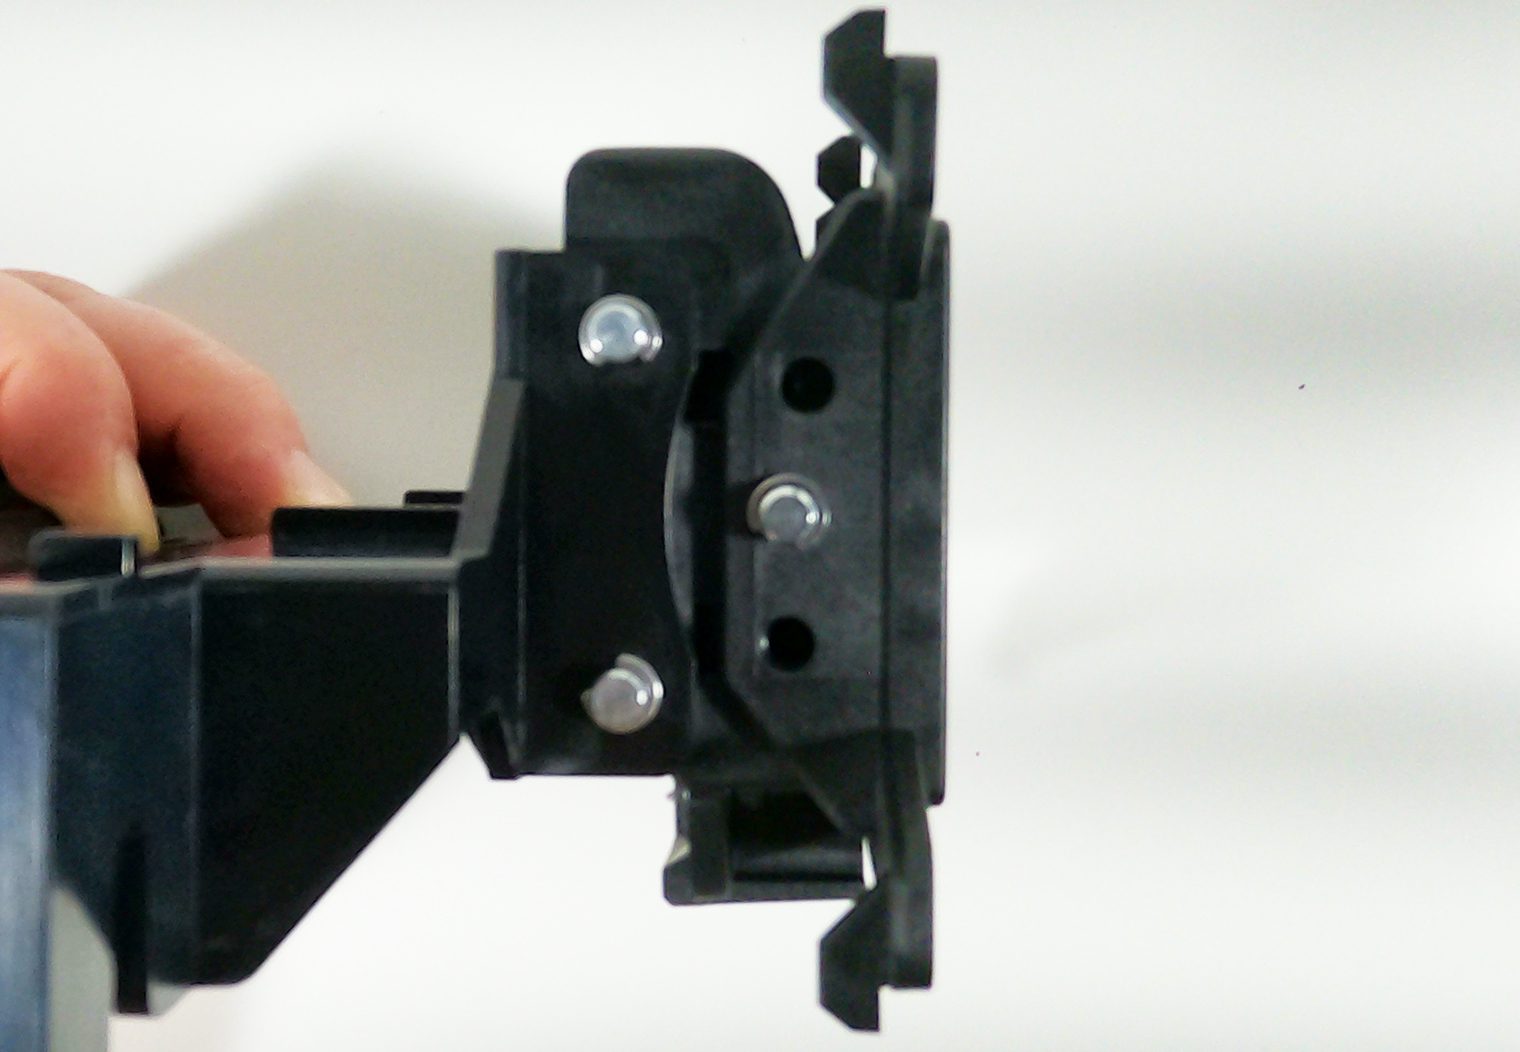
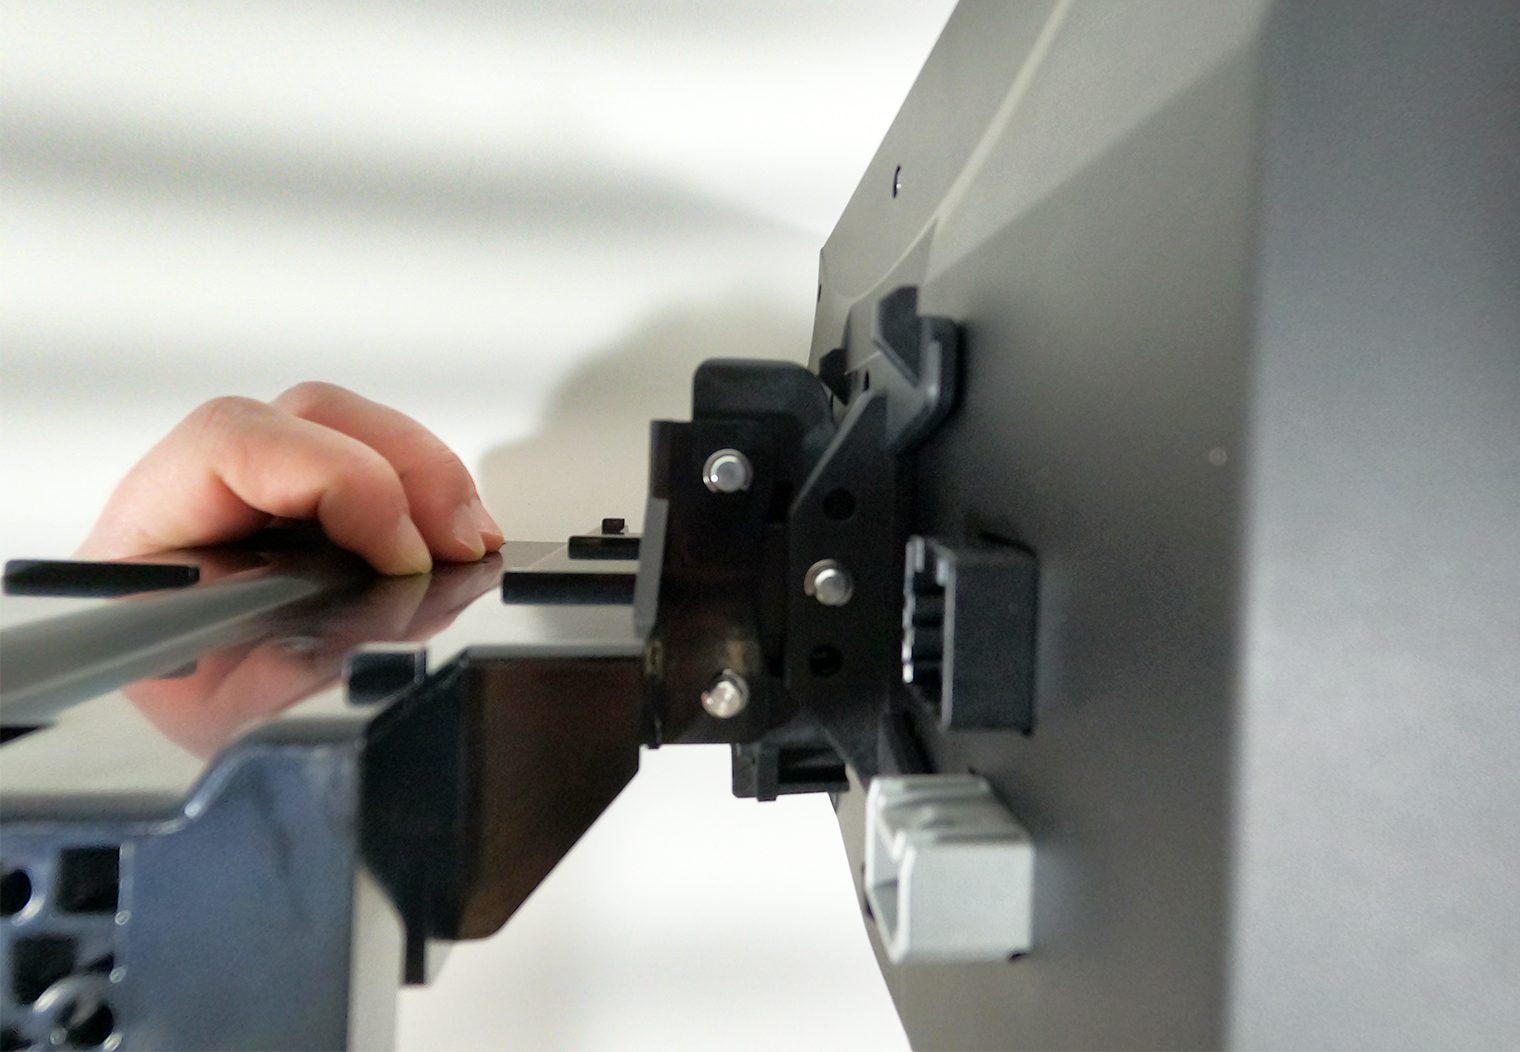
You can adjust both the vertical position (how high the unit sits in your dash) and the vertical tilt (up and down tilt) to customize how the Stinger HEIGH10 sits in your dash. The vertical position is adjusted by mounting the clamp assembly to a higher or lower mounting hole on the screen. There's about 1 3/4 inches of vertical adjustment. To adjust the tilt, you'll use one of the included m5 screws to secure the tilt position to either flat or +8 degrees of vertical tilt on the side of the bracket (see pics below to see the tilt).
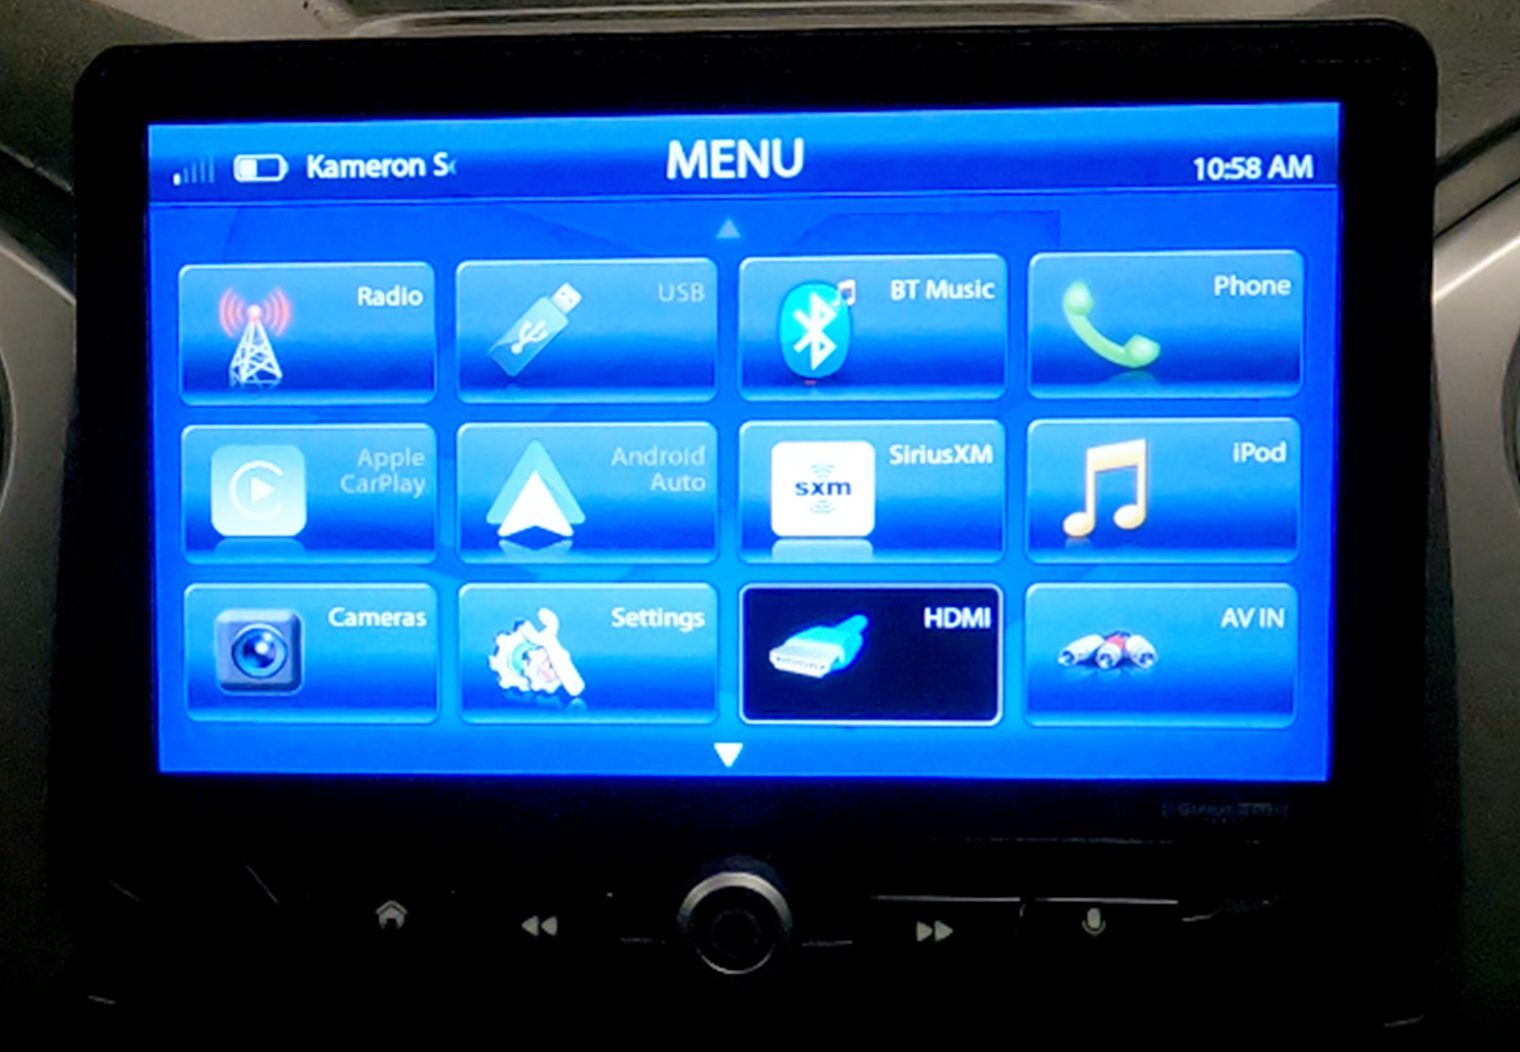
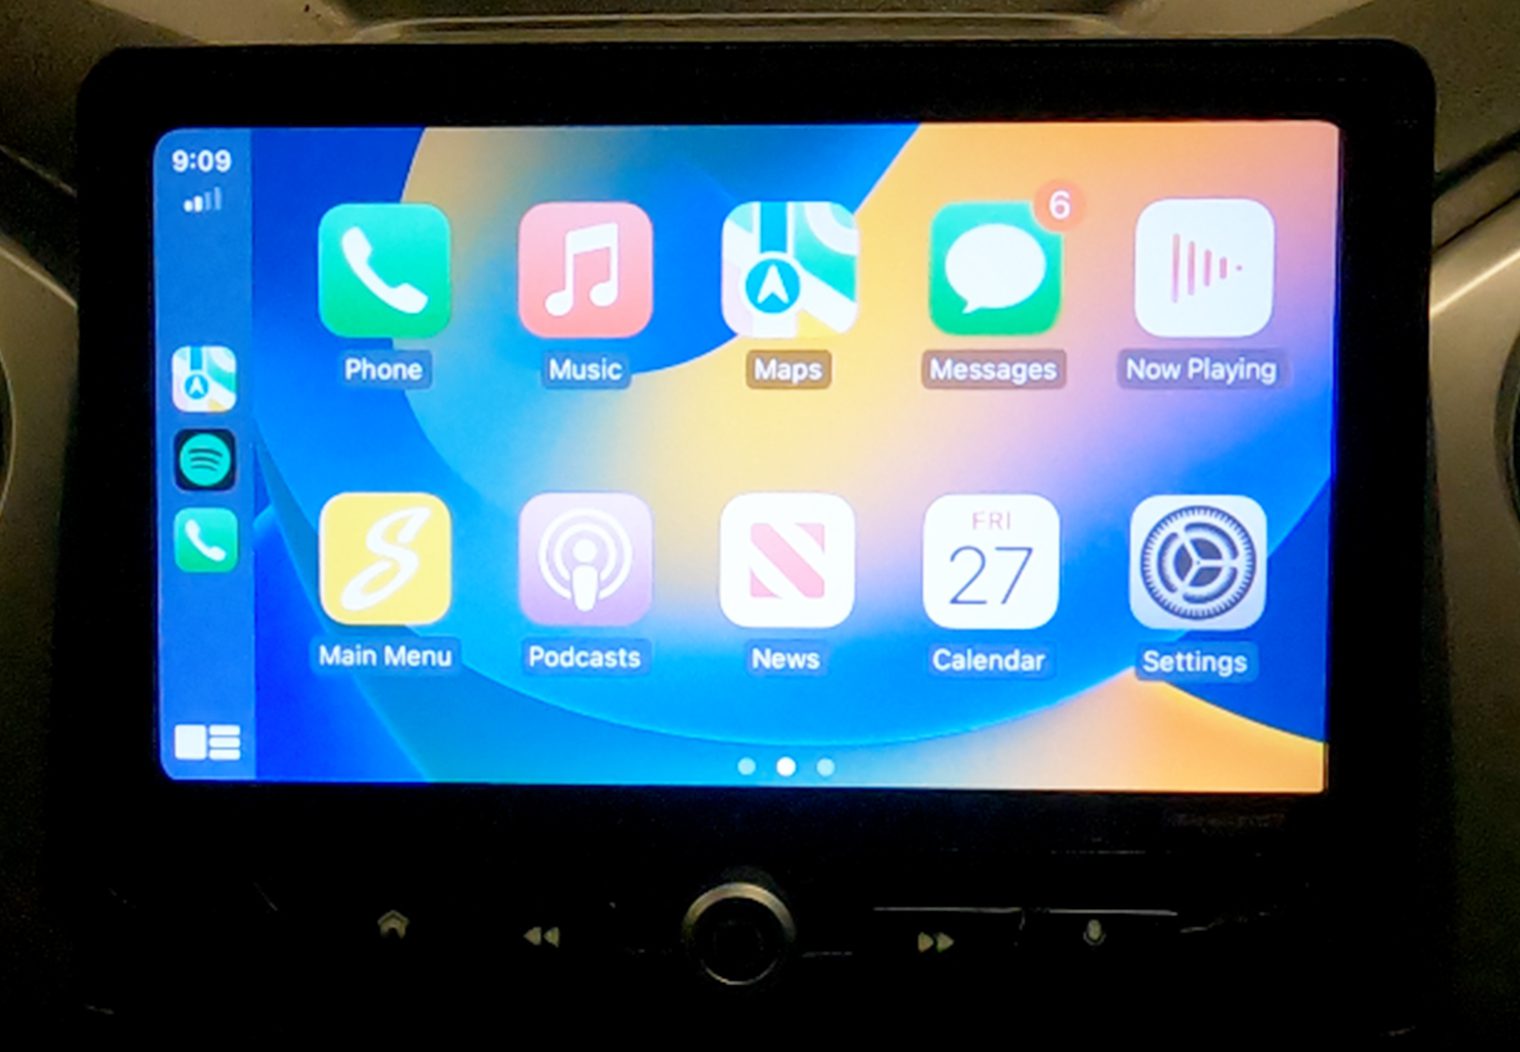
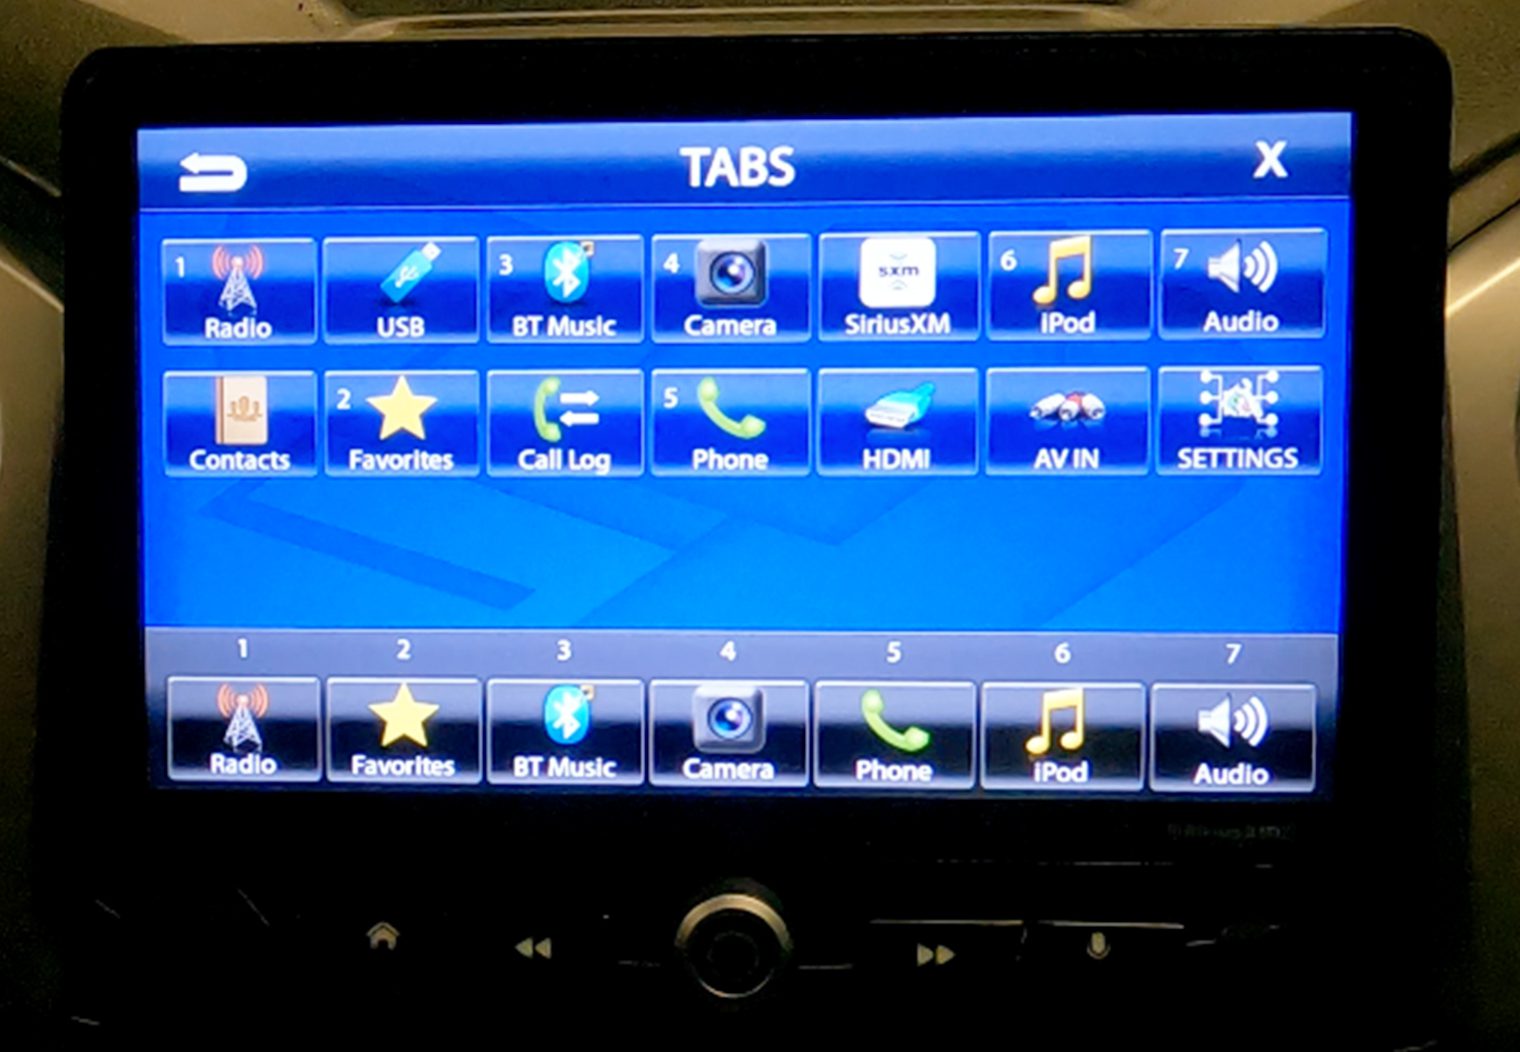
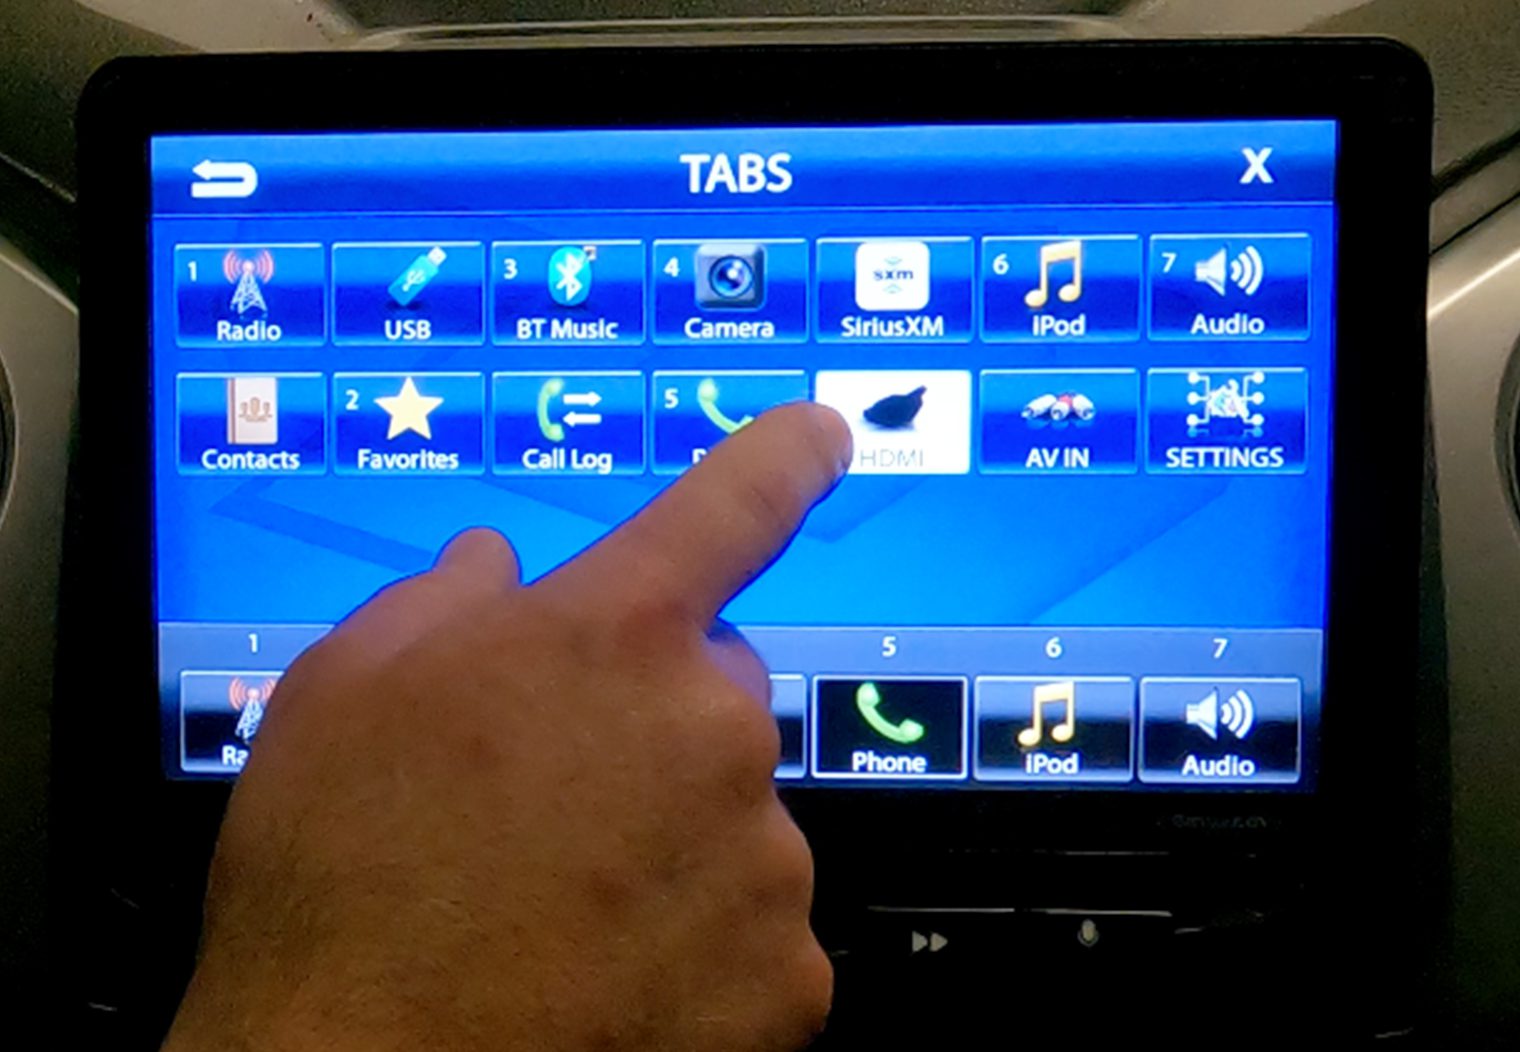
When the unit is on, the screen is pretty vibrant and clear. It's easily one of the clearest, highest quality screens I've tested. One of the display-related features I liked about this unit is the customizable shortcut ‘tabs'. You can configure the shortcut bar to show the sources and features that are most important to you and that you use the most. Surprisingly, many head units don't allow you to add or customize shortcuts so this is a refreshing feature. One that I think all units should have at this point. See the customization features section for more information on backgrounds and shortcut feature.
In general, while navigating throughout the features of the unit I thought that the user interface was user-friendly and intuitive, with a variety of shortcut buttons and an easy-to-use menu structure. Whether you're an experienced car audio enthusiast or a newcomer to the scene, I think you'll find the Stinger HEIGH10's user interface easy to use and easy to navigate.
Audio Performance & Features
A head unit like the HEIGH10 is only as good as its audio performance, right? Stinger's HEIGH10 doesn't disappoint in this regard either. It has a built-in amplifier that delivers a powerful 25 watt RMS output per channel along with high-quality signal/sound to your OEM or aftermarket car speakers. 25 watts is on the higher-end for built-in amplifiers, so this is a great feature for those looking to use their OEM speakers.
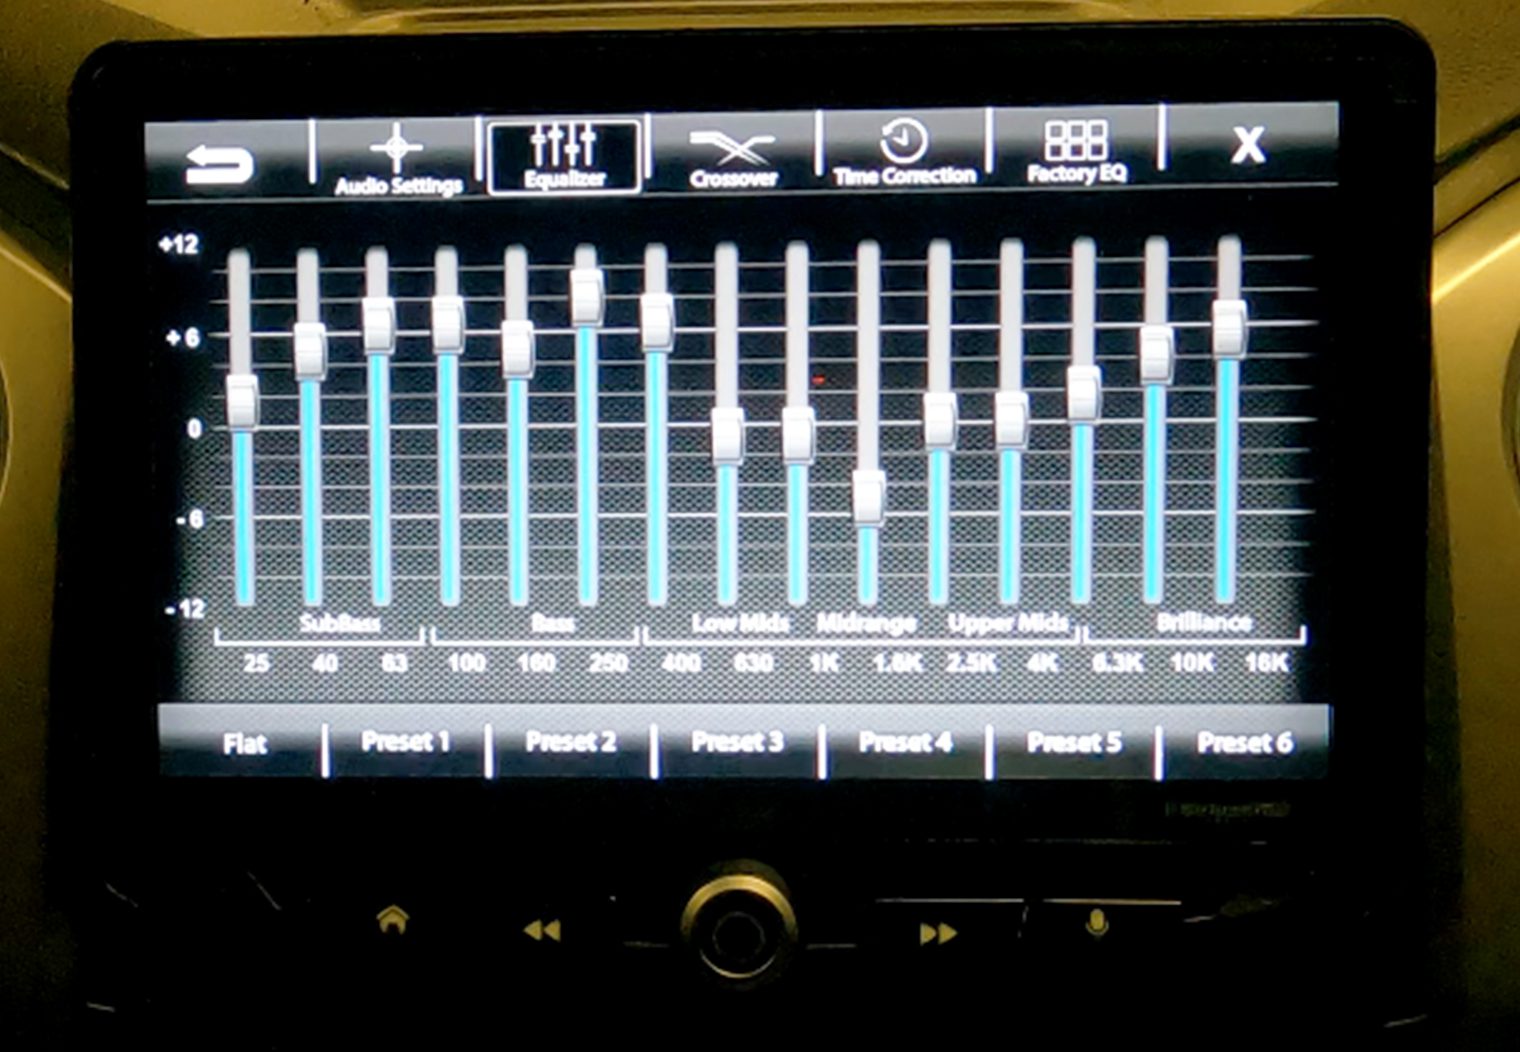
It also has a variety of audio processing features that allow you to fine-tune the sound to your liking too. These features include a 15-band equalizer, time alignment, and a crossovers.
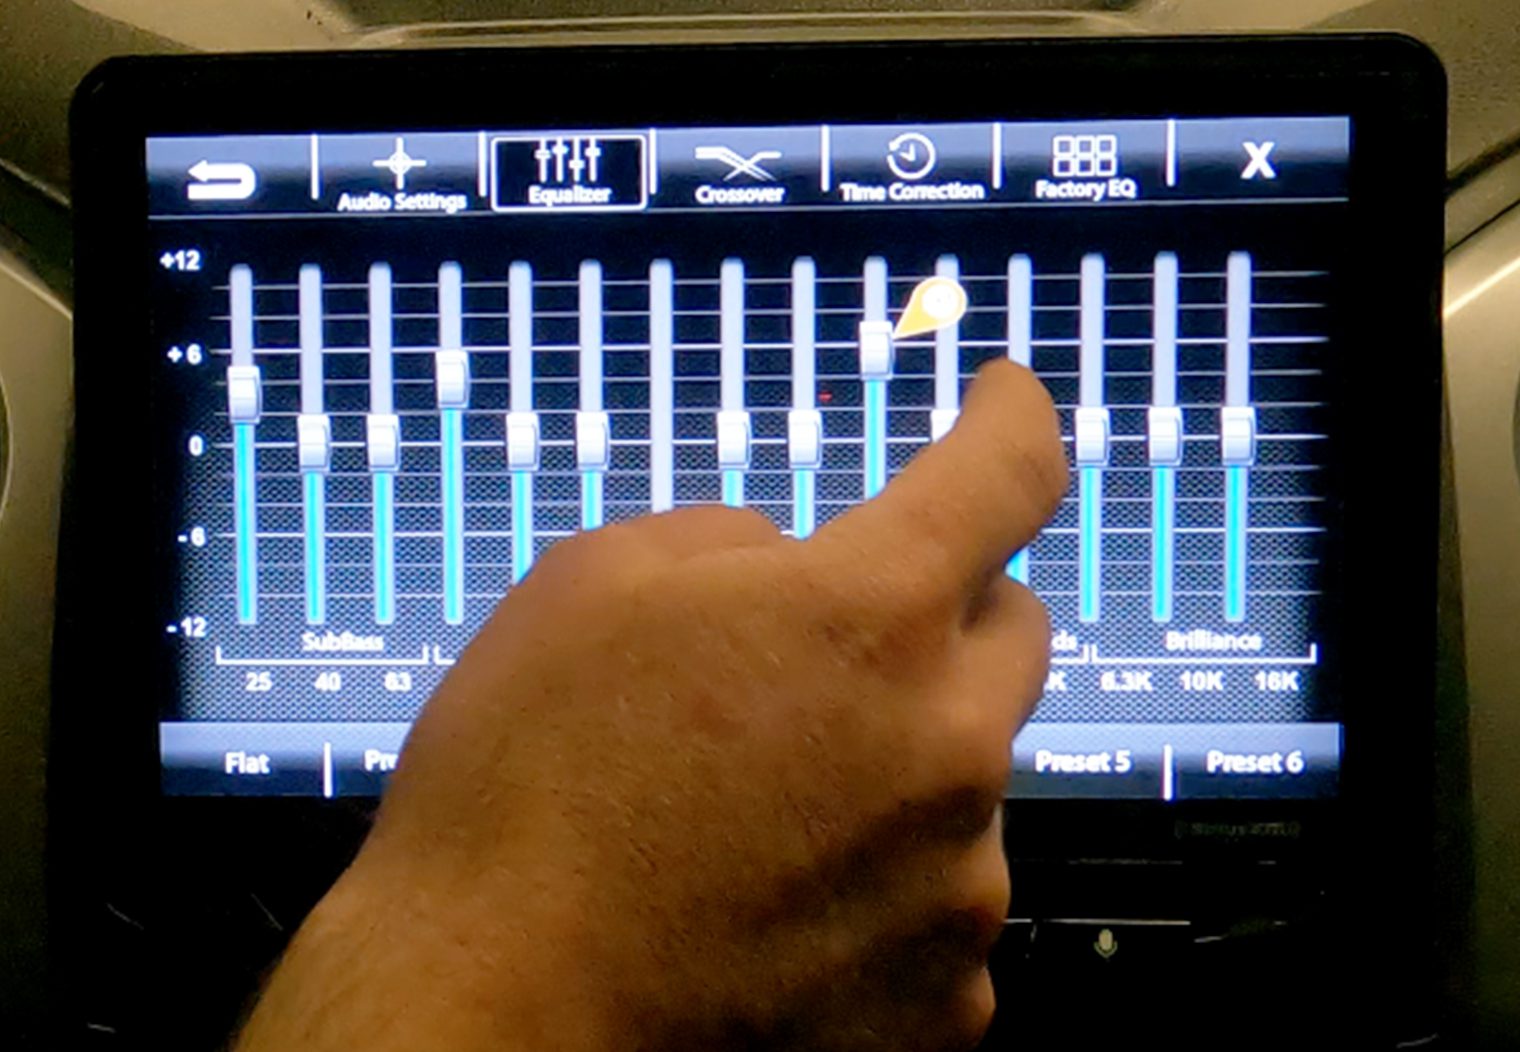
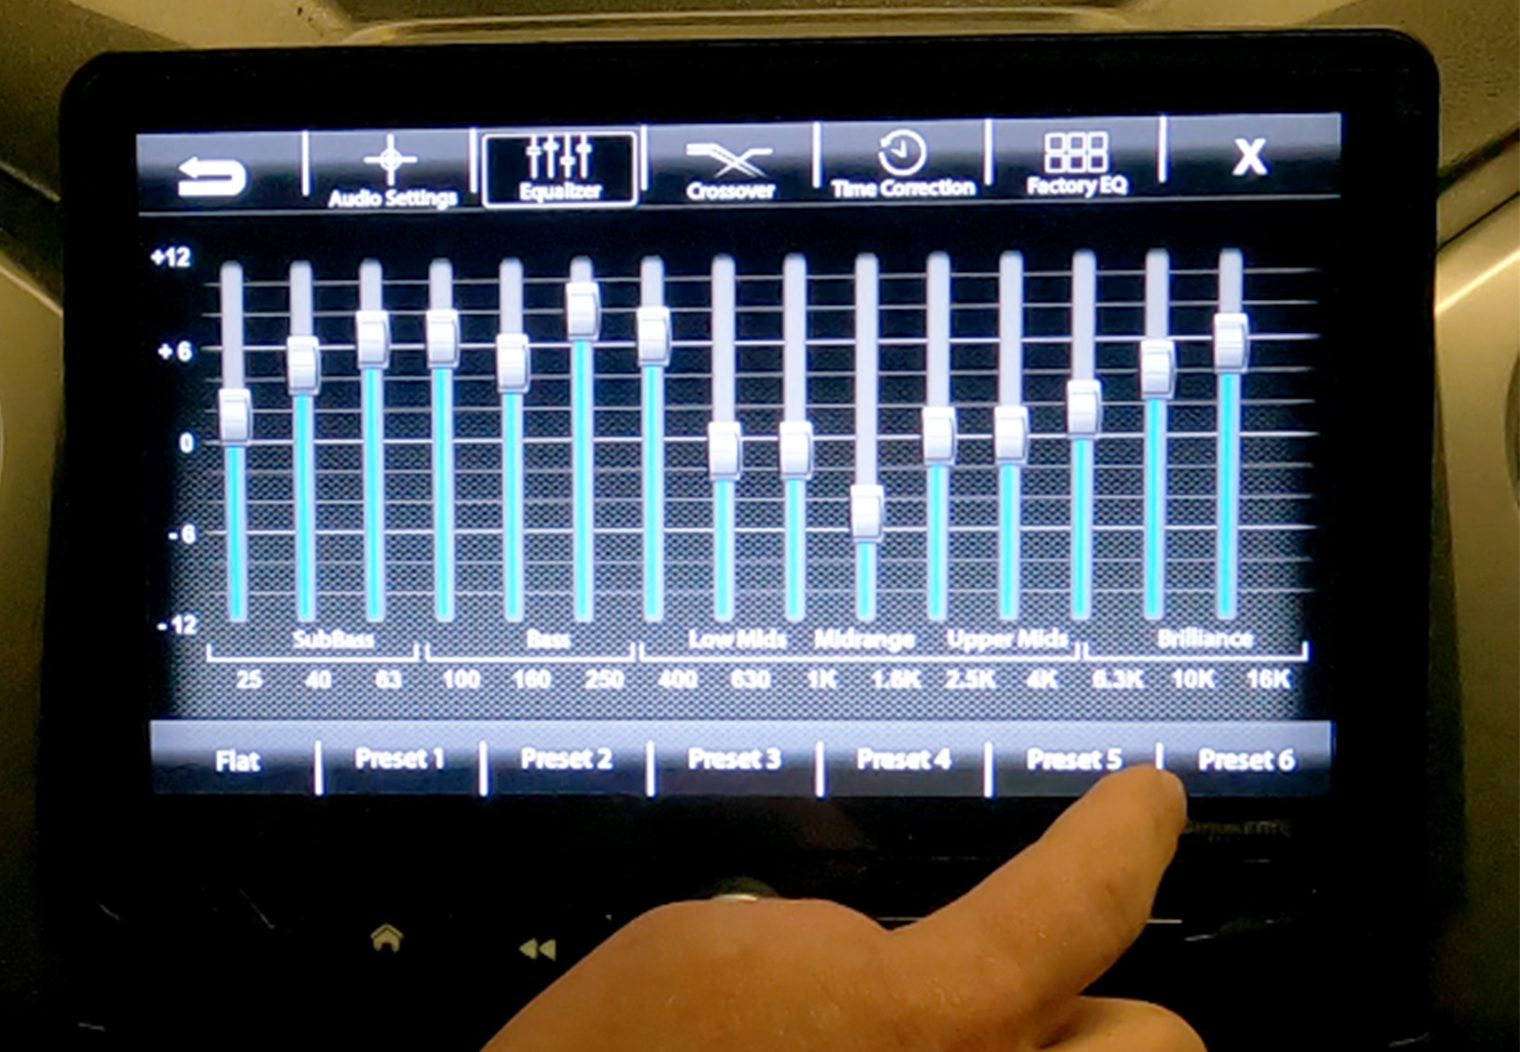
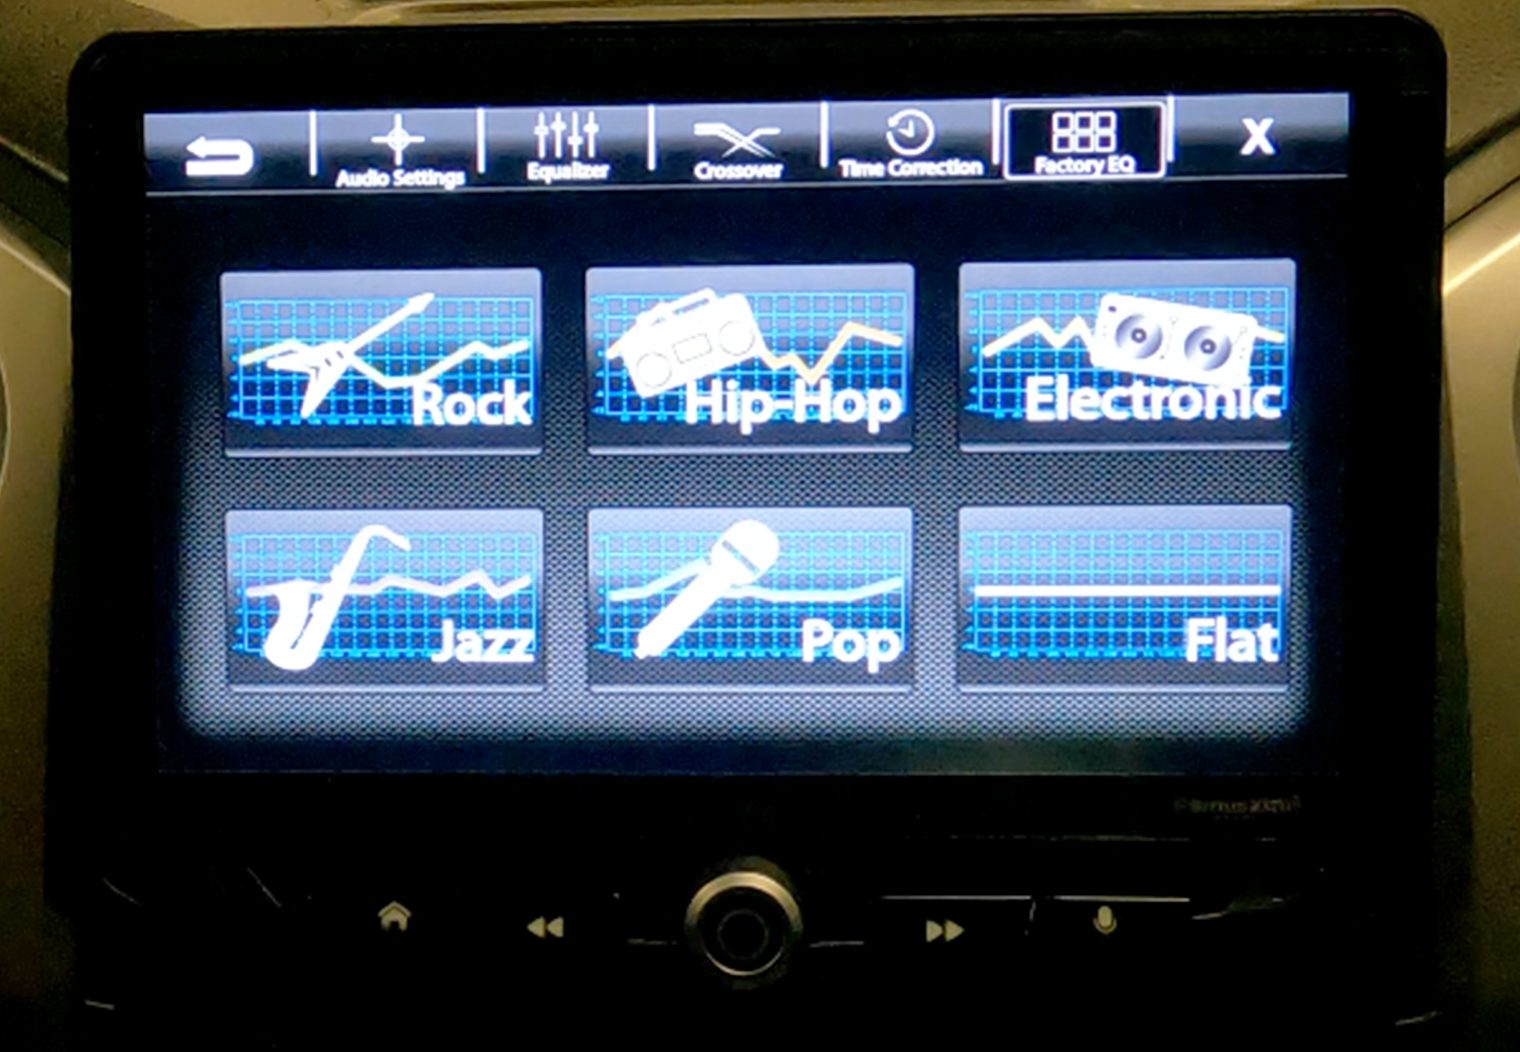
15 Band Equalizer
The 15 band equalizer interface is very straight forward and easy to use. Simply touch each band to raise or lower the gain for each frequency band. If you're not familiar with tuning, there are 6 factory equalizer preset options (e.g. rock, hip-hop, electronic, jazz, pop and flat) that you can choose from depending on the genera of music you like to listen to most. Or, if you want more control over your system you can customize your own equalizer settings by tapping and dragging the level of each EQ band and then save up to 6 custom configurations.
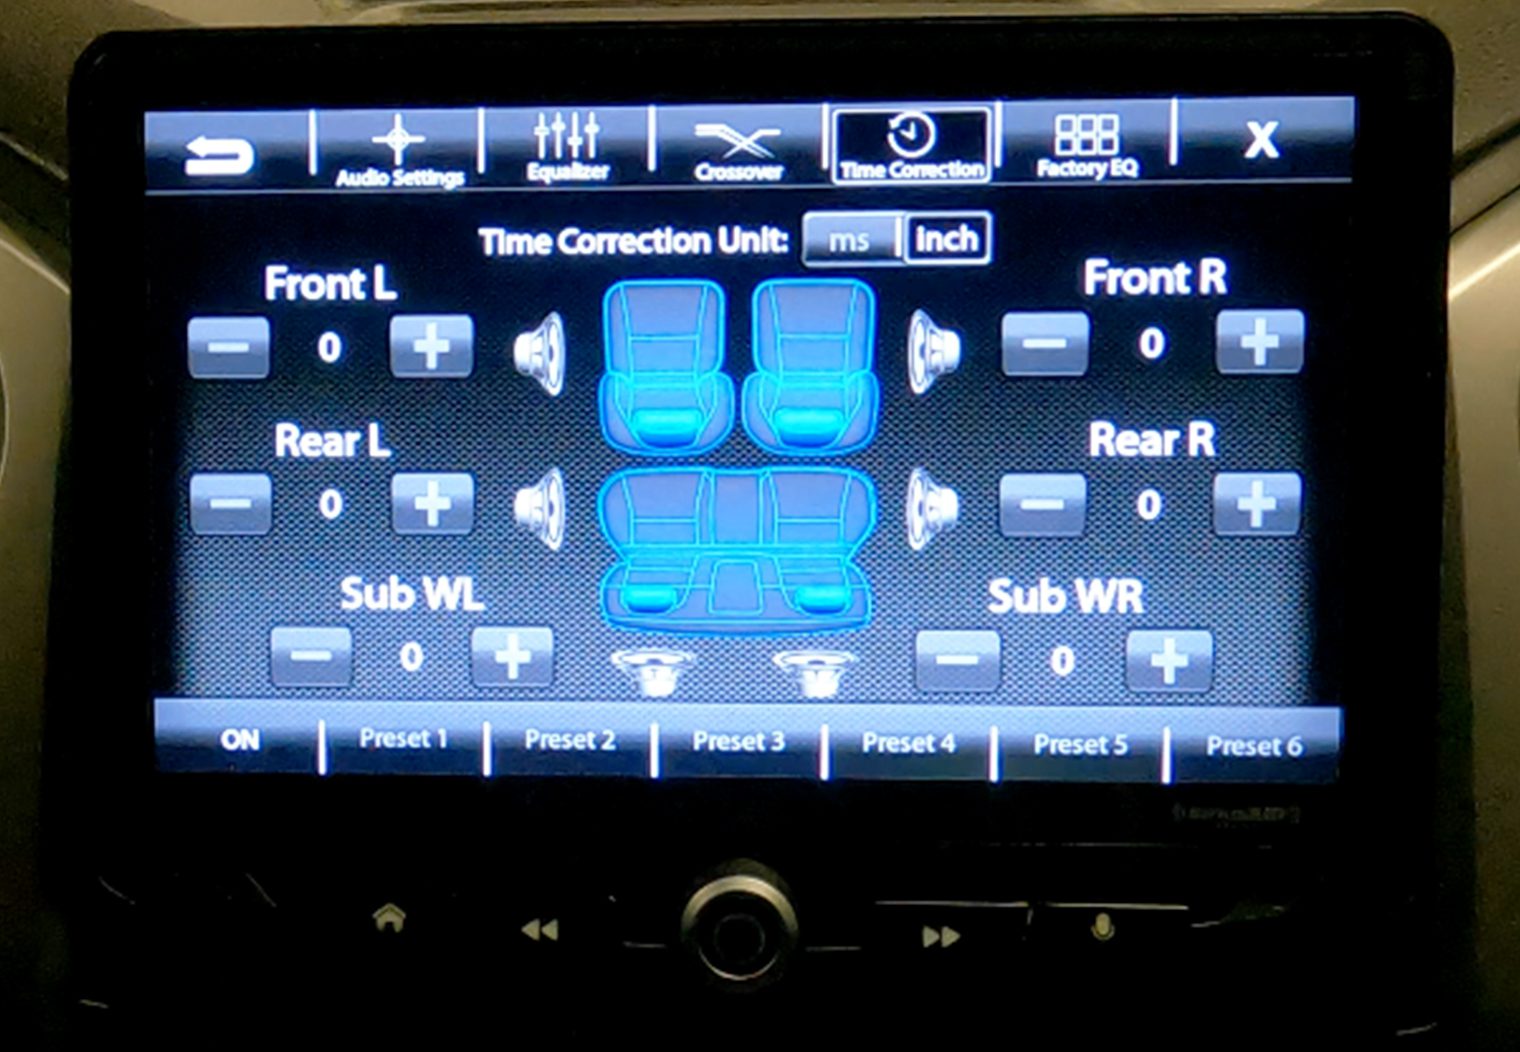
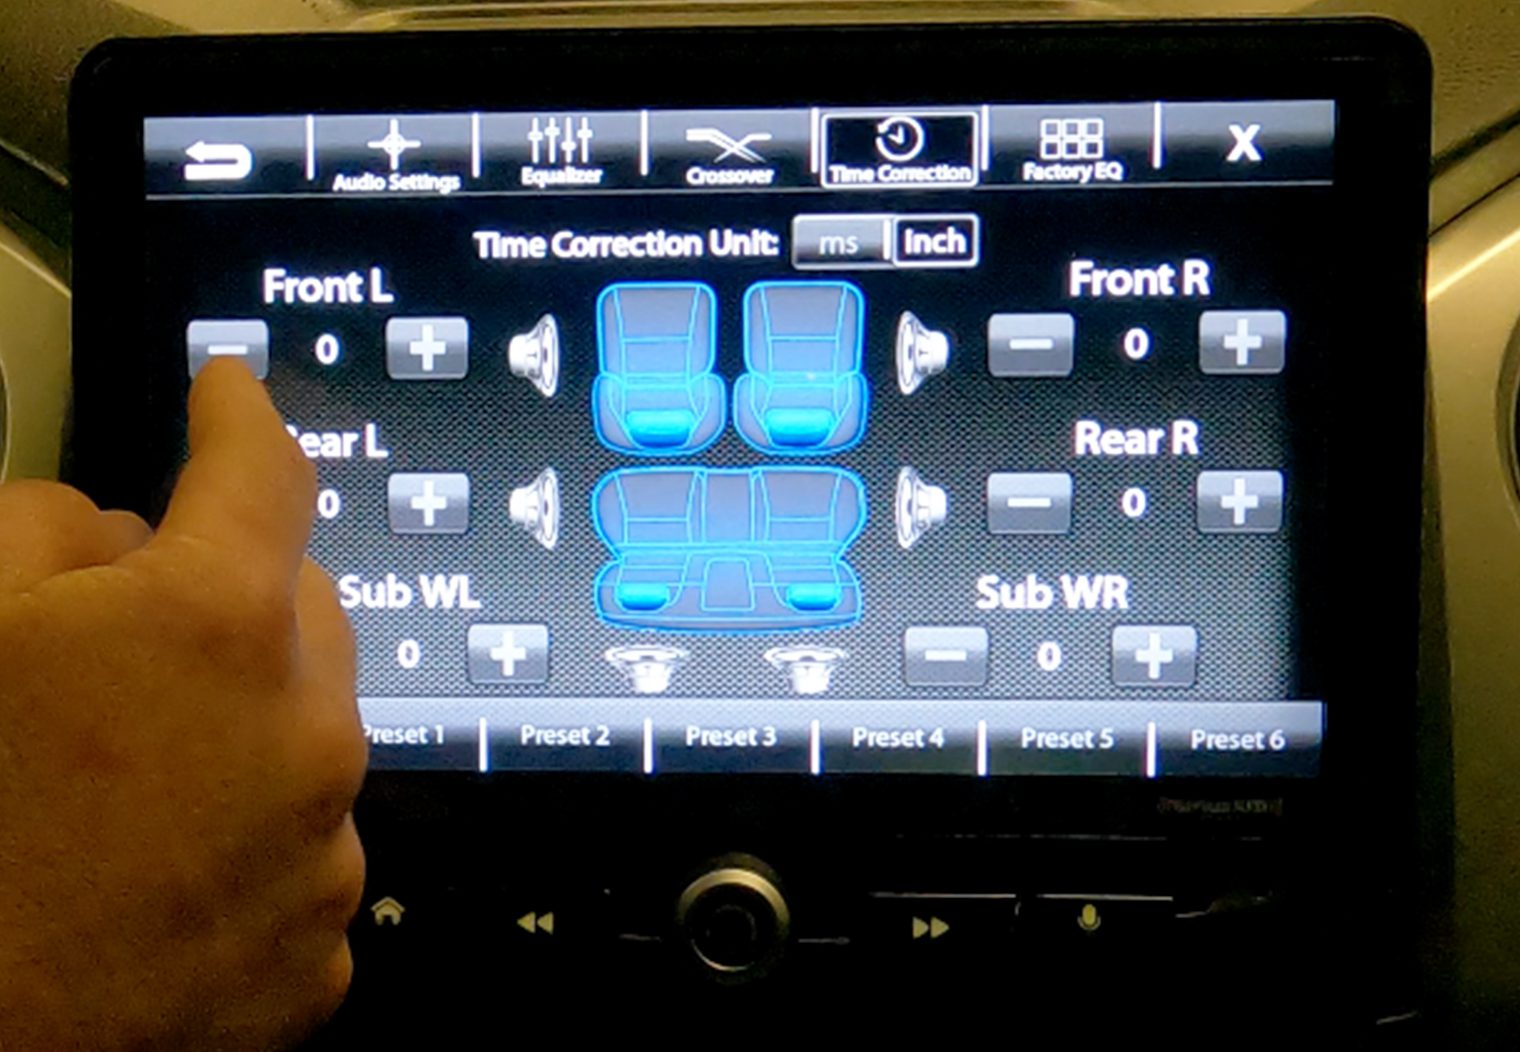
Time Alignment
Time alignment is a great feature to have for setting the sound stage of your system. It is particularly useful for upgraded and amplified systems and those trying to refine and tune their system. To use the time alignment feature, simply use a tape measure to measure the distance from each speaker to your chosen focal/listening point. Then, enter the dimensions directly into the interface. The result will automatically align the output of each speaker based on the distance to your focal point so that the sound reaches it precisely at the same time.
Crossovers
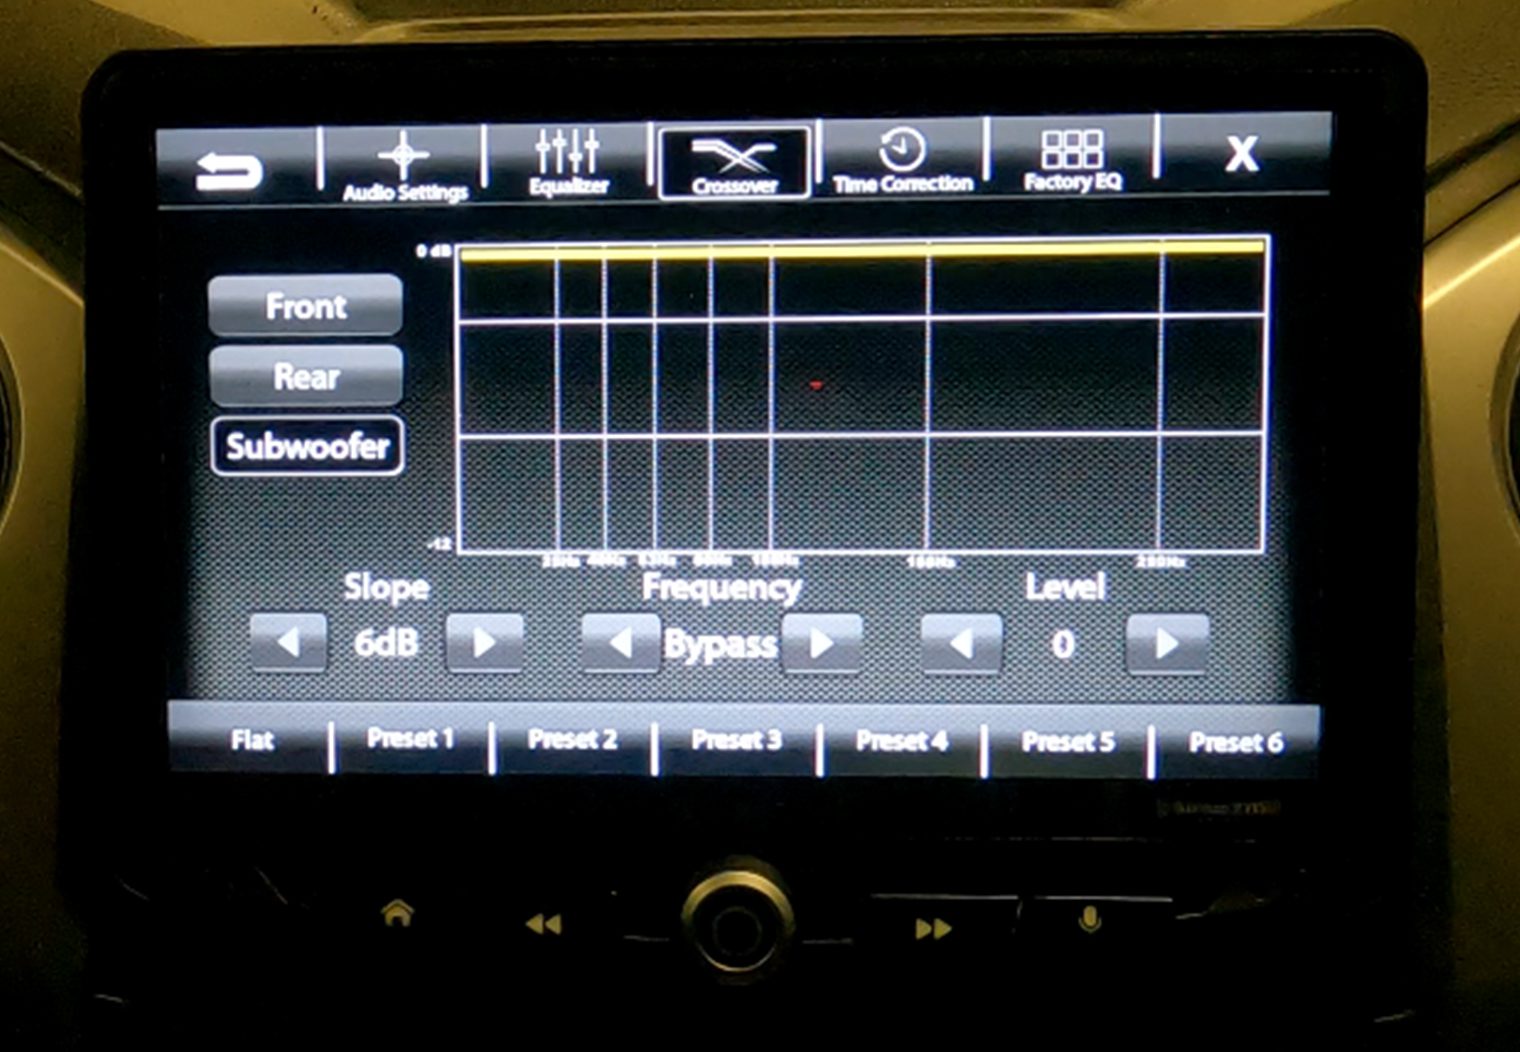
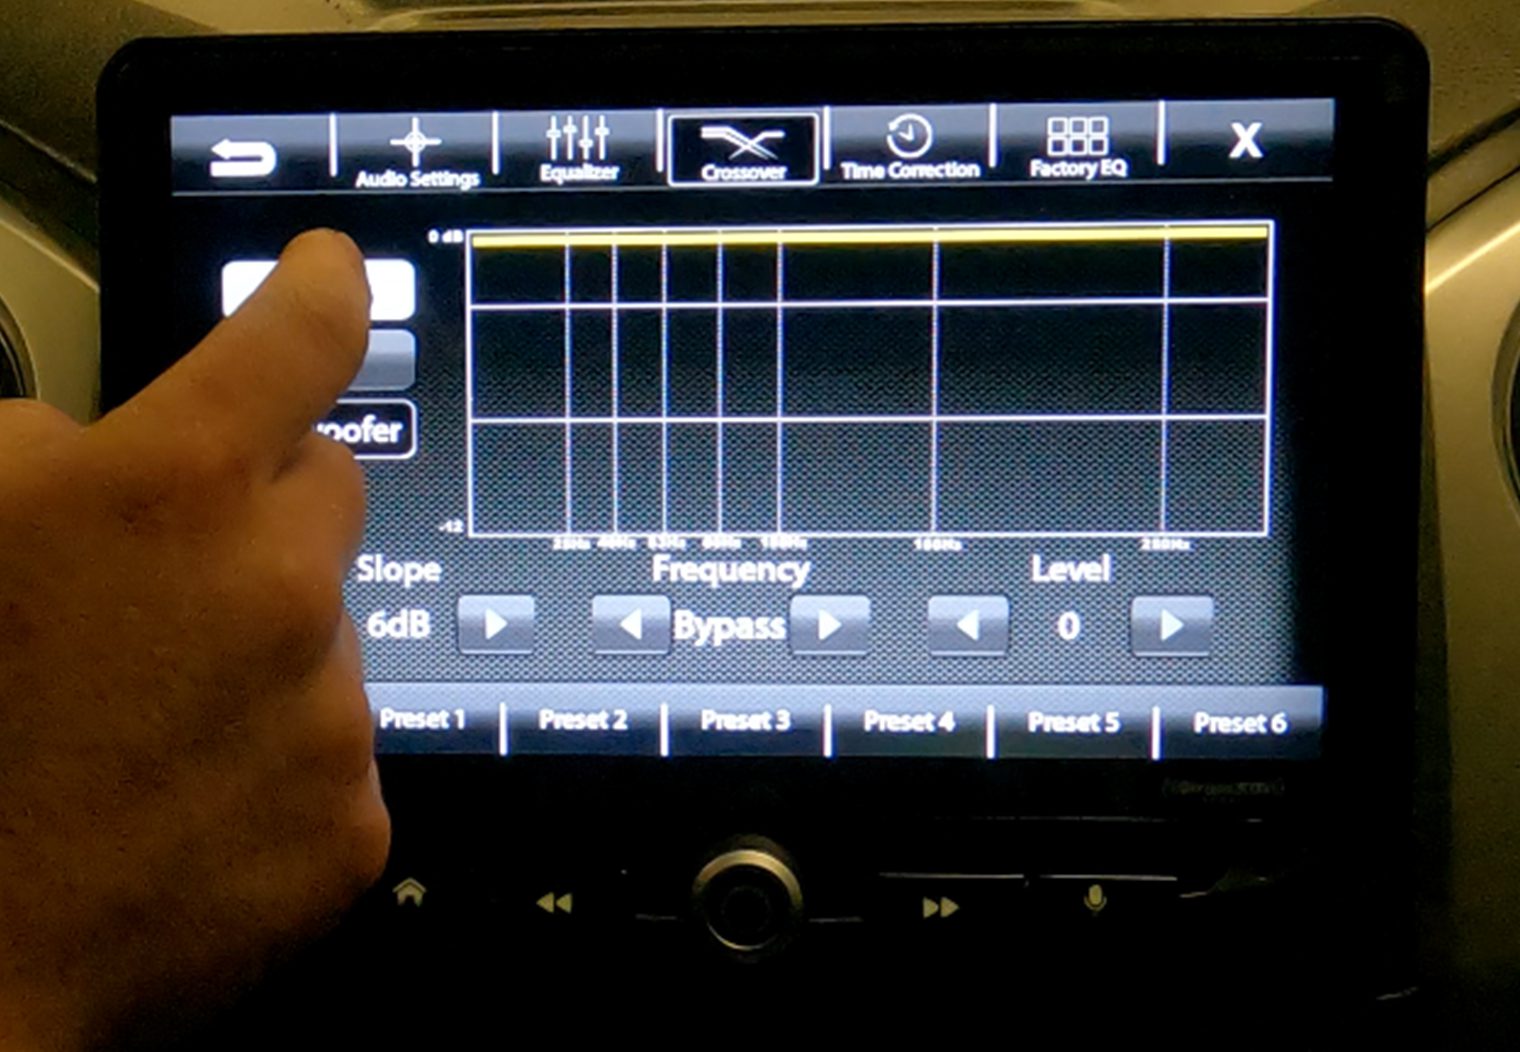
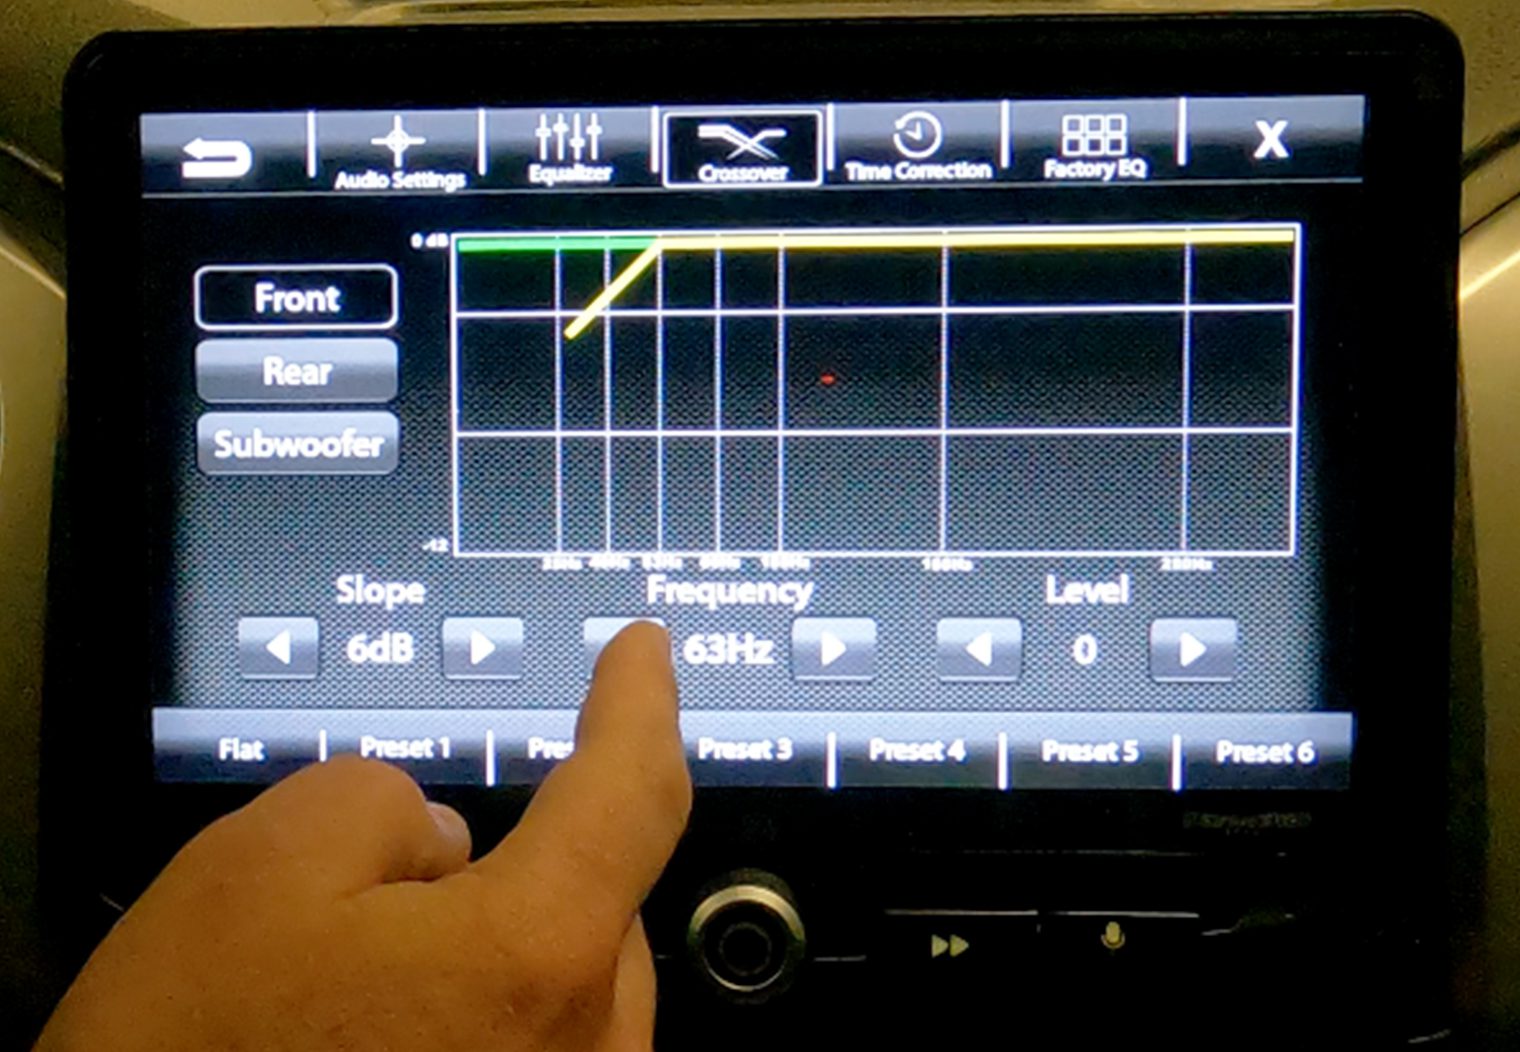
I always like to see crossover configurations directly in the interface of a head unit. When you combine the 15 band equalizer with a decent crossover interface, it really eliminates the need for an in-line/separate DSP for a majority of use cases. Especially for the DIYers and audio enthusiasts looking to amplify their system with aftermarket car amplifiers.
The HEIGH10 interface offers a dedicated crossover configuration with slope, HPF, LPF and level controls broken down by each of the three zone outputs – Front, Rear and Subwoofer. By breaking out the crossovers by zone, it will:
- Eliminate the need to configure the HPF/LPF on an aftermarket amplifier if you choose to add one.
- Allow you to tailor your system to optimize your speaker outputs based on the configuration of your stereo and the specs of your speakers. This is beneficial even if you choose not to amplify your speakers separately.
Other Audio Settings
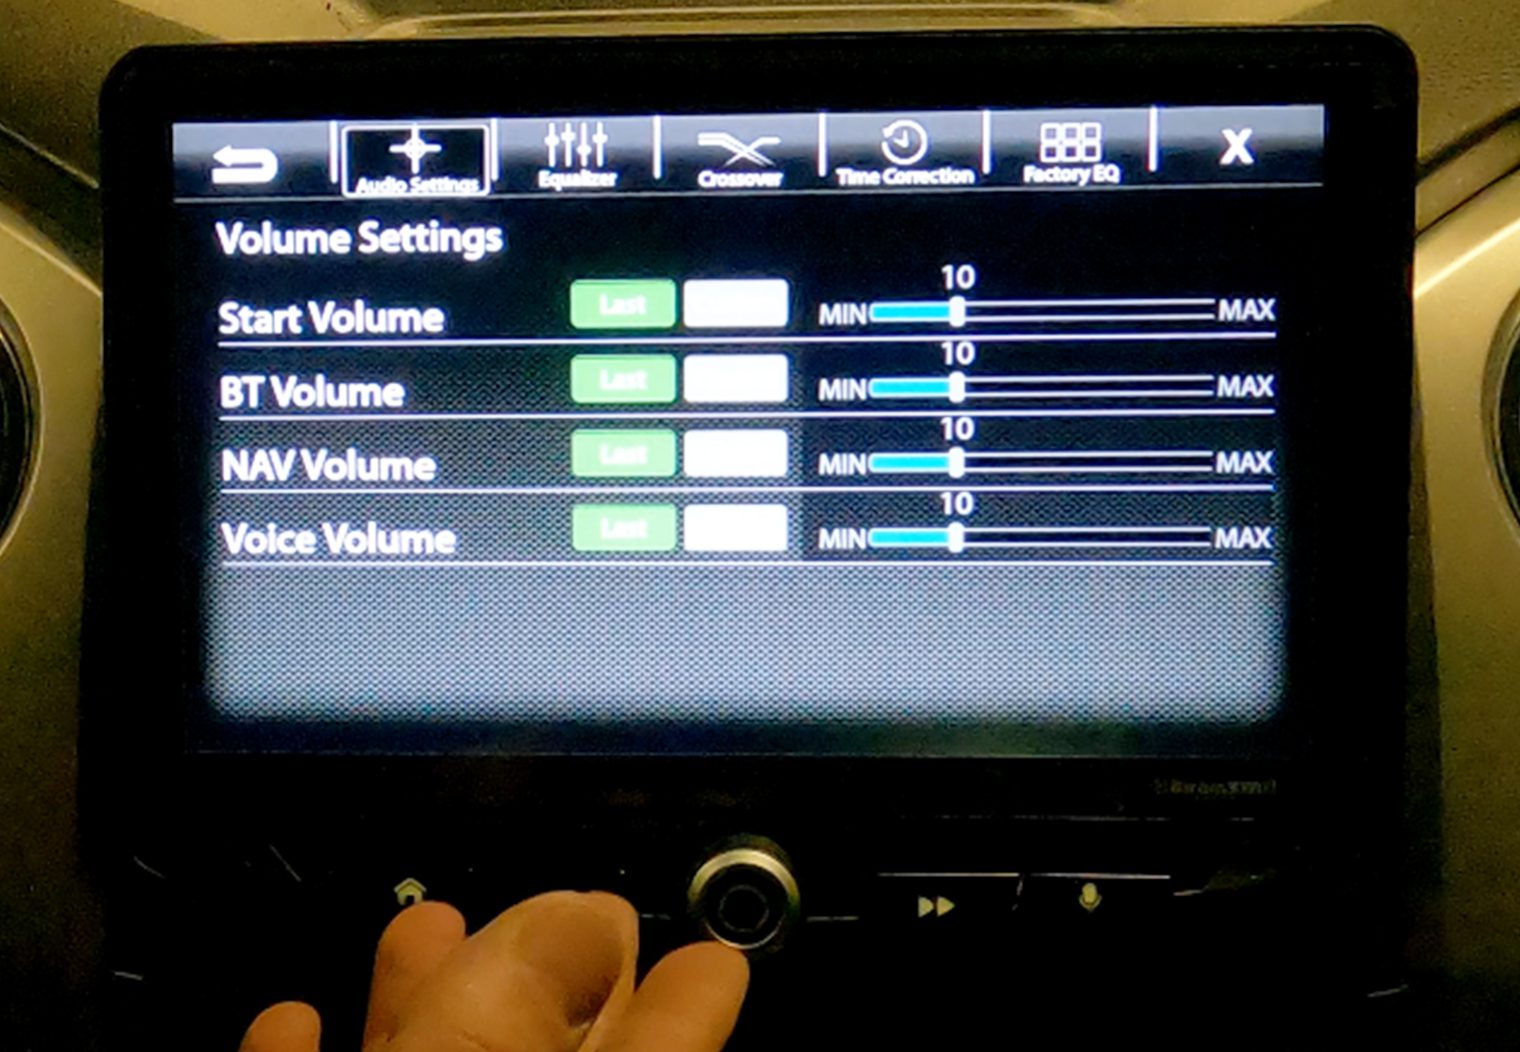
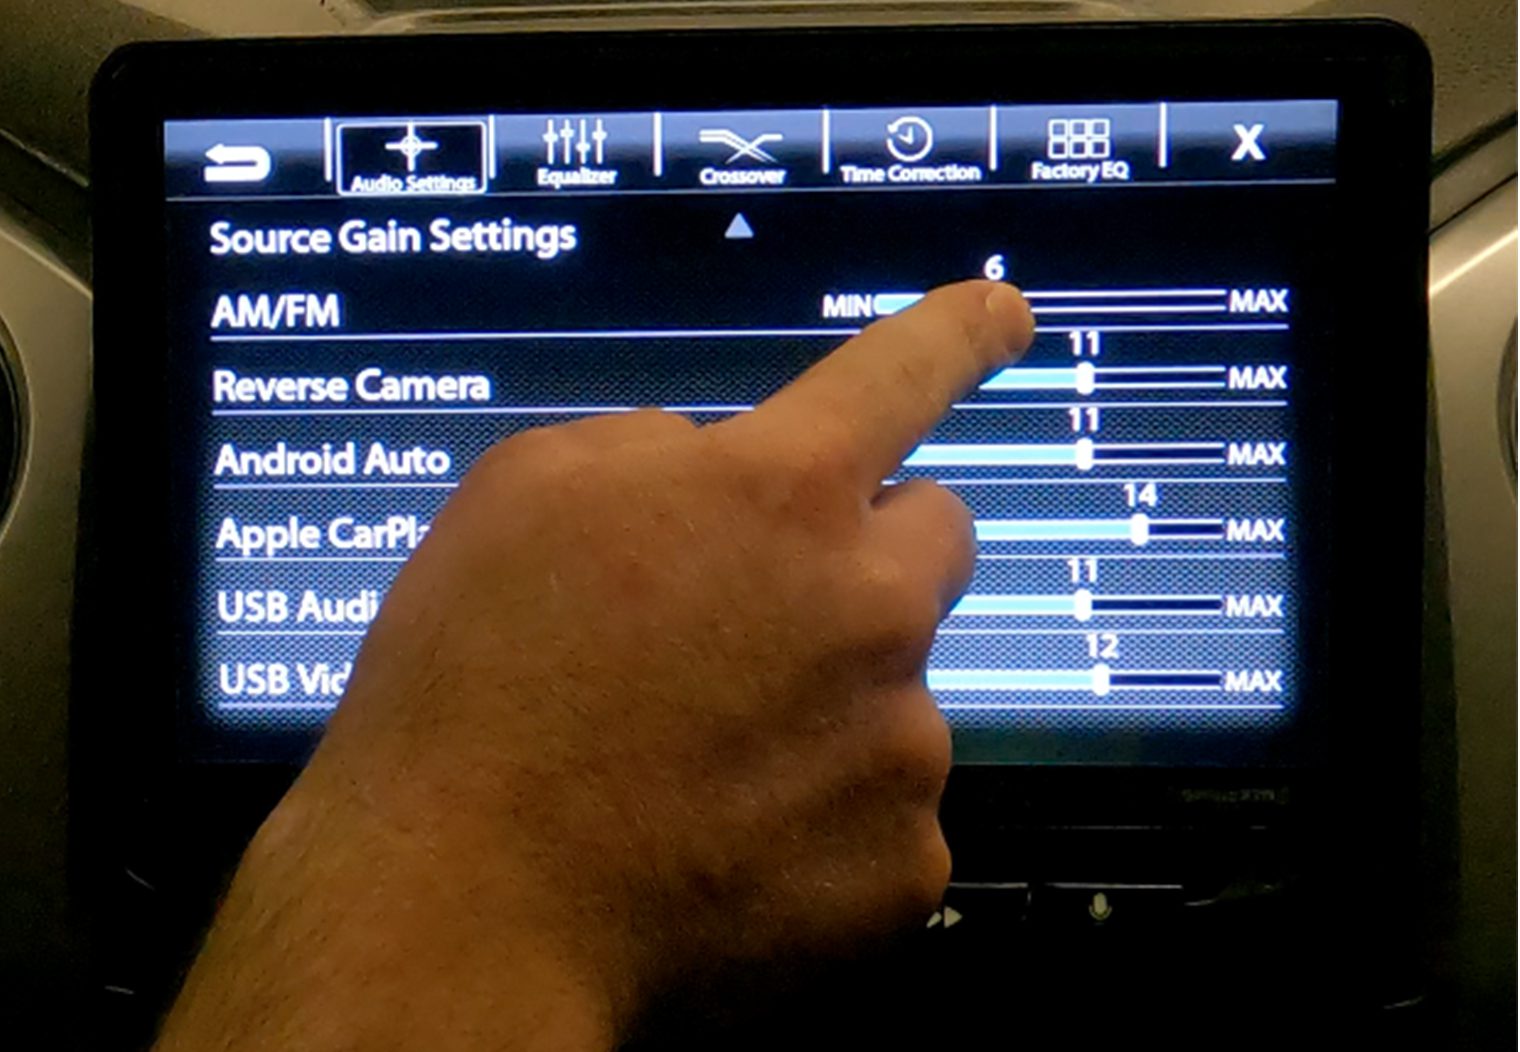
Something else worth calling out is the various source gain adjustments that Stinger gives you control over. By source gain adjustment, I mean the audio level for each of the various inputs that you might switch between on a normal drive – AM/FM radio, Apple CarPlay, HDMI, Bluetooth etc. The head unit also gives you control over your wireless phone call volume, navigation and voice volume too.
By giving you direct control over each of the various input source volumes, you can ensure a seamless volume experience when switching between them. For example, if you switch from Bluetooth to AM/FM radio without adjusting the volume, the volume levels can be adjusted to be the same (if for some reason they aren't). I've seen this issue in some older head units, where if you switch from Bluetooth to the radio source, sometimes the radio will be significantly louder. These configurations can help eliminate those fluctuations in volumes between sources. Although I personally didn't experience a significant difference in volume between sources when I tested, I still think this is a nice feature add.
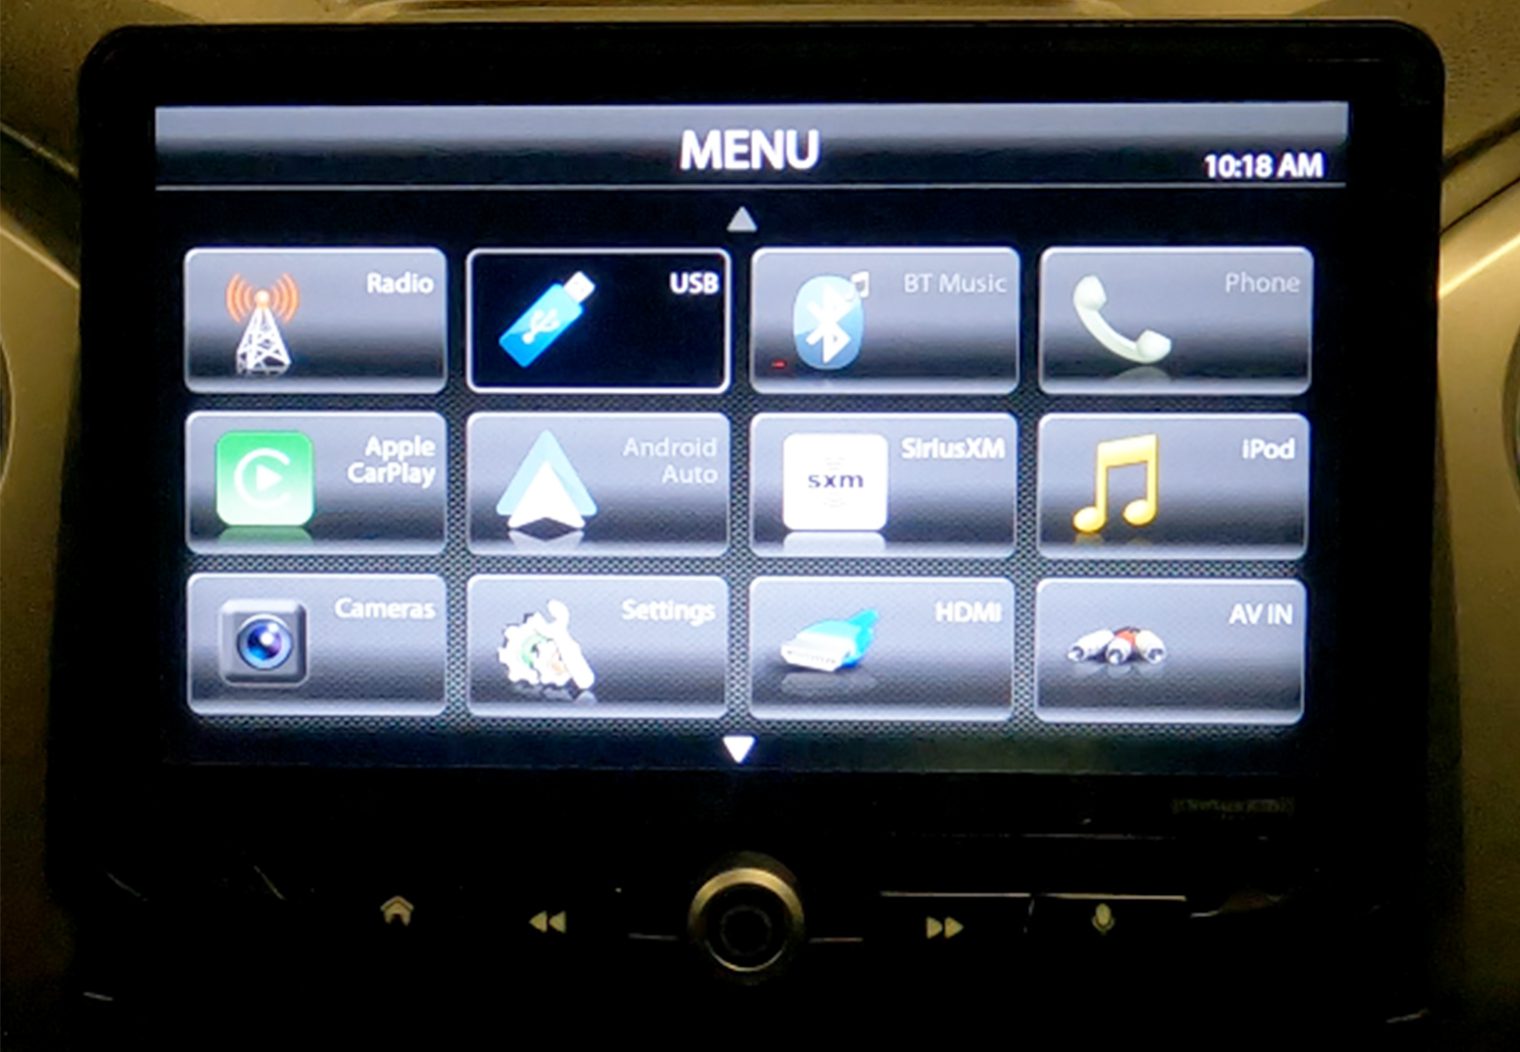
Connectivity
Expandability and connectivity on a $1000+ head unit needs to be a priority. Especially if you're interested in using it as a factory head unit replacement that'll integrate your OEM features but also add new connectivity features to your car. The Stinger HEIGH10 head unit has a variety of connectivity options that allow you to not only play your favorite music, it'll connect to your various video sources, Sirius XM radio and much more.
Bluetooth
I'll start with the basics. Stinger HEIGH10 has built-in Bluetooth 4.2, which'll allow you to make easy hands-free phone calls and stream audio from your phone or other Bluetooth-enabled device. This is a standard feature that you can pretty much find in all head units at this point. One thing worth noting related to streaming audio quality via Bluetooth – the unit supports aptX, which means you'll get CD-like audio quality (16-bit/44.1kHz) from your Bluetooth device (the device has to support aptX as well obviously).

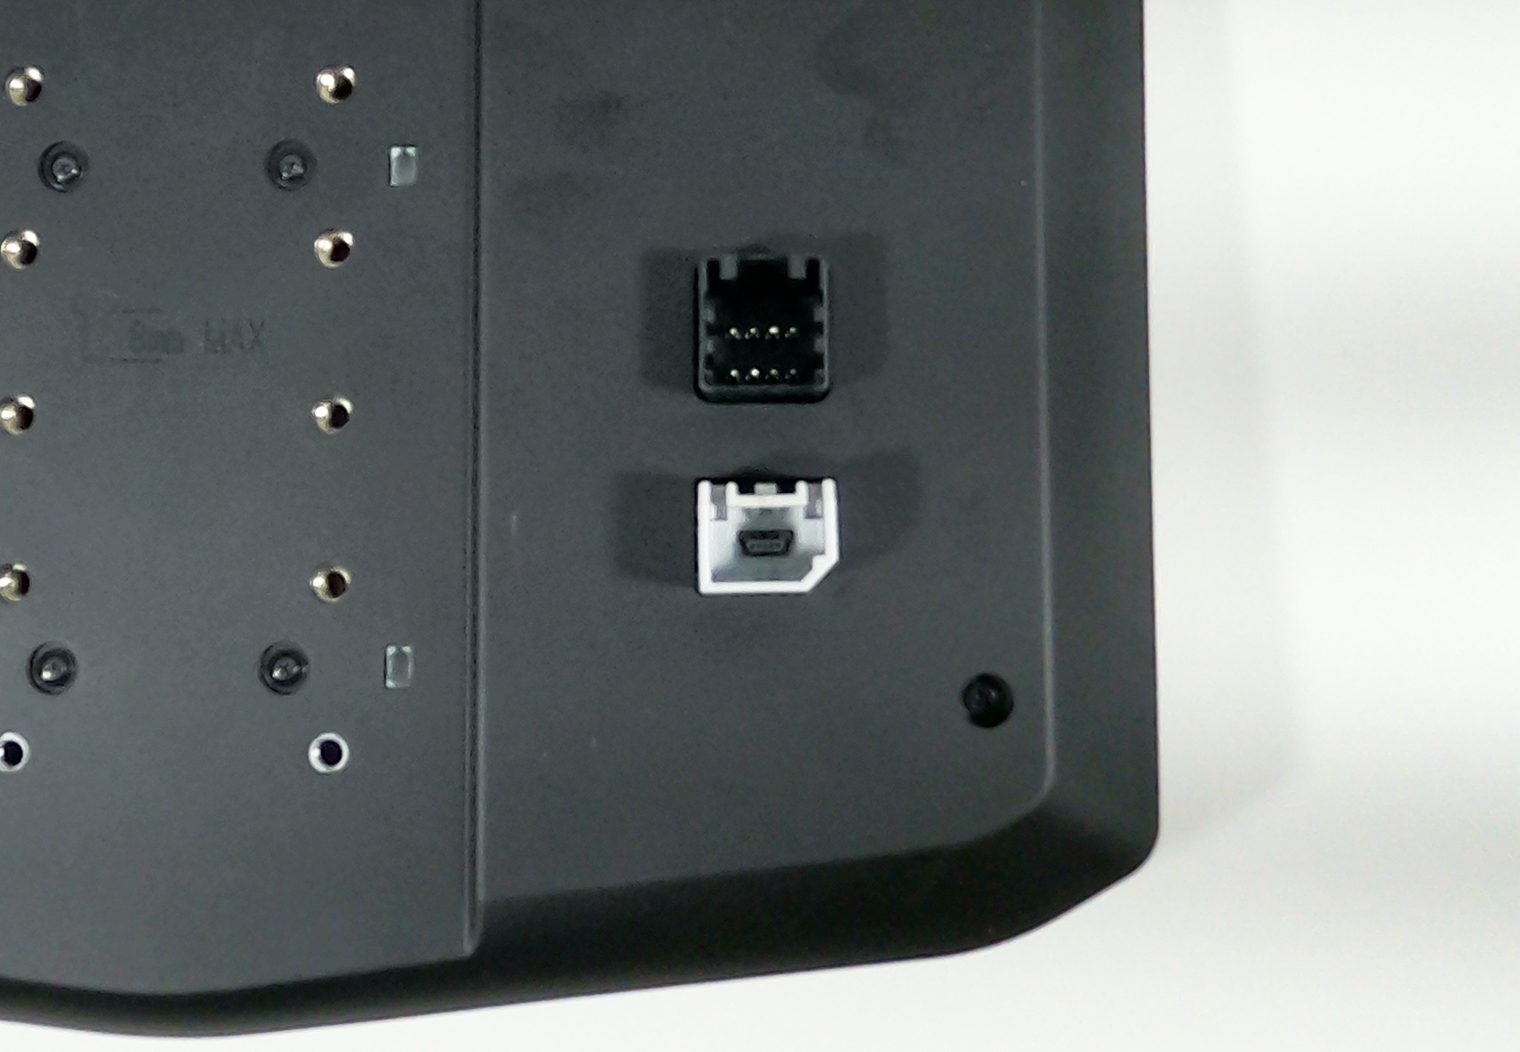
Dual USB Inputs
Another straight forward one, but also a necessity for many. The Stinger HEIGH10 also has dual USB ports on the rear side of the unit, which allows you to connect your phone, MSC (mass storage class) devices or other USB devices directly the head unit.
It's worth noting that the upper USB input is the only one that can be used for Apple CarPlay and Android Auto and MSC devices, while the bottom can used for MSC devices only. Also, no, you cannot use your iPhone to play video via USB. You'll need to leverage the A/V input or HDMI input for that.
With your USB device plugged in, you can access the directory of audio, video and imagery files via the interface and navigate through the structure of your USB drive, making it easy to find the media you're looking for. Compatible file formats include:
- Audio Files: MP3, WMA, AAC, FLAC, WAV, and OGG (up to 48kHz)
- Video Files: AVI, MPEG 1/2/4, MOV, FLV, and VOB (up to 1080p)
- Photo Files: JPEG, GIF, PNG, and BMP (up to 1024 x 600)

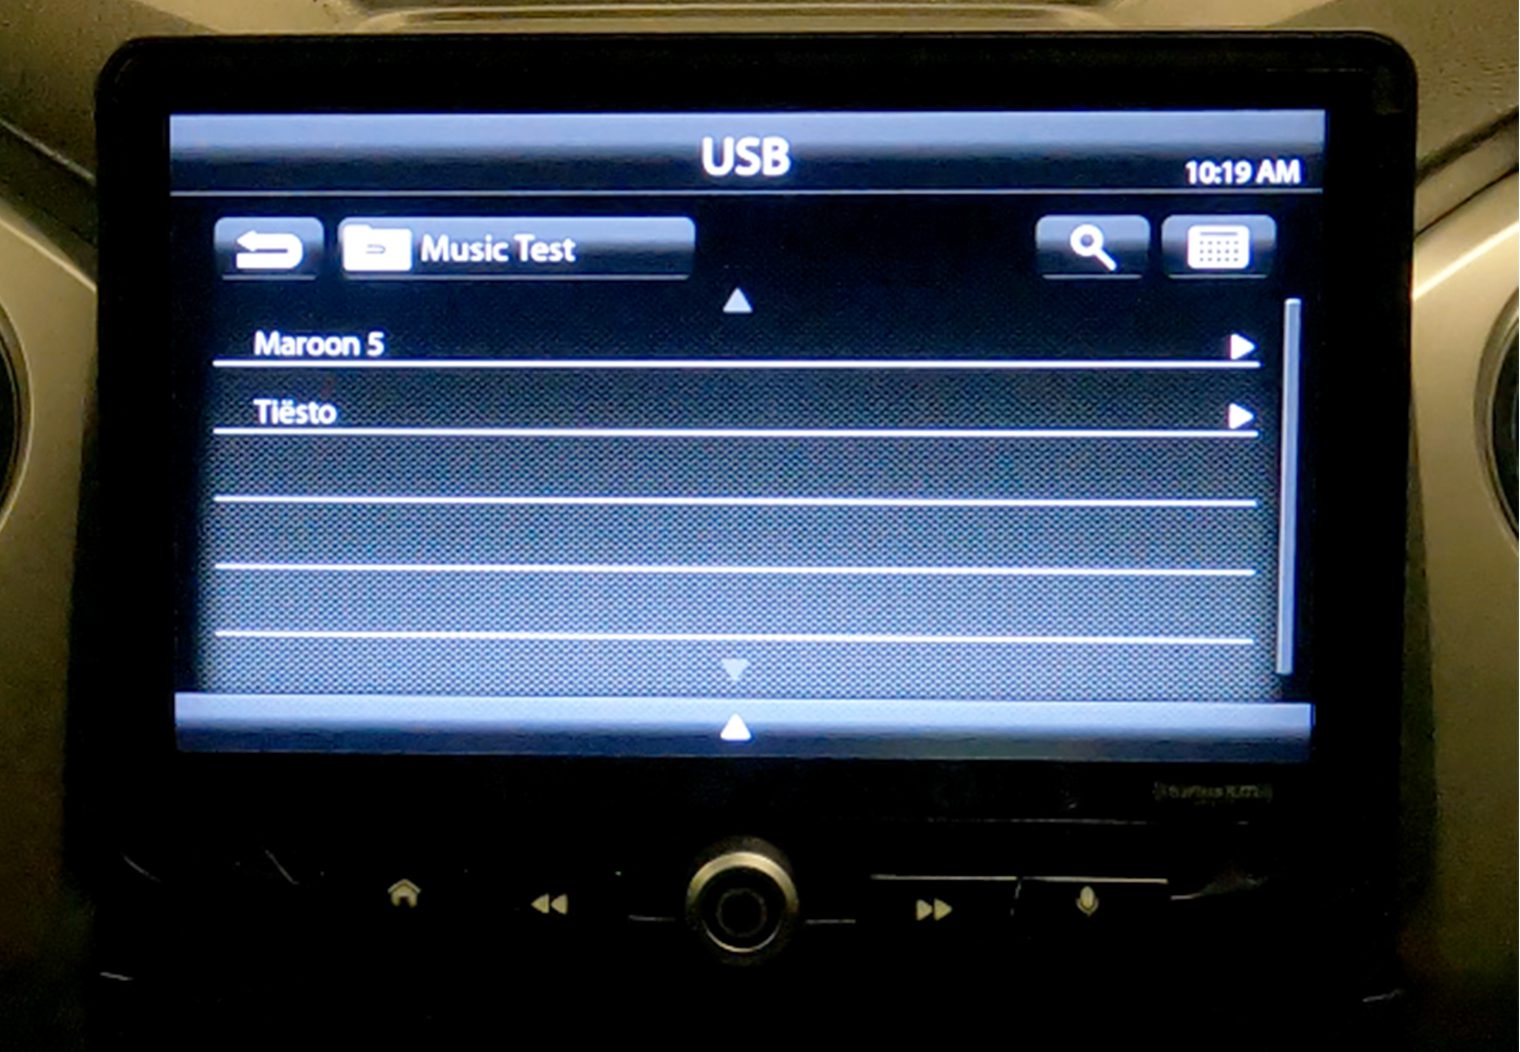
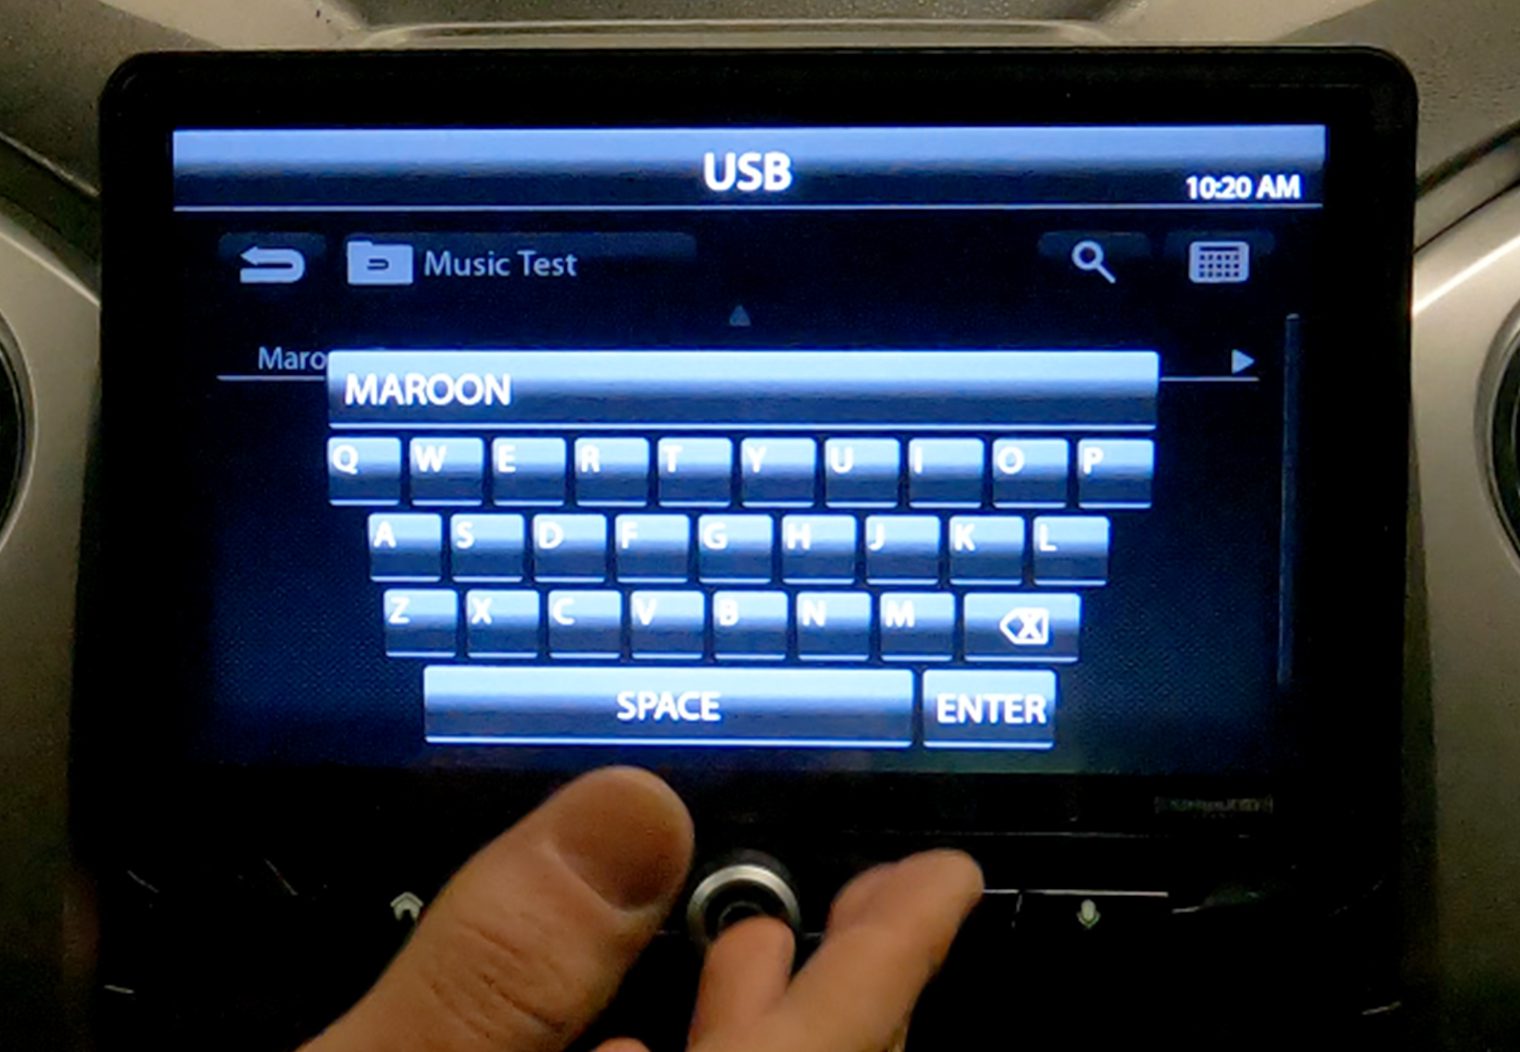

I thought that the video quality via USB was fantastic. Depending on the format and quality of the video file you're playing, its equal to, if not better than HDMI. I also particularly like the search functionality that allows you to type and search for the file/folder that you're looking for when browsing the usb drive folder structure.
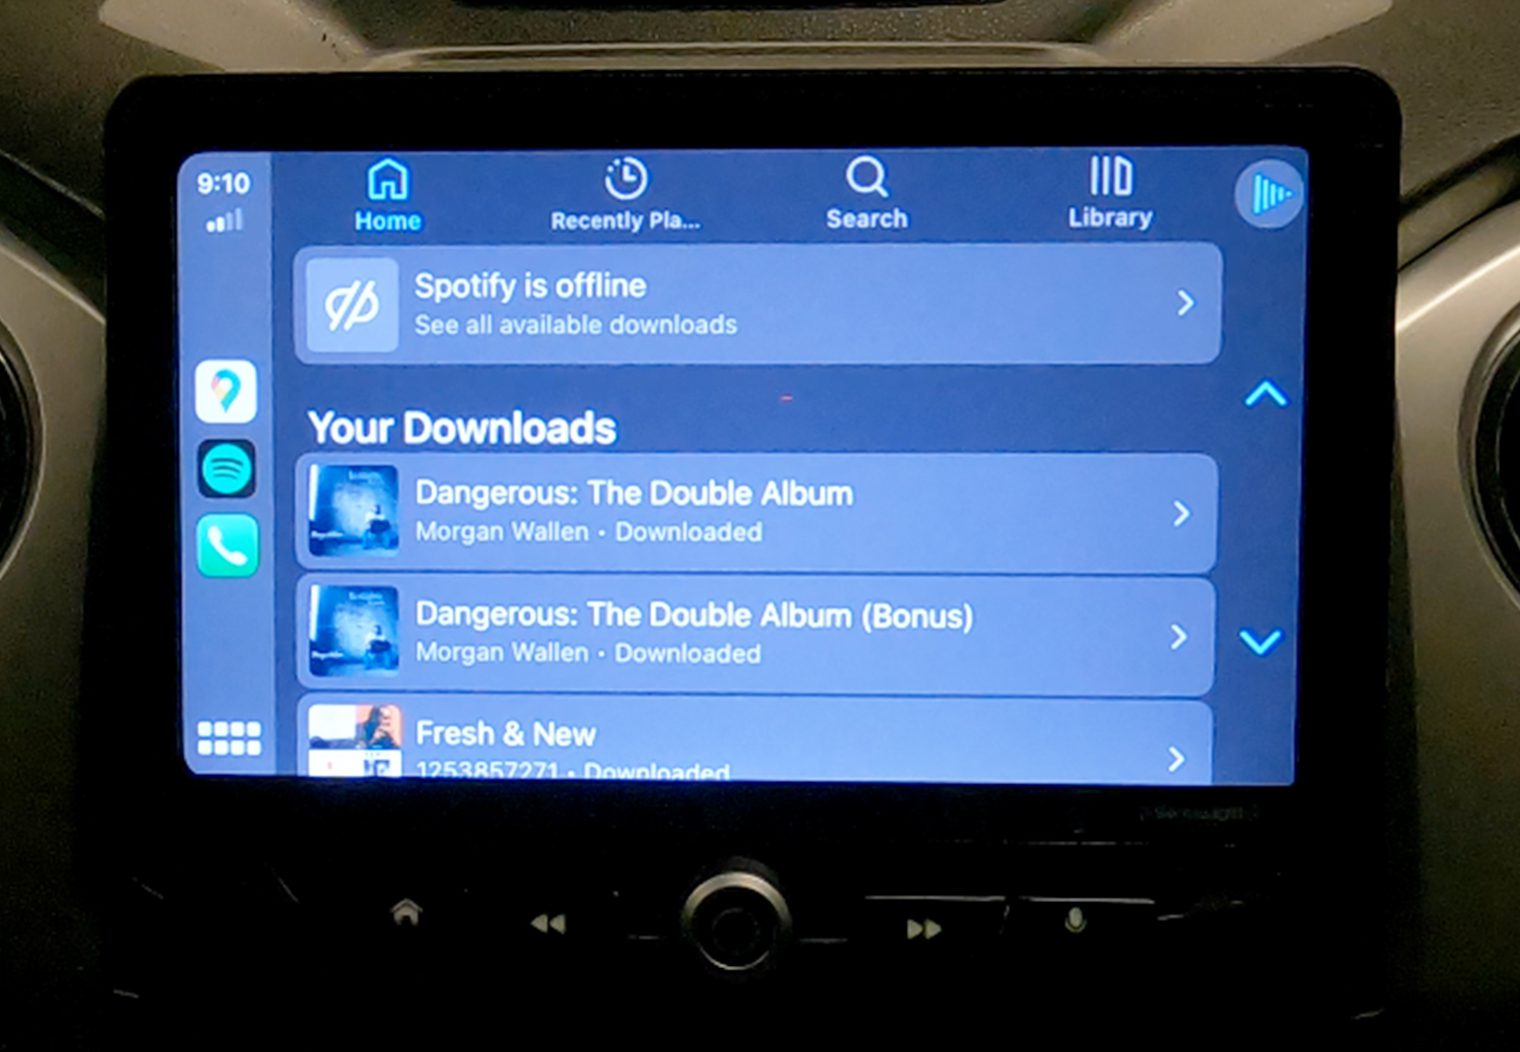
Music Streaming Services
If you're looking to use one of your favorite streaming services to play music (like most of us do today), this is obviously critical. The HEIGH10 is compatible with a variety of music streaming services, including Pandora, Spotify, and Apple Music and more via Bluetooth or USB connection. It relies on your phone or media device for the source of streaming music, meaning you'll need the app to be on your phone. I prefer to use Apple CarPlay or Android Auto via USB to ensure the best streaming quality and consistency.
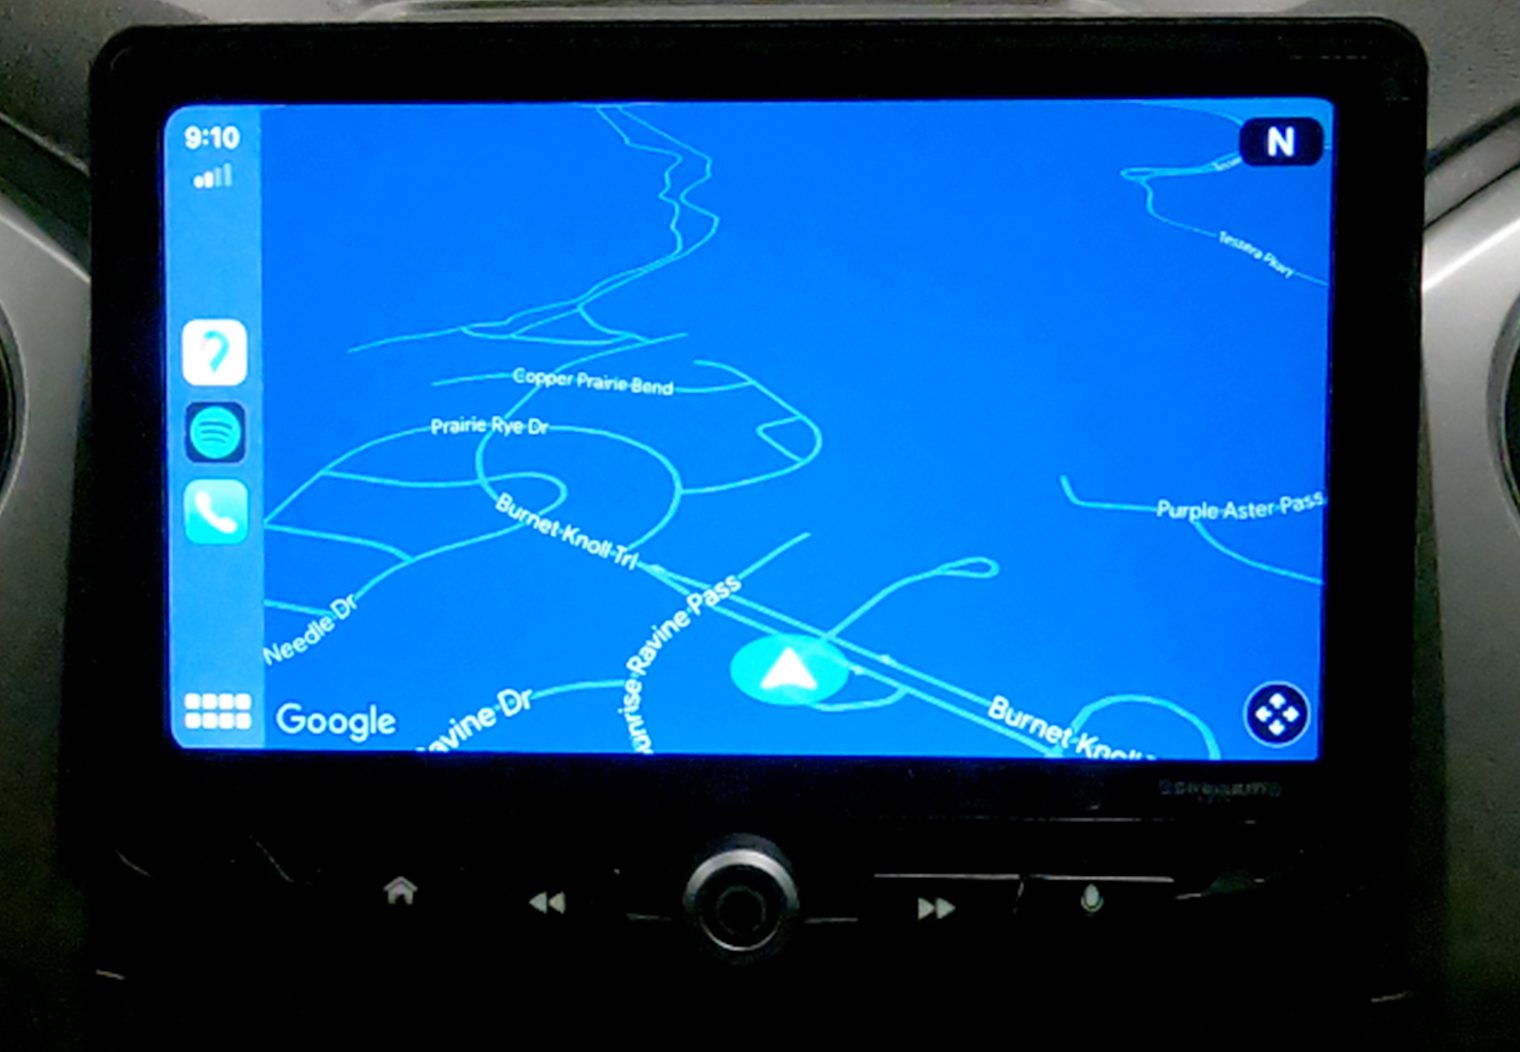
GPS Navigation
One feature that the Stinger HEIGH10 comes with that you don't see on too many units today is a built-in navigation system. Most touchscreen head units today leverage Apple CarPlay or Android Auto to enable navigation, but the HEIGH10 also comes with navigation and maps built-in to the interface. This is a convenient way to get directions to your destination and find nearby points of interest, like gas stations, restaurants, and more without the need to connect an iPhone or Android phone.
Video Playback
Video playback is one of the more attractive features of the HEIGH10. It has a few options that enable you to watch video content directly on the unit (while parked of course). This includes both an HDMI input and A/V input on the back of the unit, making it compatible with virtually any and every source of video including:
- Game consoles
- DVD players
- iPhones and Android Phones (via adapters)
- + many more
Additionally, the unit also includes A/V outputs to expand your various video input sources to other screens like headrest monitors or flip down monitors.
I put the HDMI input to the test, using an HDMI to Lightning adapter with my iPhone to cast the screen and play video. By default, the phone will mirror the contents of the phone directly to the unit. But when you use an app like Netflix, YouTube or YouTube TV and play a video, it will automatically orient the video on the screen and adjust the resolution.
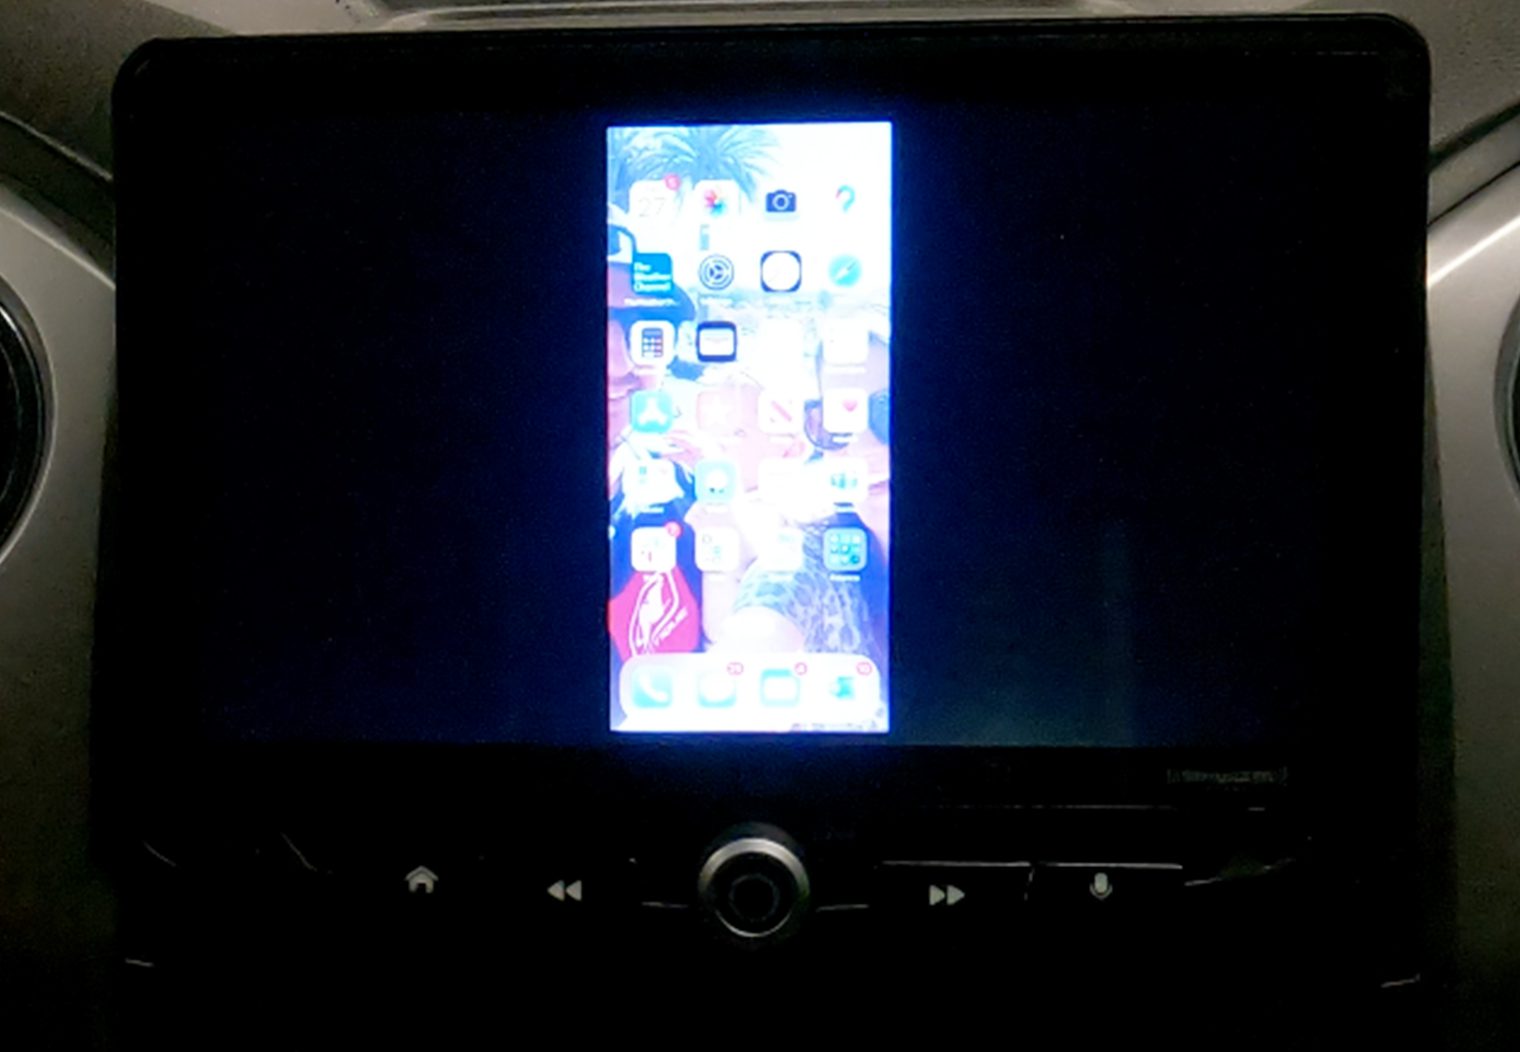
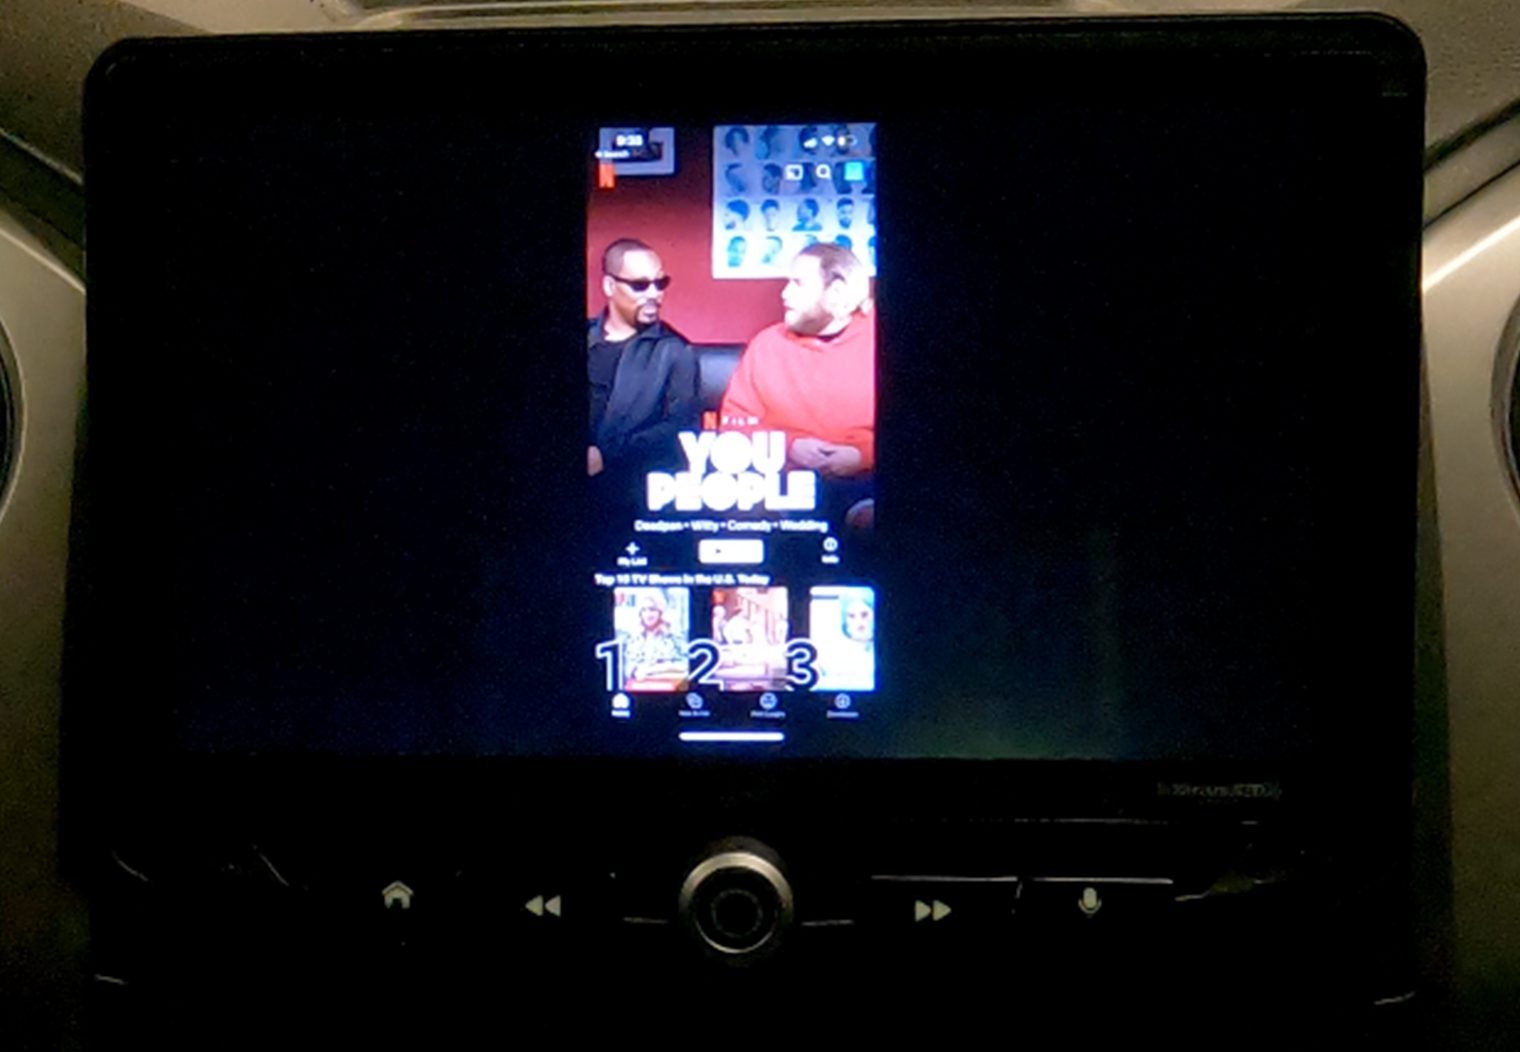
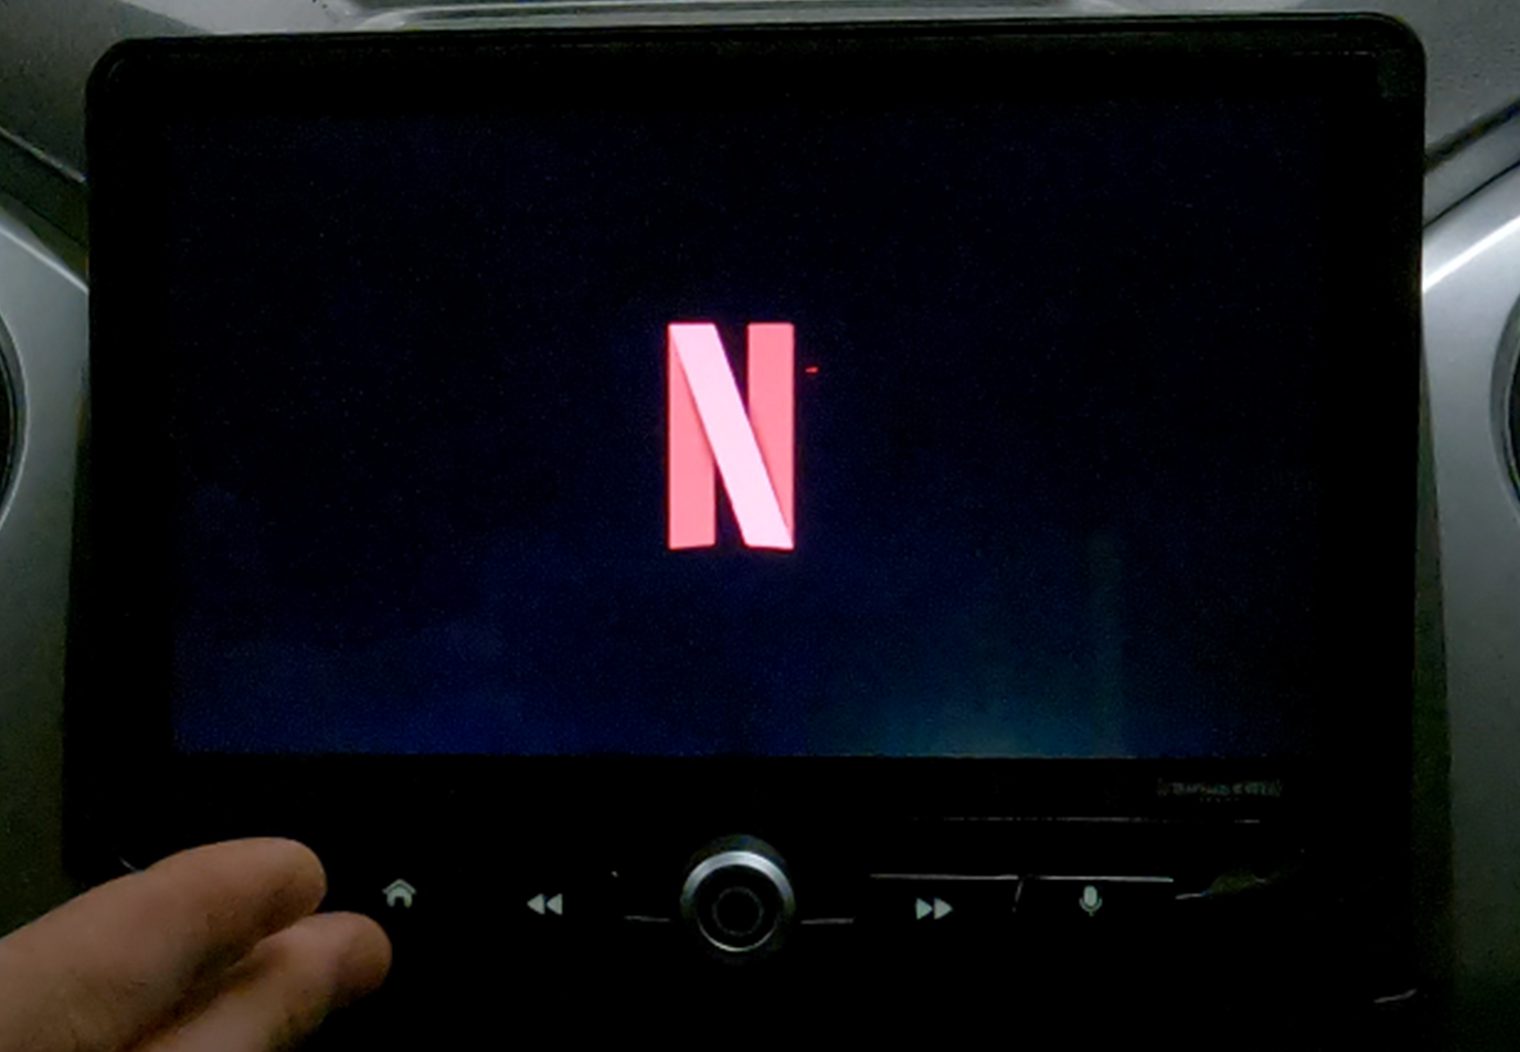

I thought the screen resolution while playing video was excellent. This is a high-resolution head unit screen and the quality is fantastic. I was very pleased with the image quality.
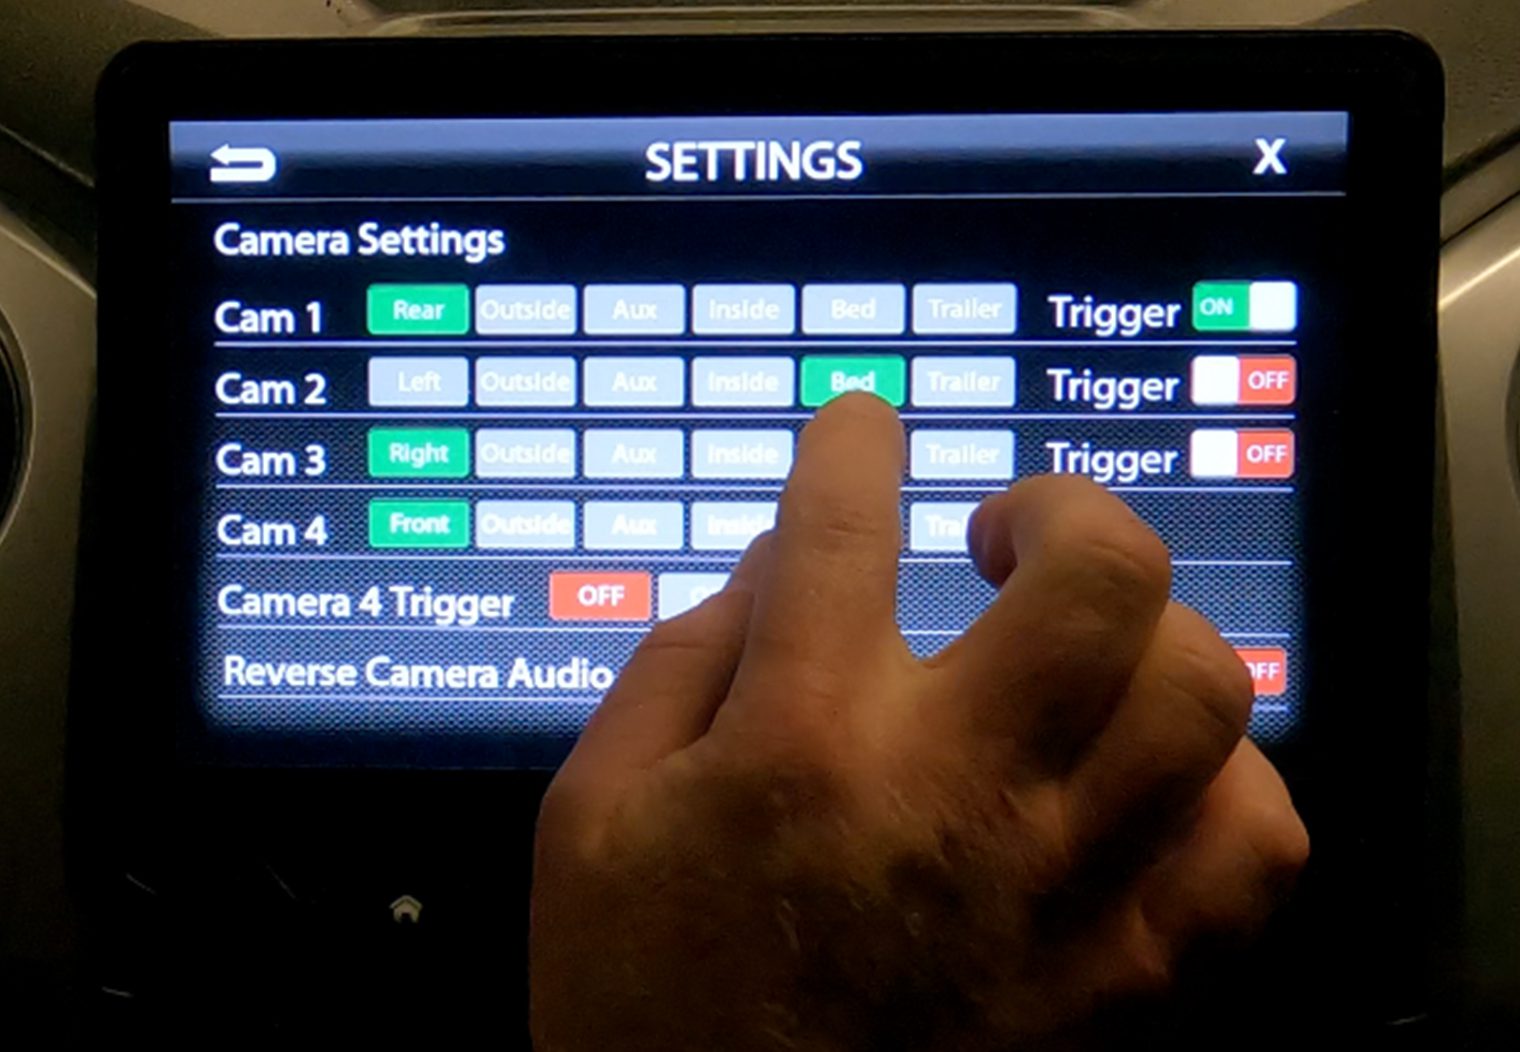
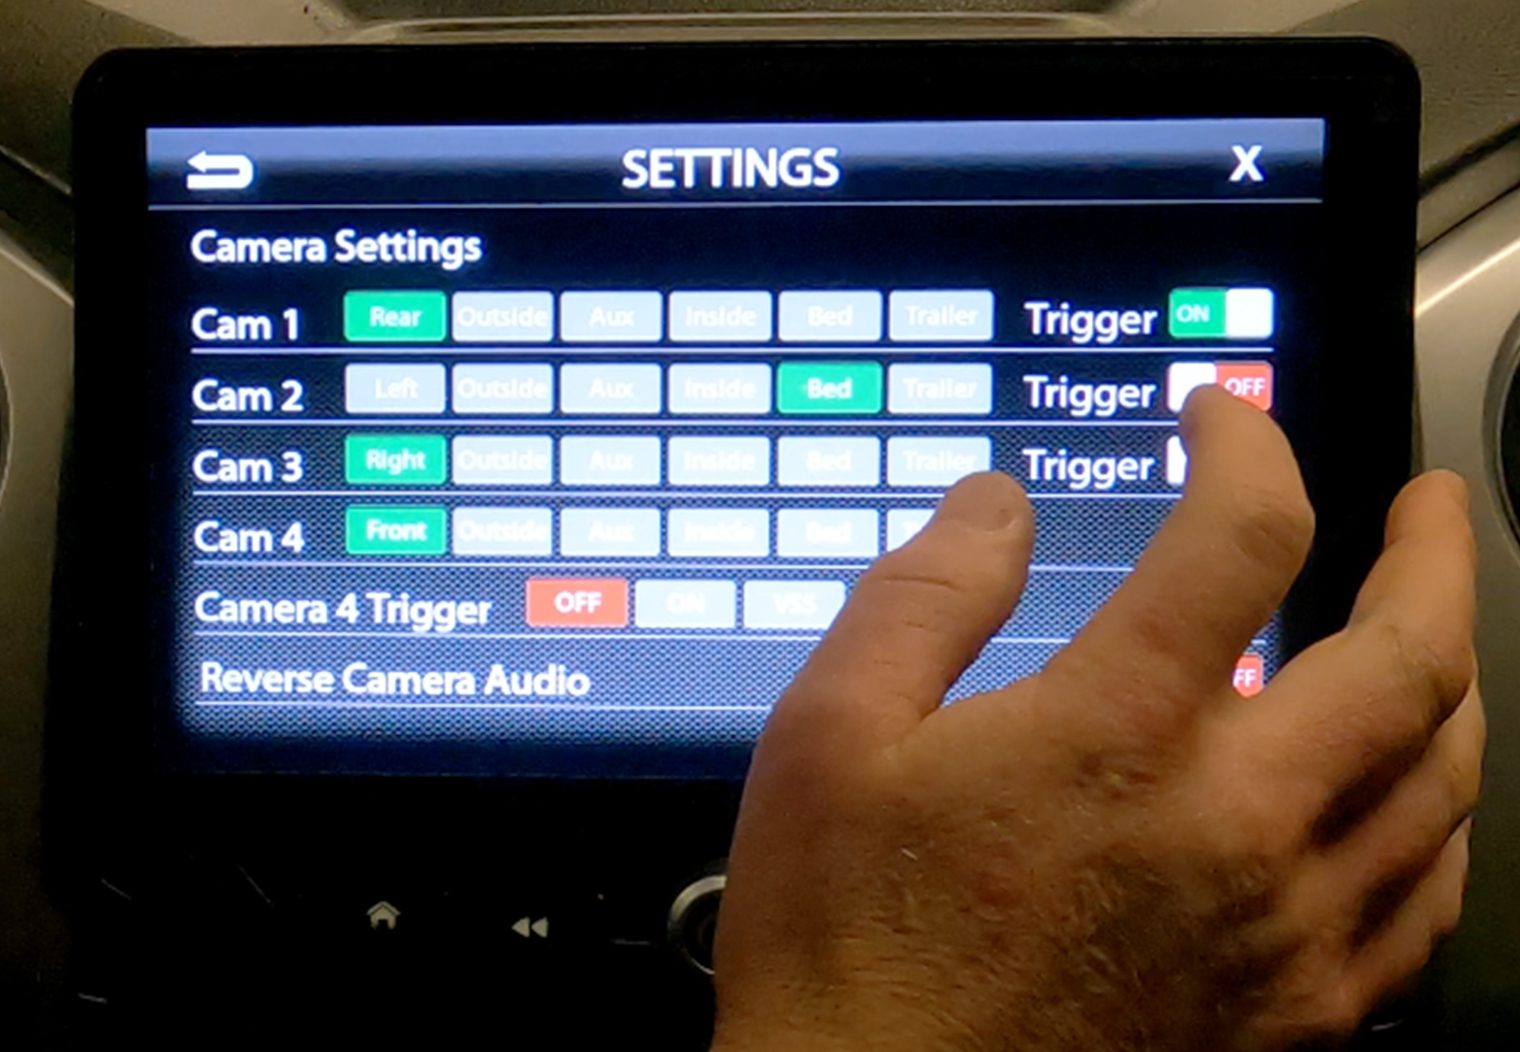
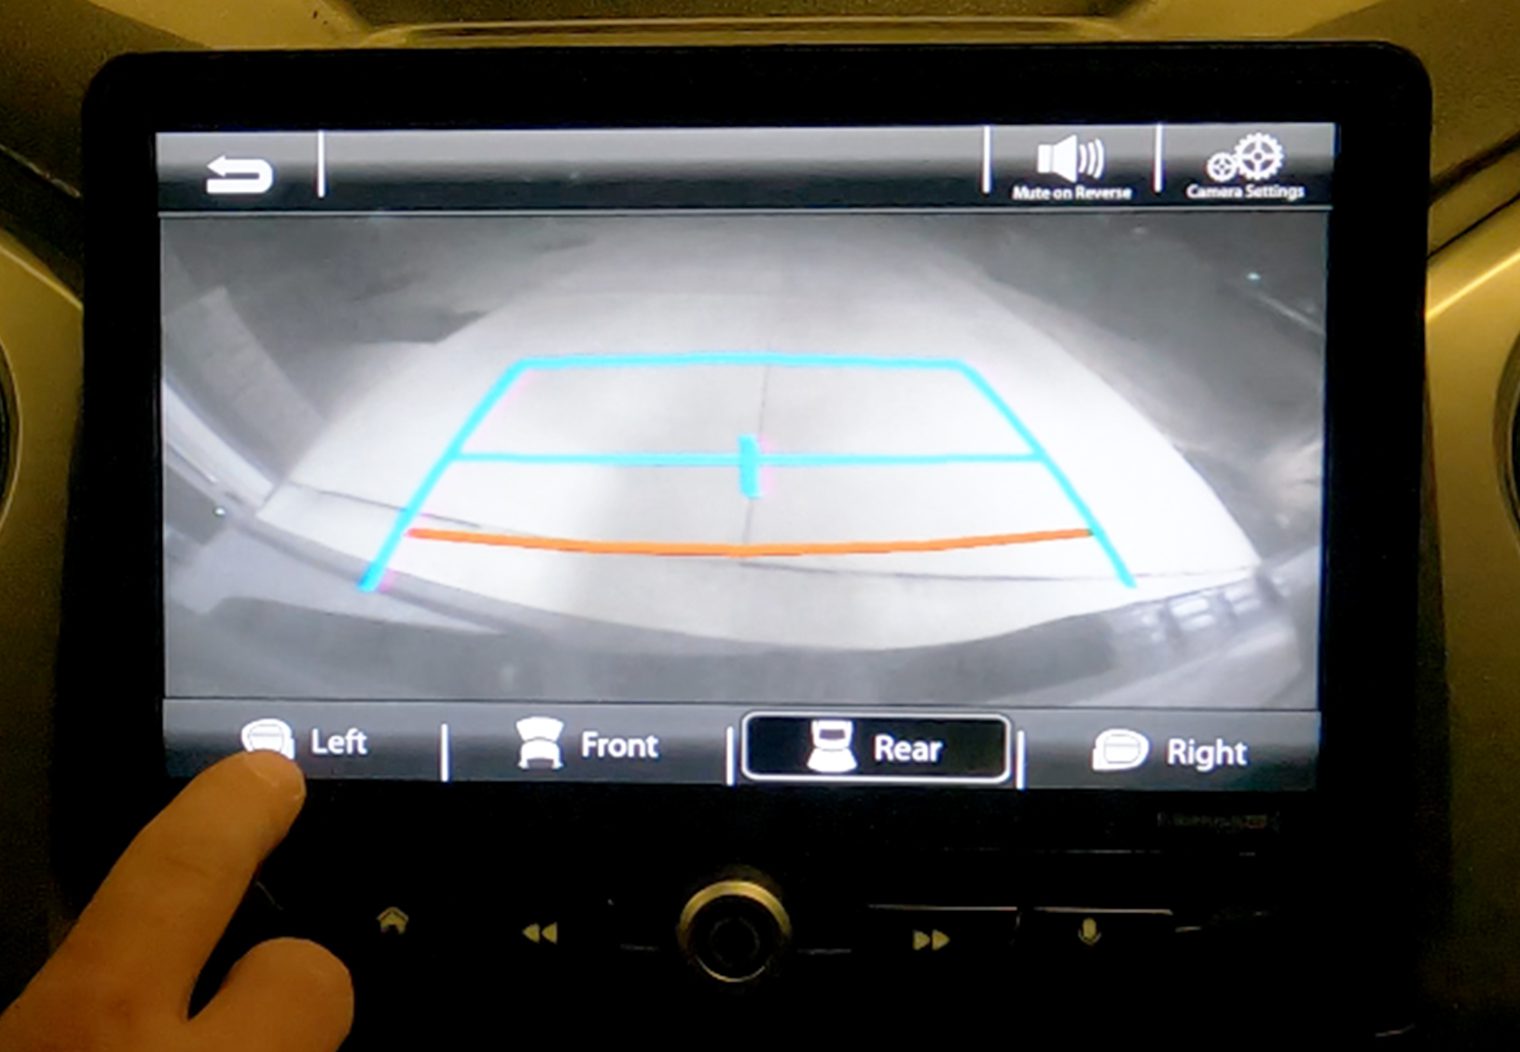
4 Camera Inputs
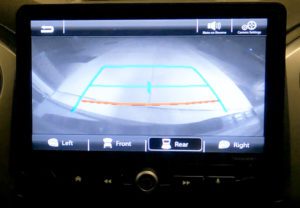
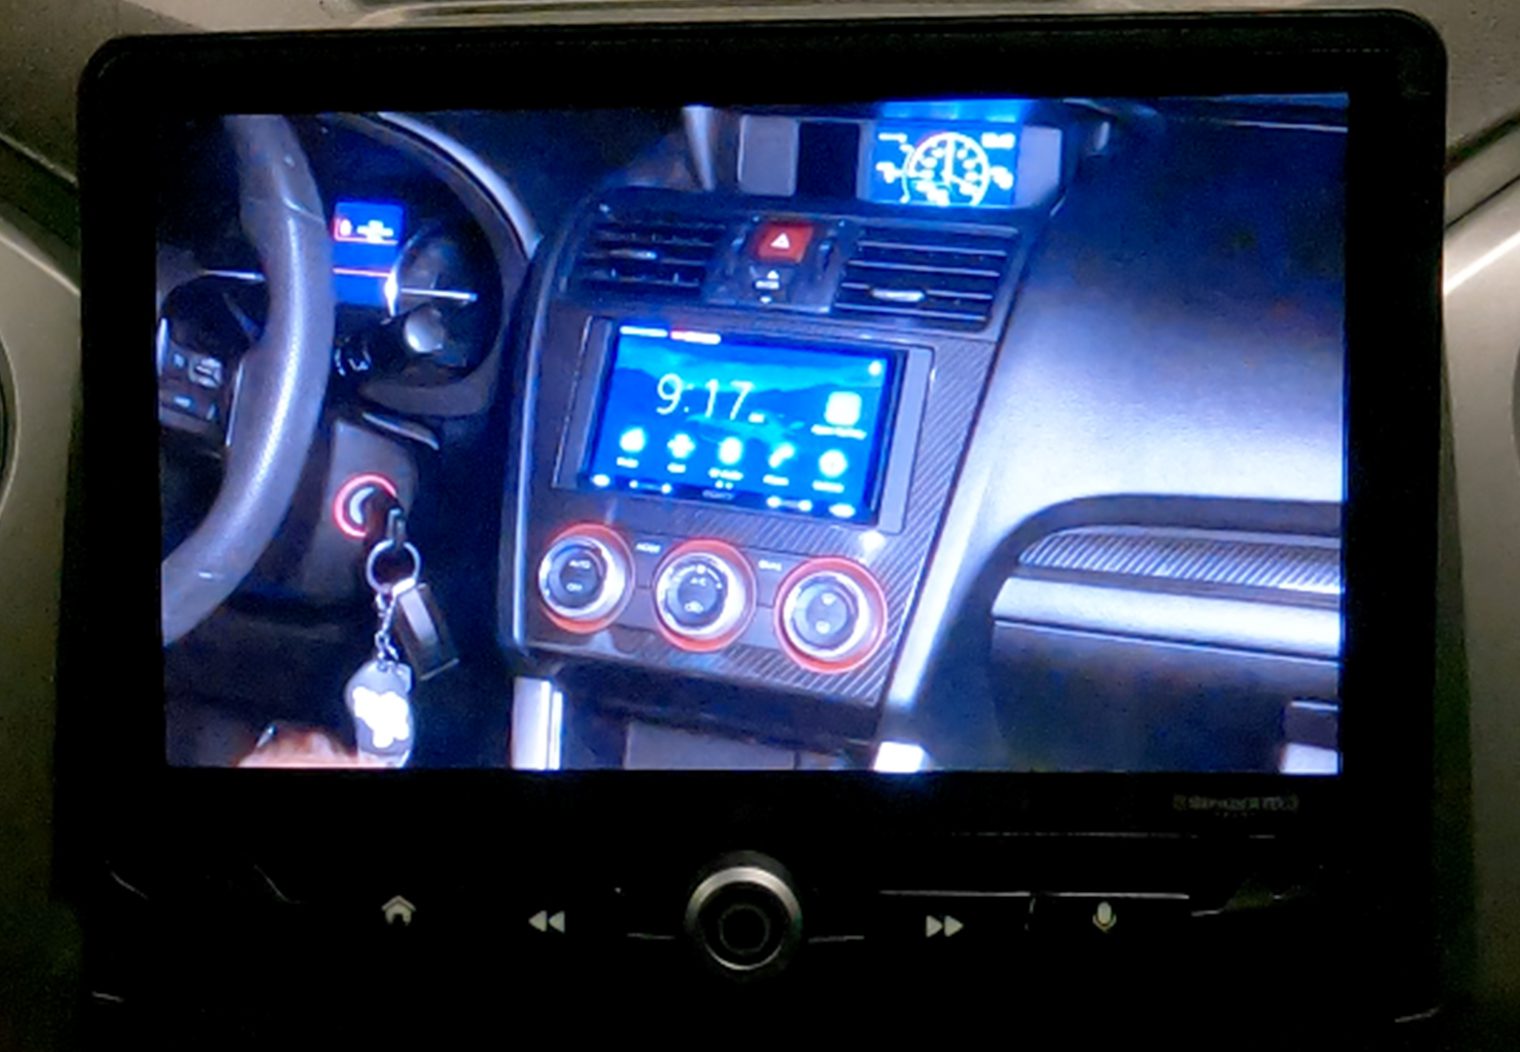
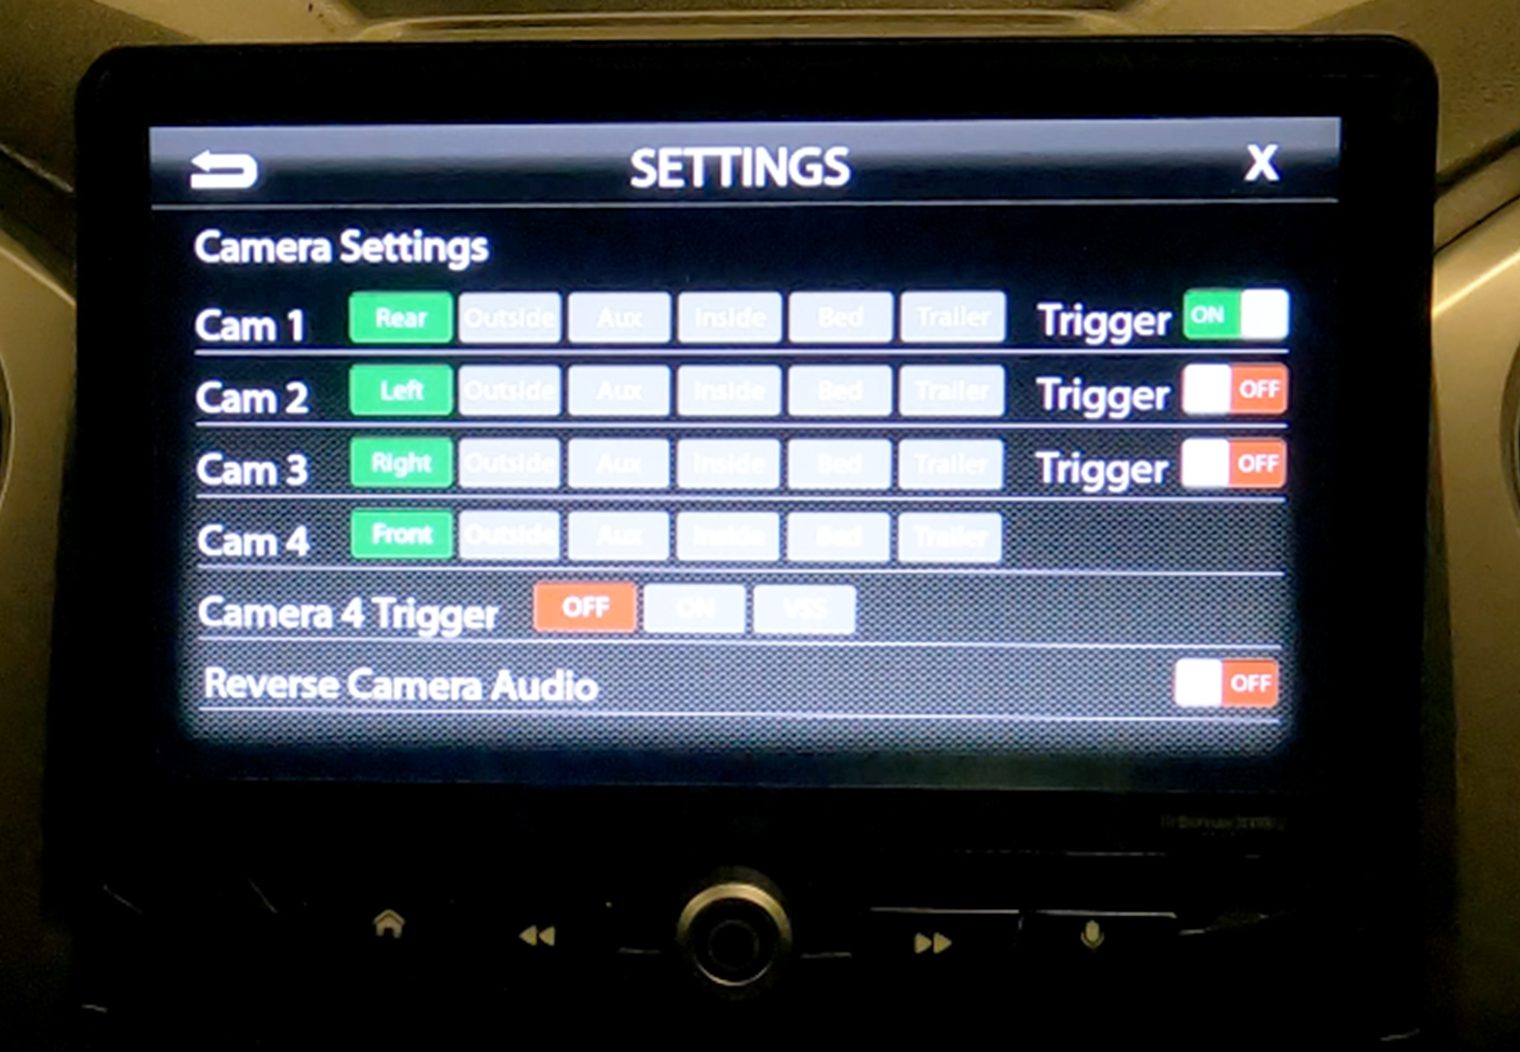
The HEIGH10 is outfitted with a total of 4 camera inputs. Each of the inputs have their own dedicated video jack (RCA) input. One input is dedicated to a backup camera, which will use the reverse wire to trigger it to show while the other 3 camera inputs have their own dedicated 12v trigger wires. This is a HUGE upgrade for someone who wants to add a front view camera, bed camera or sideview cameras for offroading, rock crawling or just parking in a normal parking lot. Personally, having a front view of my F-150 comes in handy on a daily basis and I couldn't imagine having a truck without it now. The camera images will display directly on the monitor when they're triggered.
What I loved about the camera interface is that you can customize the location for each of the 4 camera inputs (e.g. rear, left, right, bed, interior, etc) and whether or not you want them to use a wired trigger. With the trigger set to the ‘ON' position, anytime the head unit senses a 12v signal for the camera (wired separately), it'll automatically appear on the screen.
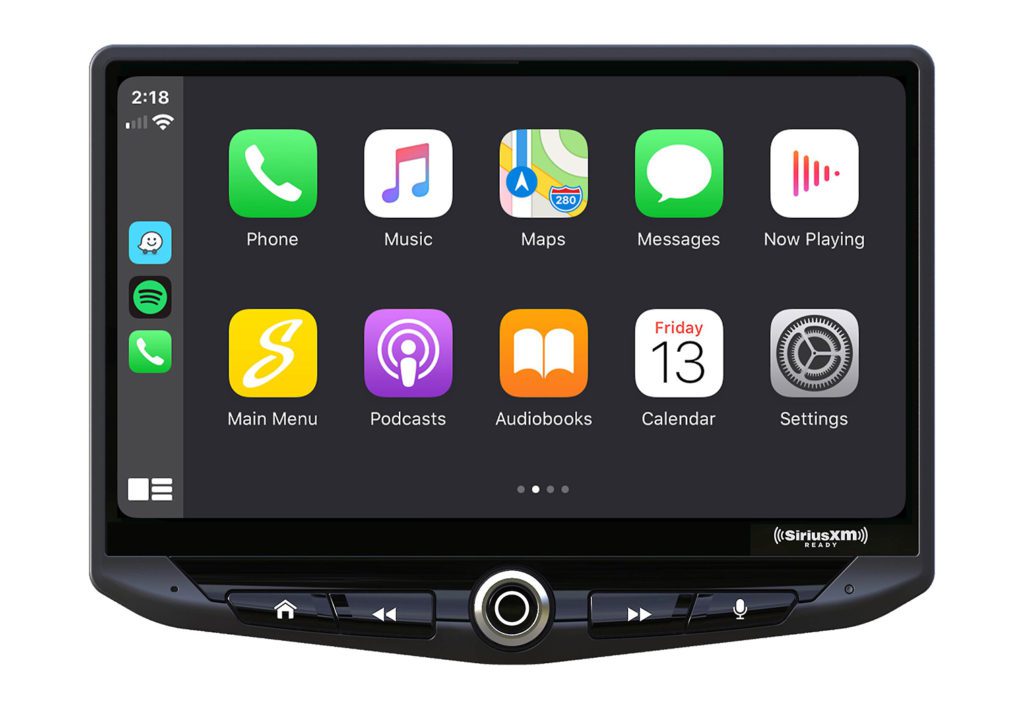
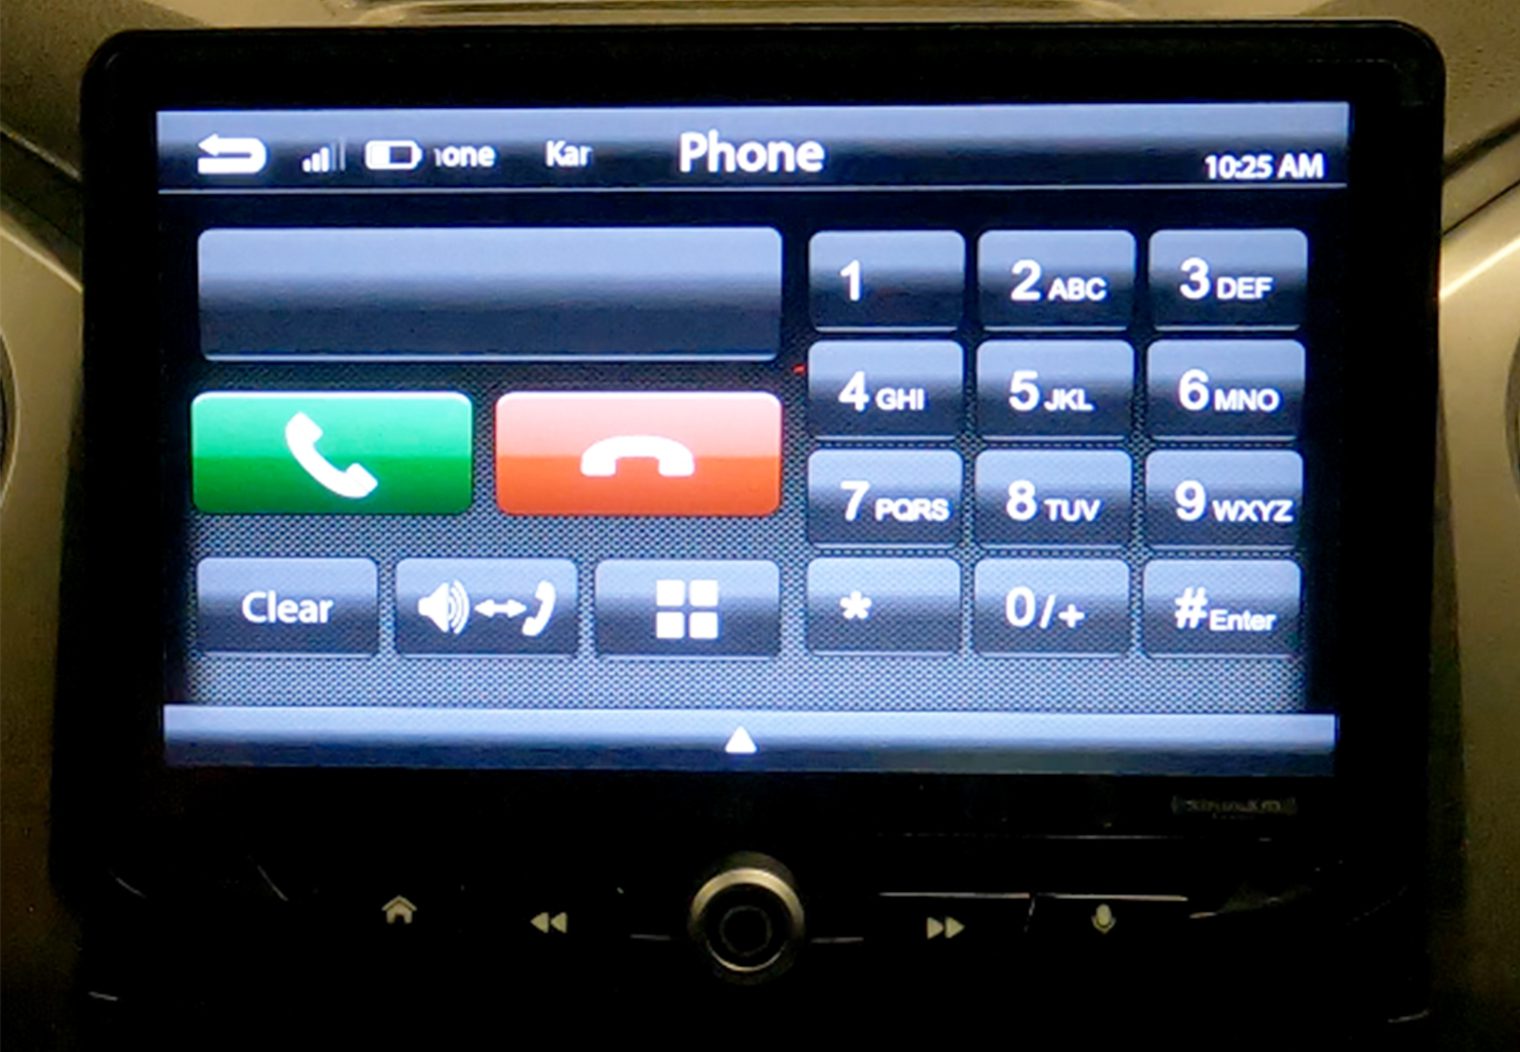
Apple CarPlay & Android Auto
Apple CarPlay and Android Auto is supported on the HEIGH10 via a wired connection. It does not offer wireless CarPlay or Android Auto at this time but if you wanted to add it, you could simply purchase one of our recommended Wireless Apple CarPlay & Android Auto Adapters. Apple CarPlay and Android Auto are virtually the same across all head units so I will not be reviewing their functionality. I will note that the connection was quick and I did not experience any delays, freezing or any other abnormal experience with the head unit while using Apple CarPlay. **Note I was only able to test using an iPhone**
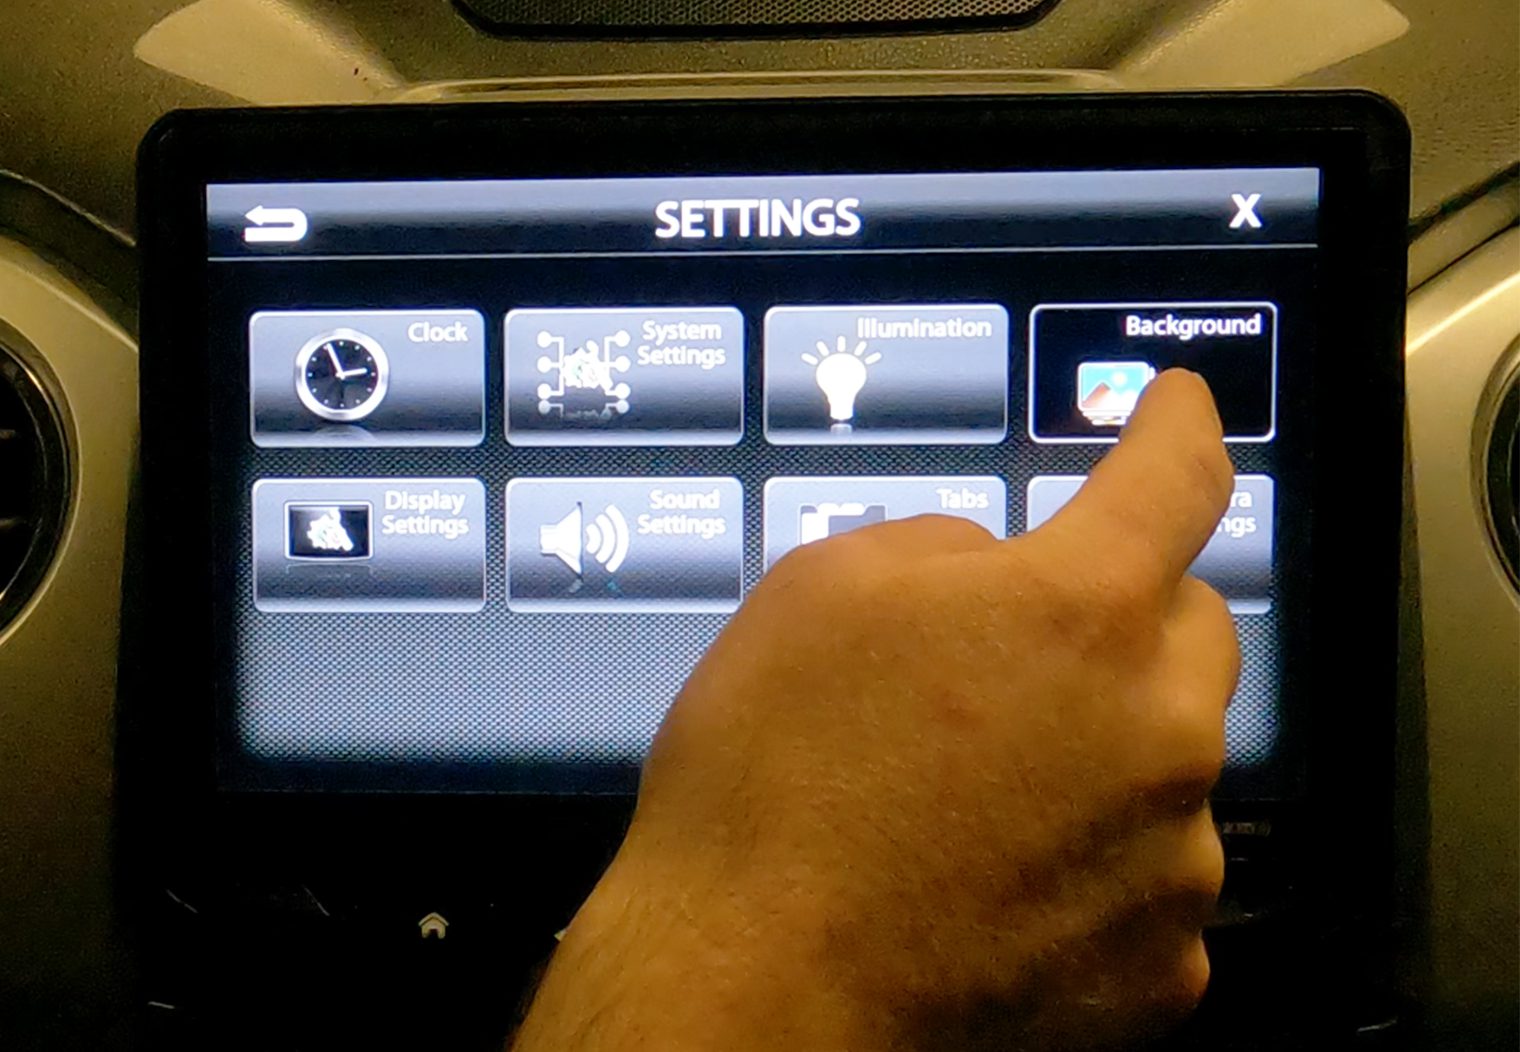
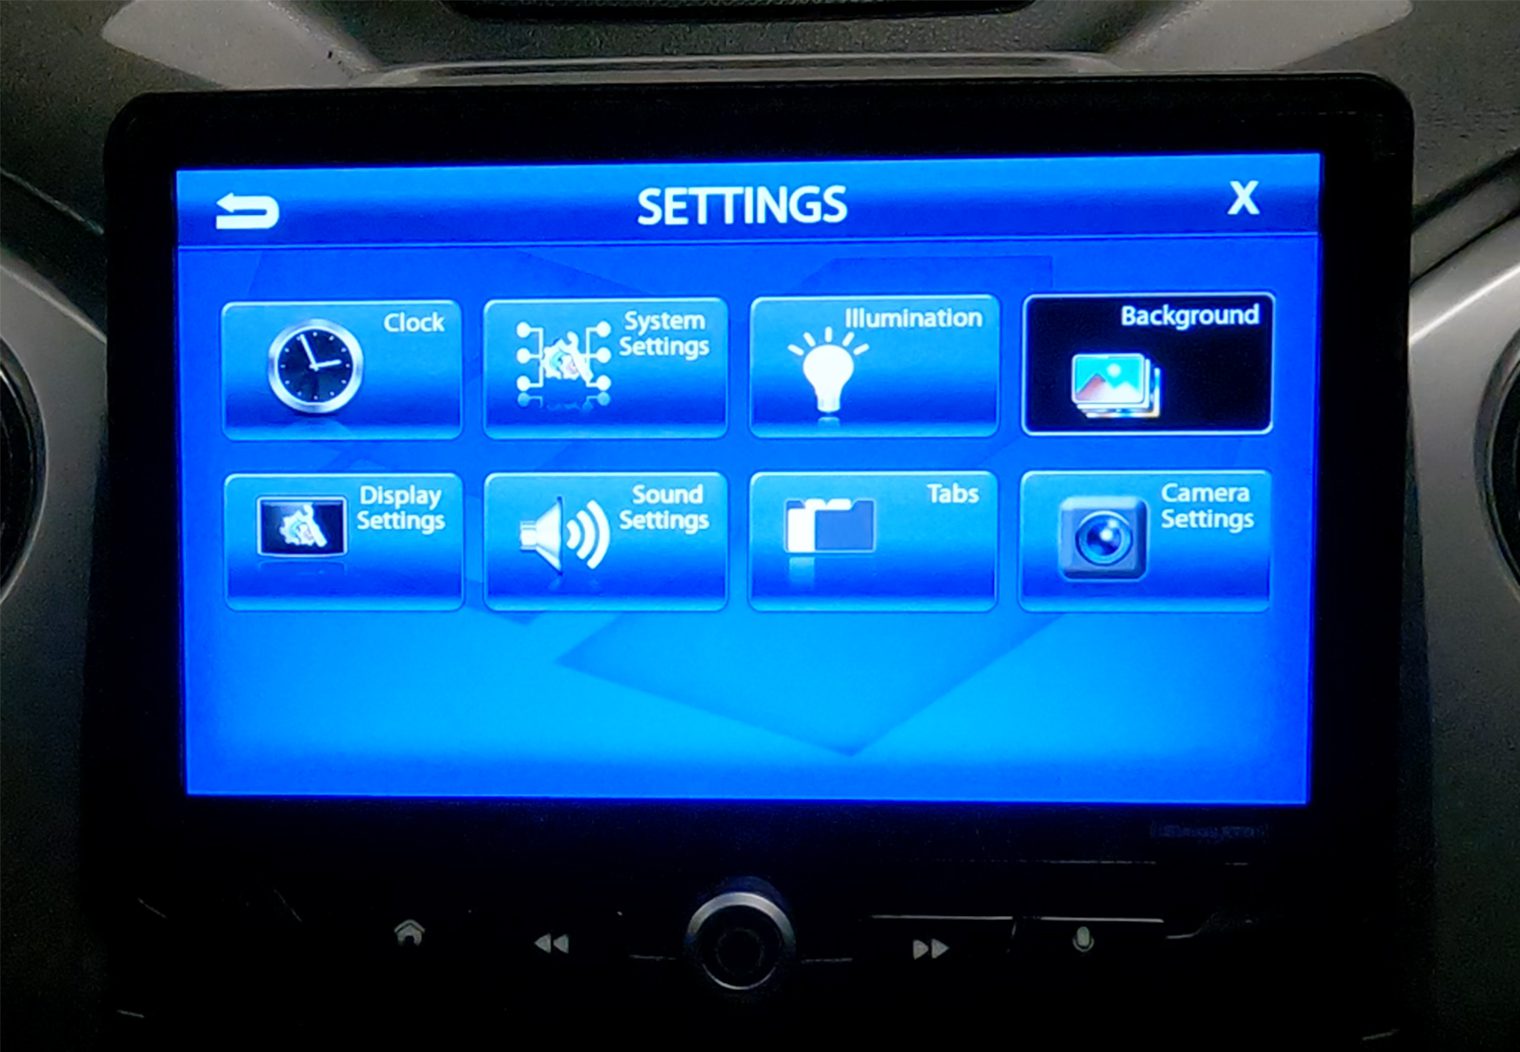
Customization Features
I like to personalize my own head units to make them feel more integrated with the vehicle, and of course, personalized. Homescreen personalization, background imagery and color schemes are some of the key things that I look at in a head unit to cover off on the basics of what I'd consider a ‘personalized' head unit.
Stinger's HEIGH10 offers a few ways to customize/personalize the head unit to your liking:
- Homescreen Icons – Customize the order and location of the various input sources however you deem fit.
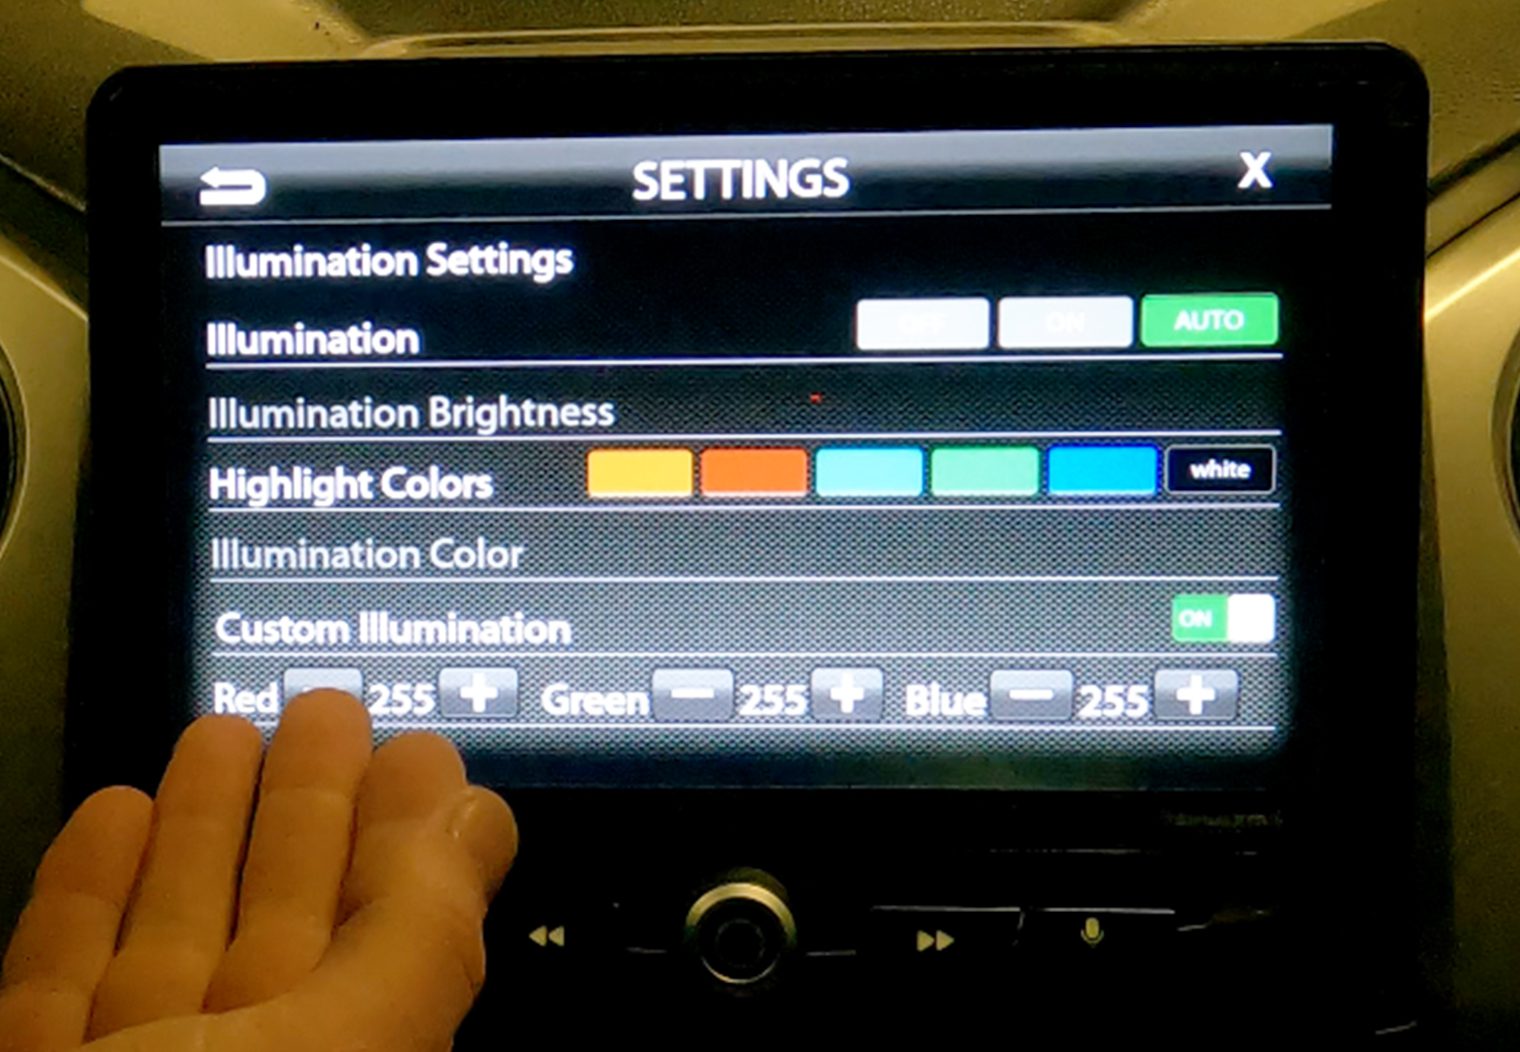
- Color Scheme – You can change the color scheme of the head unit and buttons to either a selection of preset colors (e.g. white) or enter in your own custom color. The downside to the custom color is that you need to find and enter the RGB numbers, which is a little less than user friendly.
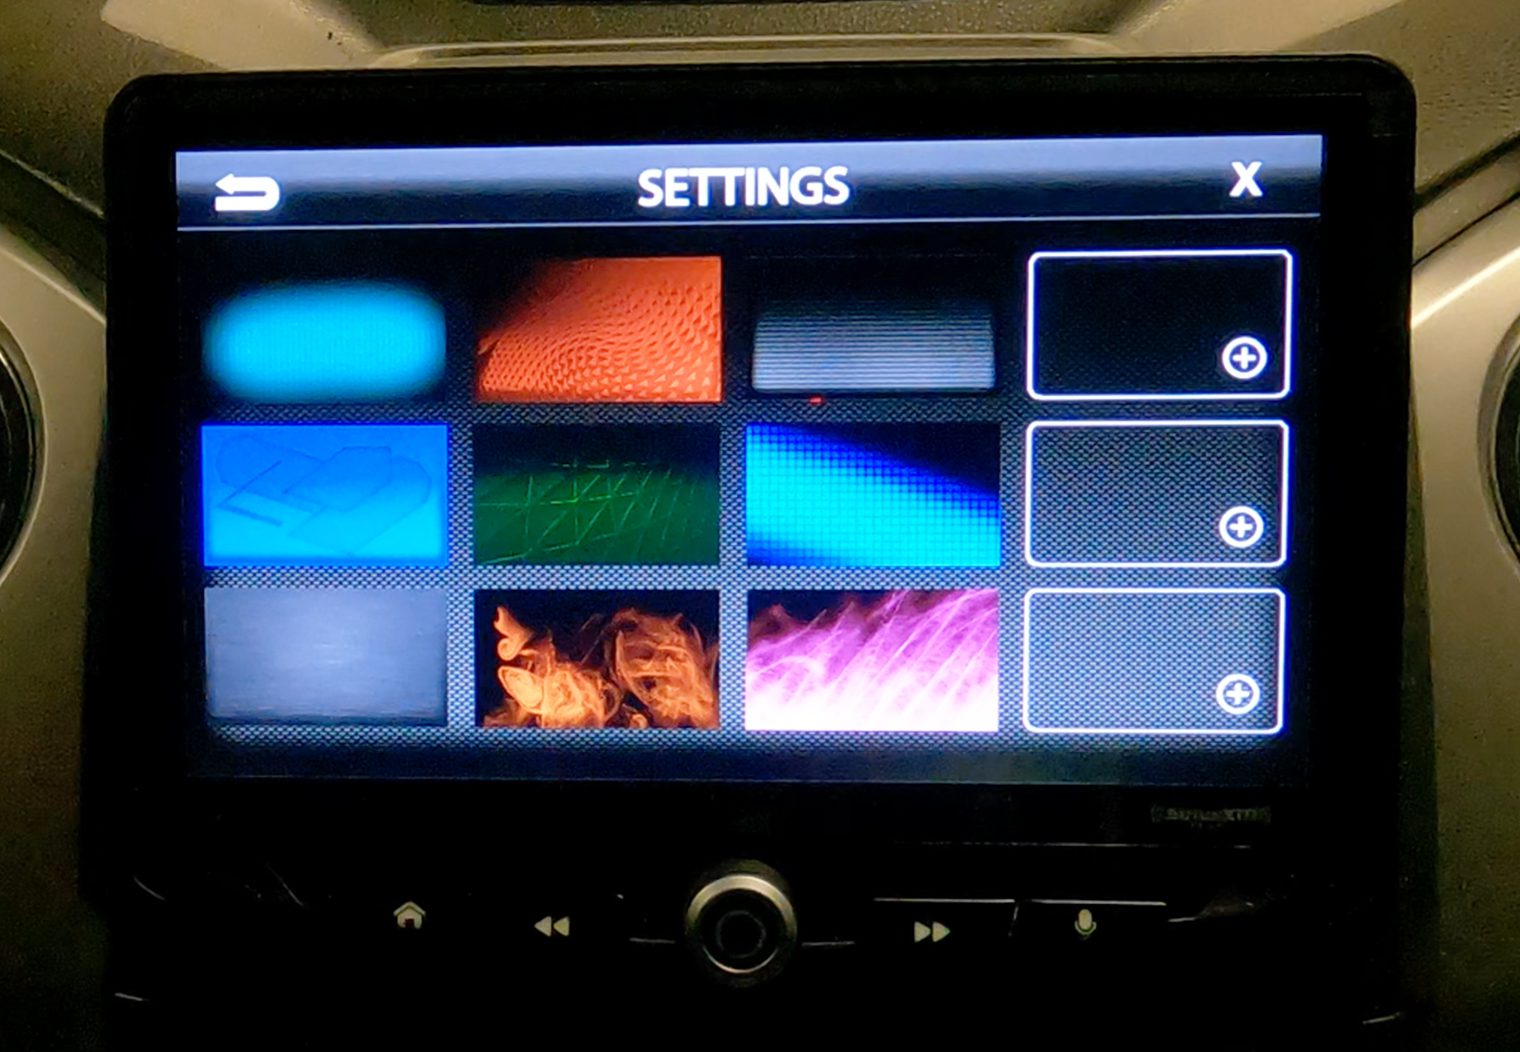
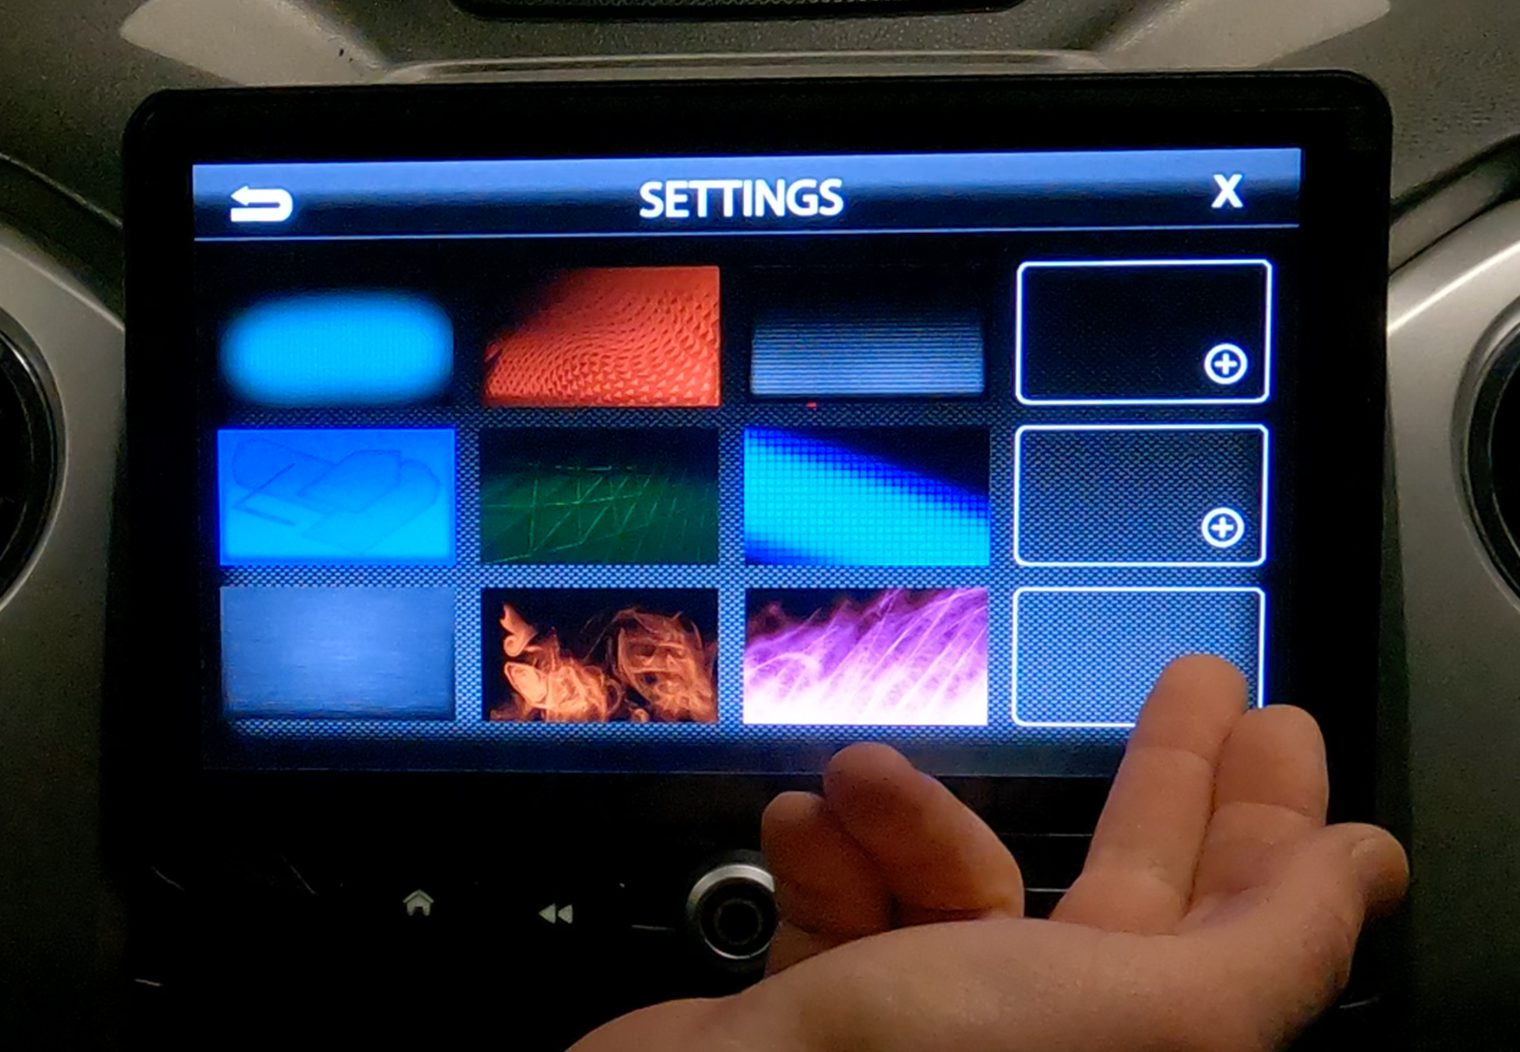
- Background Image – You can select from various preset background images, or upload your own via an image from a USB drive. Note that recommended resolution for your background image is 1024×600, and the head unit is only compatible with .jpg or .png formats.
- Quick Menu Icons – Located at the bottom of the screen by clicking on a subtle up arrow, the HEIGH10 has a shortcut menu that helps you quickly select your source of choice on the fly. This list and order of sources on this menu can be customized.
Color Scheme Options

Changing your Background Image:
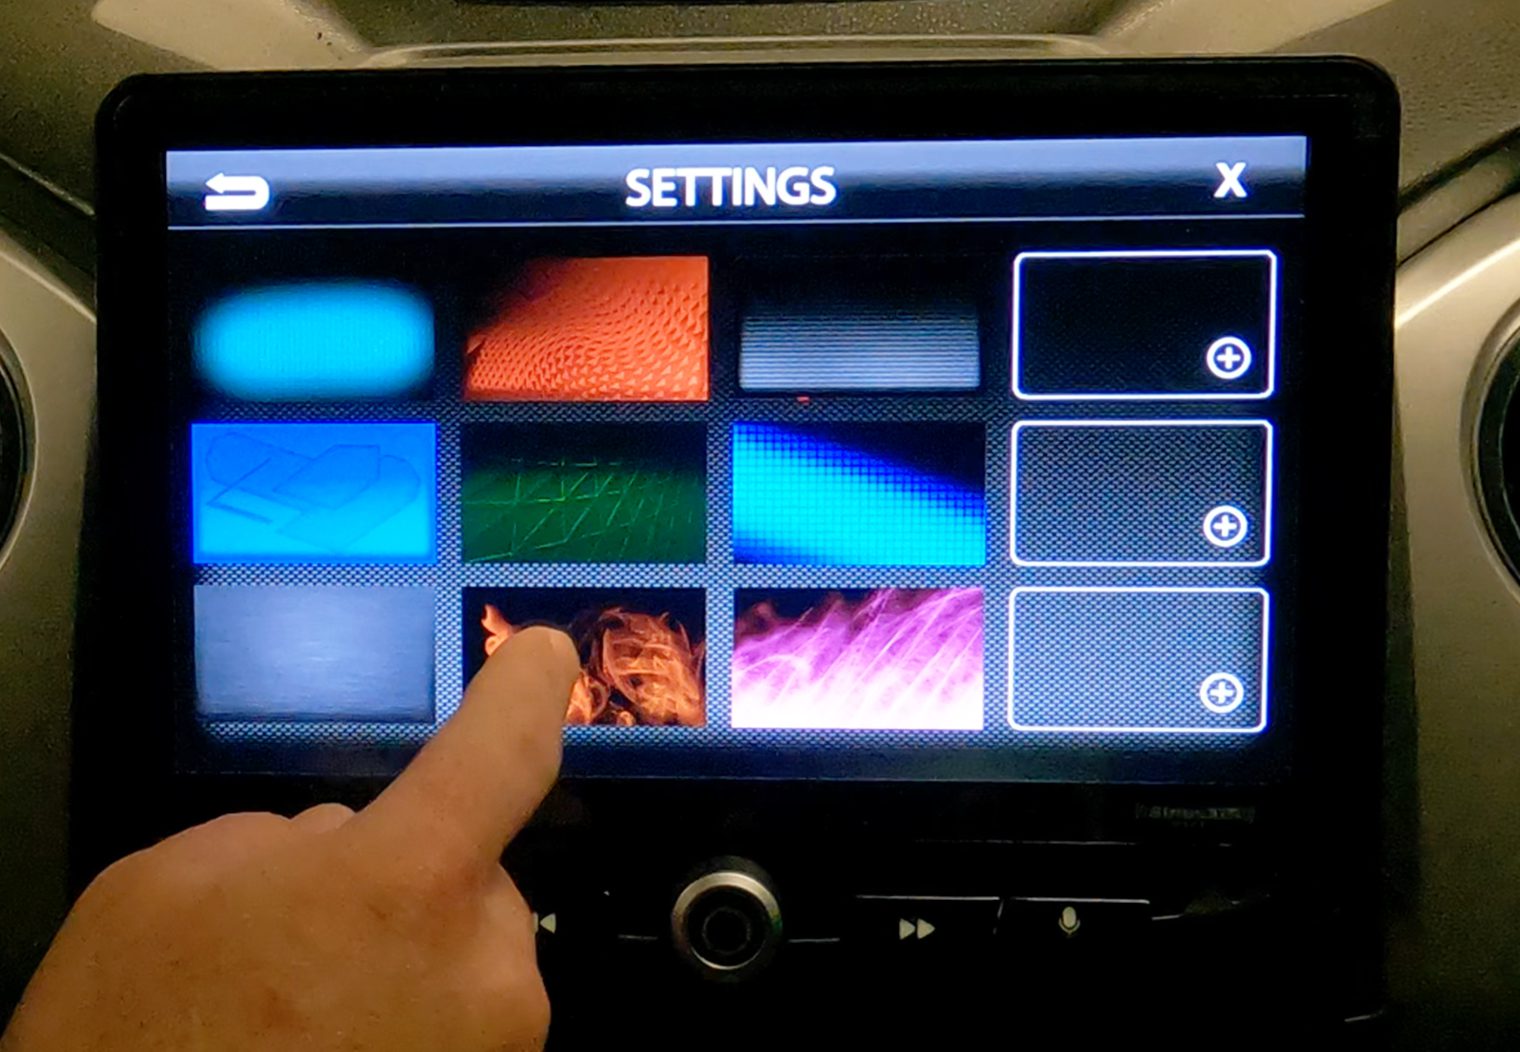
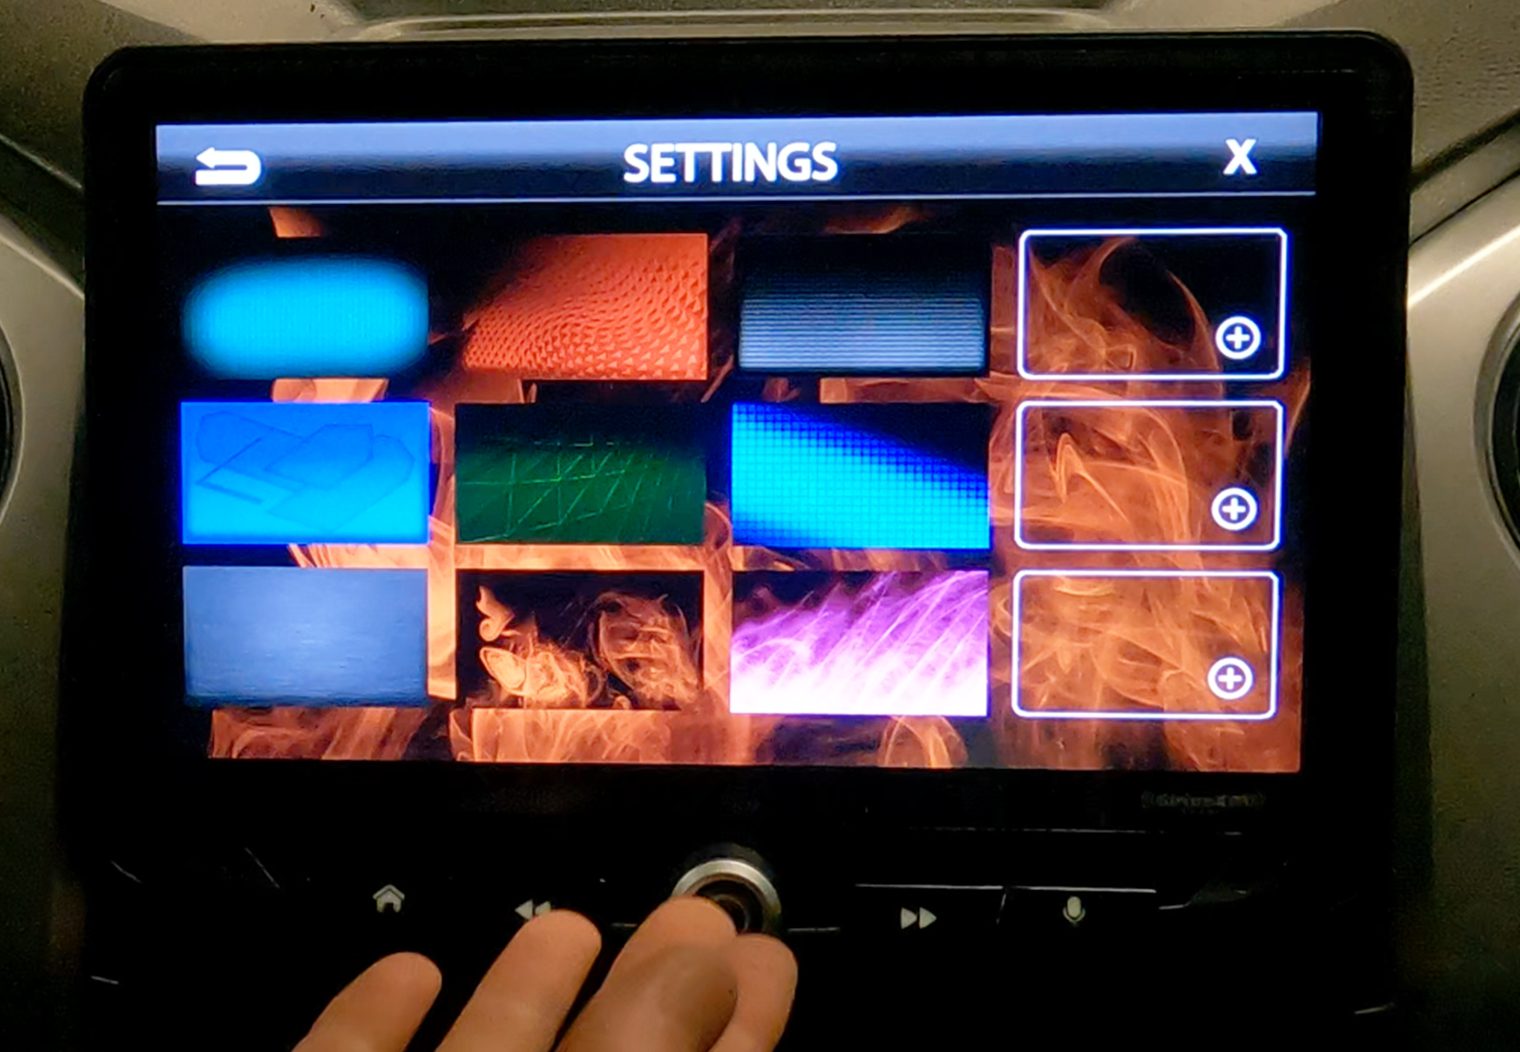
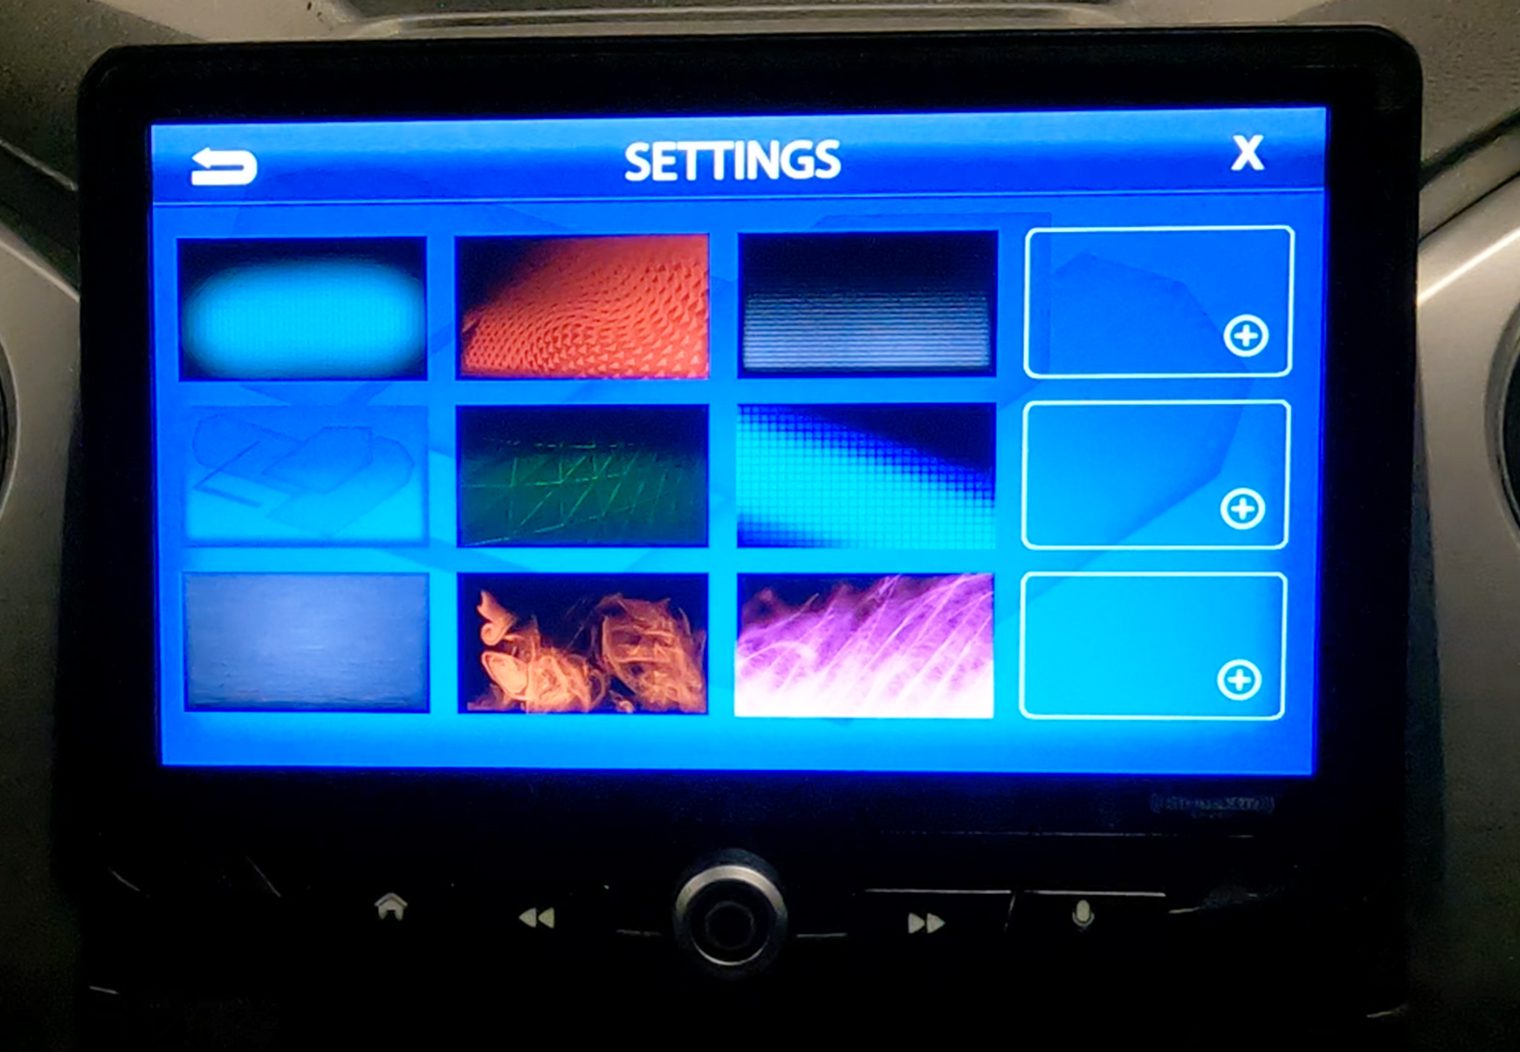
Quick Menu/Tabs
How to Install the HEIGH10 in a 2014-2021 Toyota Tundra
This head unit went into a 2017 Toyota Tundra SR5, however the kit should be compatible with all 2014-2021 Tundras.
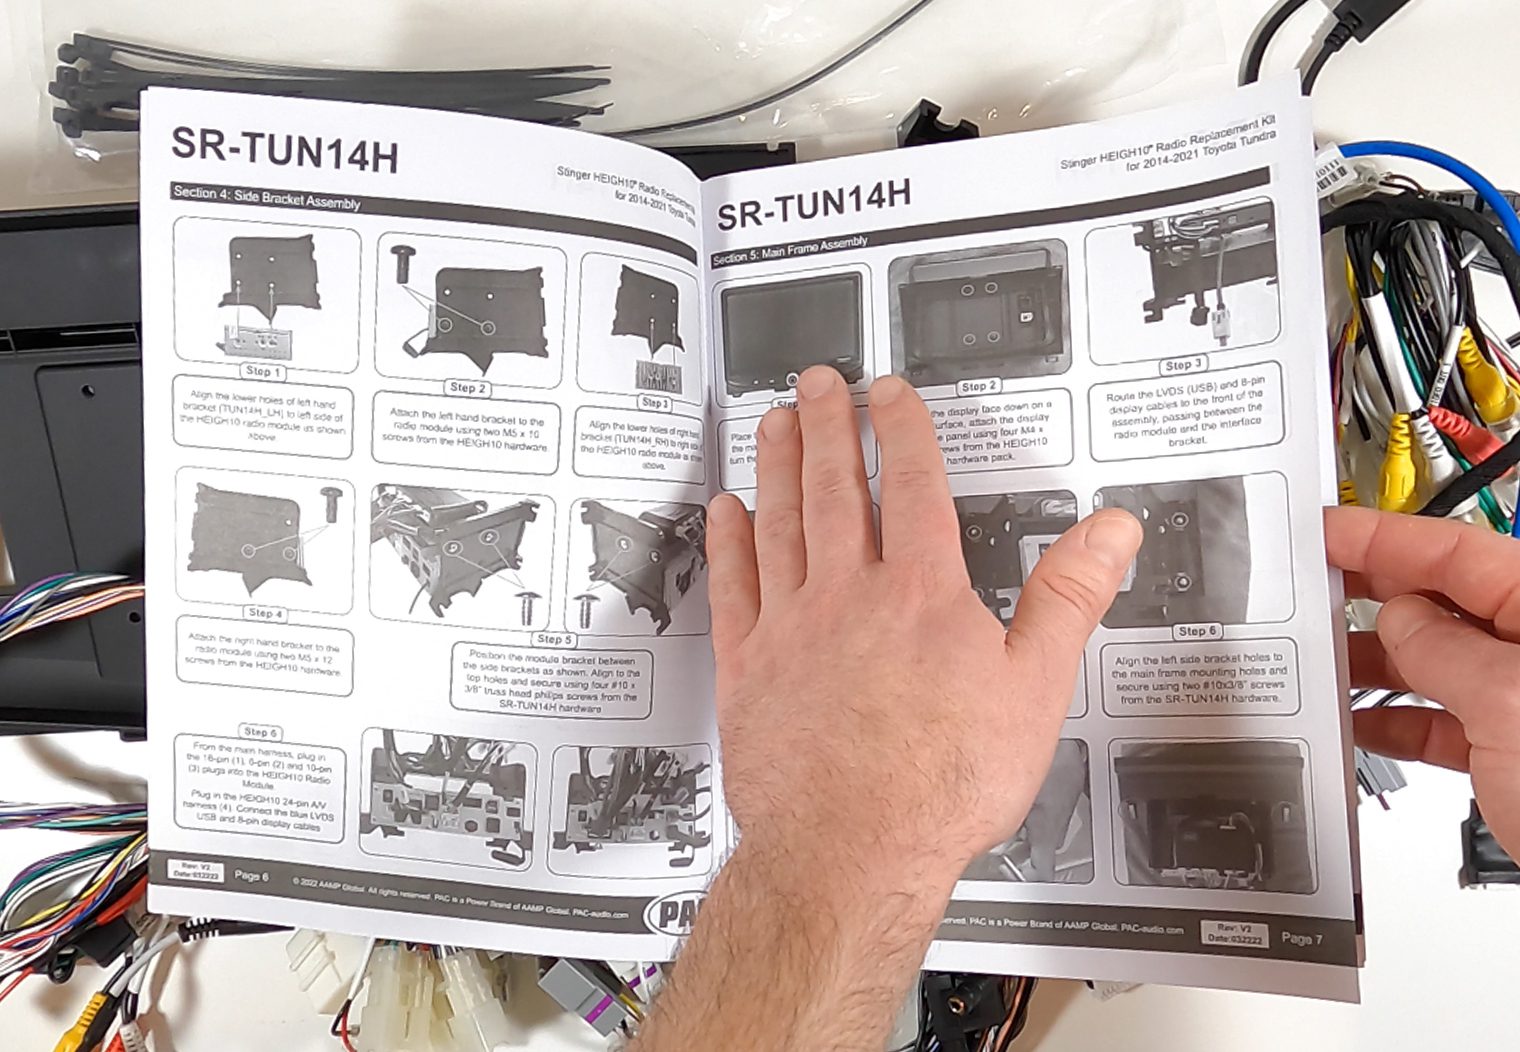
Despite the first impression that you may have had while looking at all of the various wire harnesses, adapters and mounting assembly for the HEIGH10, the installation is surprisingly straight forward. In total it took me approximately an hour and a half to prep the new unit, remove the OEM head unit and install the new HEIGH10.
In this section, I'll go over the basic steps that I took to install the HEIGH10. I will not get into detailed specifics, for example which location one of the 12pin harnesses goes into. Before you purchase this unit, I strongly recommend taking a look at Stinger's installation manual for the HEIGH10 to make sure that you feel comfortable installing it yourself and that it matches your level of installation knowledge/capabilities.
Prepping the HEIGH10
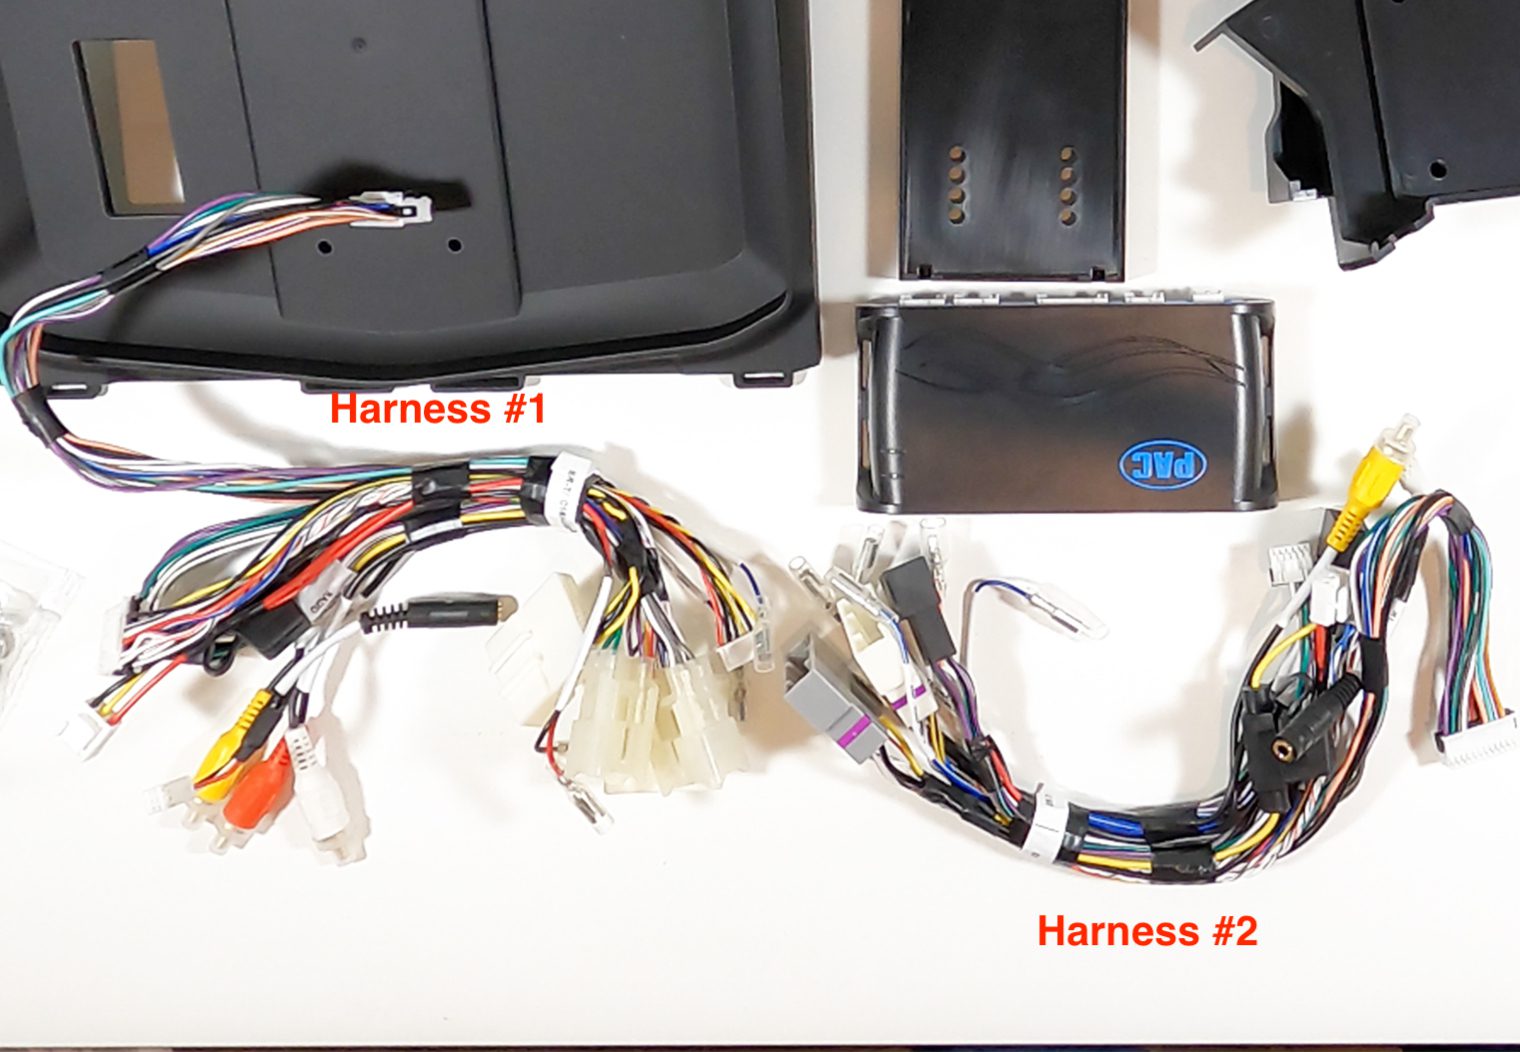
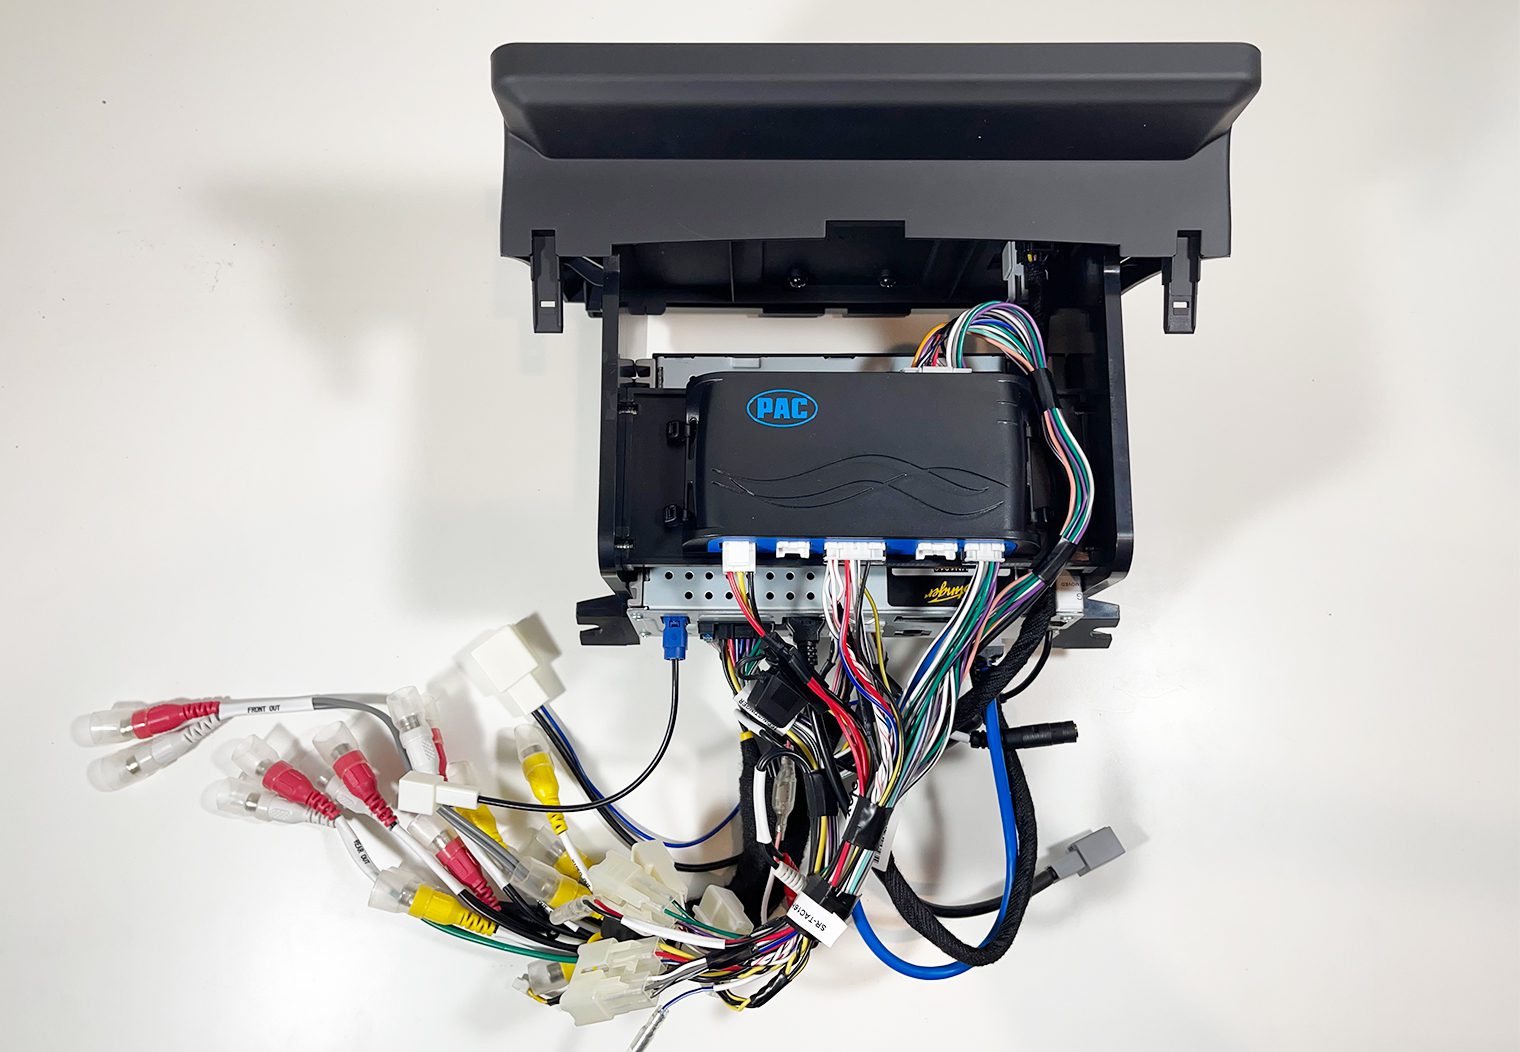
I always prep as much as I can the night before I install a car stereo. Apart from reviewing the manuals and opening up the box, it's the first thing I do. Using the installation manual to ensure that each harness was placed in the proper location and that I used the correct hardware to mount everything up, I mounted the 10.1″ screen to the dash kit and wired various vehicle-specific (and generic) wire harnesses.
There are a few things that I really liked about this kit and the assembly process:
- The fit and finish of the dash kit and mounted screen is excellent. The outer edges of the screen flow incredibly well into the adapting dash kit and its very firmly mounted in place.
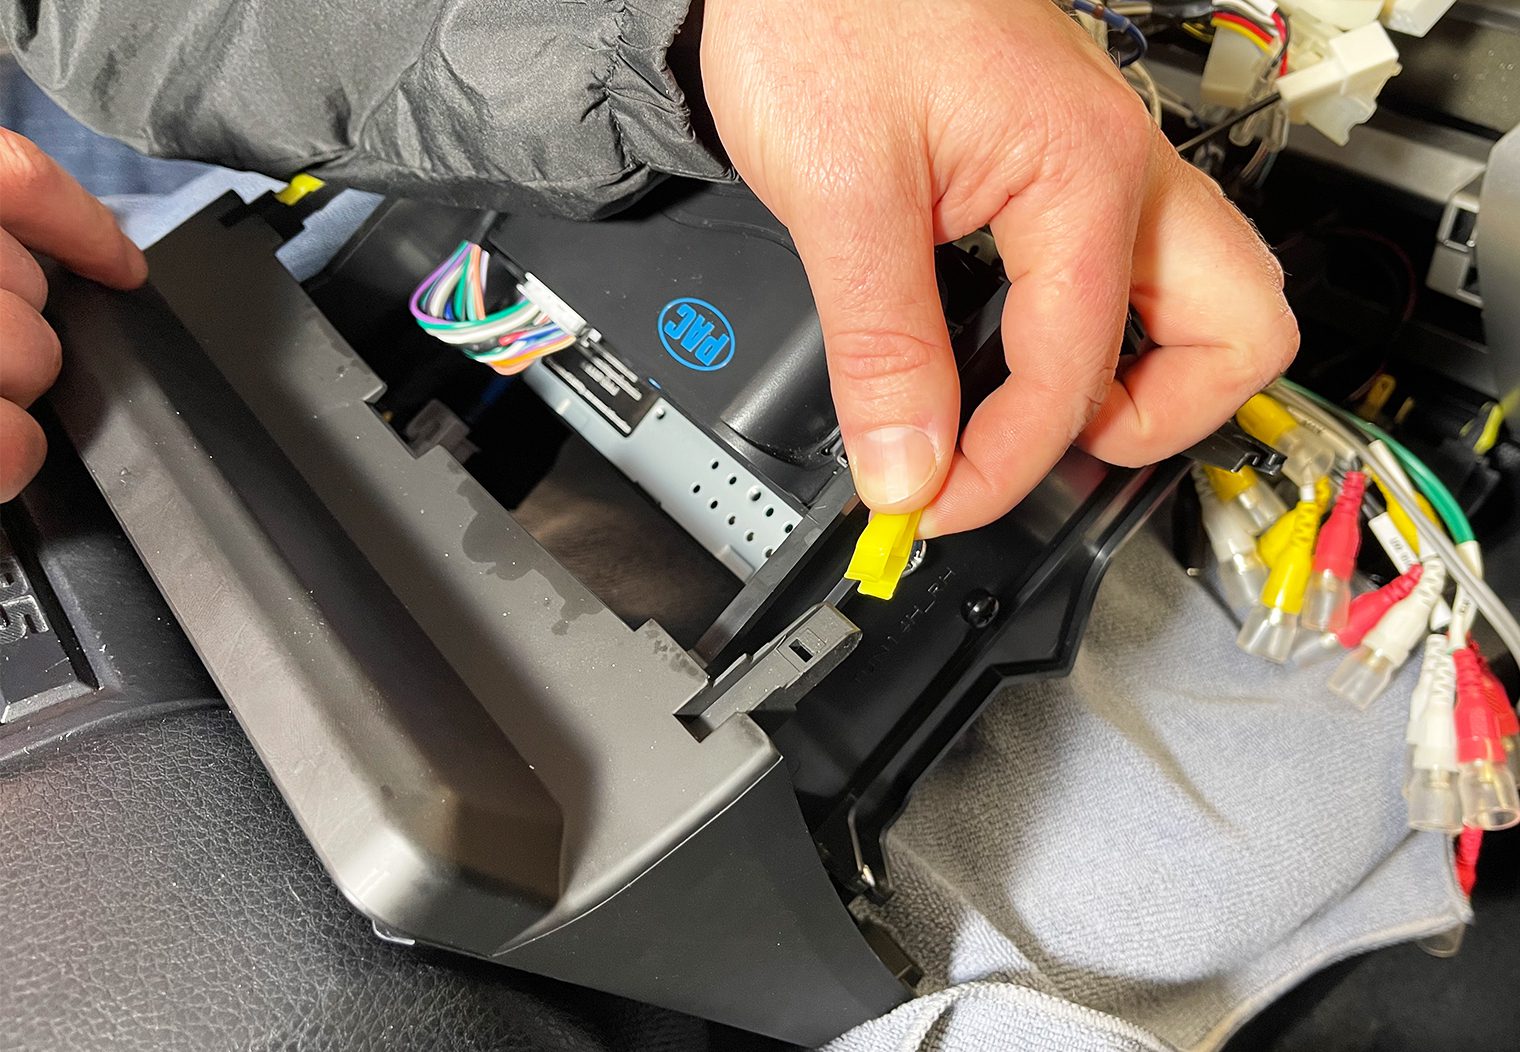
- It's contained to a single unit. The screen, dash kit, adapting mounting holes and even the separate PAC interface all fit into a single contained unit. Stinger even outlines how/where to mount the separate PAC interface.
- Although there were several harnesses, everything had it's own ‘place' which minimizes errors and accidentally plugging something into the incorrect location.
- The installation instructions were incredibly thorough and easy to follow. This really simplifies things for the DIYer.
Within 30 minutes, I was able to assemble a fully contained unit that I could essentially swap with the factory head unit.

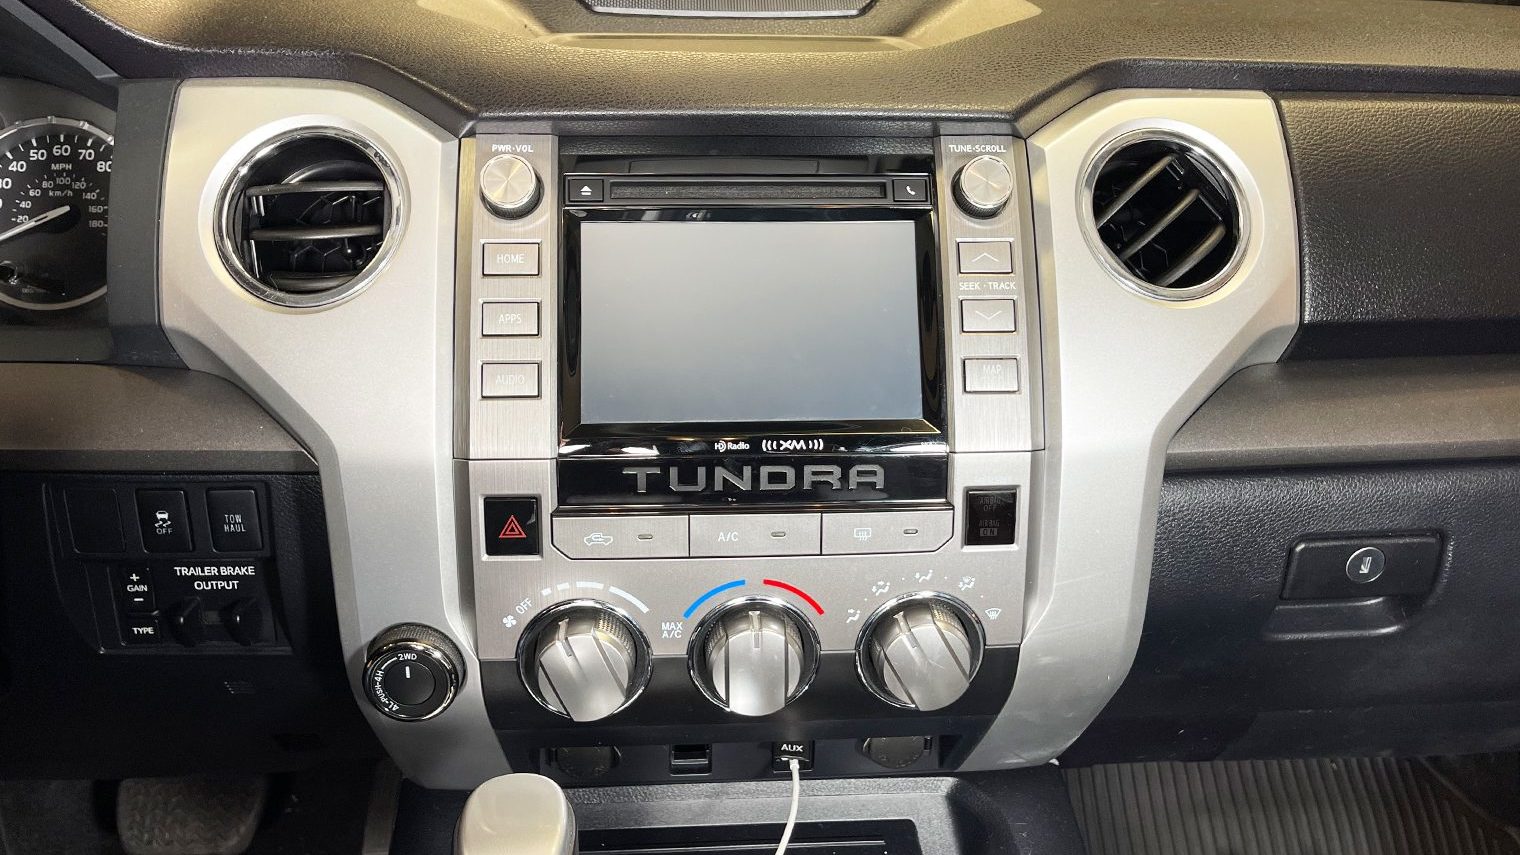
Removing Factory Head Unit from the Tundra
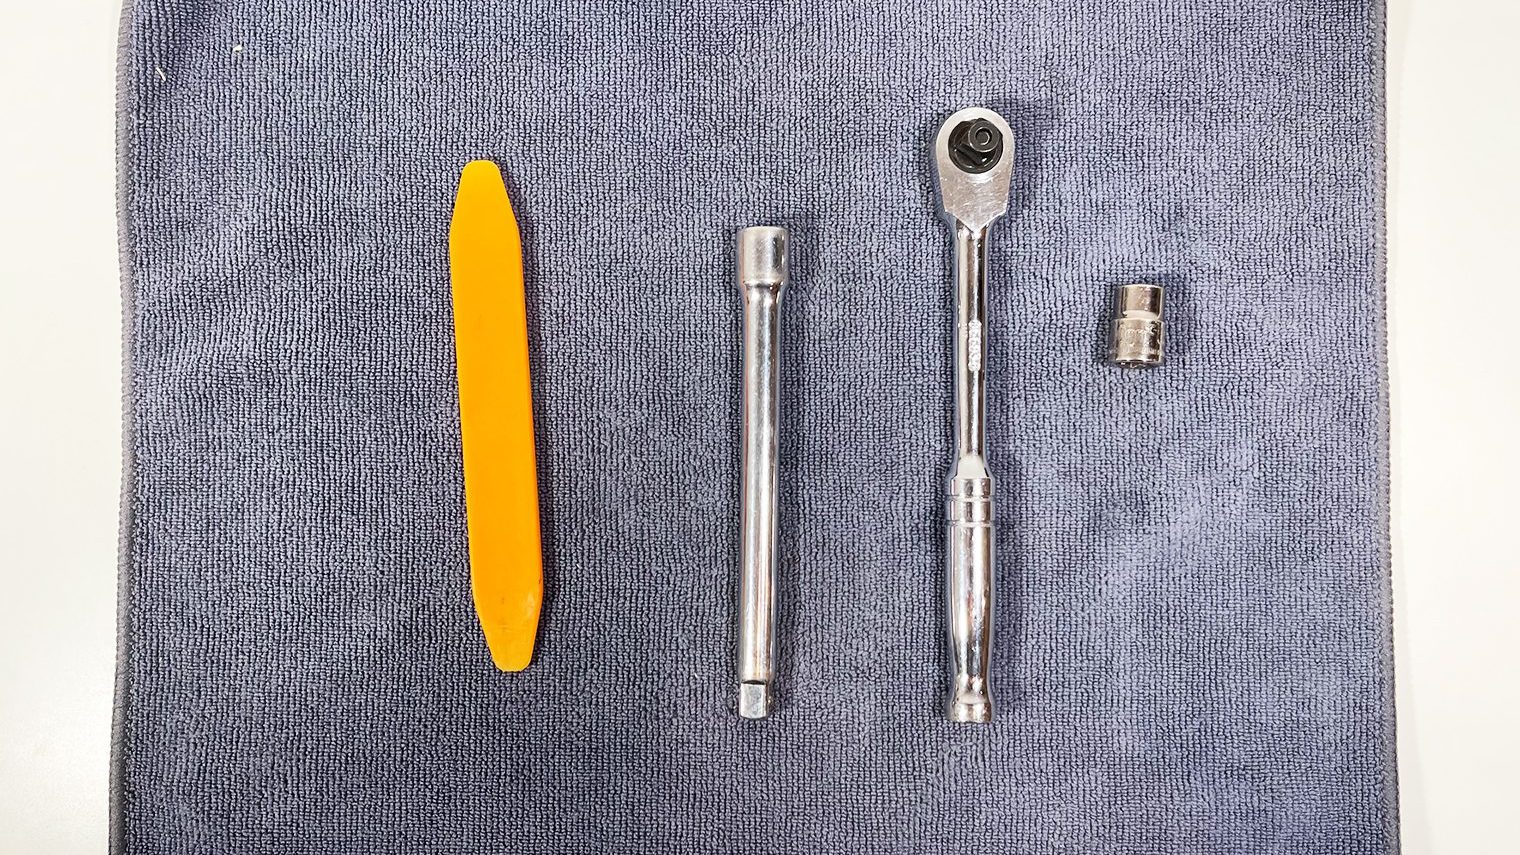
I always enjoy working on Toyotas. They're quick, easy, and have plenty of room for aftermarket head units in the dash. This generation of Tundra is no exception. To remove the factory head unit on a 2014-2021 Tundra, you need all but four tools:
- 10mm Socket
- Ratchet
- Ratchet extension
- Trim tool
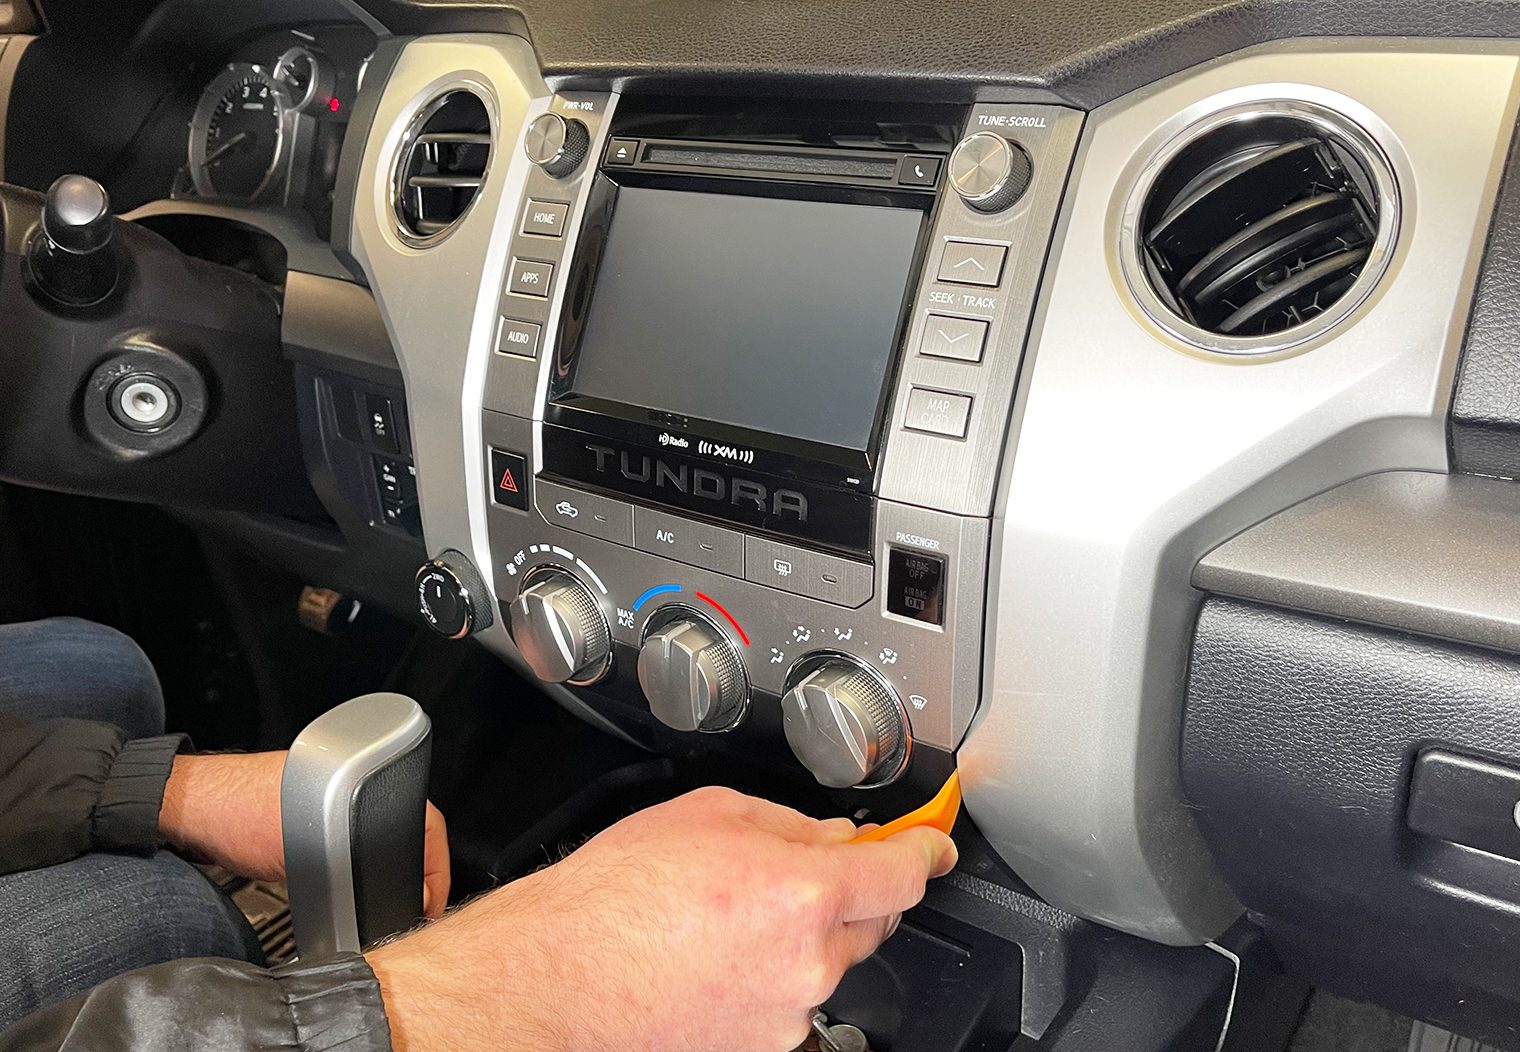
First, use the trim tool to remove the bottom most trim piece on the center of the Tundra's dash below the climate control. There are a series of clips along the top and a few on the bottom. Use your trim tool to wedge along the top and unclip it. Once the top clips have been removed, you can pull the entire unit from the dash and unplug it.
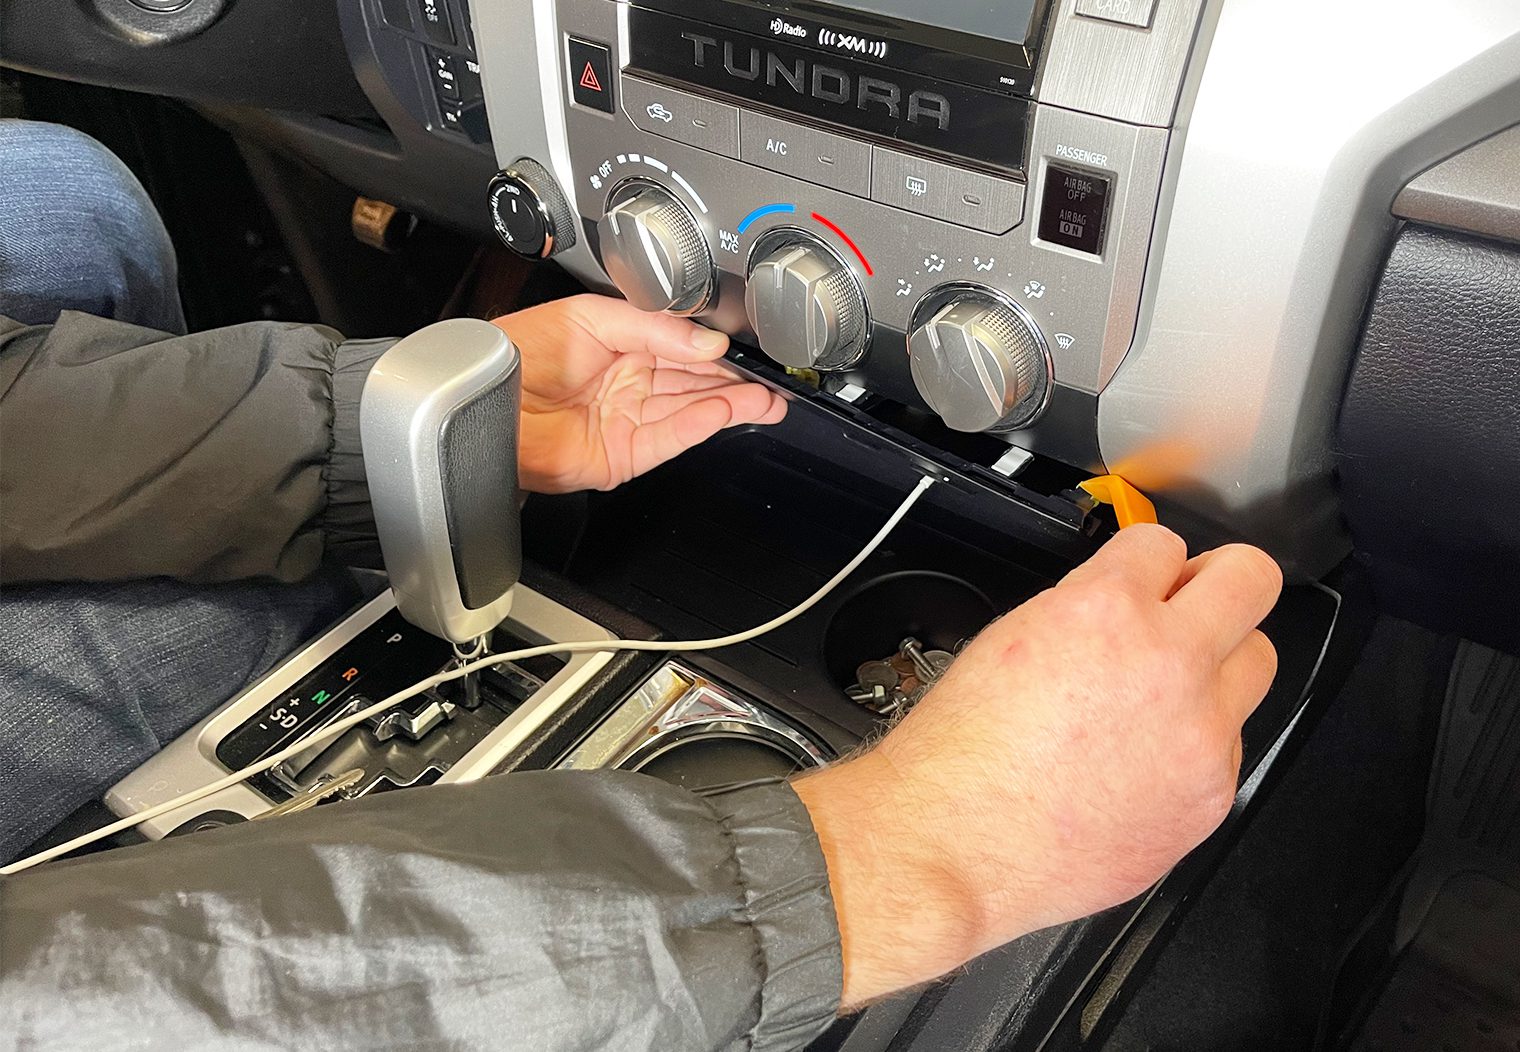
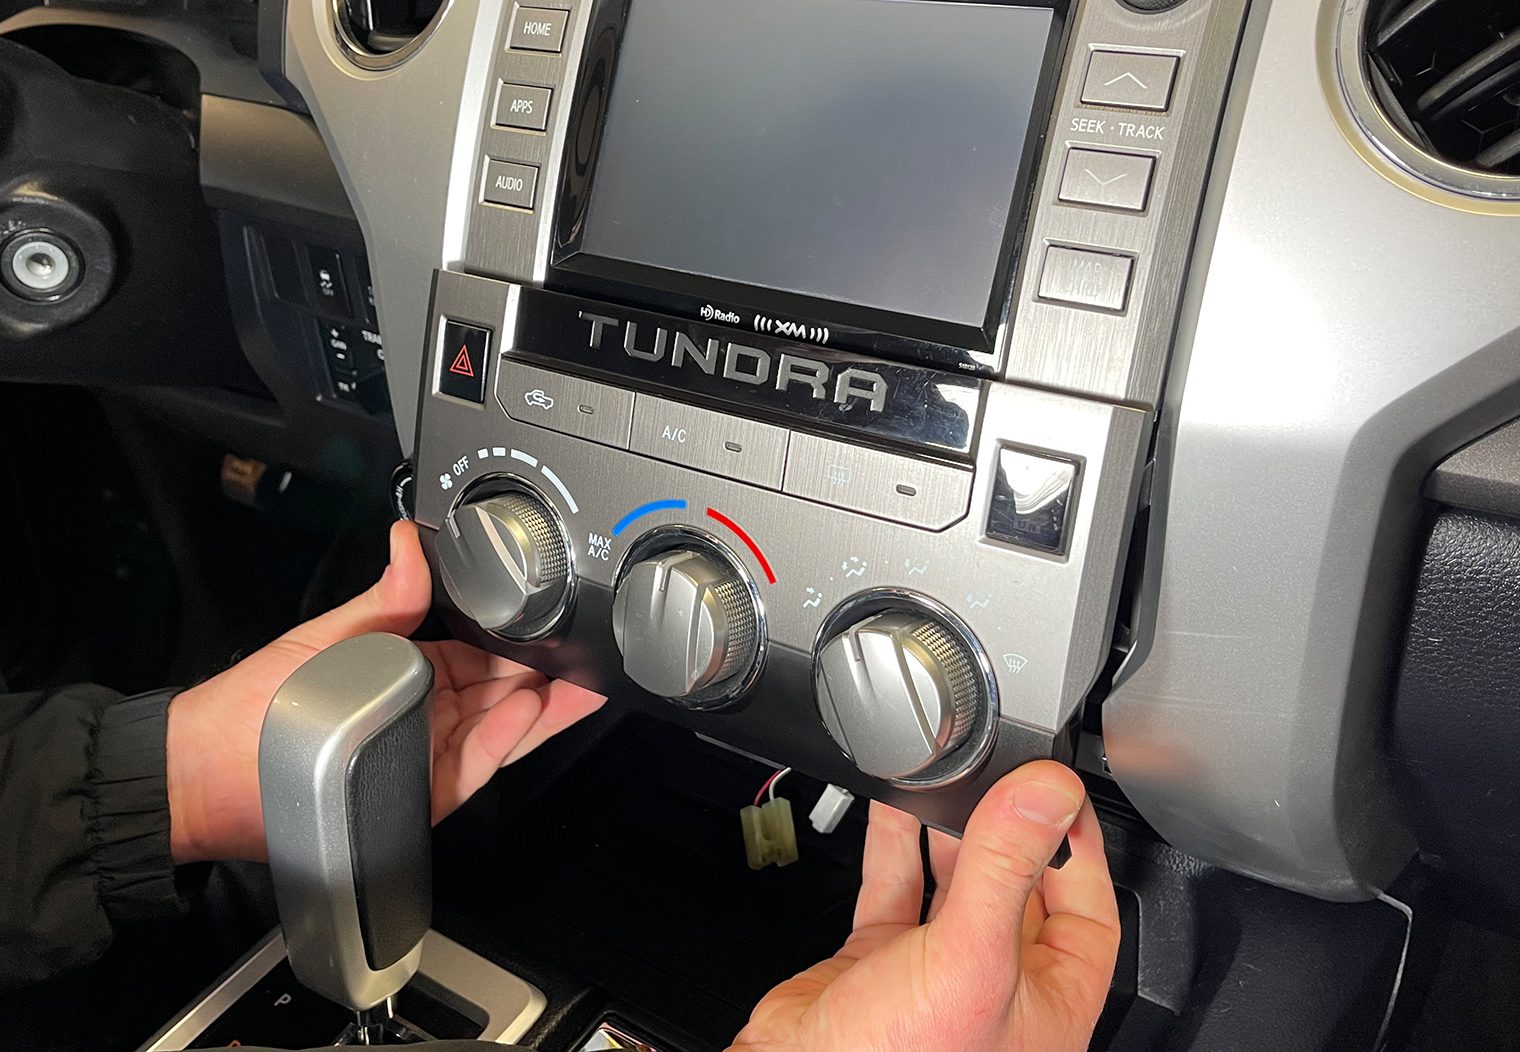
Next, you'll remove the climate control piece. This is even easier than the first trim piece since you can get your hands behind it. Simply pull outwards and it will unclip. Unplug the harnesses on the back and set it aside.

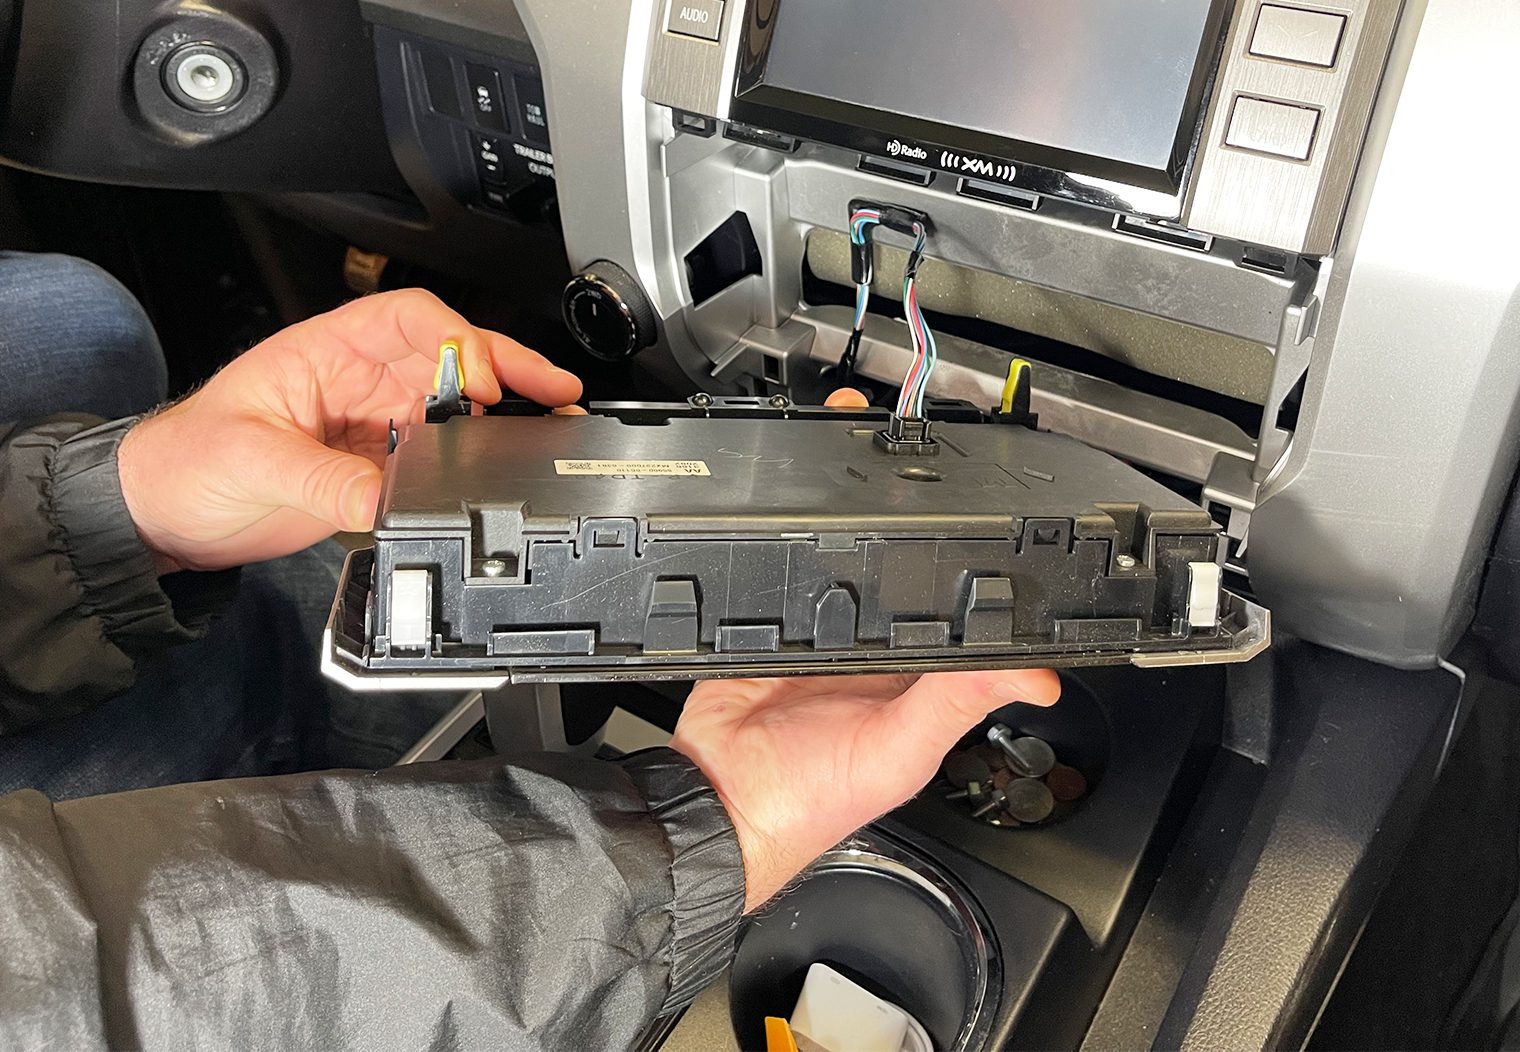
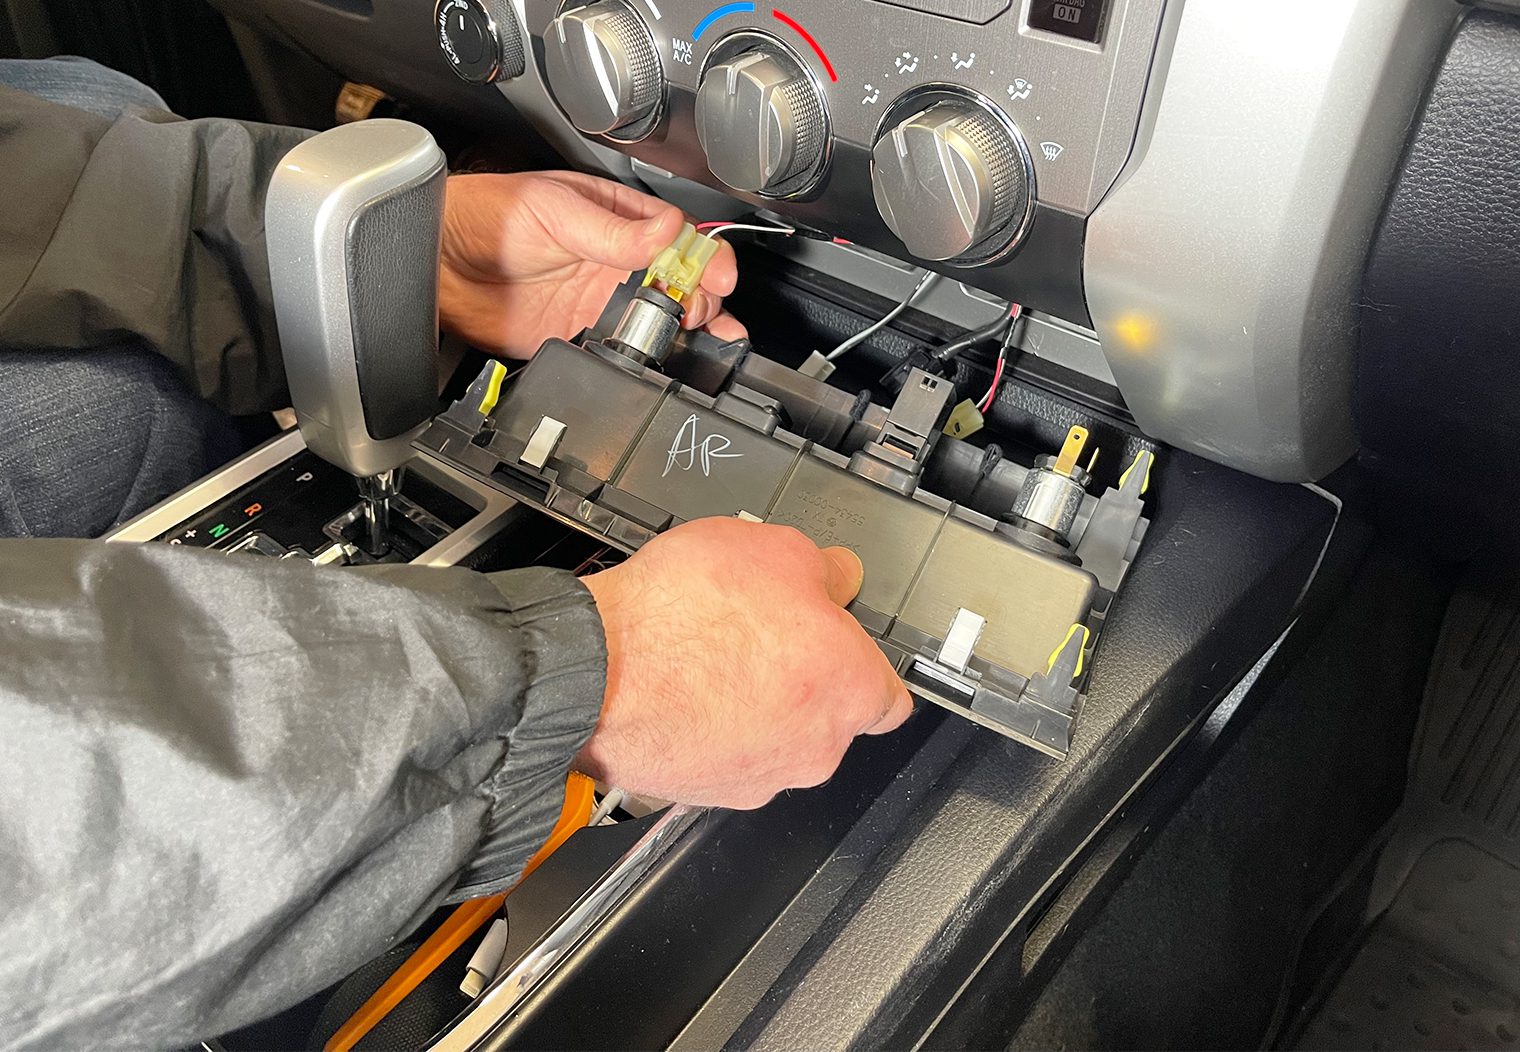
Finally, with the climate control piece removed you can access the four 10mm screws that hold the factory head unit in place. These are located along the bottom of the head unit. Two towards the center (easy and in view) and two along the bottom edges (further back and require a longer extension). Use your 10mm socket and extension to unscrew the four and then simply pull outwards on the head unit to unclip the two clips on the outer-top edges of the unit.
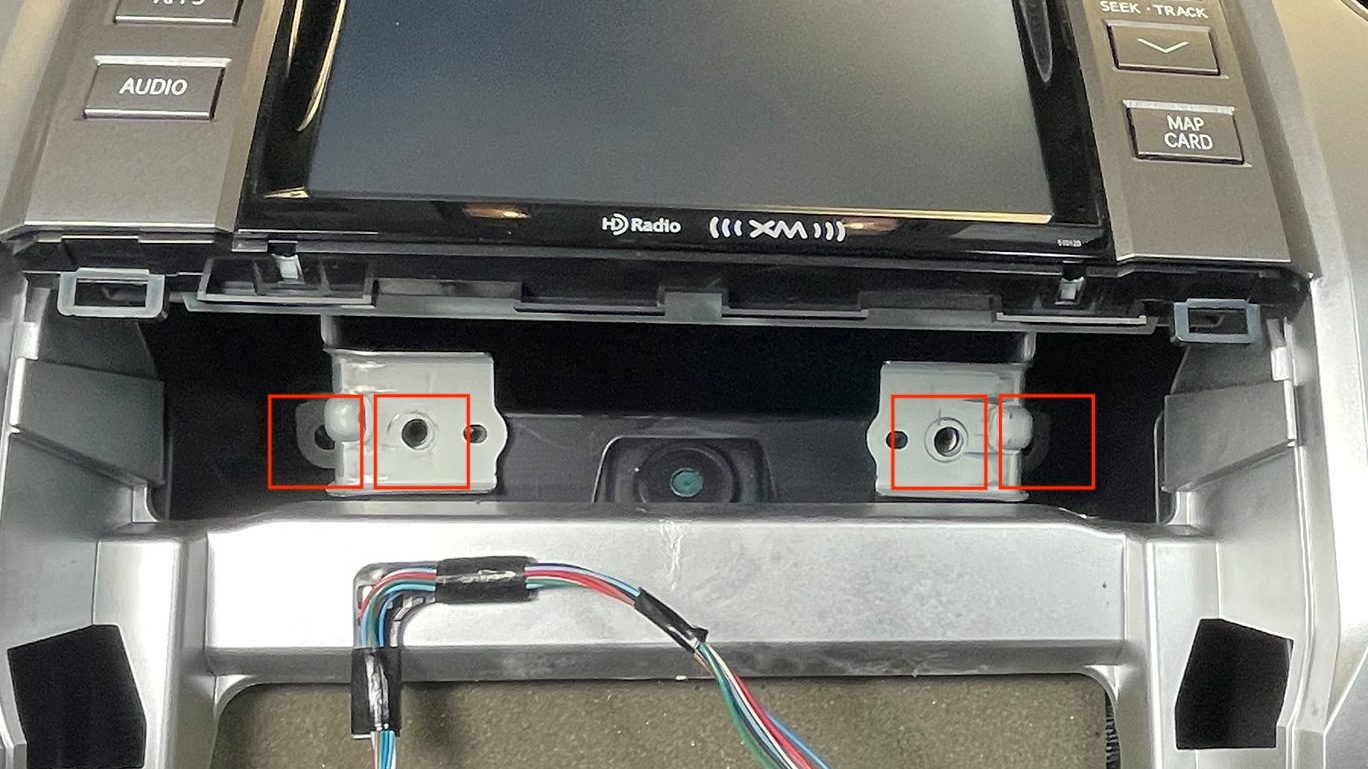
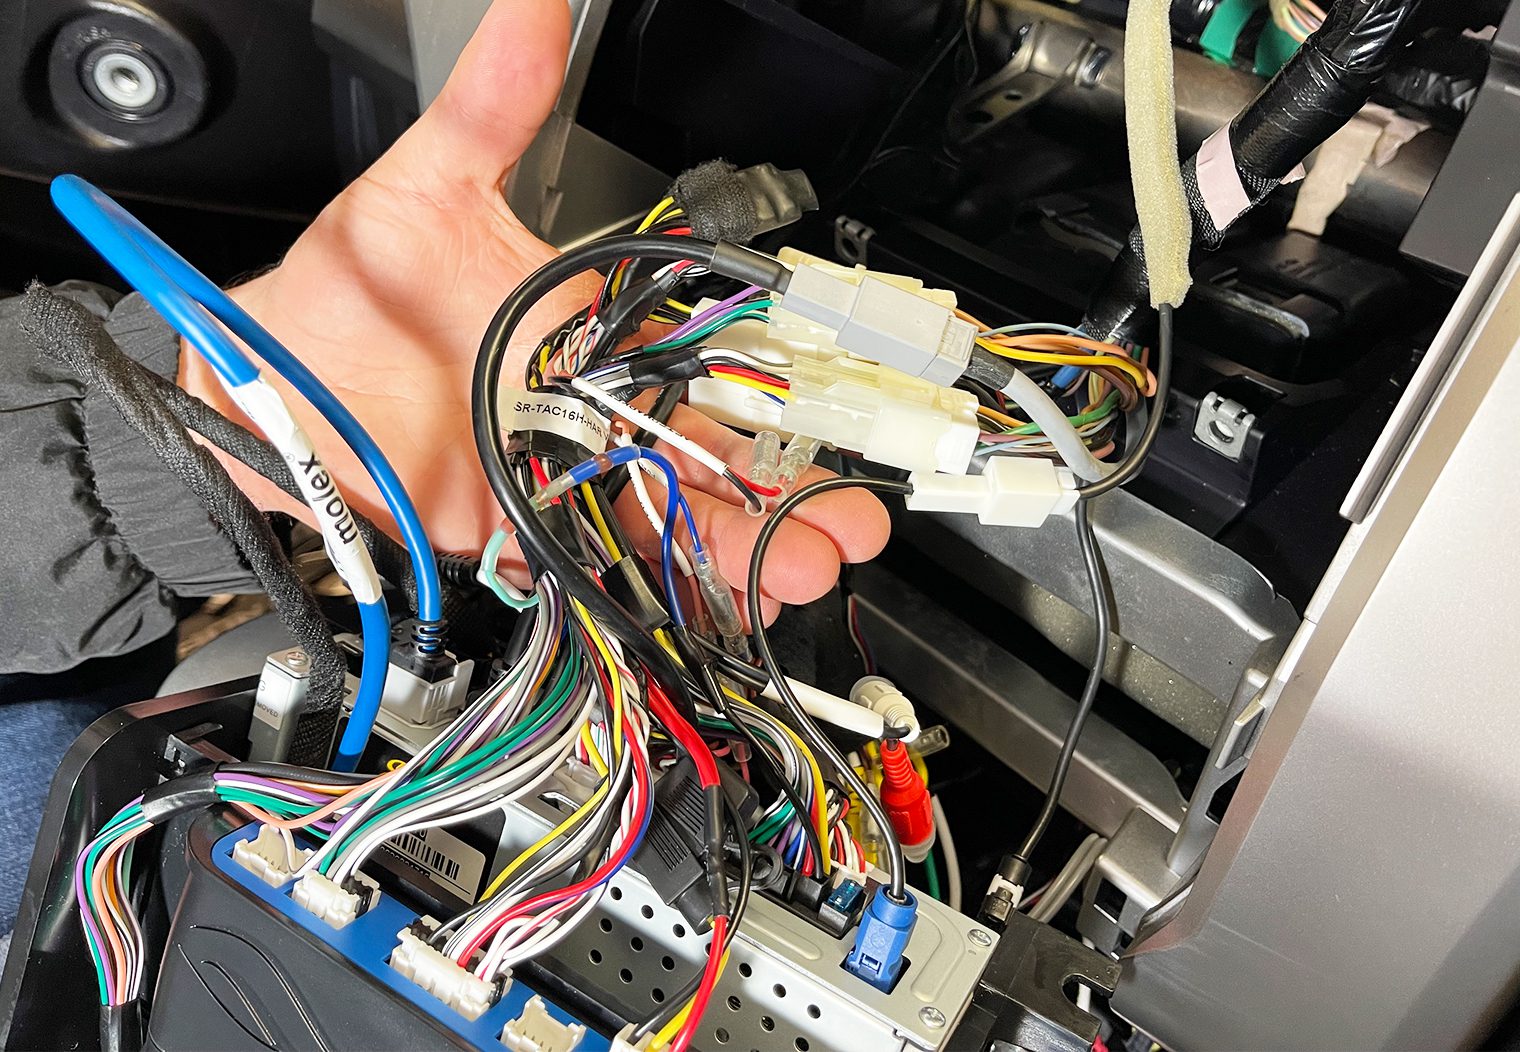
Unplug all of the harnesses along the back side of the head unit and set the head unit aside.

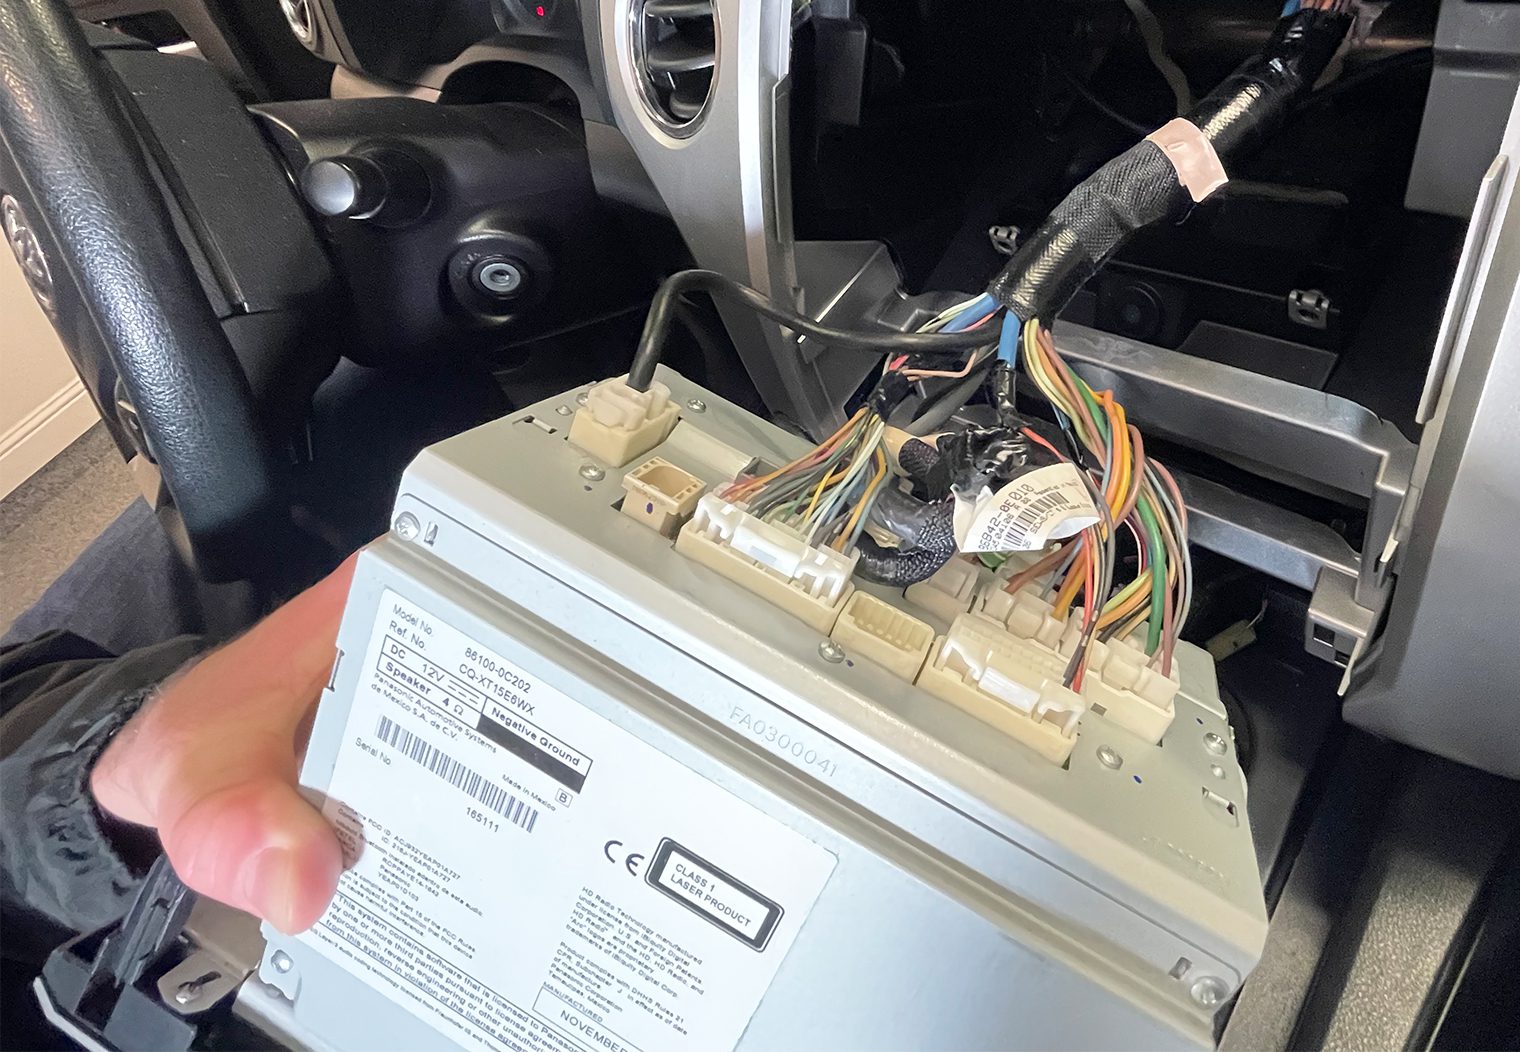
Installing the New HEIGH10
I said this before, but the vehicle specific Tundra dash and wiring kit that's provided by Stinger really simplifies the installation. Since I prepped the unit the day before, I had everything I need installed and ready to plug in.
Installing the HEIGH10 is incredibly straight forward. That said, there are two noteworthy callouts while installing the unit in your truck:
- Find a location for your HDMI input. I chose to use an empty socket on the trim piece below the climate control to house a fitted HDMI & USB Socket so that it looked OEM.
- Wire your external microphone that was included with the unit. For me, the OEM mic did not work or adapt to the new Stinger.
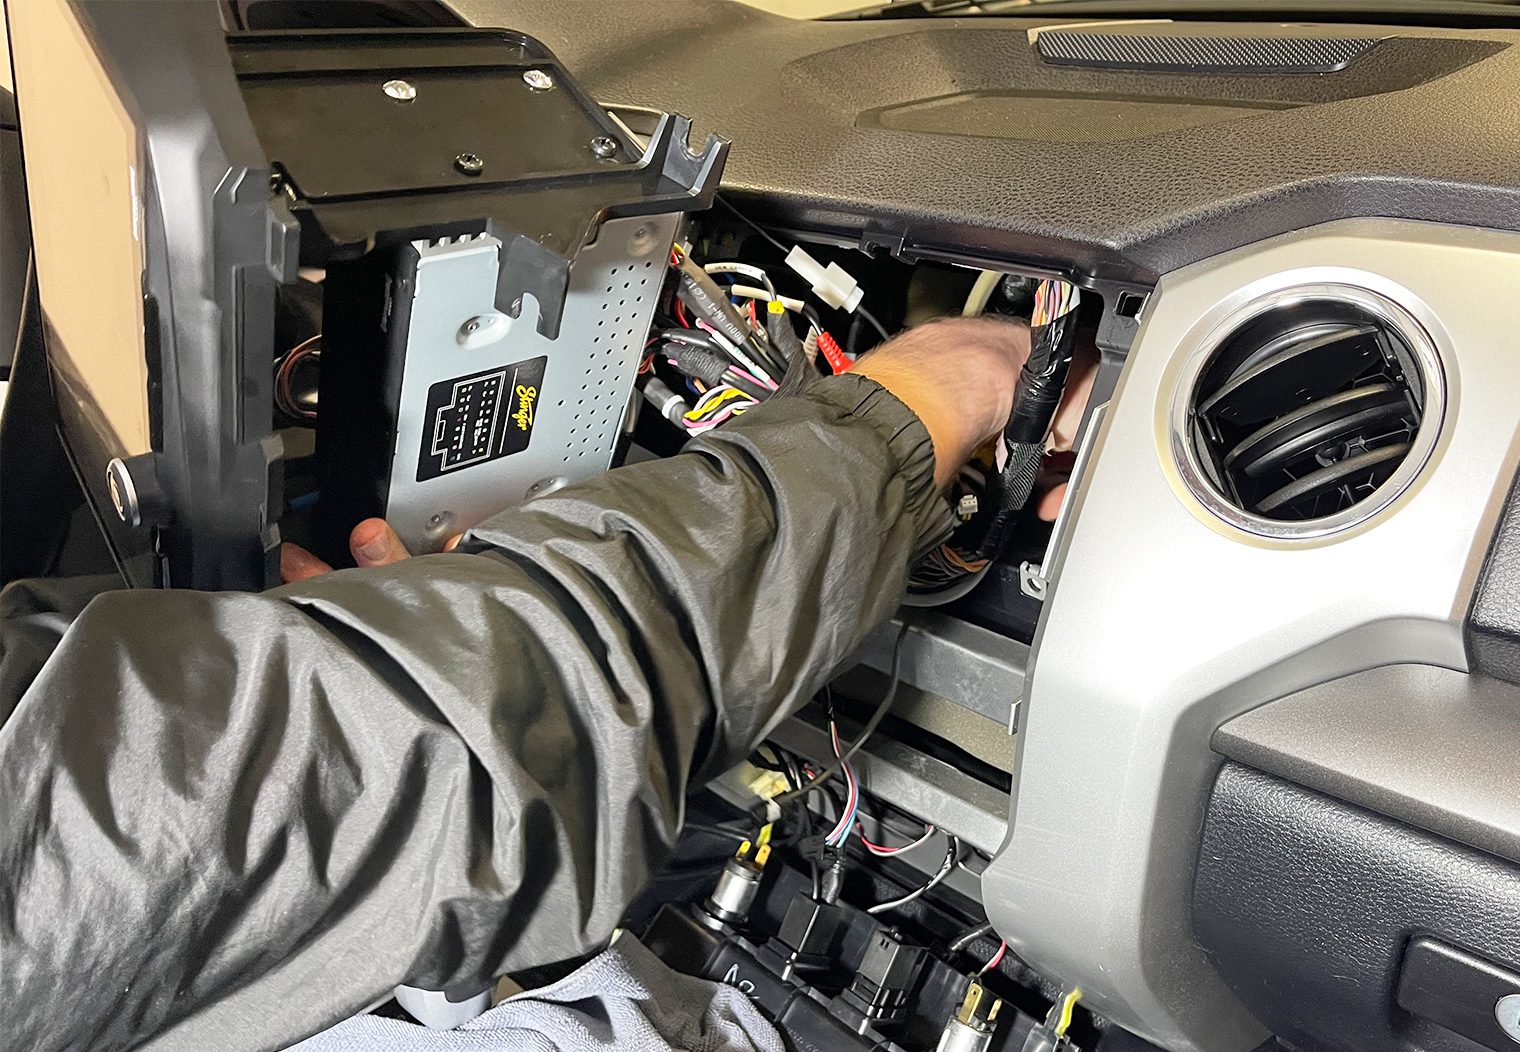
- Be sure to pull the top outer clips from your old factory head unit and place them onto the new HEIGH10 dash kit so that the unit will clip back in place.
The rest of the installation process is basically an exact reversal of what you did to pull the factory head unit out. I'll keep it simple:
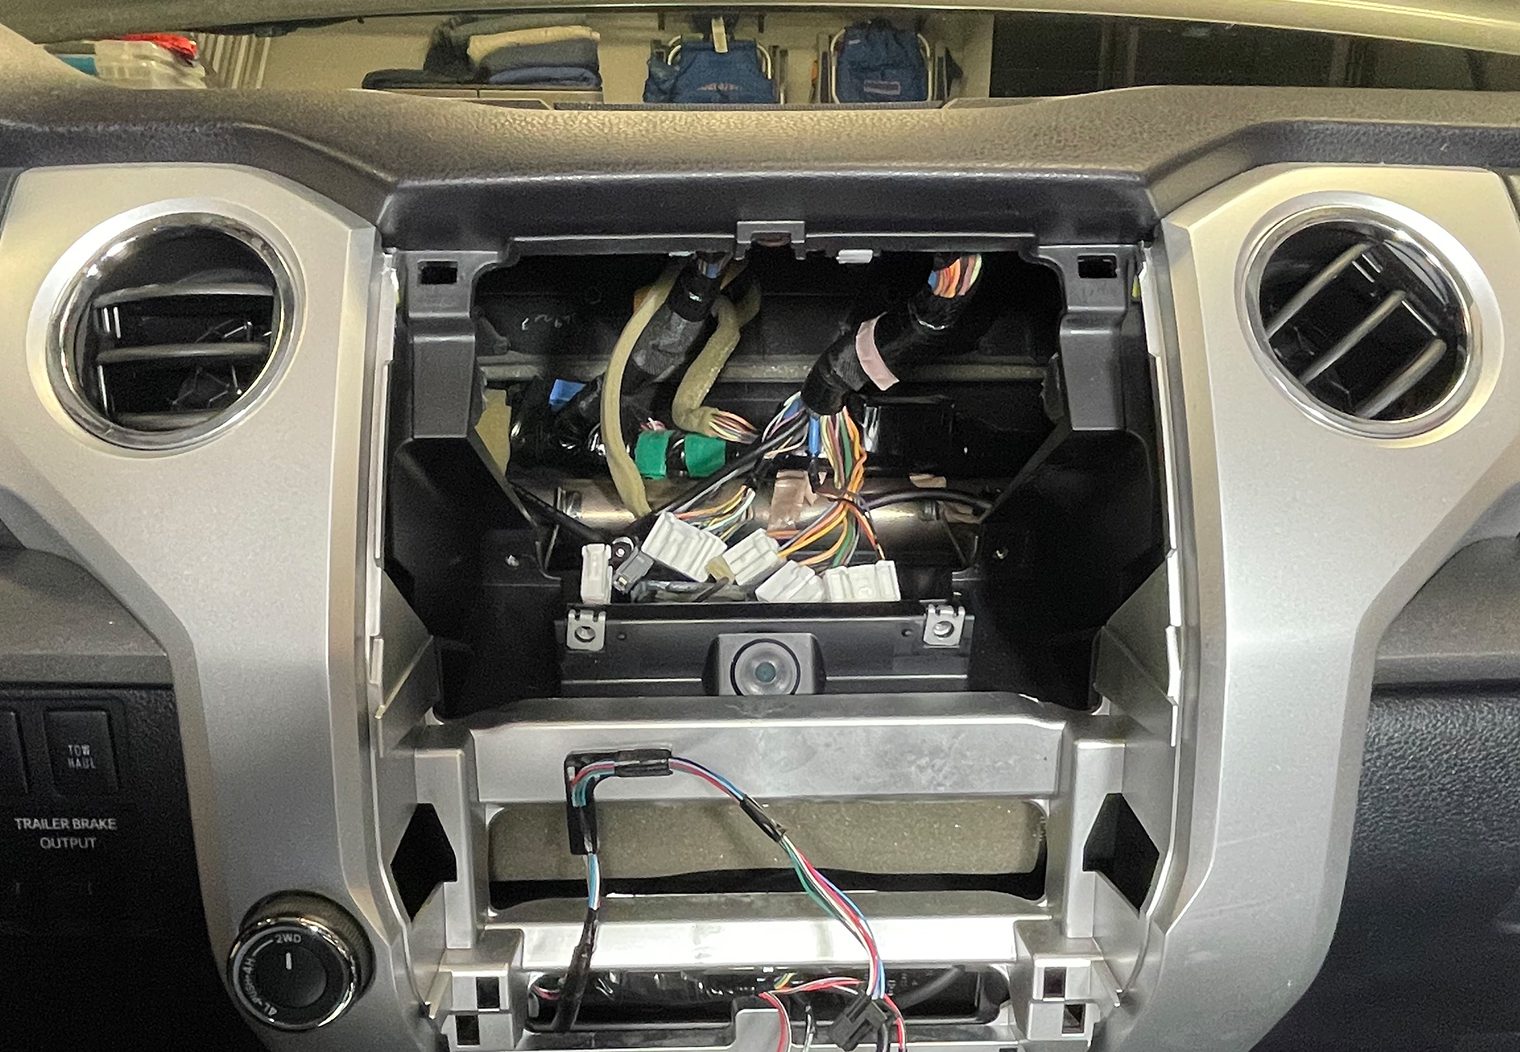
- Plug the Tundra factory stereo harnesses back into their appropriate locations on the HEIGH10 harness.
- While positioning the HEIGH10 back into the dash, ensure the wire harnesses are tucked neatly behind the dash. I used the cavity on the upper left hand side to stow any excess wire or harnesses and make room for the unit.
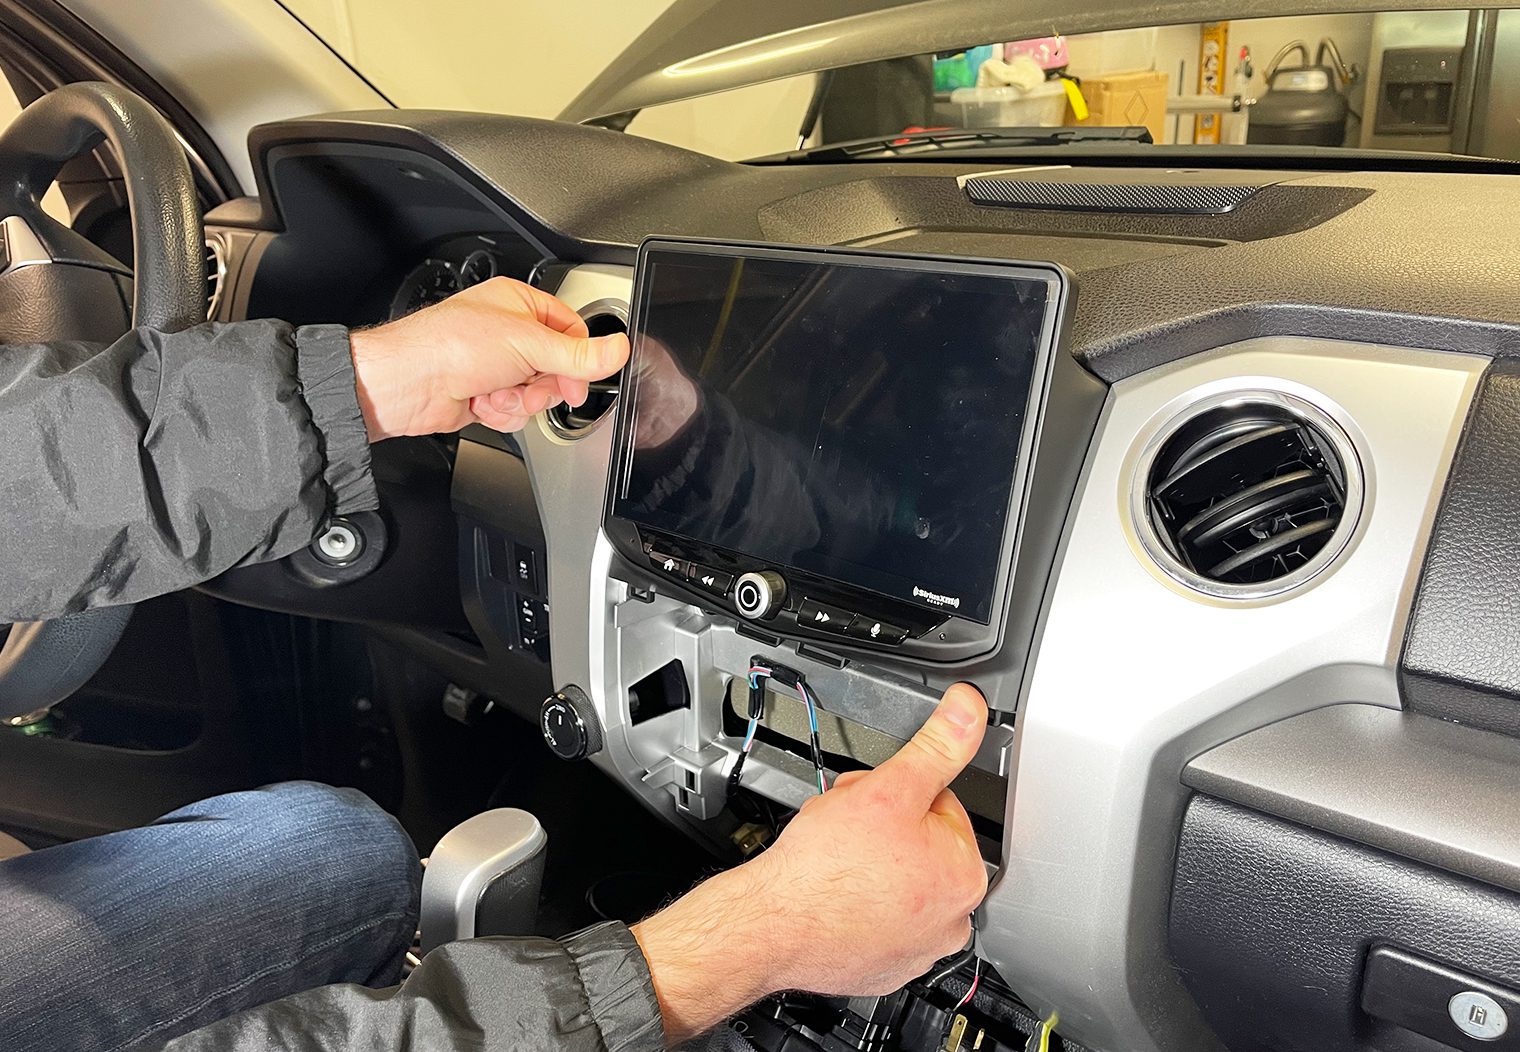
- Push the HEIGH10 in place until it ‘clips'.
- Re-install the four 10mm screws.
- Plug in and re-install the climate control and the trim piece.
Conclusion
I was impressed by the quality, look and design of Stinger's HEIGH10. When combined with the Stinger/PAC SR-TUN14H, this is the best integrated head unit kit I've seen for a 2014 – 2021 gen Tundra. It has all of the core features that I wanted to see – from 6-ch 4v preamp outputs, a crossover interface and 15 band EQ to HDMI, A/V inputs and Apple CarPlay/Android Auto compatibility. It could have included wireless Apple CarPlay and Android Auto but there are adapters for that.
The screen resolution while playing video was great – this is among the highest resolution screens I've tested on the market today so definitely no complaint there. And I also loved the integrated 4-camera inputs that allow you to configure and place four cameras throughout your vehicle and use a 12v switch to trigger them on and off.
The interface was easy to use, although it could benefit from a bit of a visual refresh. But the controls, features and touchscreen were flawless, quick and straight forward. Steering wheel control was integrated by default and worked without programming on the head unit too.
If you're looking for a badass head unit upgrade for your Tundra and don't mind the price point, the HEIGH10 is definitely a great option!
