In this article: We'll walk through how to install and wire an aftermarket amplifier in your car, truck or vehicle.
Once you’ve picked out the best car amplifier or best boat amplifier, it’s time to install it. Thankfully, with a little mechanical know-how, installing aftermarket amplifiers isn’t a challenging job. We’ll provide the steps you need, whether you are using one or two amps. We will also talk about the materials you need, location and other vital considerations when learning how to wire aftermarket amplifiers.
Before you jump right into the installation, you need to figure a few things out. We will review what installation accessories you must have as well as the proper location for your amps. Then, we will also examine how to run the wires correctly before we move on with the installation.
What Accessories are Needed to Wire Amps?
Much to many consumers' surprise, car amplifiers don't normally come with the wiring you need. You have to supply both the amp’s ground and power wiring. Plus, you will need speaker wire, RCA cables, an inline fuse and remote turn-on wire.
Let’s dive deeper into each of these categories, so you know what to purchase.
Fuse
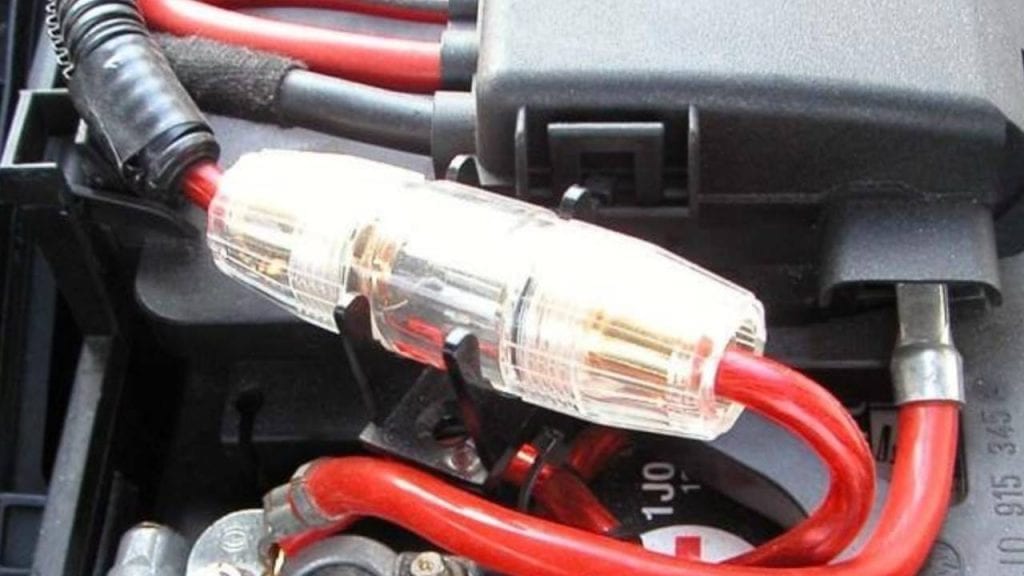
An in-line fuse is mounted on the main power cable, within about six inches of the battery connection. You must have this fuse to protect your car and wiring from starting on fire. If a short circuit occurs, you want the fuse to protect your stereo system. While every manufacturer rates the wire capacity on its own, there is a general rule of thumb for fuses.
In most cases, you will find these are the appropriate fuses:
- 10-gauge wiring: 25-amp fuse
- 8-gauge wiring: 60-amp fuse
- 4-gauge wiring: 100-amp fuse
- 1/0-gauge wiring: 250-amp fuse
Ground & Power Wires
When you wire aftermarket amplifiers, you need all of the equipment to be thick enough to handle the electrical current. Otherwise, your amplifier won’t work correctly and it can’t supply the rated power. If you look at the amp’s instruction booklet, you will find the recommended wire size to use. You also need to measure the distances, so you know how much wire to purchase.
If you purchase a complete amplifier wiring kit, you will have everything you need, including the turn-on wires, fuses, power and ground.
RCA Cables & Speaker Wire
Many amp wiring kits won’t come with the signal wiring, so you have to purchase that separately. Typically, you need RCA cables to allow the amp to receive input signals from the receiver. You will find these in various lengths.
You also want to purchase your speaker wire. To connect the amp to the speakers, you want between 14- and 18-gauge wires. Remember, the lower the number, the thicker the speaker wire is. If you are connecting subwoofers, you will use 12- to 16-gauge instead.
In many cases, you can also tap into your existing speaker wires so that you don't have to wire through door panels. You'll want to check your vehicle's wire harness and identify the color of wires for each speaker that you'd like to power.
Amp Mounting Location
Now that you know what you need, it’s time to give your amp a home. The amplifier location is key and ensures that the installation runs smoothly.
Here are a few guidelines you want to follow.
- Always adhere to the manufacturer's recommendations.
- Ensure that the amp is secure. Otherwise, it can break loose during an accident.
- Put the amplifier at least three feet away from your stereo. If you don’t, you will get noise coming from the vehicle’s electrical system. Plus, your amp can cause interference with the radio reception.
- Never bolt the amp to your metal chassis. Instead, use rubber grommets on the mounting screws or mount your amp to a wooden board before attaching it to the car.
- There should always be air space around the amp. You want at least a few inches. Plus, you don’t want to place it upside down or the heat will end up back inside the amplifier.
Let’s look at a few options where you can install the amplifier.
Inside the trunk/hatch
This area provides lots of room for the larger amps and it puts the amplifier closer to the rear speakers. Unfortunately, you have to give up some cargo room for this installation. You will also need longer patch cords and wires.
Passenger side firewall
This setup allows you to use shorter patch cords and wires. Plus, you don’t have to do any crazy acrobatics for the installation. The trouble is that larger amps aren’t going to fit in this location. You also might end up with a few noise issues.
Underneath a seat
This option is close to the receiver, requiring shorter cables and wire, but it might require you removing the seat. Plus, you aren’t going to fit a large amp under the seat.
Running Wires for an Amp
Whenever you set up car stereo equipment, you want to make sure that the wires are concealed. This doesn’t just provide a better appearance, but also offers additional safety. You might need to run wiring under the pillar trim panel, kick panel, door scuff plate or dash.
Most of the time, you can easily pry the edges of a panel up to place the wire underneath. You might need to remove a few retaining clips or screws to complete the installation. Take your time and carefully inspect everything you are removing to prevent unnecessary damage. You might also consider using a panel removal tool.
If you enjoy tips and tricks, here’s a helpful YouTube video to check out.
Install & Wire Aftermarket Amplifiers: Step by Step Guide
You are ready to install and wire an aftermarket amplifier. Follow this step by step guide to complete the stereo setup.
 #1: Safety First
 #1: Safety First
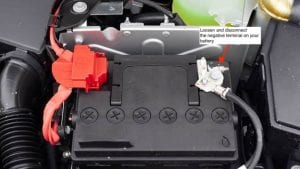
It’s essential that you disconnect the vehicle’s battery first before you get started. Simply disconnect the negative terminal prior to installation.
#2: Mount the Amp
Once you know where you want to put the amplifier, you must mount it. If you choose to put it in the trunk, you can use the pre-drilled mounting screw holes found on all four corners of your equipment. Then, run the power wire (found in the installation kit) from the car battery (positive terminal) to the amp.
The power wire in your kit should have a fuse holder installed. If it doesn’t, you need to find a spot near the battery to put the fuse-holder.
Make sure you hide the wiring as outlined above.
#3: Ground Wire Connection
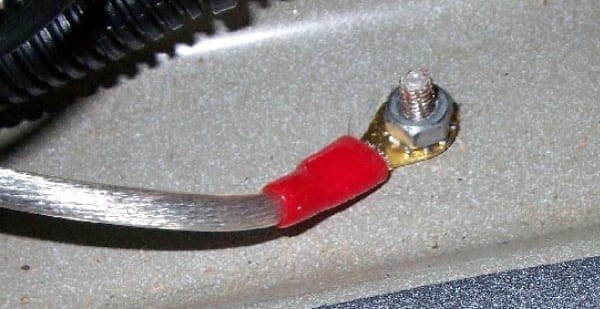
Now you are ready to connect the ground wire. This is also in the amp installation kit. You will connect it to a bolt or nut located on the chassis. Make sure it’s close to the amp’s location. If you are mounting the amp on a sidewall, you will find a screw behind the carpet.
When you connect the ground wire to the metal, you want to scrape away any residual paint first. This ensures full contact and allows the amp to function its best.
#4: Inputs & Outputs
Find the rear speakers. Pay close attention to the factory wires that are running to the speakers. Splice into the right and left speaker’s positive and negative wires with a wire stripper.
You will attach some speaker wire to every splice. Then, secure your work with electrical tape. Then, run the wire to your amp and hook it up to the speaker-level inputs. Most importantly, you must make sure you are putting them into the right spots, as the right rear must go to the right rear input and so forth.
This taps your amp into the audio system, factory or aftermarket.
Now, you want to run the wire from the amp speaker output to the subwoofer and speakers you plan to power. Ensure that you connect the negative to negative and positive to positive.
#5: Secure Connections
Finally, connect the power wire and your ground wire to the corresponding amp inputs. Make sure everything is secured with the help of a screwdriver.
When you are ready to test the system, simply connect the car battery and give it a try. If it doesn’t seem to be working correctly, you will need to disconnect the battery once again and check all of your wiring. It’s possible you have a loose connection or damaged wire.
#6: Tuning Your Amplifier
Now that you've installed your amplifier you're ready to fine tune the sound. Check out our Amplifier Tuning Guide to get your amp tuned up!
What about Multi-Amp Installations?
If you plan to run two amps, you simply run a heavy-gauge power cable from the battery to a distribution block. Then, you connect the lighter-gauge cables from this block to each amp.
Enjoy the Sweet Sound
If you did everything correctly, you are ready to enjoy the jams. There’s nothing quite as satisfying as setting up your own car stereo. From learning how to wire aftermarket amplifiers to replacing your OEM head unit, there are never-ending ways to customize your audio system.
