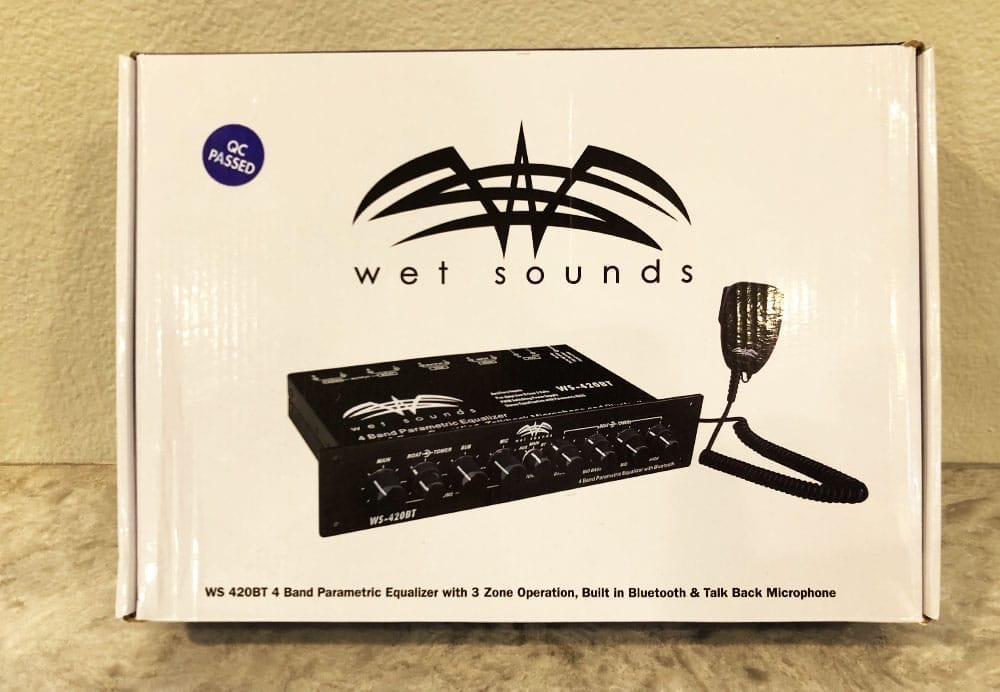
In this article: We'll unbox and review Wet Sounds WS4-20BT equalizer, it's key features and more.
High performance stereos, whether it be on your wakeboard boat or in your car, are kind of like high performance engines. They're built with purpose, they're tuned for performance, and you often have higher expectations of them than you would an OEM stereo.
If utilized properly, equalizers are what allow you to push your stereo to it's max and tune your system to your music preference. They allow you to turn up (or down) the bass for your favorite rap song or crank the mids and highs for your favorite rock jam. And just like any other high performance stereo, your boat's stereo will benefit from having an equalizer.
The problem with ordinary equalizers though is that many are built with one zone in mind, and they're definitely not built to be out in the elements like your boat's stereo. Even if you browse through Crutchfields Marine Amp/Equalizer section, there really just aren't too many options on the market still. So Wet Sounds addressed these needs (along with many others) with their WS-420SQ and WS-420BT.
In this article I'll give you a look at the WS-420BT out of the box, run you through it's features and benefits and how powerful of a tool this unit is on your boat. Especially for the audiophiles and control freaks like me.
Wet Sounds WS-420BT: Unboxing and First Look
We recently purchased another WS-420BT for an upcoming project on a Nautique G23. I personally have installed a number of these on wakeboard boats and unless you have an integrated EQ and zone control built into the tech package of your boat you're going to want something like the WS-420.
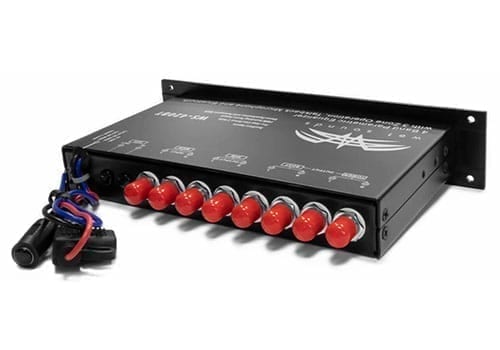
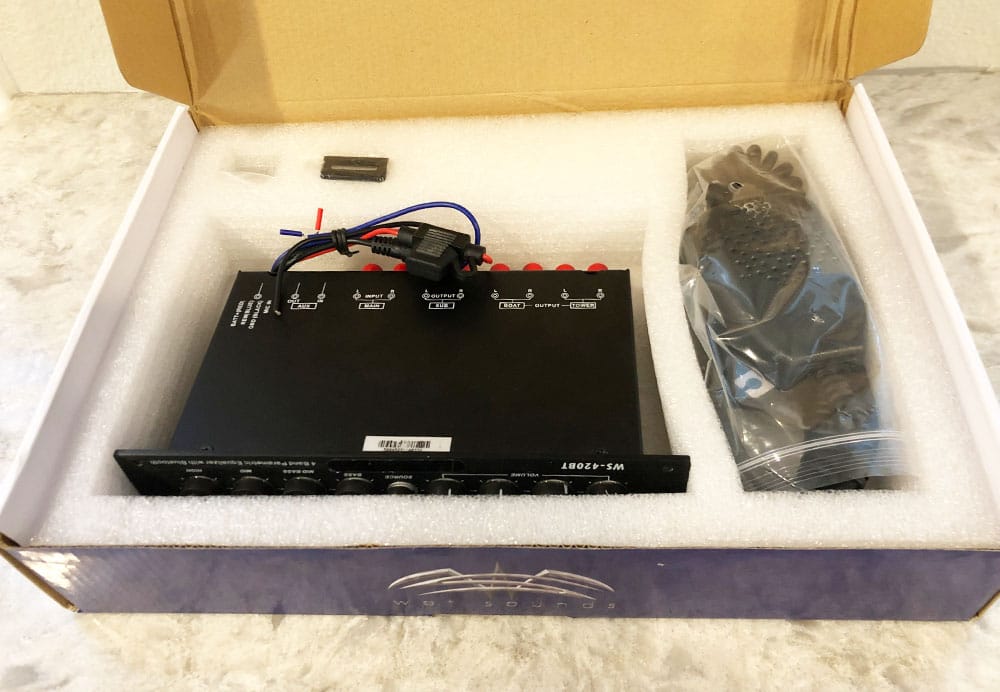
Out of the box, the WS-420BT is a pretty straight forward unit. It's considered a half DIN in size and measures 8-1/16″ W x 1-5/8″ H. In most cases it's not going to fit in an existing stereo opening or similar opening. These really are add-on units that you probably will have to find a convenient spot for.
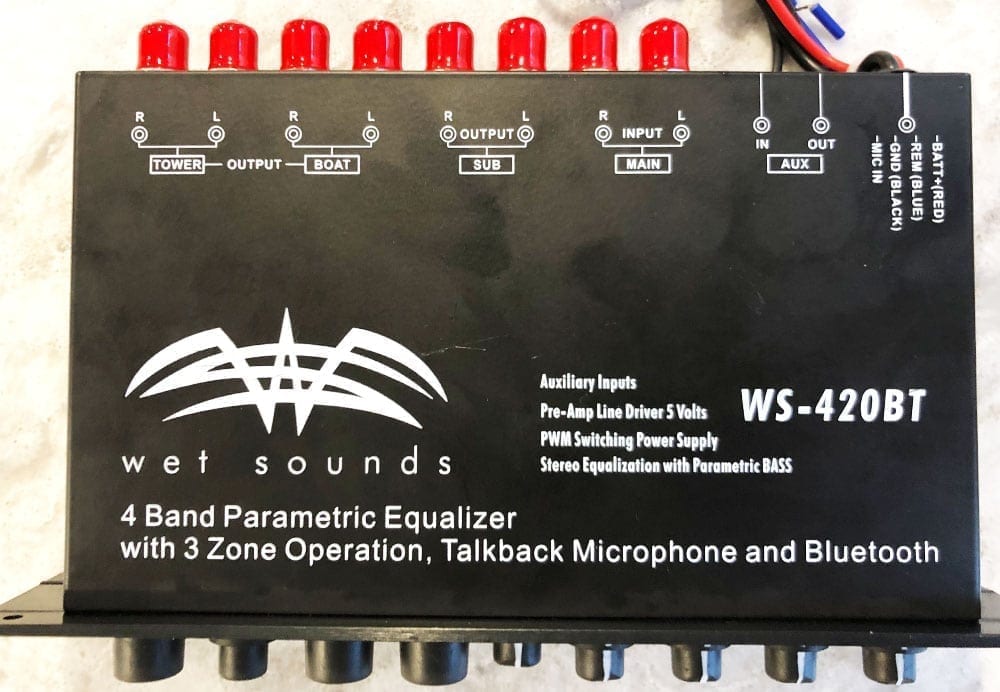
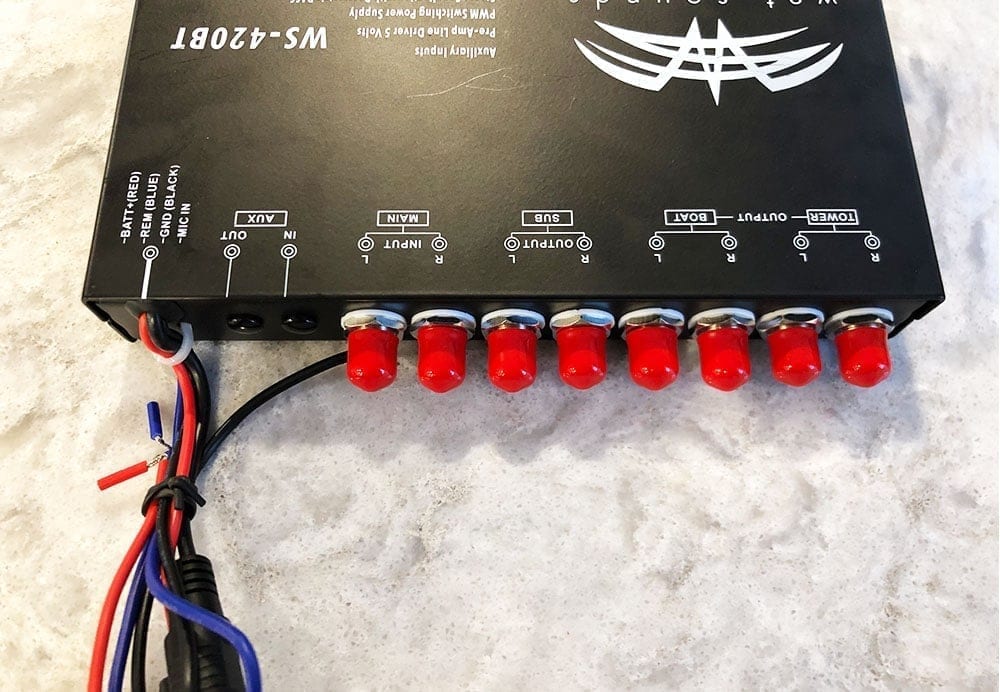
What you'll probably first notice when you pull the unit out of the box, mainly because it'll be facing upwards, is the easy labeling on the top side of the casing. Every output and input is very clearly labeled so that you don't have to have the instructions in your back pocket when you're under your dash or elsewhere wiring it.
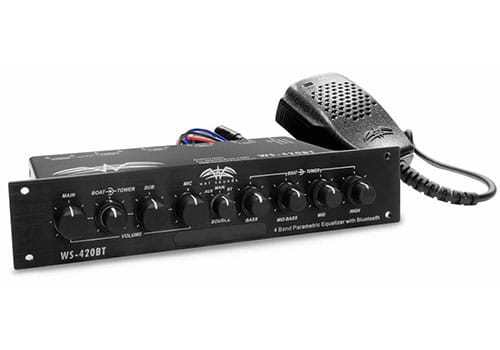
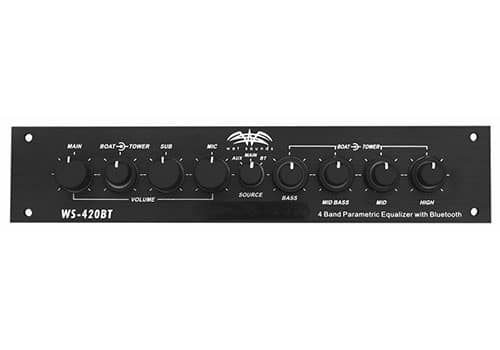
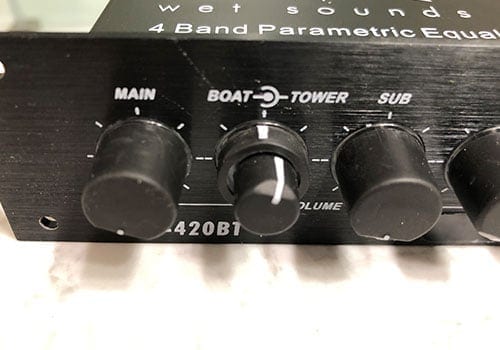
There's a number of knobs on the face of the unit – 14 in total to be exact when you include the dual knobs – also well labeled and pretty self explanatory. When you turn the knobs, you get a sense that they're stout and meant for the elements. They're a little tough to turn, but that's comforting in my opinion. The last thing you'll want is to hit some chop on the water and your tower speakers to crank on their own.
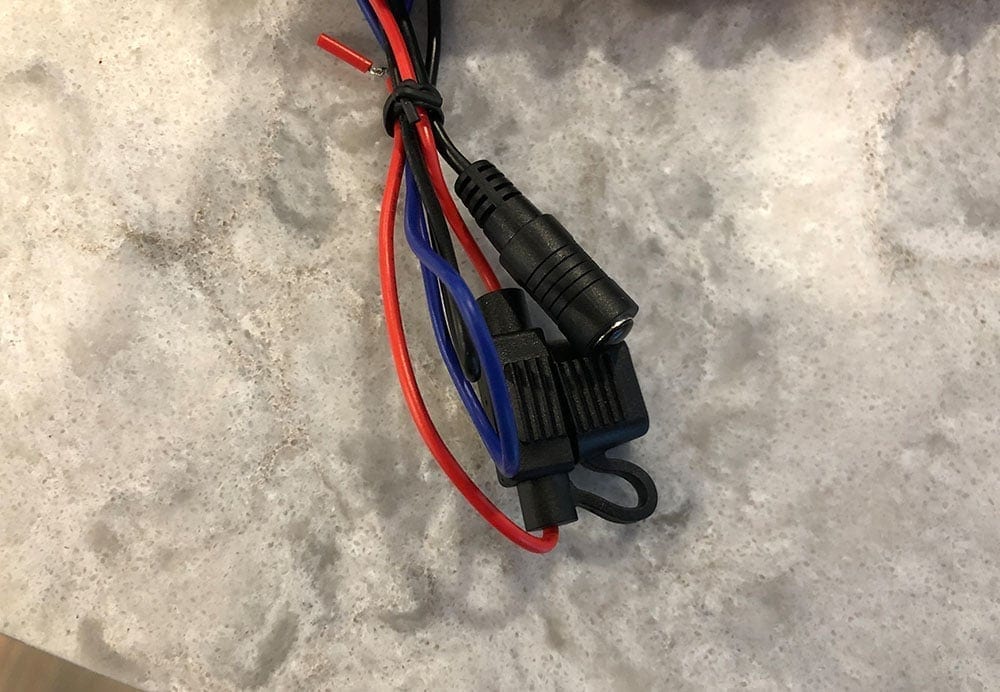
When you look at the back of the unit where the input and outputs are, Wet Sounds ships the unit with covers on all of the inputs and outputs to protect them from damage and/or moisture. Again, even the three wires that come from the unit for power, remote and ground are clearly labeled with color references on both sides of the chassis.
Buy the Wet Sounds WS-420BT
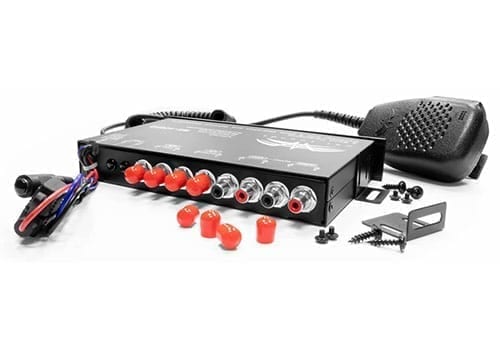
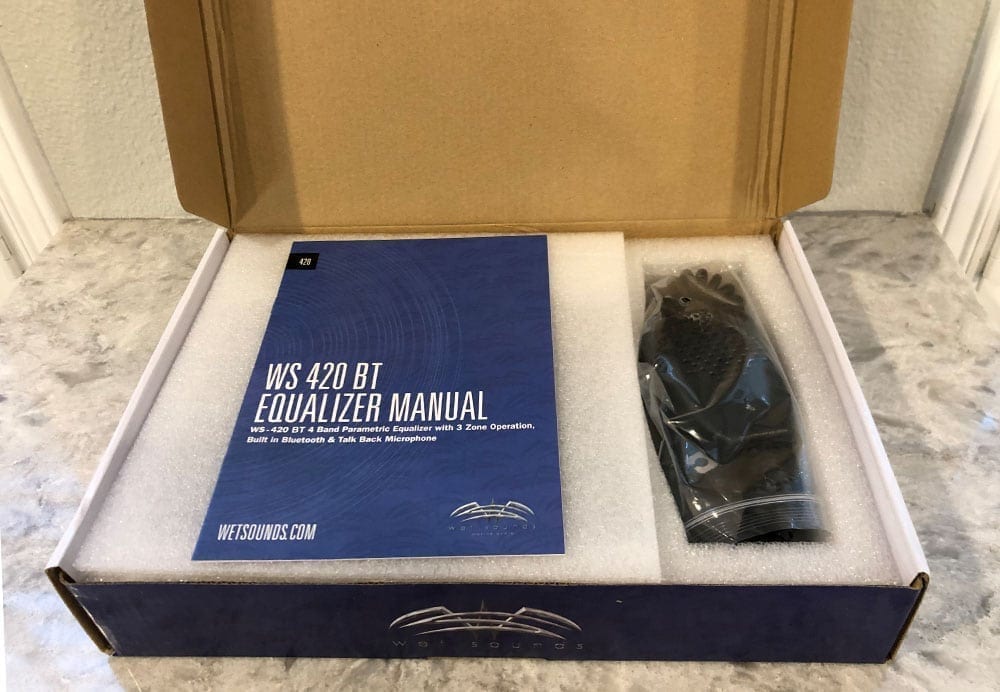
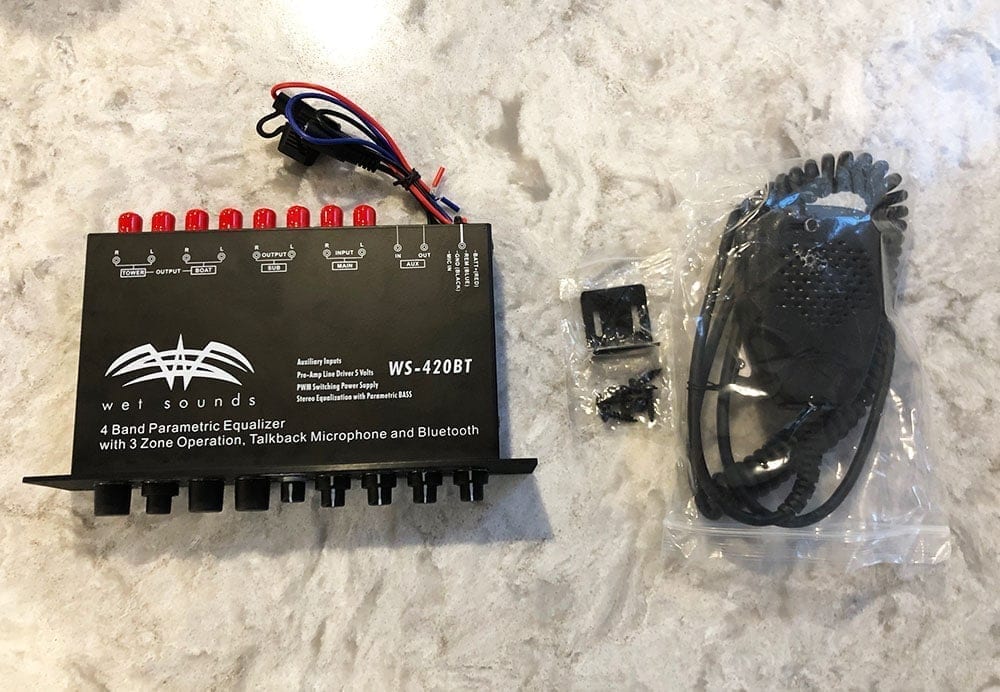
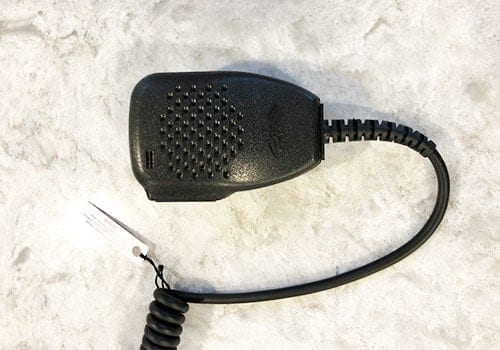
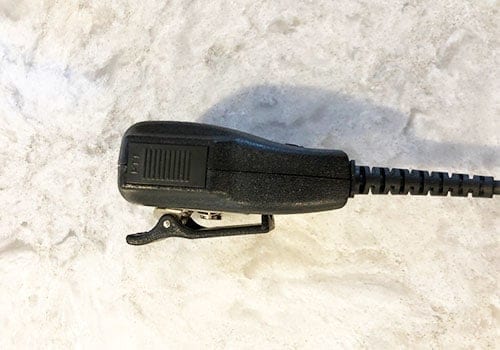
Within the box you'll also find the microphone. This was one of the very watersport-specific features that Wet Sounds integrated to allow you to talk to your rider in the water without having to yell at them or yell over the speakers. At first glance it's very well sealed and the wiring is heavy duty. This would typically be a vulnerable part to corrosion and water but in my experience, even after years of exposure to the sun and water the mic will not be a point of failure.
What I always found missing with the WS-420 units was a bezel. Wet Sounds ships the equalizer with the unit only, which has a faceplate. But if you're wanting to throw this into vinyl or undermount it below your dash you'll need to purchase a separate bezel. At the time of writing this article, Wet Sounds only carries an undermount aluminum mount. It's incredibly stout and I used it to mount below the throttle on my 2004 Super Air Nautique 210 but in my upcoming project I want to surface mount it in a vinyl panel and I actually had to 3D print my own bezel for it. You can see this bezel in the main image of this article. A quick breakout of the bezel options for the WS-420 units:
- WS-420SQ
- Flush, in-dash mount – Black or Silver
- Undermount + Bluetooth Knob – Black or Silver
- WS-420BT
- Undermount – Black or silver
Apart from that, they include mounting screws and a small bracket if you wanted to undermount the equalizer without the larger bezel.
What's In the Box:
Here's what you'll find in the box:
- Pre-amp/Equalizer
- 2-amp mini-blade fuse (installed)
- 2 Mounting brackets
- Four M3x4mm Machine screws
- Four 5/8″ Self-tapping screws
- 4 Large washer/gaskets
- 4 Small washer/gaskets
- 2 Adhesive backed foam gaskets
- Microphone with 34″ coiled cord (approximately 10′ when stretched)
- Owner's manual
Key Features & Walkthrough
Full control of your stereo – that's my opinion of what the WS-420BT gives you while you're on your boat. In fact, in my previous stereo setup on my Super Air Nautique 210 I didn't even have a functioning head unit. The WS-420BT completely replaced the traditional boat's head unit for me. It's that powerful. Let's walk through a few of the key features that make this equalizer such a powerful piece to have handy in your boat, or to replace your existing head unit entirely.
Dual 4-Band EQ
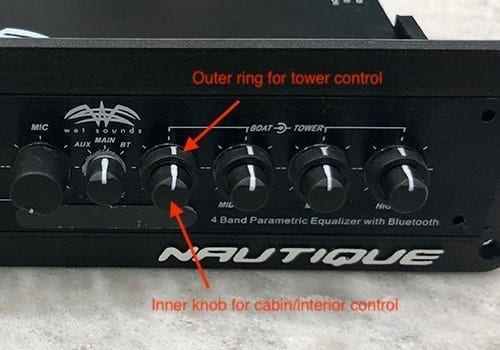
This is my single most favorite part about this unit. As it should be since I was buying it for its EQ features. What is a dual 4-band equalizer anyway? Well, Wet Sounds combined a 4-band equalizer with two separate zones. Essentially you have a 4-band equalizer (bass, mid-bass, mid, high adjustments) for your cabin/interior speakers separately from a 4-band equalizer for your tower speakers. It allows you to control the frequency coverage separately, but essentially with four dials instead of eight. They do this with dual-control knobs – the inner knob controls the cabin/interior speakers and the outer ring controls the tower speakers.
This easy, independent control of your cabin/interior speakers and towers an essential part of what makes this equalizer great. Your tower speakers are typically a completely different type of speaker altogether than your cabins and require separate tuning. Having control of both with the touch of a finger on the fly is key. Or, if you're not the audiophile type and want to set it and forget it that's fine too. Just make sure you mark what your tuner set it at originally so you can always put them back if you bump into them.
That brings me to my one and only complaint about these easy-to-use dual control knobs – if you brush up against them they're going to throw your system out of tune. I mentioned earlier that the knobs themselves feel solid and are relatively tight and hard to turn. But mistakes happen and it's still really easy to accidentally turn one of these eight knobs without really even noticing it. It would be amazing if there was a mechanical ‘locking' feature for these.
3-Zone Control
The dual 4-band equalizer is essentially an equalizer for 2 zones. But that's controlling the gain for certain frequency ranges. When Wet Sounds says “3-zone controller”, they're really referring to volume control. The WS-420BT is equipped with 3 zones, where you can control volume independently for your:
- Tower Speakers
- Cabin/Interior Speakers
- Subwoofer
The tower speaker zone control is what I use the most. If you're towing someone and they happen to fall, you can cut the towers immediately without completely dropping the interiors and sub. And if your rider can't hear the music, you can also crank the towers up a little more without blasting the passengers that are inside the boat. Similar to the equalizer controls, there's an inner and outer ring. The inner controls the cabins/interiors and the outer controls the tower volume (consistent with the equalizer controls so you don't confuse yourself).
It's not a ‘new' concept to have zone control in a boat, but bringing it onto the boat with such an easy to use dual-control knob is so convenient.
And if you'd prefer to not hassle with the multiple zones, you can also just set the volume across all three once and use the “Main” volume control that's on the far left (in the picture above). This will raise the volume across all zones equally without requiring you to mess around with each zone independently.
Microphone
For towing skiers, wakeboarders and surfers, the WS-420BT comes with a talkback microphone that will allow you to talk to your rider in the water directly from the boat. It will mute all other music in the tower speakers whenever you engage the microphone. On the panel, it also has a dedicated volume control to allow you to control how loud your voice is in the tower speakers separately from the music volume.
Personally, I never used the microphone all too much on the water. But every once and while when you need it, it's nice to have.
Input Selector
The biggest difference between the WS-420SQ and WS-420BT is that the 420BT has an additional input selection for Bluetooth connectivity. The WS-420BT has three input selections:
- Main: This is uses an RCA input that comes directly from your head unit.
- Aux: This is an auxiliary input that uses a headphone jack on the rear of the unit.
- Bluetooth: You can connect directly to the WS-420BT by connecting to “TQDZ” on your phone.
You can technically connect any device at any time to this unit via one of the three inputs. Switching between them is a simple toggle of the most central knob on the unit. Since I didn't even have a functioning head unit in my previous boat I actually used the Bluetooth feature exclusively and connected directly to my phone. Then, I'd use my Apple Watch to adjust the volume directly from my watch while I was out in the water. It took me about 3 years to pull the trigger, but I (almost) specifically bought an Apple Watch just to do this!
Installation & Configuration
I think when it comes down to installing and configuring the WS-420BT (or SQ version for that matter), the downsides to this product are revealed. The good news is that if you have a professional installer that knows what they're doing you won't have to worry about it and you can probably skim through this section!
In reality, it's not overly complex to install thanks to Wet Sound's clear labeling and detailed instructions. But I can remember the first unit that I installed, looking at the RCA outputs and inputs in the rear, reading through the gain setup and tuning and thinking “this'll be fun”. I would recommend consulting an expert when you go to install this unit, especially tuning. It's relatively easy to ruin your stereo if you don't configure your gains properly or hook up something incorrectly.
Wiring & Inputs
Let's start with power and ground. On the back of the unit there are three wires:
- Red: 12v Constant. This hooks up to a constant 12v power on your boat or directly to the battery. If you're hooking your entire stereo up behind a fuse, I'd recommend hooking this into the same 12v that's behind the fuse. You can tap into your distribution block if you have one.
- Blue: 12v Remote. This hooks up to the remote turn on from the back of your head unit or the remote turn on signal wire from your boat. This is the same as the “accessory” turn on in a car. It tells the unit when to turn on and off. Don't run this to constant power or you'll have a constant draw on your battery.
- Black: Negative. This hooks into the negative wire on your boat or directly to the negative terminal on your battery.
Locating the power and hooking in the power and remote are pretty straight forward. Typically you'll find both constant power and remote power from the back of your head unit. The yellow wire on the back of your head unit is 12v constant and the red will be remote/accessory. Note that if you plan on running your stereo and the WS-420BT independent of having your head unit on, you'll want to use the red remote/accessory that's on the back of your head unit and not the blue remote wire output. If you tap into the blue, in some cases the head unit will need to be on in order to send power to the remote wire, which would force you to always have your head unit on when you want your WS-420BT on. Tapping into the red accessory wire will ensure its tied to the boat's remote power instead of the head unit's.
There's one callout to make about wiring the negative on this unit. VERY frequently people complain about feedback in their stereo after wiring in the WS-420. This alternator wine or feedback is normally related to a poor ground connection. There are two ways to resolve this:
- Fix your ground. Make sure that you have a quality source that's properly grounded. This can be tough though.
- Use the ‘ground isolation' jumper that's built into the unit. It's a feature that Wet Sounds included just for this purpose to limit or eliminate feedback due to a bad ground. You can find more information about the location of this jumper. I personally have never had to use it. I normally always have been able to find a quality ground when installing these units, or rewire the grounds/Perko setup to improve the feedback significantly. If I ever end up using it, I'll be sure to update this article.
When it comes to the RCA outputs and inputs, there's a lot of them but thankfully they're labeled. The only thing you need to know is what the output/input is and match it to the amplifier that will be powering that particular zone. For example the “Tower” output would go into the amplifier channel that powers the tower speakers. I mentioned this earlier about the “Main” input – this input will come directly from the “Front” RCA output from your head unit.
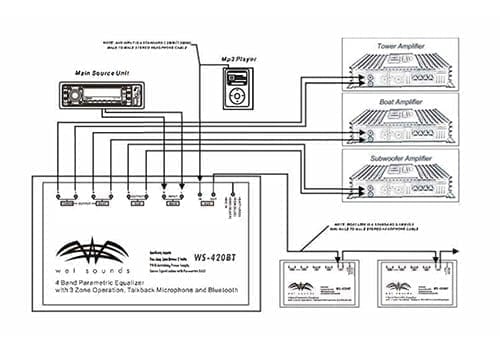
Here's a snapshot from Wet Sound's manual:
Configuring/Tuning
Once you have your stereo setup and your WS-420BT wired, the last thing you'll want to do is configure it and set up the gains. Instead of me writing it out, I'll quote the steps found in the manual because it's still what I reference when I install these.
- Unplug all the RCA's from your amps. Turn all the amp gains down.
- Turn the radio up to find the maximum volume. Set the system with the head unit volume at 85% of max. This is the loudest the radio should ever go. Radios will create distortion the higher the volume is turned up. Which will create distortion on the output signal before reaching the amps. So find a safe easy to remember volume. If the head unit is 35. Max should be 30. If the head unit is 40. Maximum should be 30 to 35 and so on.
- Once you have found the maximum volume set point. Turn the radio back down. Use a test CD that you are familiar with for tuning. Something that has highs and lows and vocals.
- Make sure the settings on the radio are flat. You should not tune a system with the treble or bass up.
- Make sure all the eq adjustments are flat. Right in the middle. Plug in all the rcas from the eq to the amps.
- Plug in just the RCA's for the in boat speakers amp. Set the high pass crossover at around 80HZ to 100HZ.
- Turn the radio up to the max safe level found in step 2. Turn the eq up to about¾ of max volume.
- Slowly turn the gain up until you hear the speakers distort. Slowly back off the gain from that point a small amount until you hear the speakers play as loud as they can with no distortion.
- Unplug the RCA's from that amp and plug the RCA's into the amp running the tower speakers. Set the high pass crossover on the amp for the tower speakers at 80HZ to 100HZ.
- Slowly turn the gain up until you hear the speakers distort. Slowly back off the gain from that point a small amount until you hear the speakers play as loud as they can with no distortion.
- Unplug the RCA's from that amp and plug the RCA's into the amp running the subwoofer. Set the low pass crossover on the amp for the subwoofer at 80HZ. On the WS-420. Turn the bass level to max. The ring is a frequency adjustment. All the way down to the left is 30 HZ. You will want to put this around 60 to 80HZ. So about¼ of the way up.
- Slowly turn the gain up until you hear the speakers distort. Slowly back off the gain from that point a small amount until you hear the speakers play as loud as they can with no distortion.
- Turn the radio back down and plug in all RCA's and do a final check with everything playing. You should now have the gains set at “unity” Meaning they are all at the same level and you are matched across the board.
- Note that you can adjust the high pass and low pass filters to tailor the sound to each boat. As you can set the high pass higher to get more volume but at the expense of losing some low end mid bass. You can then fine tune the sound on the eq as well. Using the knobs and rings. Most systems will not need much in terms of boost.
You can find the full manual here: http://www.wetsounds.net/media/products/manuals/Wet-Sounds-WS-420BT-Manual.pdf.
These instructions will give you a solid foundation for most setups.
WS-420BT Specs:
- dual 4-band equalizers
- built-in Bluetooth
- independent control of cabin and tower speakers
- independent subwoofer volume control
- half-DIN (1″ tall) chassis
- 3.5mm Boat Link allows you to link up with other WS-420BT-equipped boats
- 3.5mm aux input jack for MP3 players and other sources
- microphone input for Wet Sounds talk-back PA mic
- frequency response: 10 to 40,000 Hz
- signal-to-noise ratio: 80 dB at full output
- bass at 100 Hz, midbass at 300 Hz, midrange at 2000 Hz, highs at 15,000 Hz
- equalizer range: +12dB
- max output voltage: 5 volts RMS
- choose blue or red backlighting (via simple jumper removal – see manual)
- size: 1-5/8″ H x 8-1/16″ W
Conclusion
I'm a big fan of the WS-420BT. I've had it in my own personal boats and have installed several in other boats as well. And I plan on putting one in my G23 too. There's something about the simplicity and control that the unit gives you over your stereo. I think that this unit is best for the audiophile though, but also a very powerful for the normal stereo/music lover. I say that because if you aren't familiar with how the EQ will affect your stereo and start turning knobs, you can do some real damage.
I would also recommend allowing an audio expert or someone that's familiar with the unit install it. It's a tough DIY and, again, you can do some real damage to your expensive stereo if you don't configure and tune it properly.
Zone control is a must in your wakeboard boat though, and the WS-420BT does it incredibly well. The dual 4-band EQ is clutch when tuning your cabins/interior speakers separate from your tower speakers, and with the volume control and Bluetooth you can really ditch your traditional marine head unit if you wanted to. I highly recommend the WS-420BT for every boat with separate towers and interior speakers.
