In This Article: We'll unbox and review Sony's new XAV-AX5600 bezel-less touchscreen head unit, walk you through the unboxing process with images, detail all of its key features including how to play video and multimedia on the unit, and provide our opinion about the unit along the way.
Sony's XAV-AX5600 is a double-din, touchscreen digital media receiver (so it doesn't play CDs or DVDs). It's the newer and improved version of its sister unit, the XAV-AX5500. Last July (2020), we unboxed and reviewed the AX5500 and installed it in a Subaru STI. I was really pleased with the unit. Sony has stepped up their game this year with this latest model.
In April 2021, Sony announced the release of three new/updated head units. Among them was the XAV-AX5600. They also released the AX8100, you can read our review of Sony's XAV-AX8100 here if you're interested. The AX5600 has a ton of great features, and also some really cool new things that really unlock it to be among the best multimedia and video head units on the market today. In particular, an HDMI input!
In this review, I'll unbox a new XAV-AX5600 and show you all the angles and it's features. I'll point out some of the key differences between this new head unit and its predecessor, the AX5500 and give you a full walk around of the head unit. I'll also power it up and demo all of the functionality when the unit is turned on so you know exactly what you're getting into if you're looking to purchase one.
By the end of this review, you'll have a great understanding of all of the key features on this head unit and hopefully have enough info to make your decision if you want to purchase one or not.

Unboxing the XAV-AX5600
Who doesn't like to unbox a beautiful, new head unit? Unboxing a head unit, to me, really sets the tone and expectations for the type of product you just purchased. So it's important to include it in a review. If you're going to spend $500+ on a head unit, you want to at least be sure that if it's dropped during transit it's well-protected and that it comes with everything you need to install it.
So in this section, I'll unbox the XAV-AX5600 for the first time and detail all of my first impressions of the head unit, what I liked, what stood out and give you a look at everything in the box as I pull it out.
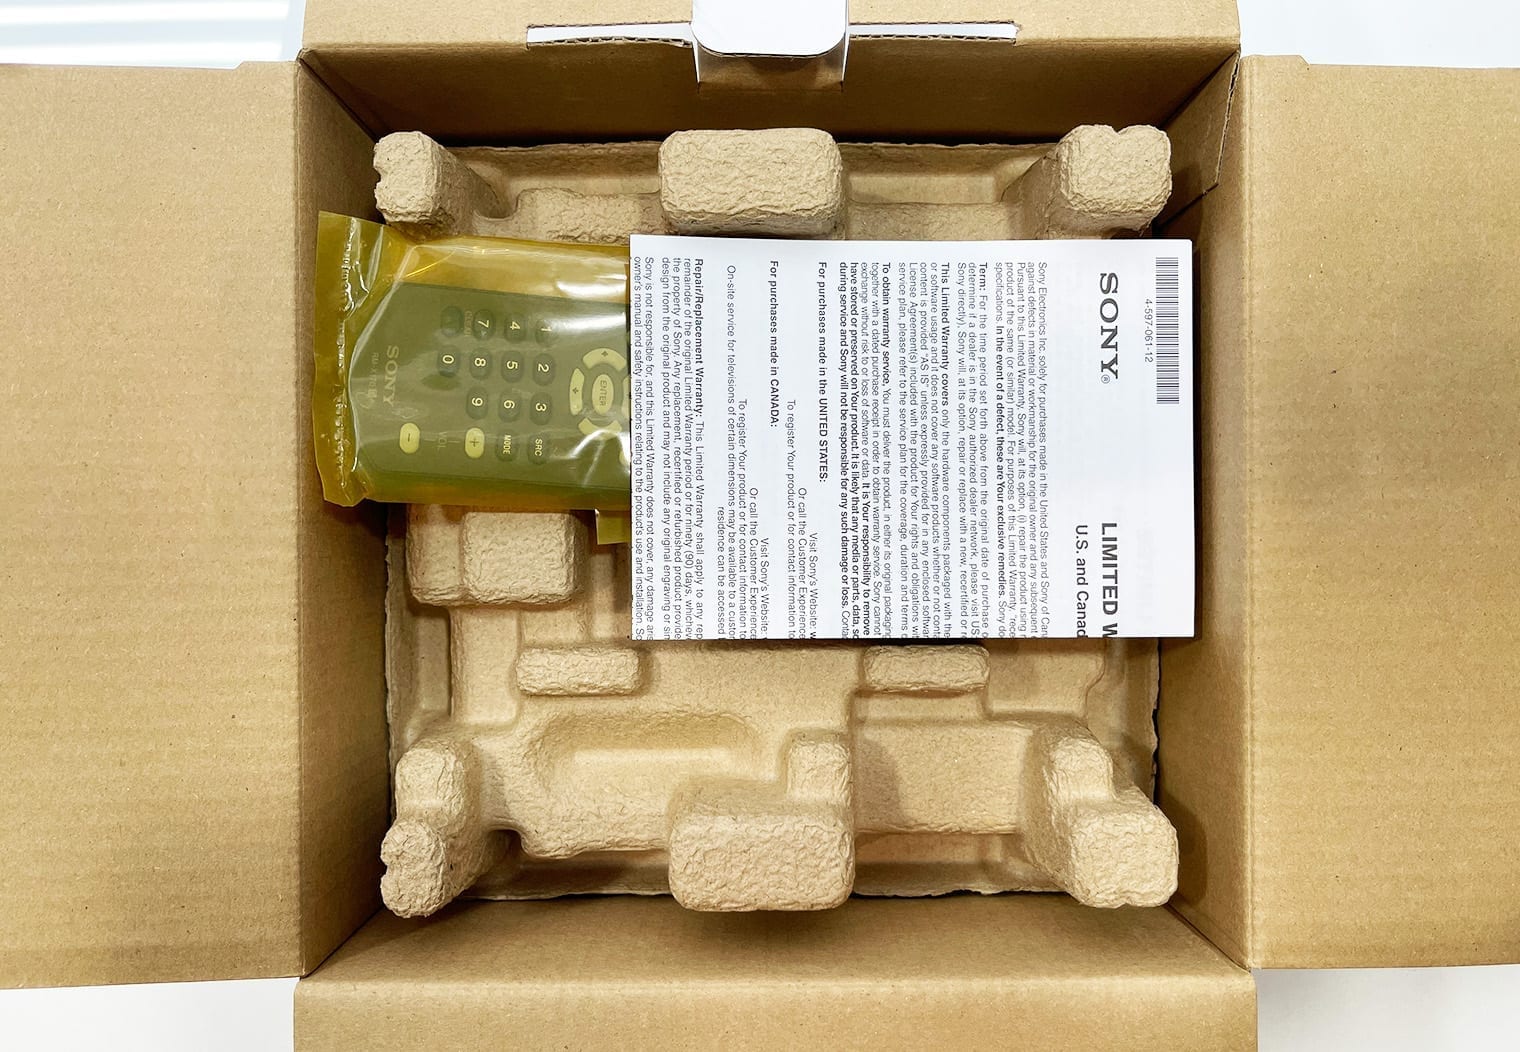
First thing's first, the XAV-AX5600 comes with the following in the box:
- Digital media receiver with 6.95″ touchscreen monitor
- Wiring harness with 6.5′ parking brake wire
- 3-Wire to 3.5mm SWC adapter for steering wheel control
- 52″ USB extension cable
- Remote control (RM-X170) with battery included
- Double sided tape
- Microphone w/ visor-bracket (attached 12′ cable terminated by a right-angle mono-3.5mm connector)
- Operating Instructions
- Warranty Information
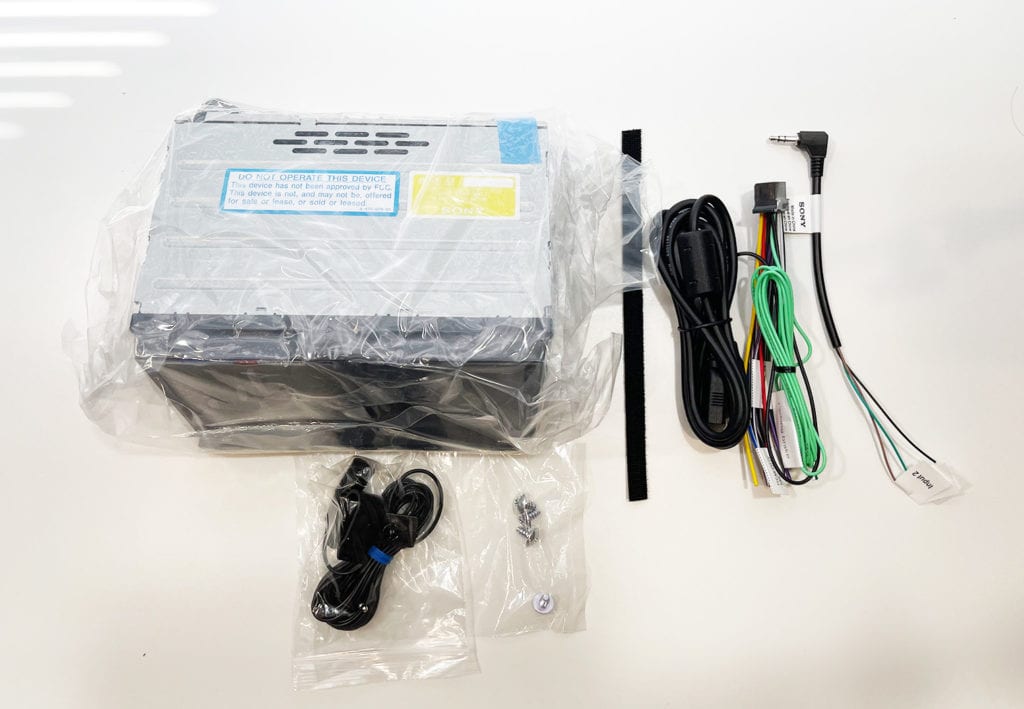
Here's a look at the XAV-AX5600's packaging and box as I opened it up for the first time. Like all Sony products, it's neatly packaged and well protected. All of the wires and components are organized and secured well inside the box. And the outer packaging looks great too with all of the key features and details right on the front for you to see.
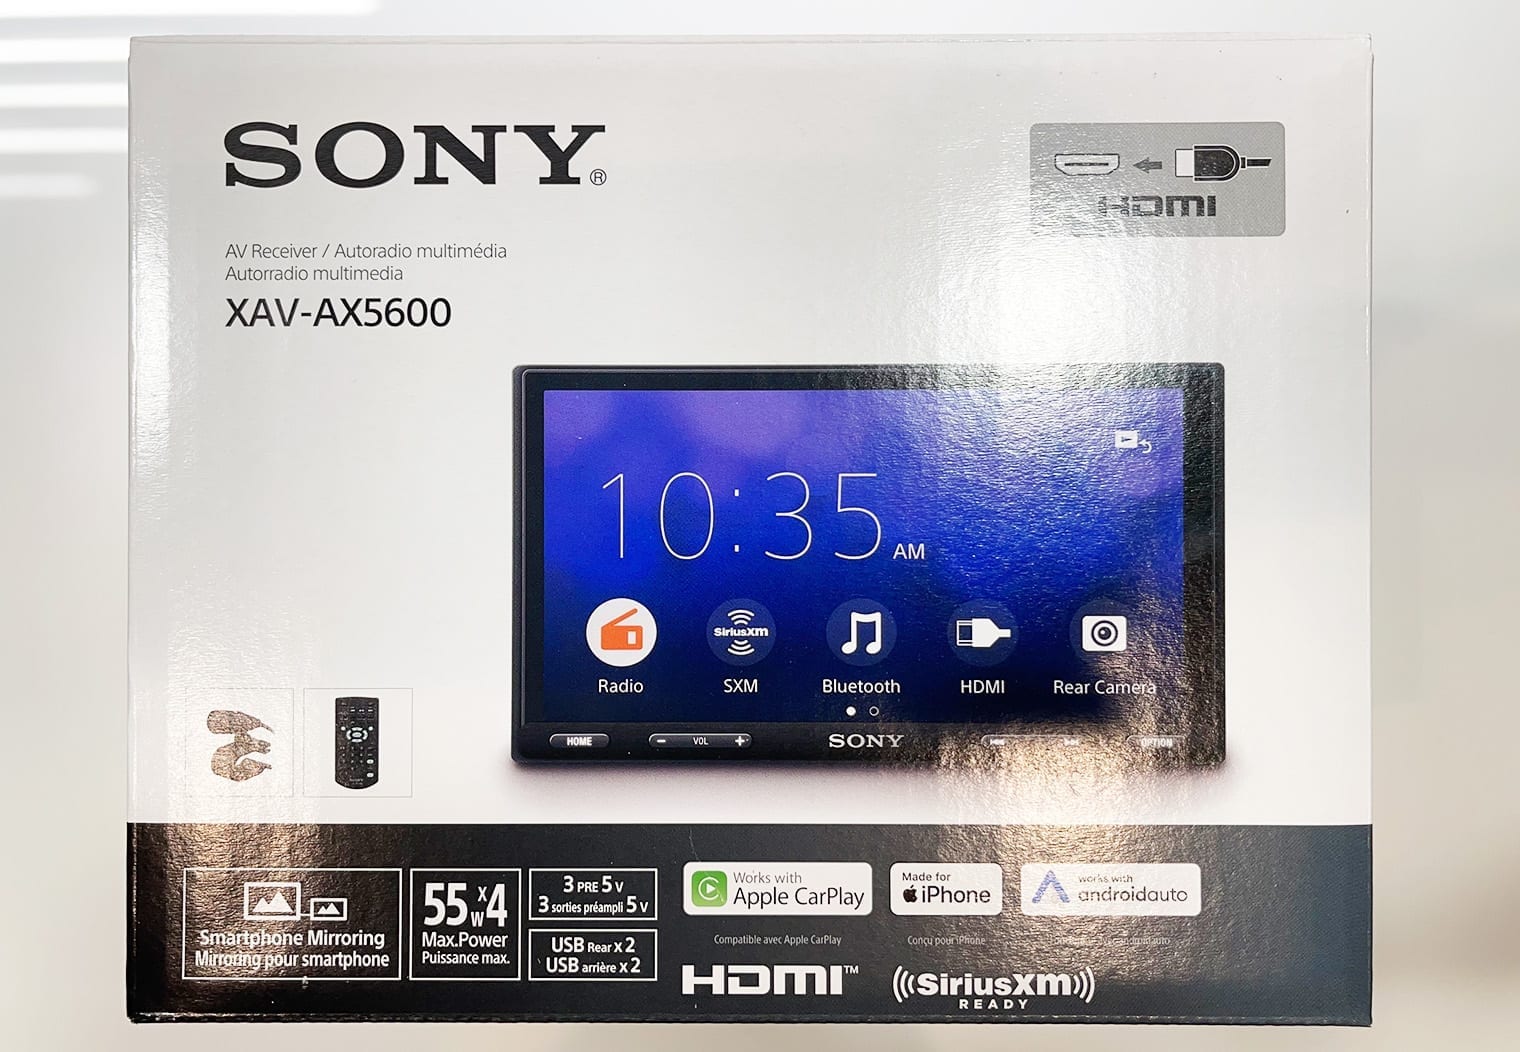
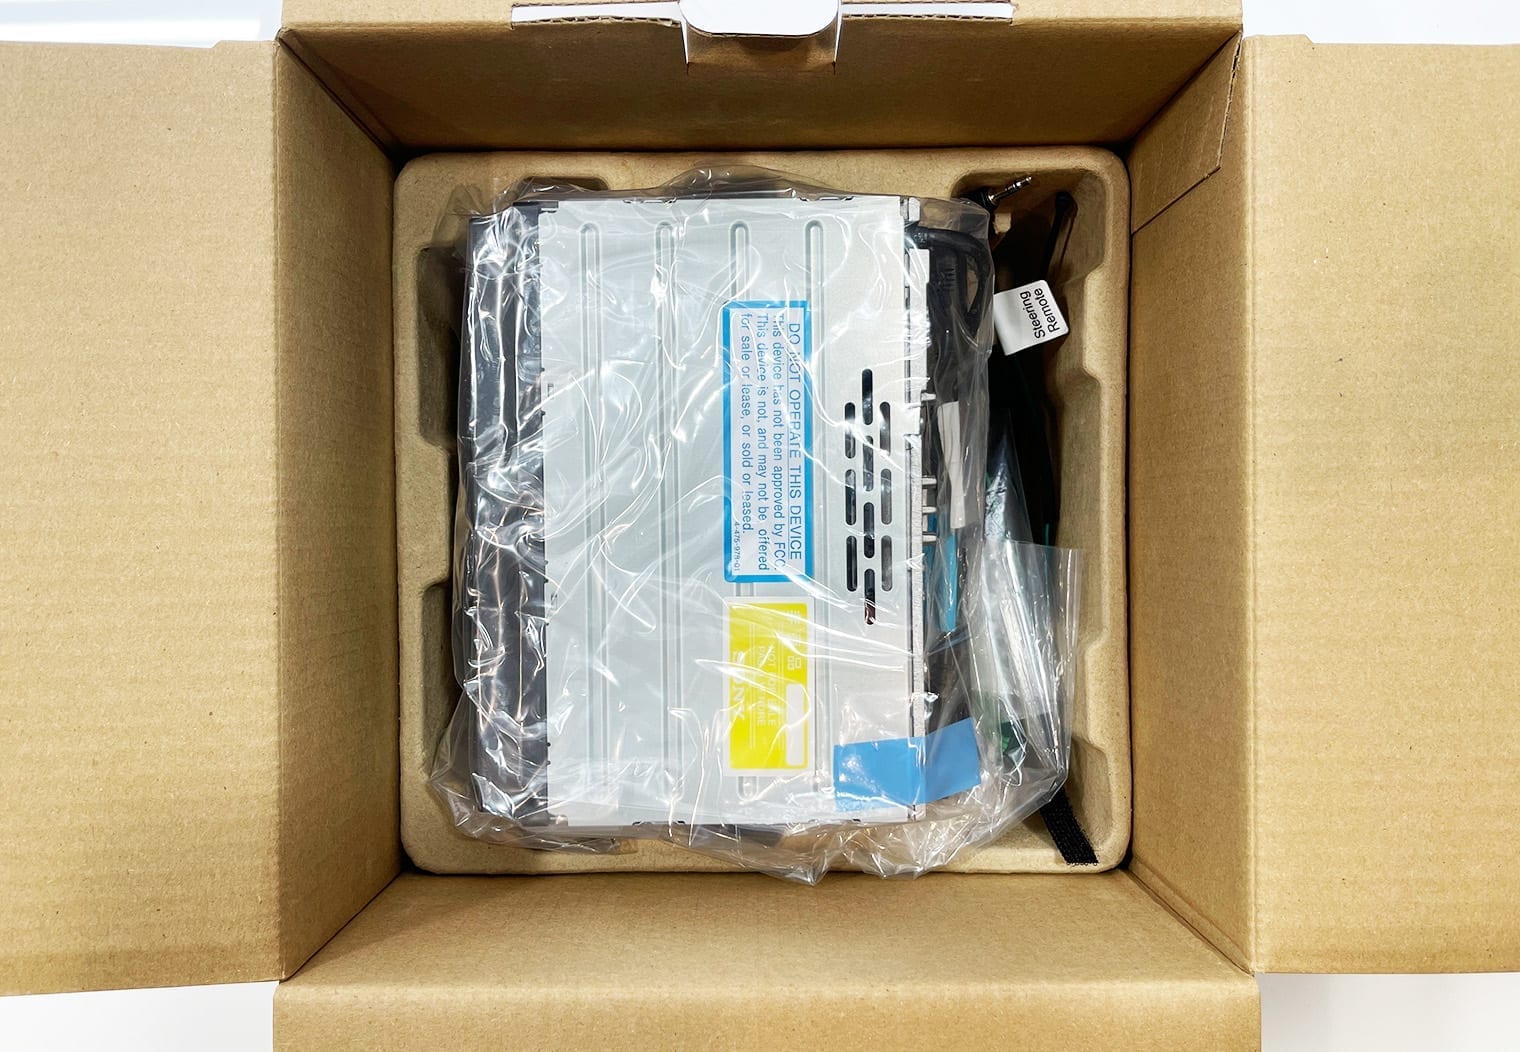
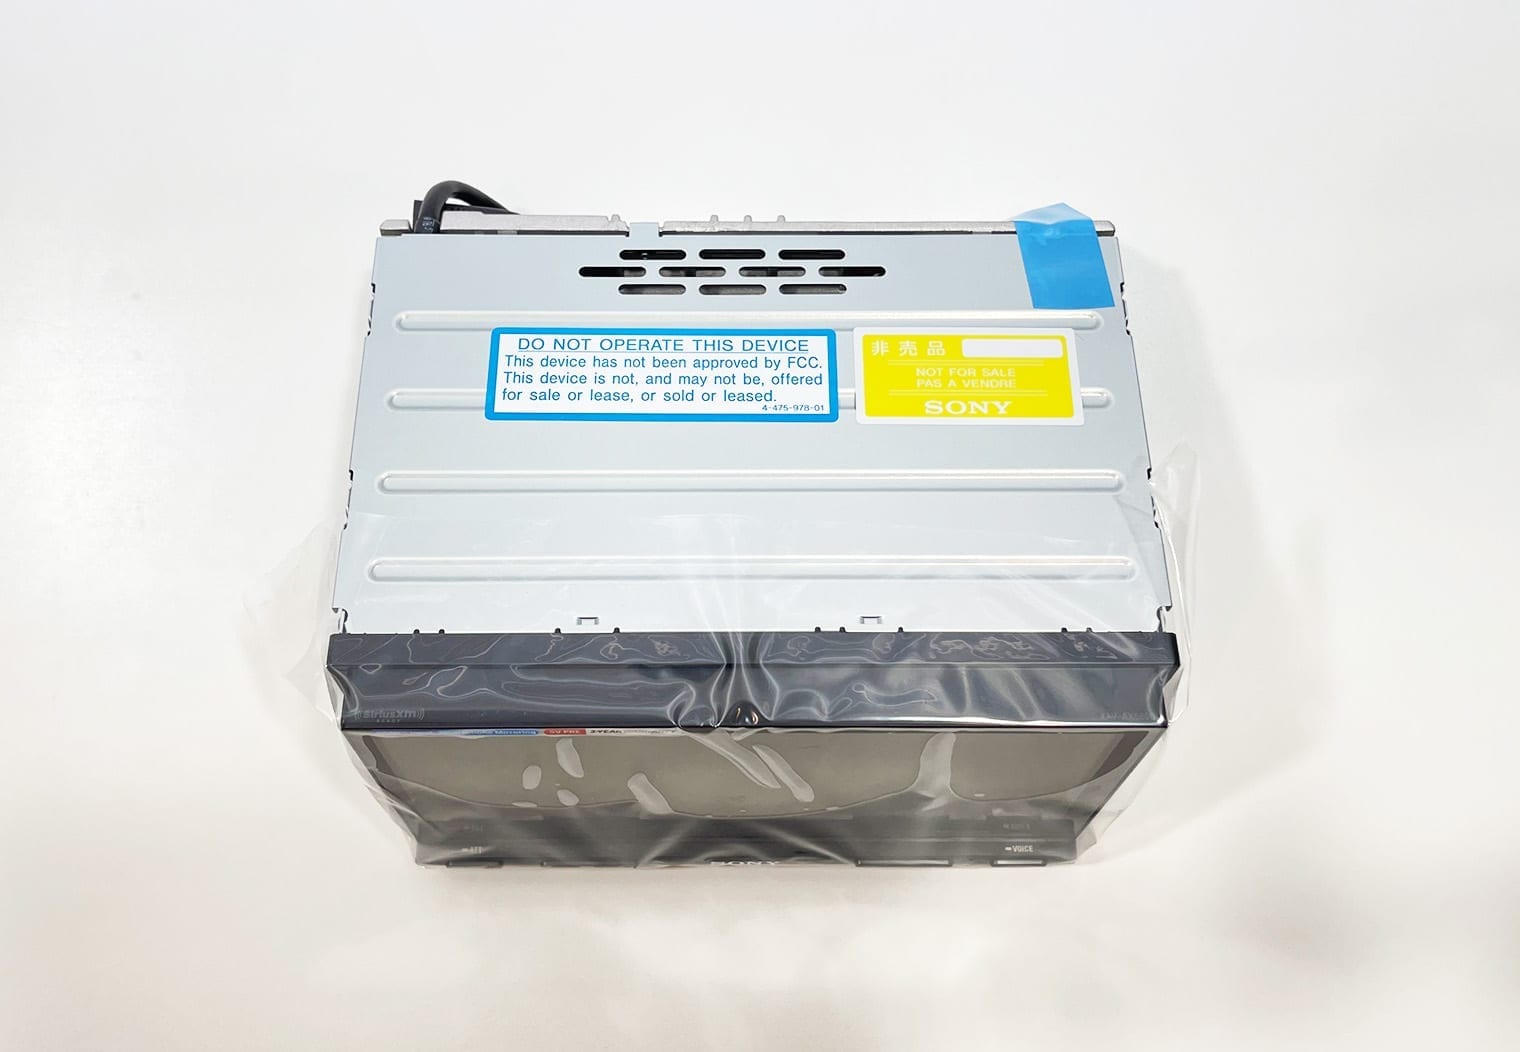
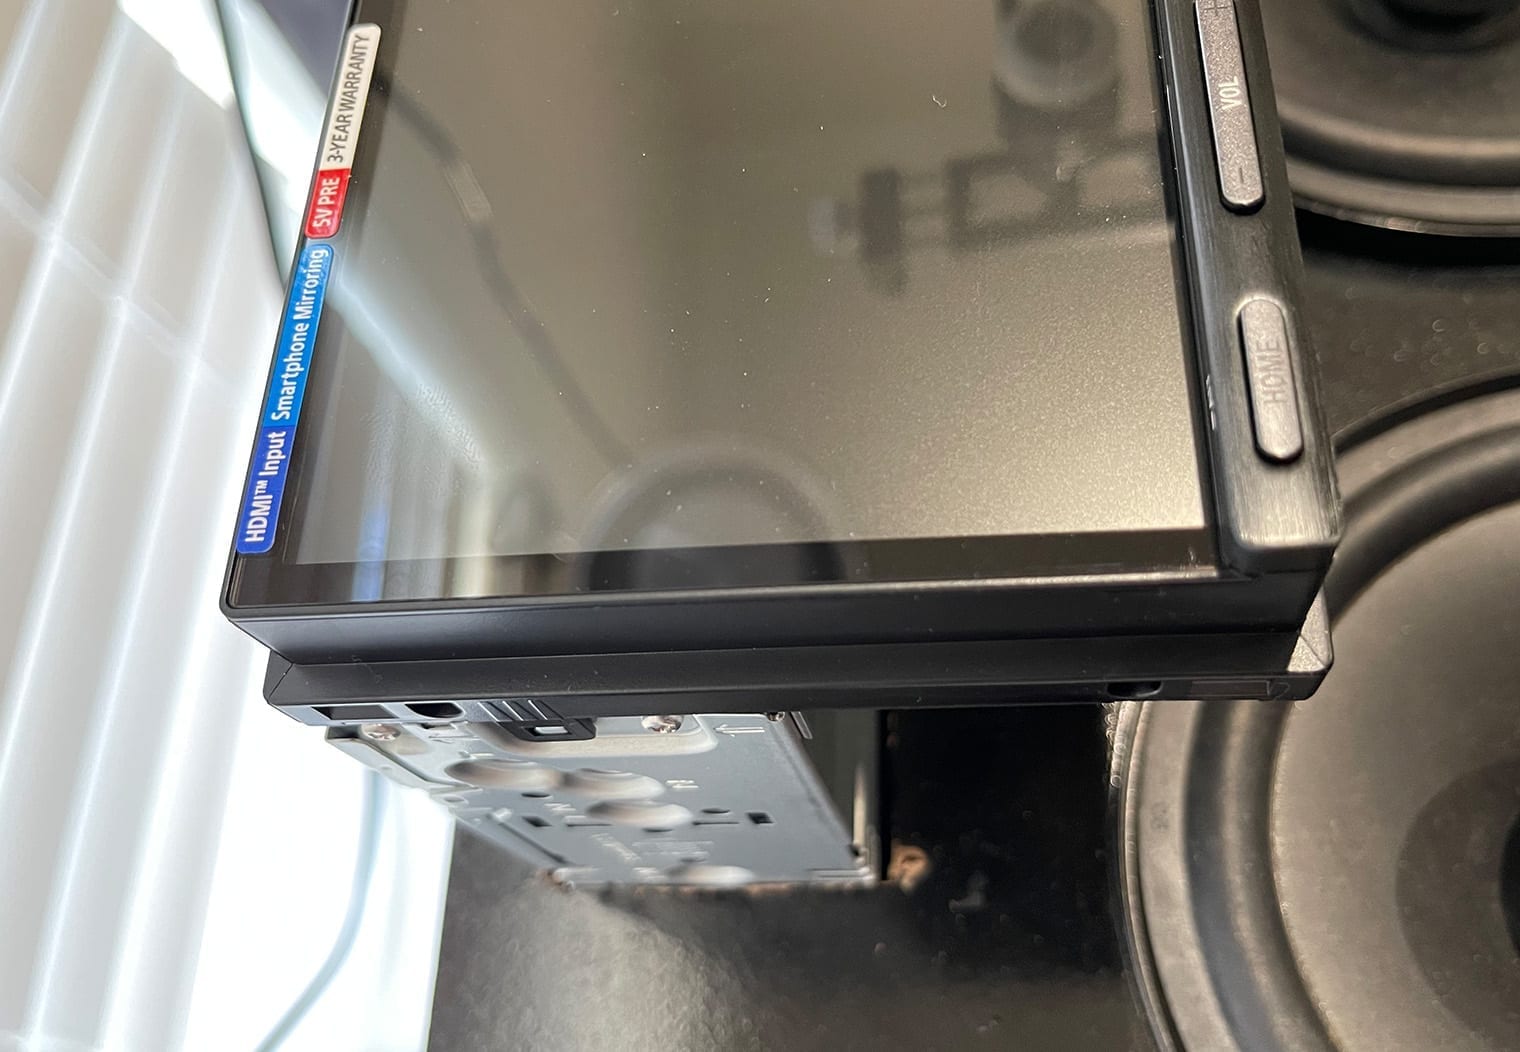
Presentation is always on point whenever I open up a Sony. Unboxing the XAV-AX5600 met my expectations. The first thing that I pulled out, naturally, was the head unit to take a look at the screen and inspect it. It's shipped with a protective film but once you pull that off I could really get a sense at how clean the screen was and a closeup look at the bezel-less edge. I'll cover more about the screen further in the article but here's a few shots of the unit as I pulled it out.
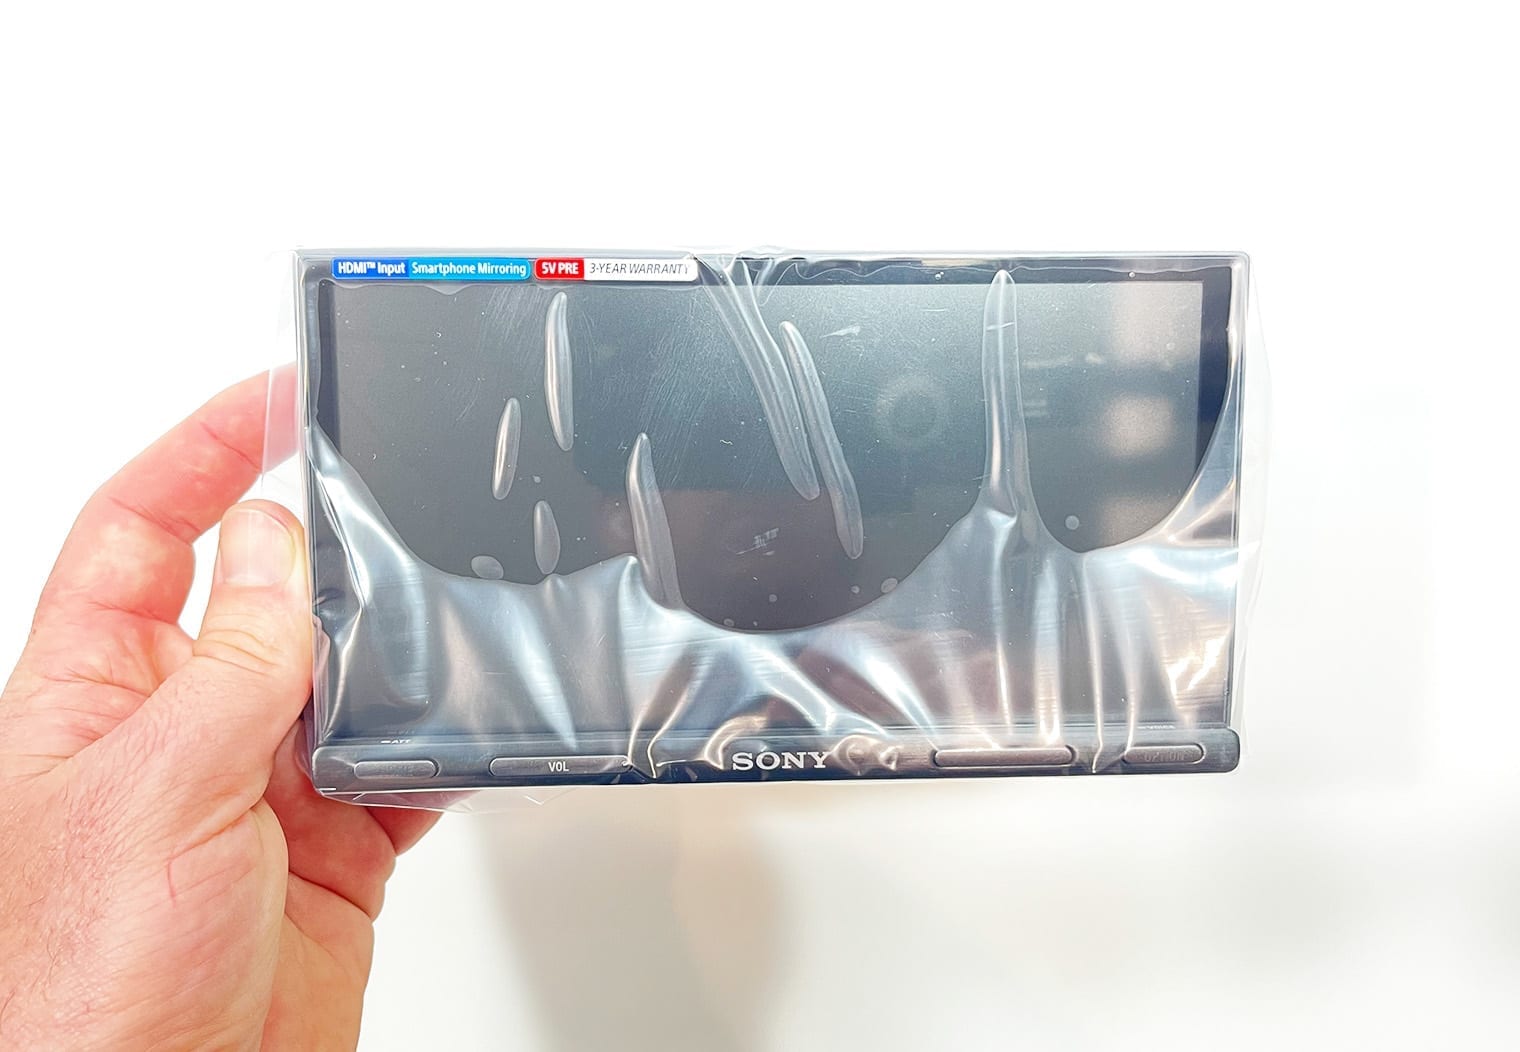
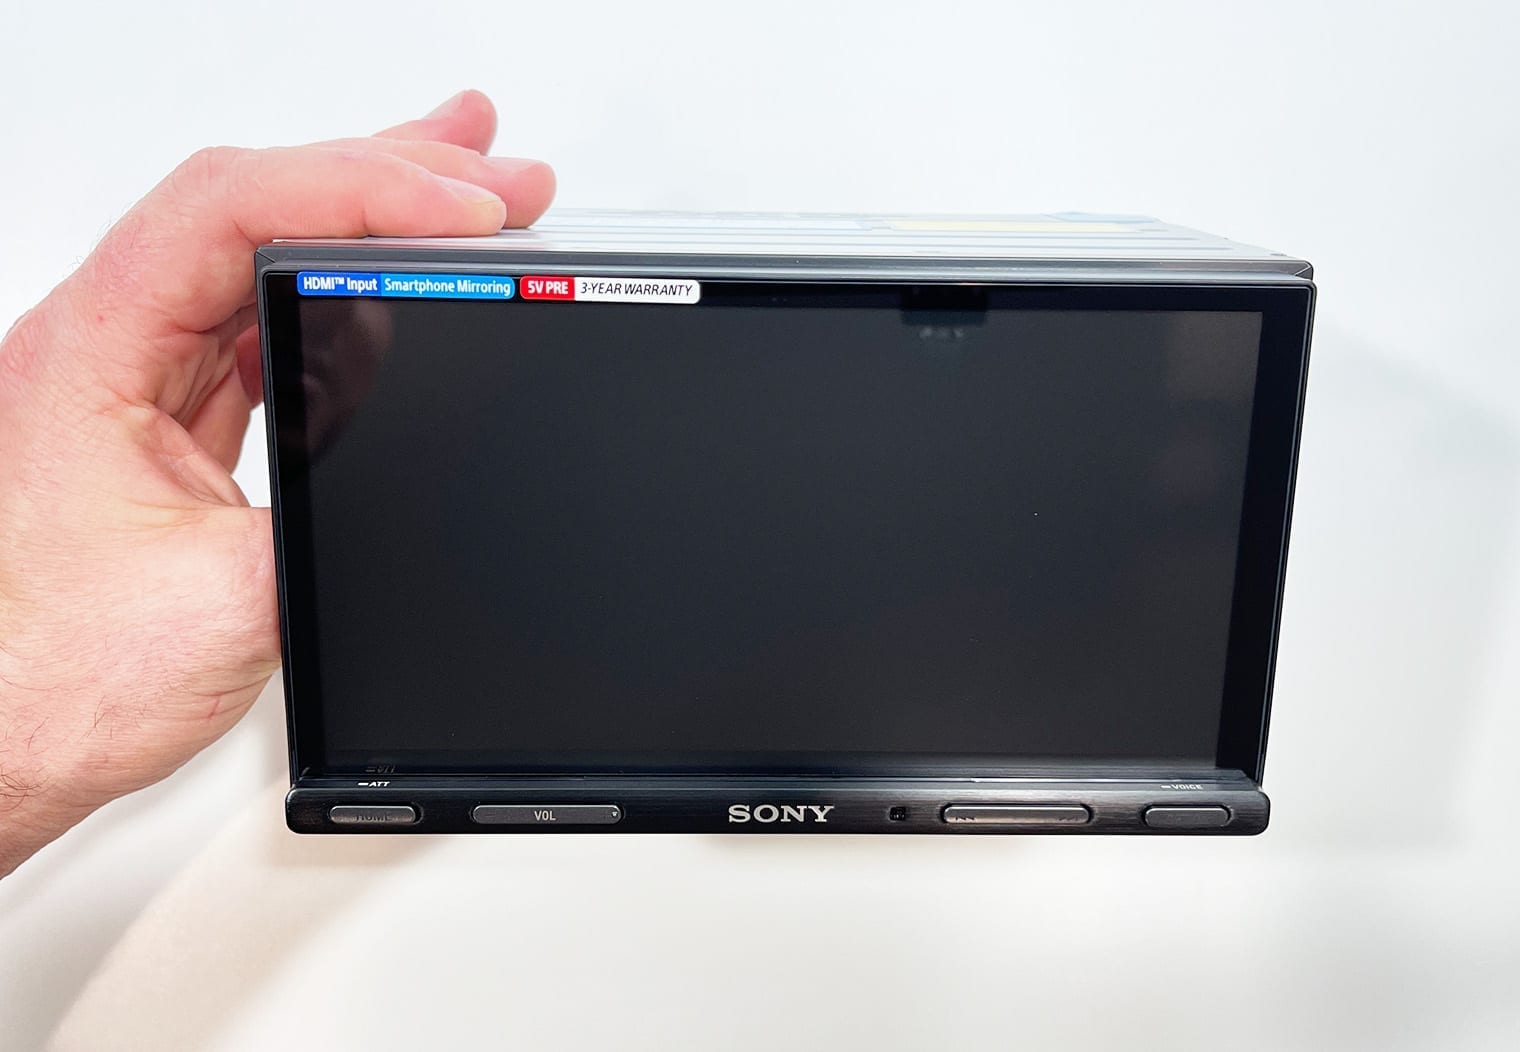
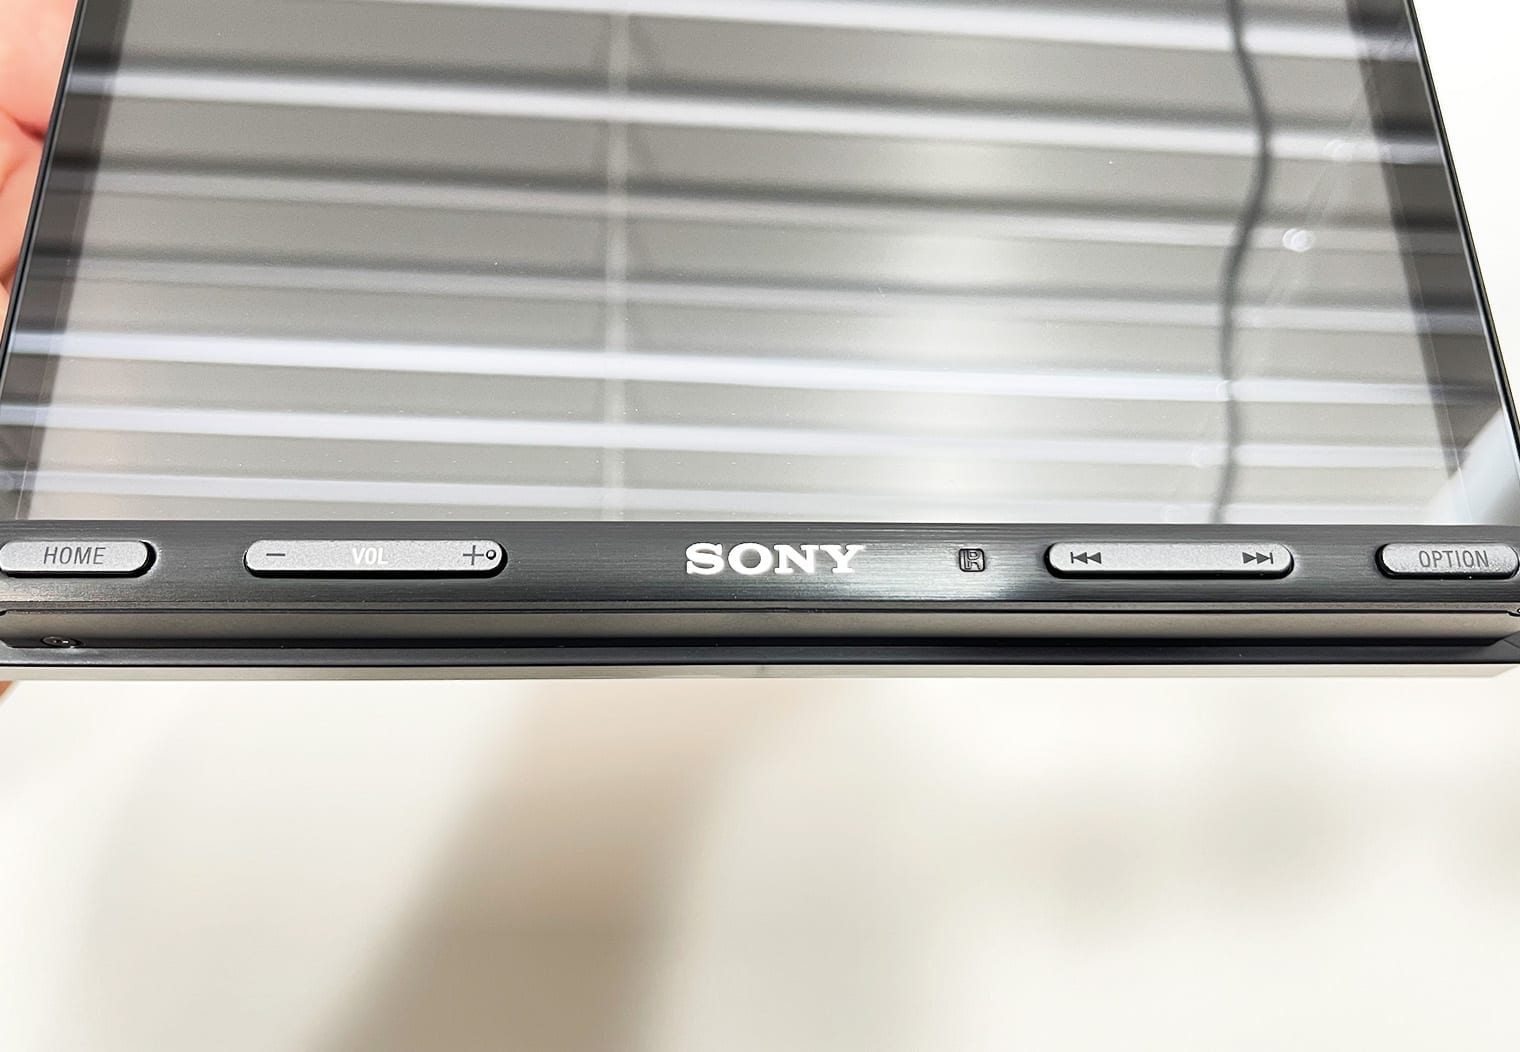
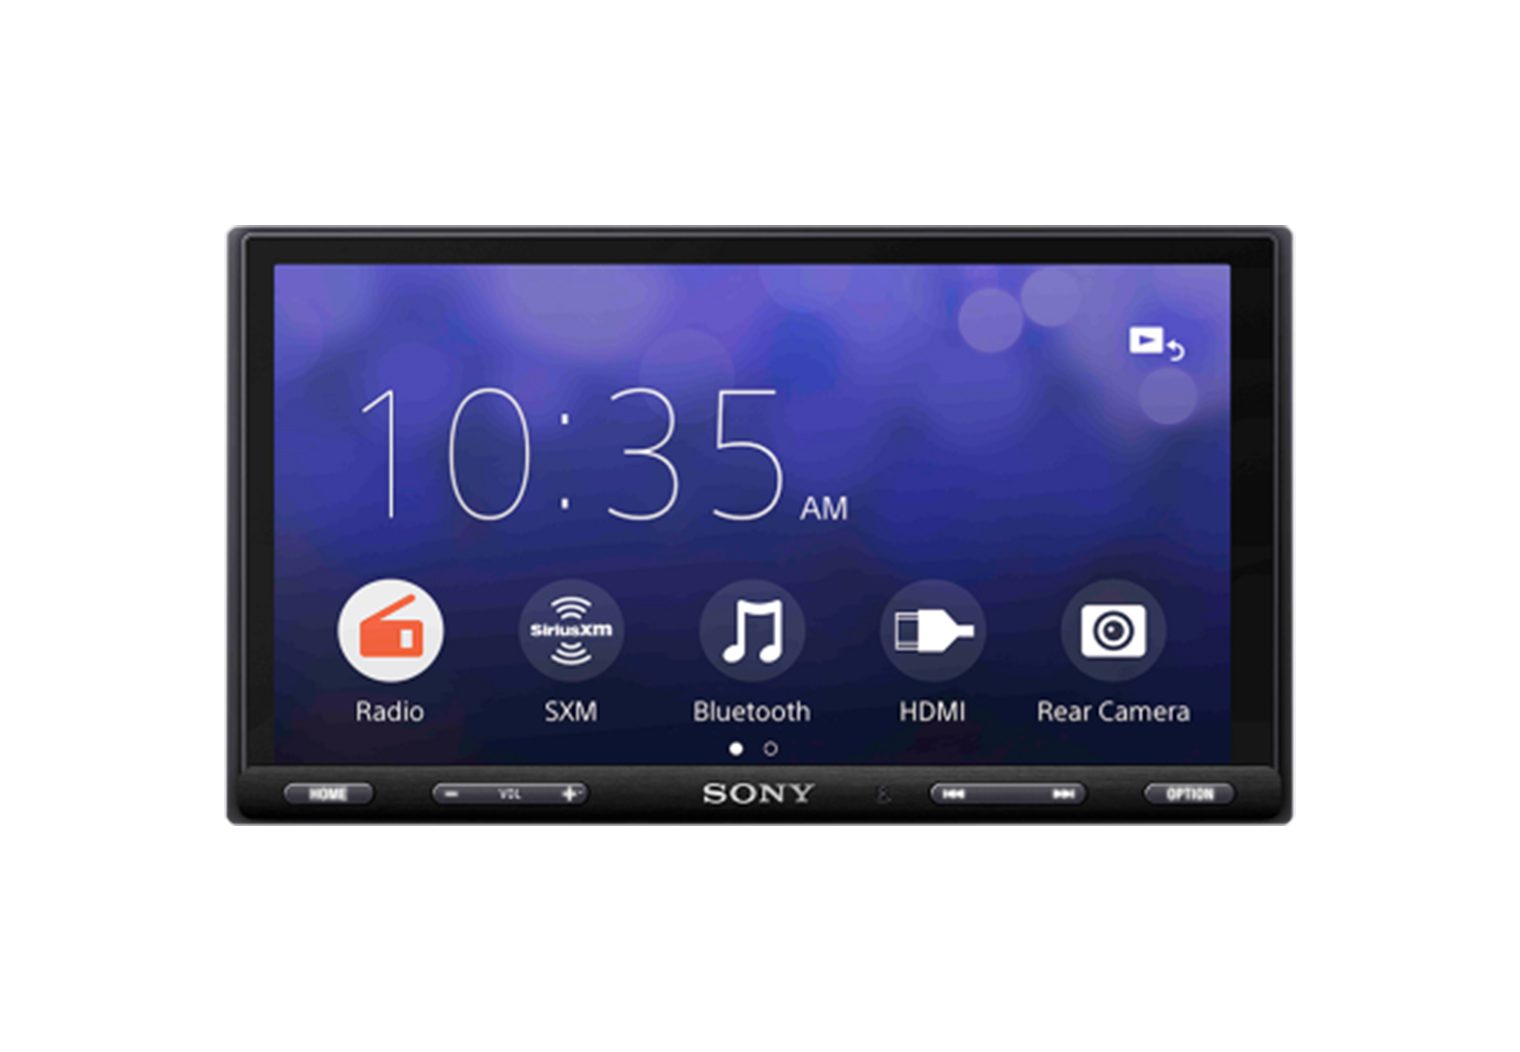
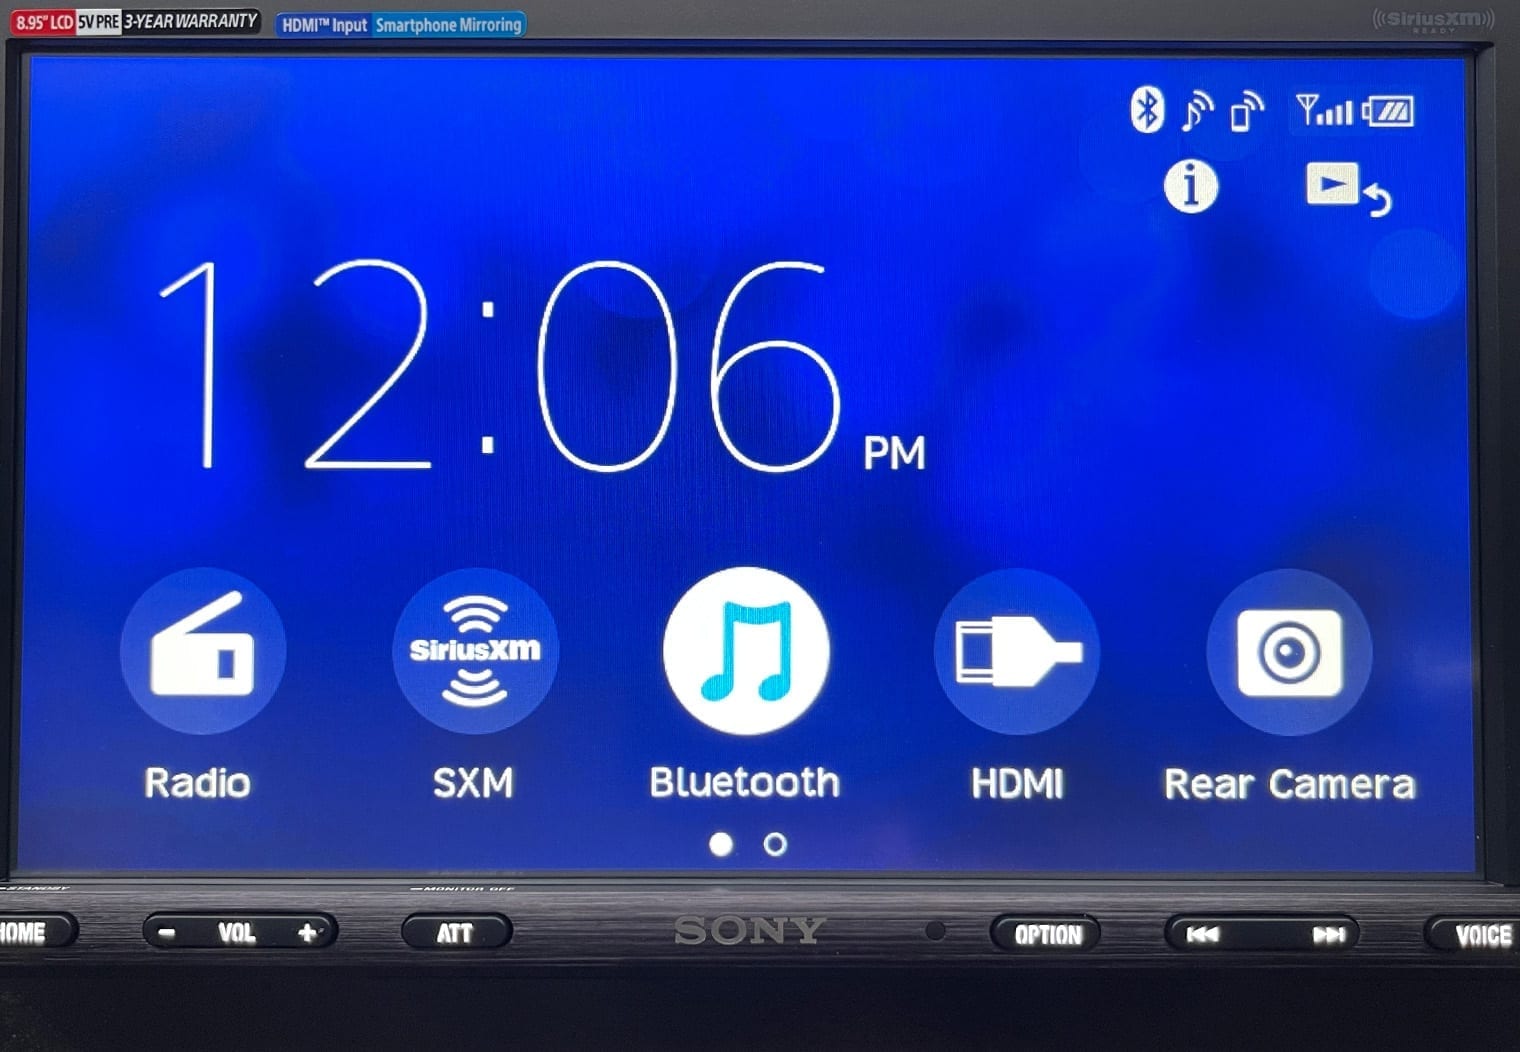
The 6.95″ Bezel-less Screen
I have to say, the screen on this head unit (and the AX5500 before it) really looks clean. It's a single pane of glass that spans the face end to end with no bezel, giving it a super-clean finish and OEM look when it's installed in your dash. Here's some more details about the screen on this unit and what to expect when you use it.
Screen Specs
The screen on the XAV-AX5600 measures 6.95 inches diagonal (156.6W x 81.6H in millimeters according to Sony's specs). 6.95″ is pretty standard in the industry for touchscreen head units that have button controls on the bottom like this one unless it's an oversized screen like Sony's XAV-AX8100. Some units replace the button controls with touch-screen controls which expands the size to 7″ but it's really not a noticeable difference.
The bezel is non-existent on the edges of the screen, making the single smooth piece of glass span the full width and height of the screen. It has a DOT resolution of 800×480 which is plenty for this size of screen. I'll talk about clarity more in the HDMI section when I review the screen and video functionality.
Resistive vs Capacitive Touchscreens
I like to detail the difference between resistive and capacitive touchscreens in these reviews because people might have a preference for one but don't know it unless you're touching the screen in person. So for those who might not know what a resistive or capacitive touchscreen is, here's a quick overview.
Per wikipedia, a resistive touchscreen is a touch-sensitive screen that's composed of two flexible sheets coated with a resistive material and separated by an air gap or microdots. So, when you touch a resistive screen, you can somewhat feel the flexible sheets as you push down. In comparison, when you touch your iPhone's screen is like touching a hard piece of glass.
One of the benefits of a resistive touchscreen is that any object that touches it – nails, pens, hands with gloves, etc – will trigger the touchscreen. It's the easiest, most universal type of screen between the two which makes it (in reality) more ideal for the automotive use case. The downside is that the layers of flexible sheets that enable the ‘touch' can change the way that the screen looks and the quality of the image. This is slightly noticeable between the AX8100 and AX5600. In the images below, you can see the difference in clarity of the AX5600 (left) and the AX8100 (right). In person, the screen on the AX5600 looks a little clearer.

On the flipside, you have capacitive touchscreens. The XAV-AX5600 has a capacitive touchscreen. And the easiest way to describe it is to reference your iPhone or smartphone. iPhones have capacitive touchscreens, which use an electrical charge to detect touch and movement on the screen. Most folks who own an iPhone know by now know that not every surface will trigger the phone's touchscreen. That's because you have to touch it with something that's conductive for it to work. Nails, pen tips, etc aren't conductive so they won't work.
What's nice about a capacitive touchscreen is that it really does feel like a superior screen and gives you the same feeling as using your smartphone. It also, again, has a clearer looking screen because it's just a pane of glass instead of the layers of material that are on a resistive touchscreen. But at the same time, there aren't many capacitive touchscreens that have anti-glare, that includes this unit. In the end, the preference for one screen or the other is going to be entirely your own and for your own reasons. I like them both for different reasons.
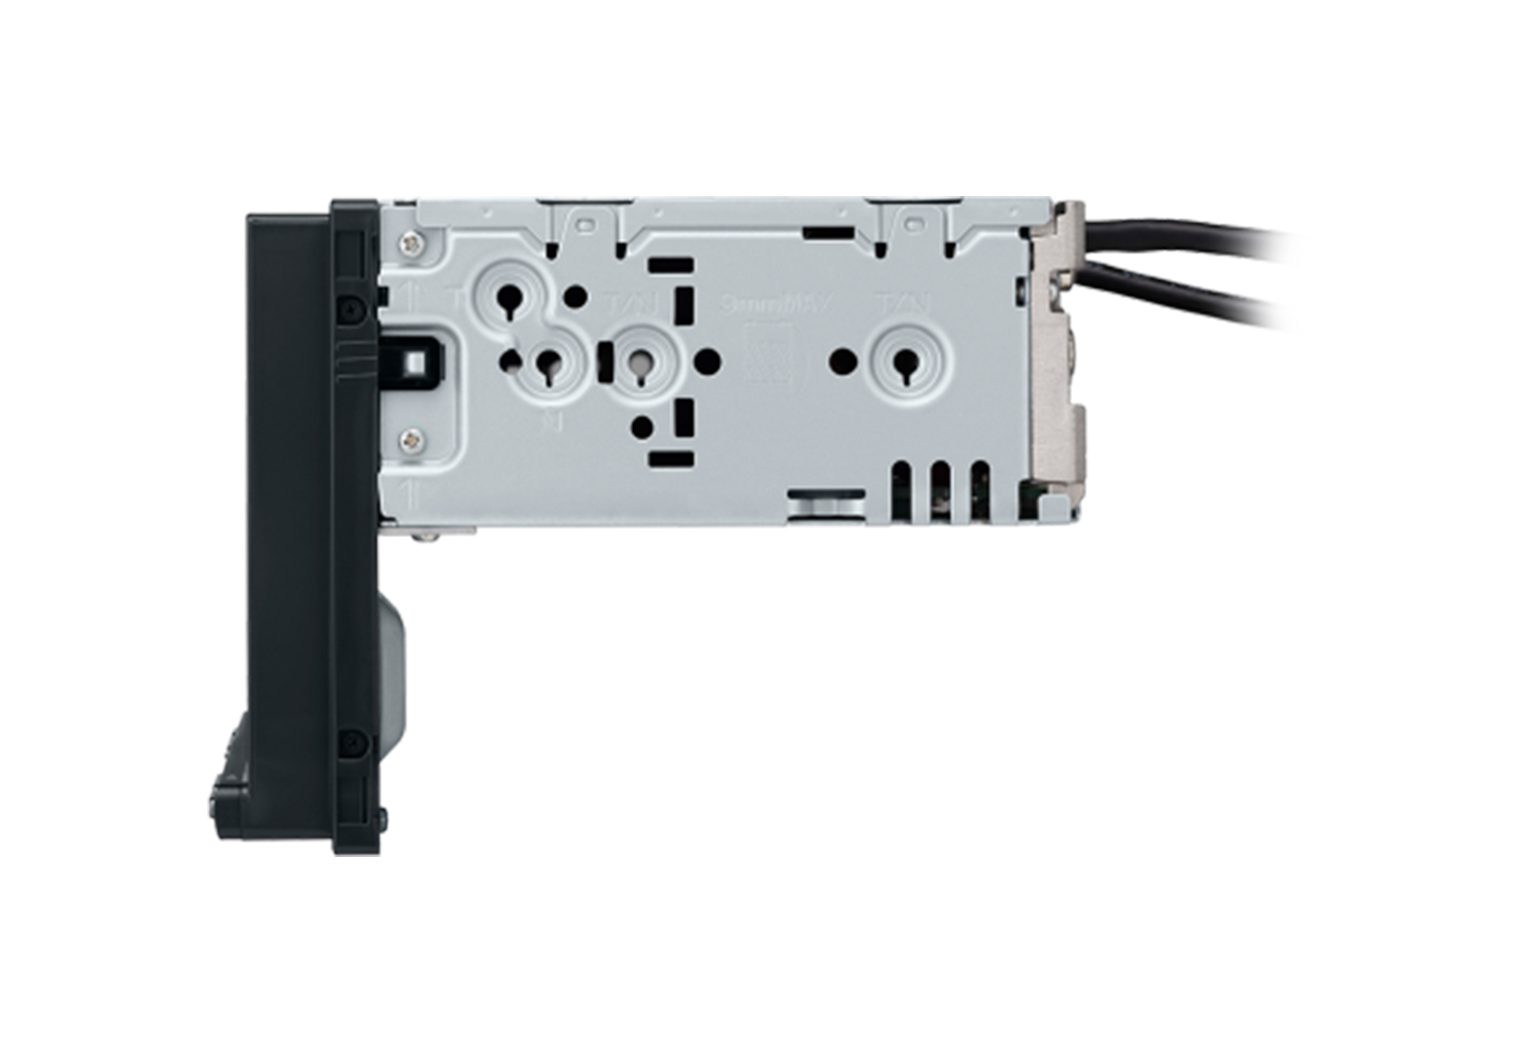
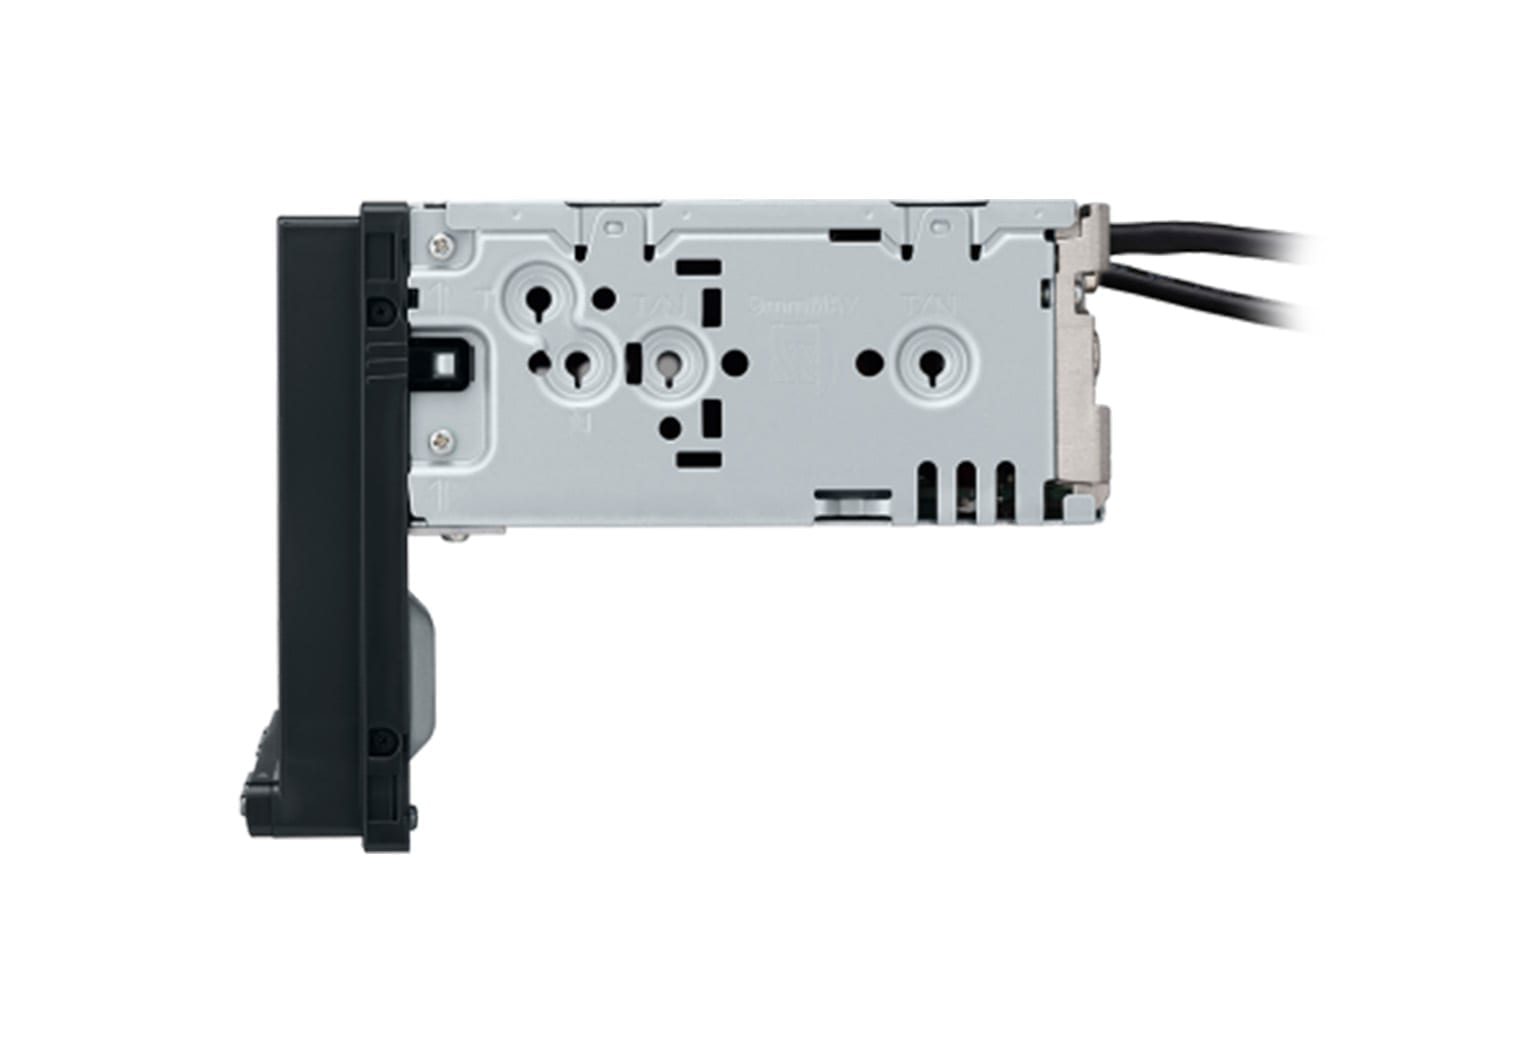
Single DIN Chassis
Most of the new double-din head units are actually built within a single-din chassis. This makes it easier for install because they're now a little shorter and thinner which gives you more room to tuck wiring behind the unit when you mount it.
The AX5600 is built on a single-din source unit, but fixed to a double-din screen. The important thing to note here is that even though the chassis looks like it's a single din, it's not just going to fit into your single din opening. If you have a single-din opening in your car and are looking for a bigger screen, I'd recommend the XAV-AX8100.
Here's a few photos of the chassis (compliments of Sony).
Connectivity (Inputs, Outputs and Multimedia)
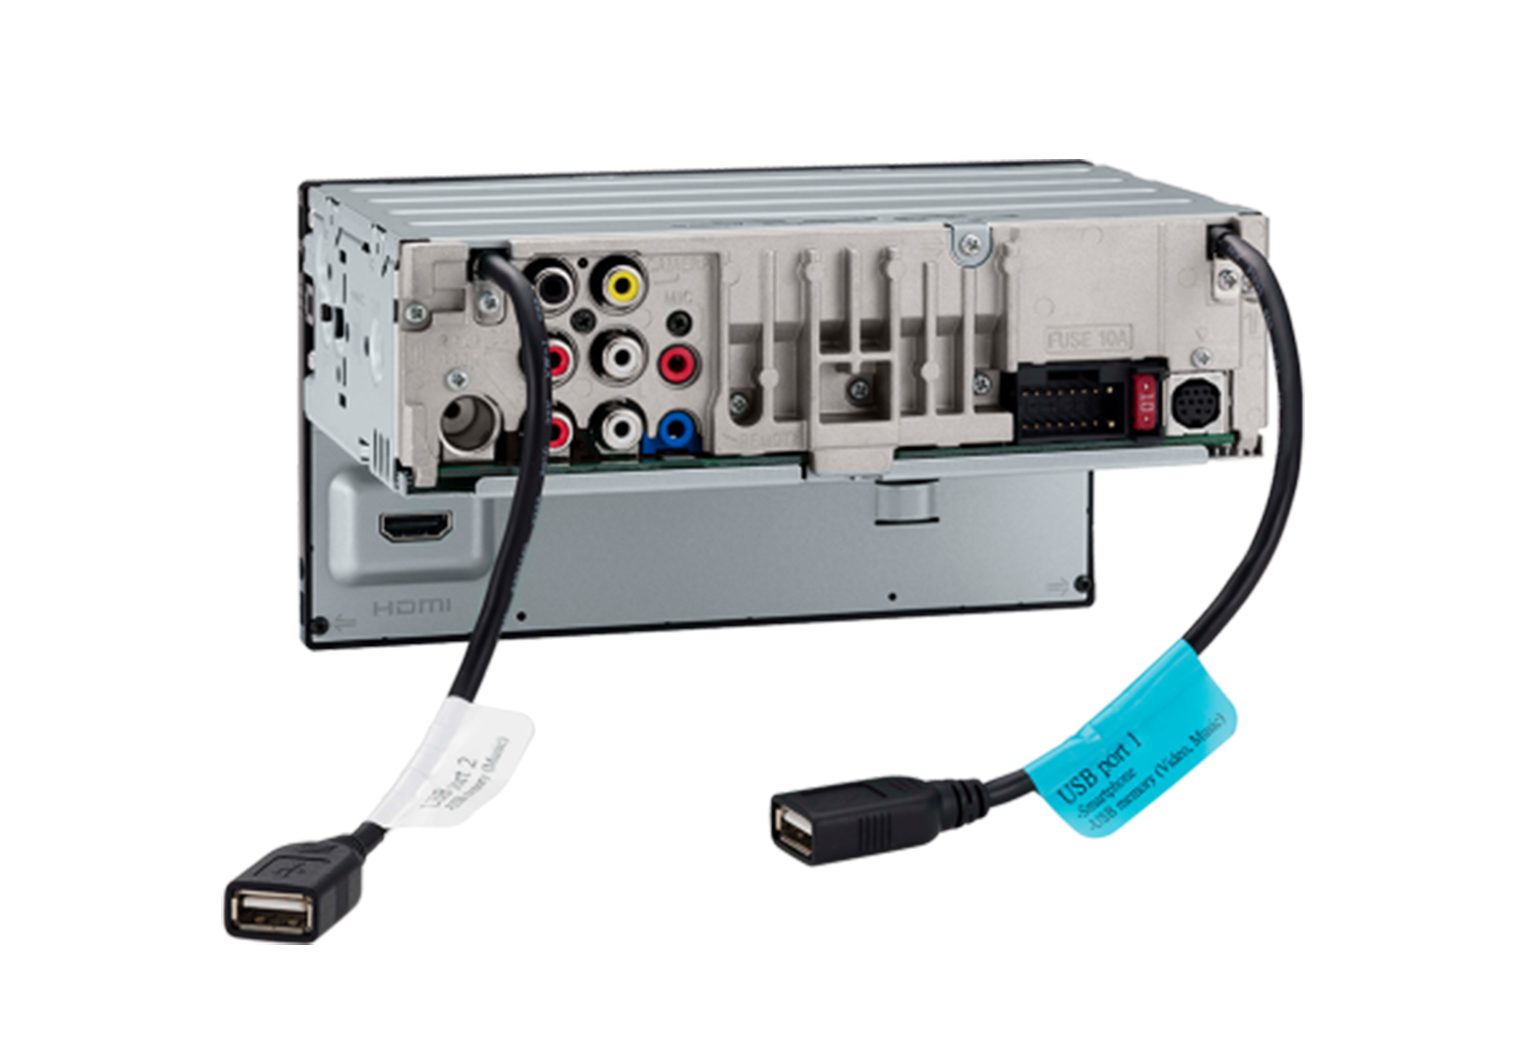
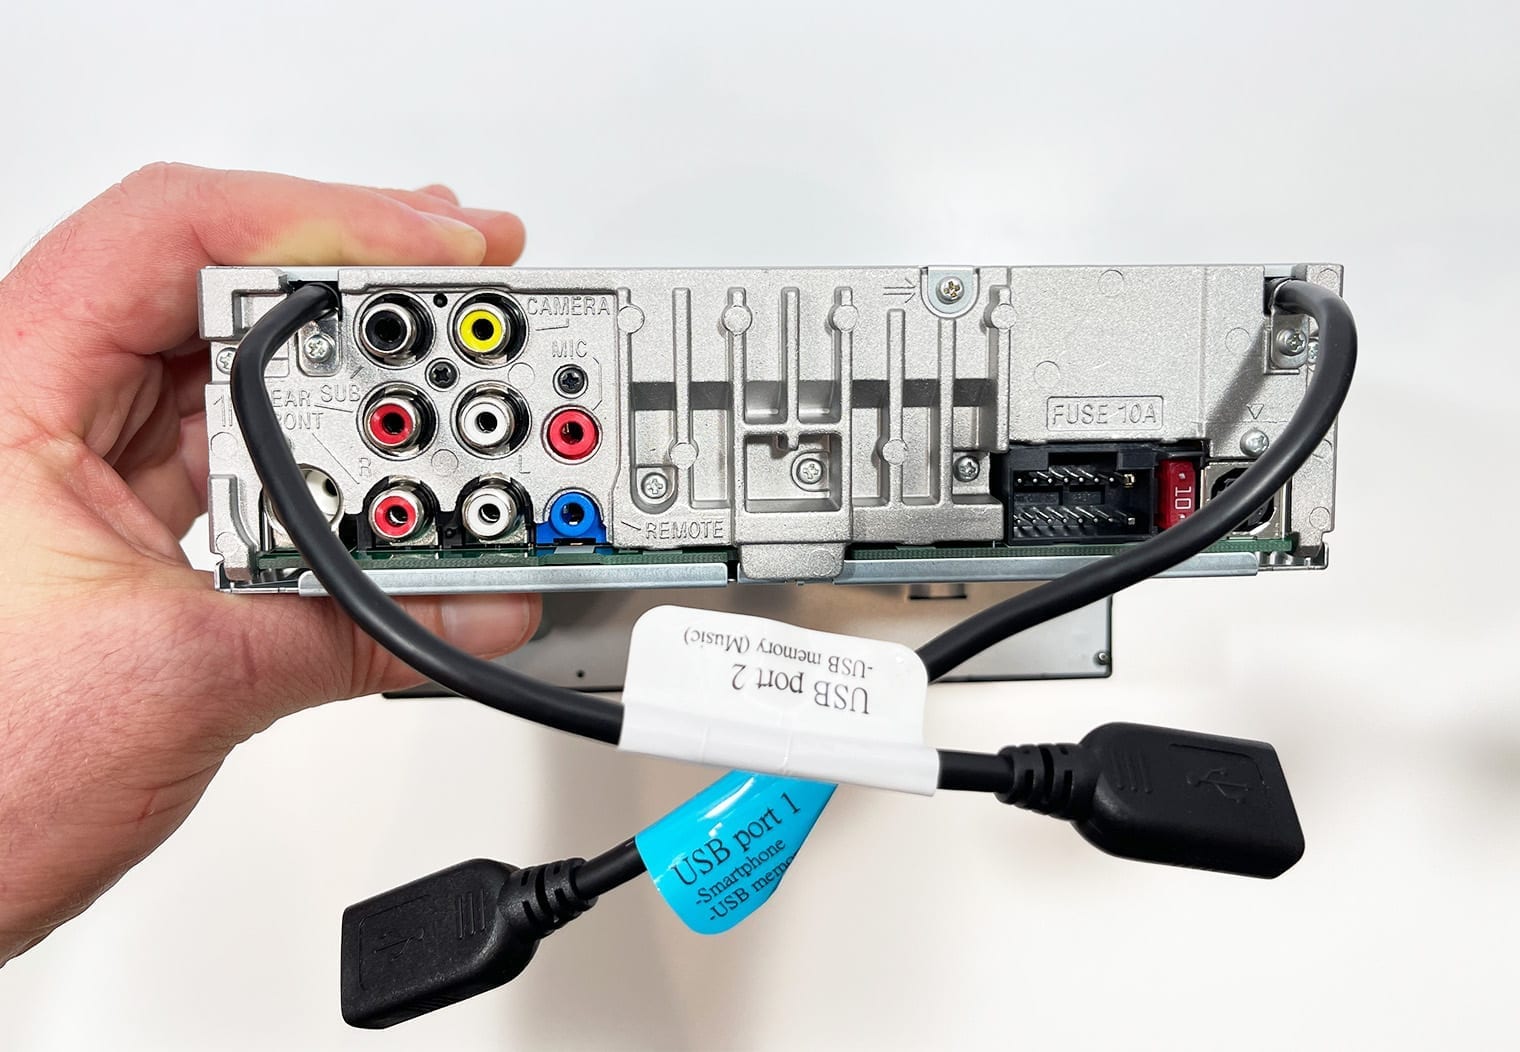
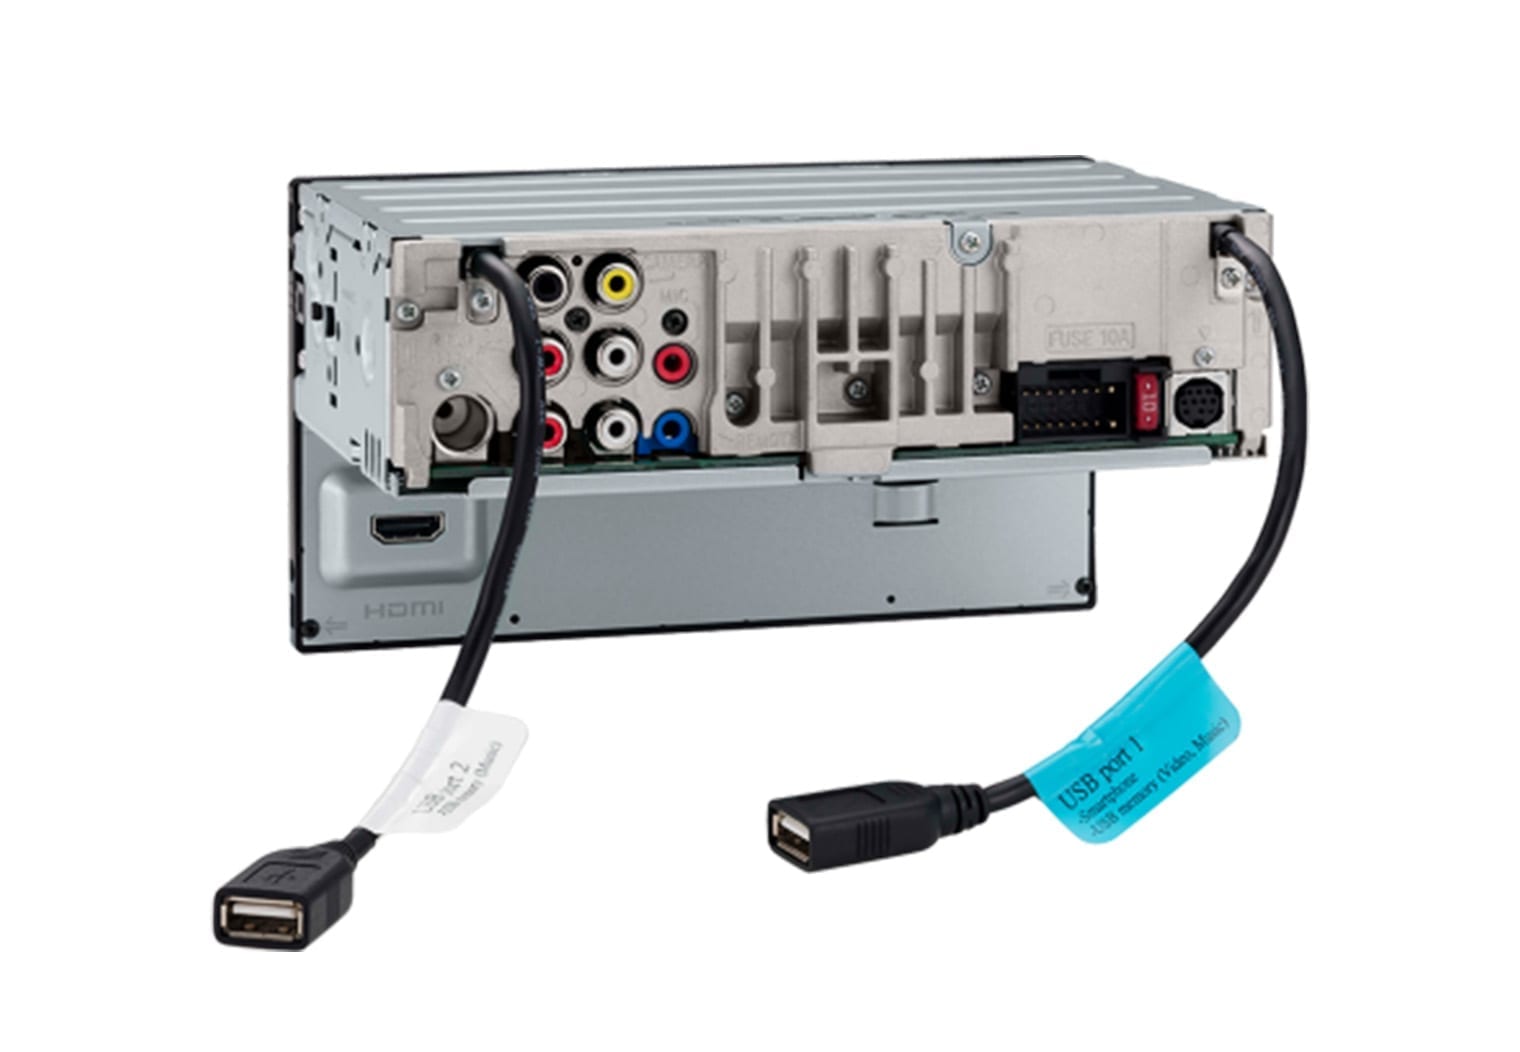
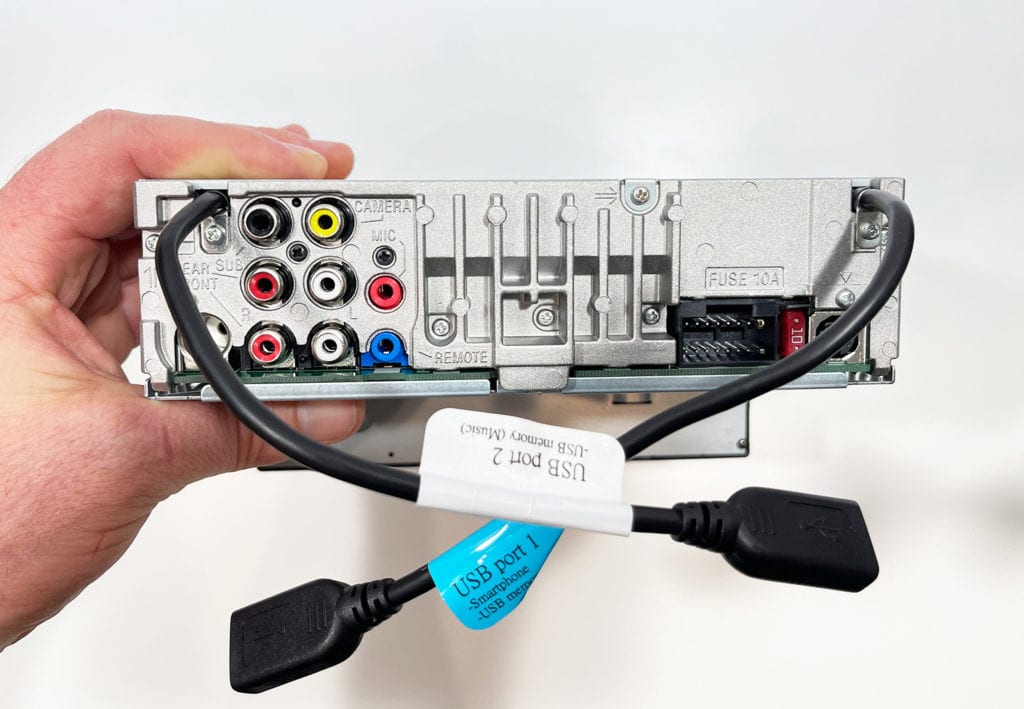
The XAV-AX5600 has a ton of connectivity options to make it compatible with all sorts of devices. Between it's pre-outs for amplification, dual USB inputs and newly added HDMI input – you can really do just about everything you want with it. In this section, I'll review all of the inputs and outputs that the XAV-AX5600 has and what you can do with them. Starting with the rear-side of the unit, you have:
- Inputs:
- Rear-view camera
- Universal module input (for things like Sirius XM via the SiriusXM SXV300V1)
- Microphone
- Steering Wheel Control (SWC)
- Radio Antenna
- Wire harness plug
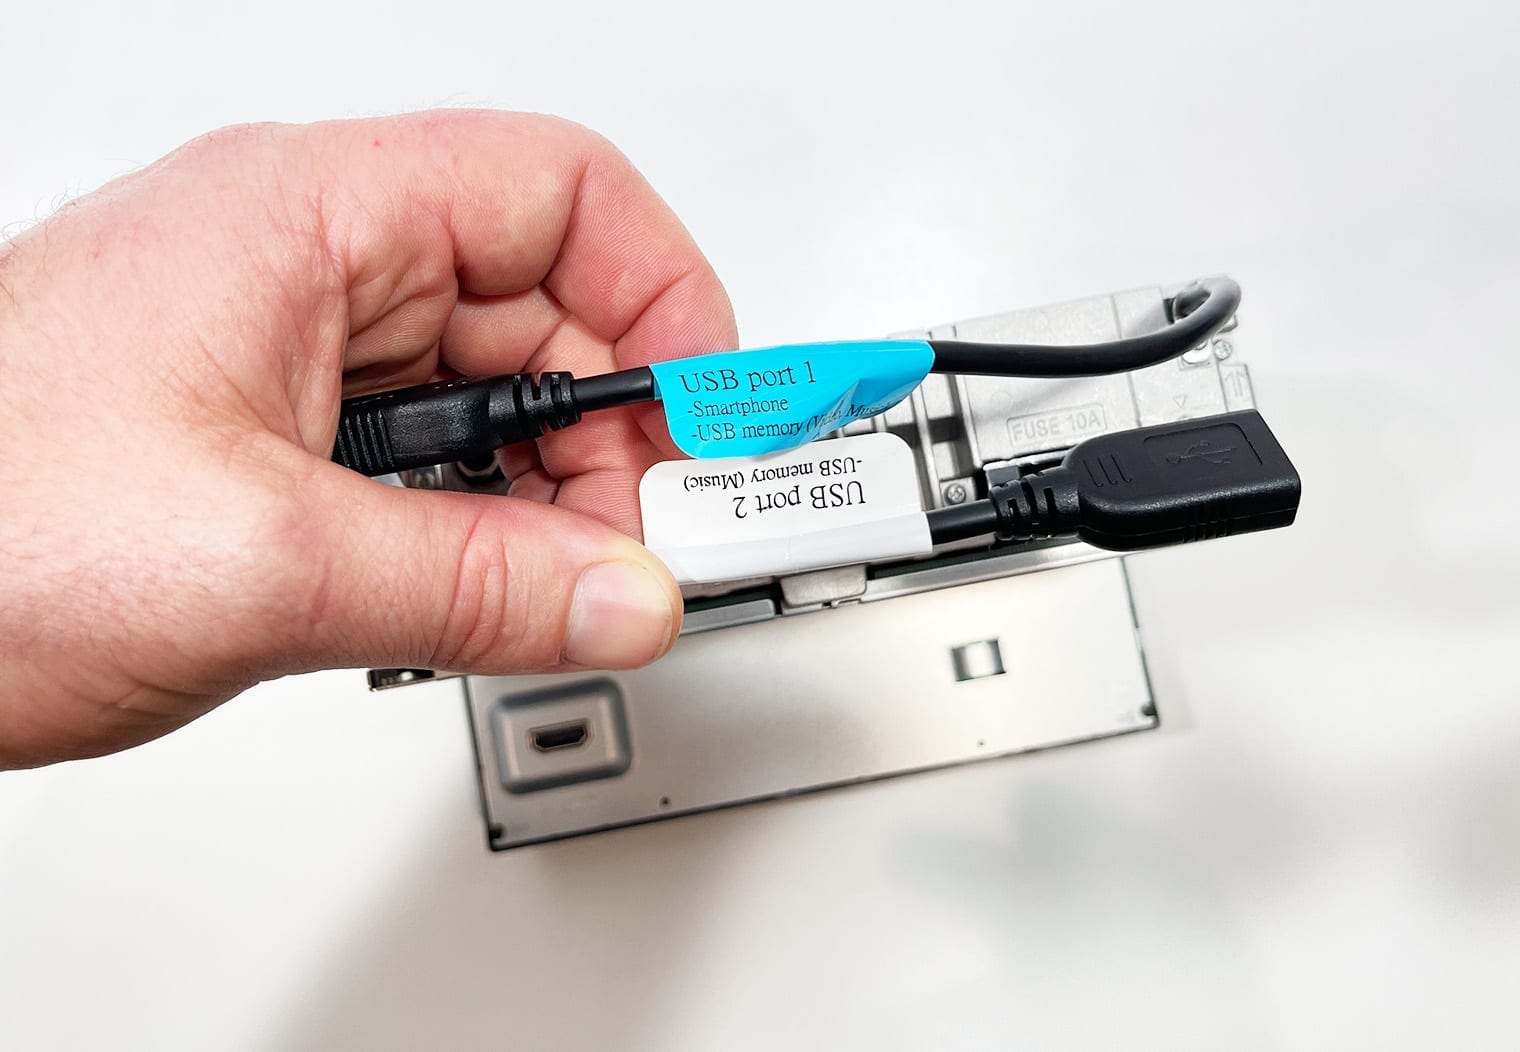
- Dual USB Inputs:
- Port 1: Smartphone, USB memory (Video, Music)
- Port 2: USB memory (Music)
- Outputs:
- 5-channel preamp outputs (5-volt):
- Front
- Rear
- Mono sub
- 5-channel preamp outputs (5-volt):
Multimedia Inputs
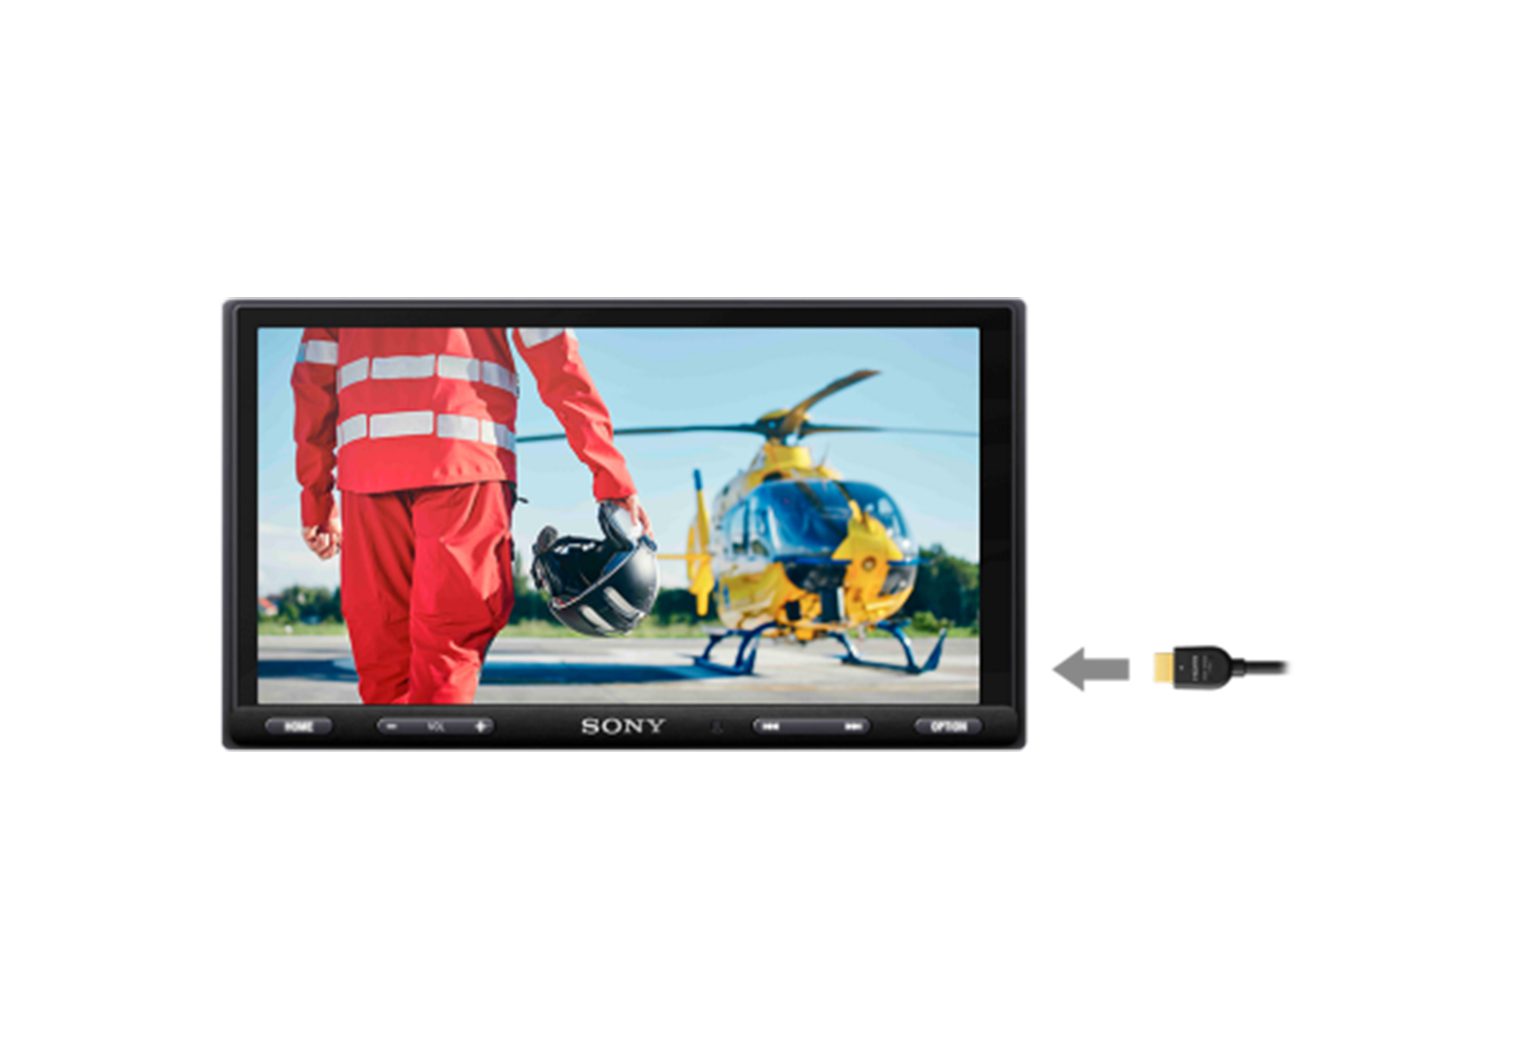
On my opinion, this is the area where Sony made the most improvements between the AX5500 and the AX5600 this year. Prior to this model, the only way to access multimedia and video on the screen was via a USB input or via WebLink. And even on WebLink, it was very limited to the apps that are compatible like YouTube. So what did do? They added HDMI. There are now two types of multimedia inputs on the unit – USB and HDMI.
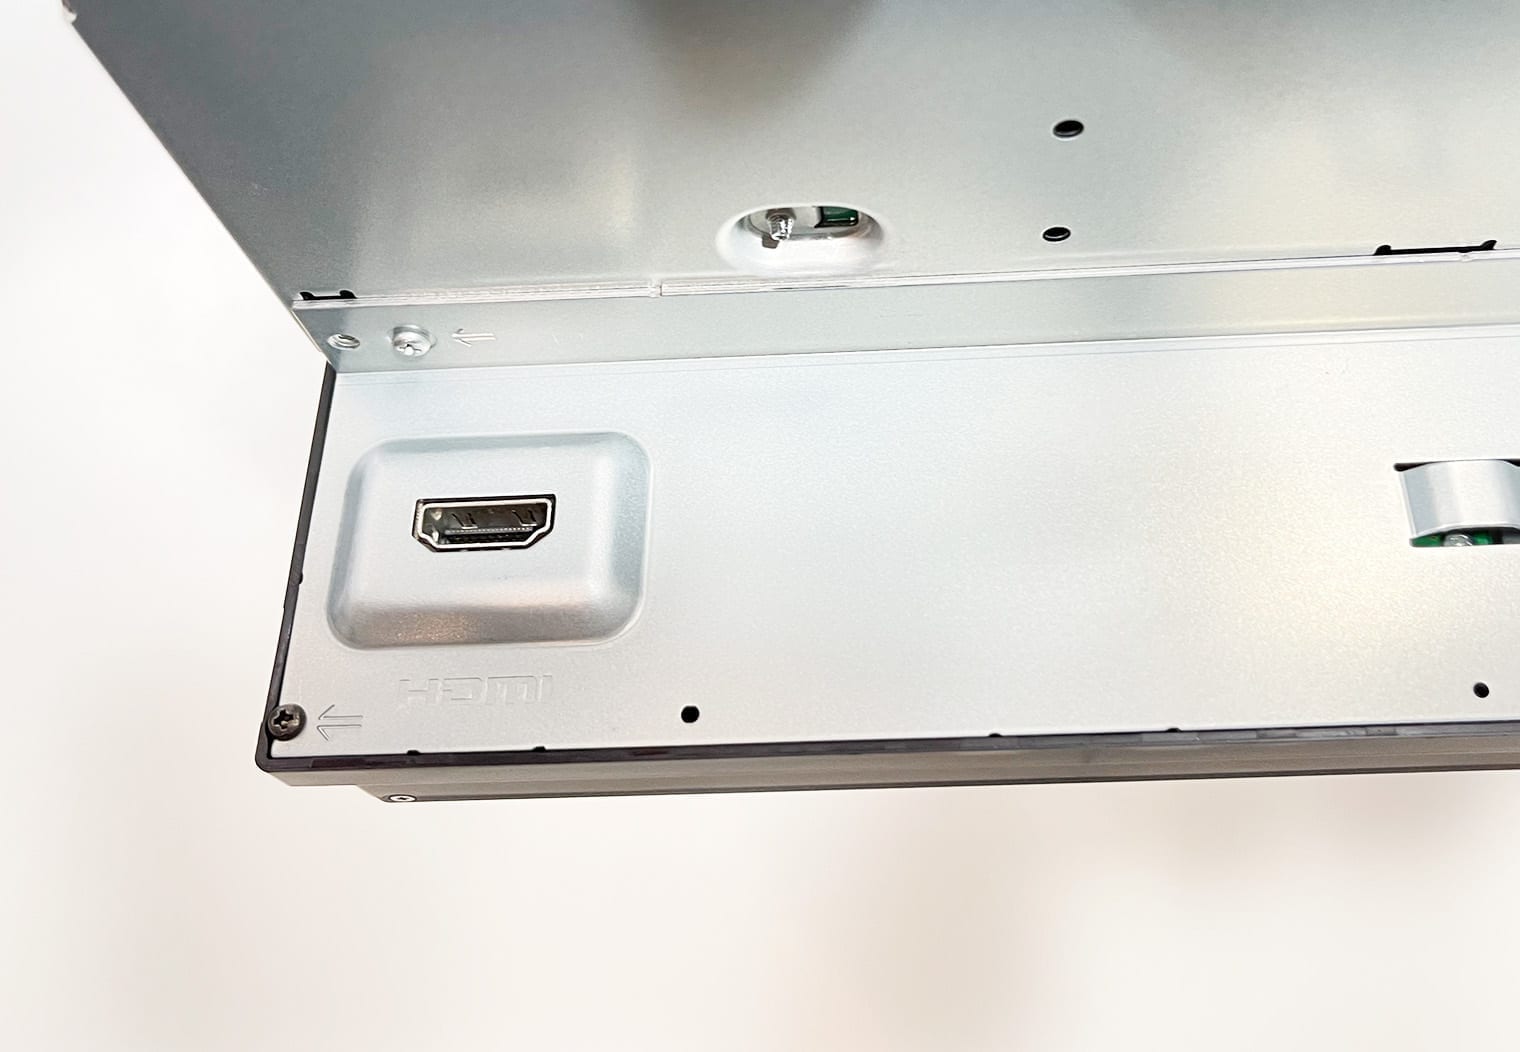
HDMI
Along with the Sony's AX8100, the XAV-AX5600 is one of the few head units on the market that features an HDMI input. When I reviewed the AX5500 in 2020, this was really one of the biggest complaints that I had about the unit – the lack of a universal multimedia input or capability beyond a thumb drive. With HDMI, it really boosts the value of the head unit to a new level.
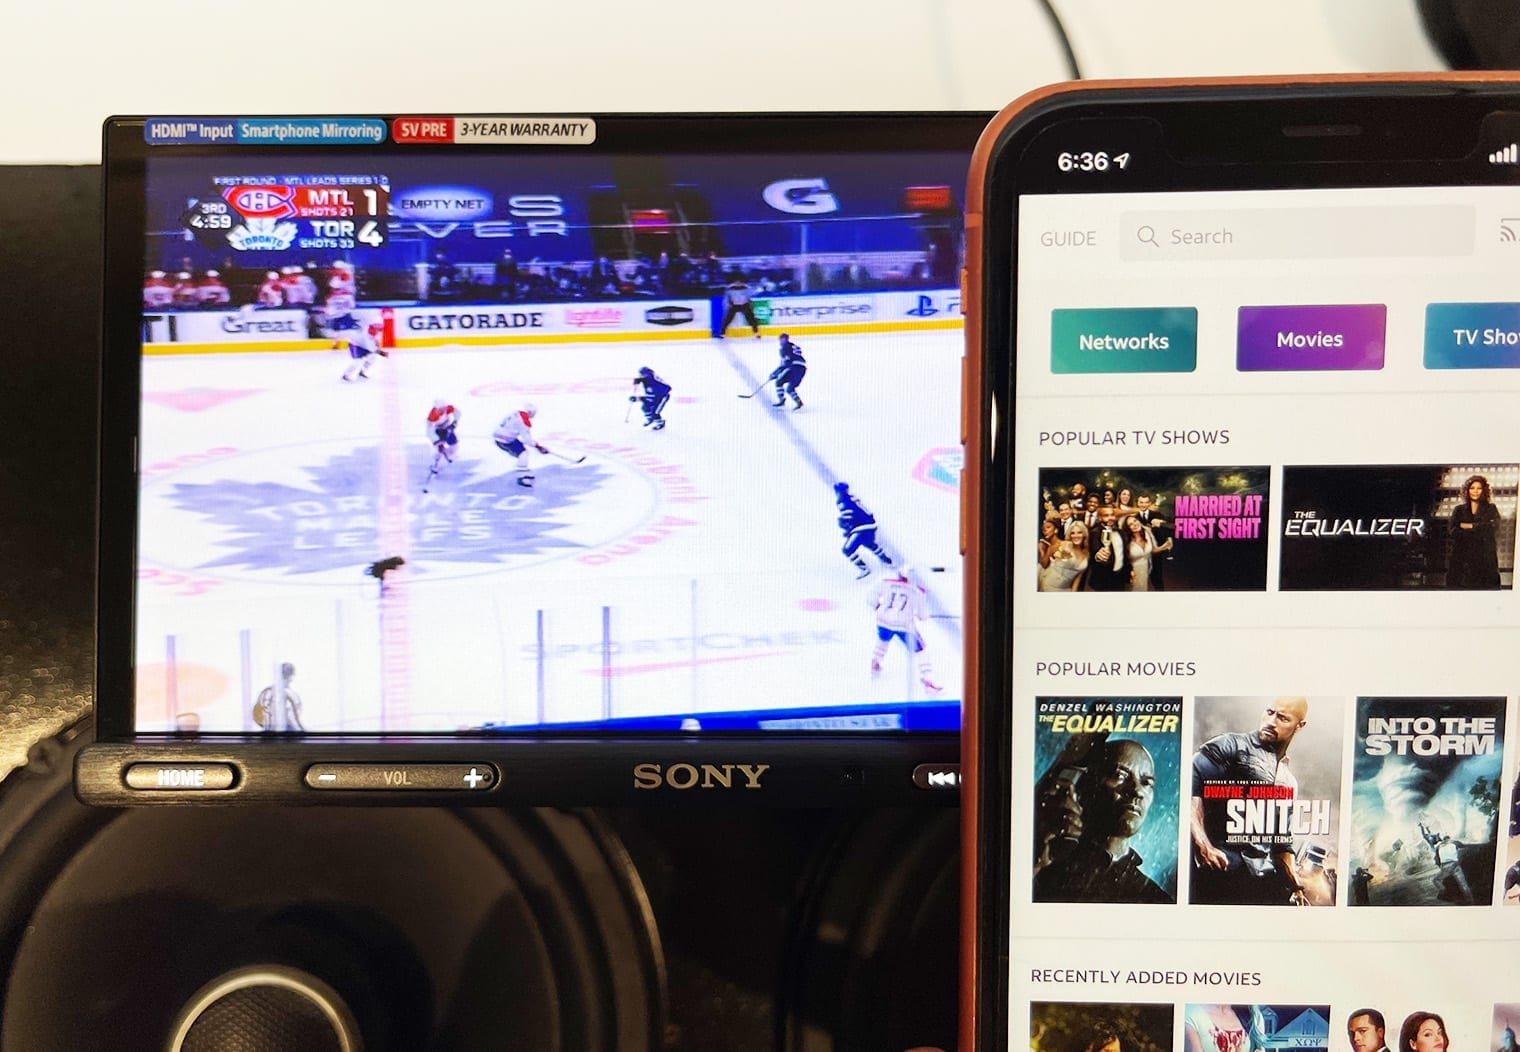
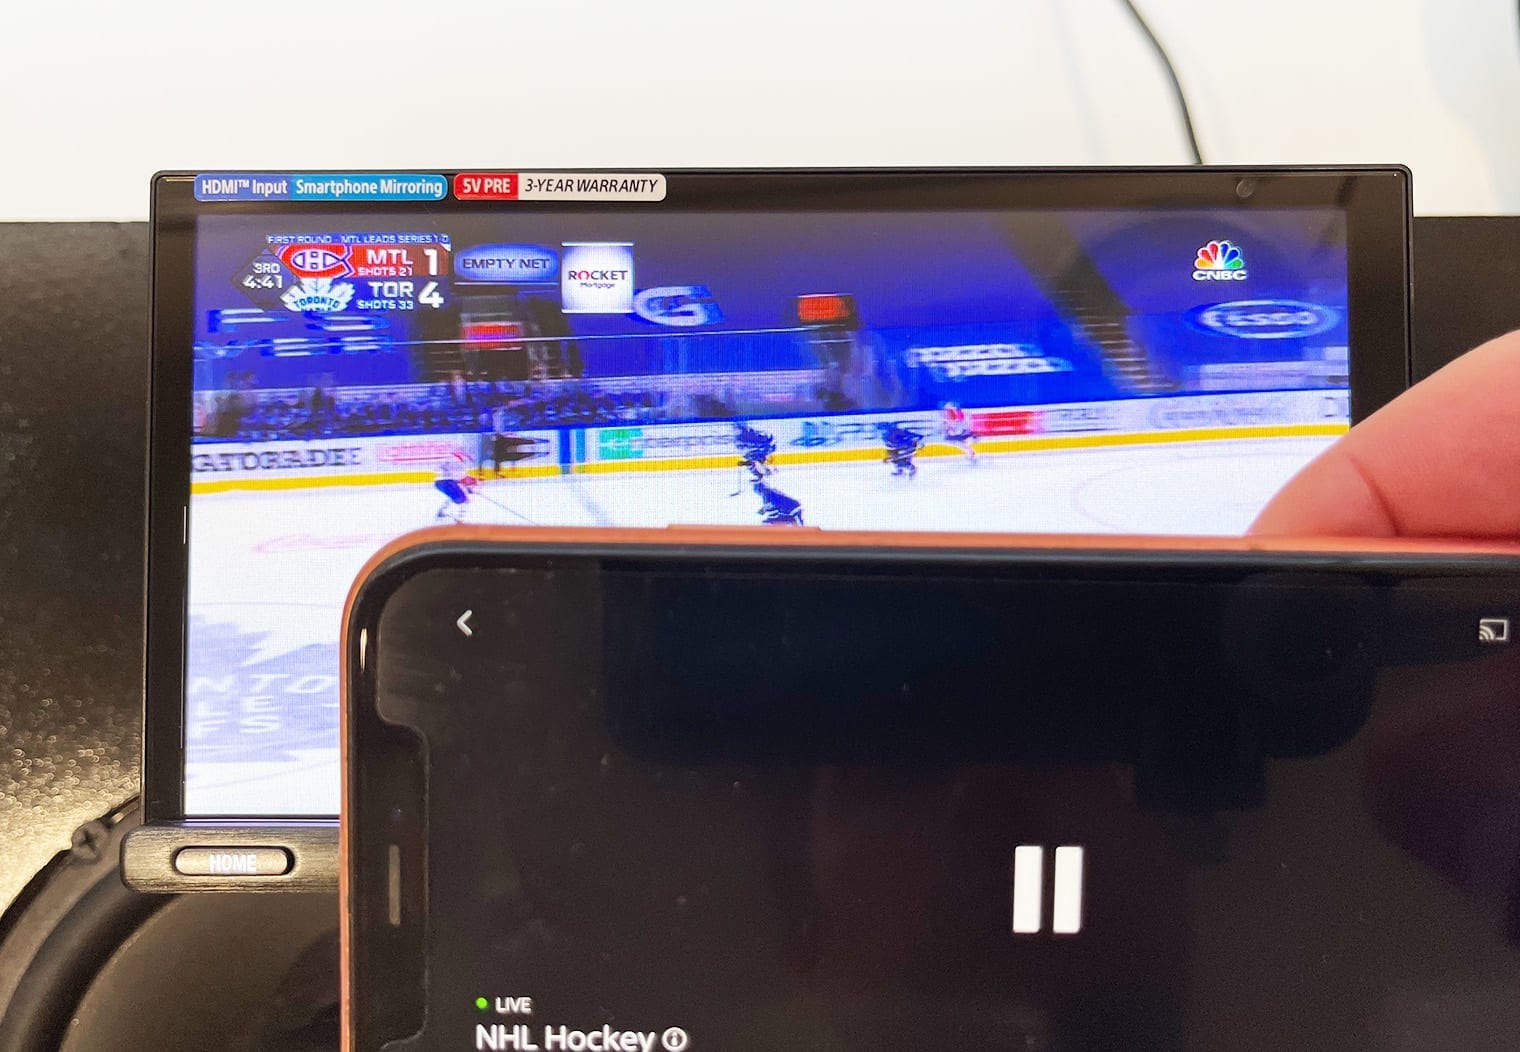
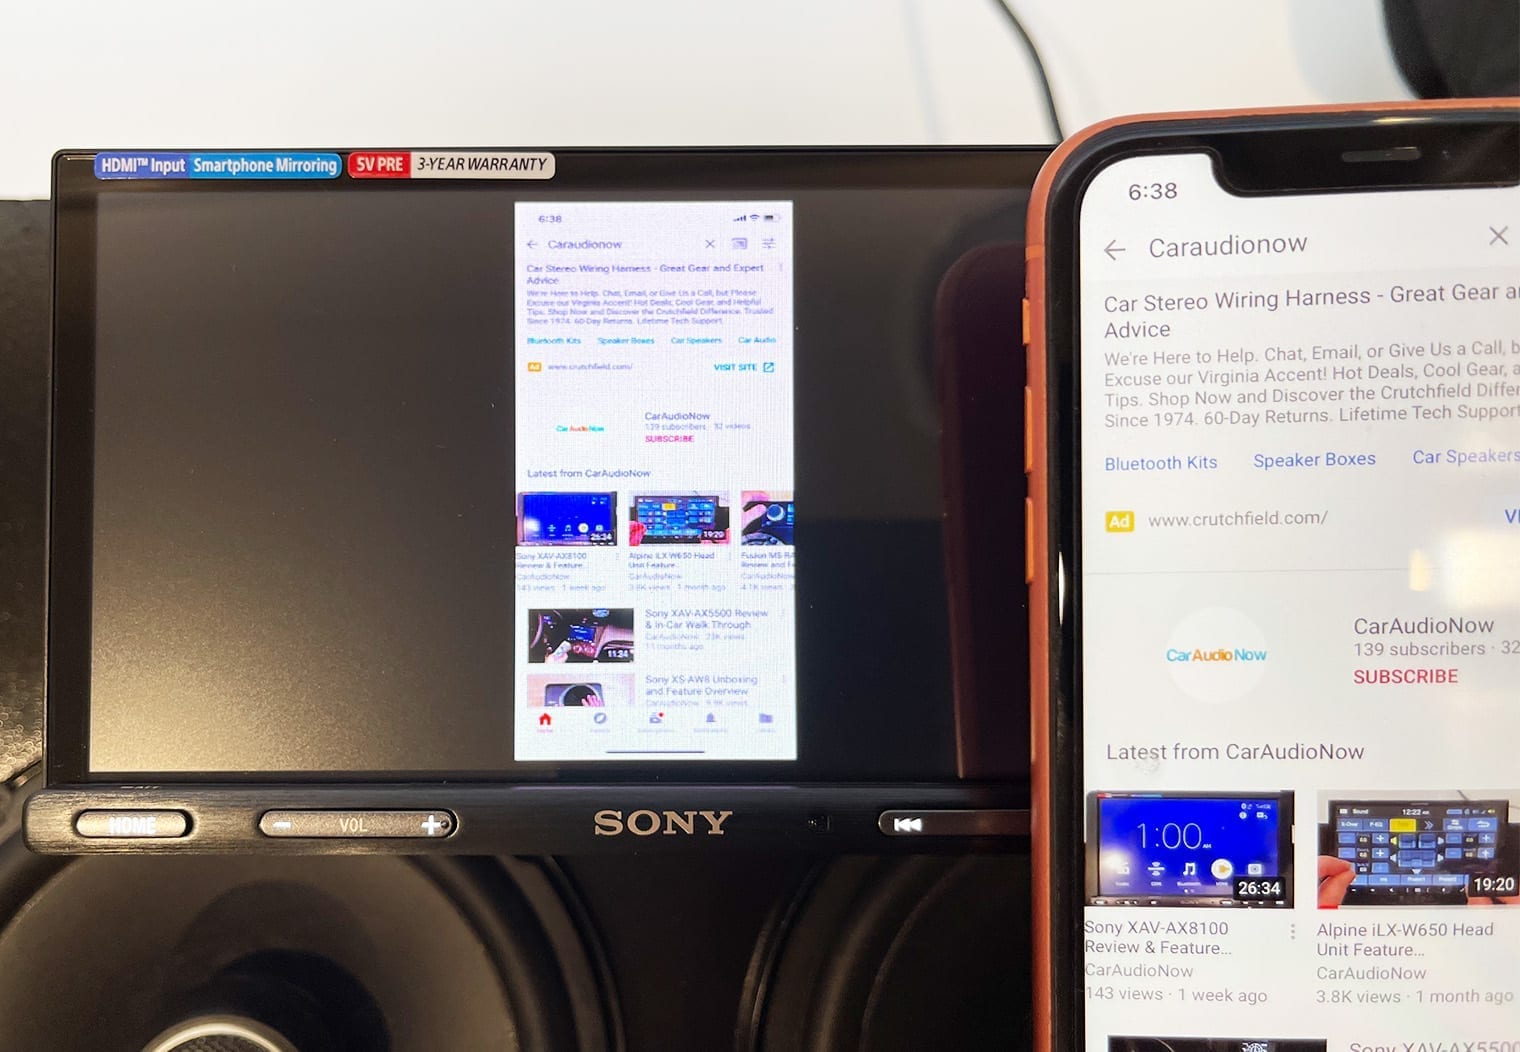
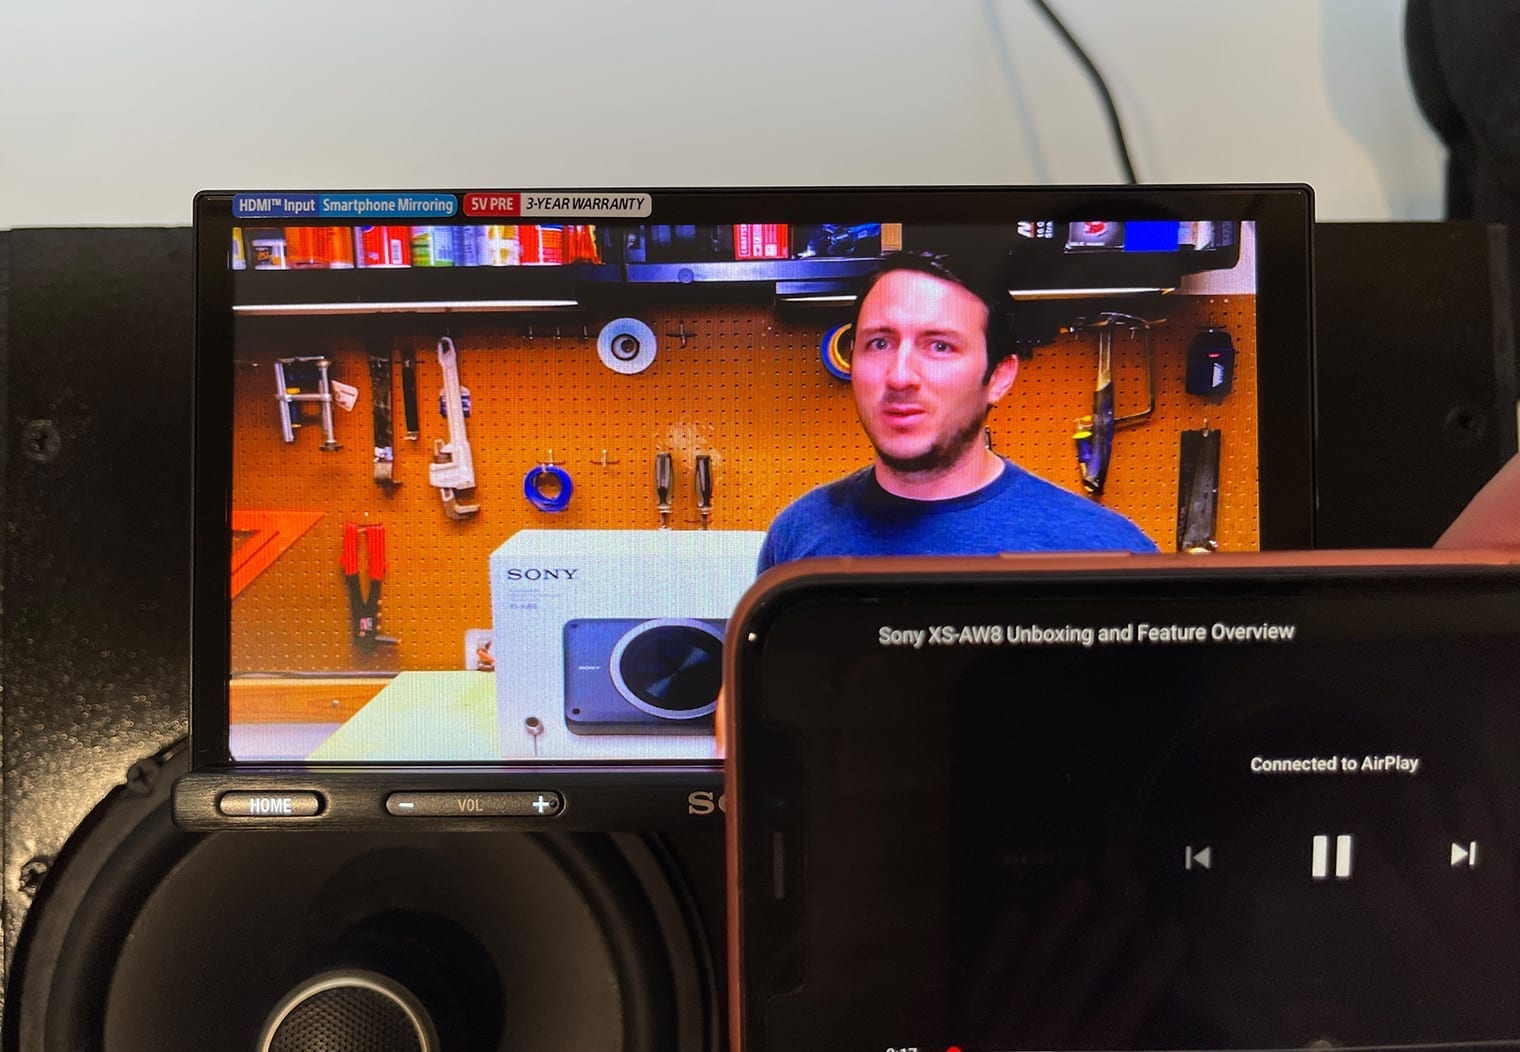
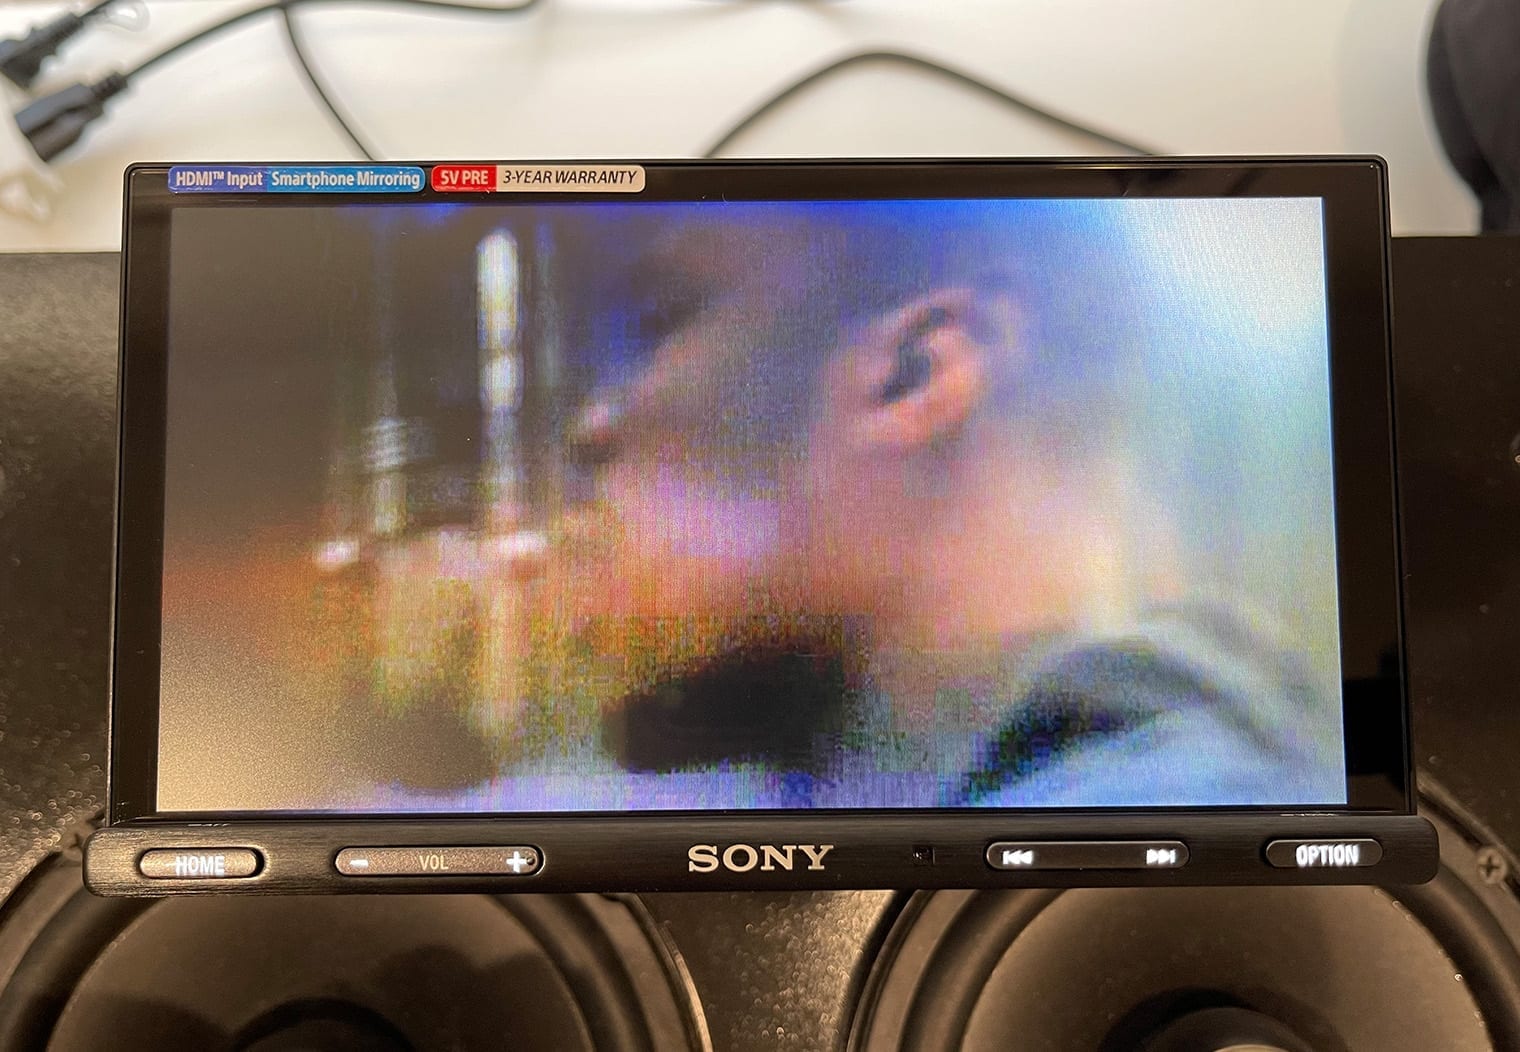
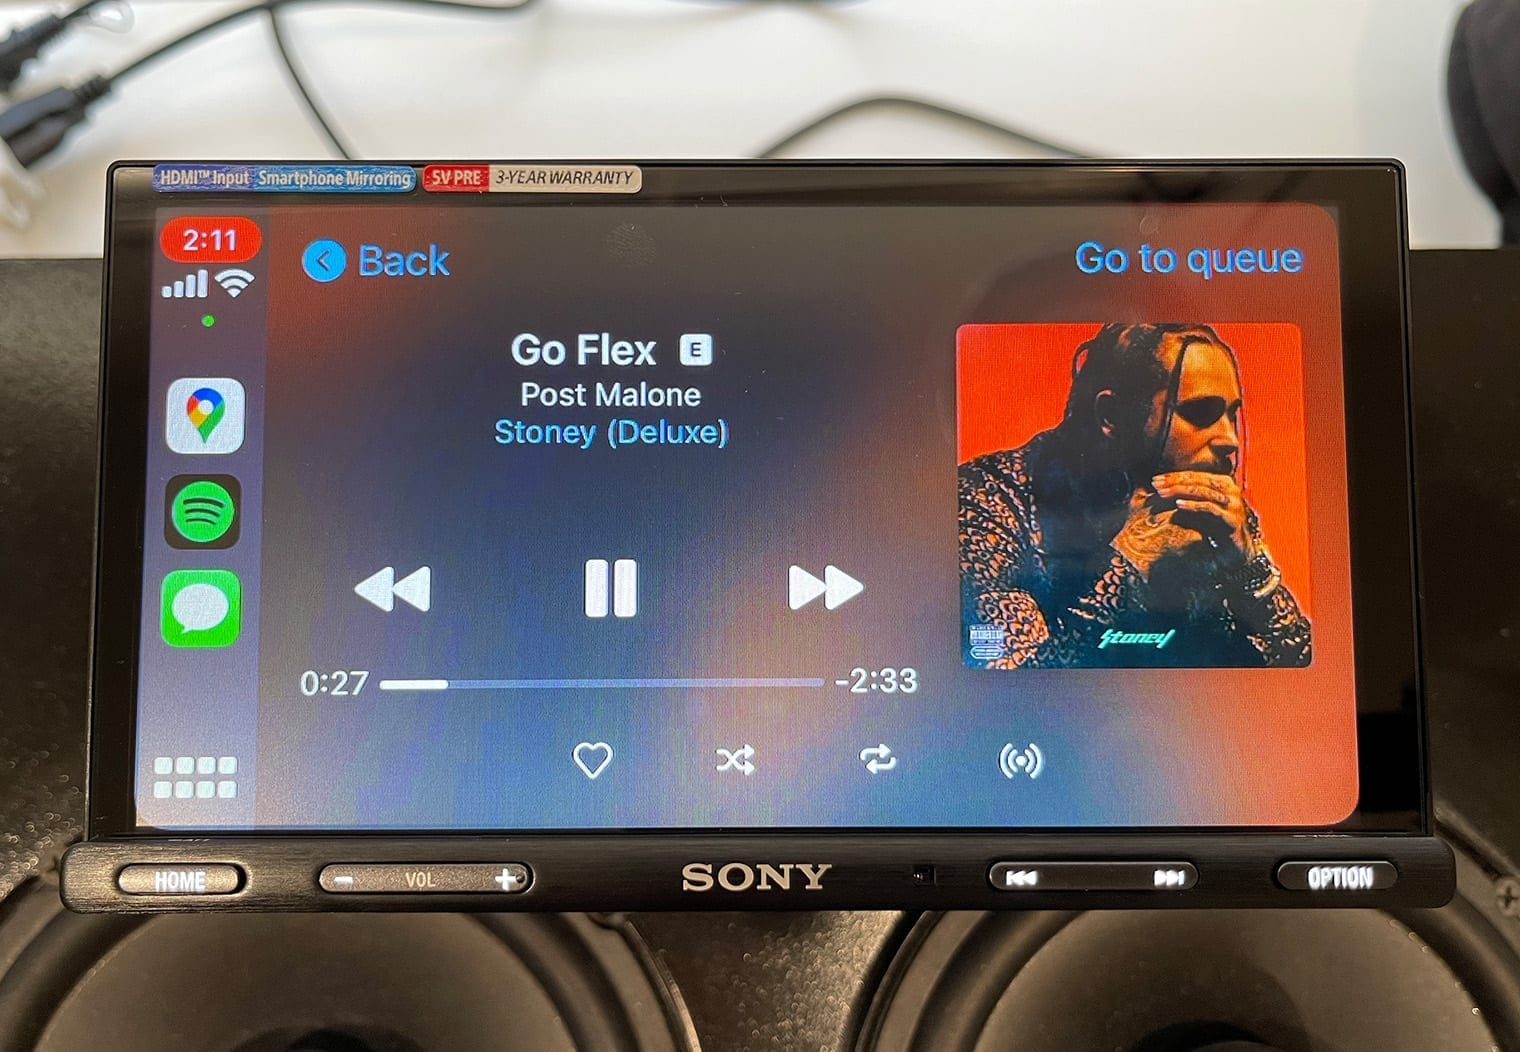
With an HDMI input, you can now connect all of your favorite video and gaming devices directly to the head unit. That includes Xbox, Playstation, Nintendo Switch, BlueRay players, and beyond. You can even connect your phone too with a HDMI to Lightning adapter, which is what I did to access apps like YouTube, Netflix and AT&T TV while on the road (Custom wiring required to enable this. It's also dangerous and could be illegal depending on the state you live in).
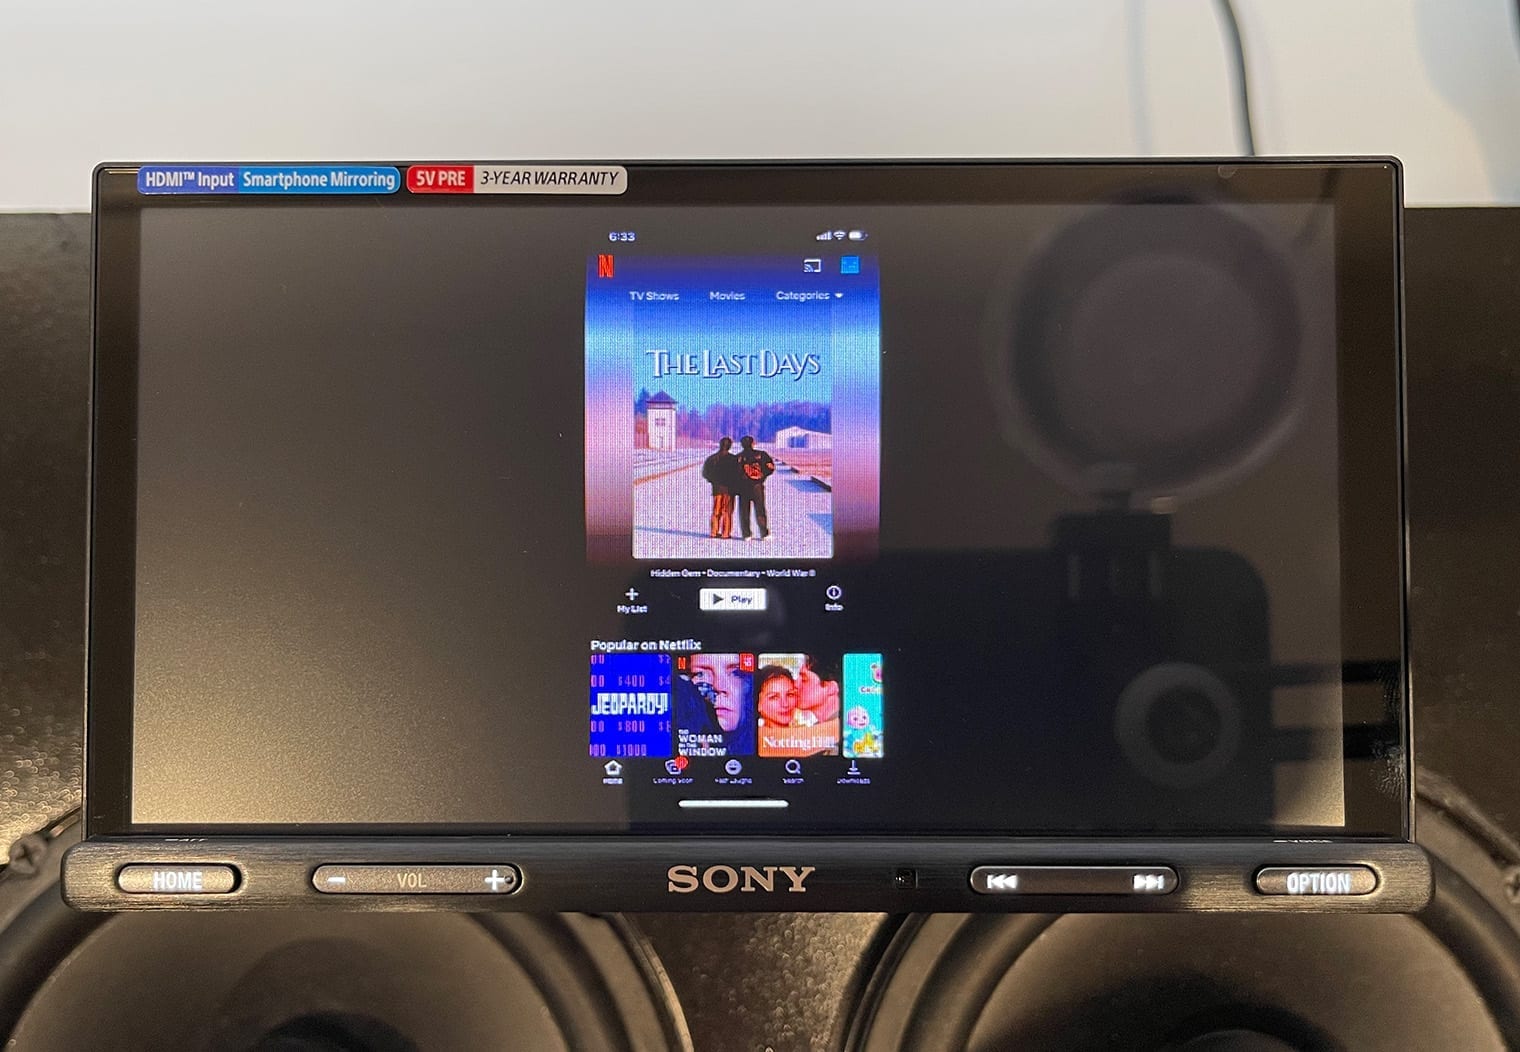
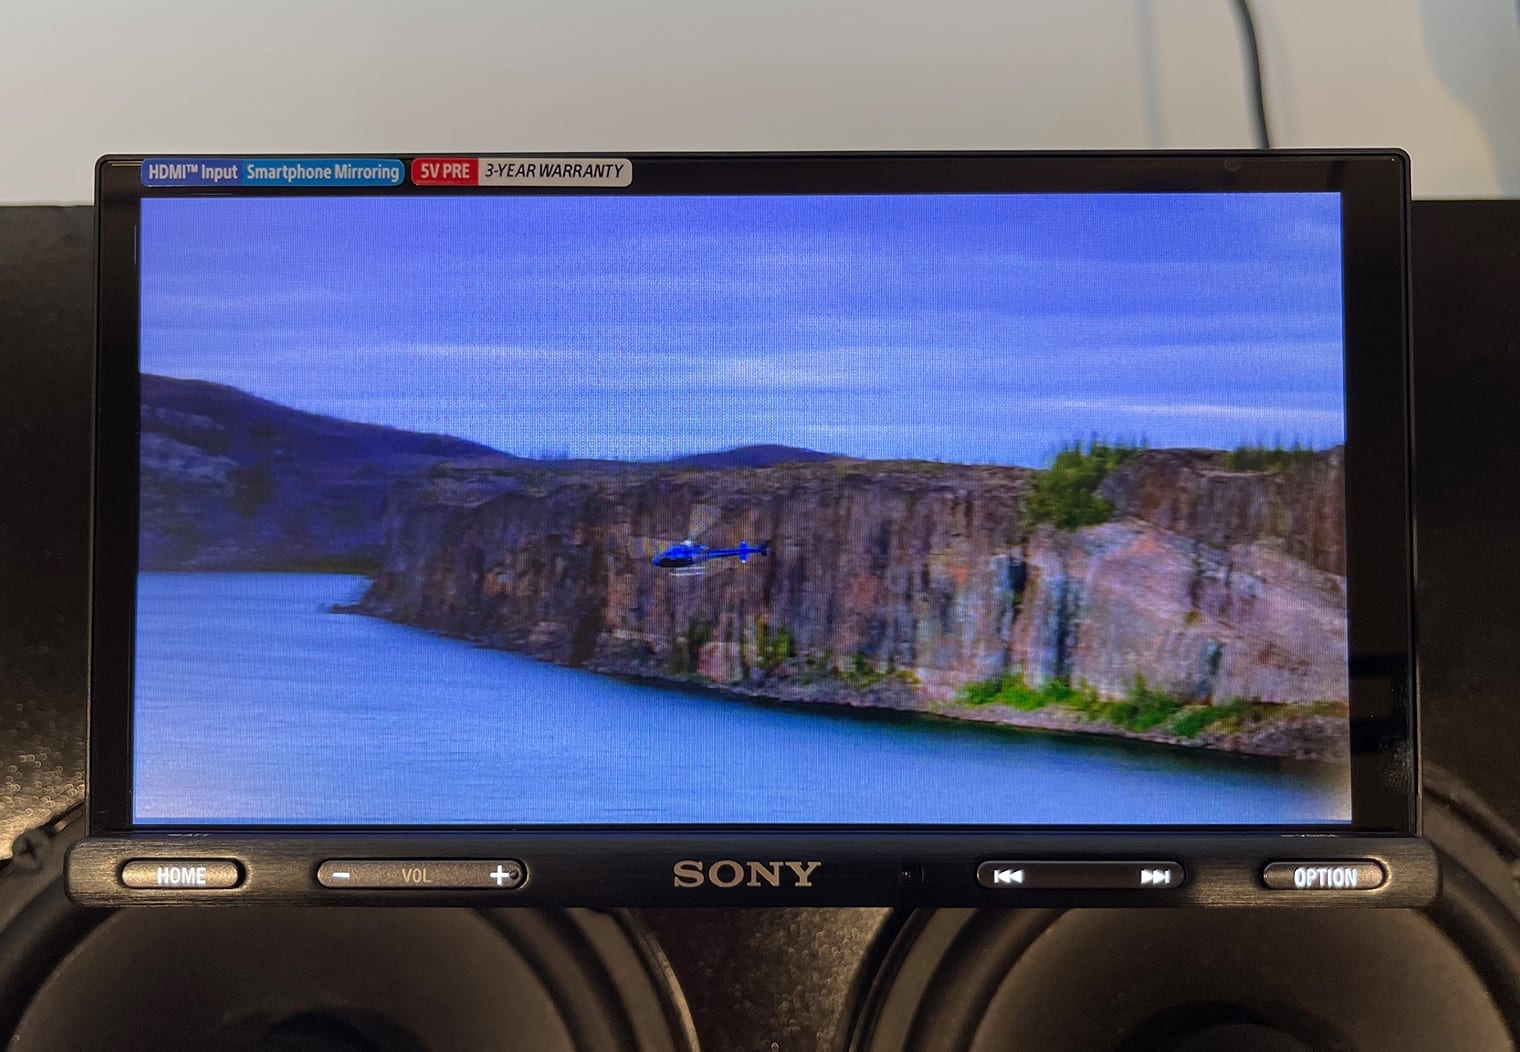
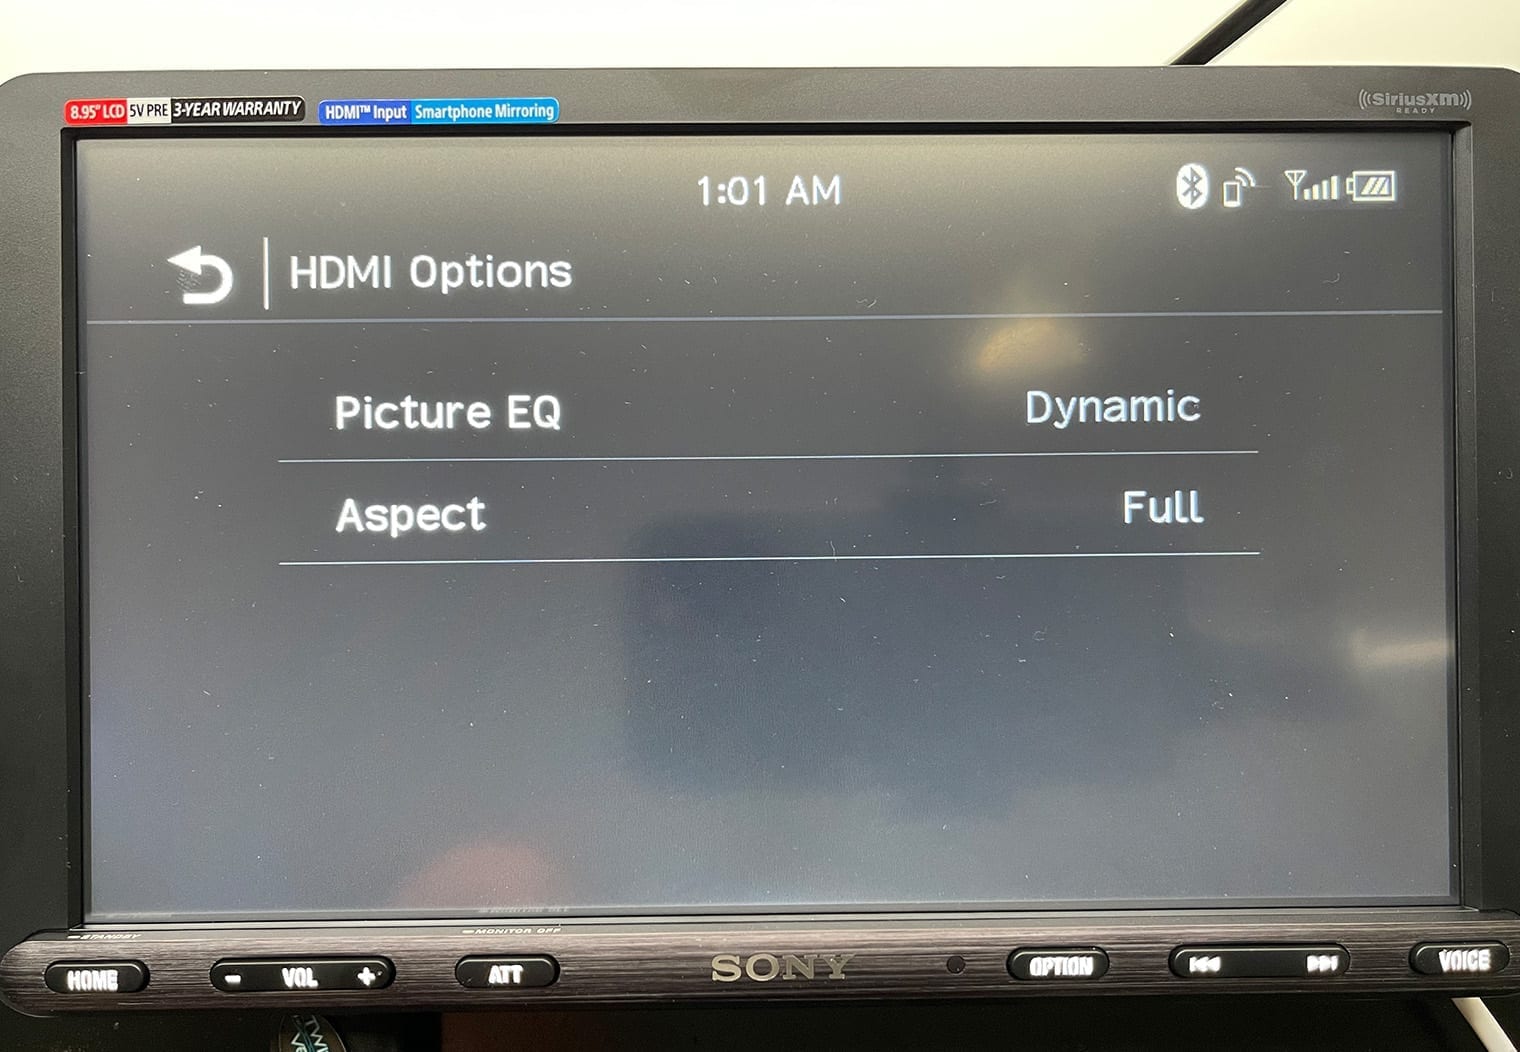
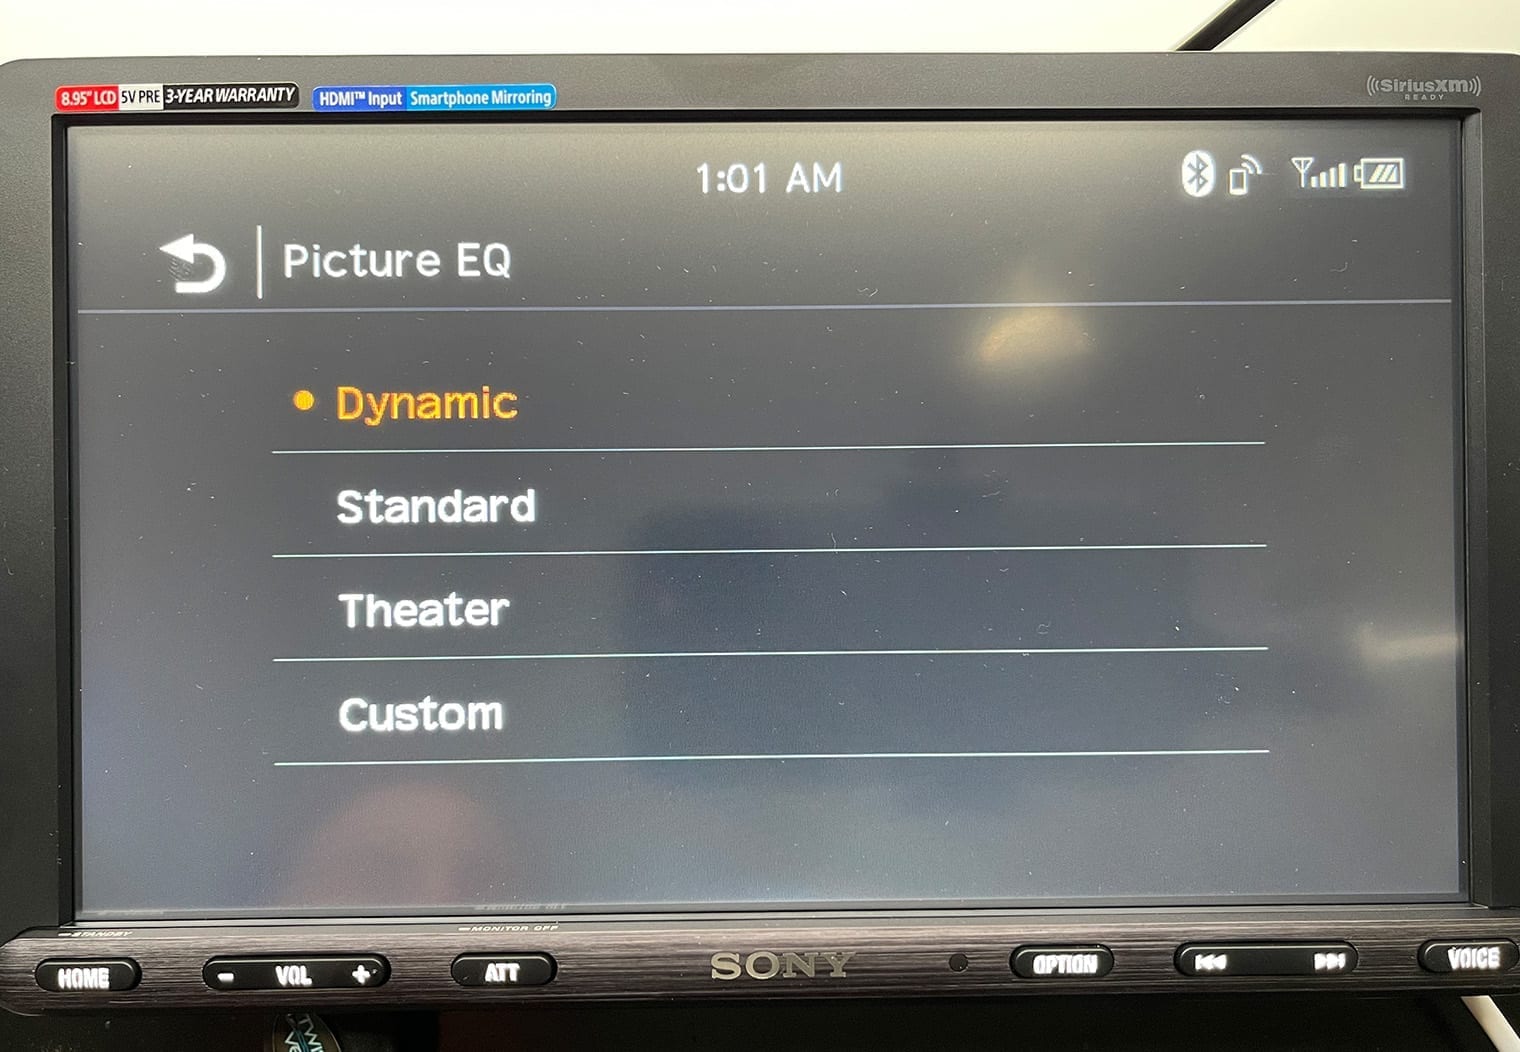
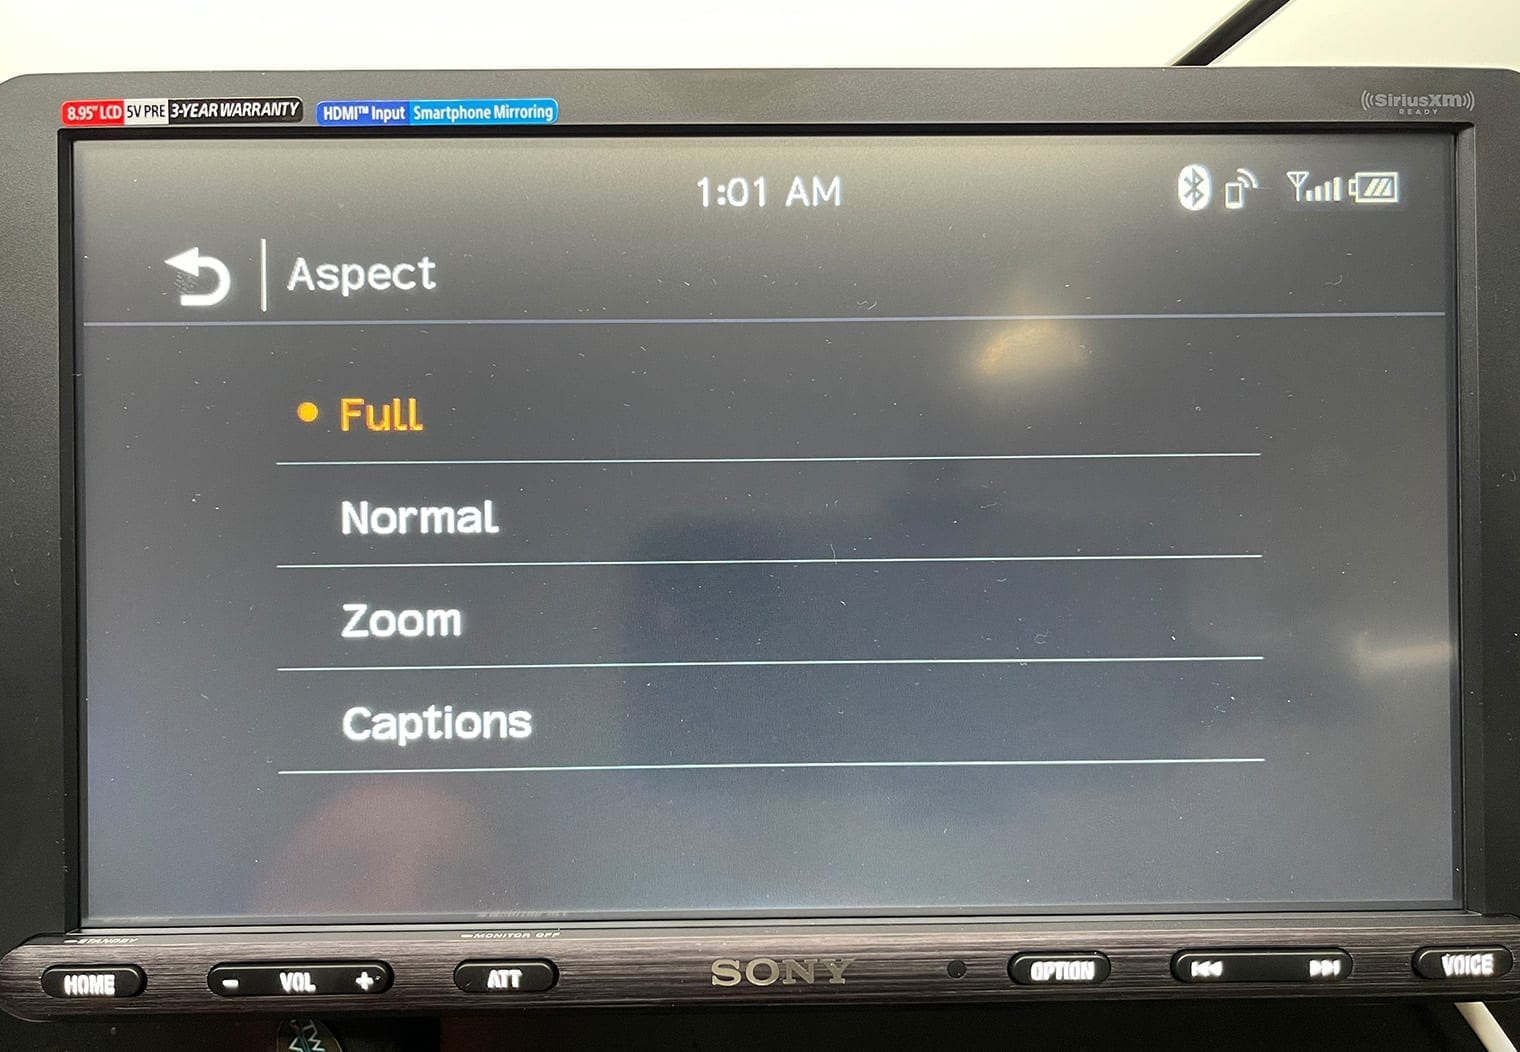
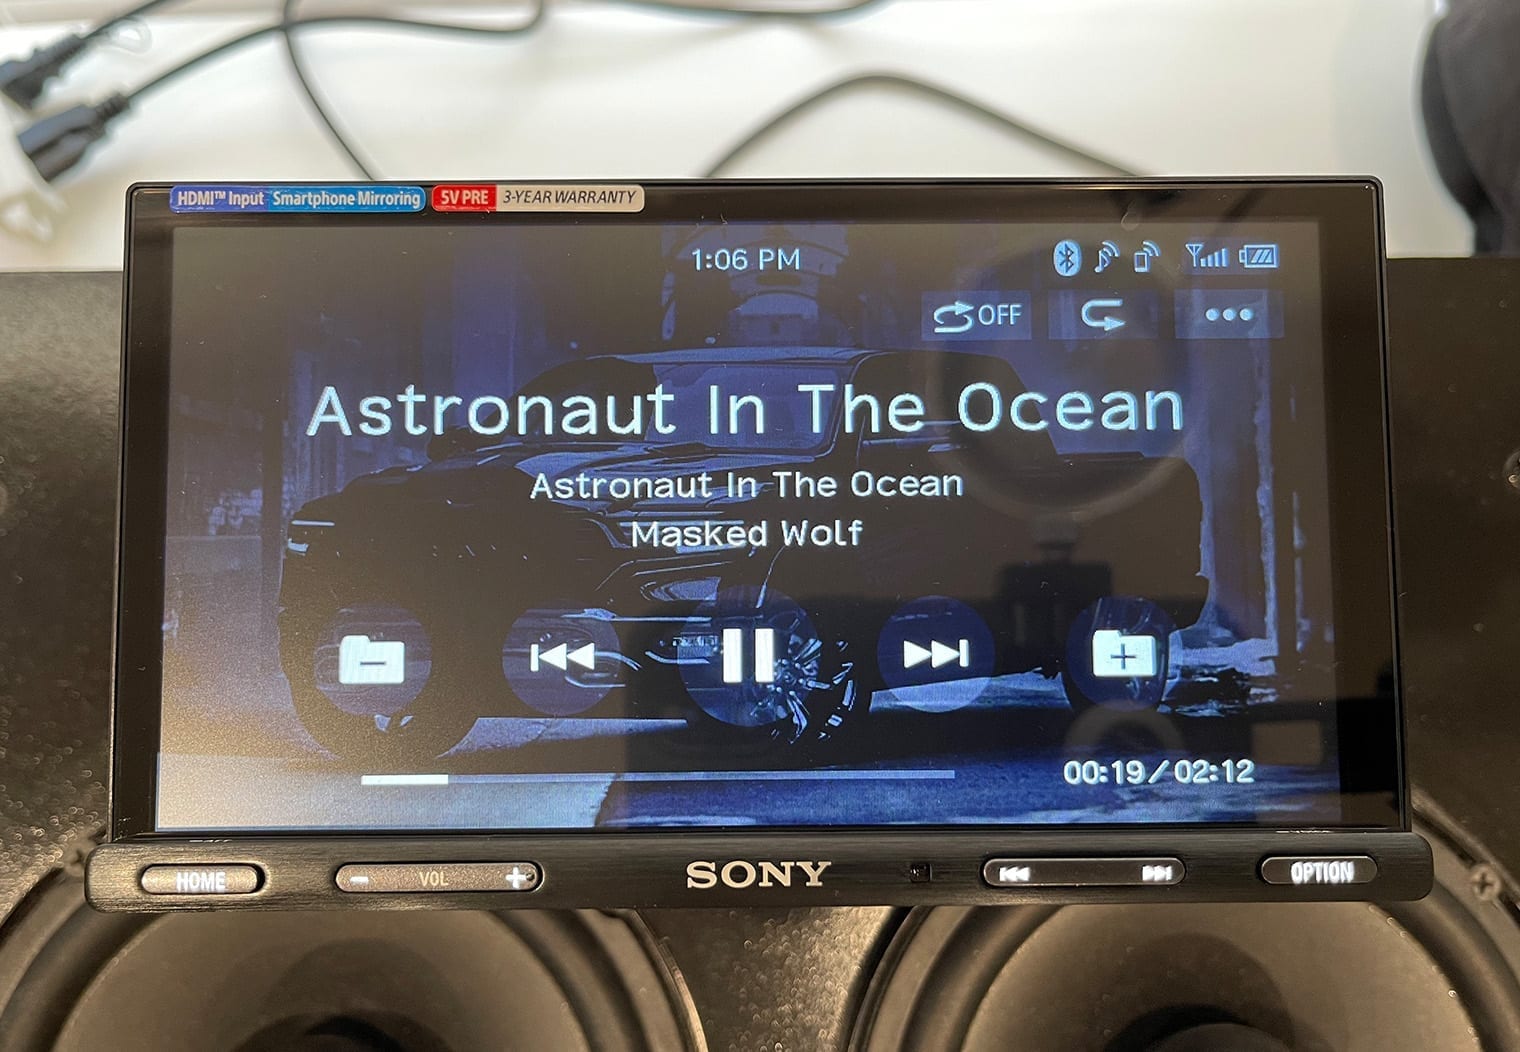
I went through and demoed the HDMI functionality and in the images below I'll show you what AT&T TV, Netflix and YouTube look like when you hook into HDMI from an iPhone. Instead of using WebLink, which is limited in what type of video you play (it doesn't allow you to put video from apps like Netflix on the screen), you can now use HDMI as a screen mirror video input. With HDMI, I really don't anticipate using WebLink with my iPhone as much. HDMI is cleaner, easier and has a higher quality screen mirroring. However, one of the pitfalls to HDMI vs WebLink is that with HDMI, you have to control everything via your phone. For example AT&T TV – I opened up the app, found the channel I wanted to watch and then selected it. Only then would it play the channel I want full screen on the XAV-AX5600. The App functionality is not extended to the touchscreen when you use HDMI.
As far as the image quality goes, it's super clear and vibrant. The color are great along with the resolution.
When you're playing video via HDMI or USB you can also adjust the screen settings, brightness and etc. These images are actually from the AX8100 but the functionality is identical on the AX5600.
Dual USB
Like I mentioned earlier, there are two USB input ports are located on the rear that will need to be wired to somewhere in the interior of your vehicle that you can plug your device into. With these USB ports, you can do a variety of things:
- Connect to Apple CarPlay and Android Auto
- Connect a music device like an older iPod or other like-music device
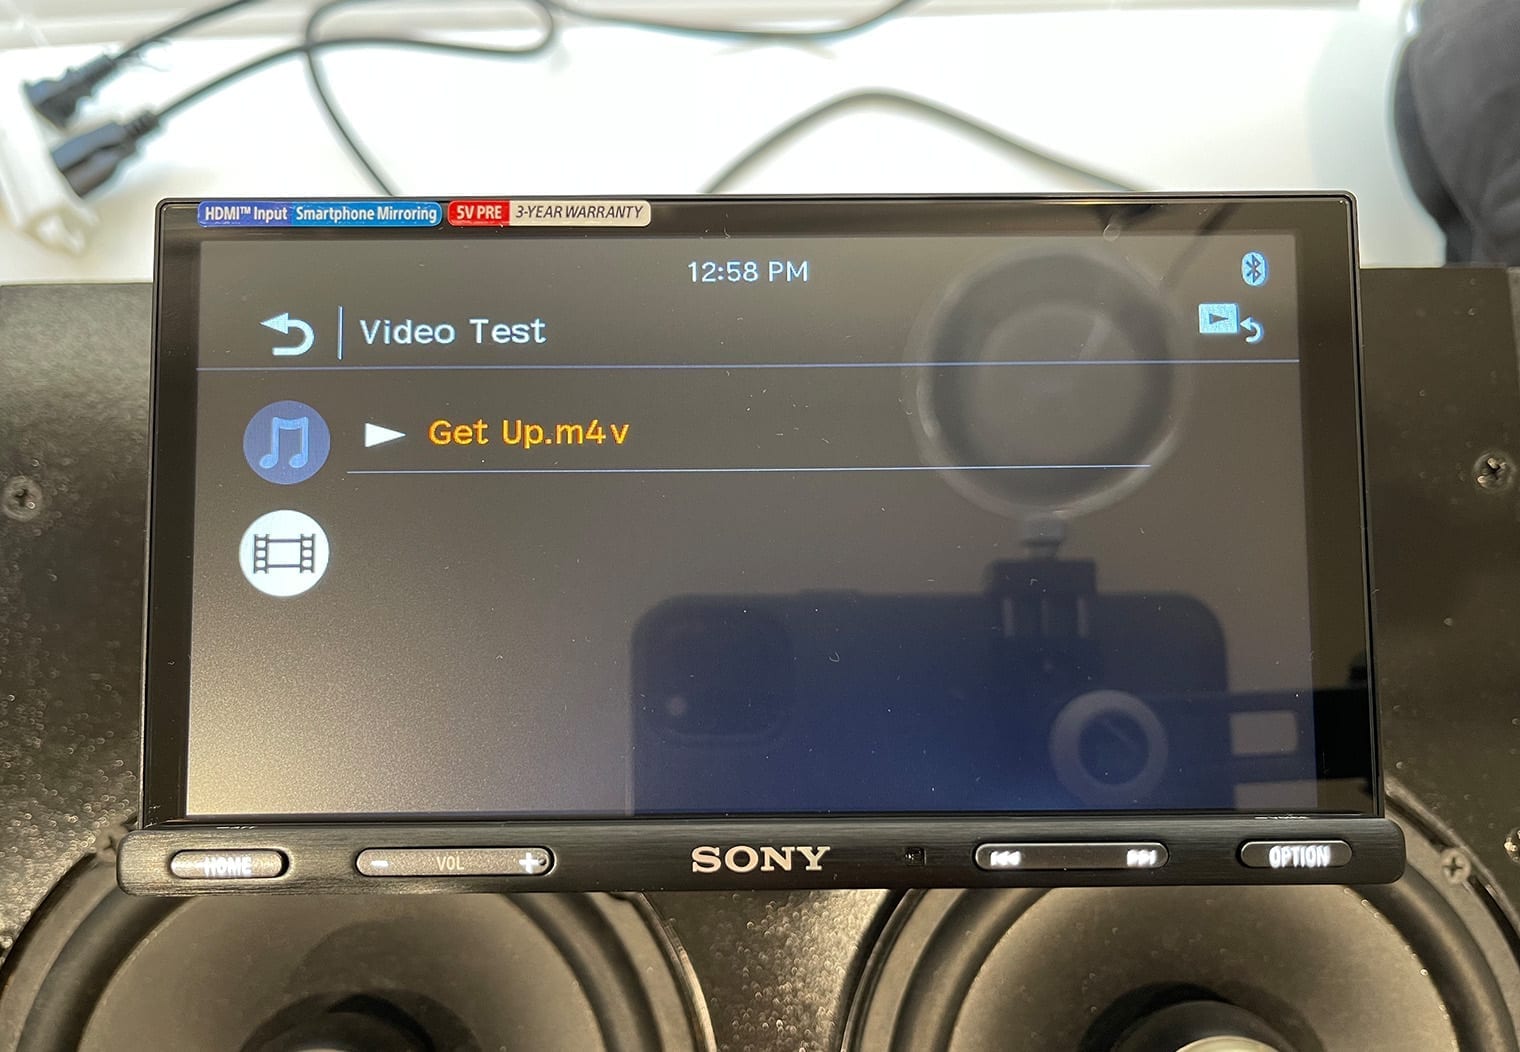
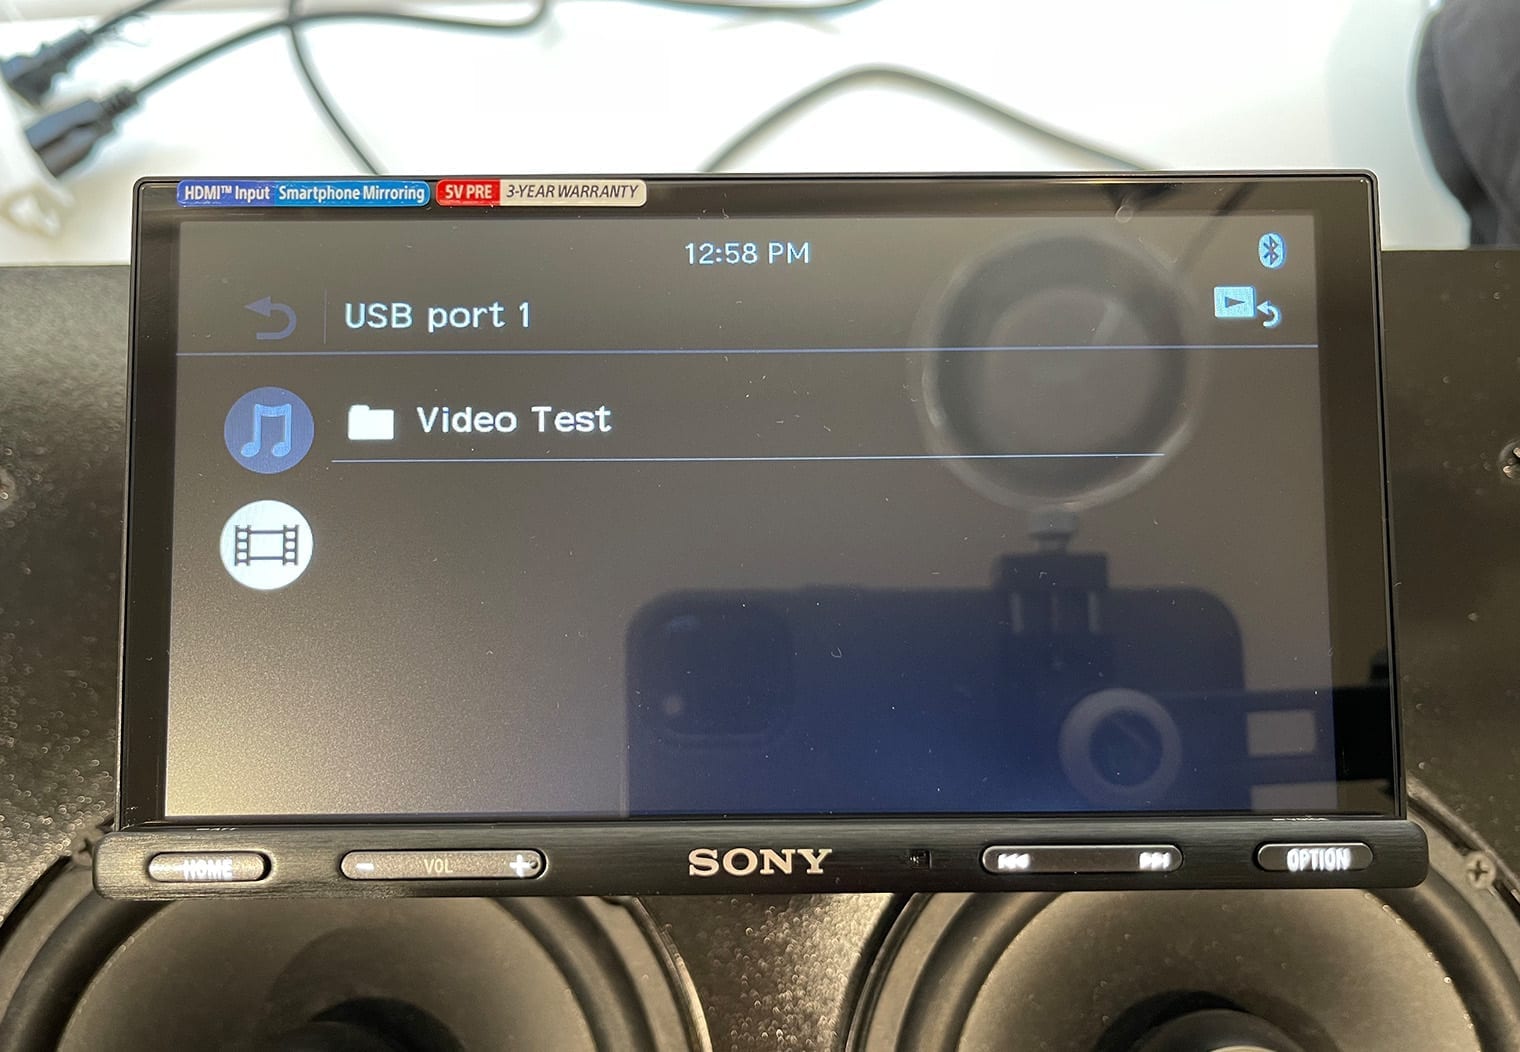
- Play video that's downloaded to a USB drive
- Play music that's downloaded to a USB drive
USB is really.. universal. I would recommend one of these usb ports that replaces your existing cigarette lighter style plugins so that you can easily plug in your device without an extra wire laying around. You will also want to wire the second USB port somewhere. I would recommend wiring the USB Port #1 to the usb port I recommended and linked just above, and then wire the USB Port #2 to your glovebox to use for a USB thumb drive since you don't really pull that out as frequently as you do your phone.
The USB Ports support different types of media:
- USB Port #1: USB Memory (Music and Video)
- USB Port #2: USB Memory (Music)
Basically, if you want to play video on the head unit via USB you'll need to use USB Port #1.
Here's a what the USB functionality looks like when you have a video uploaded to a USB drive and how it looks when you navigate through the USB drive files.

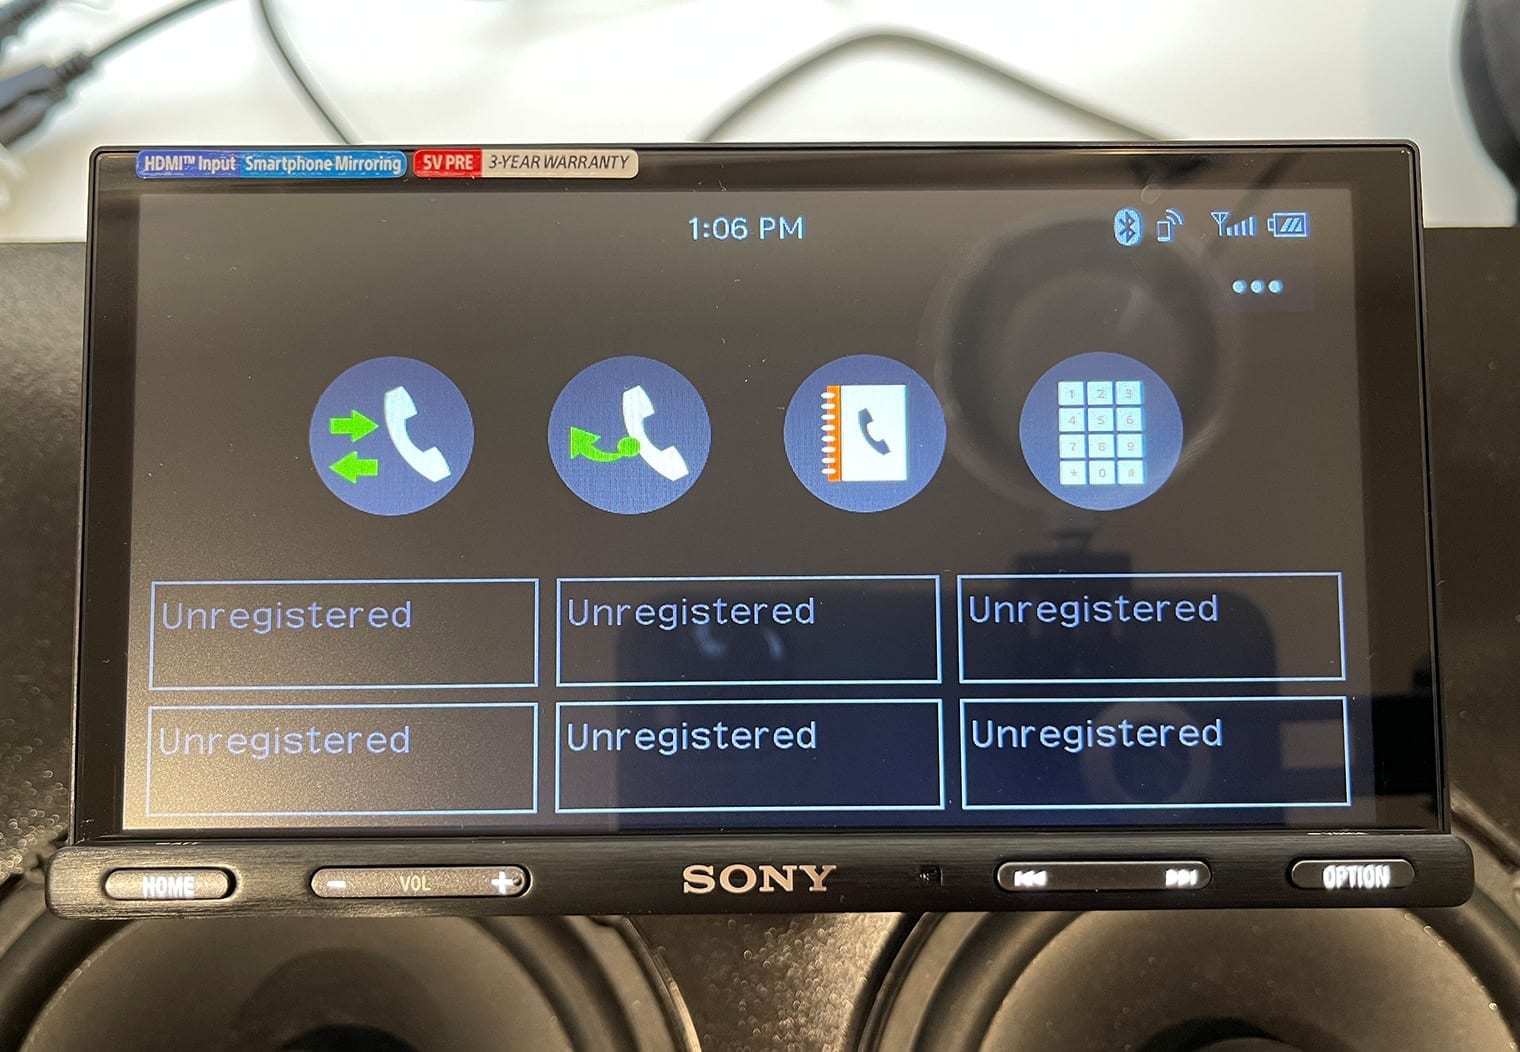
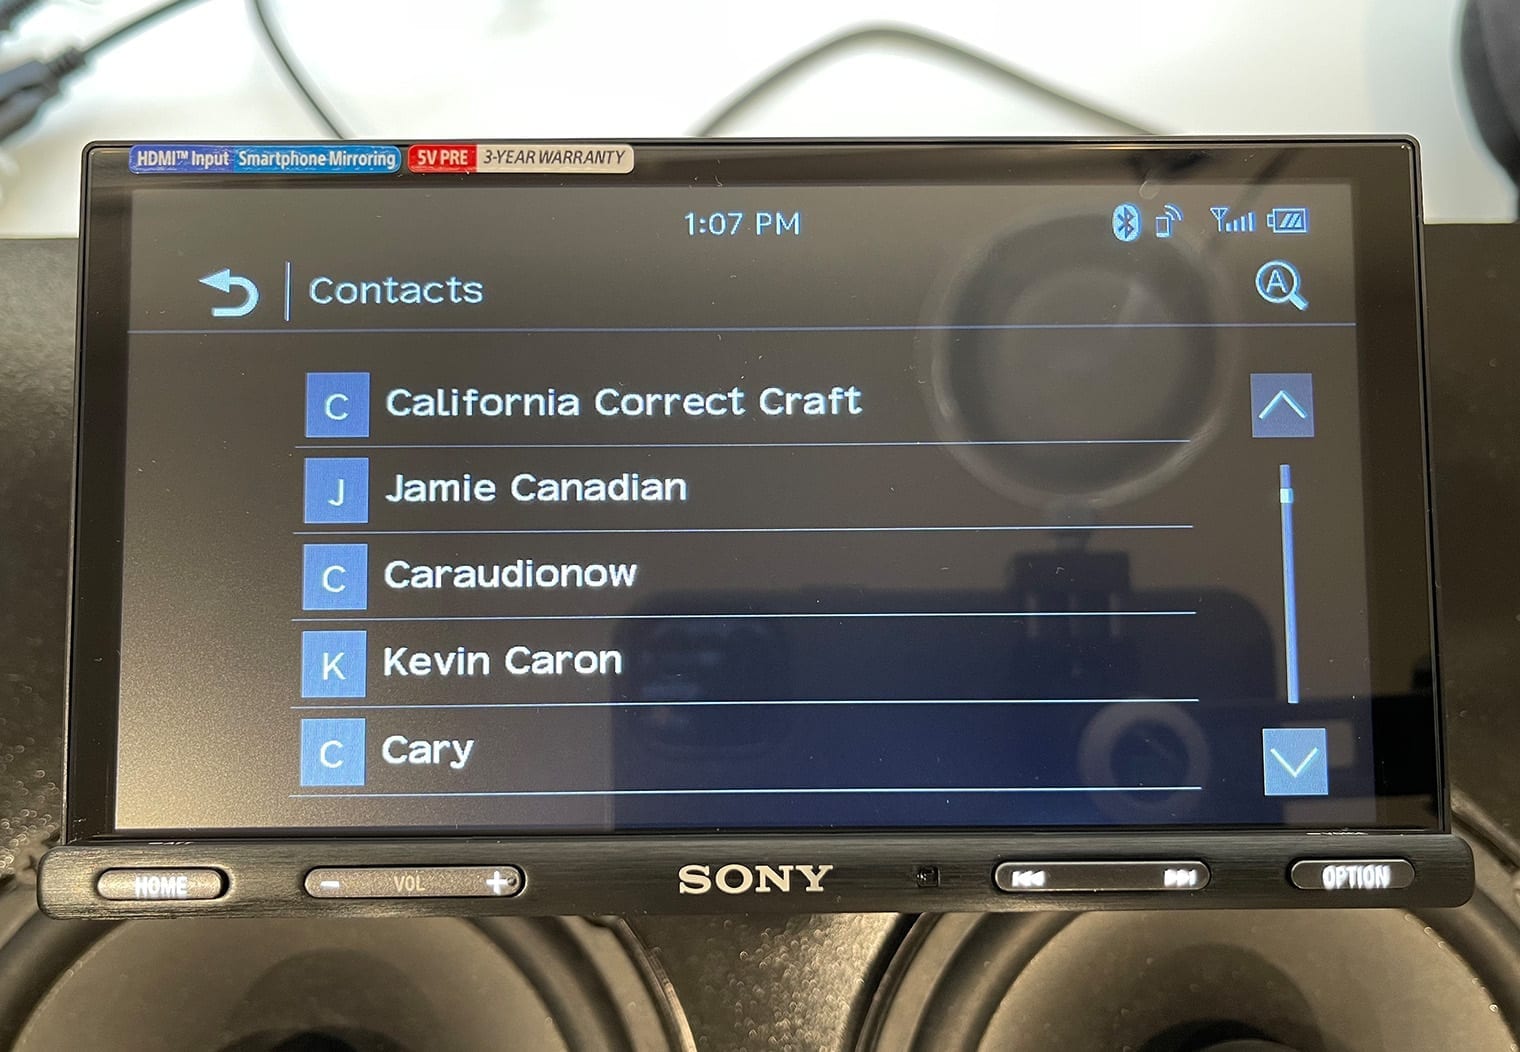
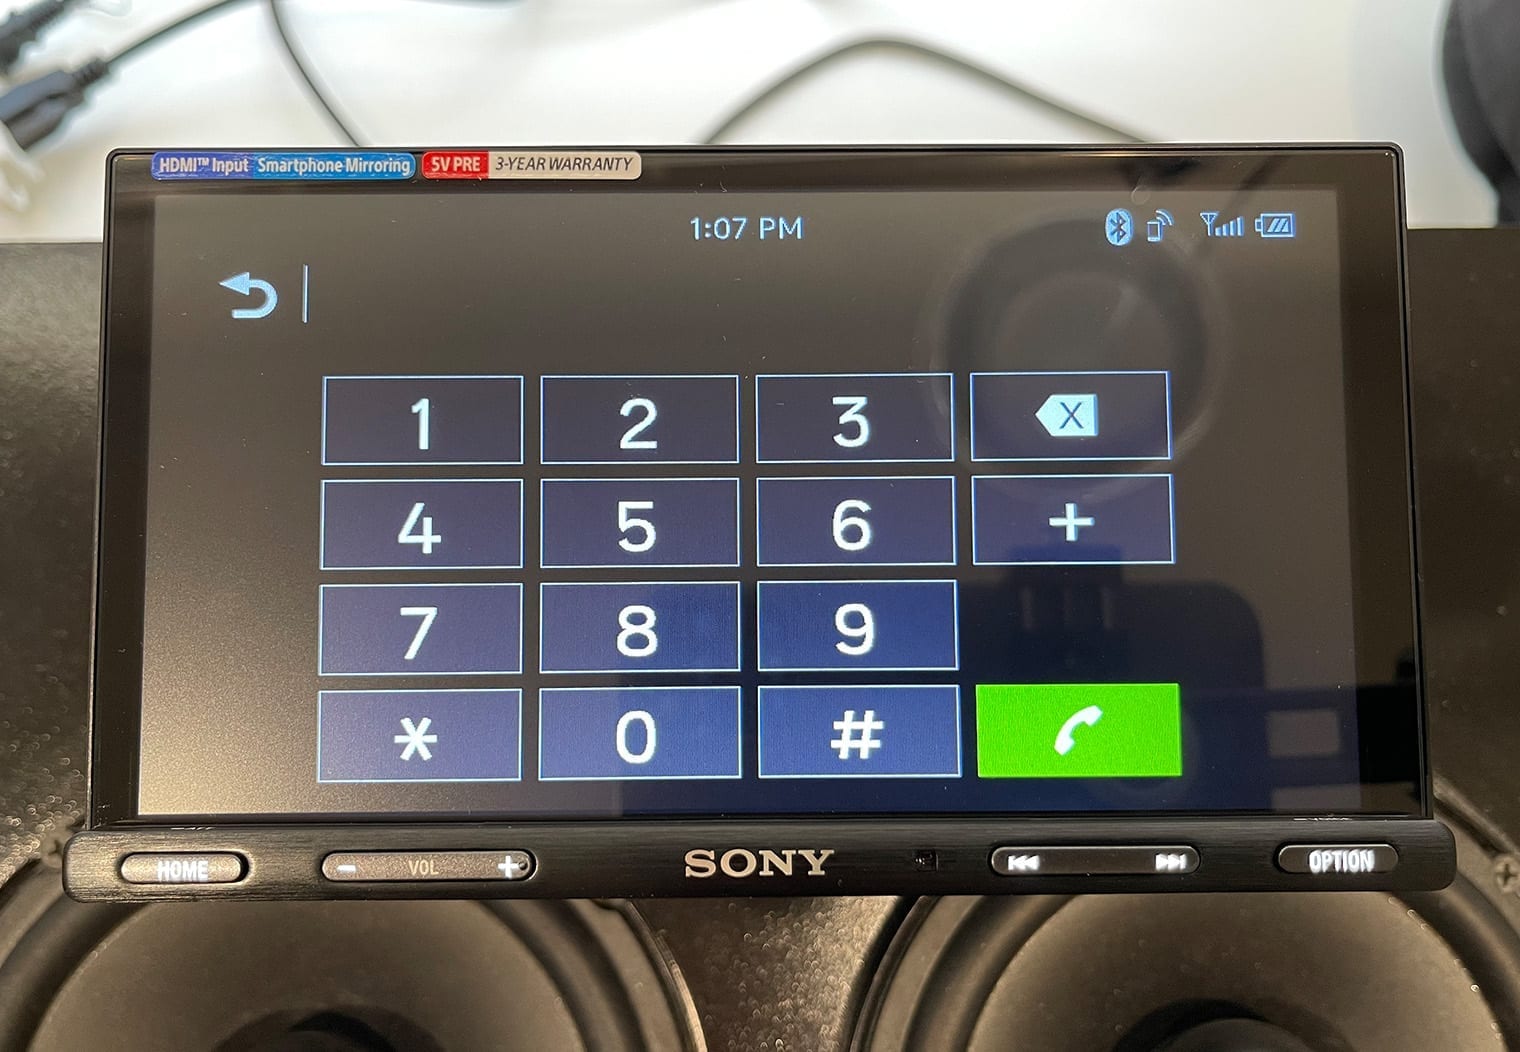
Bluetooth Connectivity
Bluetooth on the AX5600 is exactly you'd expect that it would be. Adding a new device is easy and quick – it took me less than 30 seconds to do it from start to finish. Bluetooth functionality on this head unit and all of the similar Sony head units includes:
- Streaming music on your app of choice from your phone or Bluetooth device
- Hands free phone calls and text message responses/readouts
- Voice command
Personally, I like to plug in my device though. Streaming music and hands free calls/text messaging on an Apple device is still a little better when you plug your phone or device directly into the unit via one of the USB ports. Bluetooth is flawless on this head unit, but streaming quality somehow always improves a little when you hook it directly into the USB.
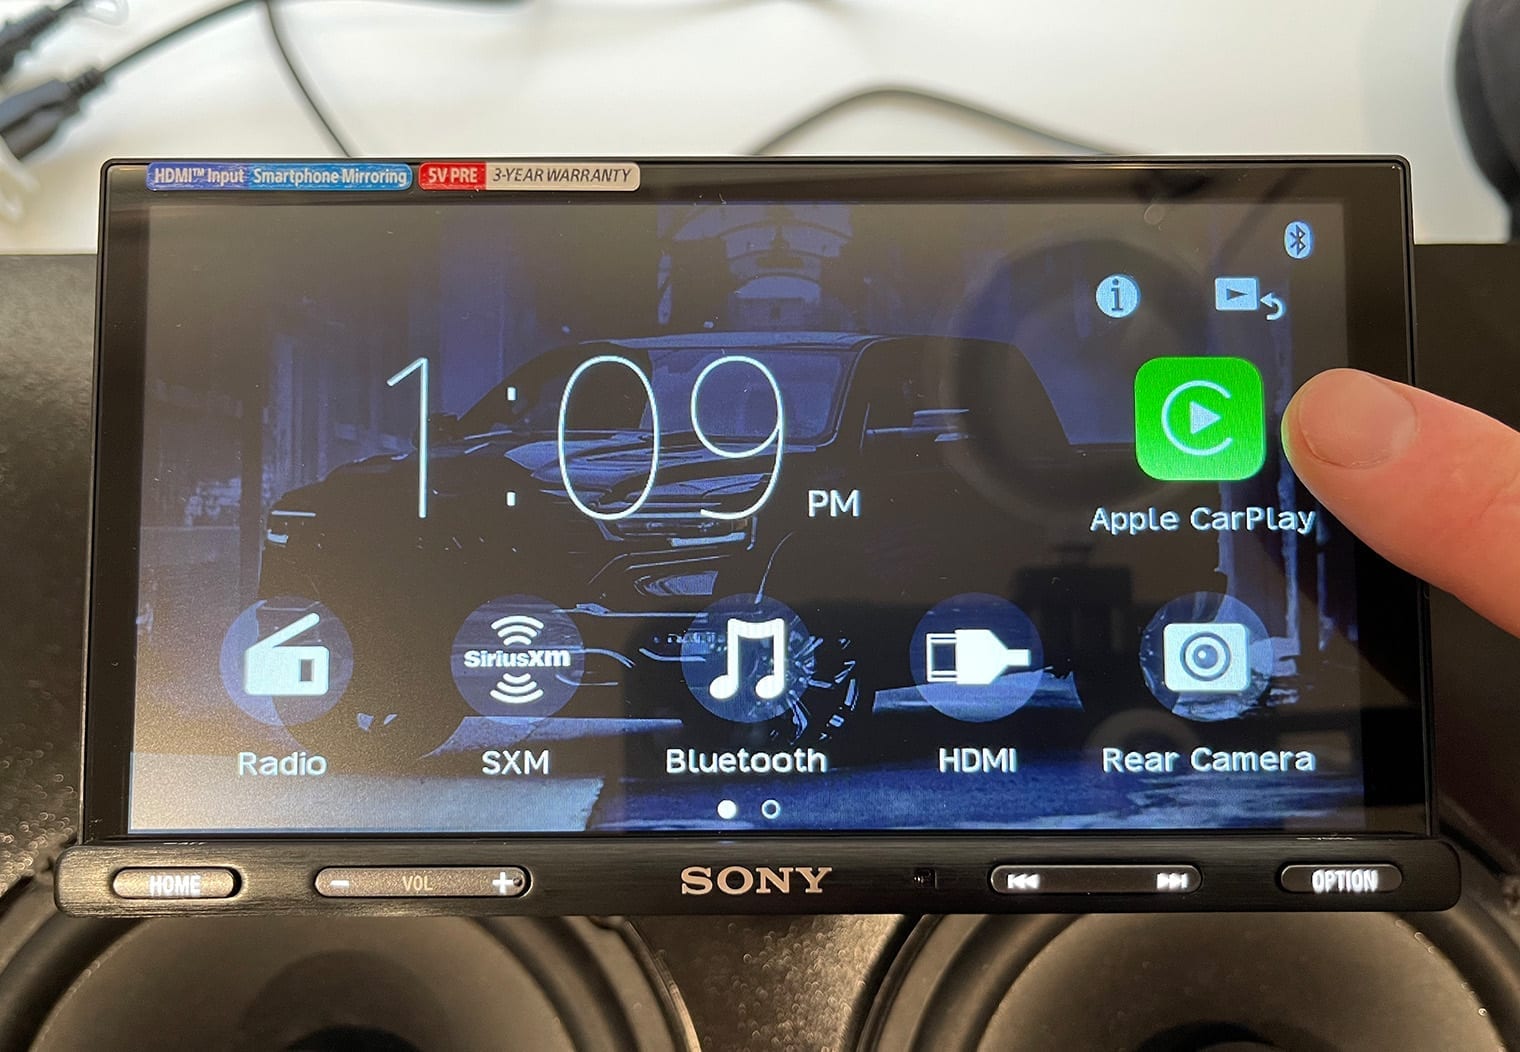
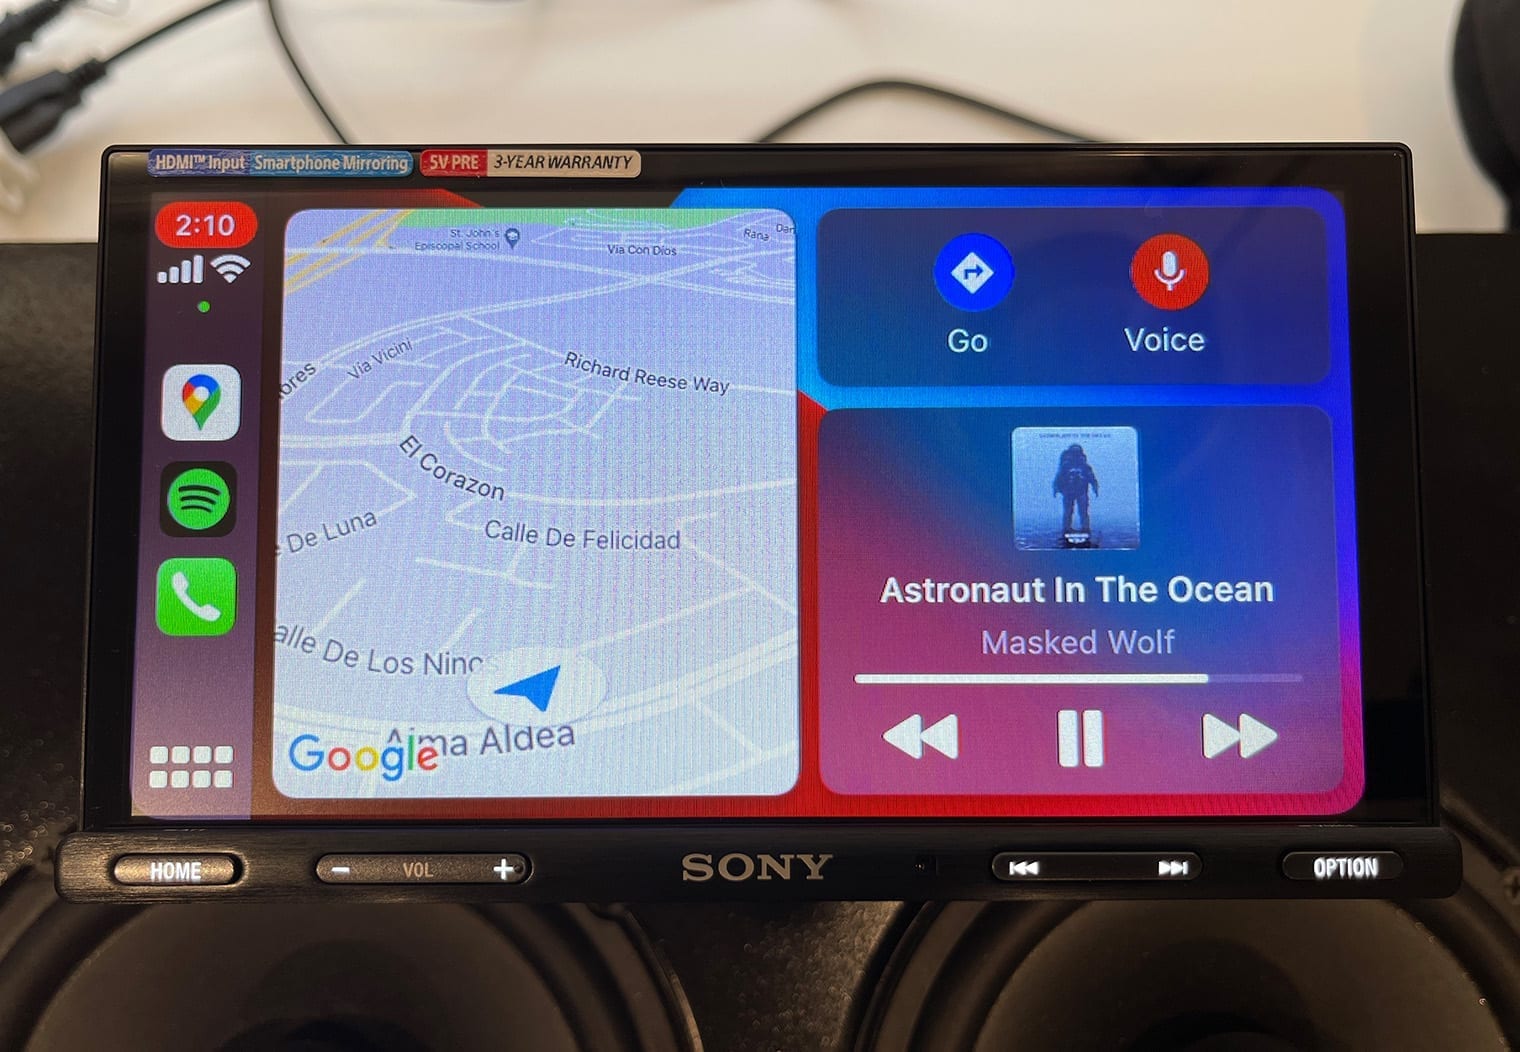
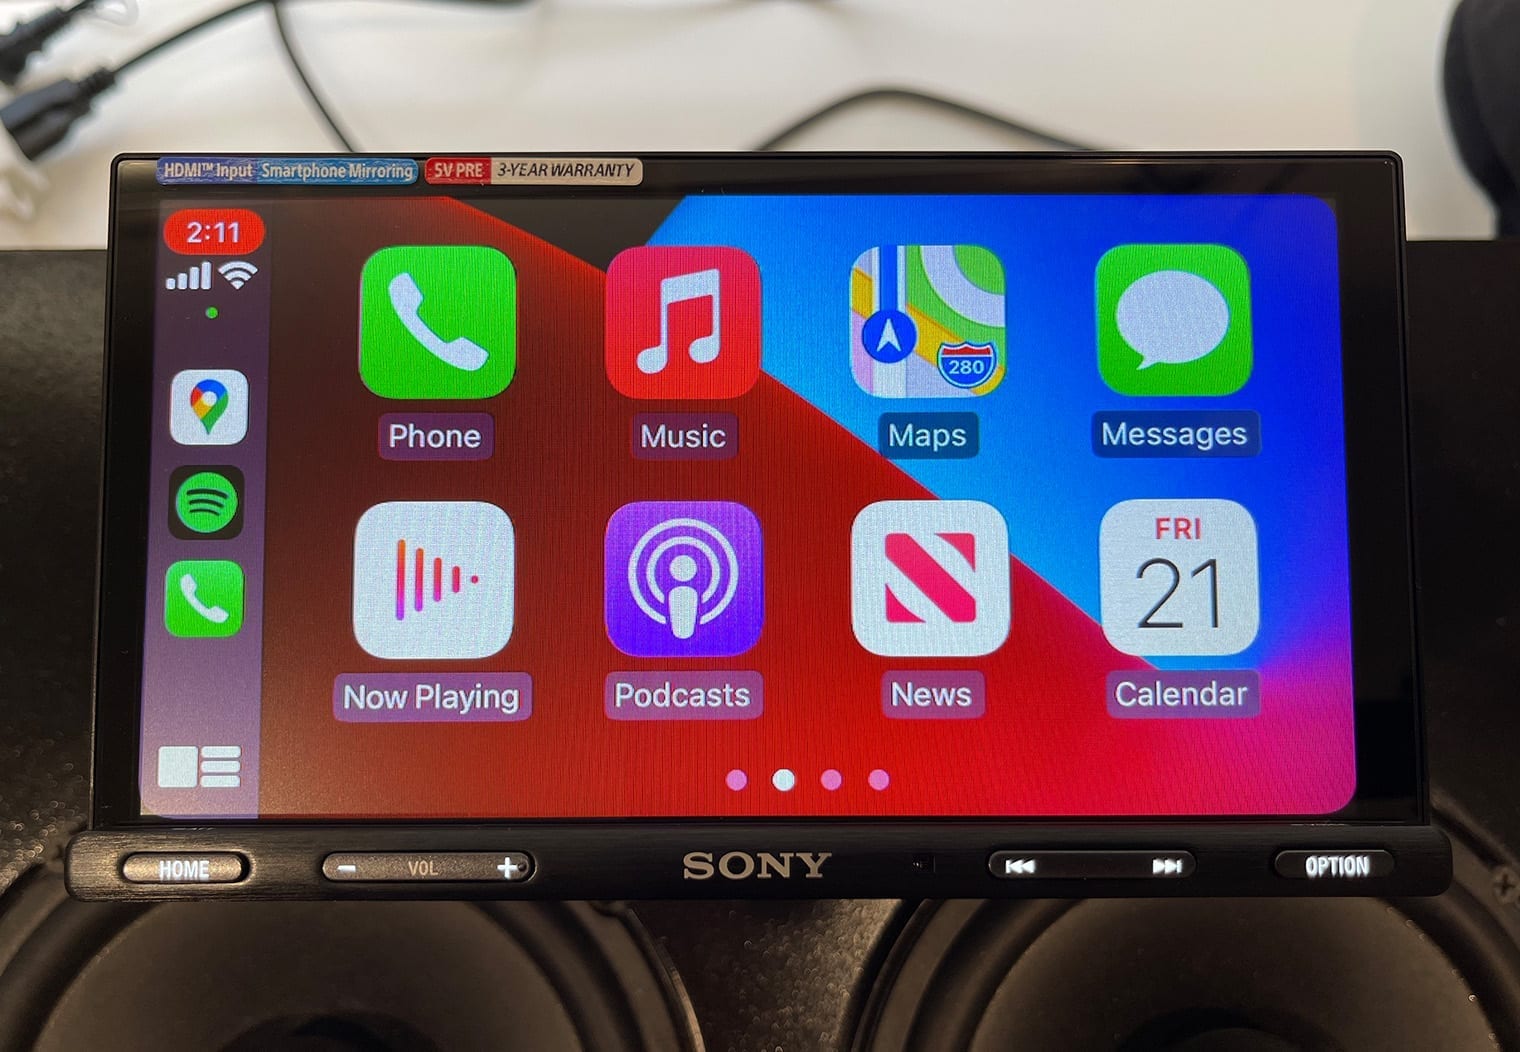
Apple CarPlay & Android Auto
Apple CarPlay and Android Auto have pretty much become standard in new vehicles. But even though they're standard, I still think that CarPlay and Android Auto are in their infancy and are a significantly ‘lite' versions of the apps that you use on your phone. Nonetheless, here are a few reasons why CarPlay and Android Auto are really helpful:
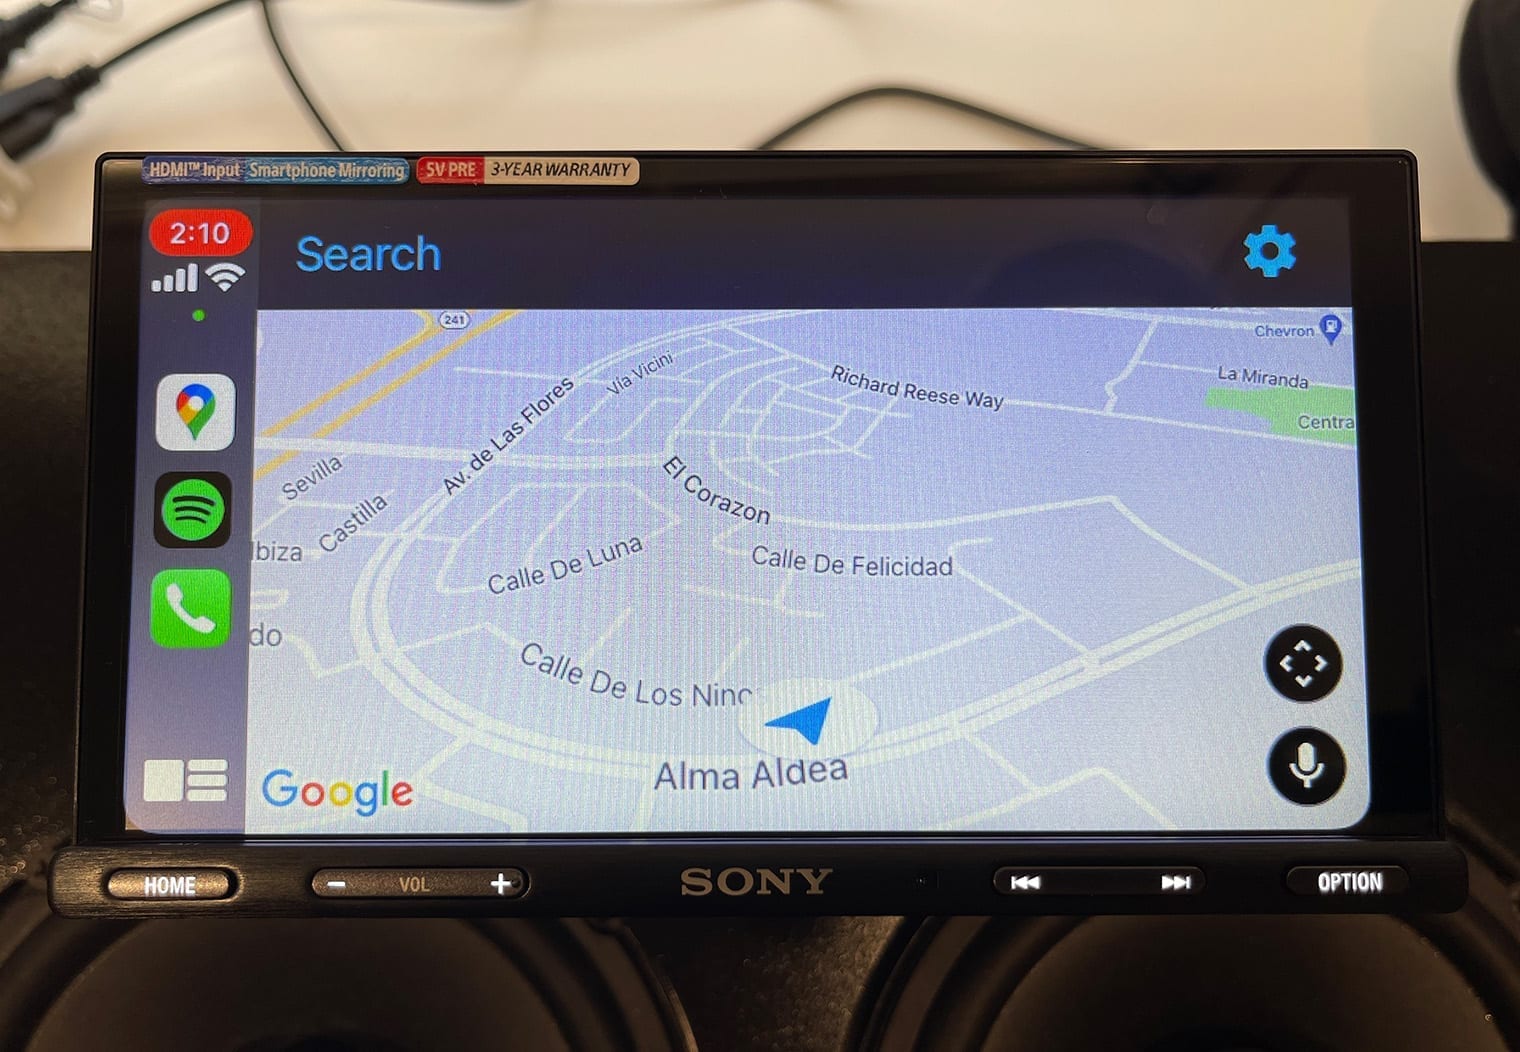
- Navigation: Even though we maintain a list of the best GPS navigation head units on the market today, the reality is that you don't need one if the head unit has CarPlay or Android Auto capability. In fact, the navigation via CarPlay and Android Auto is better – it uses Google Maps, Waze or Apple Maps which you're likely much more familiar with and is constantly being updated. I would almost go as far as saying DON'T get a GPS nav head unit if the unit has CarPlay or Android Auto.
- App Compatibility: Although the app features are ‘lite' versions of what they'd be on your phone, they're still super helpful to have on your head unit. Developers are juggling between functionality and distraction which is why they are still ‘dummed down' versions of what they'd be on your phone. But even so, it's really helpful to have even 50% of the functionality of apps like Spotify at the tip of your fingers on this 8.95″ touchscreen instead of scrolling through your phone.
- Audio Quality: Bluetooth is great but for some reason or another if you're going for audio quality the best way to achieve that is to start with a hardwired connection (aka USB). Right now, CarPlay and Android Auto still require a USB connection so the audio quality is still going to be better.
I won't get too deep into Apple CarPlay or Android Auto because it's all but the same no matter what head unit you're using it on but you can read up more about why you need Apple CarPlay or check out our best Apple CarPlay and Android Auto Head Units.
The one thing I wish this head unit did have was wireless Apple CarPlay and Android Auto. Like I said earlier, this tech is still in its infancy today but not having to connect your device via USB to access CarPlay and Android Auto would be another game changer in my opinion. Maybe next year it's something Sony will add!


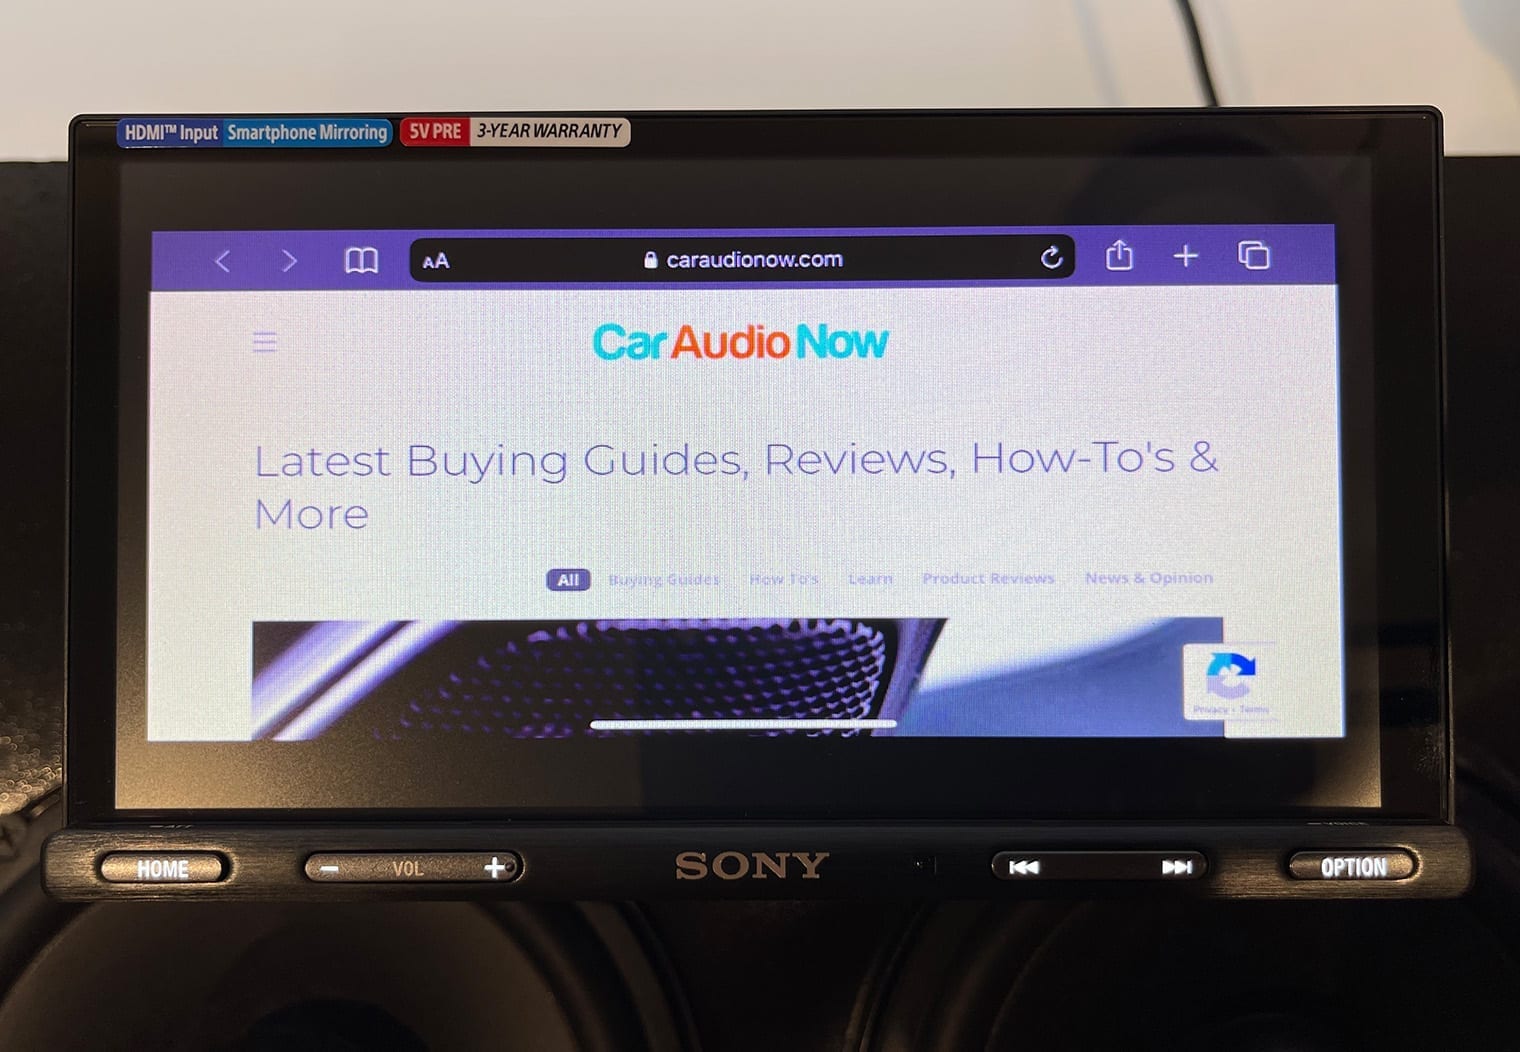
WebLink
All of the new Sony multimedia units come with WebLink compatibility. For those of you who aren't familiar with WebLink, it's basically another way to share your phone's screen and functionality on the head unit's screen. It also has a number of pre-set applications similar to what you'd see in Apple CarPlay or Android Auto.
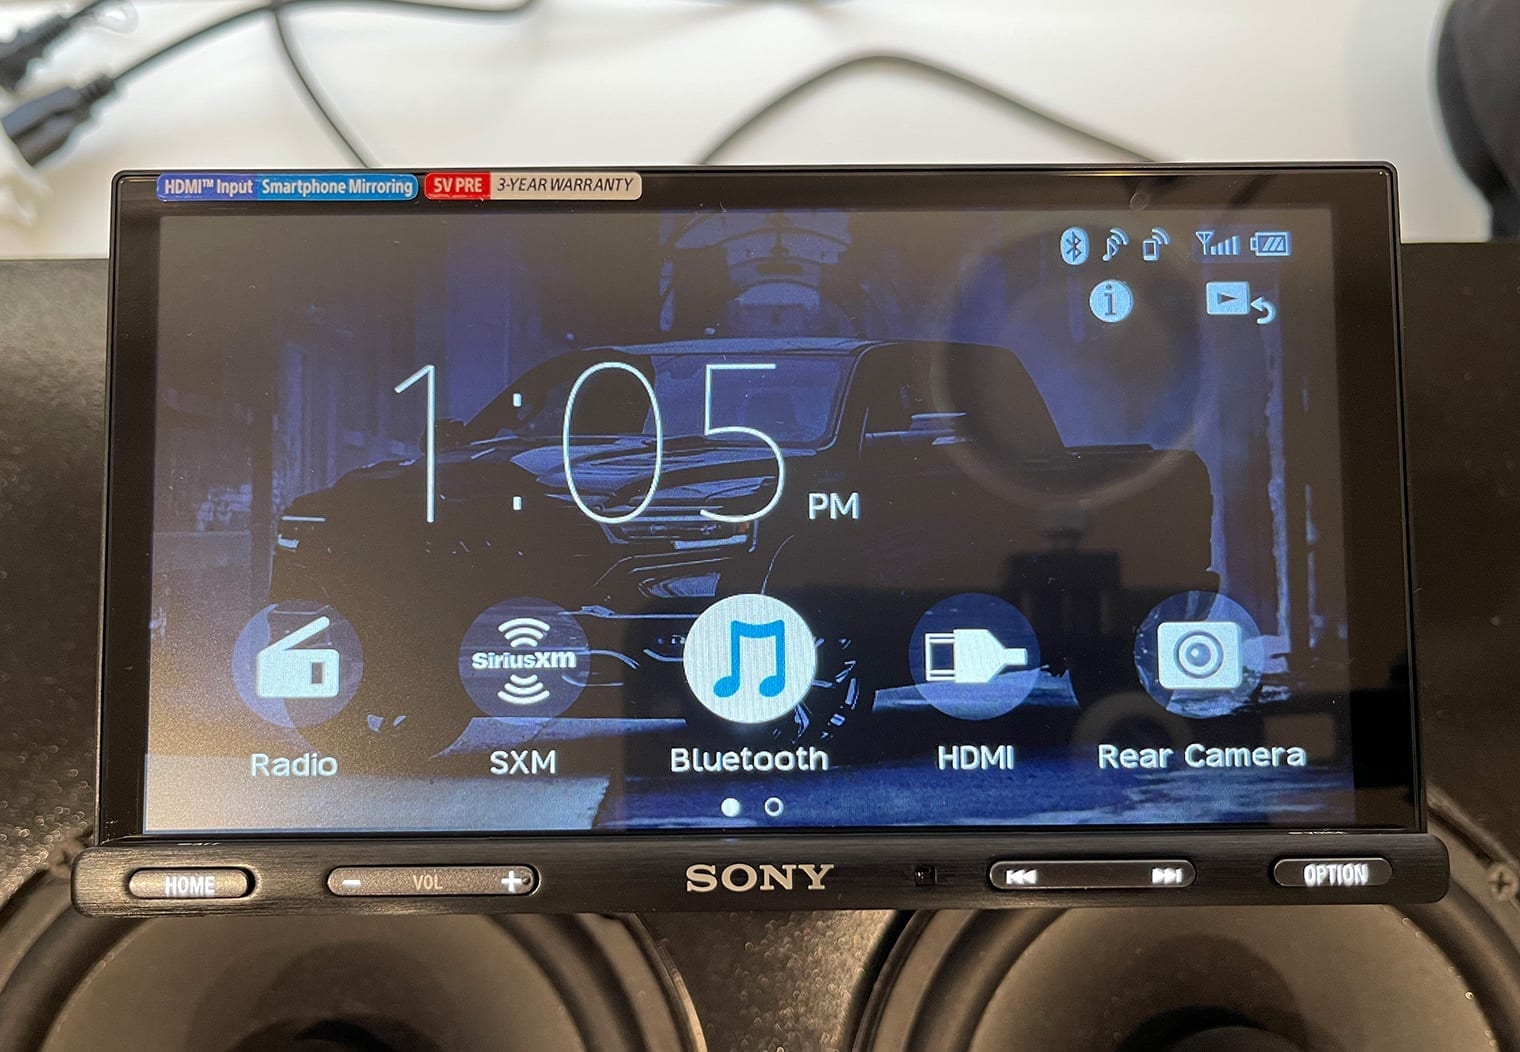
In order to access WebLink, you need to download the WebLink app and then plug your phone into the USB input. On the second page of the homescreen you'll see the WebLink icon. Once you click on that icon (and if you have the app installed) it'll open WebLink up and you'll have access to all of the WebLink apps. Apps vary but on my screen there were a couple notable ones:
- Waze
- YouTube
- Videos
You could also ‘cast' your screen from your phone to the head unit as well. This essentially copies what's on your screen to the head unit's screen. I find this feature now more than ever less useful. Especially with the addition of an HDMI input that does exactly what this is trying to, but with no delay or limitations. For example, if you use the WebLink cast to try to play video from Netflix it'll block it from appearing on the head unit screen. You can hear audio but the screen is black.
WebLink is a nice connectivity add, but at this point I think that for the average user of this head unit it's really just a redundant feature with HDMI and CarPlay/Android Auto.
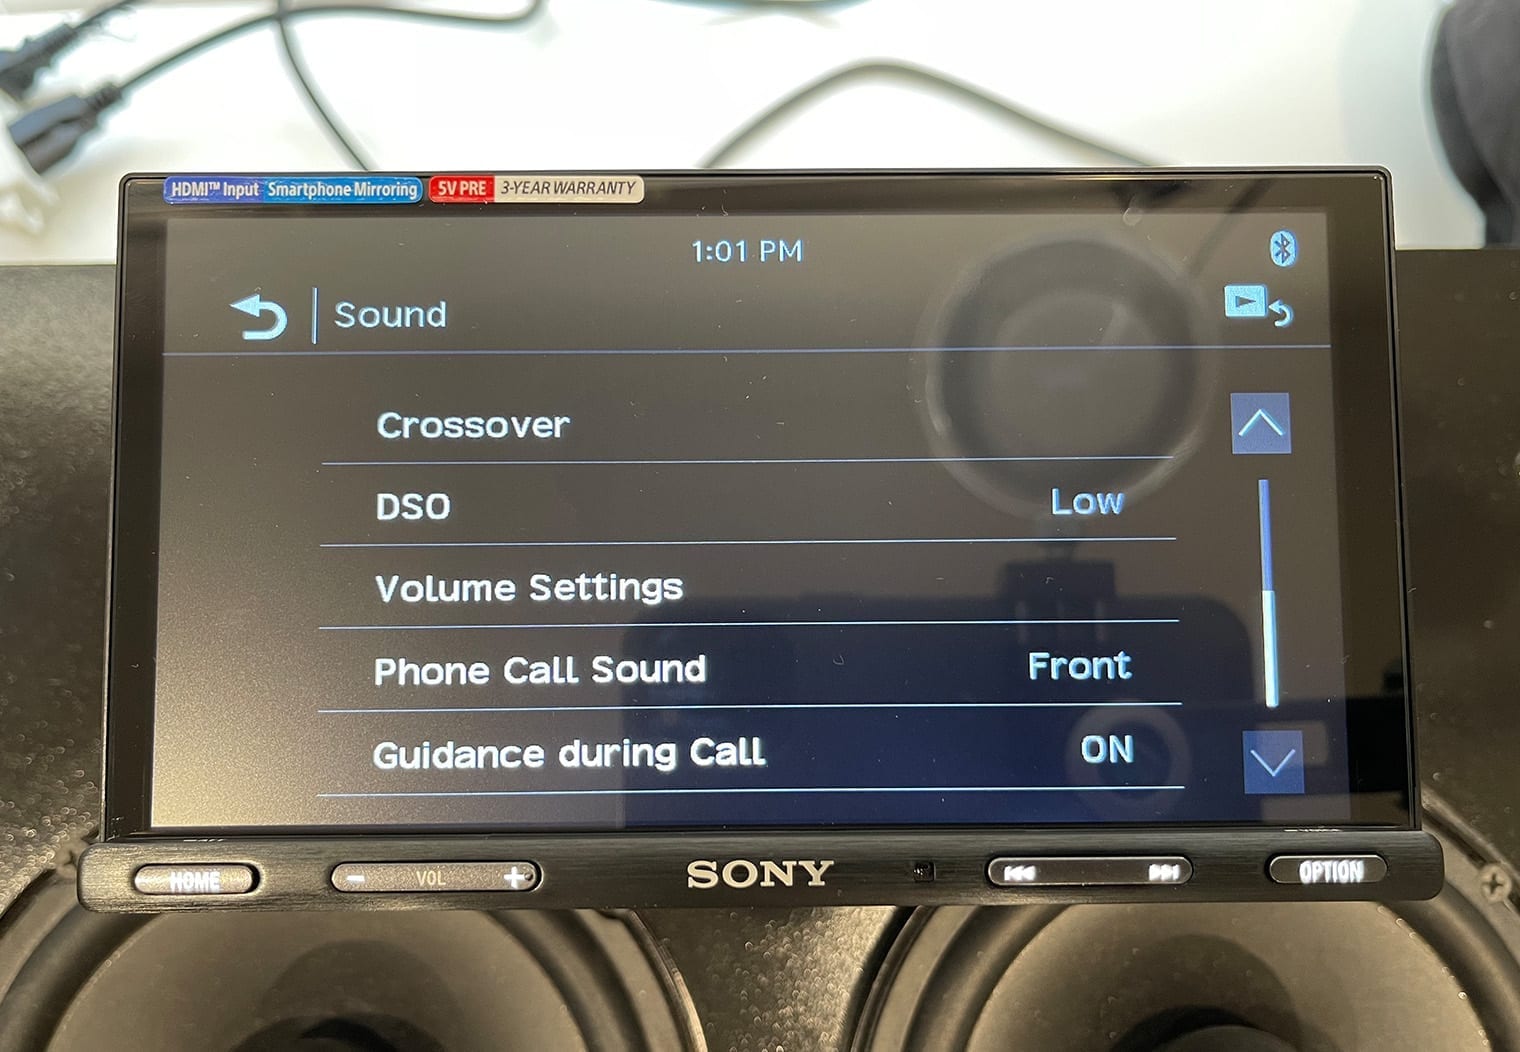
Audio Features – Setup, Output and Tuning
Sony's XAV-AX5600 is ready for both an amplified system or non-amplified. For the non-amplified systems, the AX5600 puts out 55W x 4 (peak) and 20W x 4 (RMS) channels to power your interior speakers directly from the head unit without a separate amplifier. 20W x 4 RMS won't get you to a custom sounding system, but 9 out of 10 times it will improve the volume and sound of your car's stereo. Typically, head unit outputs sit between 12-18W so 20W is ‘above average'.
And for those who plan to install aftermarket amplifiers to power their speakers or subwoofer(s), you'll find three 5V RCA preouts on the rear of the head unit – Front, Rear and Mono Subwoofer. One key thing to reiterate here is that the preouts are 5V, which is the new high-standard for preout voltage. 10 years ago, 4V was more common, but today 5V is really what you want to have a high-powered, amplified setup.
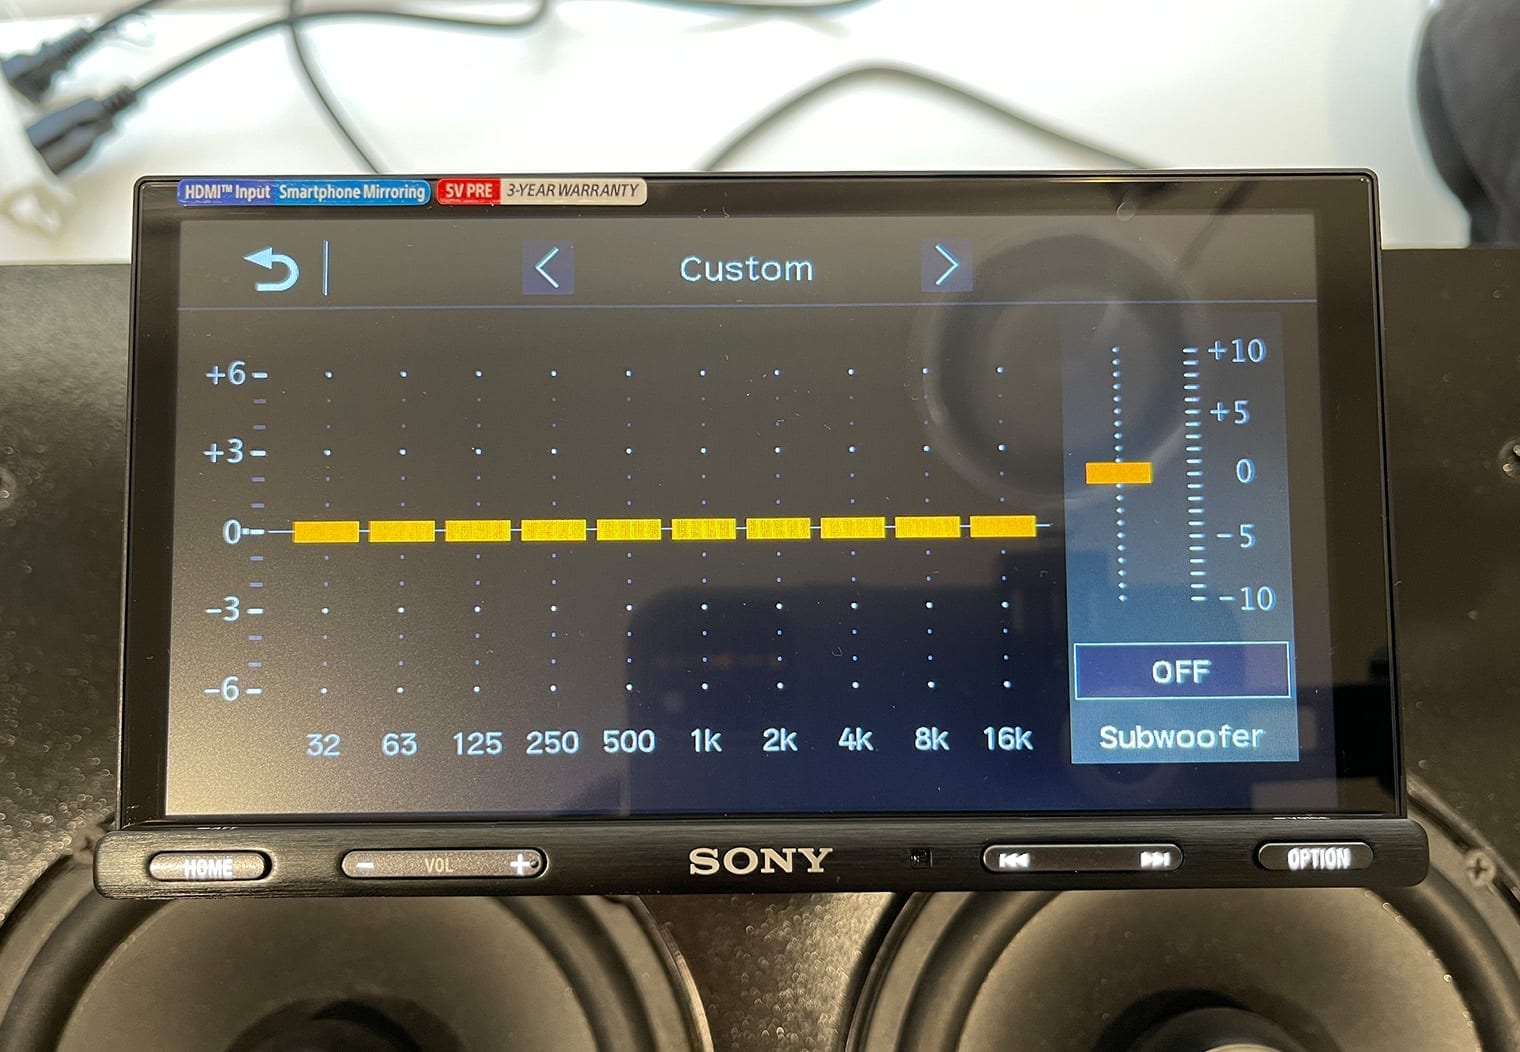
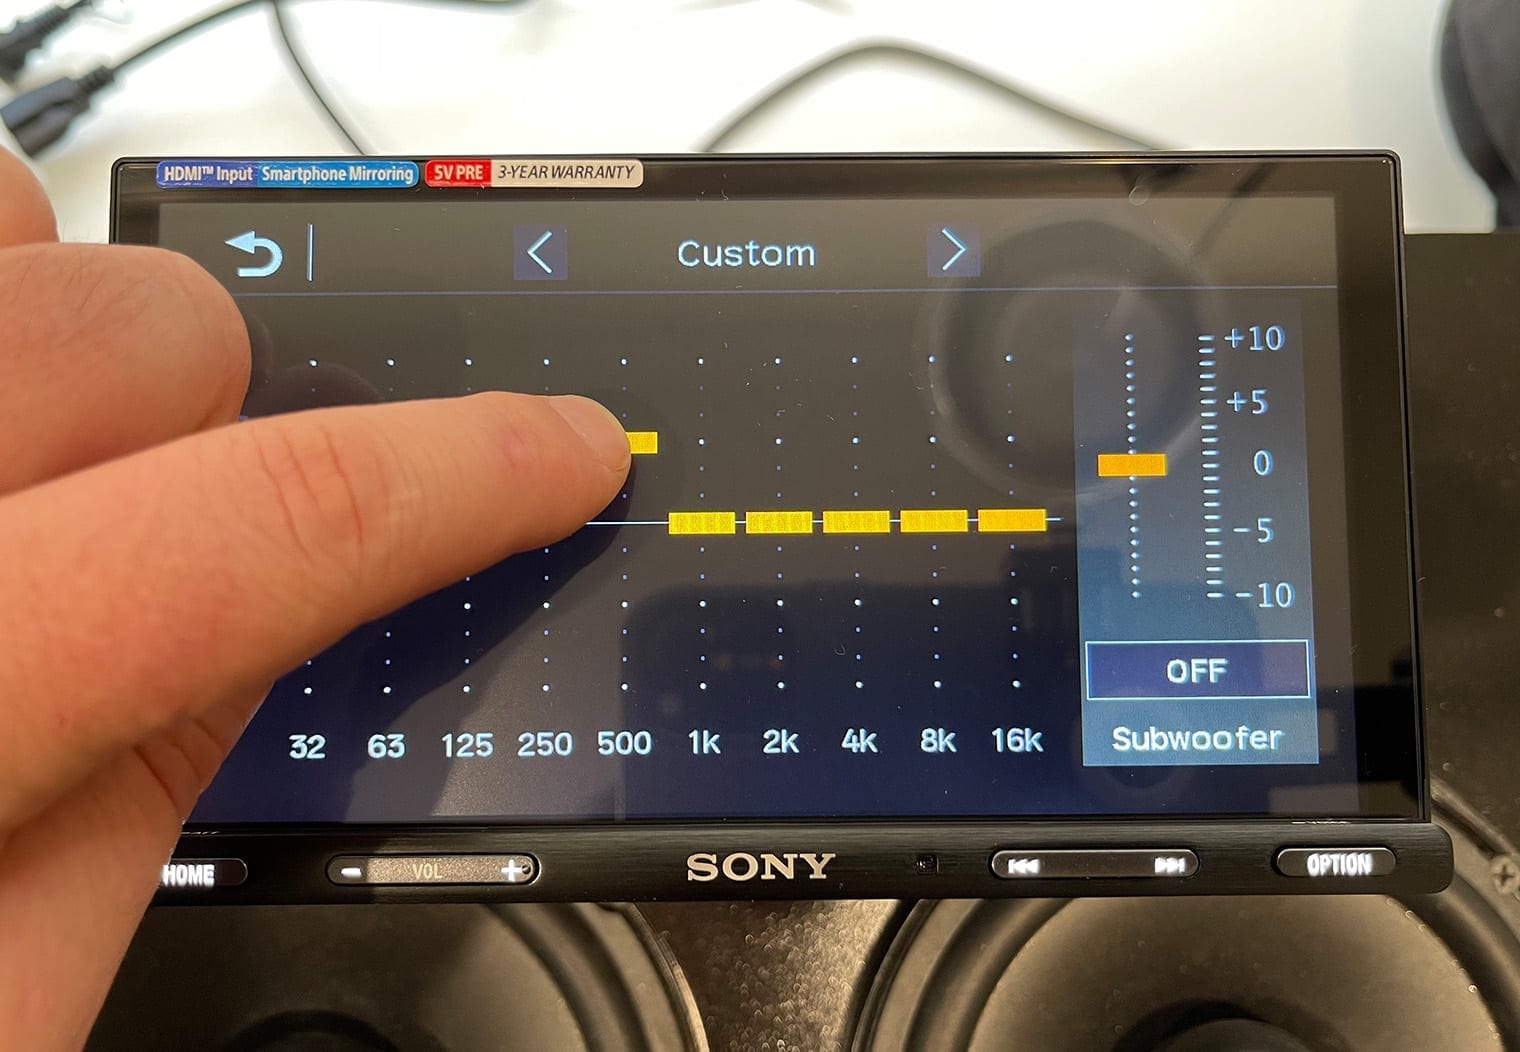
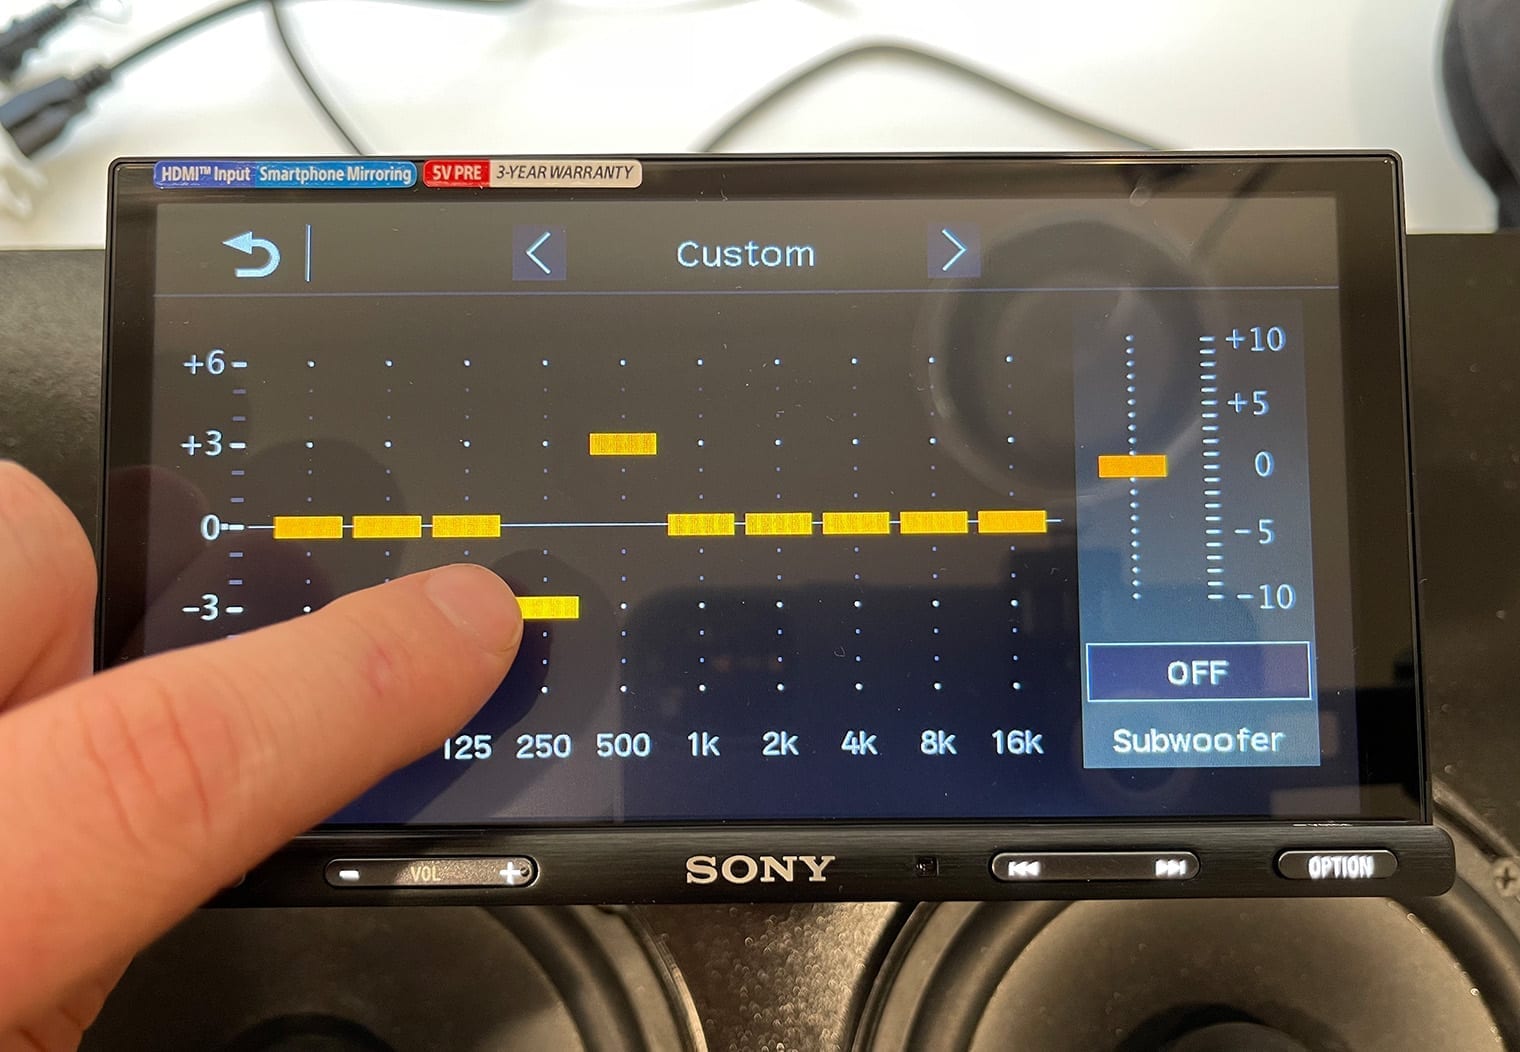
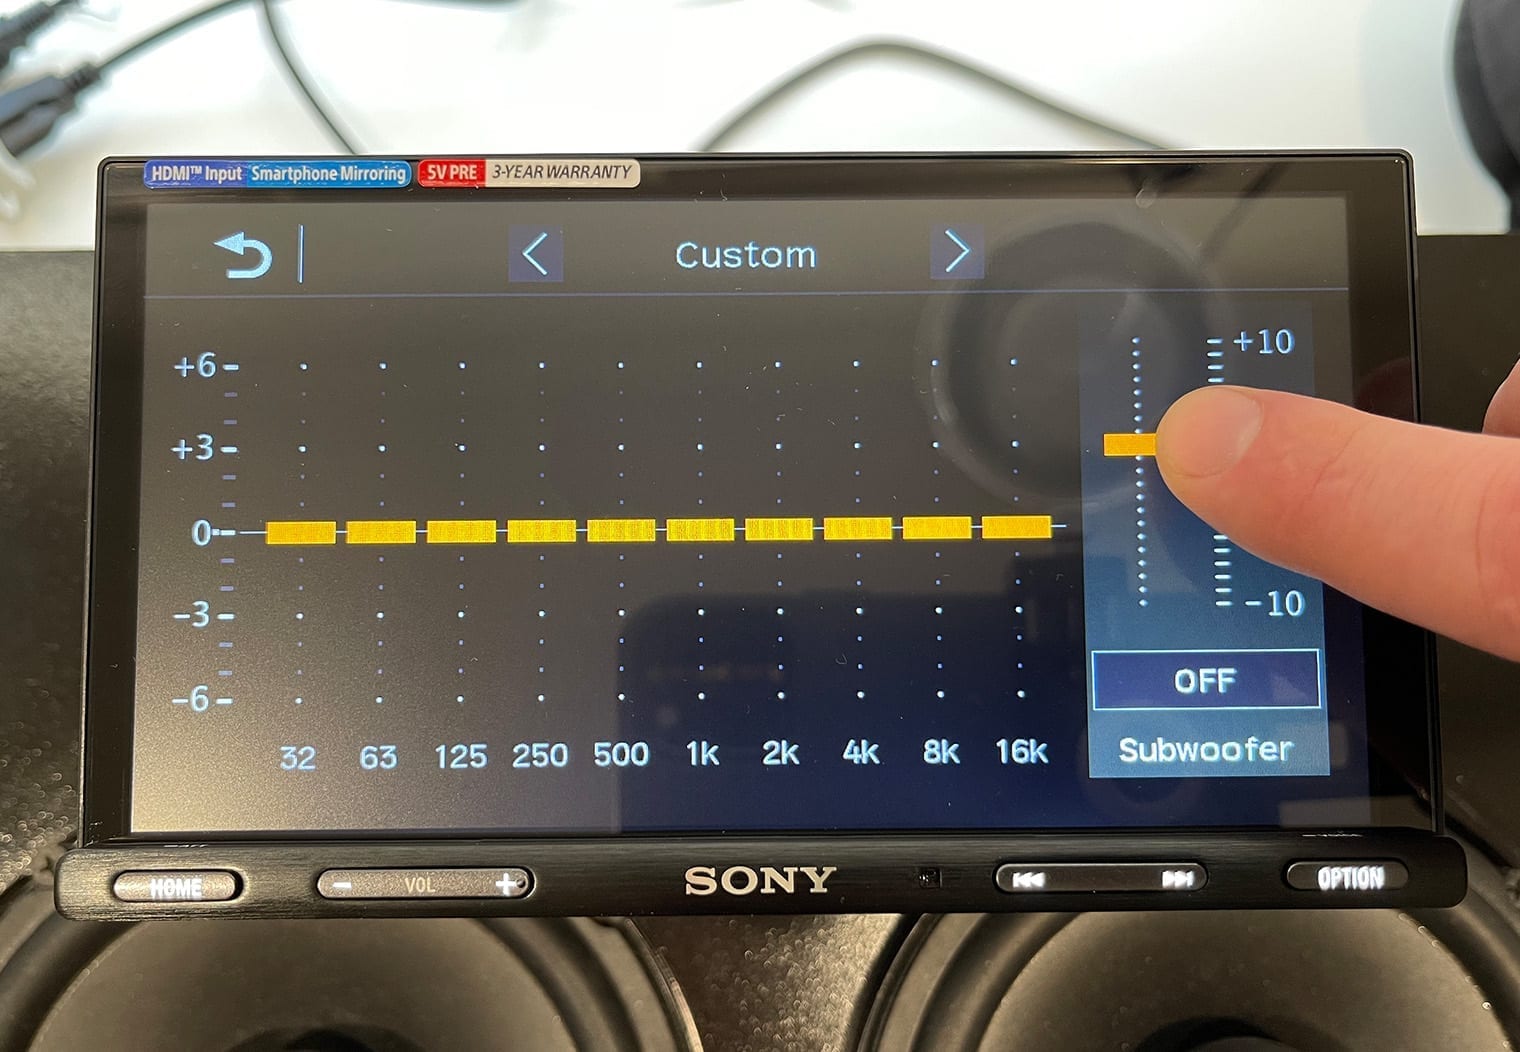
10-band Equalizer
Like it's preceding model, the AX5500, the AX5600 has a 10-band equalizer that will provide a broad range of control of your head unit's sound output regardless whether or not you're adding an aftermarket amplifier or not. You can find the Equalizer in the Settings > Sound > EQ10/Subwoofer section. In the EQ settings you'll find a series of preset equalizer settings. These presets are predefined by Sony to align with certain genres of music out of the box to make it easy for you to choose and flip through depending on what you're in the mood to listen to. This includes, Pop, Hip-Hop, Rock, Jazz, Electronic and more. You can interchange them while you're listening to the music you'd like to tune your stereo to and choose the one that sounds the best. Here's a few photos of what the settings and equalizer presets look like.
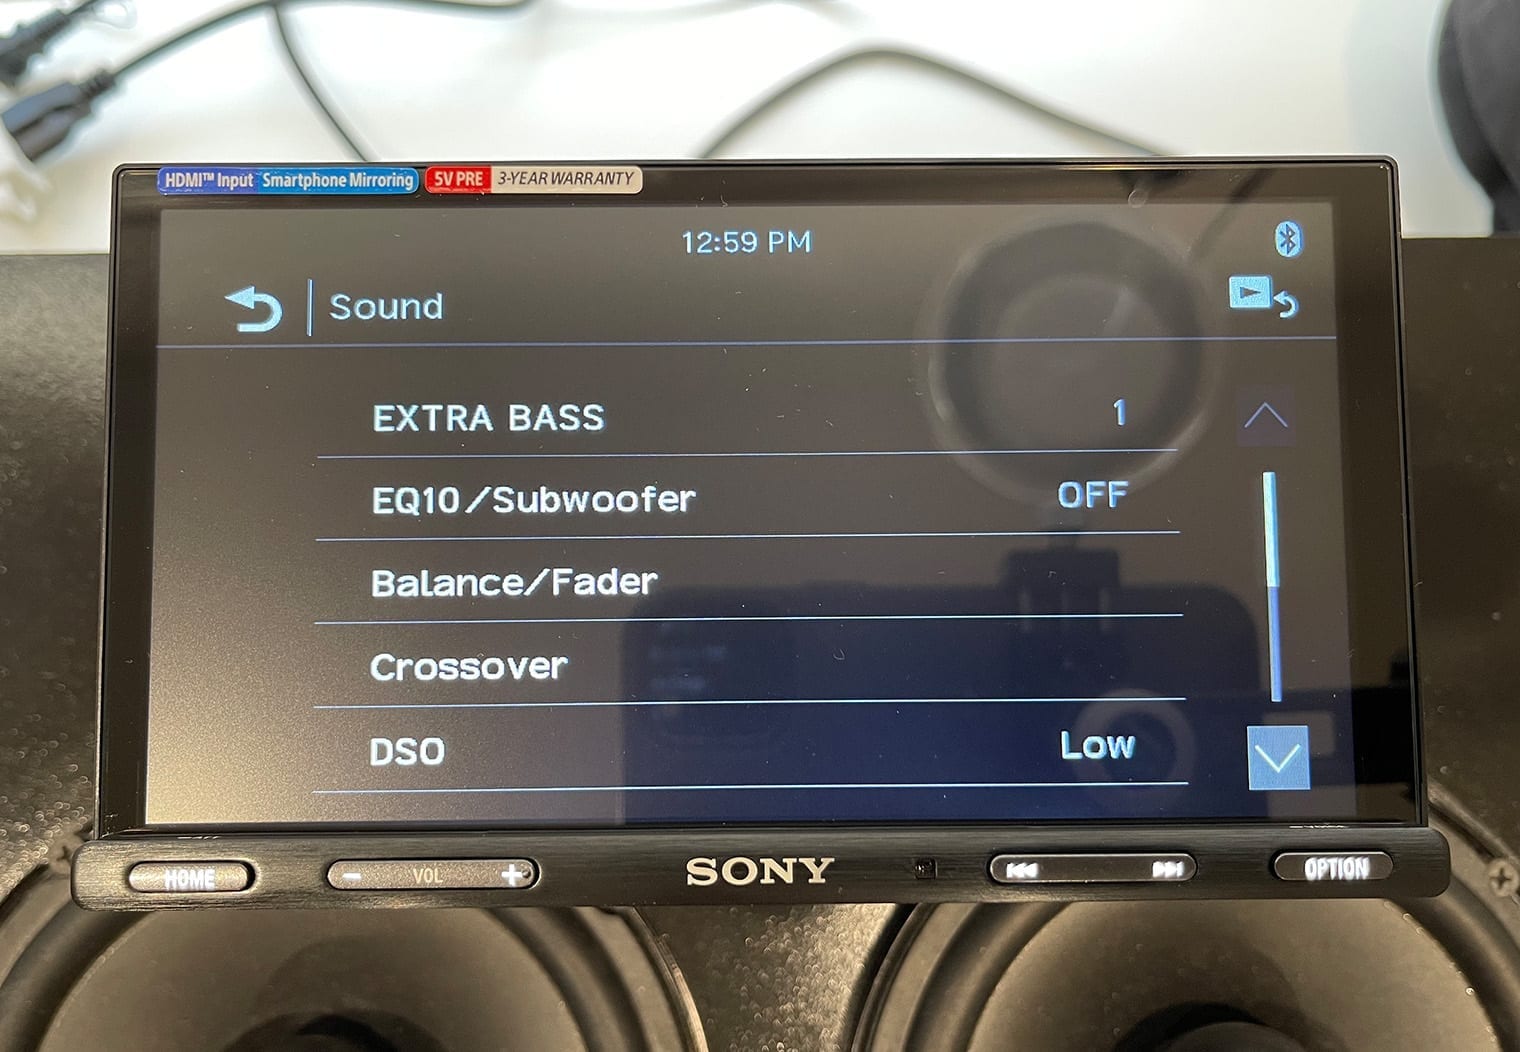
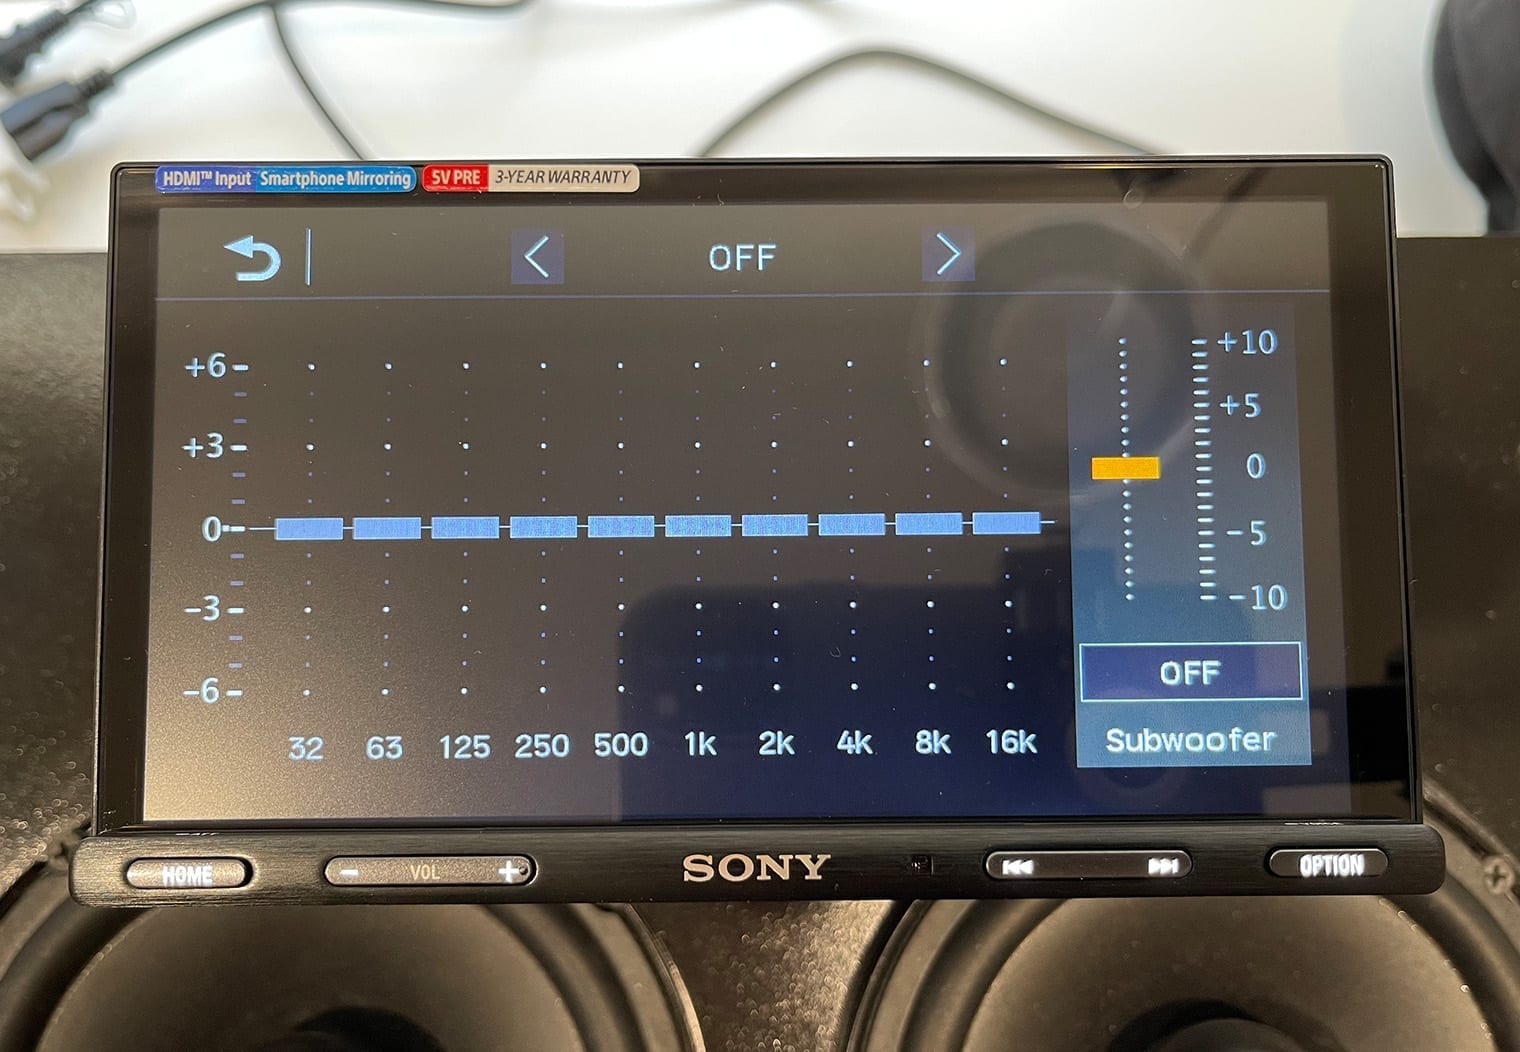
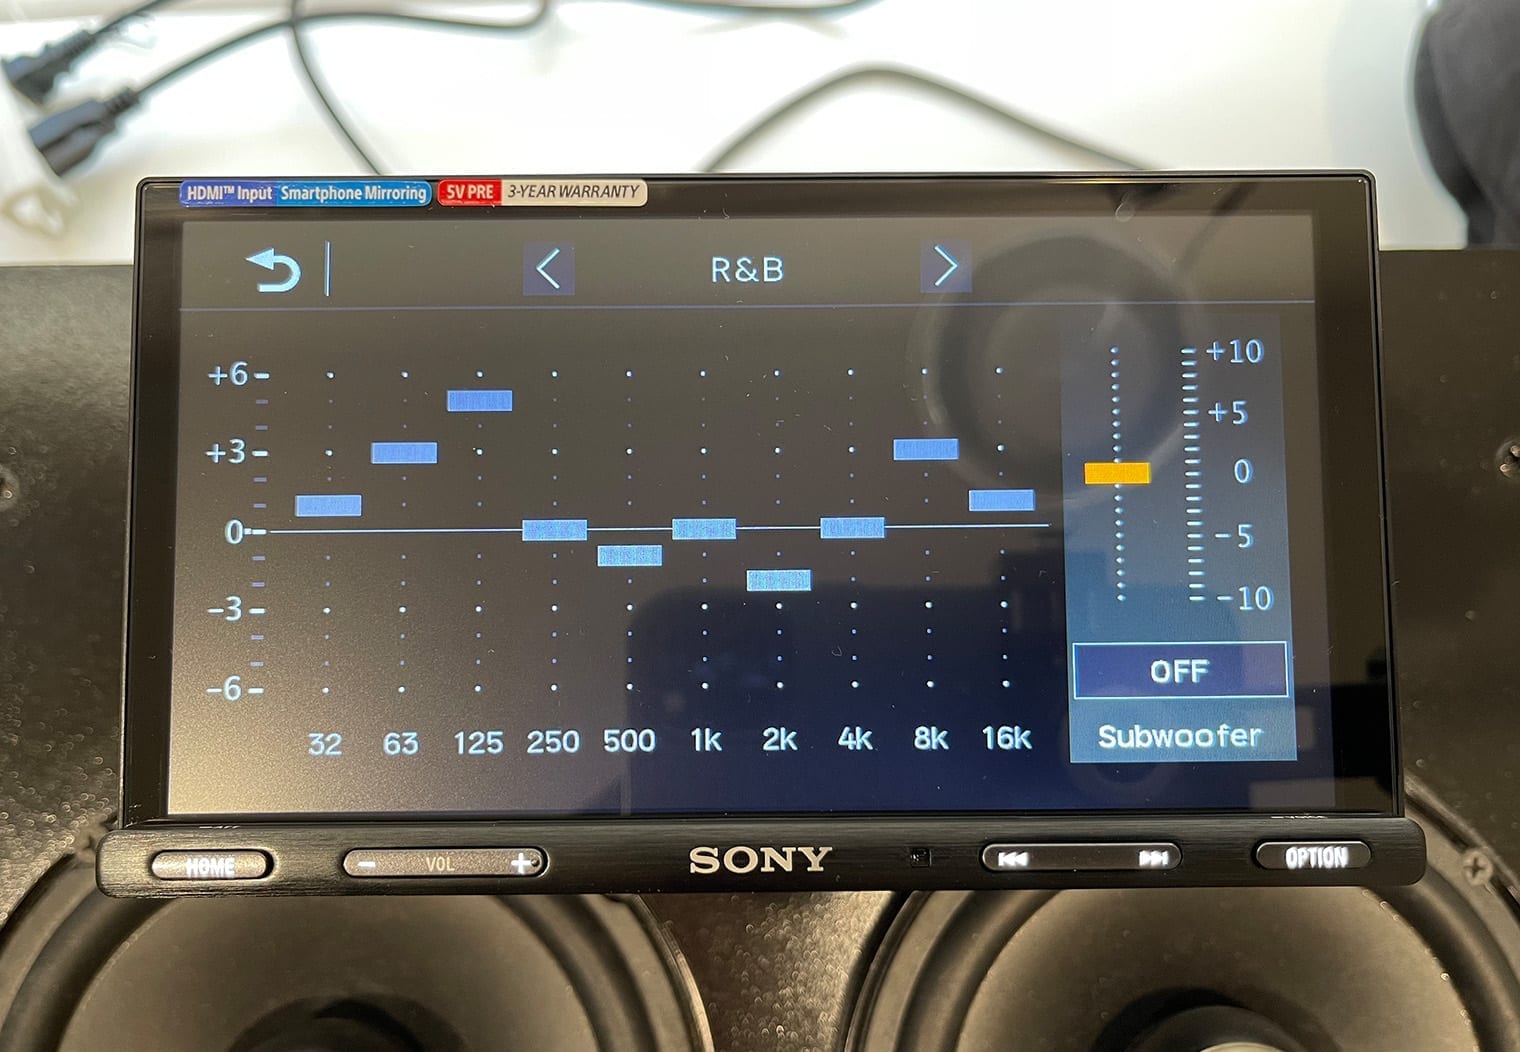
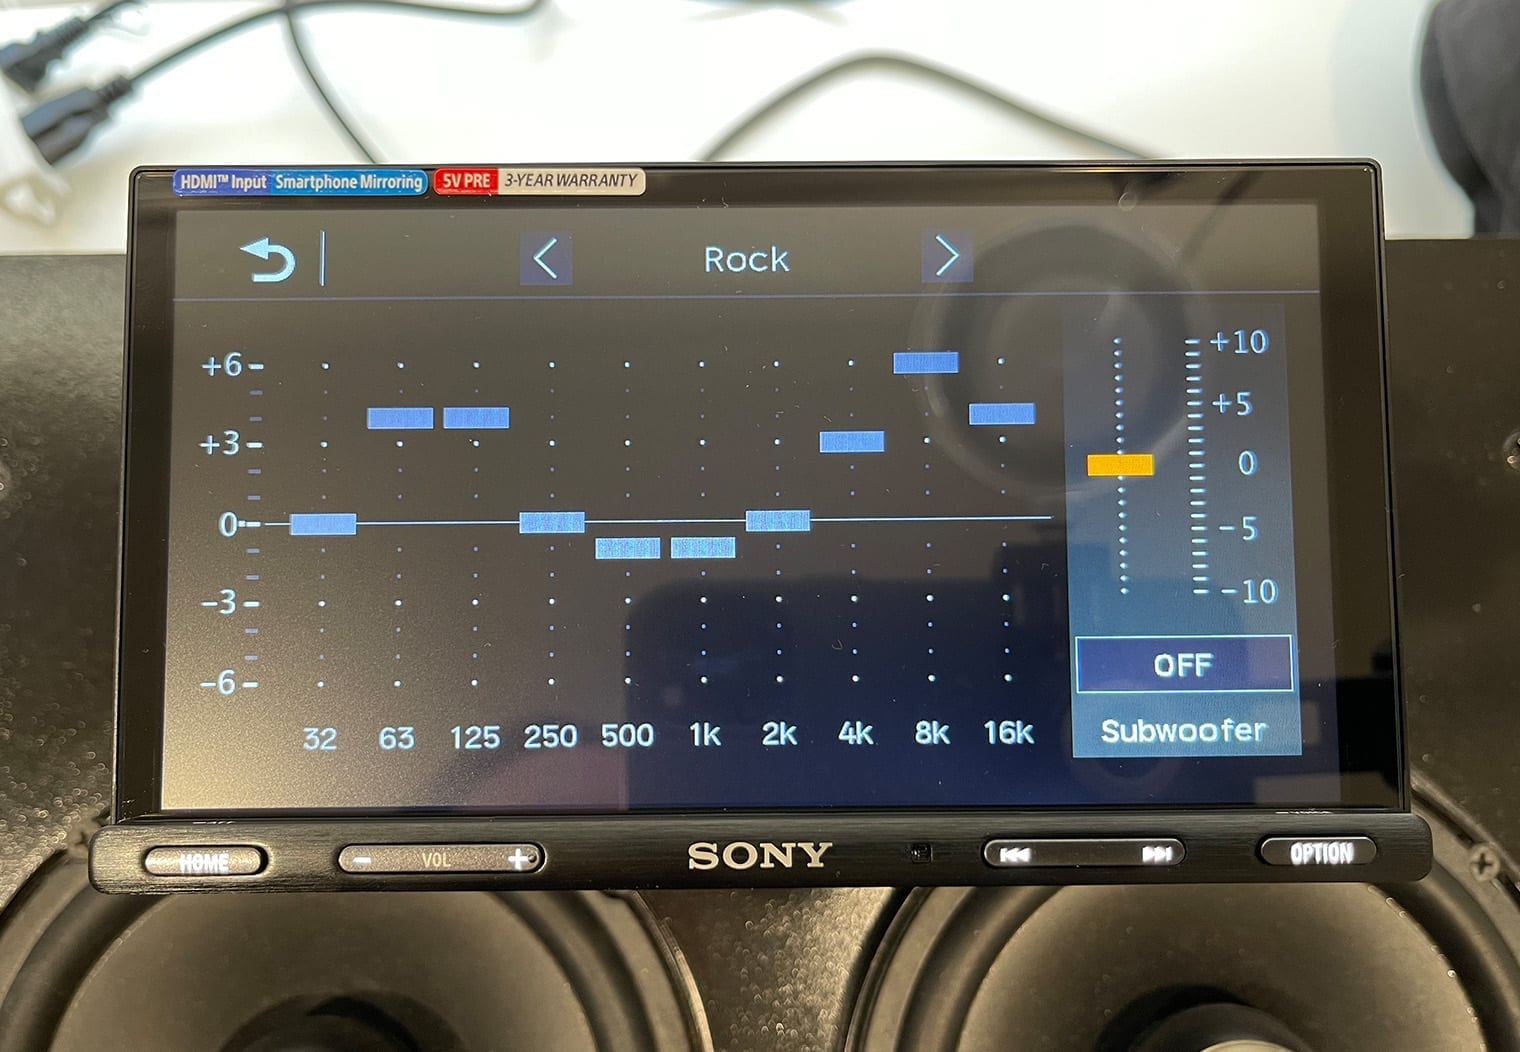
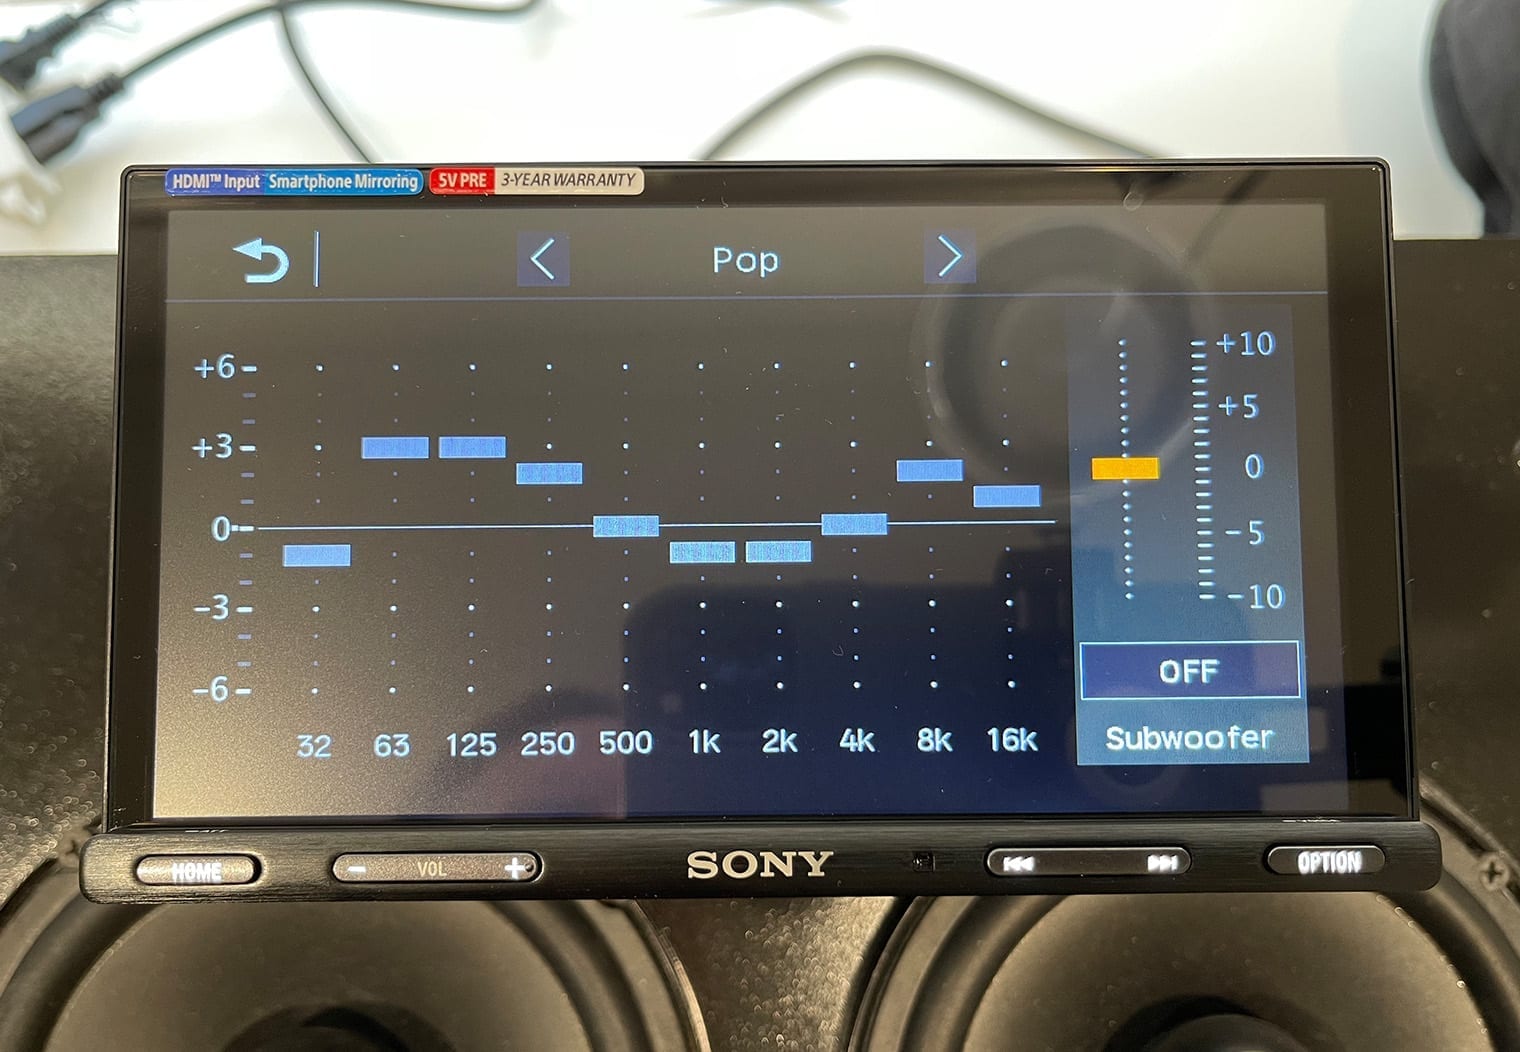
If you're a more audio savvy individual or an installer, you can also control each of the 10-bands yourself in the ‘custom' section. To get to the custom EQ, you simply navigate through all of the other presets until you see all of the bands light up yellow and the preset is labeled “Custom”. I wouldn't recommend this for the average DIY installer unless you're pretty familiar with tuning. It's unlikely, but depending on your setup you could actually do damage to your system if this is done improperly.
Customizing the EQ on these Sony head units is pretty easy – just tap and drag each band to where you want it to go. And on the right hand side of the EQ, you can adjust the Subwoofer gain if you have one installed.
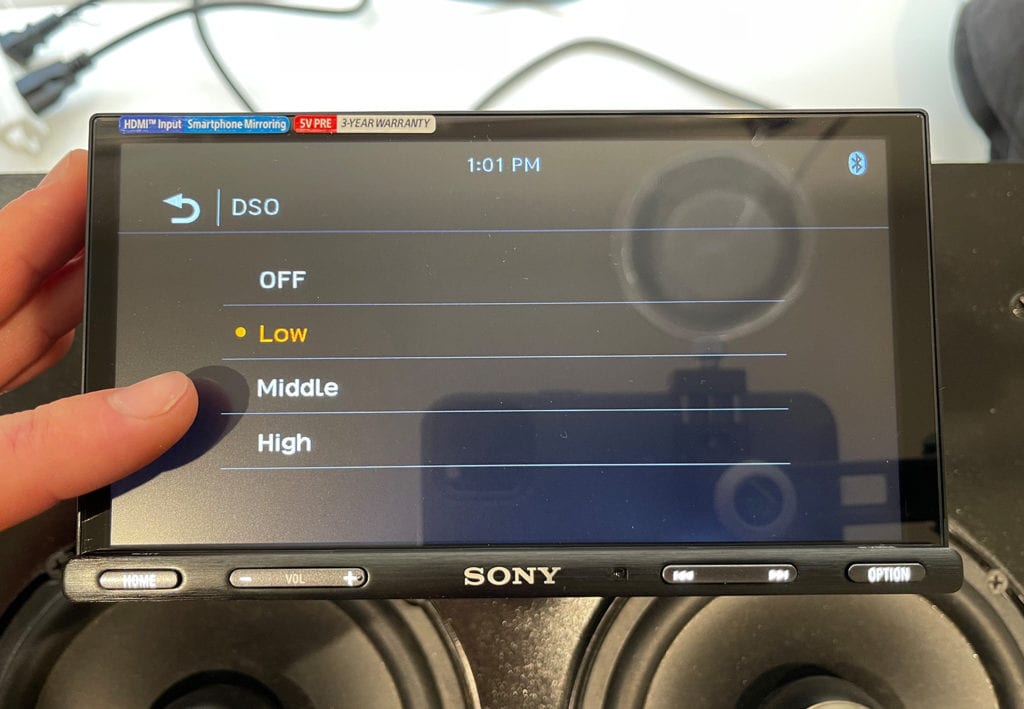
Dynamic Stage Organizer (DSO)
One of the unique and proprietary features of Sony's head units is their Dynamic Stage Organizer, or DSO. This feature was designed for speakers that are built into door panels, that vary in their distance away from your ears, or are generally mounted lower/further from where you're seated – anything that might alter the way that the speaker sounds as a result of where they're installed. With DSO, the frequency output of your speakers is altered to make the speakers and sound more natural given their placement. It's meant to make the sound appear as if it was coming from your dashboard rather than your feet. Sony calls this “virtual speakers in your dashboard”. There are four adjustments – low, medium, high and off.
For each setting, there is a noticeable difference in the sound and where the sound “appears” to come from. The higher the setting, the ‘higher' the sound appeared to come from. Literally. Your setting will be dependent on where your car's speakers are positioned and how far they are away from you. When I installed Sony's XAV-AX8000 into my Honda Accord, I used the “Middle” setting here and it noticeably lifted where the sound came from without touching the position of the speakers. I didn't hear any degradation of the sound quality either. Pretty cool.
Other Audio Features
Here's a few other features to call out. These are pretty standard on every head unit, so I won't get into too much detail but definitely worth covering.
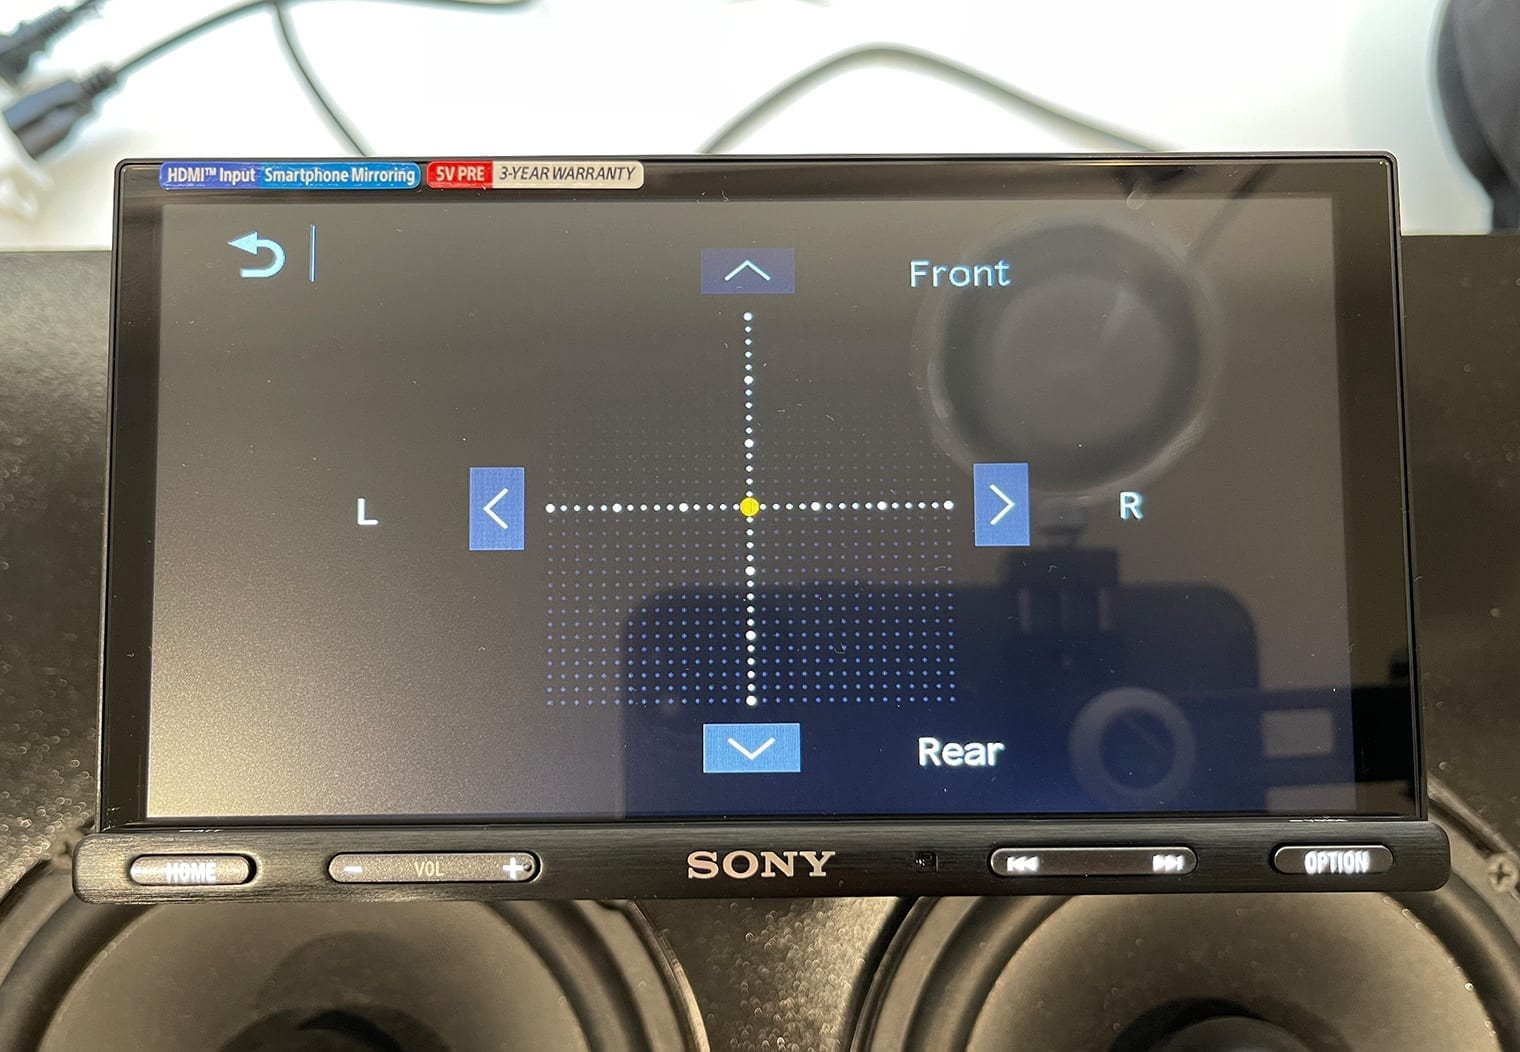
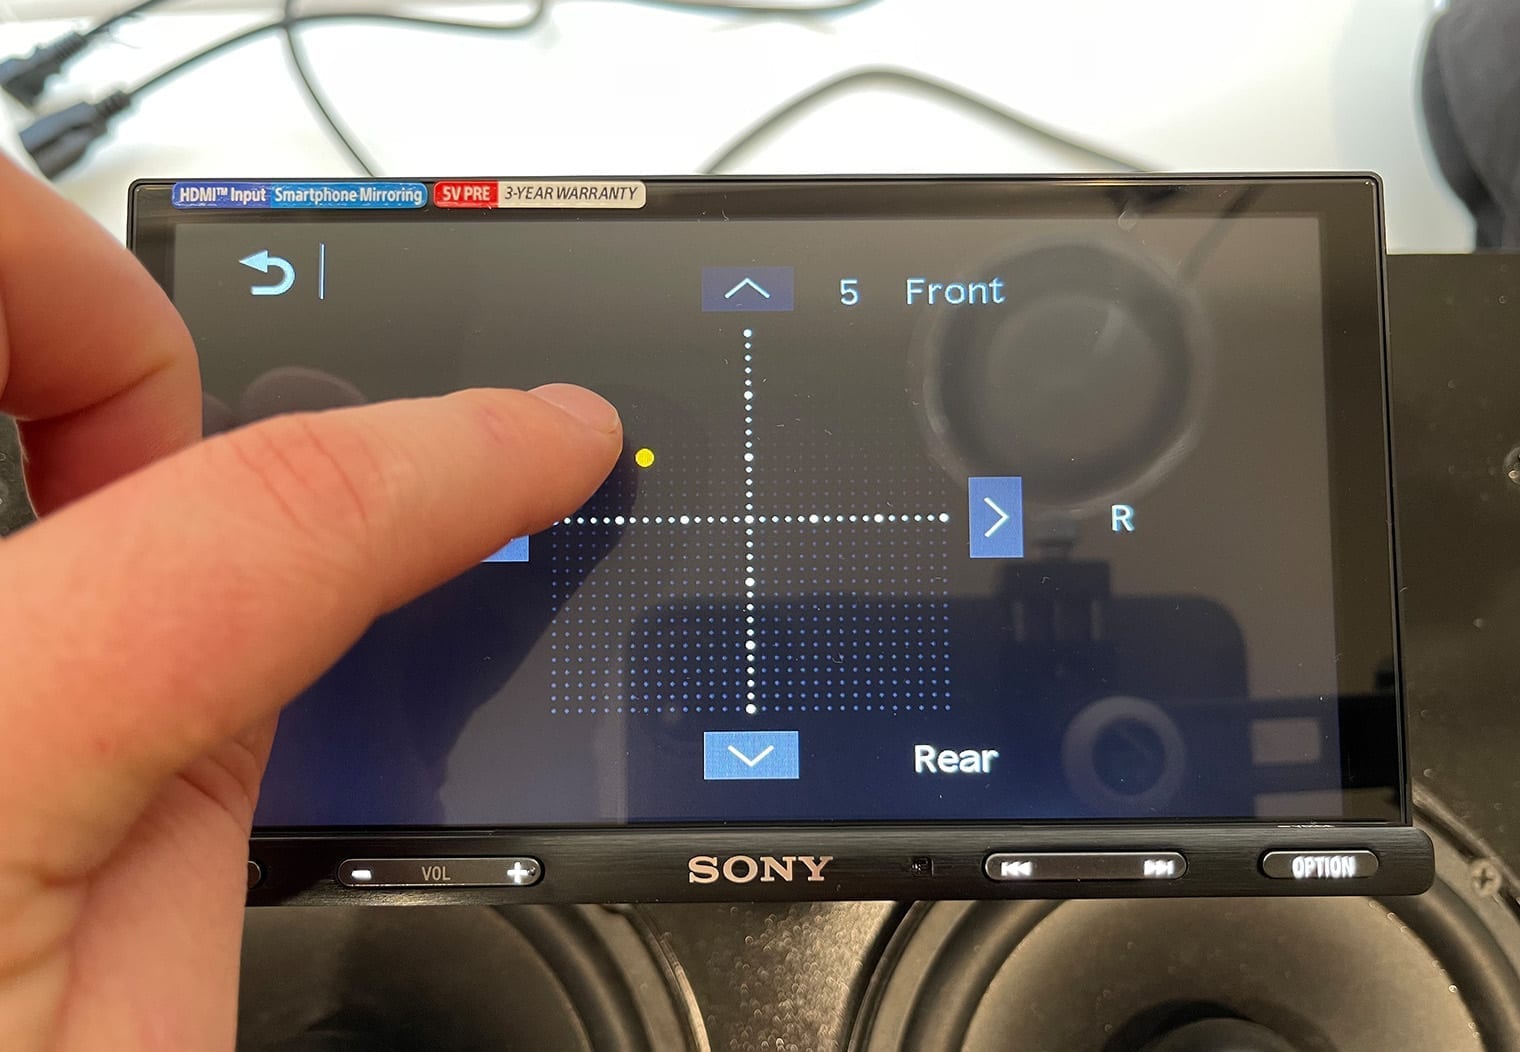
Here's a few snapshots of some of the other features including fading/balance and crossover control. Simply tap and drag the dot to adjust fade and balance.
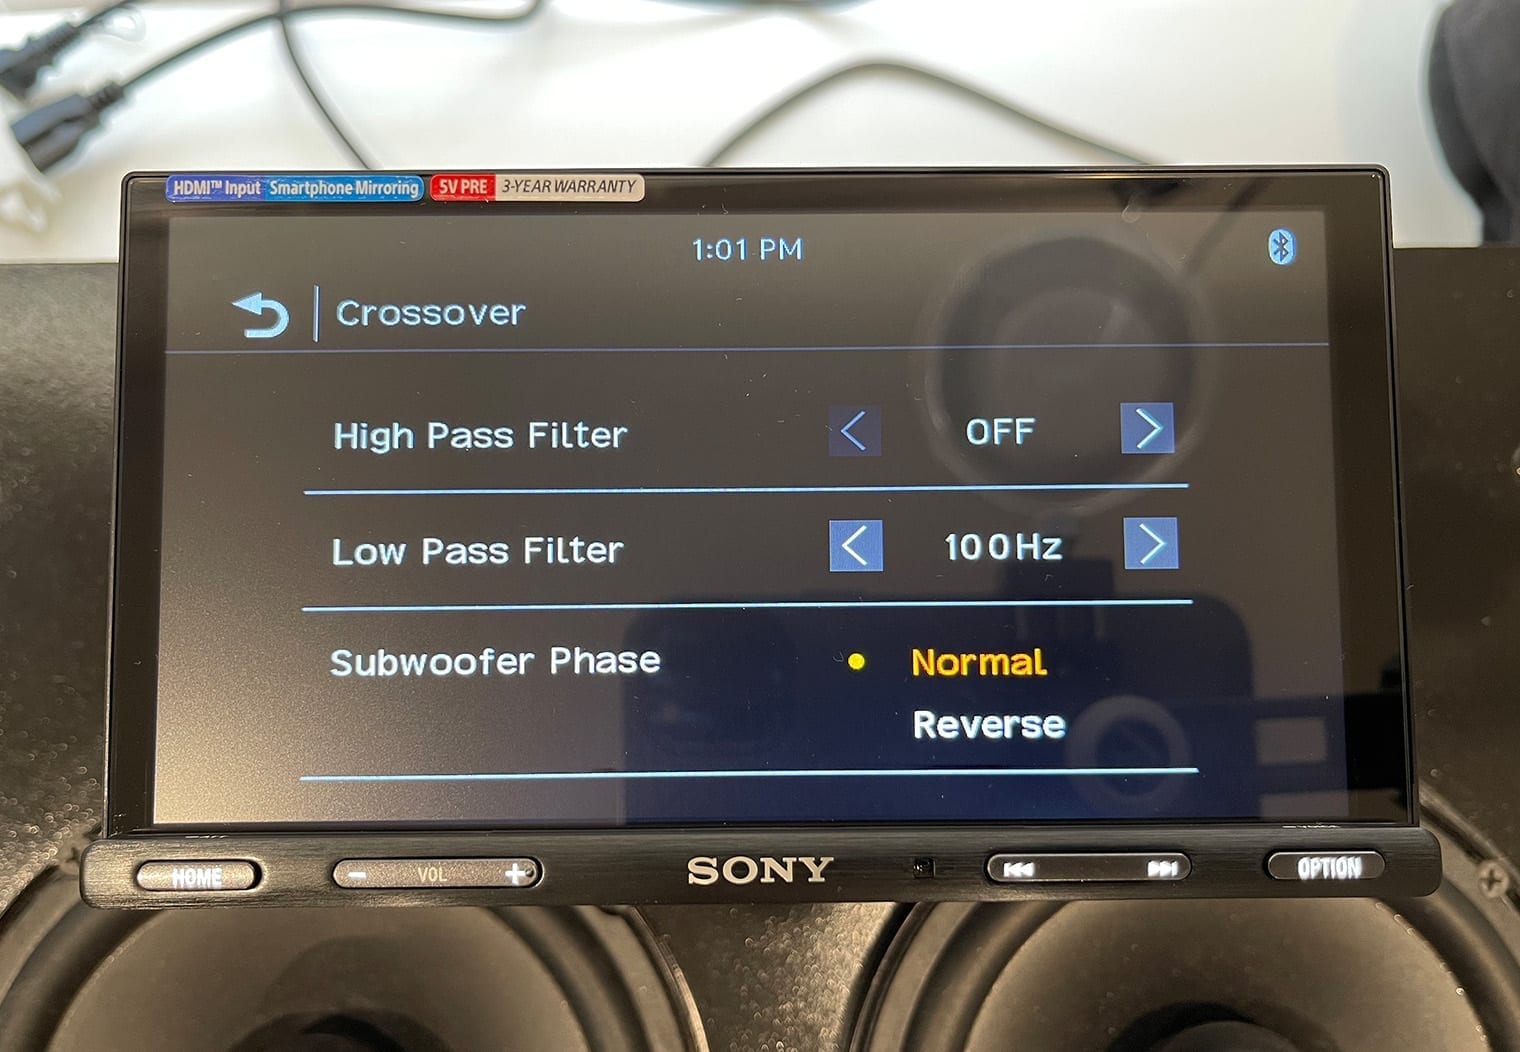
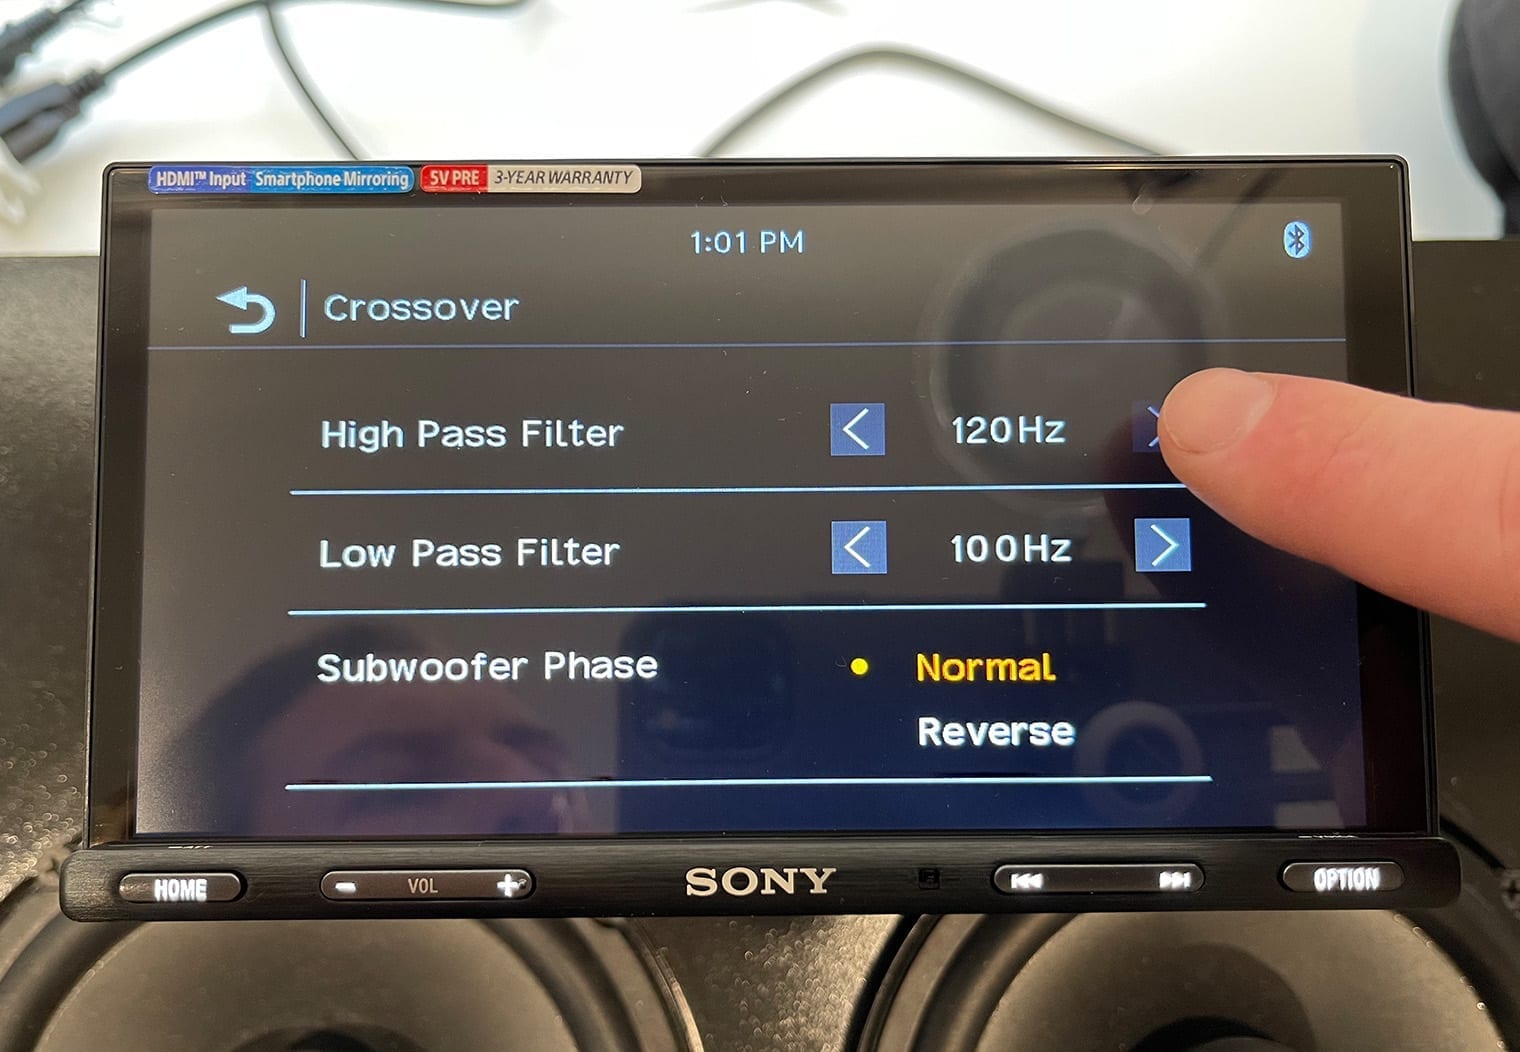
The crossover control on the new Sony head units are really straight forward and simple. It gives you a decent level of control of the output to your speakers. I will say that this head unit is incredibly strong in its connectivity and multimedia functionality, but doesn't break out the audio/tuning control as well as a head unit that might be designed for competitive or high performance audio. In the crossover section you can basically control a high pass, low pass and subwoofer phase depending on how you installed your subwoofer. On some head units, this section alone would break out into three or four different tabs of control, with control of each channel output (e.g. rear, front, sub, etc). This head unit'll do everything you're going to want it to do for 90% of all the stereos out there. But, if you're building a competitive or super-high performance system you may need to add a separate DSP that you can really control each channel output. Rare use-case but worth noting.
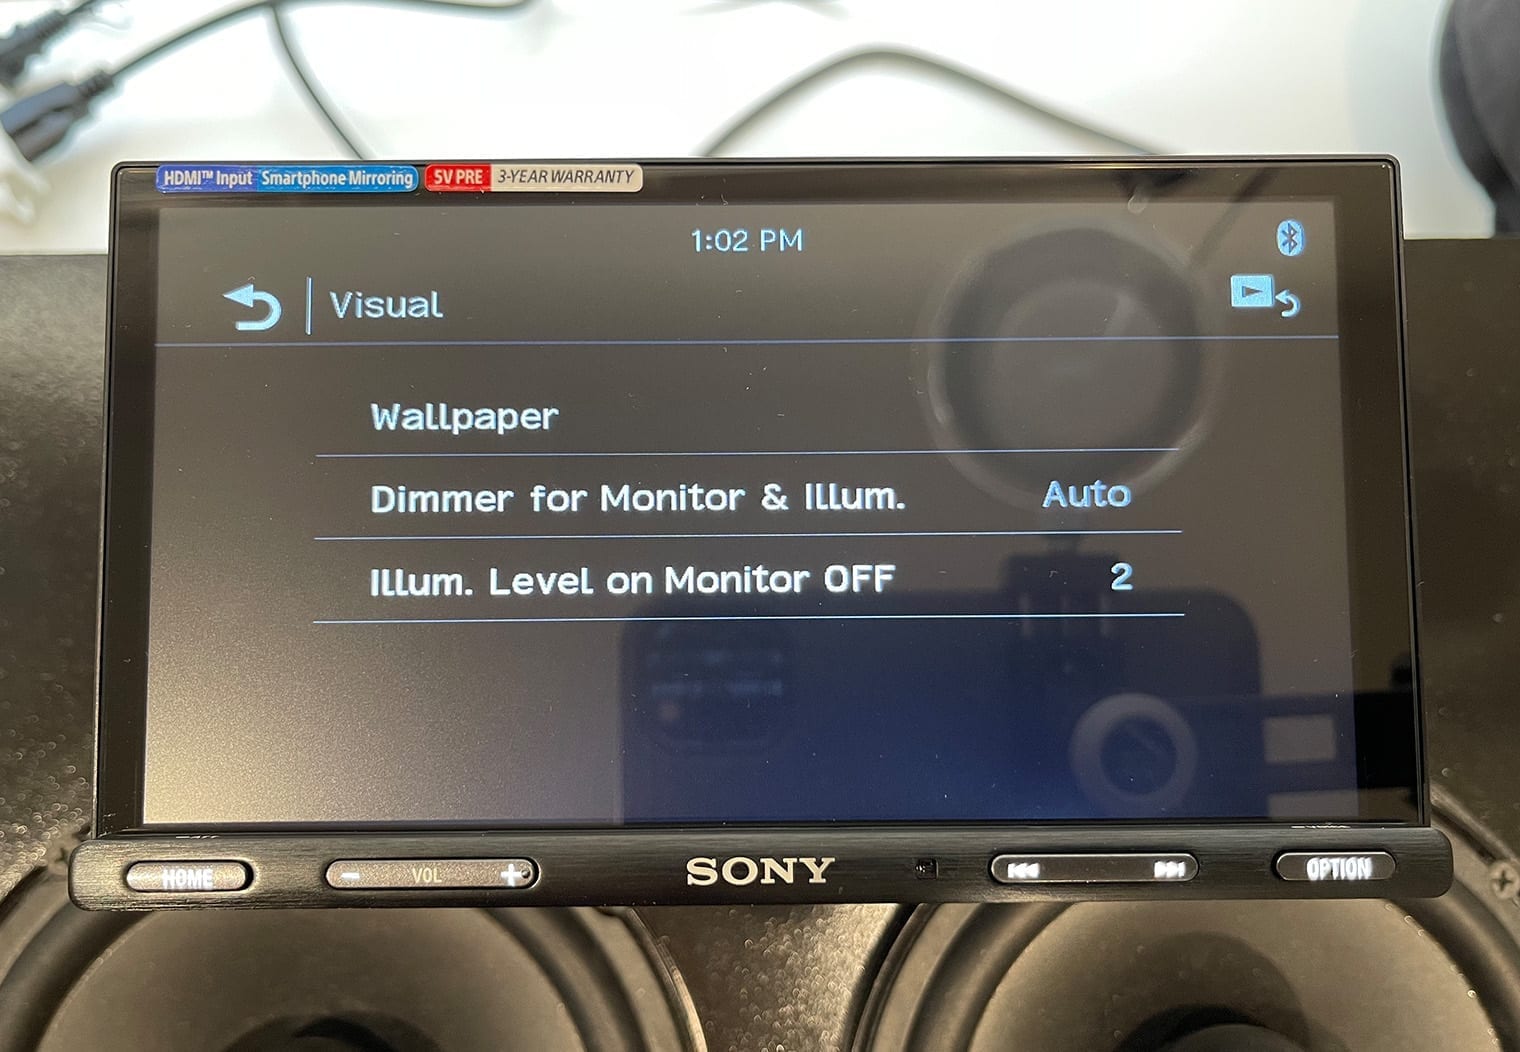
Visual Customization
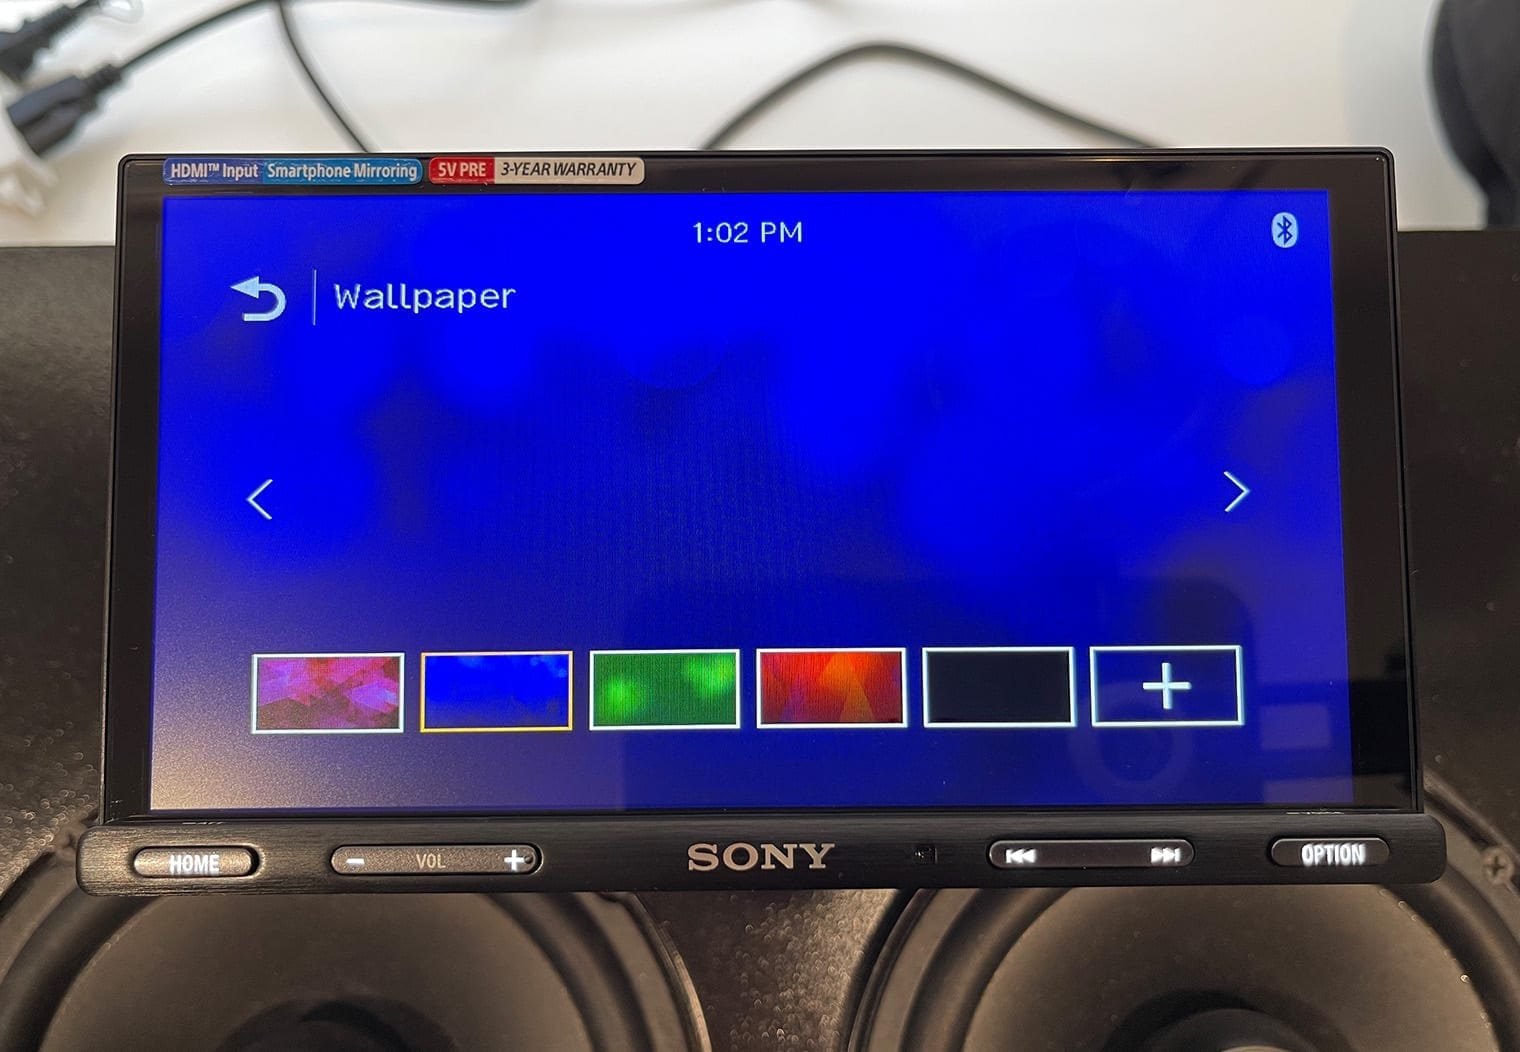
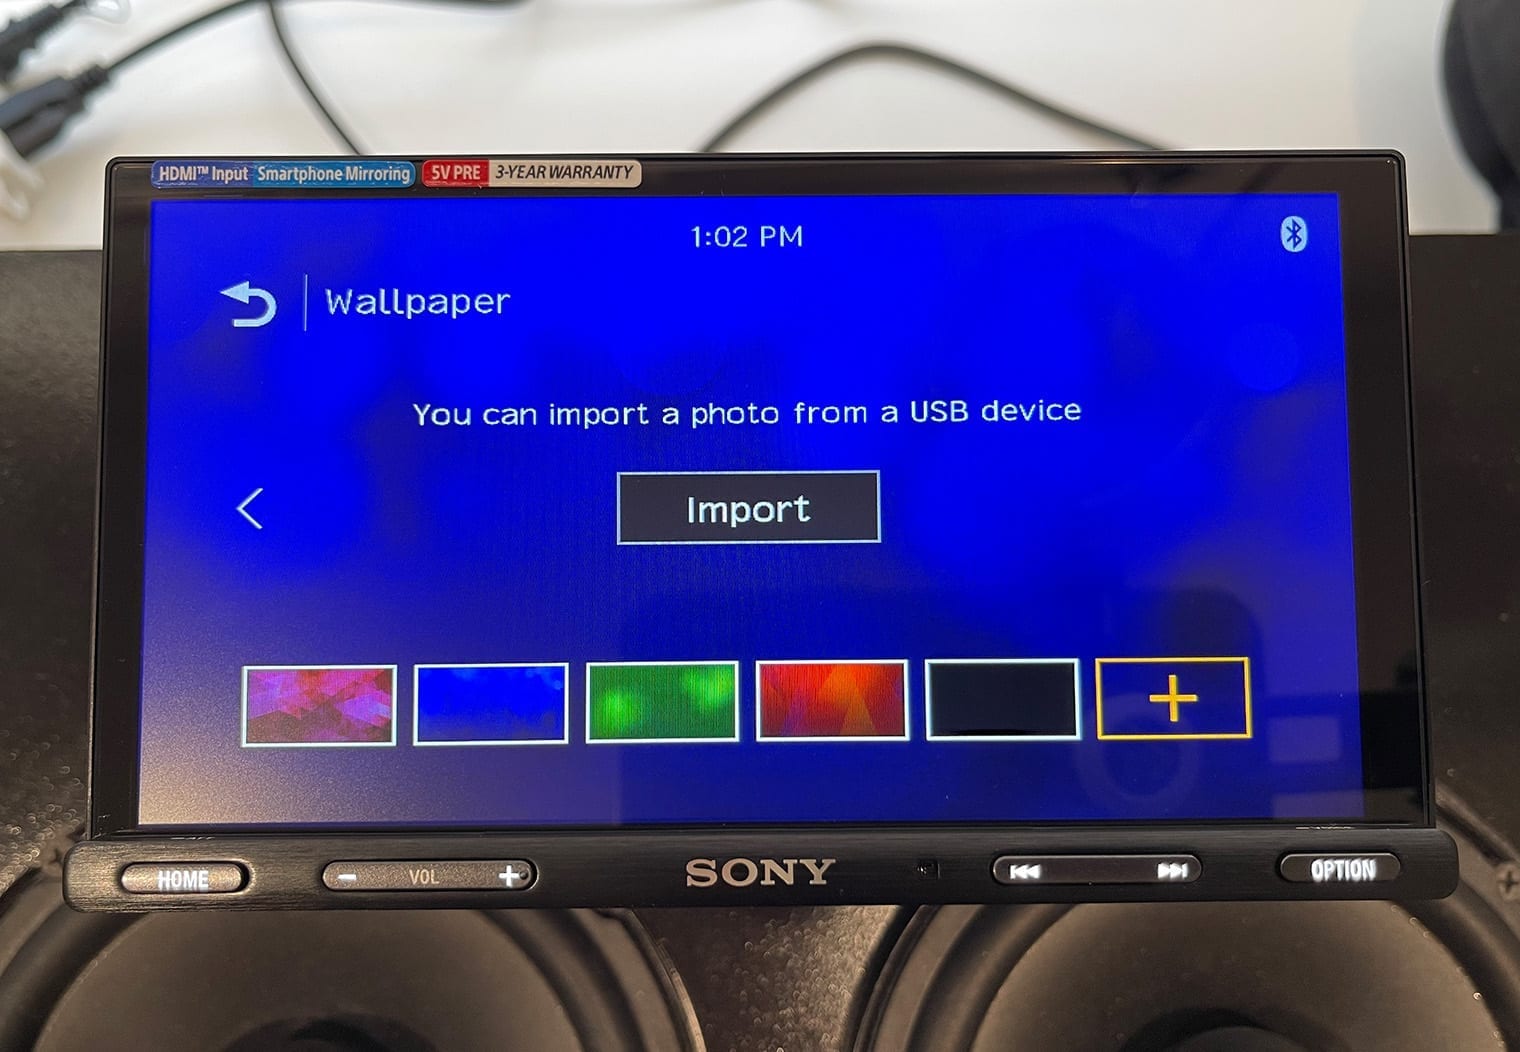
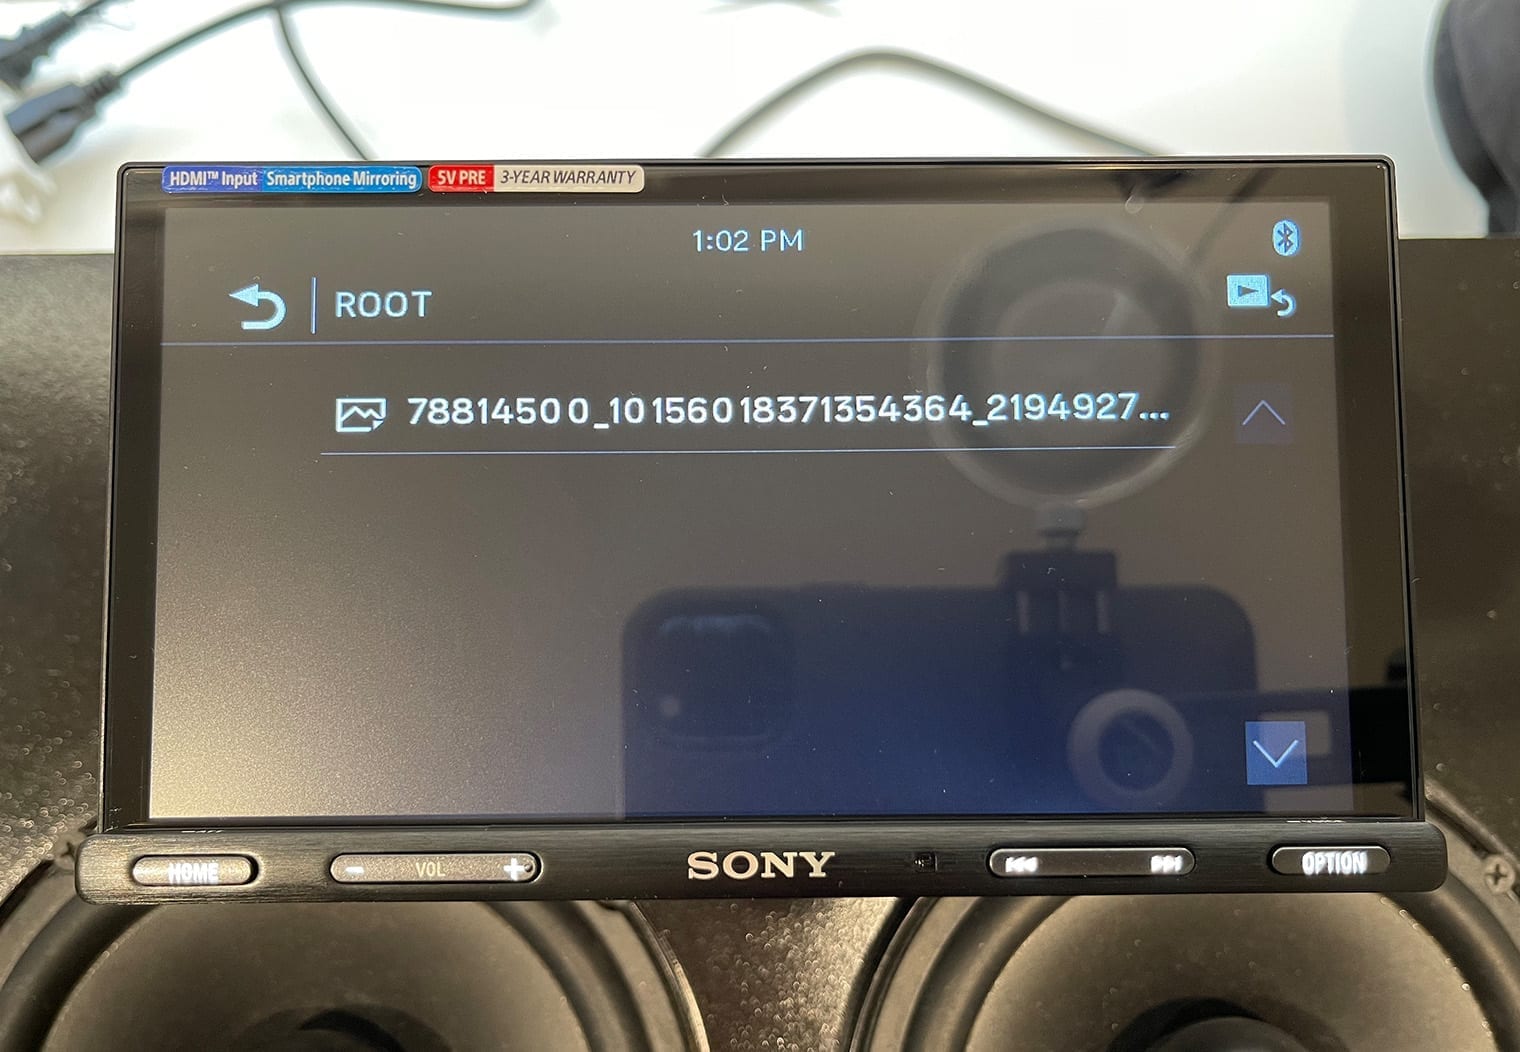
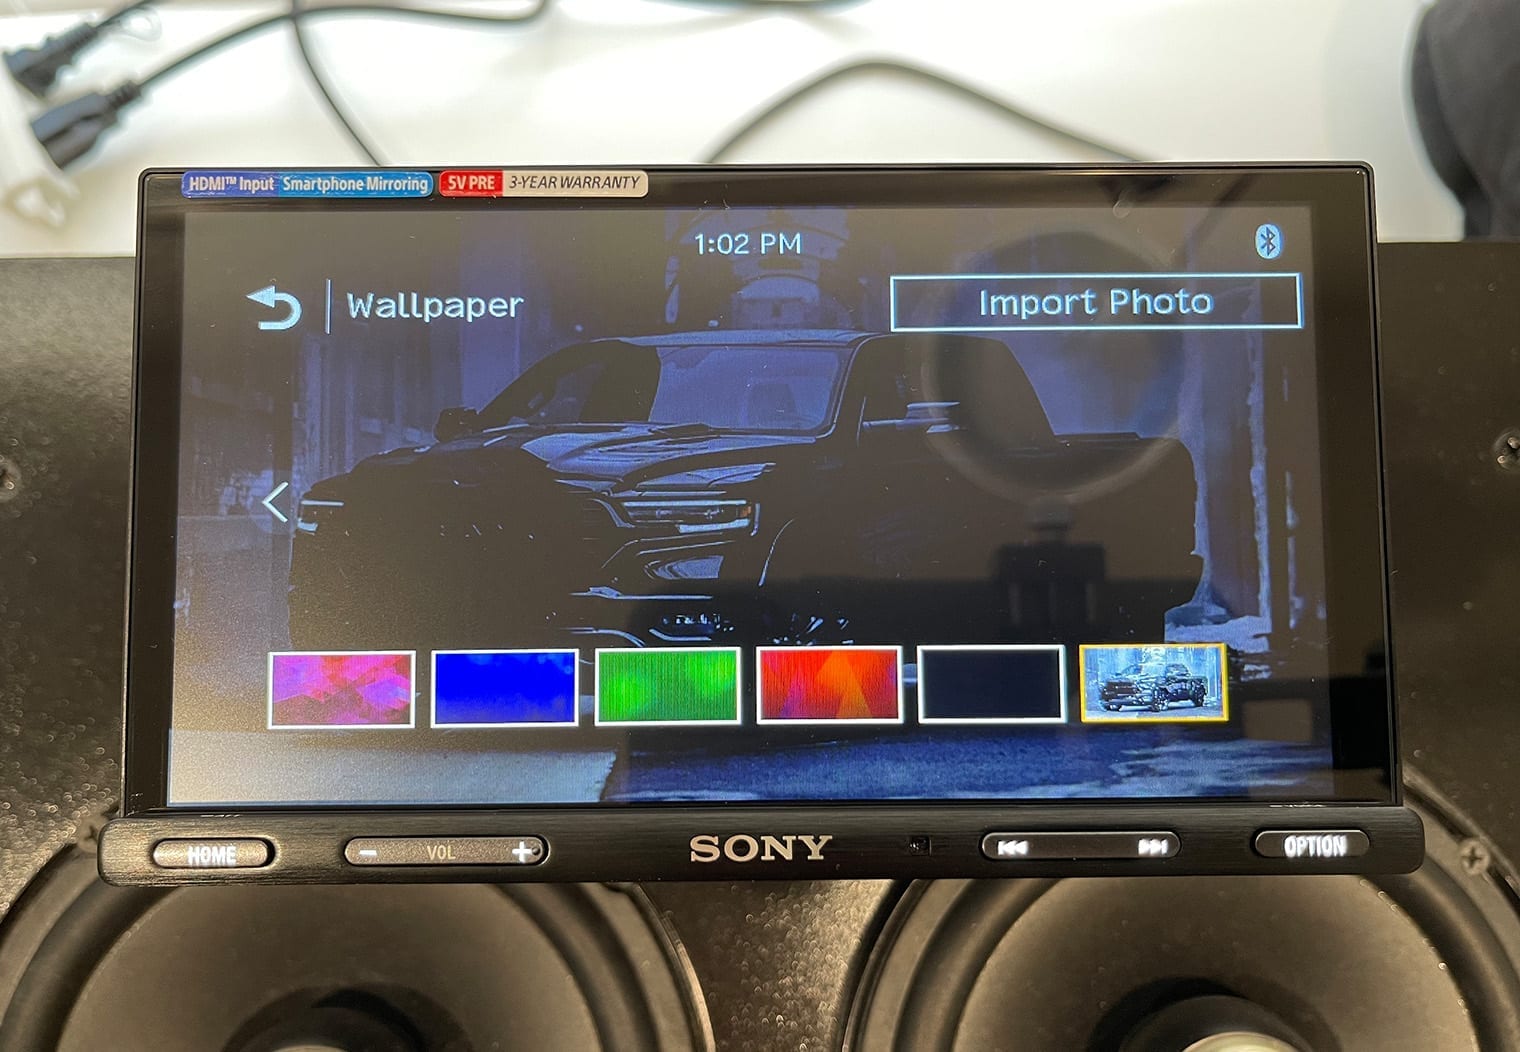
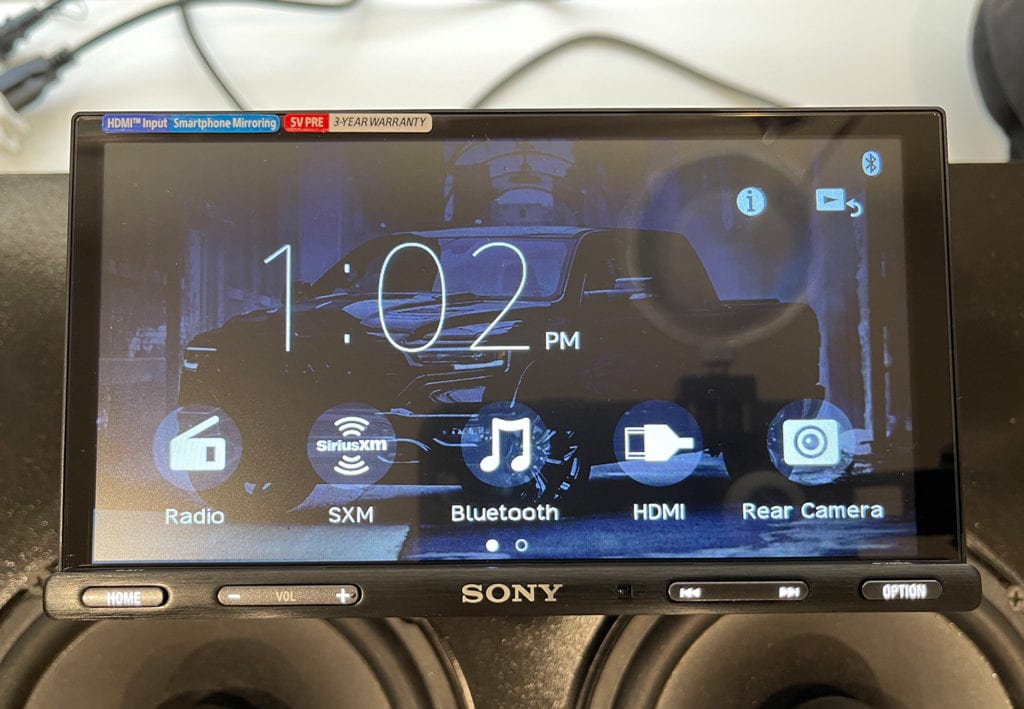
Making an aftermarket head unit your own with custom wallpapers and colors is important to a lot of people. It's what sets your head unit apart and how you also make it blend-in well with the rest of your dash. With a touchscreen like the 6.95″ on the AX5600, the home screen is the most prominent and important screen on the unit. It's also the one you're likely going to see the most of, so having it look exactly how you want it to might make or break whether you like the look of the head unit on your dash or not.
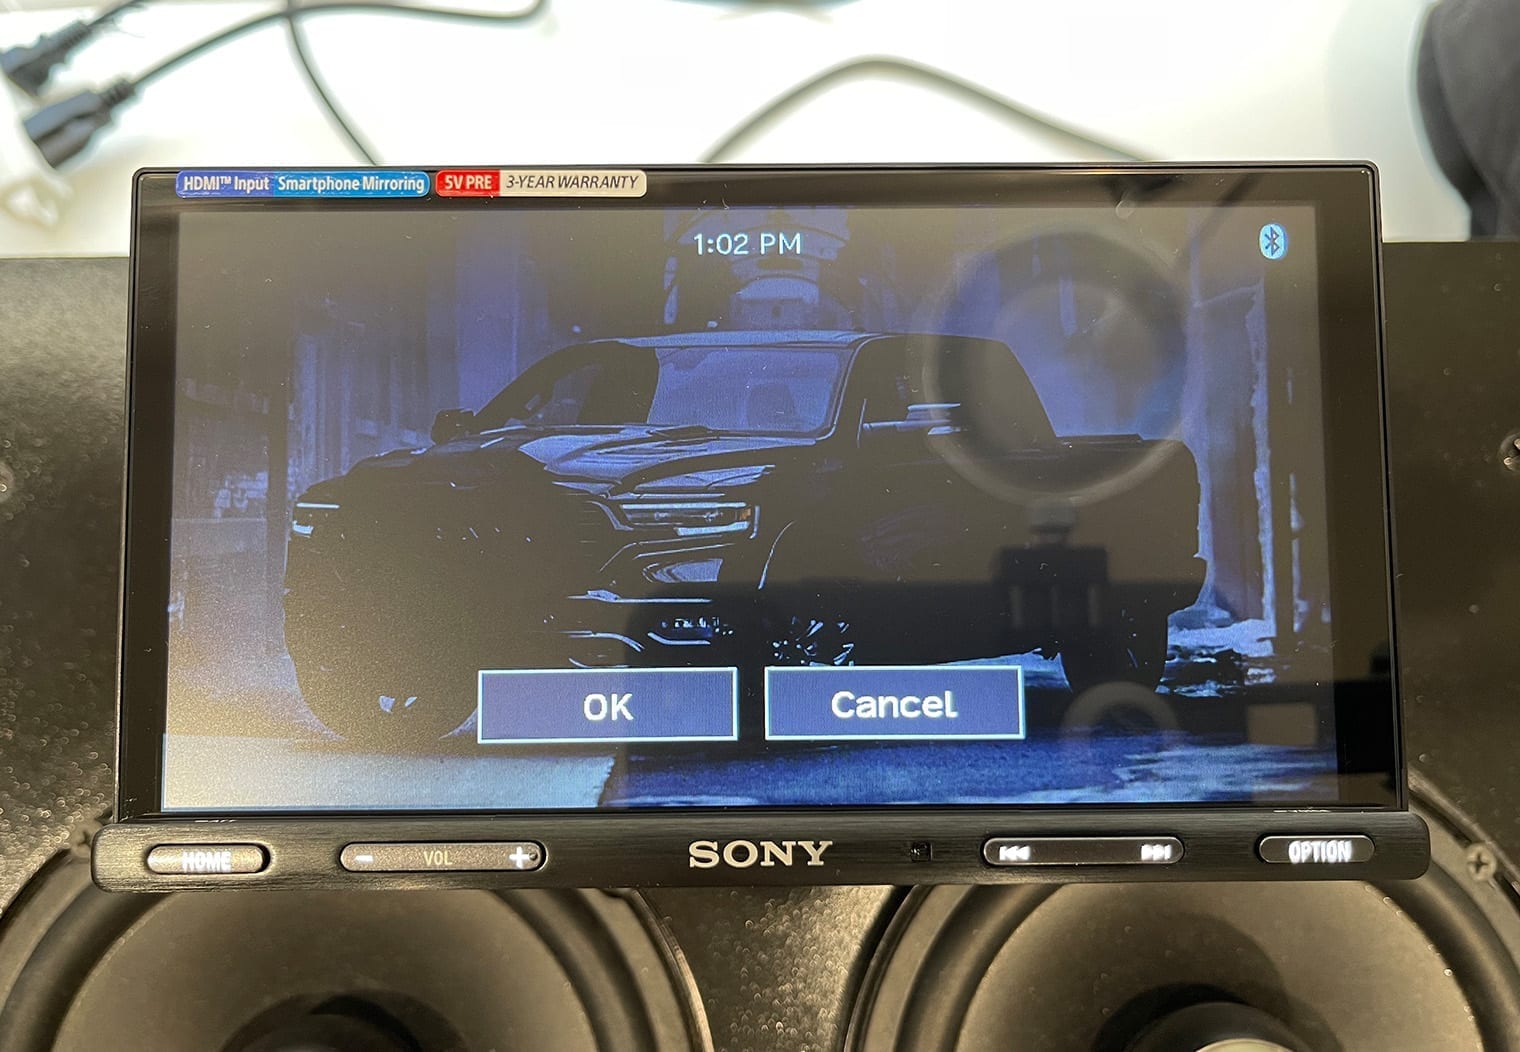
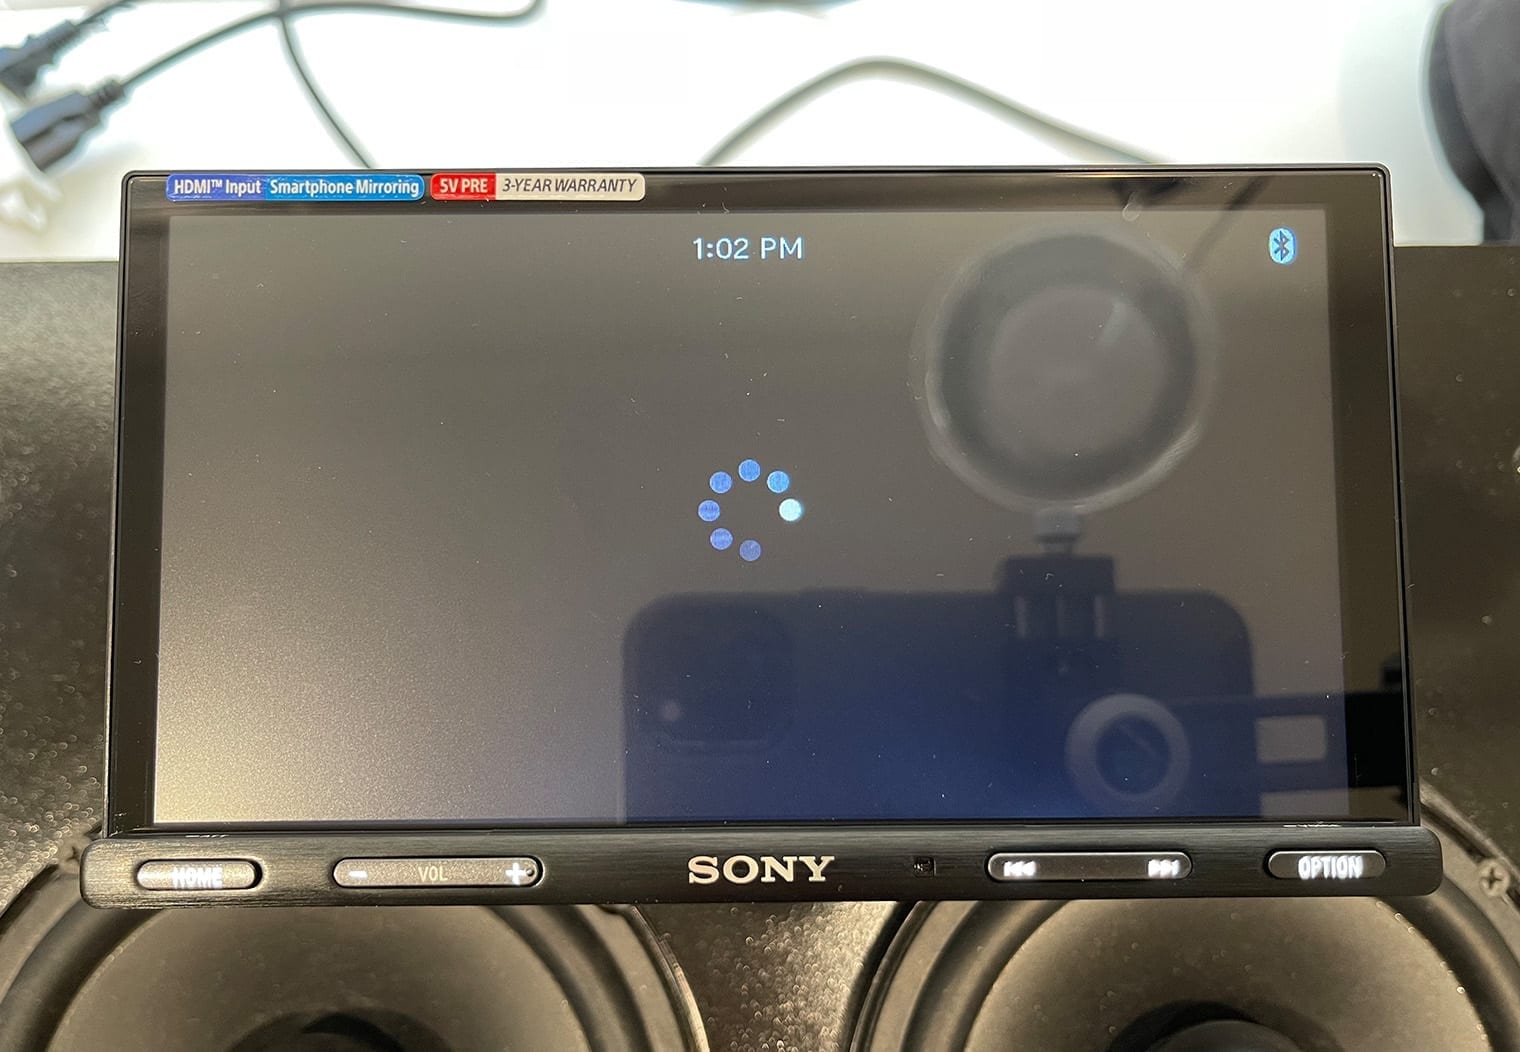
As of 2020, Sony allows you to customize the the wallpapers on their XAV-AX lineup of head units by uploading any photo you'd like using your USB drive. It's pretty simple too – just navigate to the Settings > Visual > Wallpaper then click on the ‘+' on the selection on the bottom right. From there, you'll be taken to the USB drive that you connected to select and upload the photo. Choose the photo you want, upload it and you're done. Here's a few snapshots of the process to upload and set a custom wallpaper background on the unit.
The one thing I'd still love to see in these Sony head units from a customization standpoint is RGB buttons. The control buttons on the bottom of the screen are permanently white, which look good in pretty much all vehicles but it would be great to be able to make those buttons match the interior button colors of your car.
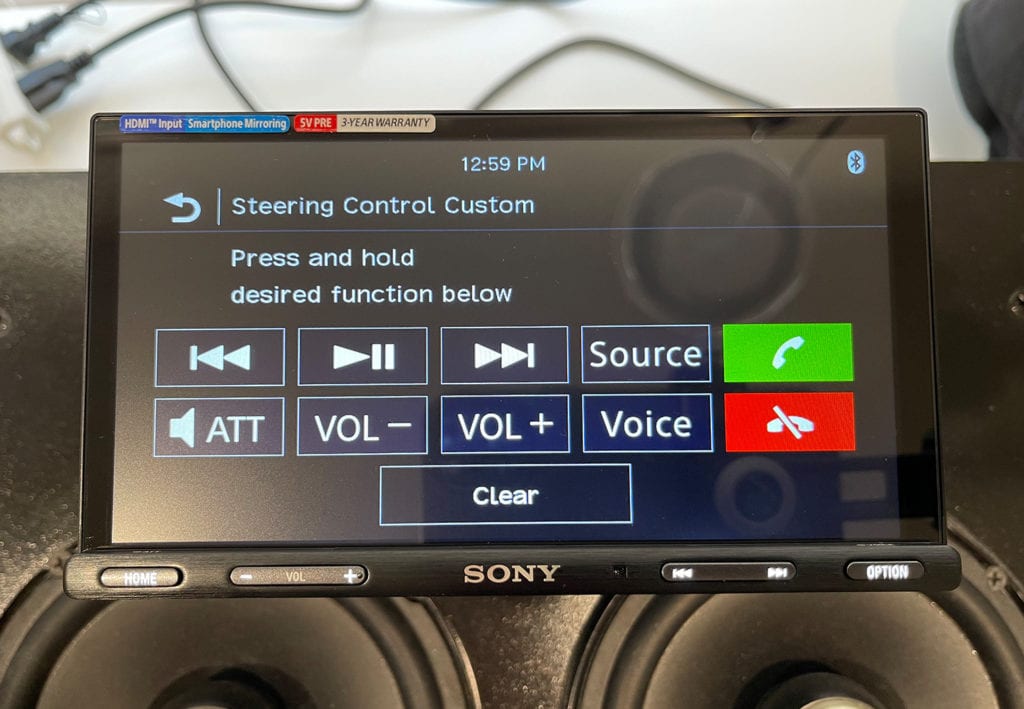
Steering Wheel Control Customization
Another cool feature worth noting on Sony's new head units like the AX5600 is the custom Steering Wheel Control (SWC) feature. Out of the box, you'll find a small wire harness with a headphone-looking jack and two exposed wires on the other end. This adapter will plug into the two signal wires that your vehicle has for steering wheel controls. **Note that not all vehicles are compatible and may require an extra adapter. But for the vehicles that are compatible, you can look up the wire color in the harness for these SWC signal wires and simply connect and program them. I would recommend either consulting with, or allowing an expert installer to handle this part if you can't find a clear and definitive wiring diagram or wire colors for your year make and model vehicle.
Once you've connected these two wires to the matching wires on your vehicle, you can use Sony's custom SWC feature to program each function to a button on your steering wheel just how you like it.
Having this feature and harness makes SWC pretty universal and might save you $50 – $100 bucks on what you would have spent purchasing an adapting module and harness. But, on the downside you have to find and wire up the harness which might be challenging for the DIYer.
What's Missing or Could Be Improved?
Now that Sony included an HDMI input in the unit to unlock its true multimedia potential, 75% of my original “improvements” from the AX5500 and AX8000 that I reviewed last year are really resolved. That said, there's a couple things that I would love to see in these units to make it even better than it already is.
- Wireless CarPlay/Android Auto – There are some head units and manufacturers that are starting to do this now. Today, you still have to connect your phone to the head unit via USB for 95% of the car stereos out there in order to access CarPlay and Android Auto. But it would be such an upgrade to no longer have to pull your phone out of your pocket or bag to access CarPlay and Android Auto features. Another game changer in my opinion.
- Audio control – The 10-band equalizer and simple crossover controls are great. When combined with the 5V output on an amplified system, even better. But I'd love to see a little more control over the audio to independently control the crossovers for each channel output – Rear, Front and Sub – so that I can simplify the amp tuning process and really only set gains.
- Customized Button Colors – I like the white, it's classy and universal. But most cars have a unique button color all over their dash so it might stand out a bit. The ability to have custom RGB buttons would really help this unit blend well into any vehicle at night time.
- Video Outputs – Now that the unit has HDMI capability, it'd be awesome to see the unit come with at least one audio/video output that can be used to extend your video to things like headrest monitors or flipdown monitors. You'd really have a full multimedia system in your car.
- Aux Input – I wouldn't necessarily say this is “missing”, but if you're looking for a traditional aux input this unit doesn't have it. I think it was a smart call, no one really uses aux inputs anymore.
Conclusion
I still have the XAV-AX5500 from when I installed it in my Subaru STI last year. It's super clean with the bezel-less screen and has a ton of great features. But with the newly added HDMI input, I'm definitely going to be upgrading to the AX5600. I'd probably even go as far to say I'd purchase the new one (if Sony wouldn't have hooked it up).
When you combine the HDMI input with the dual USB inputs, the XAV-AX5600 really becomes a multimedia touchscreen head unit through and through. And despite some of the things I pointed out above in the “What's MIssing” section, this unit is incredibly powerful, high-quality, super easy to use and reliable for the price. It's one of the cleaner looking touchscreens that you can put in your dash too if you're going for the high-end look.
I said this in my review of the AX8100 too but since these units share so much awesome functionality I'll say it here too – the AX5600 is pound for pound one of the best bangs for your buck on the market right now with all of the multimedia functionality, connectivity and screen features. The only thing I'd say is if you want a bigger screen, get the AX8100. But if you want the clean, flush and capacitive touchscreen this is a great choice, no questions asked.

Very nice walkthrough on the Sony 5600.Im buying my daughter this head unit for her jeep patriot and will make her watch this video to more clearly understand the workings of the unit.Good Job!
Very nice. I notice you had the screen detached, but didn’t show the backside. I am interested in the connection type between the screen and the based unit, as I want to buy a cable to mount it separate due to dash layout.
So, do you know what type of connector/plugs it uses?
I would imagine it’s some sort of standard connector.
If you do go back and read this, then thanks for any help.