In this article: We unbox and review Pioneer's DMH-2660NEX multimedia head unit, walk through all of its features in a live demo box and provide our opinion along the way.
Pioneer head units have always been among our list of premier products on the market. They've been featured on almost every one of out top rated car stereo product lists, including our best car stereos, best video and dvd head units, best touchscreen car stereos and more. We decided to review the Pioneer DMH-2660NEX recently because it's a great mid-level, mid-priced unit with a lot of great features, expandability and connectivity for the price.
As a part of their NEX lineup, the 2660NEX is a double DIN digital media receiver (doesn't have a CD/DVD player) with a 6.8″ capacitive touchscreen. It's packed with a ton of great features that are ideal for those seeking a multimedia system with video expandability options, and also a great choice for the audio enthusiast who's looking to add external amplifiers, subwoofer and upgraded speakers. It checks the boxes for things like HD and Sirius XM radio, Apple CarPlay and Android Auto, video compatibility and more.
So in this review, I'll walk you through my unboxing of a brand new DMH-2660NEX and my first impressions. I'll also hook it up to our demo unit, give it power and go through all of the key features worth covering. By the end of this review, you'll hopefully have enough information about the head unit to make an informed decision whether or not it's the right unit for your car or setup.

Unboxing and First Impressions
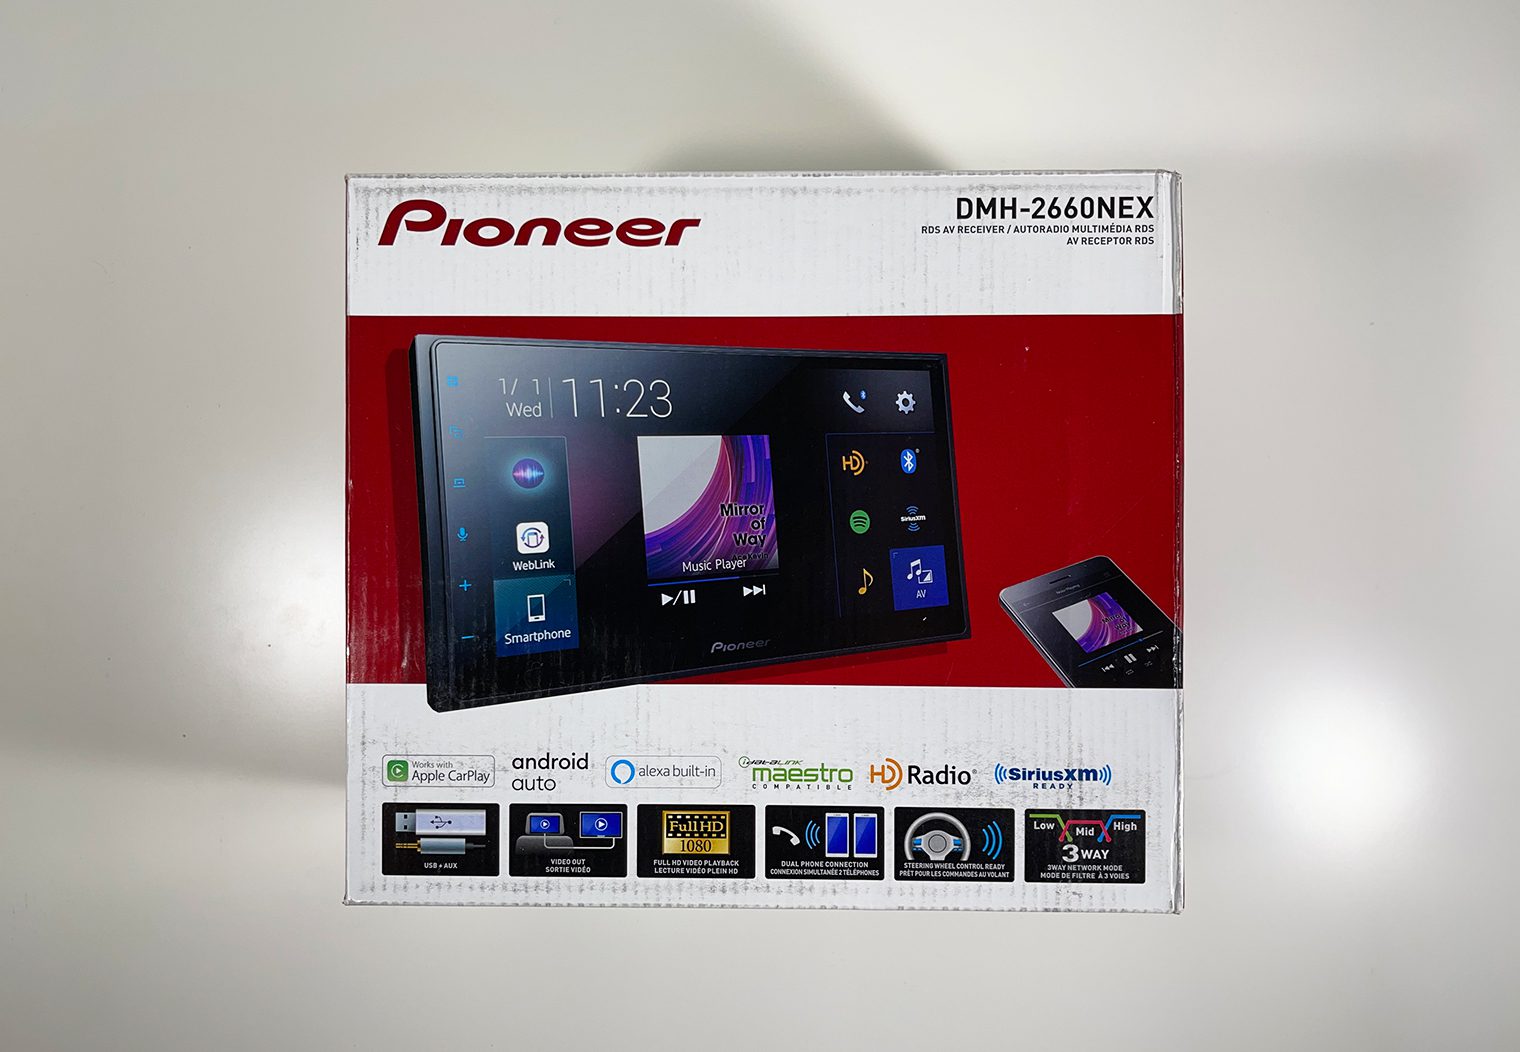
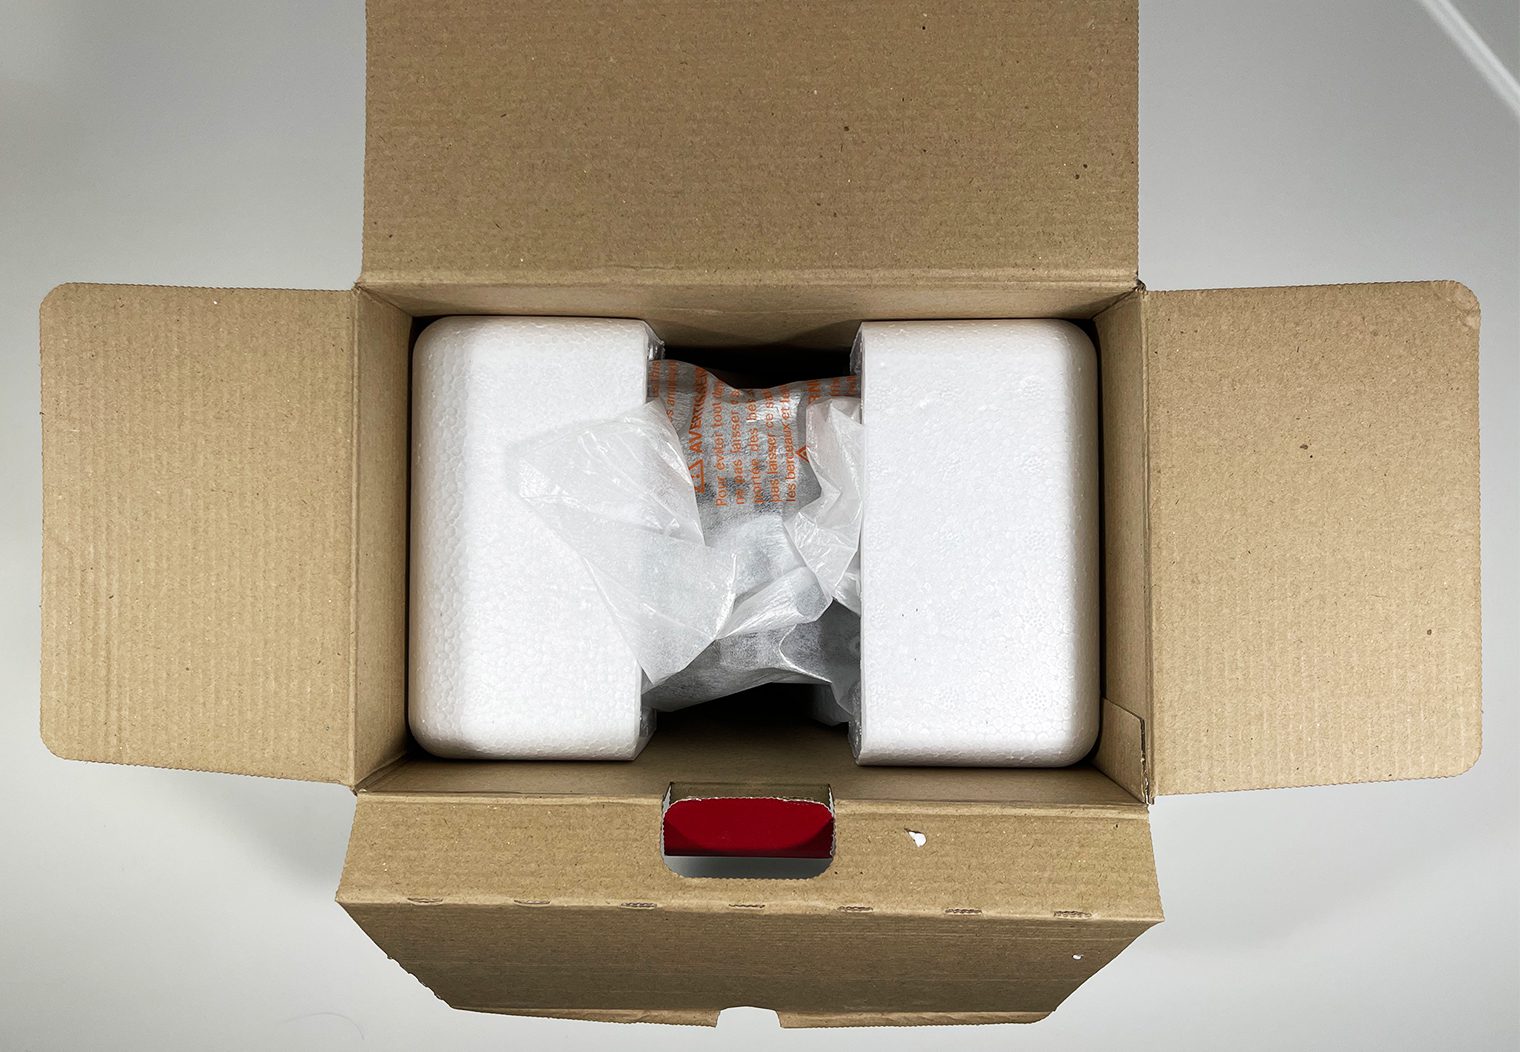
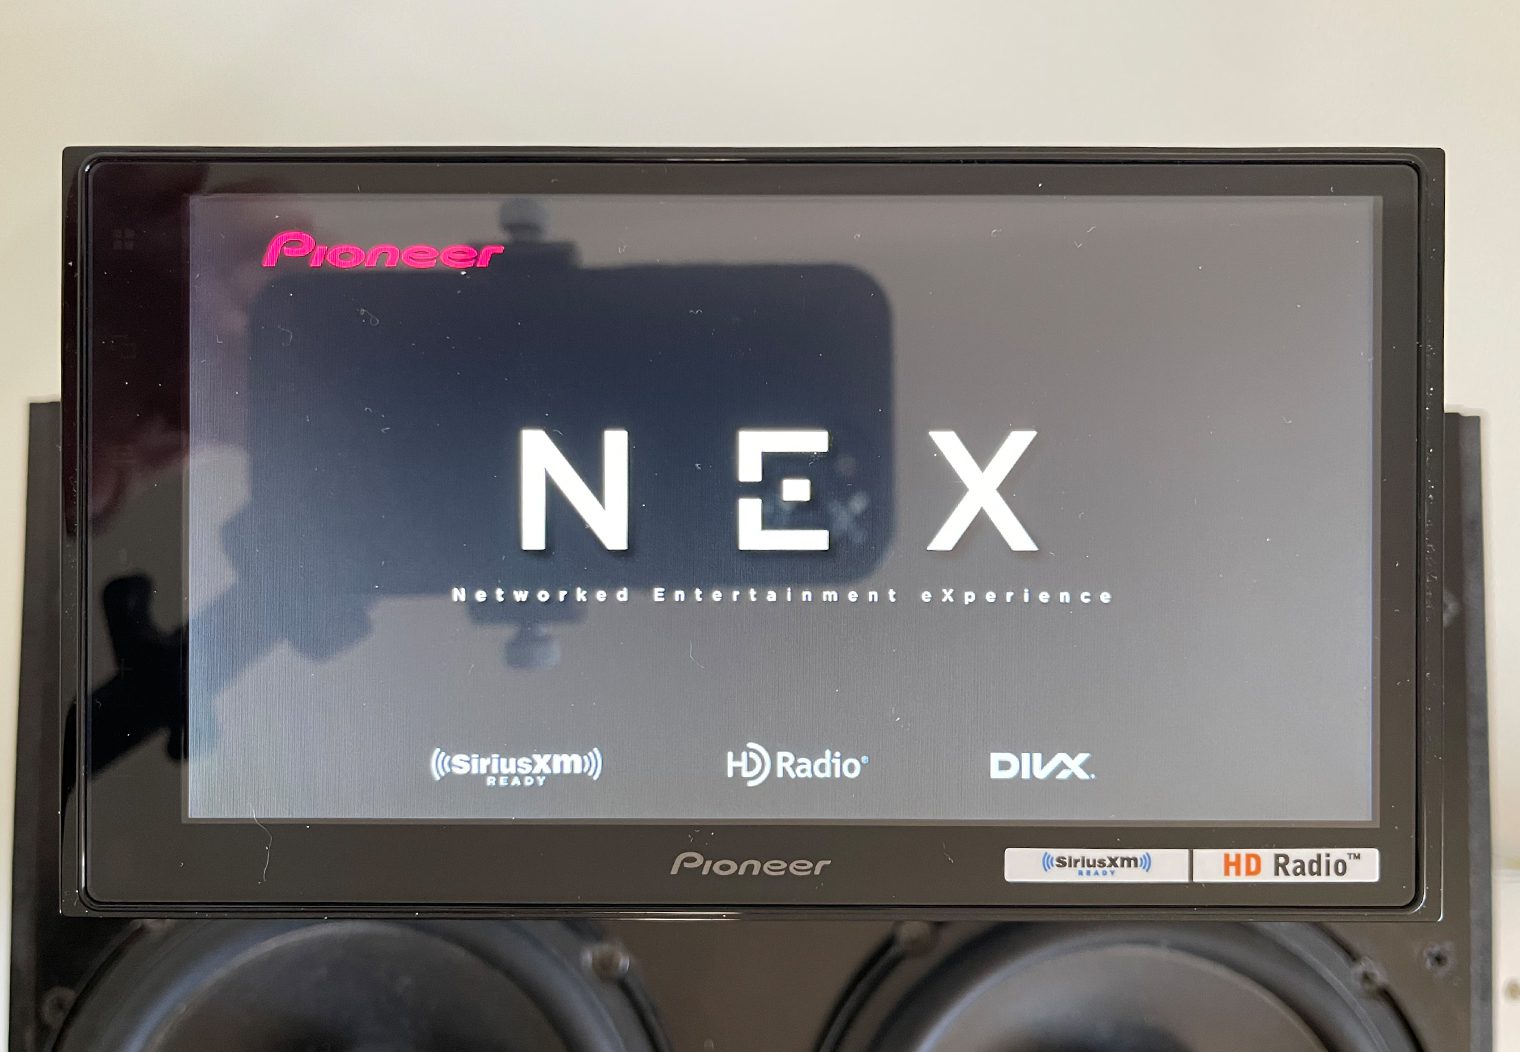
You can tell a lot about a head unit before you fire it up for the first time just by unboxing it. Starting with the packaging and the various components that come inside the box. It never gets old, opening up a new unit for the first time. What I like about Pioneer's packaging is that it gives you a great understanding of what kind of features you're going to get with the DMH-2660NEX just by looking at the packaging. You know it has CarPlay, Android Auto, HD Radio, Alexa, iDatalink, Steering Wheel Control, etc. All from the box. Here's some photos of the DMH-2660NEX as I opened it up for the first time.
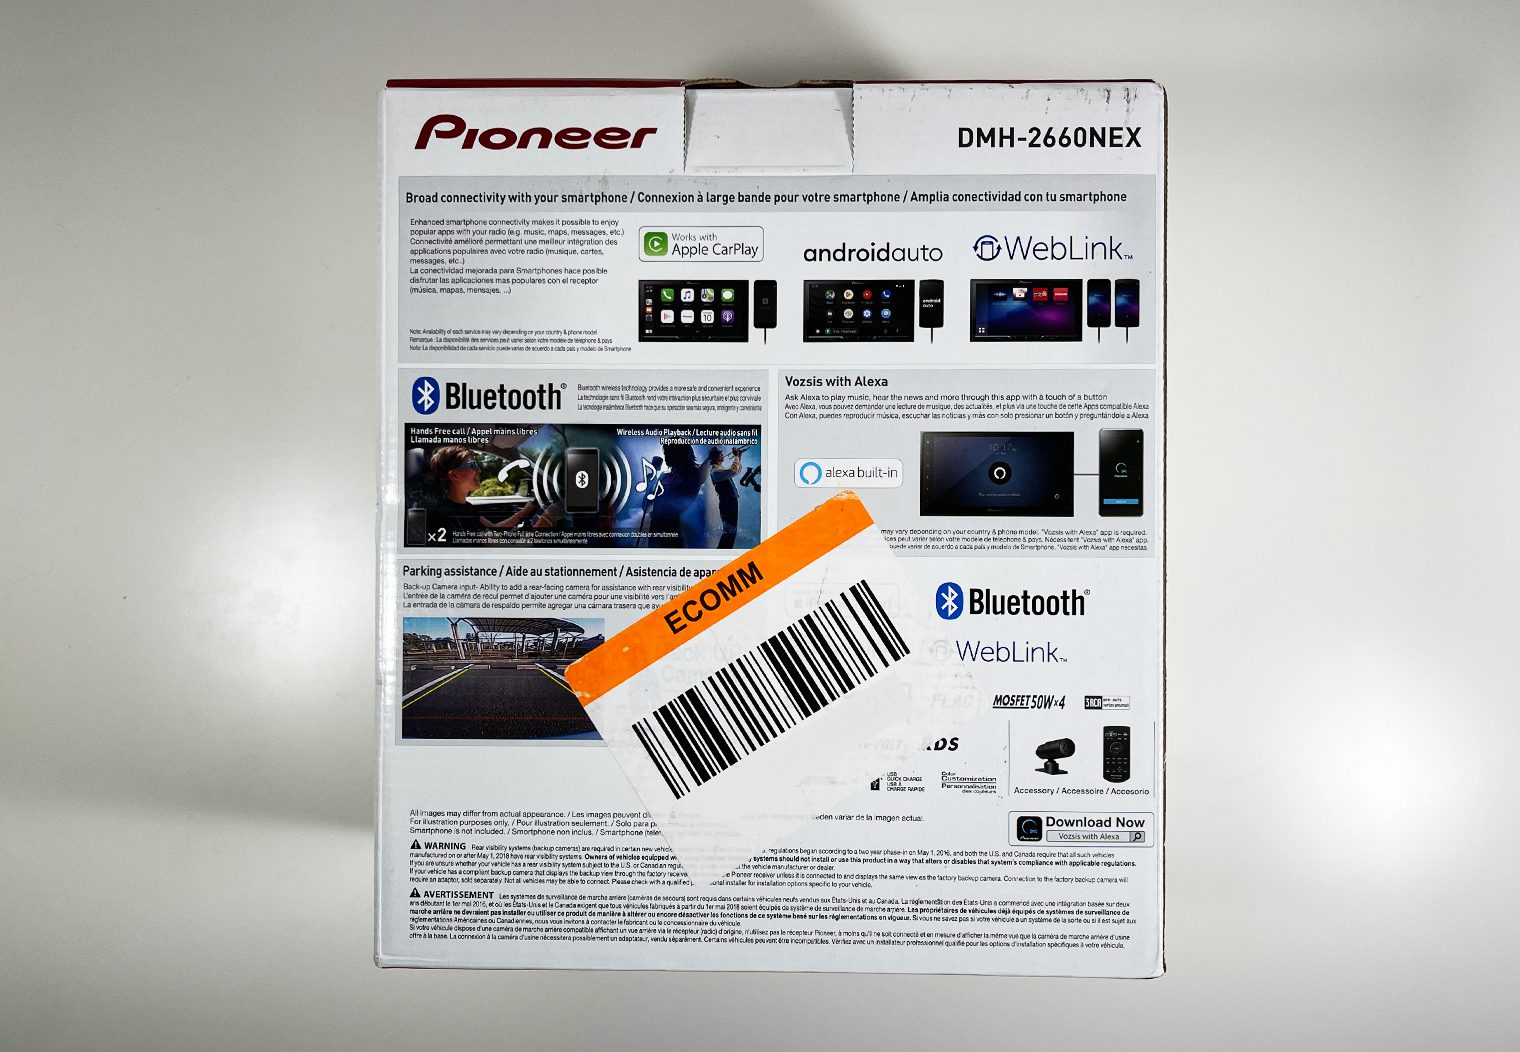
What's In the Box
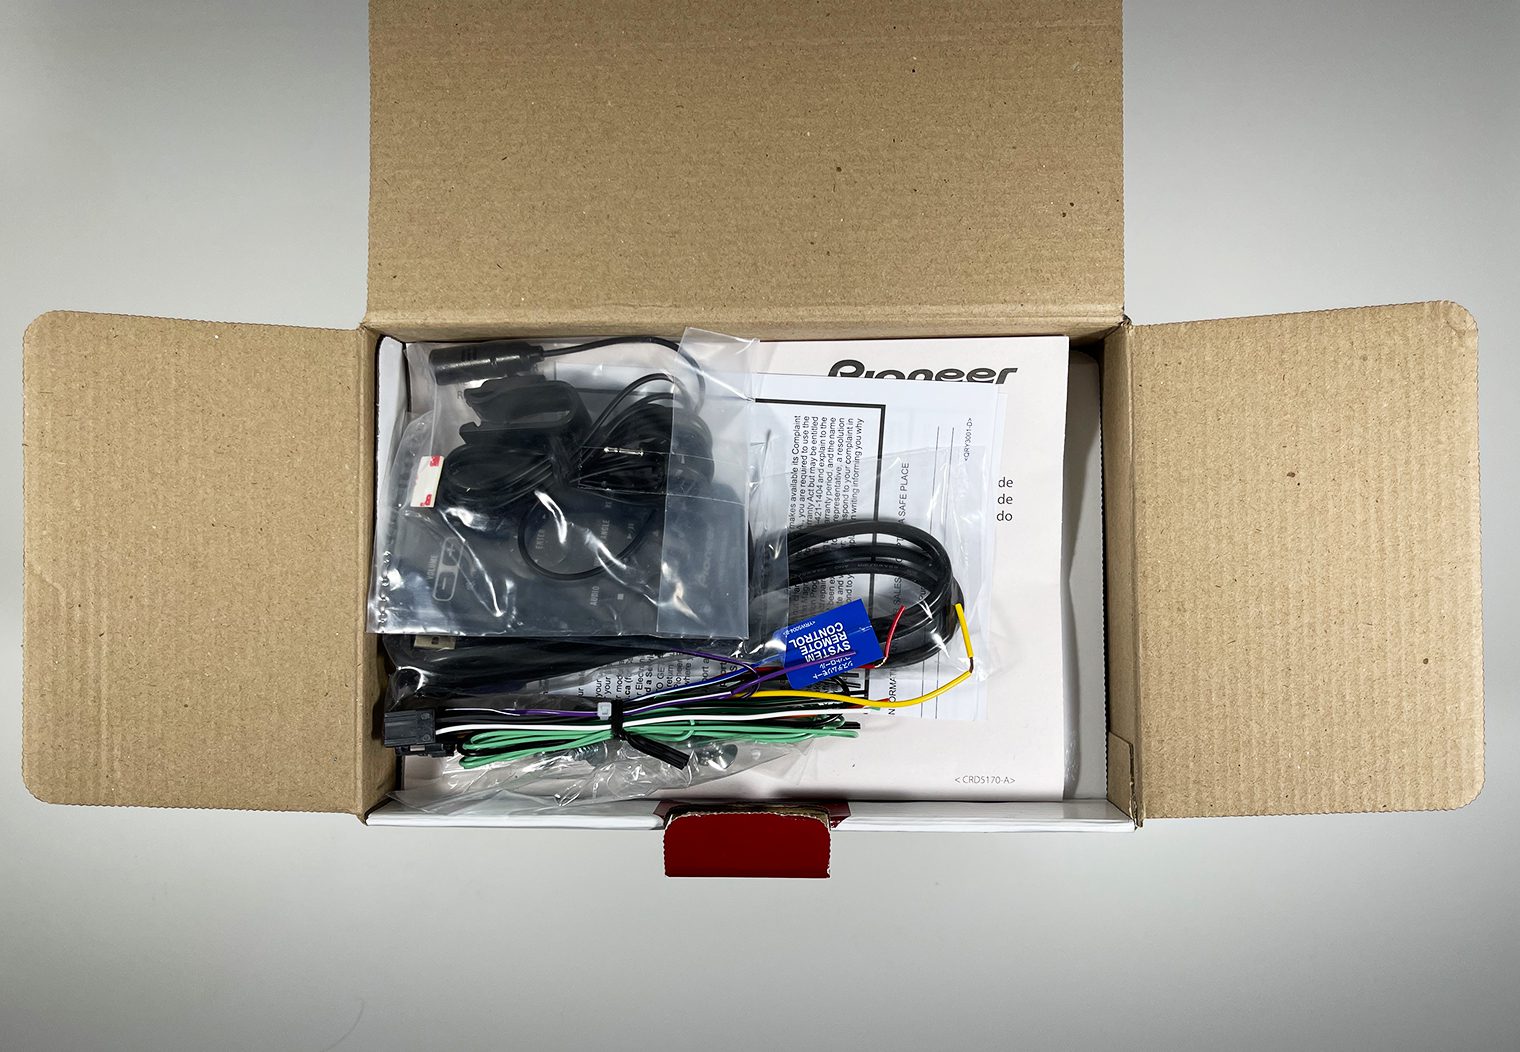
So what in the box with the 2660NEX? Here's a look at what's inside.
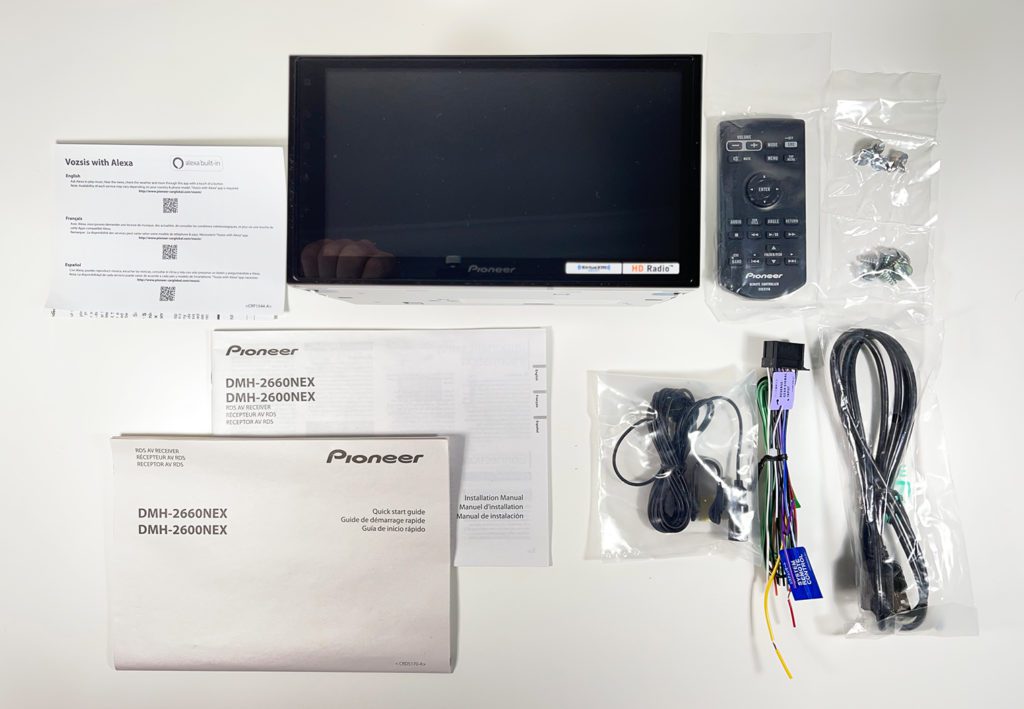
- Double DIN Digital media receiver with integrated 6.8″ touchscreen
- Wiring harness
- Microphone w/ bracket (attached 13′ cable terminated by a right-angled 2.5mm connector)
- Double-sided tape
- 58″ USB extension cable
- Remote control (CXE5116)
- CR2025 3V lithium battery (installed in remote)
- 6 Pan-head ISO screws (M5 x 9mm)
- 6 Counter-sunk ISO screws (M5 x 9mm)
- Installation Manual
- Quick Start Guide
- “Vozsis with Alexa” sheet
- Warranty Sheet
Pioneer DMH-2660NEX Overview and Specs
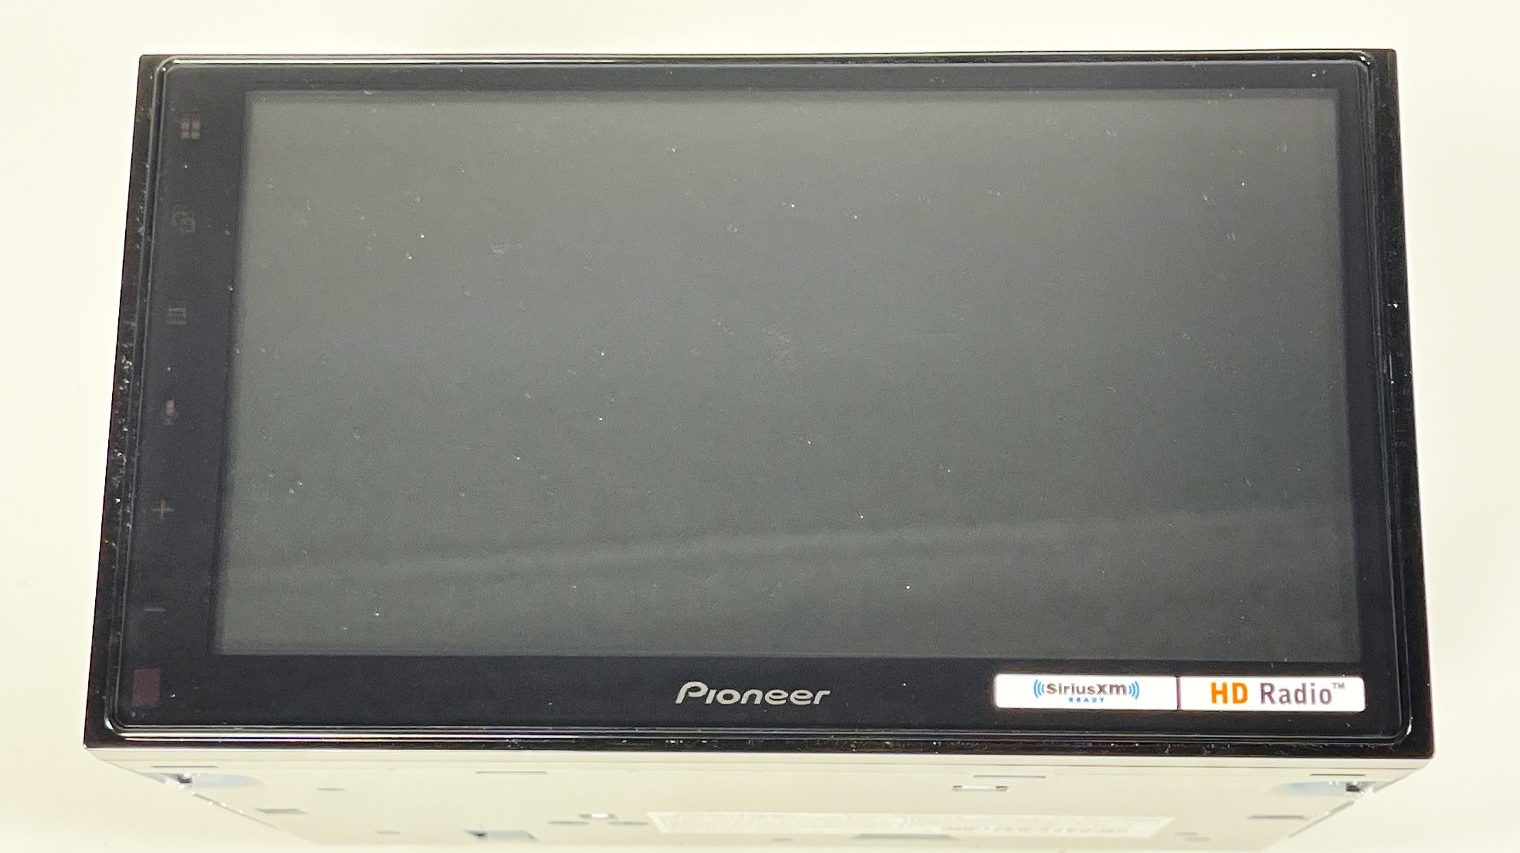
Like I mentioned already, the DMH-2660NEX is a double DIN digital media car stereo with a 6.8″ capacitive LCD touchscreen. Since the chassis is a double DIN, you'll want to make sure that your dash fits a double DIN unit like this before purchasing. Check out our vehicle dash size lookup to check. And because it's a digital media receiver, it does not have a CD/DVD player. However, the 2660NEX is definitely a multimedia head unit that's designed for bringing video entertainment to your vehicle via its video inputs and outputs.
It is packed with many of the latest features like HD radio, Apple CarPlay and Android Auto, iDatalink and more. I truly think that the DMH-2660NEX is a great middle of the road unit that will bring you almost all of the latest features on the market day. It's priced competitively too, in the mid $300s. So you can have the features you want in a head unit from a brand you can trust, all for a price that won't break the bank. Here's a quick overview of some of the key specs and features.
Head Unit Specs
- Double DIN digital multimedia player with AM/FM tuner
- 6.8″ capacitive LCD touchscreen display
- Plays media loaded with MP3, WMA, AAC, and FLAC music files
- Built-in HD Radio tuner
- Built-in Bluetooth
- Android Auto and Apple CarPlay compatible
- WebLink provides access to Amazon Alexa
- Pandora and Spotify control with iPhone and Android
- Siri Eyes Free control for select iPhones
- Google Assistant for select Android smartphones
- 13-band graphic EQ
- Time alignment, fade/balance adjustments
- Sirius XM compatible (requires additional components)
- Inputs: rear USB input, rear audio/video inputs, backup cam input (A/V input can be used for a 2nd camera if need)
- Outputs: video output, 6-channel preamp outputs (4-volt front, rear, sub)
- Built-in amp with 14 watts RMS/50 peak x 4 channels
- iDatalink Maestro compatible (requires separate components)
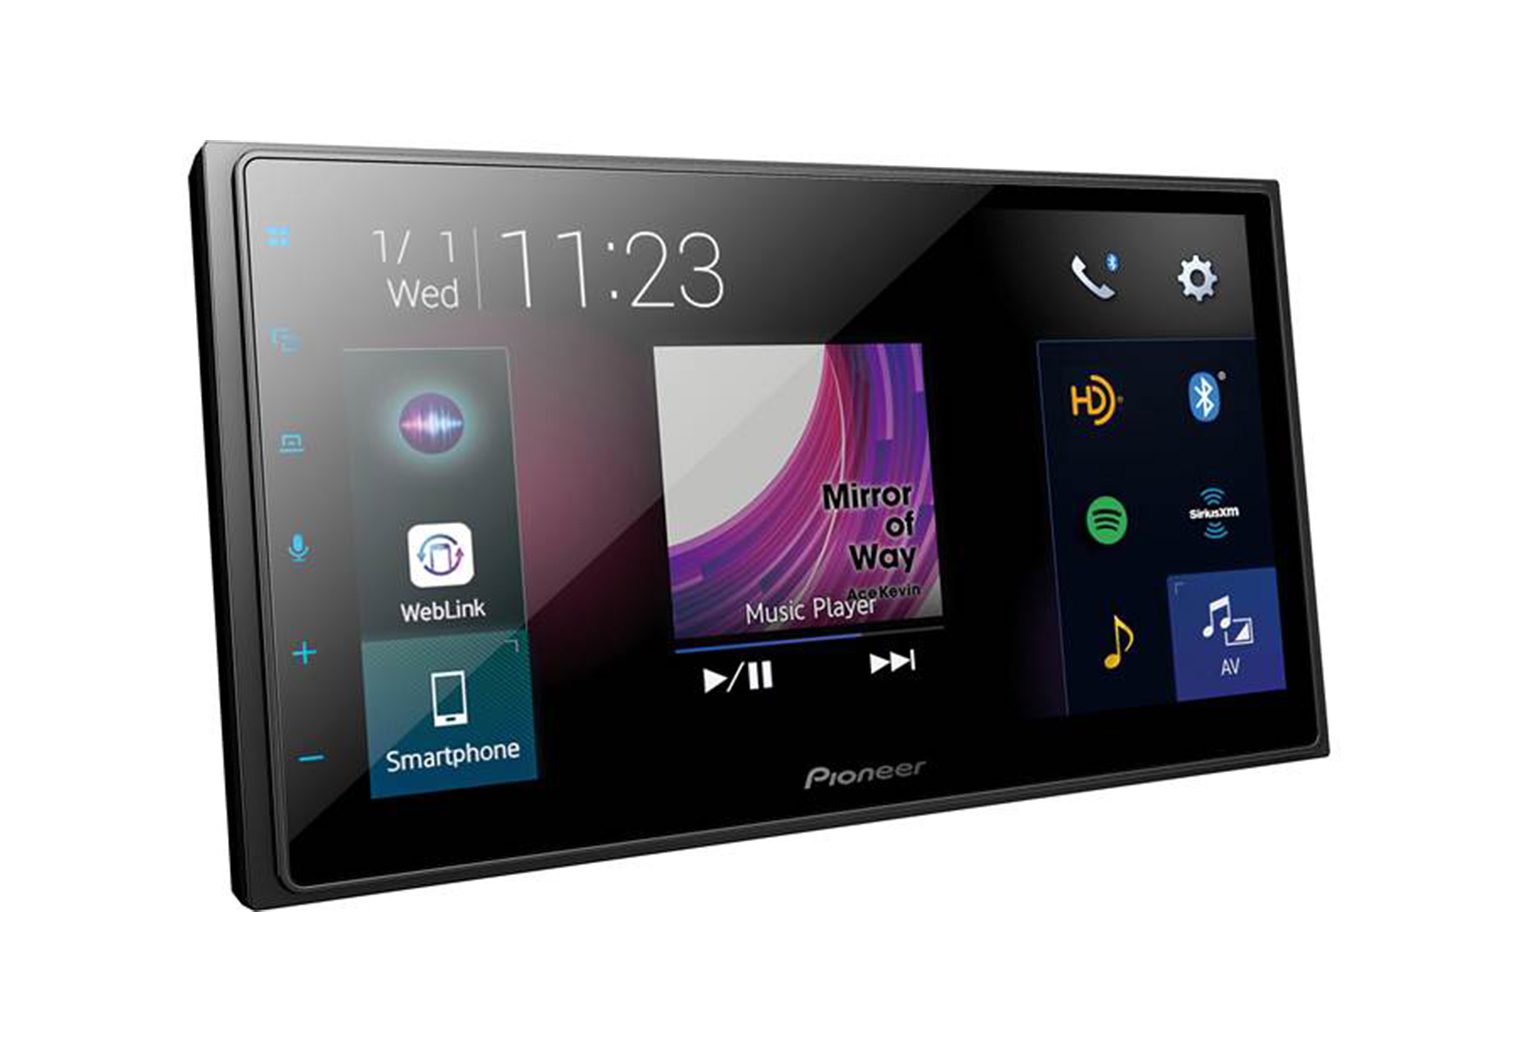
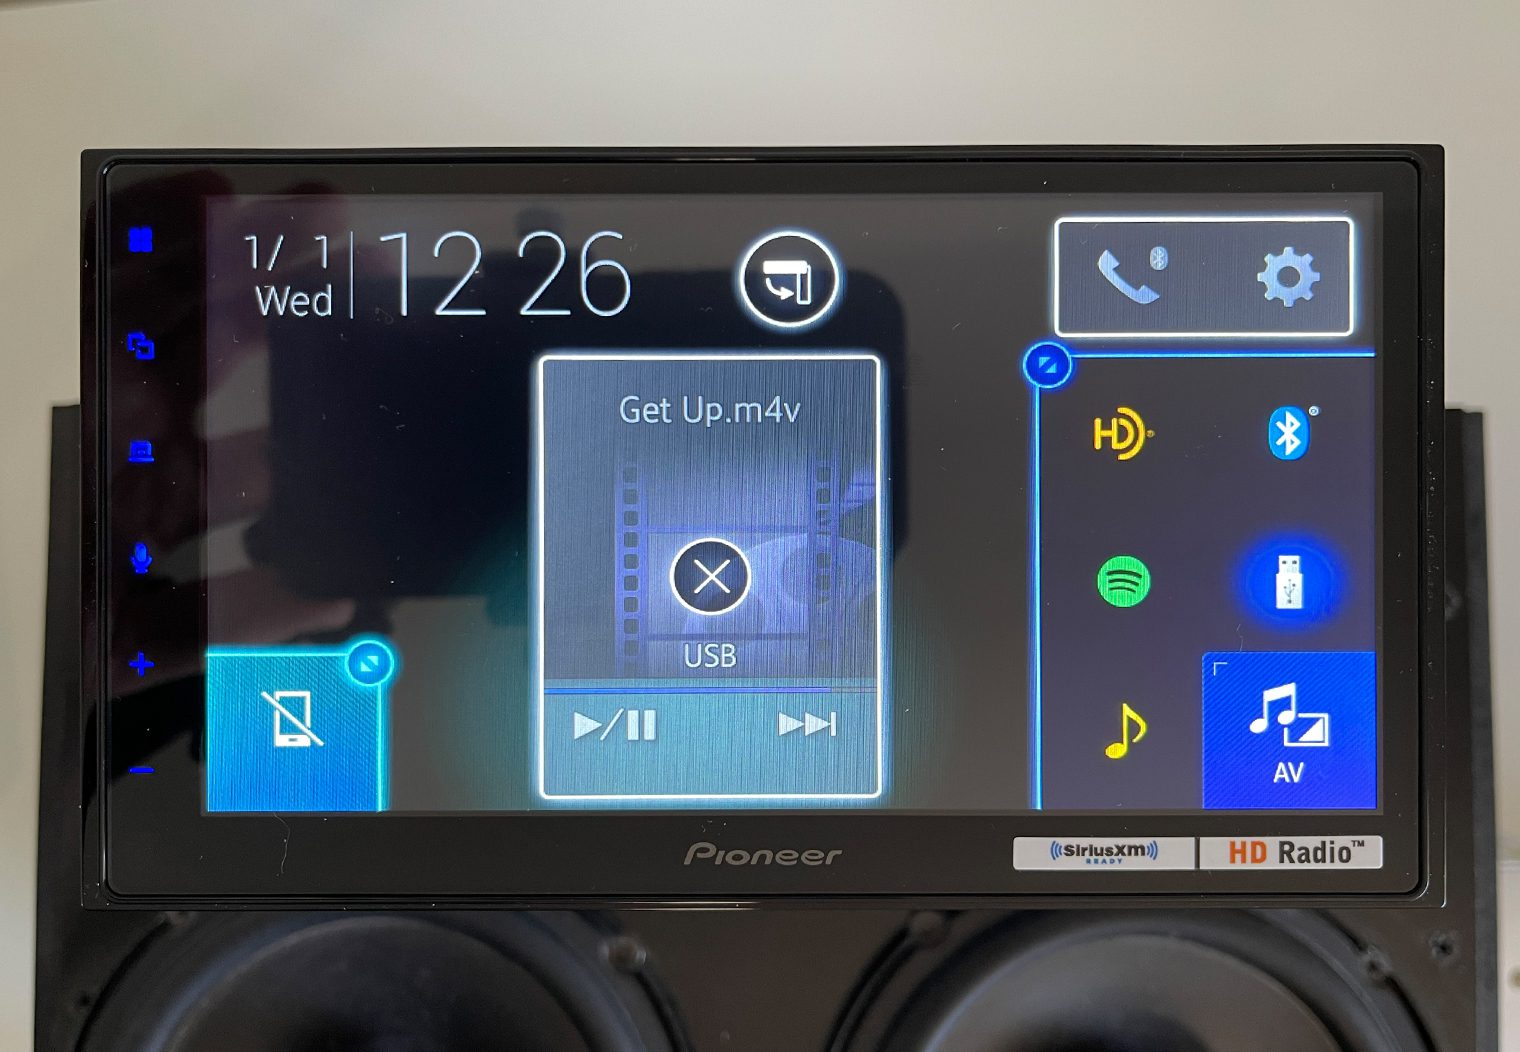
DMH-2660NEX's Touchscreen
Naturally the screen is the first thing you judge when you turn a head unit on. Being a multimedia head unit, clarity is super important (obviously). The 2660NEX features a 6.8″ capacitive touchscreen with an 800×480 (RGB) resolution. I was a little disappointed that it's not an HD screen but then again it's only a $350 unit. The screen also does not have any anti-glare features or film. Taking photos of it for this review was pretty much like looking in a mirror most of the time.
In terms of clarity, I don't feel like its a let down by any means even though it doesn't have HD resolution, but I will say that video and image quality is not fantastic. It gets the job done well, but if you put this side-by-side with a higher resolution screen like the DMH-WT8600NEX, you're going to see a big difference.

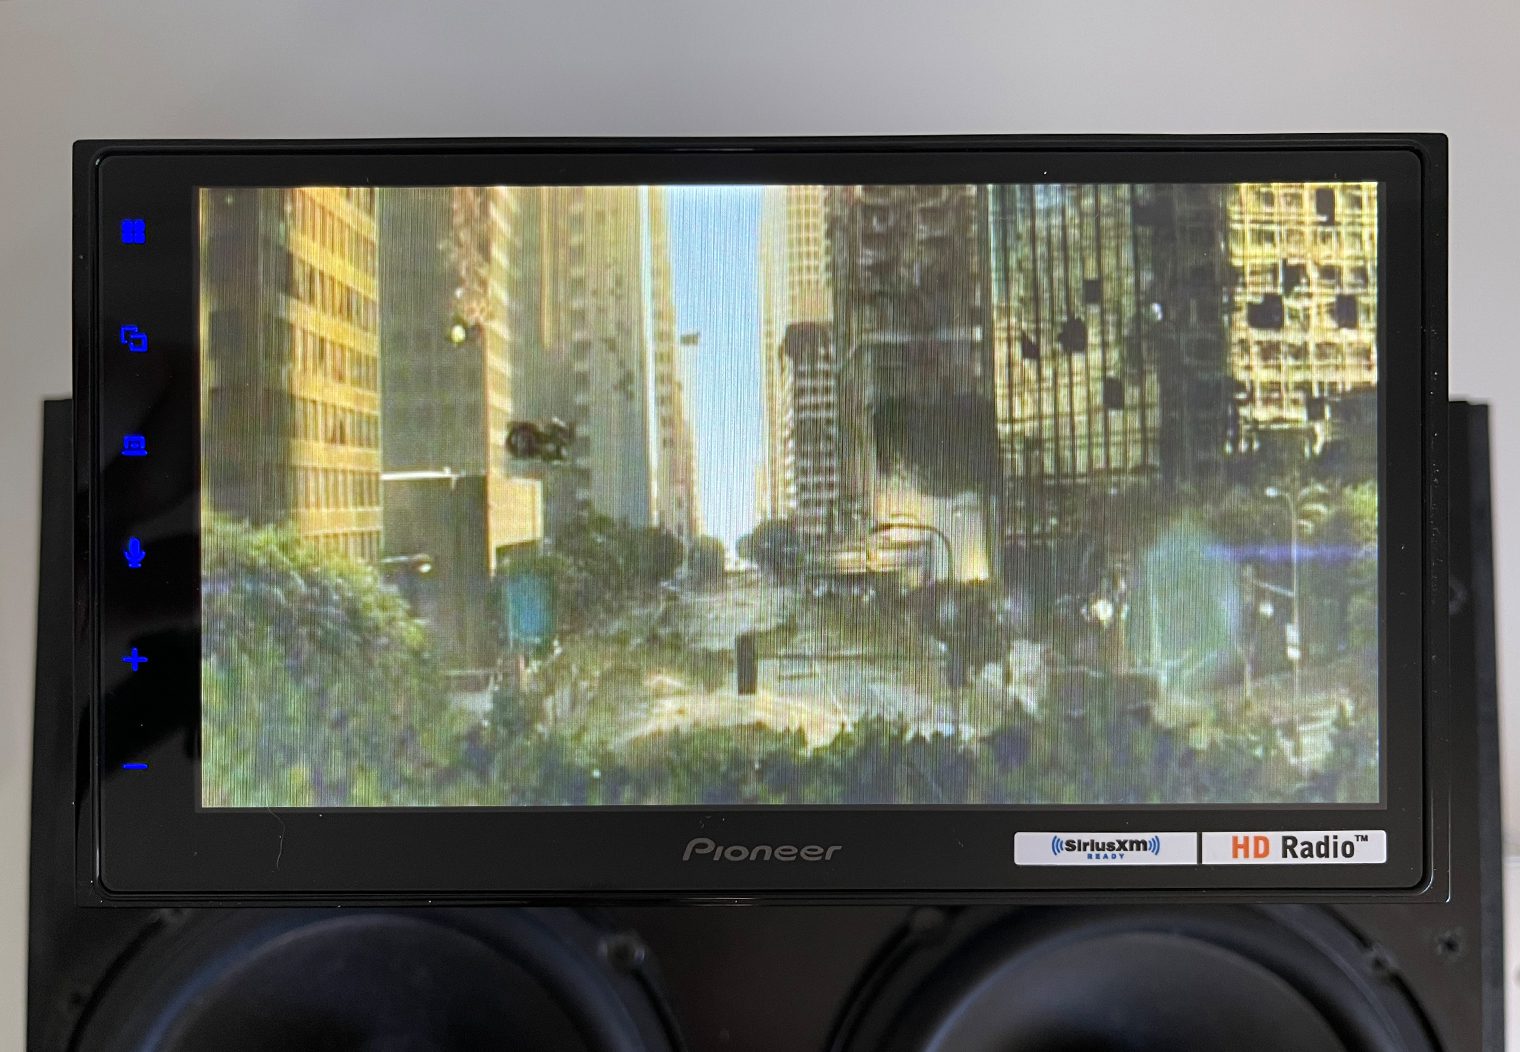
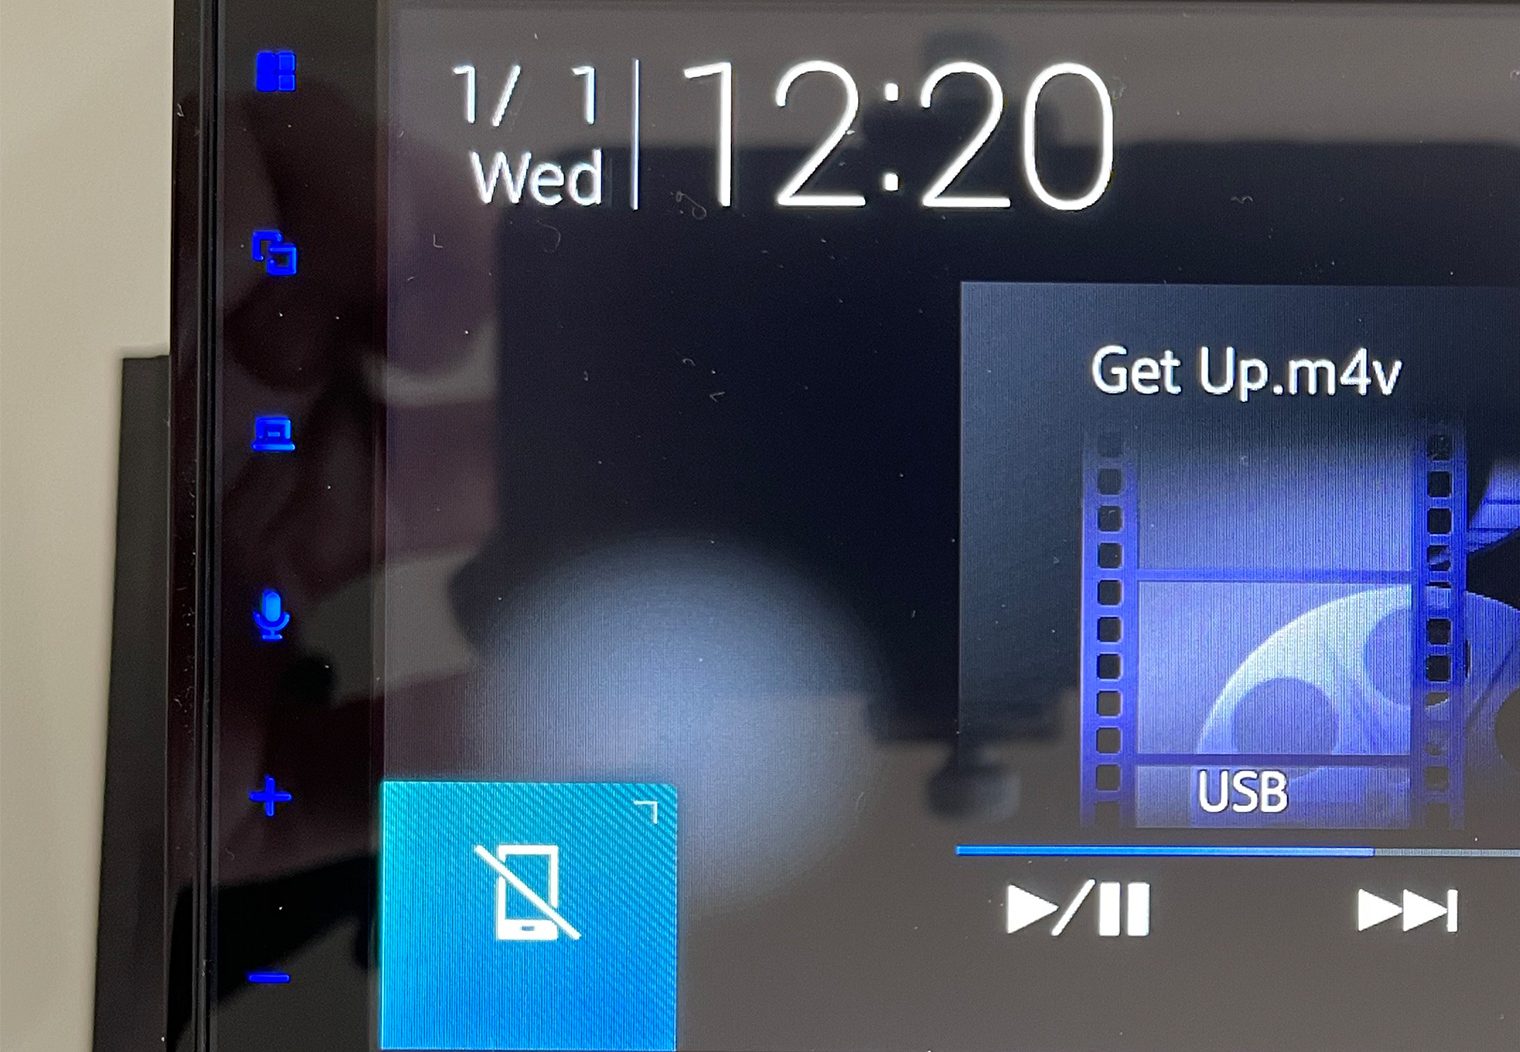
And since they're along the edge of the screen, let's talk a little bit about the control buttons. When the screen is off, you don't really notice that there are touch controls along the left hand side of the screen. Once you turn the unit on, it becomes much clearer. You can see them in the images above (blue).
From top to bottom you have six control buttons:
- Home
- Turn display off
- Media control panel
- Voice control
- Volume up
- Volume down
What I like about the touch controls is that it creates a very clean, sleek looking screen. Traditional button-style controls require a thicker bezel and can really degrade the look of the head unit in the dash. So I like that they're touch and that they're behind the single pane of glass that also covers the screen. They are also RGB, so you have the ability to change the touch button colors. I'll get into this later in the customization section. This is a big deal for those who like to match the look and feel of their OEM dash and button colors.
What I don't like is the size of the buttons. I wasn't even in the car on the road and I felt like I was fat-fingering the small icons. But since they're located next to the screen, if I were to choose between bigger icons and a bigger screen I'd choose the bigger screen every time.
Resistive vs Capacitive Touchscreens
For those who might not know what a resistive or capacitive touchscreen is, here's a quick overview. Per wikipedia, a resistive touchscreen is a touch-sensitive computer display composed of two flexible sheets coated with a resistive material and separated by an air gap or microdots. So, when you touch the 2660NEX's screen, you can somewhat feel the flexible sheets as you push down. In comparison, when you touch your iPhone's screen is like touching a hard piece of glass.
One of the benefits of a resistive touchscreen is that any object that touches it – nails, pens, hands with gloves, etc – will trigger the touchscreen. It's the easiest, most universal type of screen between the two which makes it (in reality) more ideal for the automotive use case. The downside is that the layers of flexible sheets that enable the ‘touch' can change the way that the screen looks and the quality of the image.
On the flipside you have capacitive touchscreens. And the easiest way to describe them is to reference your iPhone or smartphone. iPhones have capacitive touchscreens, which use an electrical charge to detect touch and movement on the screen. Most folks who own an iPhone know by now that not every surface will trigger the phone's touchscreen. That's because you have to touch it with something that's conductive for it to work. Nails, pen tips, etc aren't conductive so they won't work.
What's nice about a resistive touchscreen is that it registers touch from anything. For example if it was cold out and you were still wearing gloves until your car warmed up, you'd still be able to use the head unit to it's fullest. Again, more ideal from a user-friendly perspective but capacitive will give you a higher quality image at the end of the day.
Key Feature Walk Through & Demo
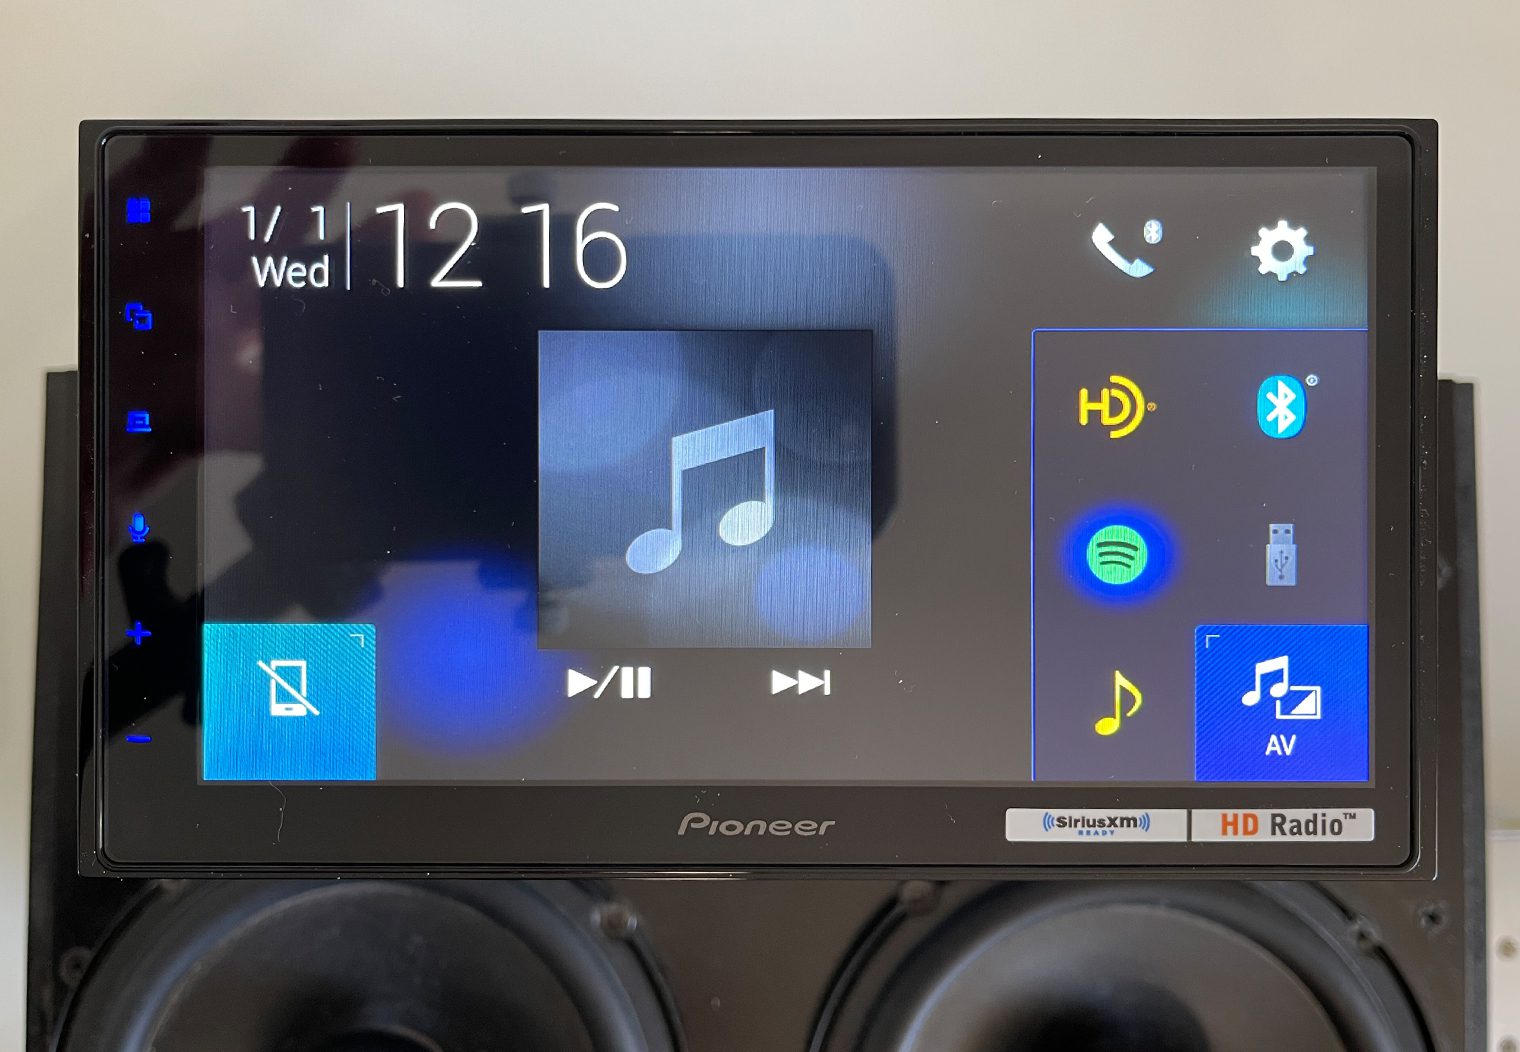
I hooked up the Pioneer head unit to my demo box and started to run through all of the key features worth noting. There's a lot! The DMH-2660NEX has a ton of awesome features that really bring entertainment and customizability to a new level in your car. The interface is fantastic, I've always loved Pioneer's approach to UX/UI in their OS. The homescreen design is very clean and sleek too and pleasant to look at. You can customize it too.
Let's walk through some of the key features that the 2660NEX has to offer.
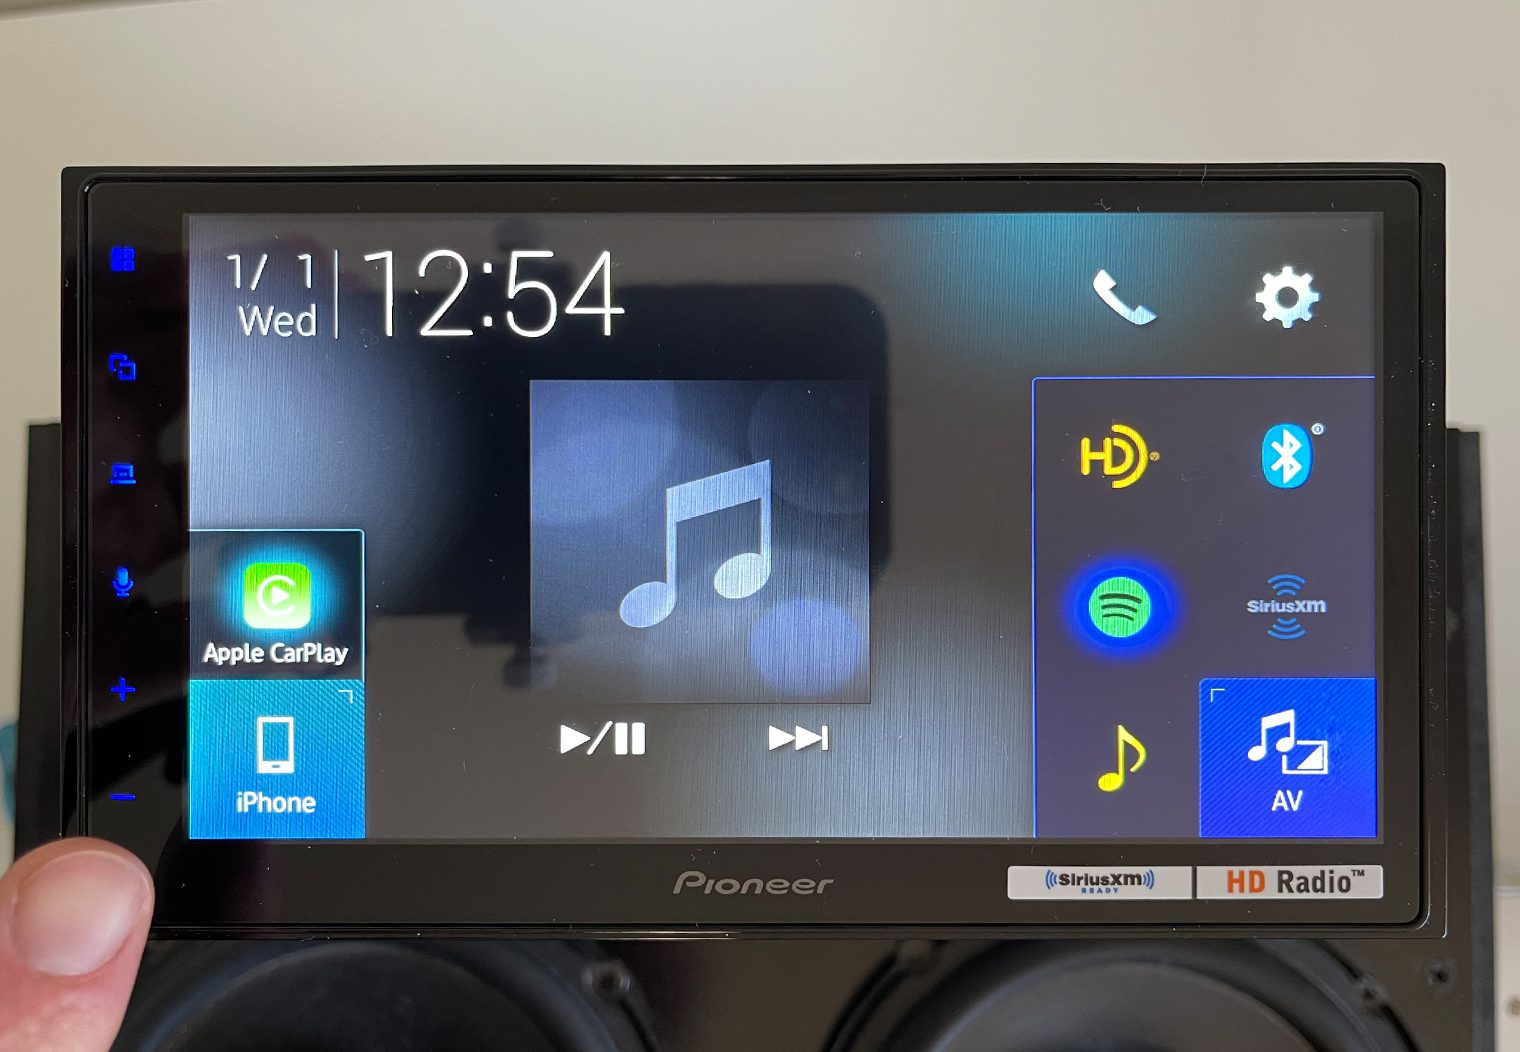
Smartphone Connectivity
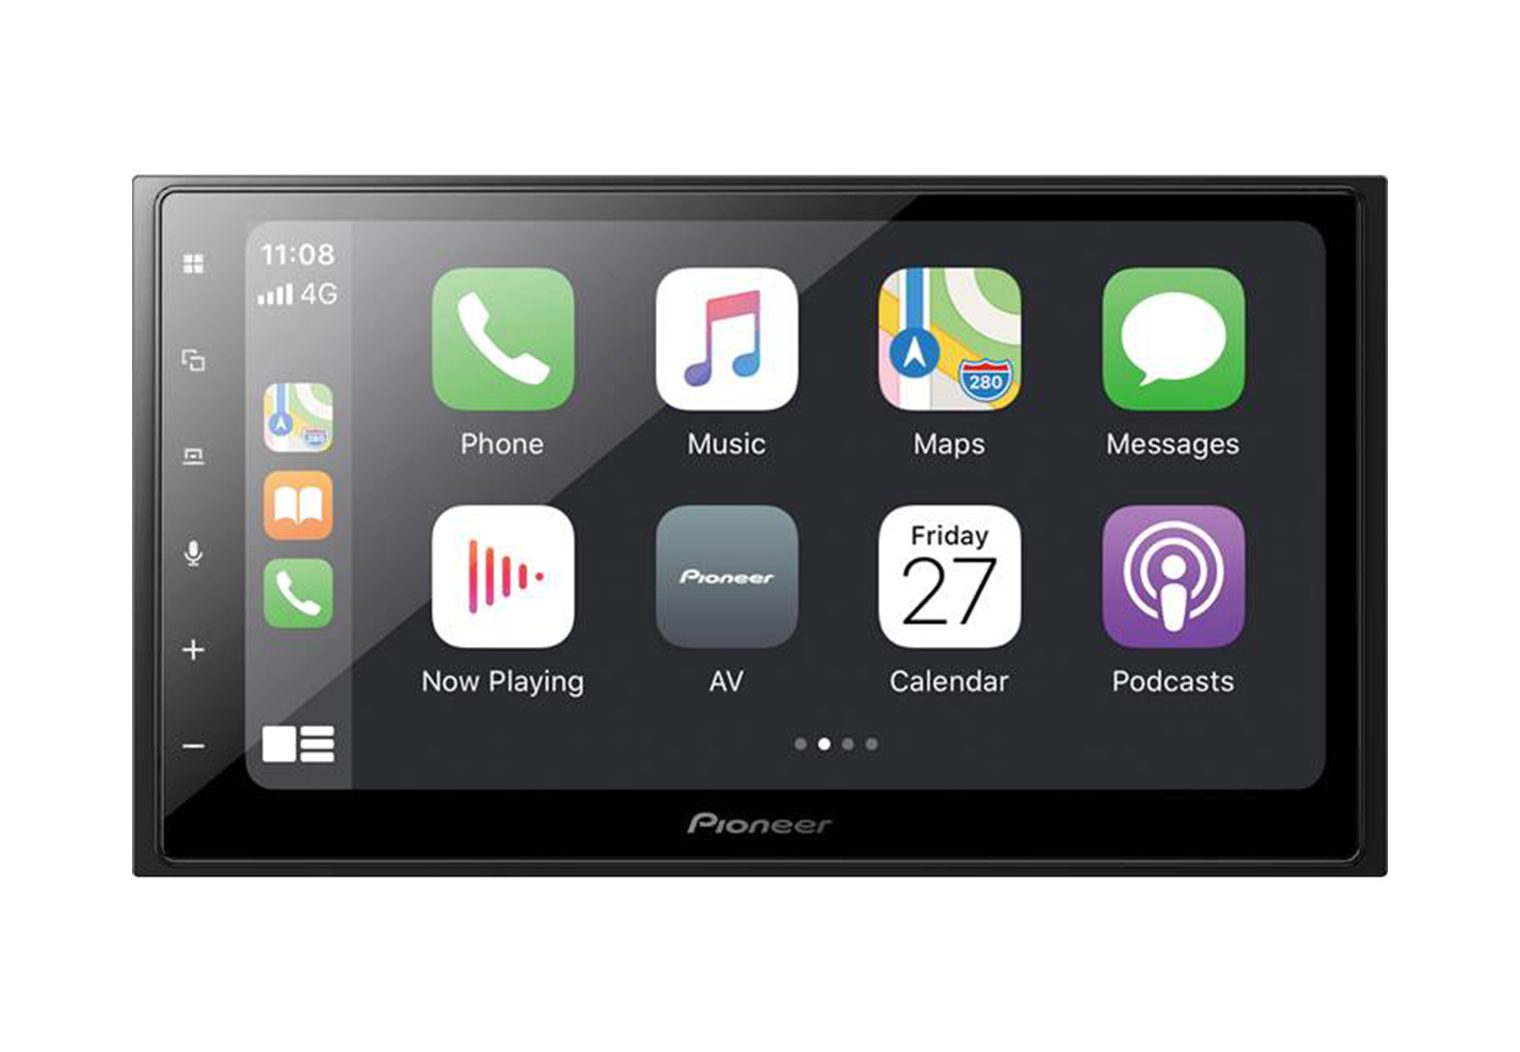
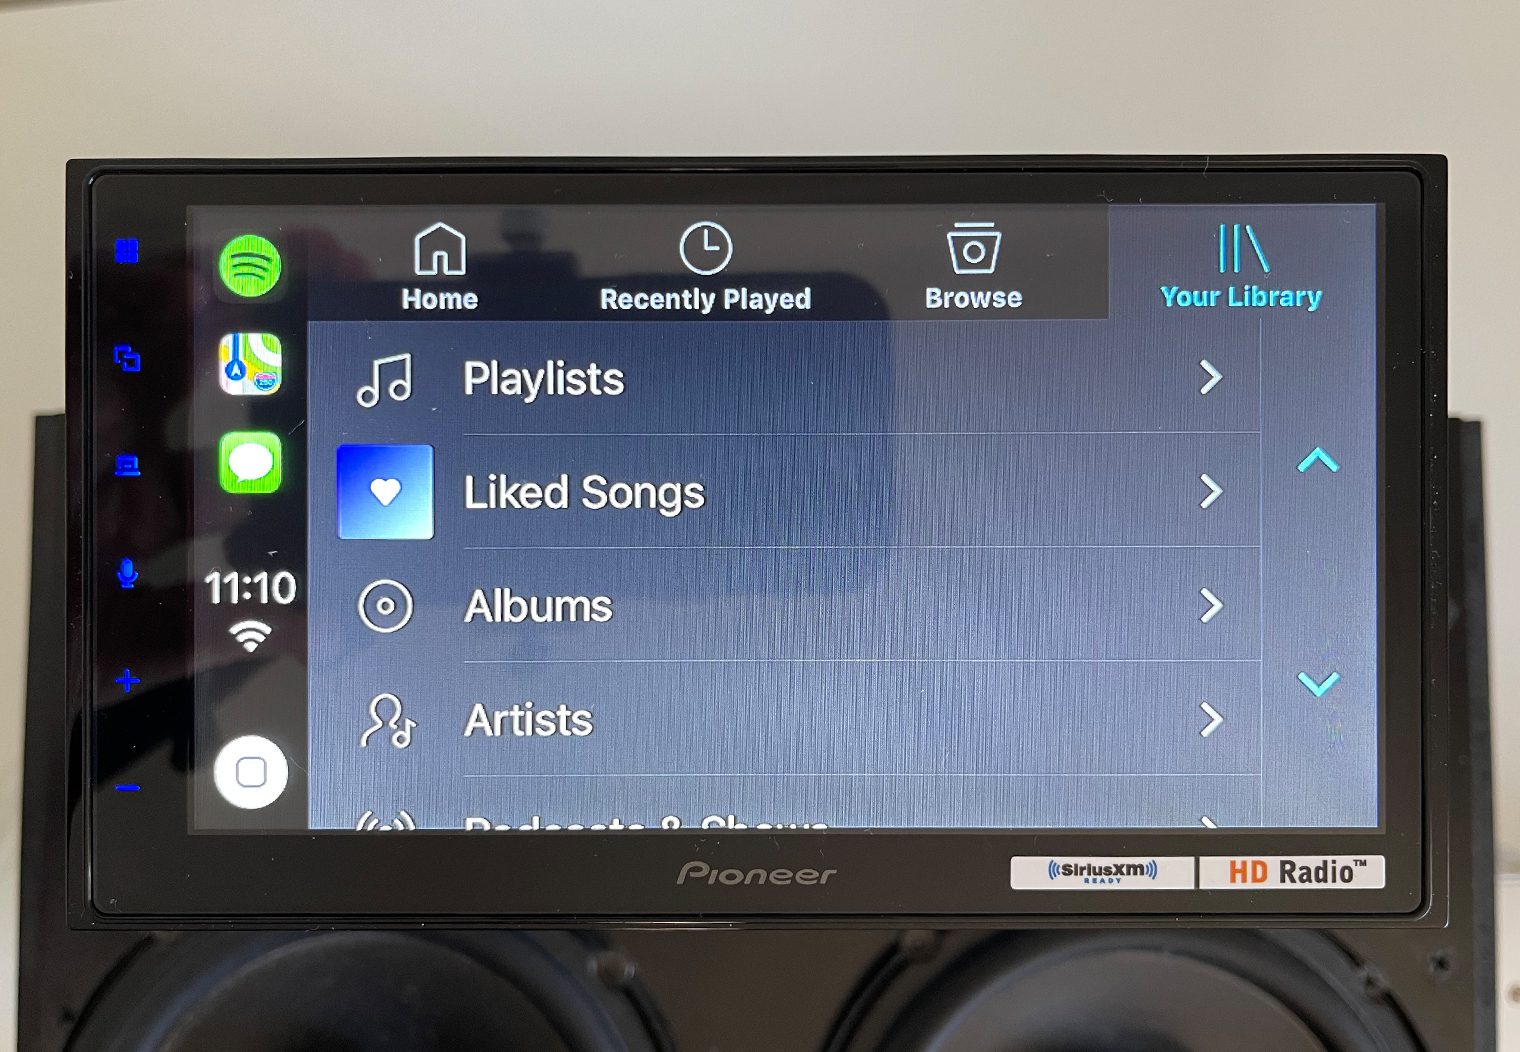
Pioneer hits almost all of the checkboxes when it comes to smartphone compatibility. Bluetooth, Apple CarPlay and Android Auto among the most important of the bunch. Starting with Apple CarPlay, the interface is seamless and fast. Once you're connected to the unit, it has all of the typical CarPlay features and apps. I won't get into too much detail but if you're looking for more information on what Apple CarPlay is and what it does, be sure to read our Why You Need CarPlay article. Essentially you have access to all of the CarPlay compatible apps, for example Apple and Google Maps along with Waze for navigation and Spotify or Pandora for music.
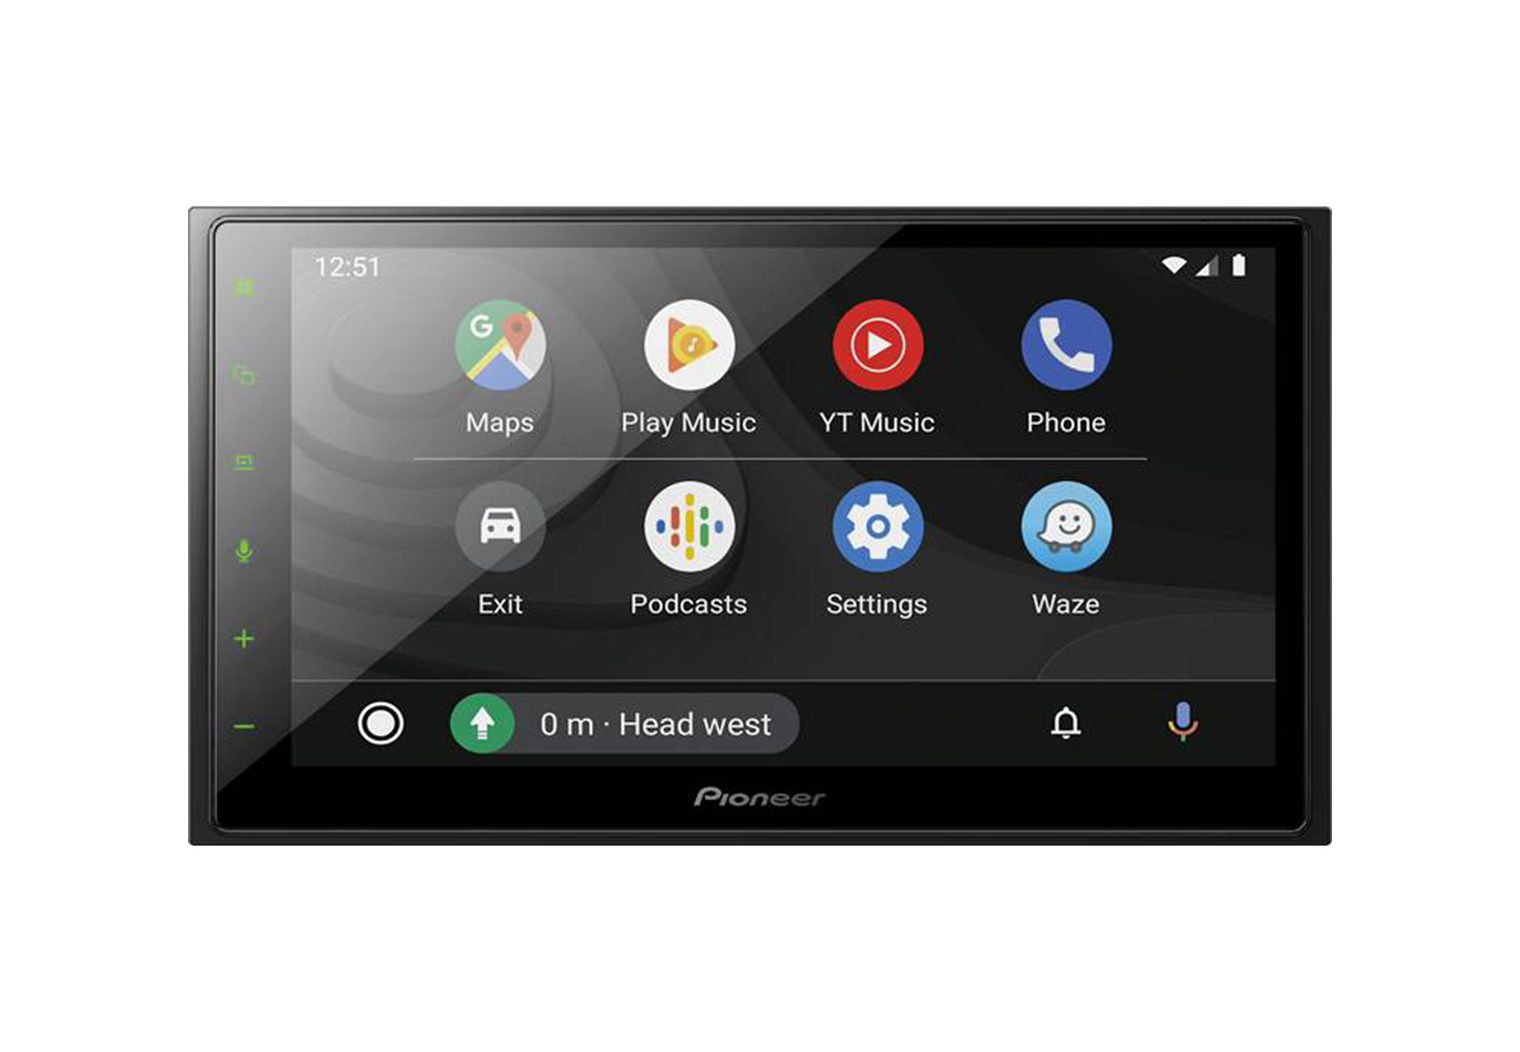
Sorry in advance to Android users, I don't have an Android to test Android Auto.
Apple CarPlay
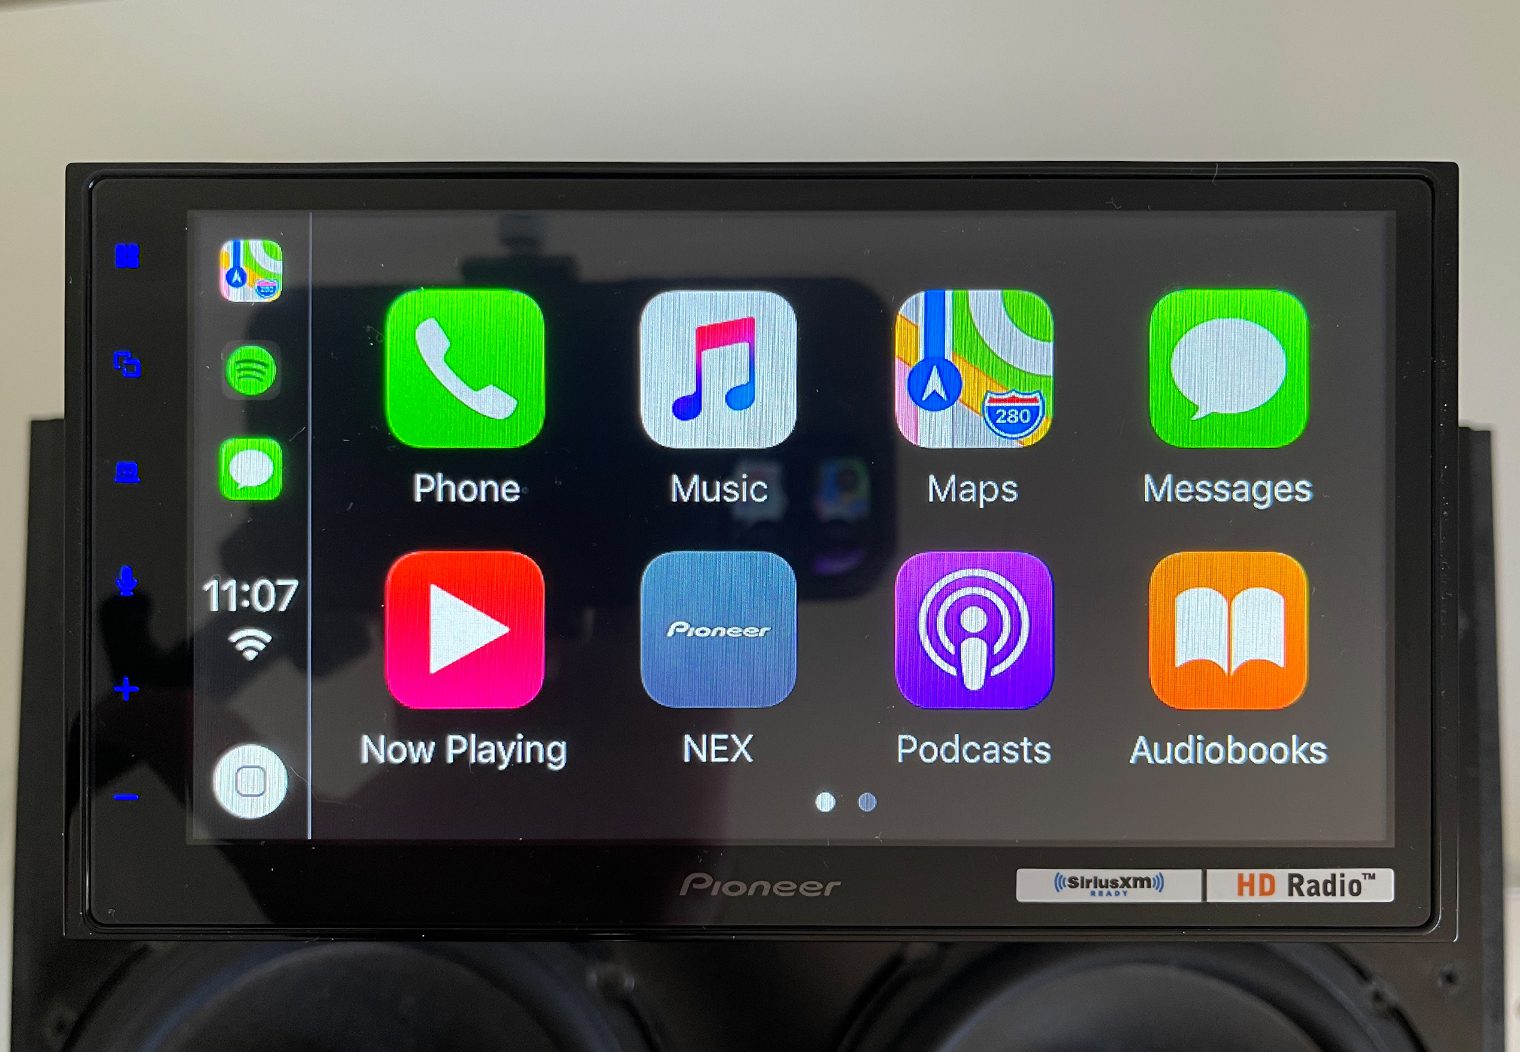
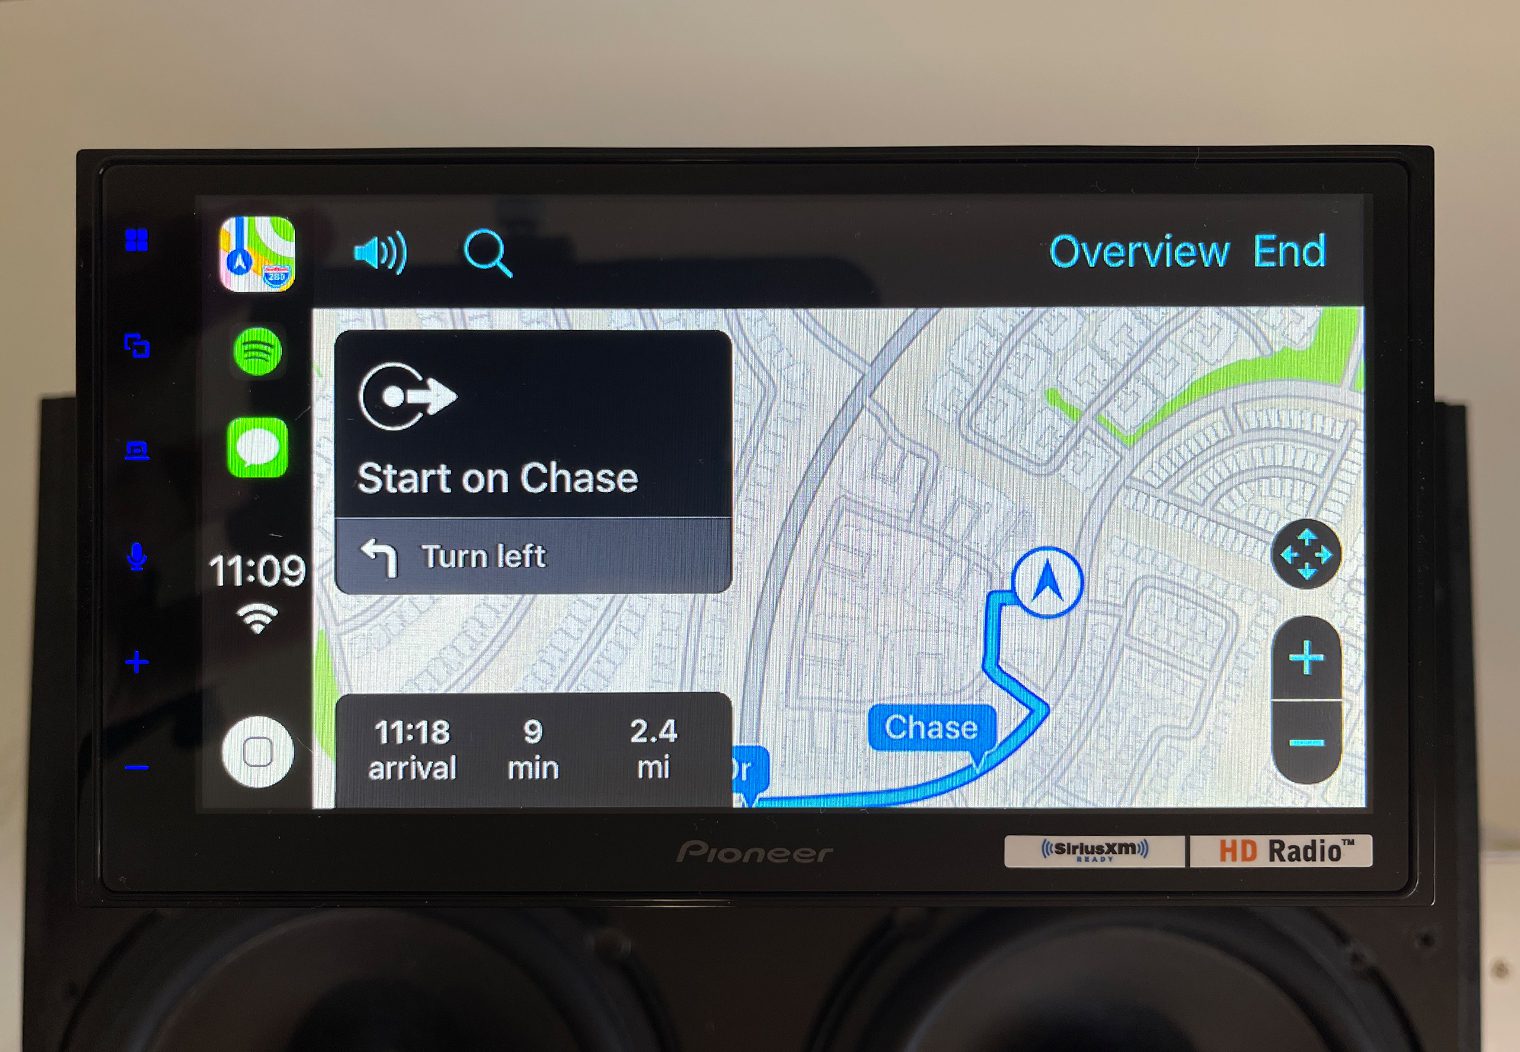
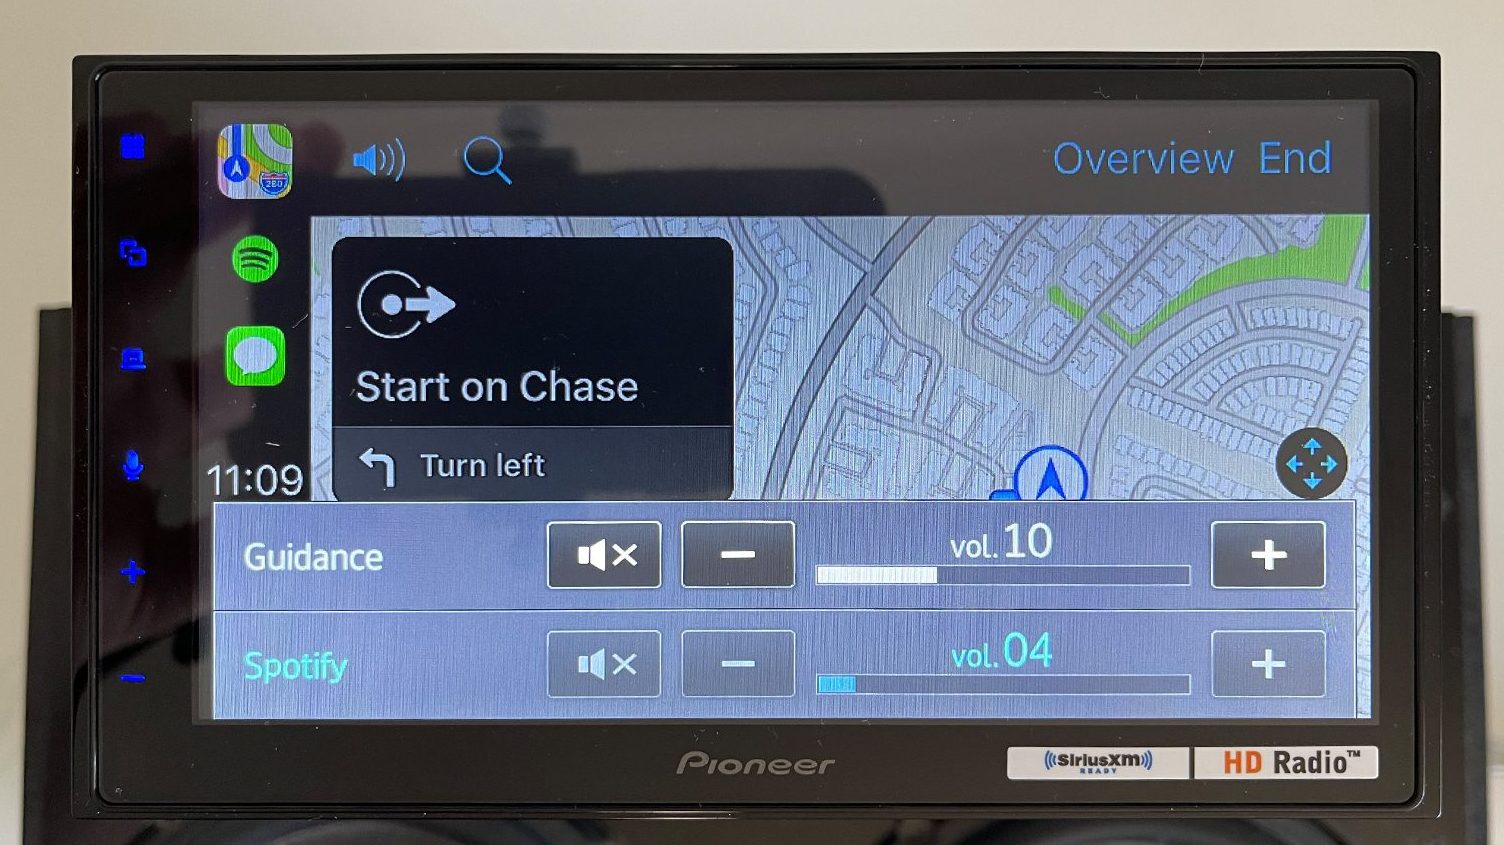
What I thought was really clever that Pioneer did while CarPlay is connected and navigation is activated (for example using Apple Maps for directions to a nearby restaurant) is create a volume separation. Whenever you're navigating somewhere and want to hit the volume, you'll see two separate volume controls. One for your music and one for your guidance volume. You can control each independently or even mute one or the other. Not all head units do this. The downside is that if you want to quickly mute or turn the music volume down, it's a two step process instead of one.
The one thing that I was disappointed with CarPlay was the lack of a multi-view screen. On this Pioneer, you can only see the app screen and need to open up each app independently to control their functionality. For example if you were using navigation but wanted to change a song on Spotify. You'd have to go to the apps screen, click on Spotify then change the song. CarPlay on most other head units, including OEM ones, have a dedicated screen that gives you a better view of your media while you're navigating. Here's an example of what I'm talking about on Sony's XAV-AX8100.
If you don't want to use CarPlay or Android Auto, you can always switch to Bluetooth to stream music or make phone calls. But you won't be able to access navigation from the head unit this way. Just unplug your phone and it'll default back to Bluetooth. Although, the quality of CarPlay when your phone is connected via USB is always going to be superior to Bluetooth so I would suggest plugging in. It's also just so much easier to use CarPlay.
The one big question that I know some folks will have about this unit “Is Apple CarPlay and Android Auto wireless?” The answer is no. You have to connect your phone to USB to access CarPlay and Android Auto. However, you can always add one of our recommended wireless CarPlay and Android Auto adapters to make it wireless.
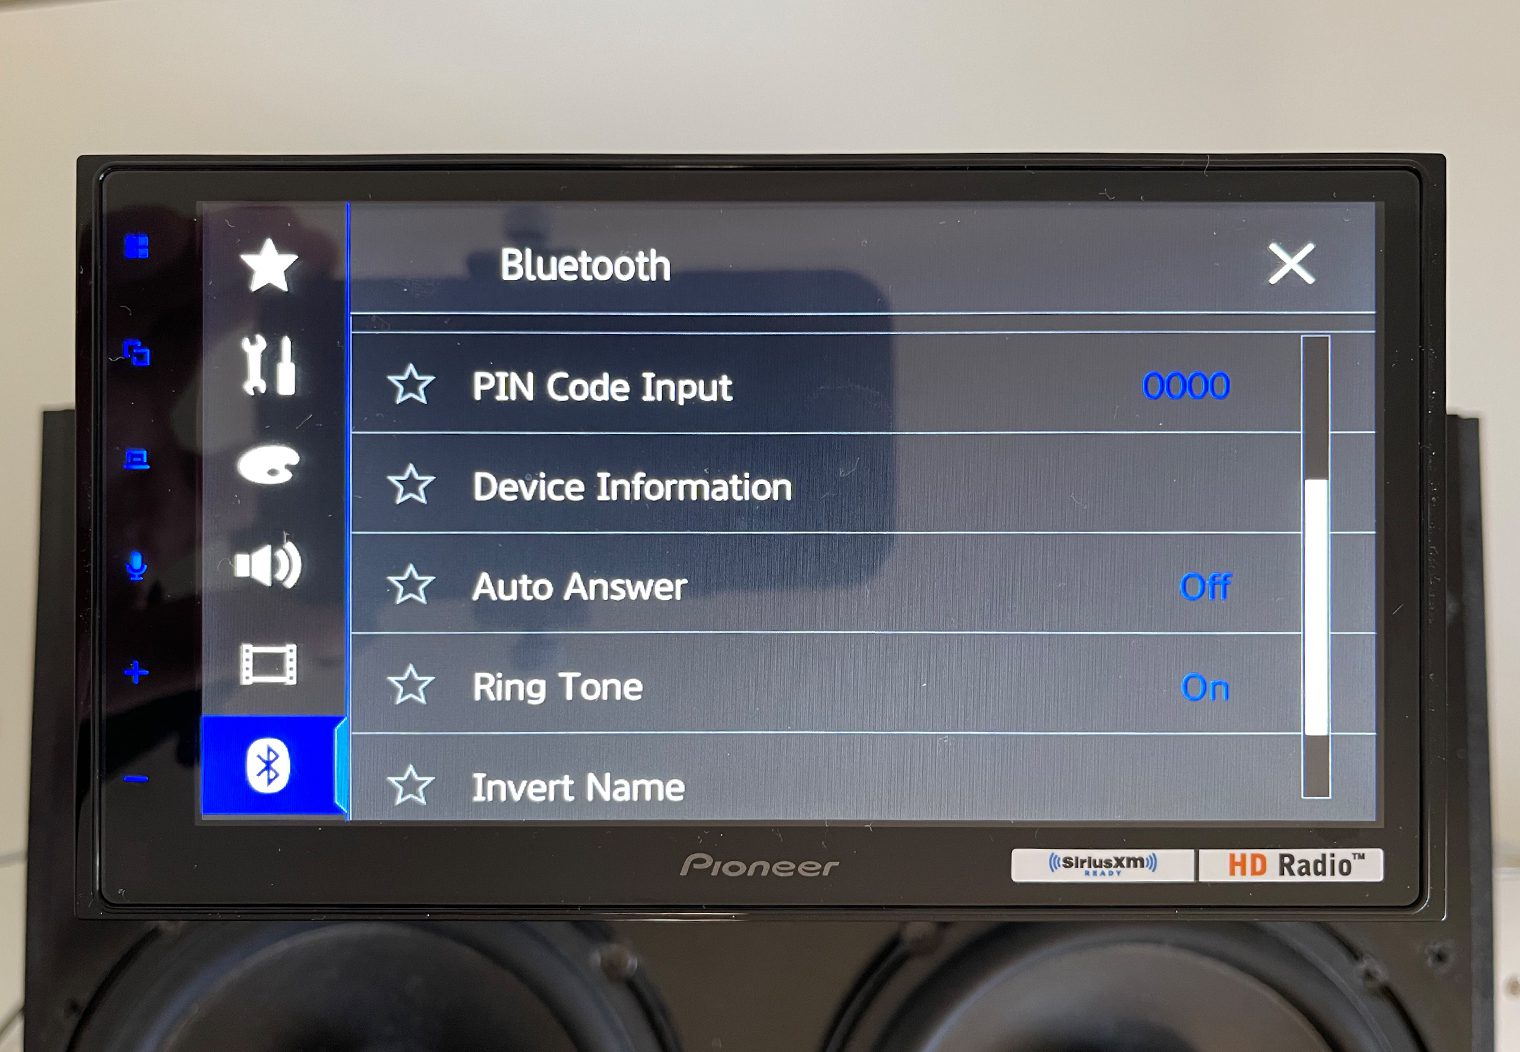
Bluetooth
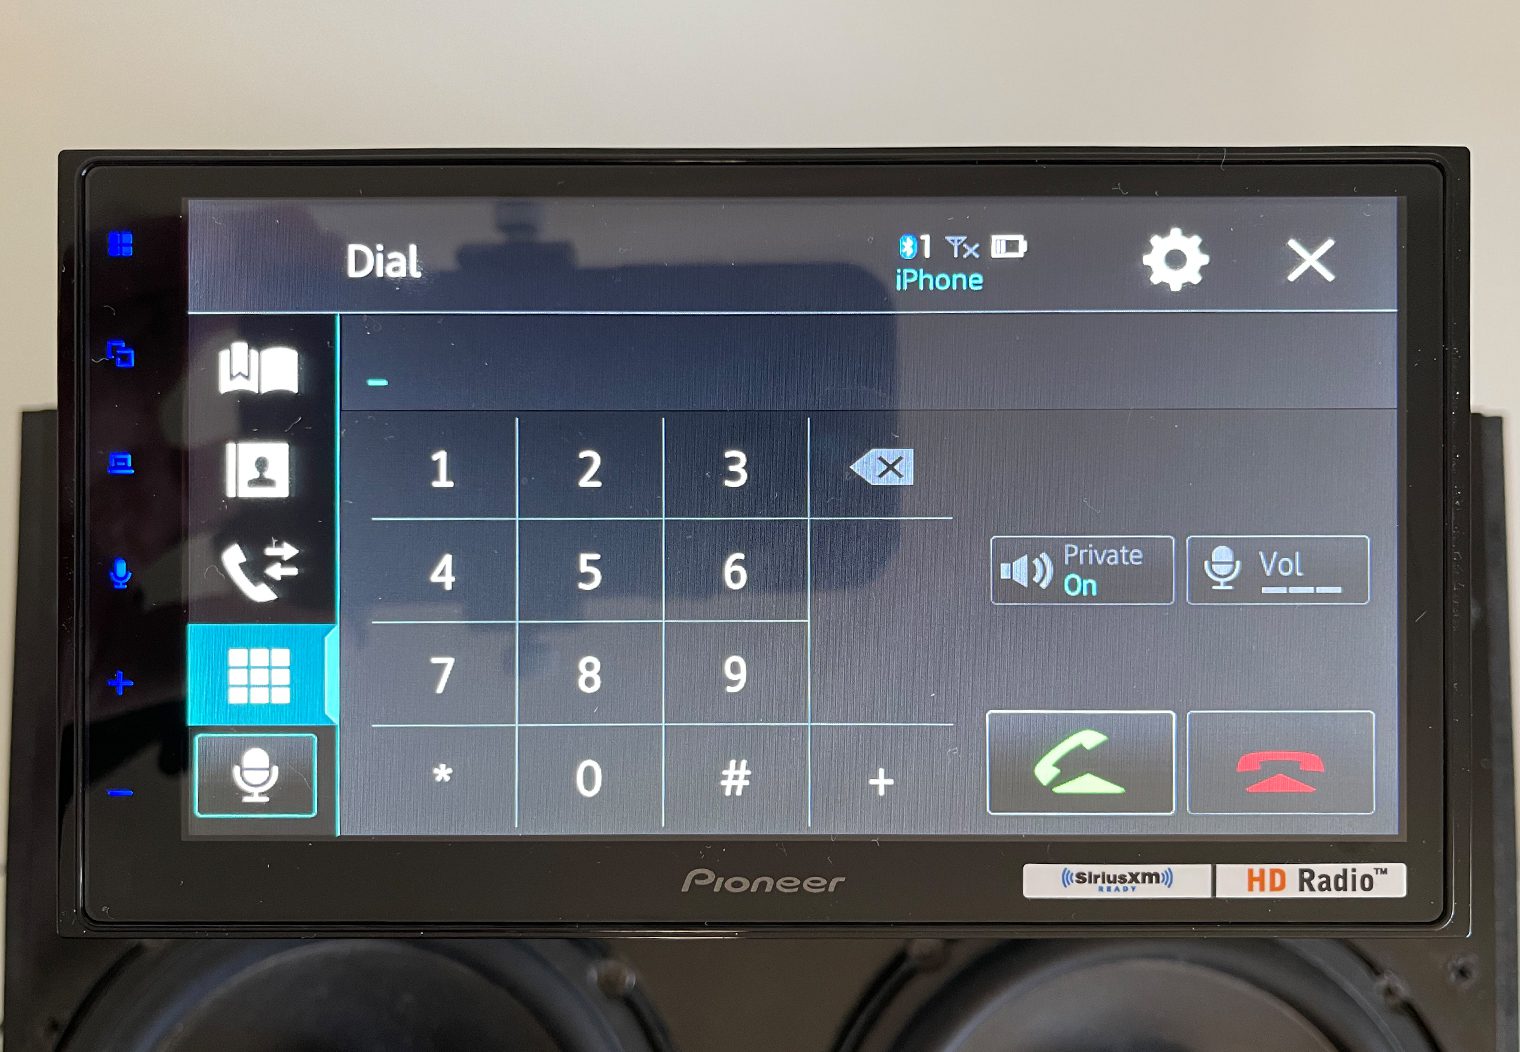
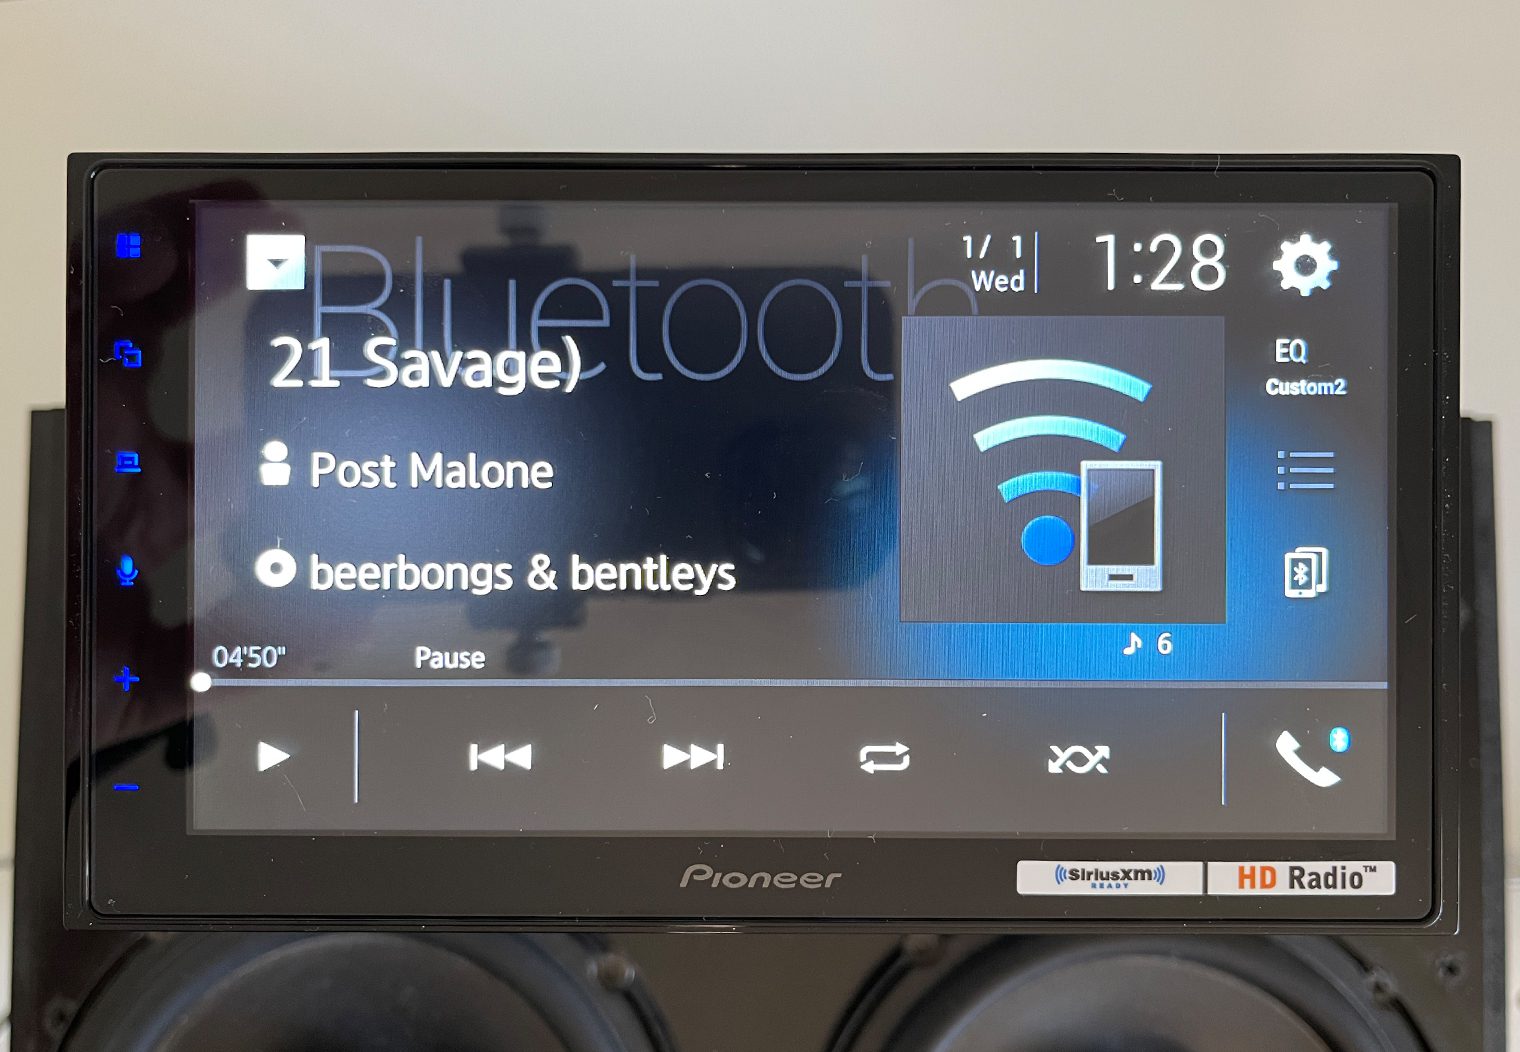
Just like almost any head unit from a reputable manufacturer these days, Bluetooth is seamless and easy on the DMH-2660NEX. You can stream music from any of your apps on your device, make wireless phone calls and more. The interface on this unit is simple to use – you can manage phone calls directly from the unit with a keypad or directly from your phonebook. And you have simple controls of streaming music like next, previous, pause play, repeat, etc. When you're streaming music you can see information like song title, album and artist too.
USB Connectivity
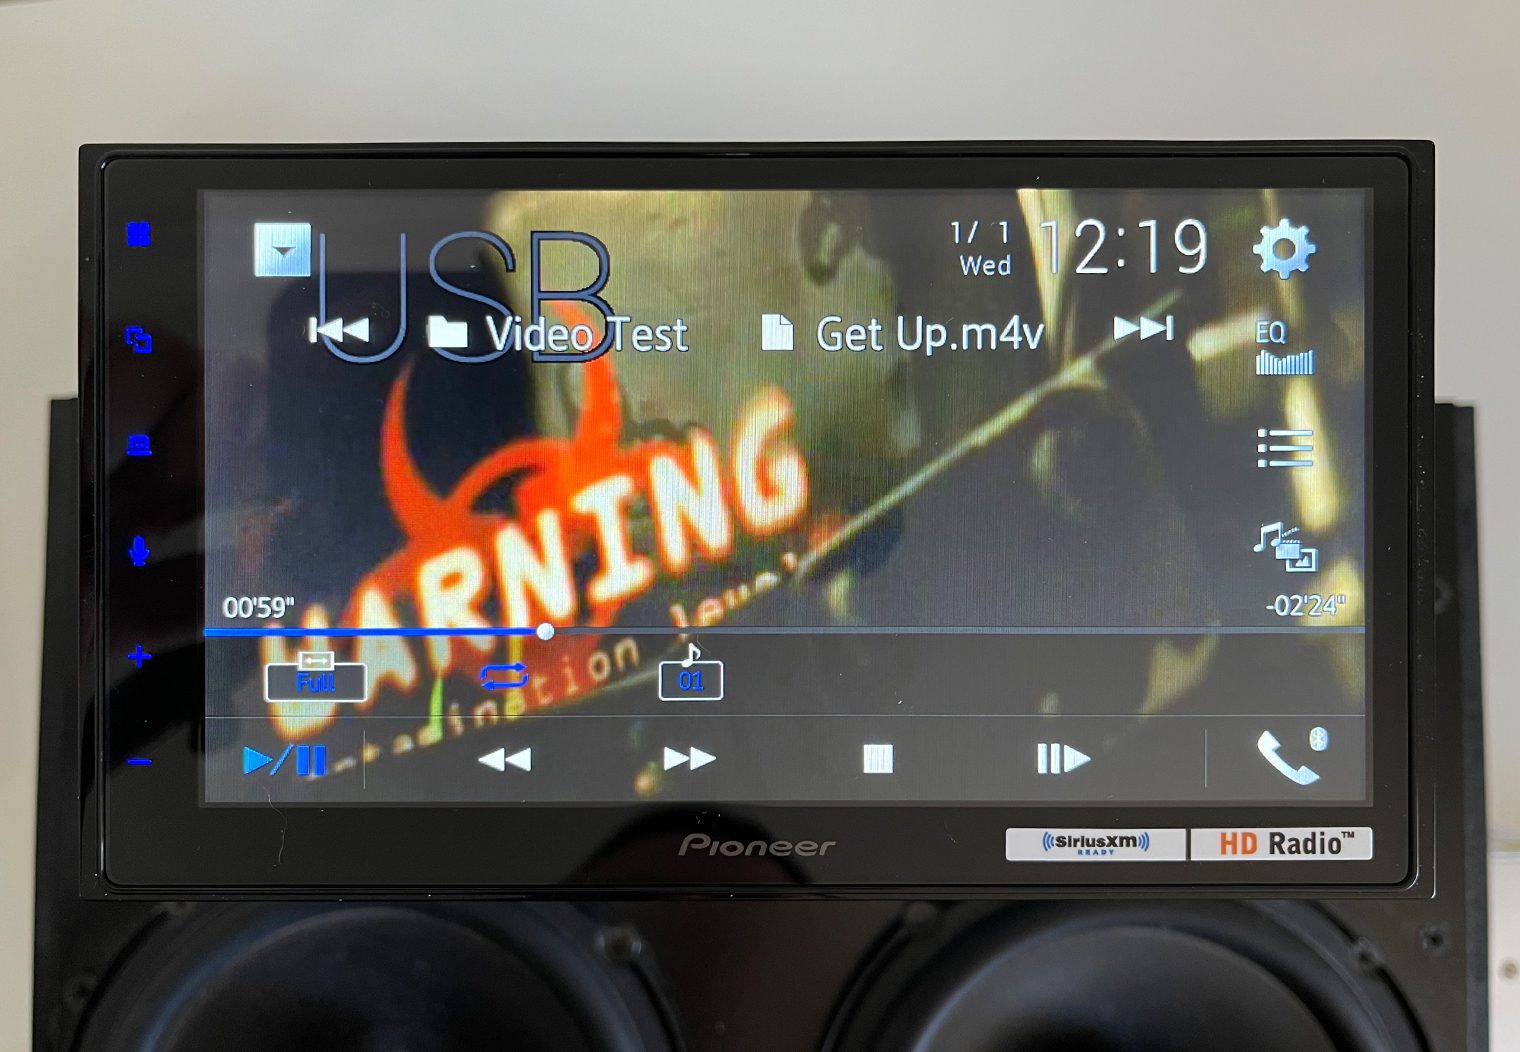
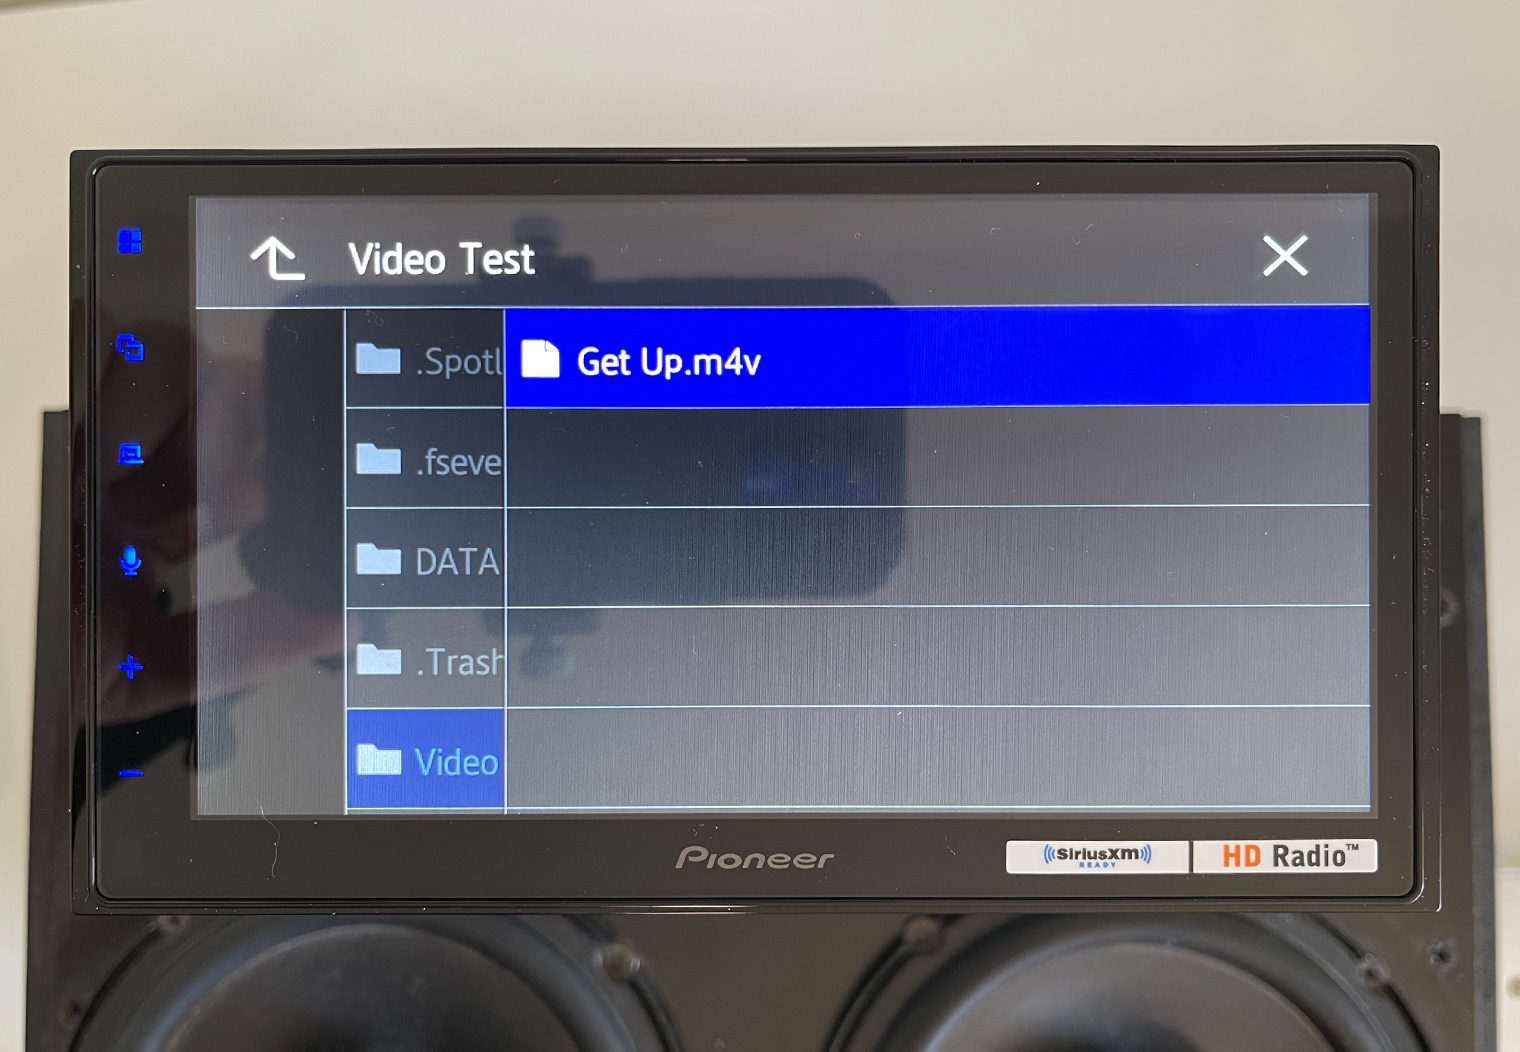
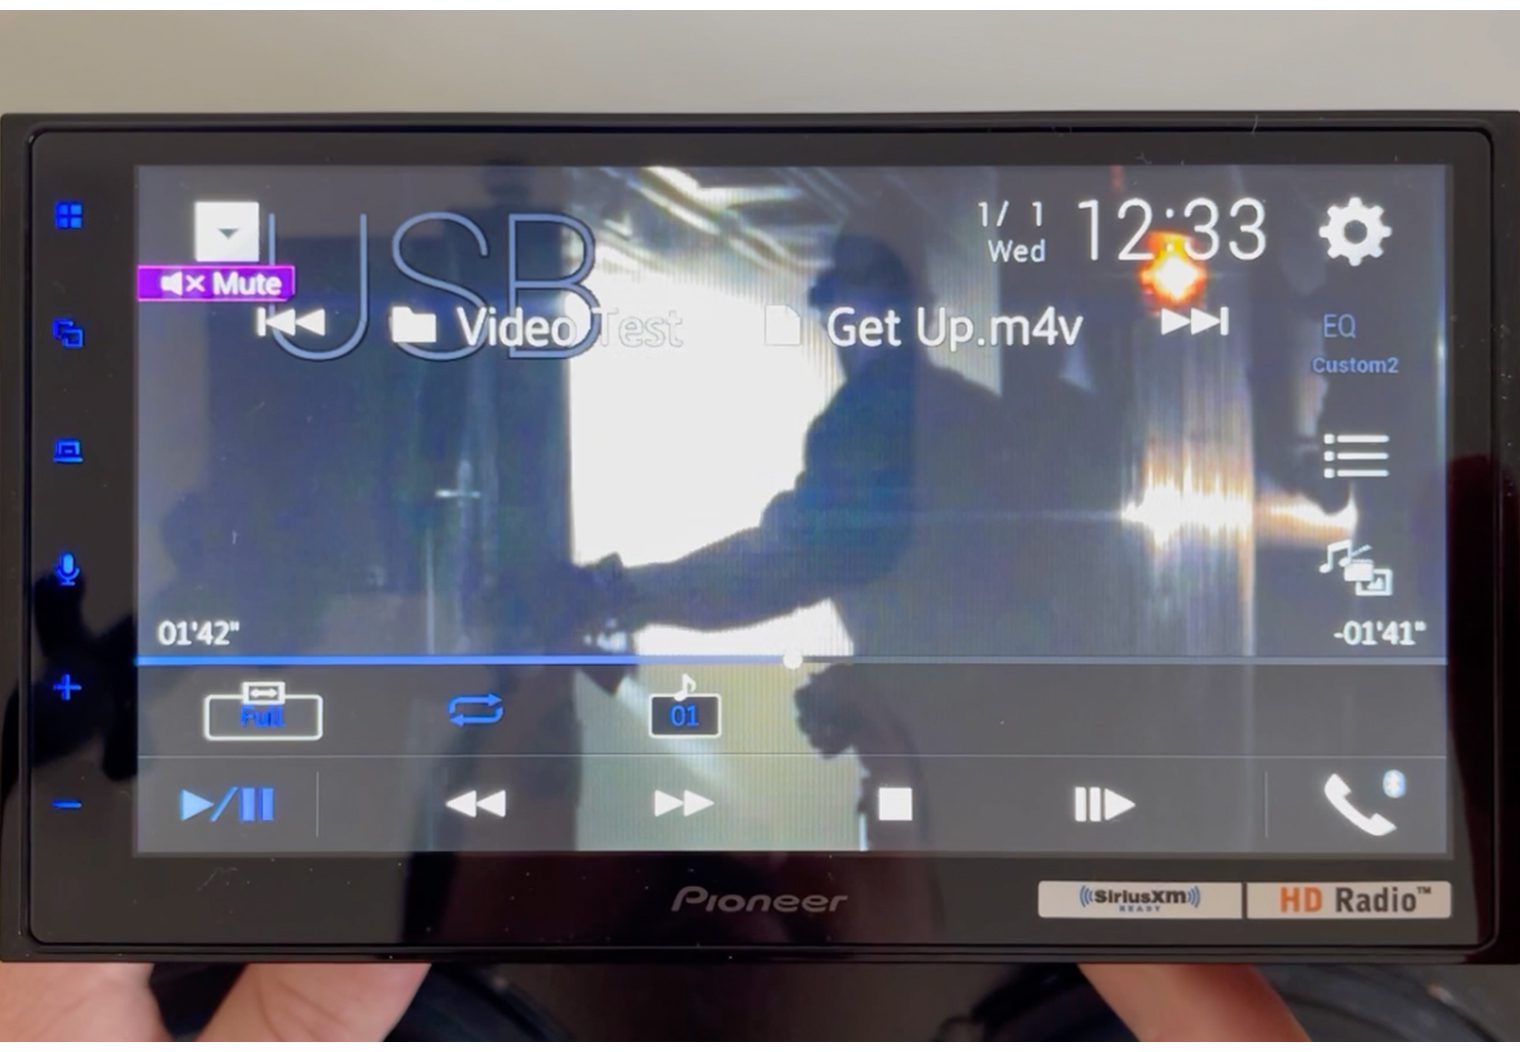
Like almost every car stereo on the market today, the DMH-2660NEX has a USB input. It'll enable you to play music from a music device/thumb drive and will also enable Apple CarPlay and Android Auto when your phone is connected. More importantly, USB is one of only a few ways that you can get multimedia and video on your screen. You'll do so by connecting a USB drive with video files loaded. I'll touch on this in more depth in the video/multimedia section in a bit. It's important to note that an iPhone is NOT a USB drive and you cannot play video on this head unit by simply connecting an iPhone that has videos loaded on it.
Video/Multimedia Features
Pioneer's DMH-2660NEX was designed as a multimedia and video head unit. It has a variety of features that are geared at turning your vehicle into an entertainment center. From the A/V inputs and outputs and USB input on the back of the unit to its video format compatibility and video playing interface. This unit is a great way to bring video directly to your dash, and then output it to additional screens in your vehicle like a headrest monitor or flipdown video player.
Video Inputs/Outputs
All of the video inputs and outputs on this unit are located on the back.
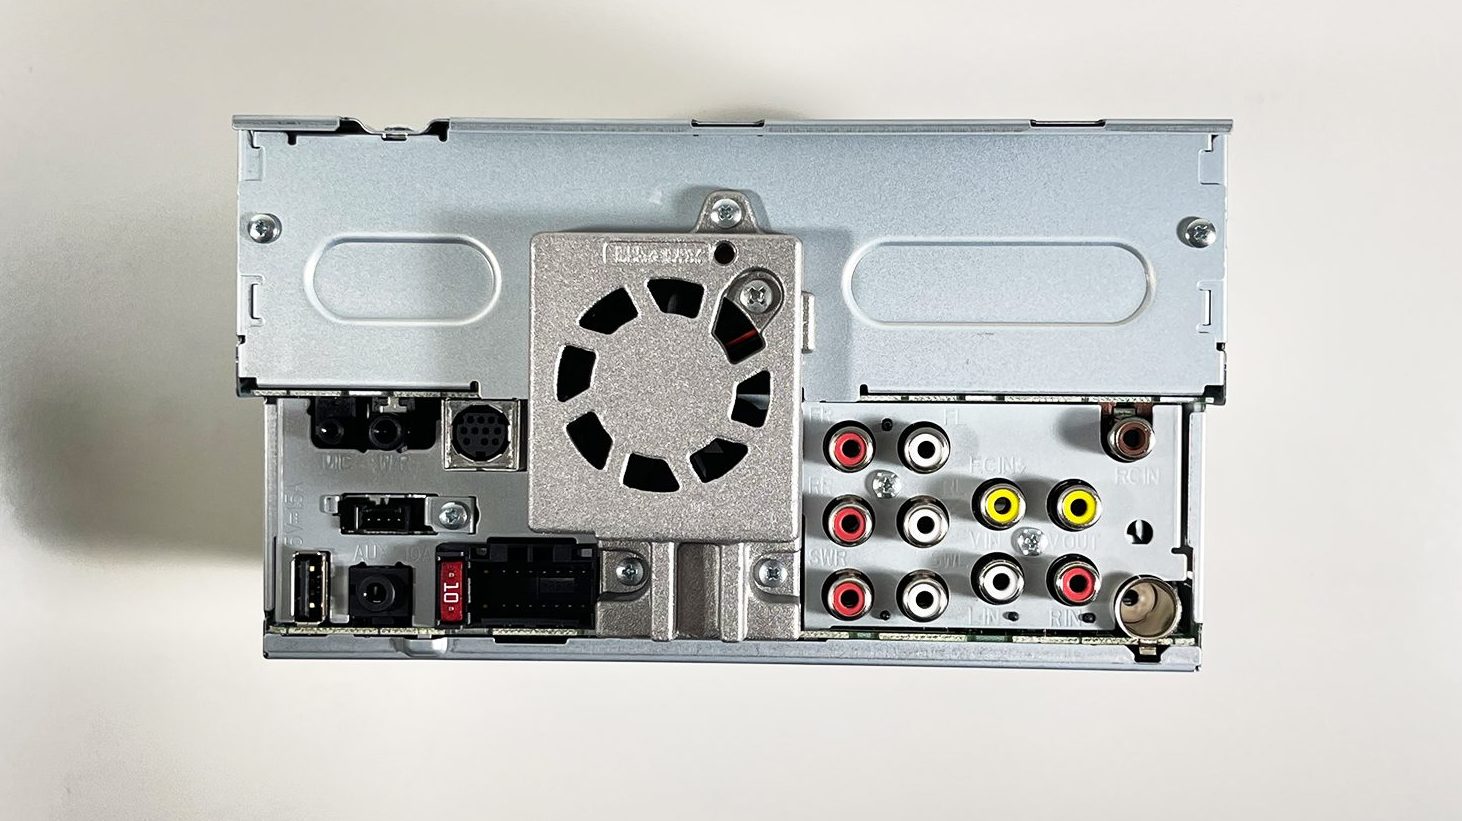
If you're looking to add multimedia or video inputs to the 2660NEX, you can do so in three ways:
- Via the A/V inputs (RCAs) on the right hand side. This is the most universal way to add a video source to the unit. If you have a console, or other video source that comes with A/V connectors, simply connect them to the back of the unit. Or, if the video source you're looking to connect has an HDMI cable you can always purchase an HDMI to A/V Adapter which will adapt any HDMI video cable or source into the proper A/V RCAs that will plug into the back of the unit. With the adapter, you can plug in things like a Firestick, Game Console, Apple TV – anything that uses HDMI.
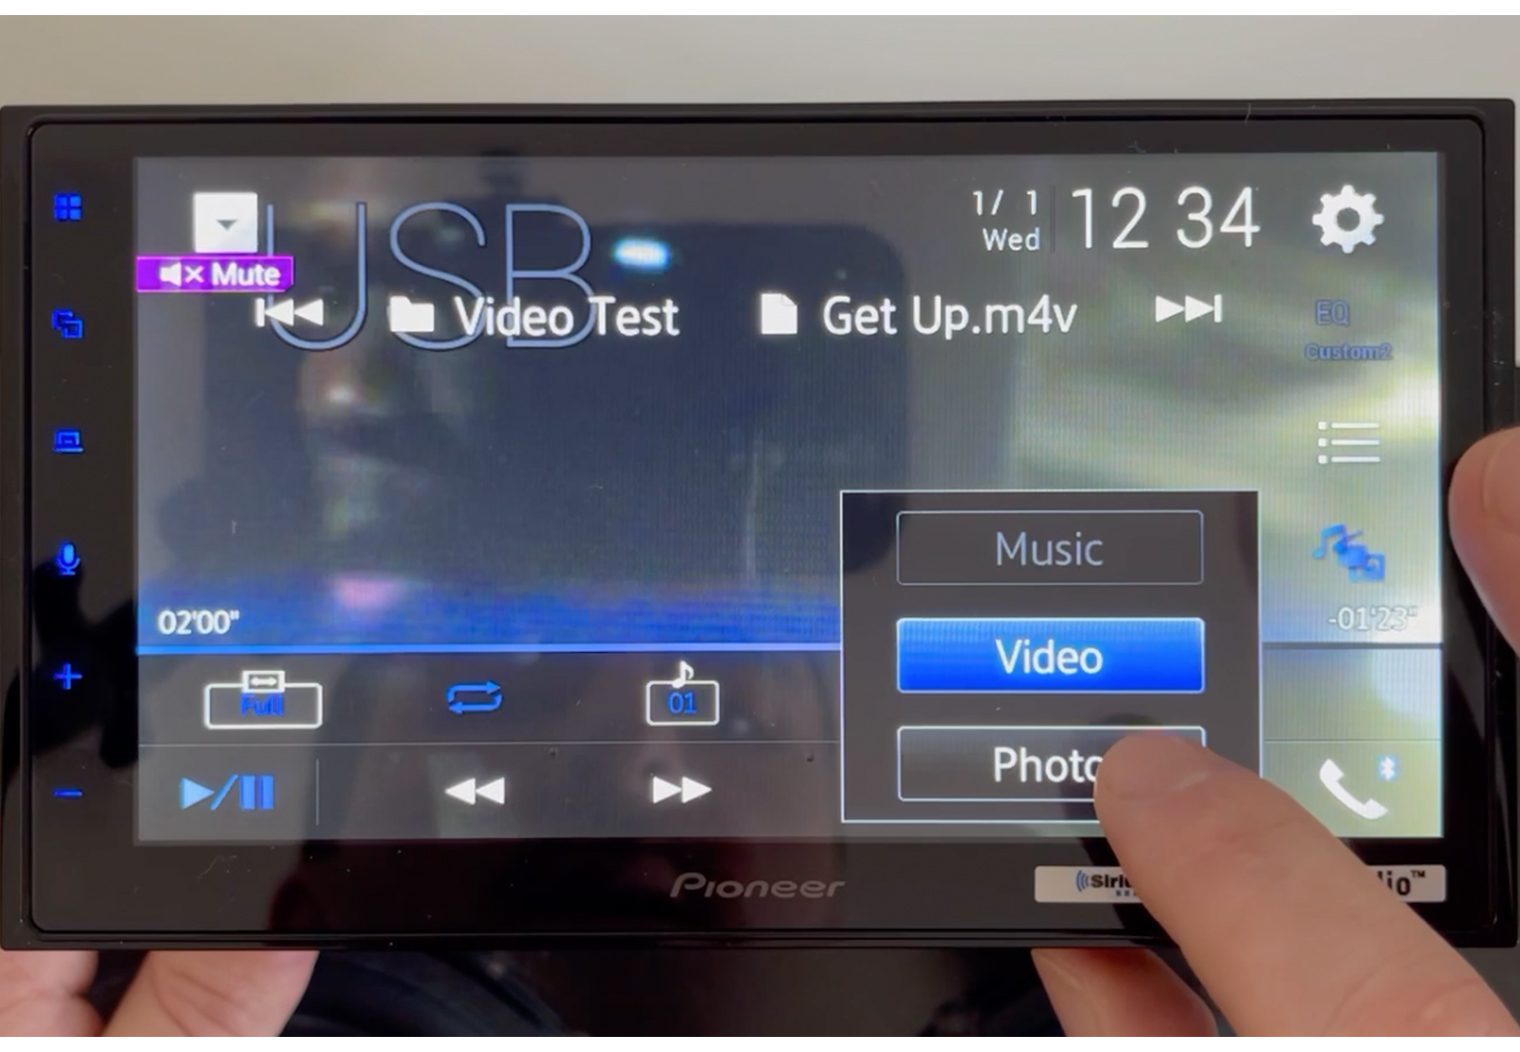
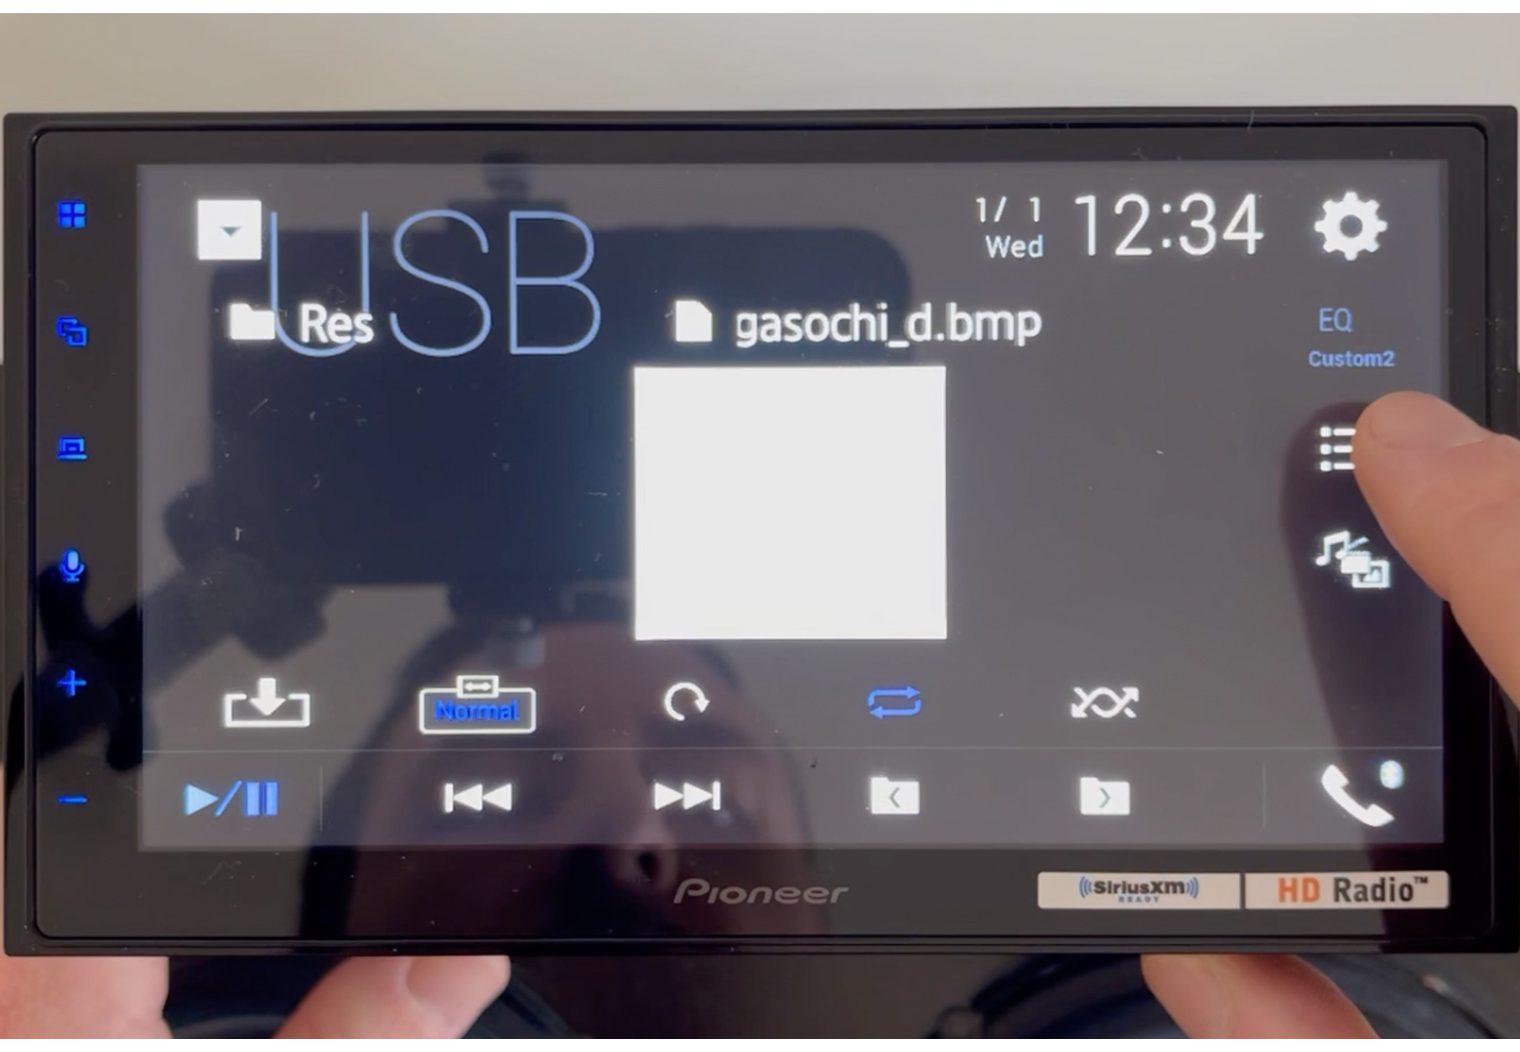
And if you're looking to mirror your screen, you can always purchase the HDMI to A/V Adapter plus the Lightning to HDMI Adapter to play video or just mirror your iPhone on your head unit for around $50. - Via the USB input on the left hand side. If your preference is a USB drive and you have audio or video on a USB hard drive or thumb drive, you can plug your drive into the unit and select the USB source. It'll allow you to interchange between audio, video or images and provide full navigation of the file structure on your drive. Compatible video files include: DivX, MPEG2, MPEG4, MKV, MOV, FLV, WMV, AVI. Compatible audio files include: MP3, WMA, AAC, WAV, FLAC. And compatible video files include: JPEG, PNG, BMP.
- Via WebLink's YouTube app. You'll need to download WebLink's app on your phone, connect your phone to the unit via DVD and then navigate to YouTube. I would recommend option #1 over WebLink though. WebLink has always been clunky and slow for me.

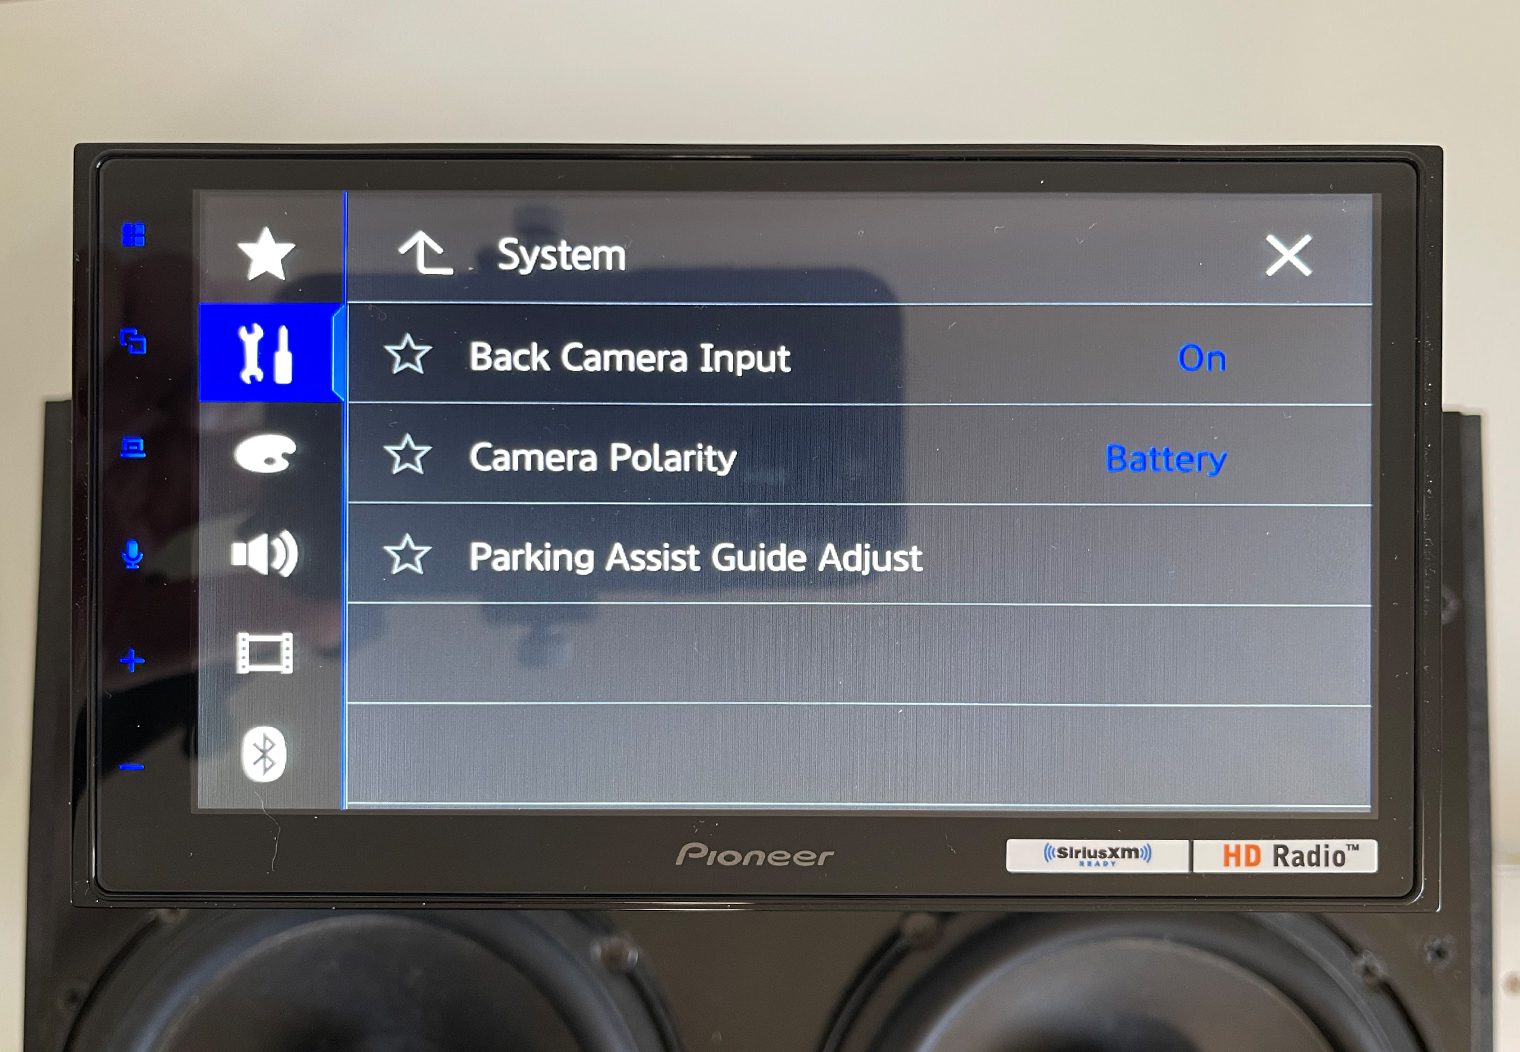
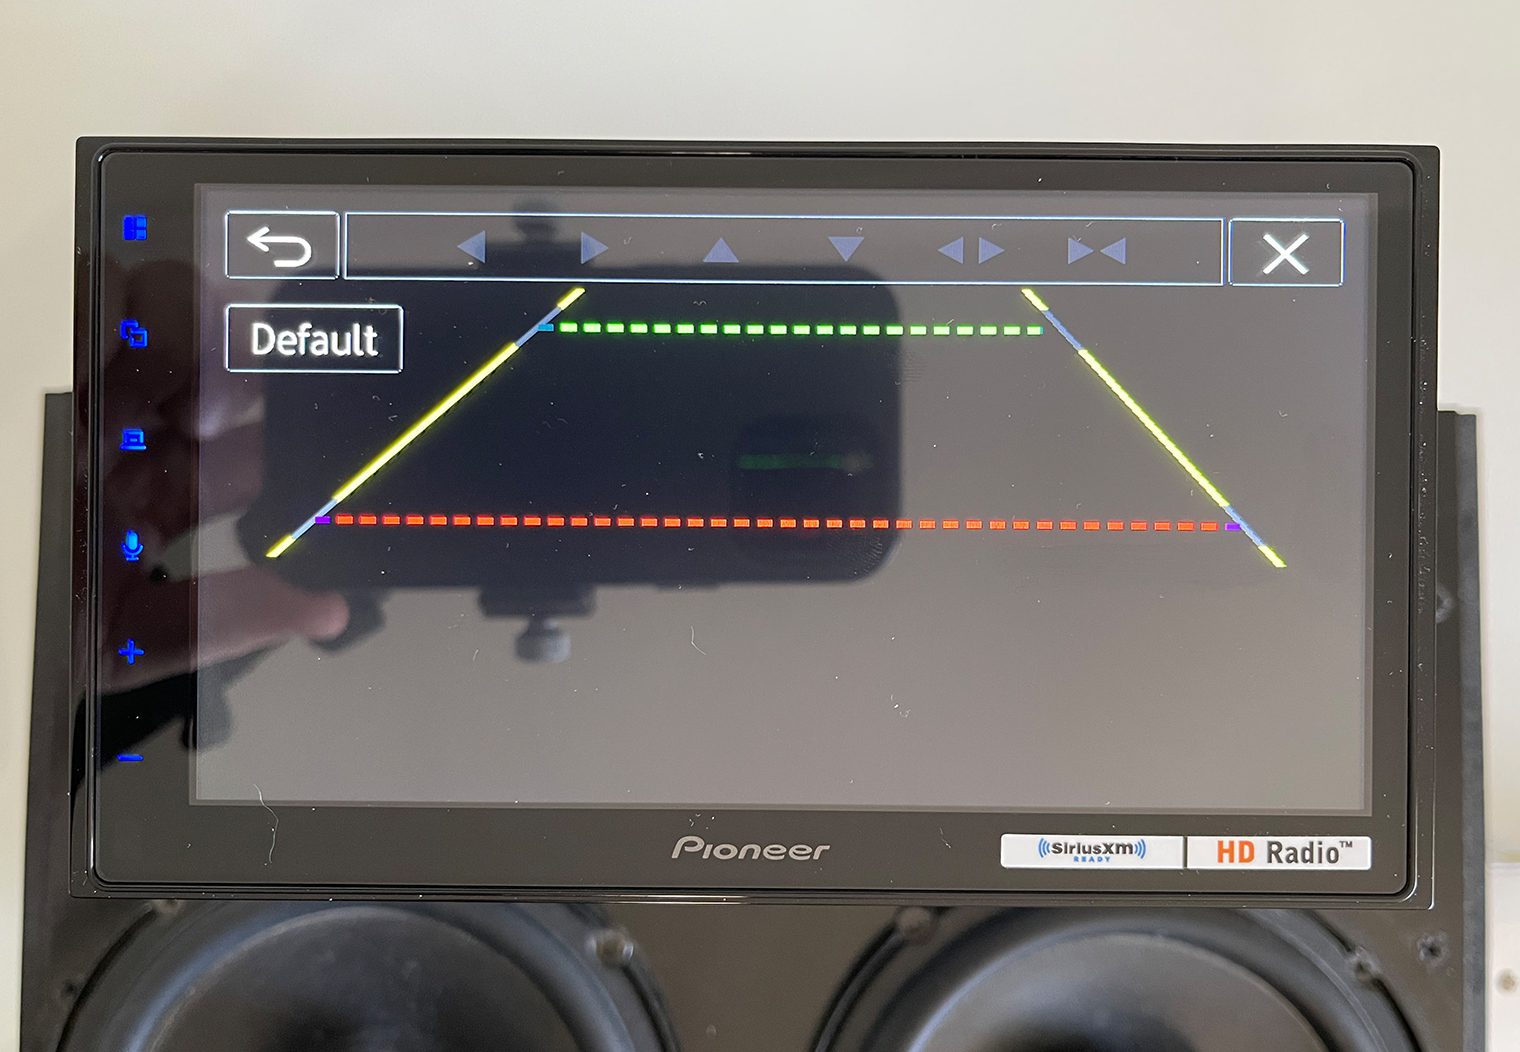
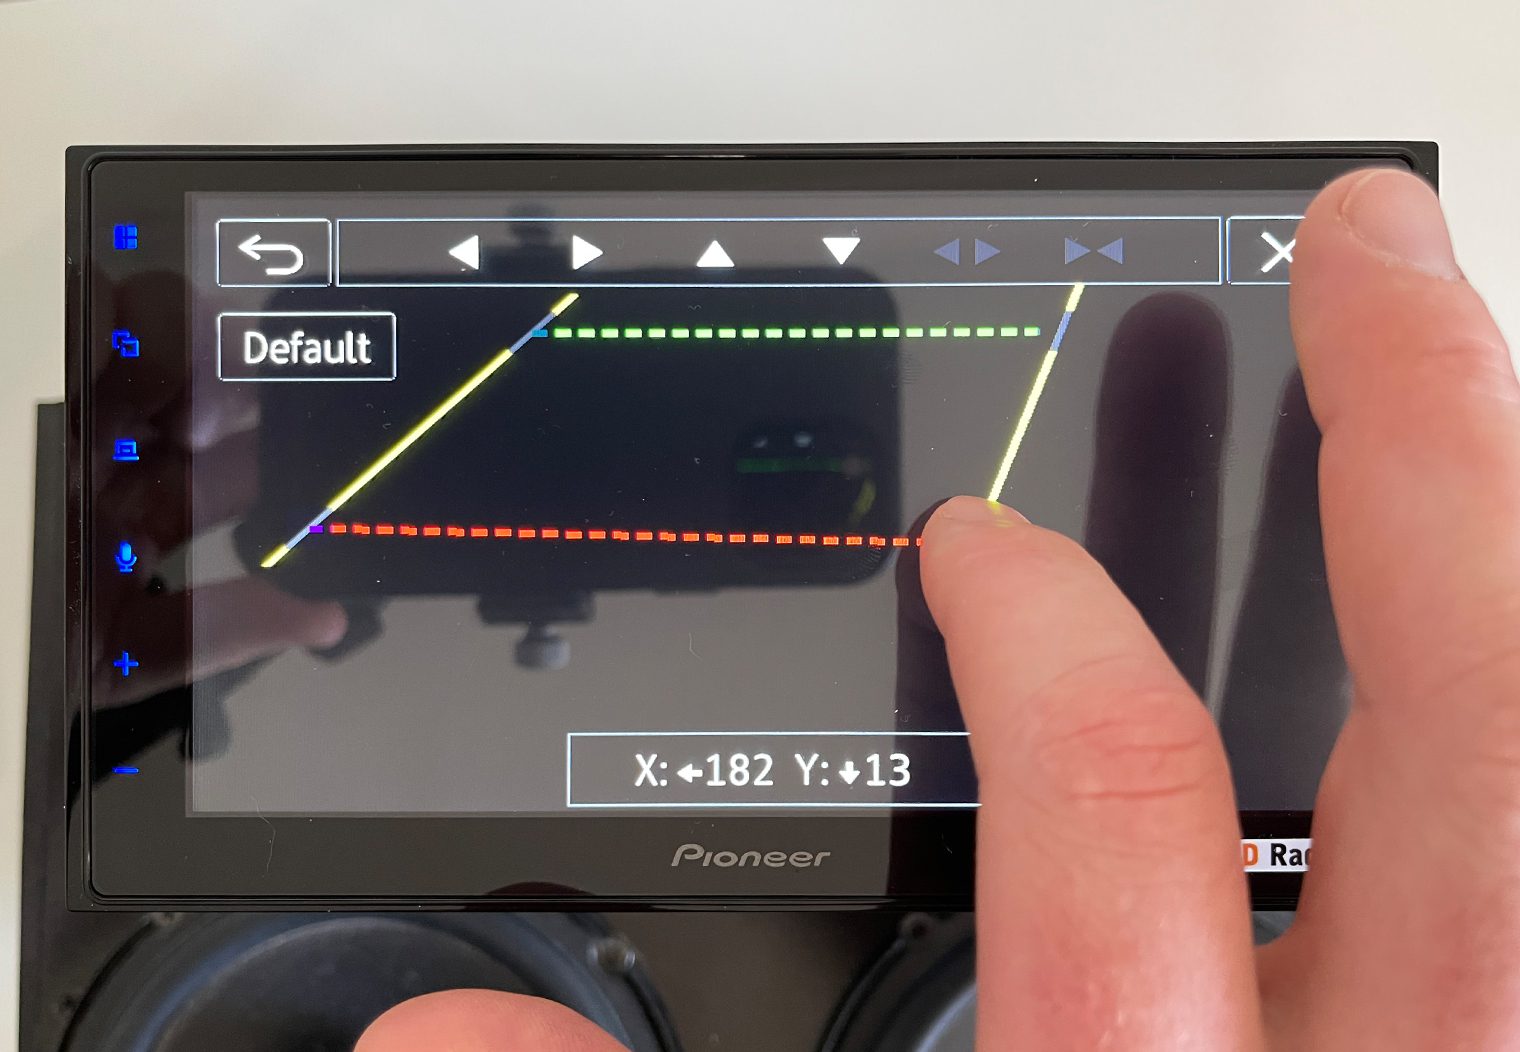
In addition to the video inputs, it also has a backup camera input if your vehicle has one, or you're looking to add an aftermarket backup camera in the future. To leverage the backup camera feature you'll need to plug the video RCA into the back of the unit and then wire up signal to the corresponding wire in the harness to tell the unit when you're in reverse. It also has the ability to customize your reverse guidelines to tailor it to the size of your vehicle and position of your camera.
The only thing that's missing on this unit in terms of multimedia and video inputs is an HDMI input. Many of the newer units are incorporating them, including some of the higher end Pioneers. So if you're looking for a video head unit that has an HDMI input, you'll need to consider one of the higher priced Pioneers or other brands.
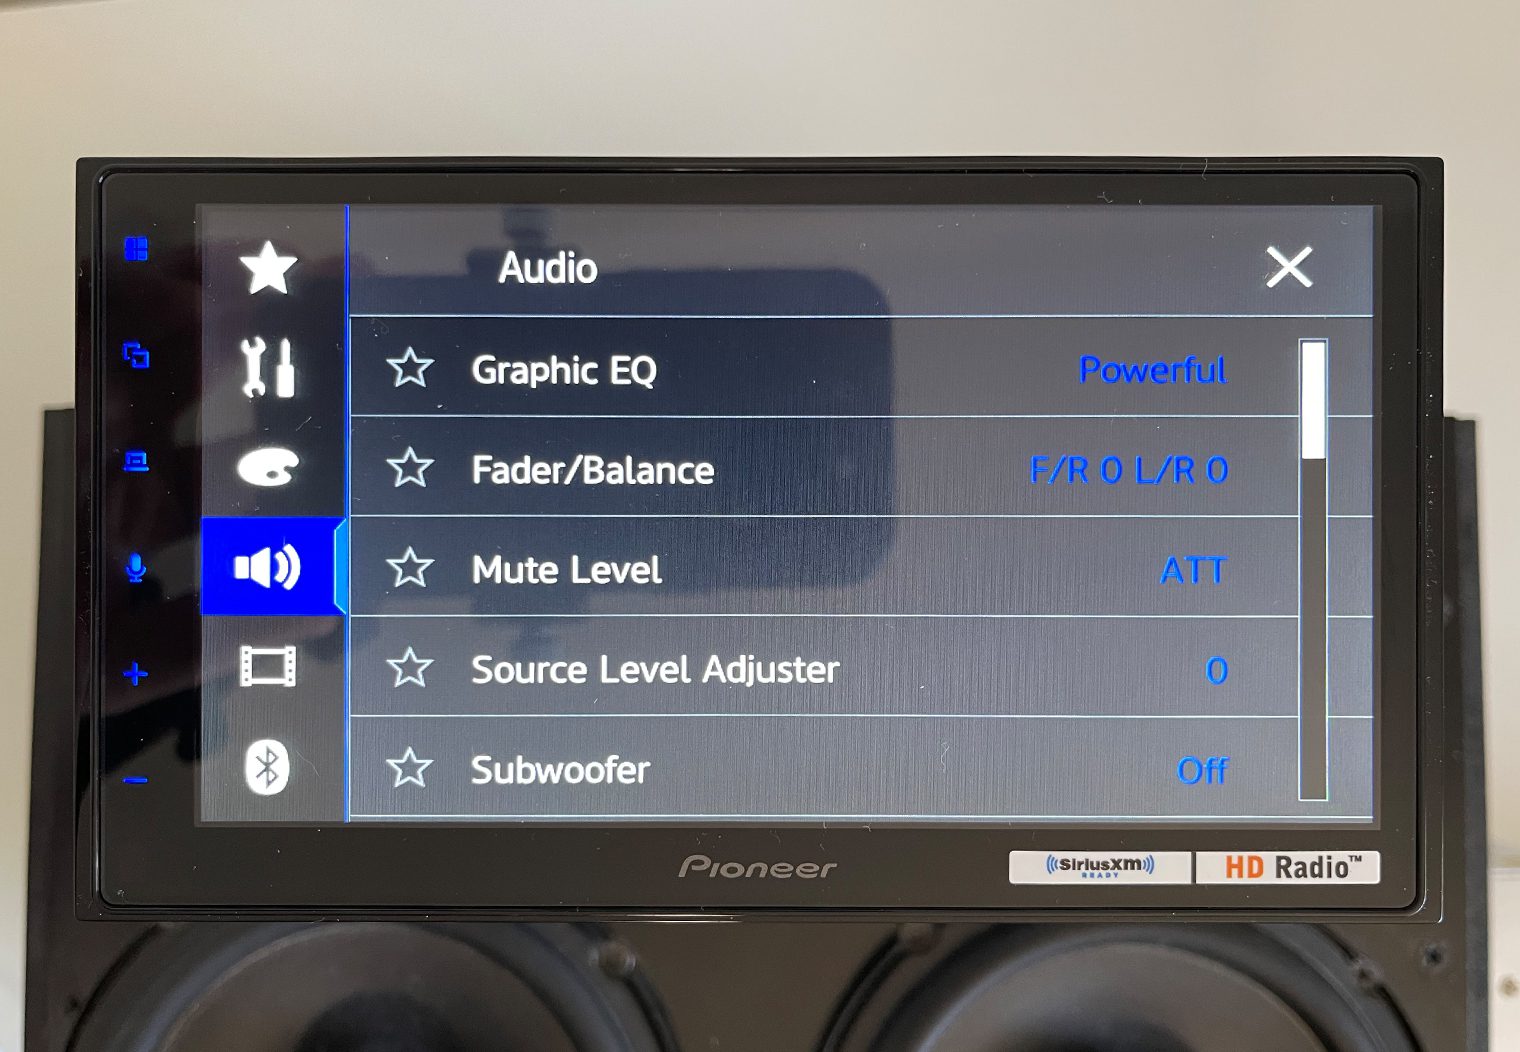
Audio/Sound Features
The DMH-2660NEX has some very nice and powerful audio features too that are great for both OEM systems and aftermarket. For those looking to simply swap the head unit out and power your speakers with the head unit's built-in amplifier, you can expect 14 watts RMS x 4, which is a little low in comparison to other units. If you're looking to add a car subwoofer or otherwise add aftermarket amplifiers to power your system, the 2660NEX has you covered as well with its 4V front, rear and subwoofer RCA preouts.
Whether you chose to use the built-in amplifier or an external one, there are some key audio features on the head unit that will allow you to tailor/tune your sound the way you want it.
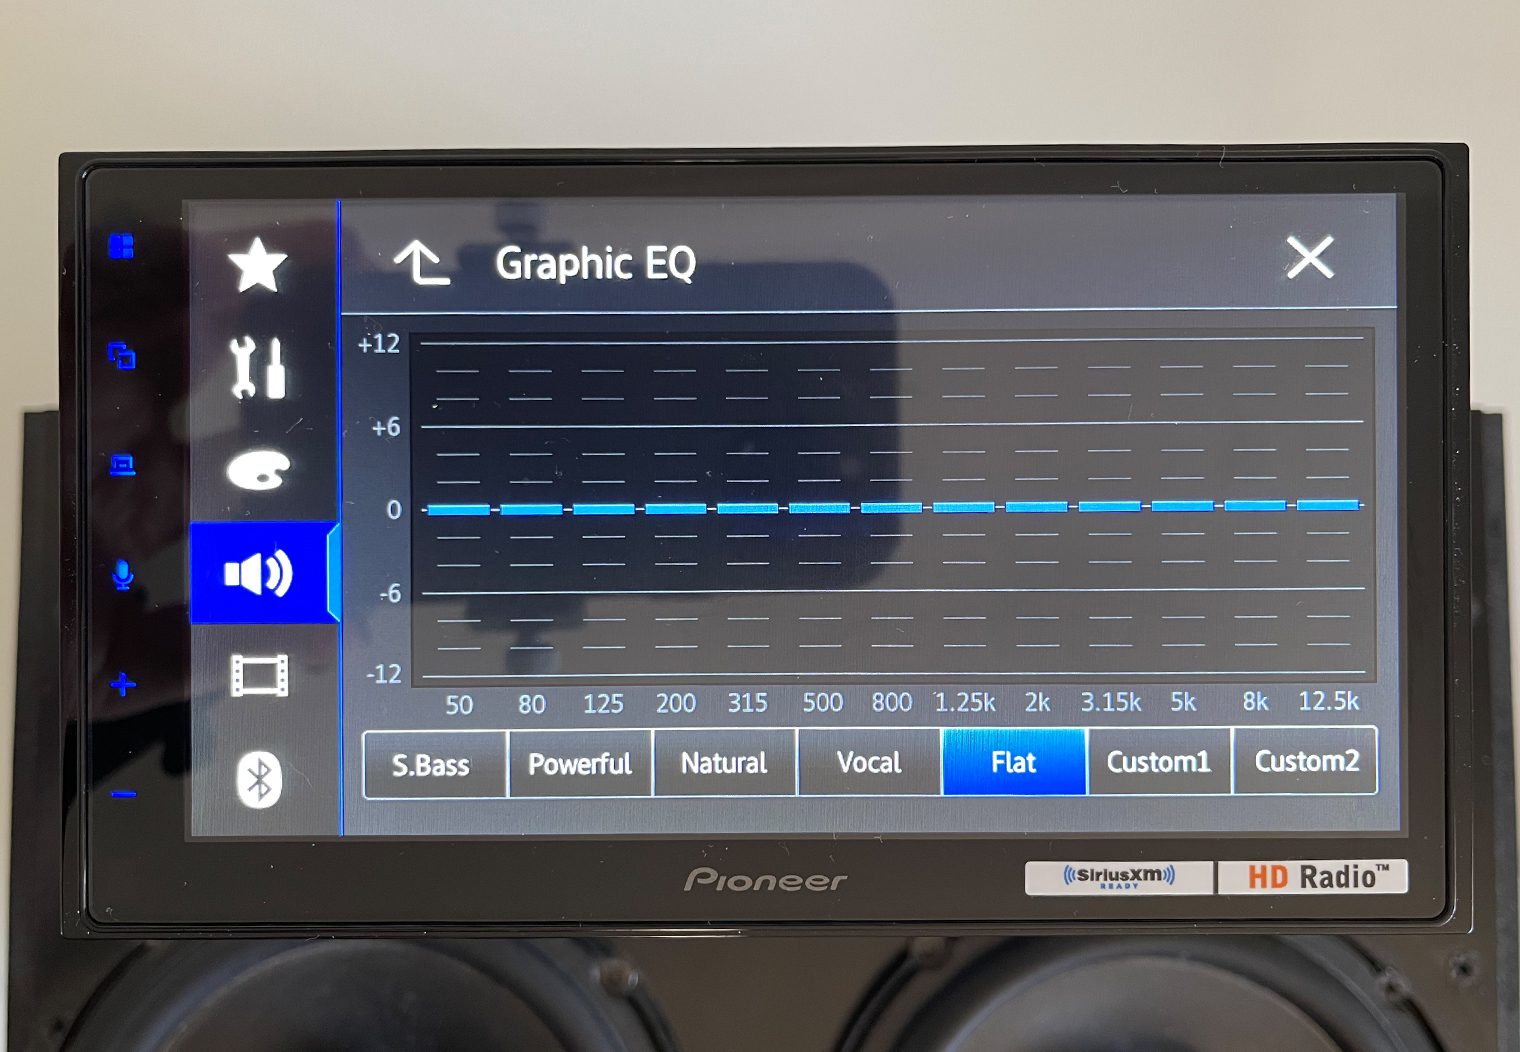
13-Band Graphic EQ
This unit features a 13-band graphic equalizer. The more bands that the EQ allows you to adjust, the more accurately you can tune the sound to the music that you love. So having 13-bands will give you much more control over your music than lets say an 8-band.
Graphic EQs basically mimic that of old traditional EQ with manual sliders for each band, just build into a graphic user interface. They operate the same though. The EQ interface on this unit is intuitive and easy to use.
To start, you can choose from a variety of presets that include Powerful, Vocal, Natural, Flat or S.Bass. This will probably cover 50% of users that would like to tailer the sound a little bit. Depending on the type of music you're listening to, you can select the preset that sounds best while a song is playing
Here's a look at the graphic EQ and its presets.
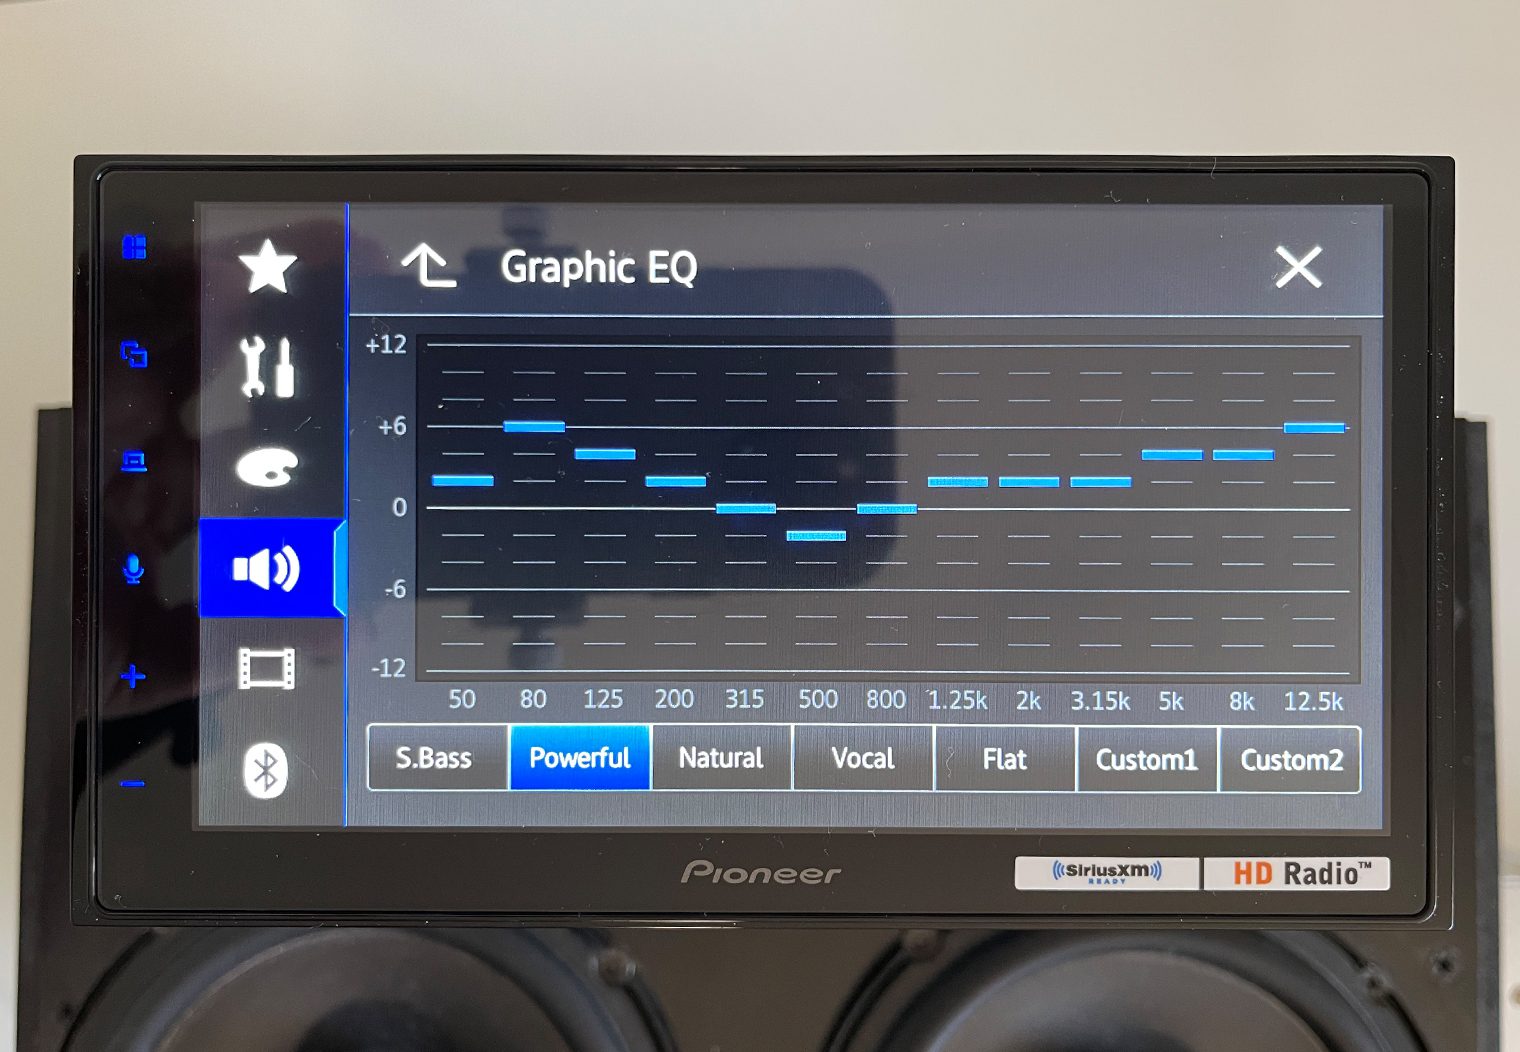
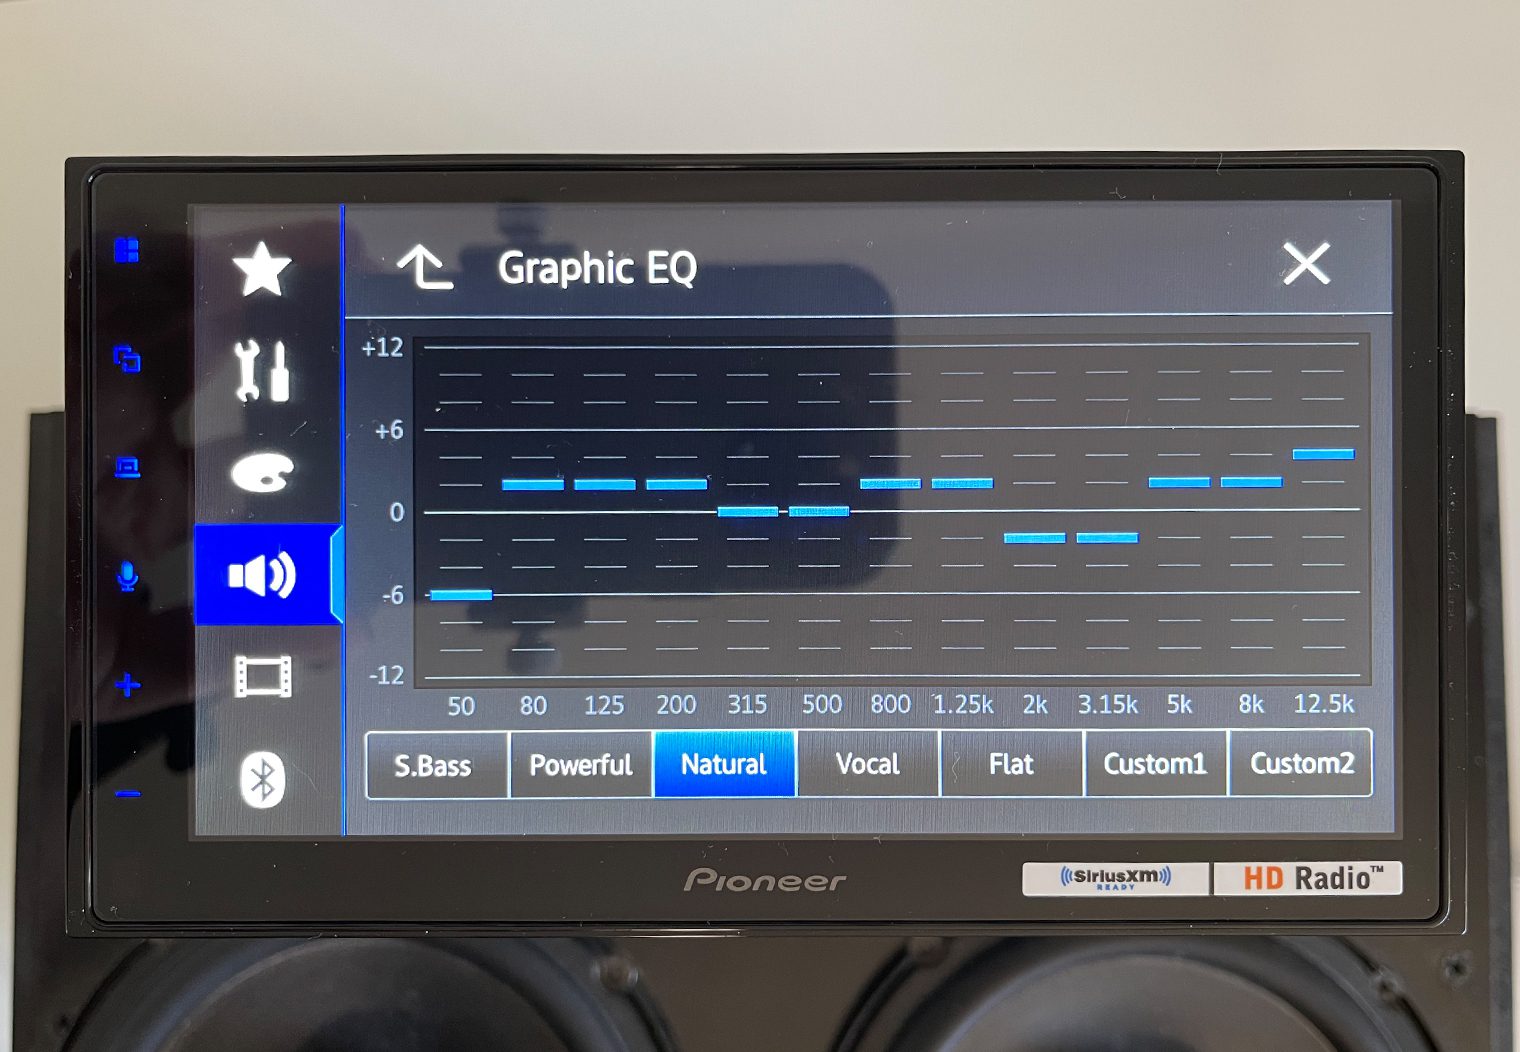
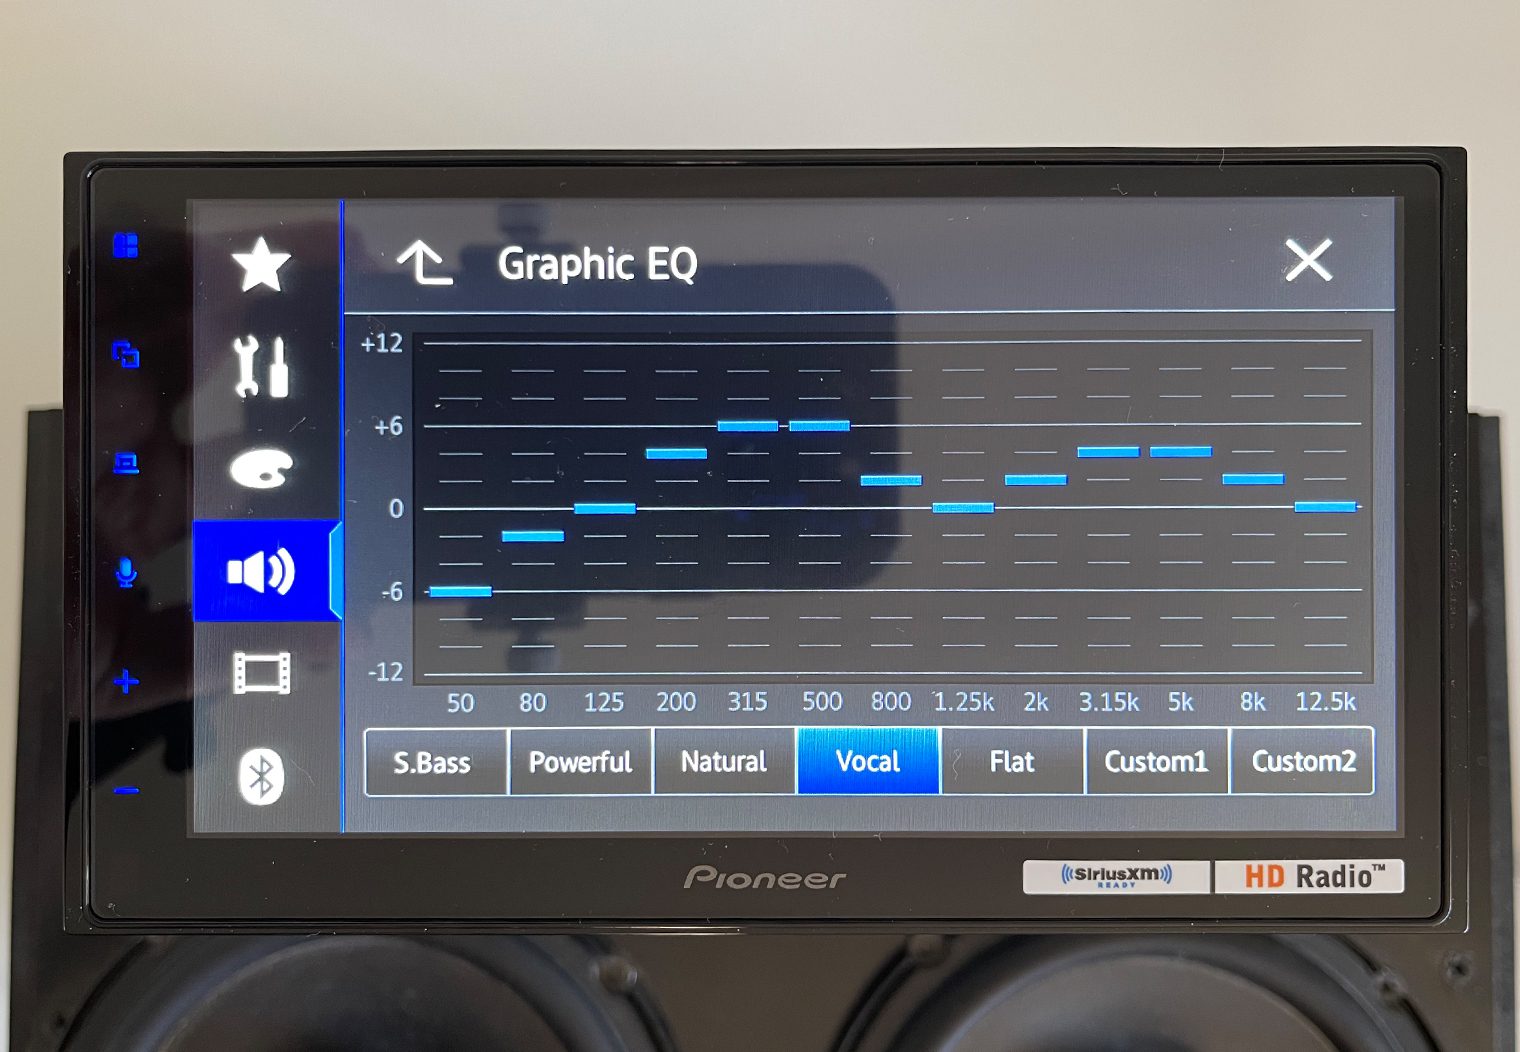
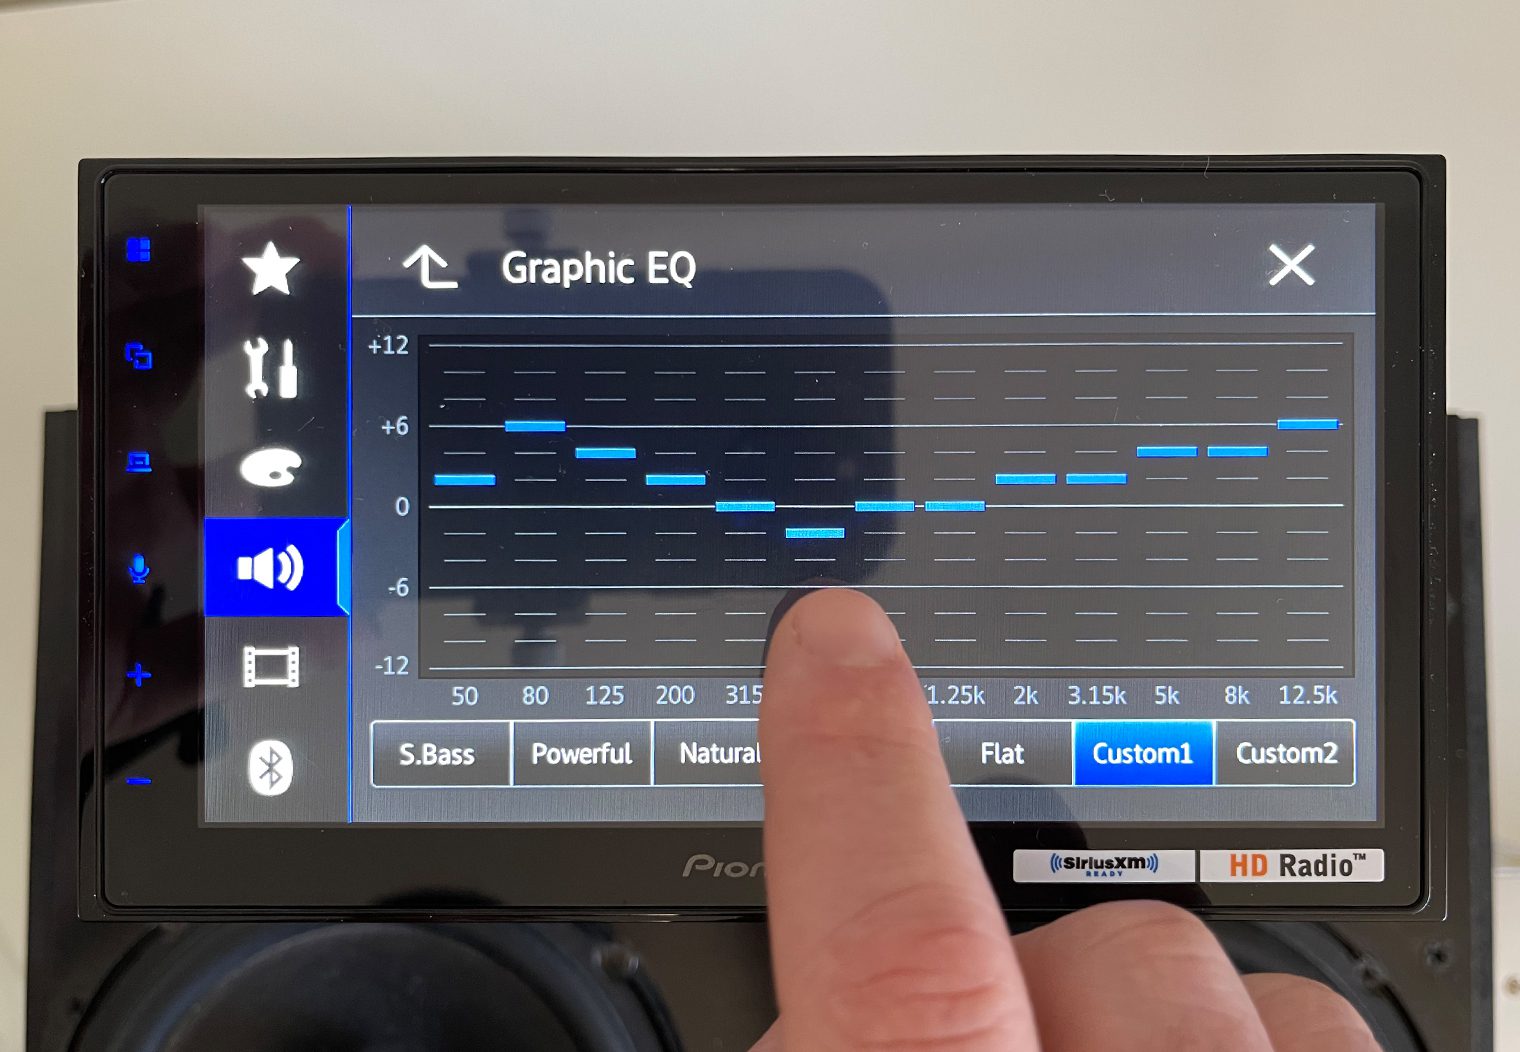
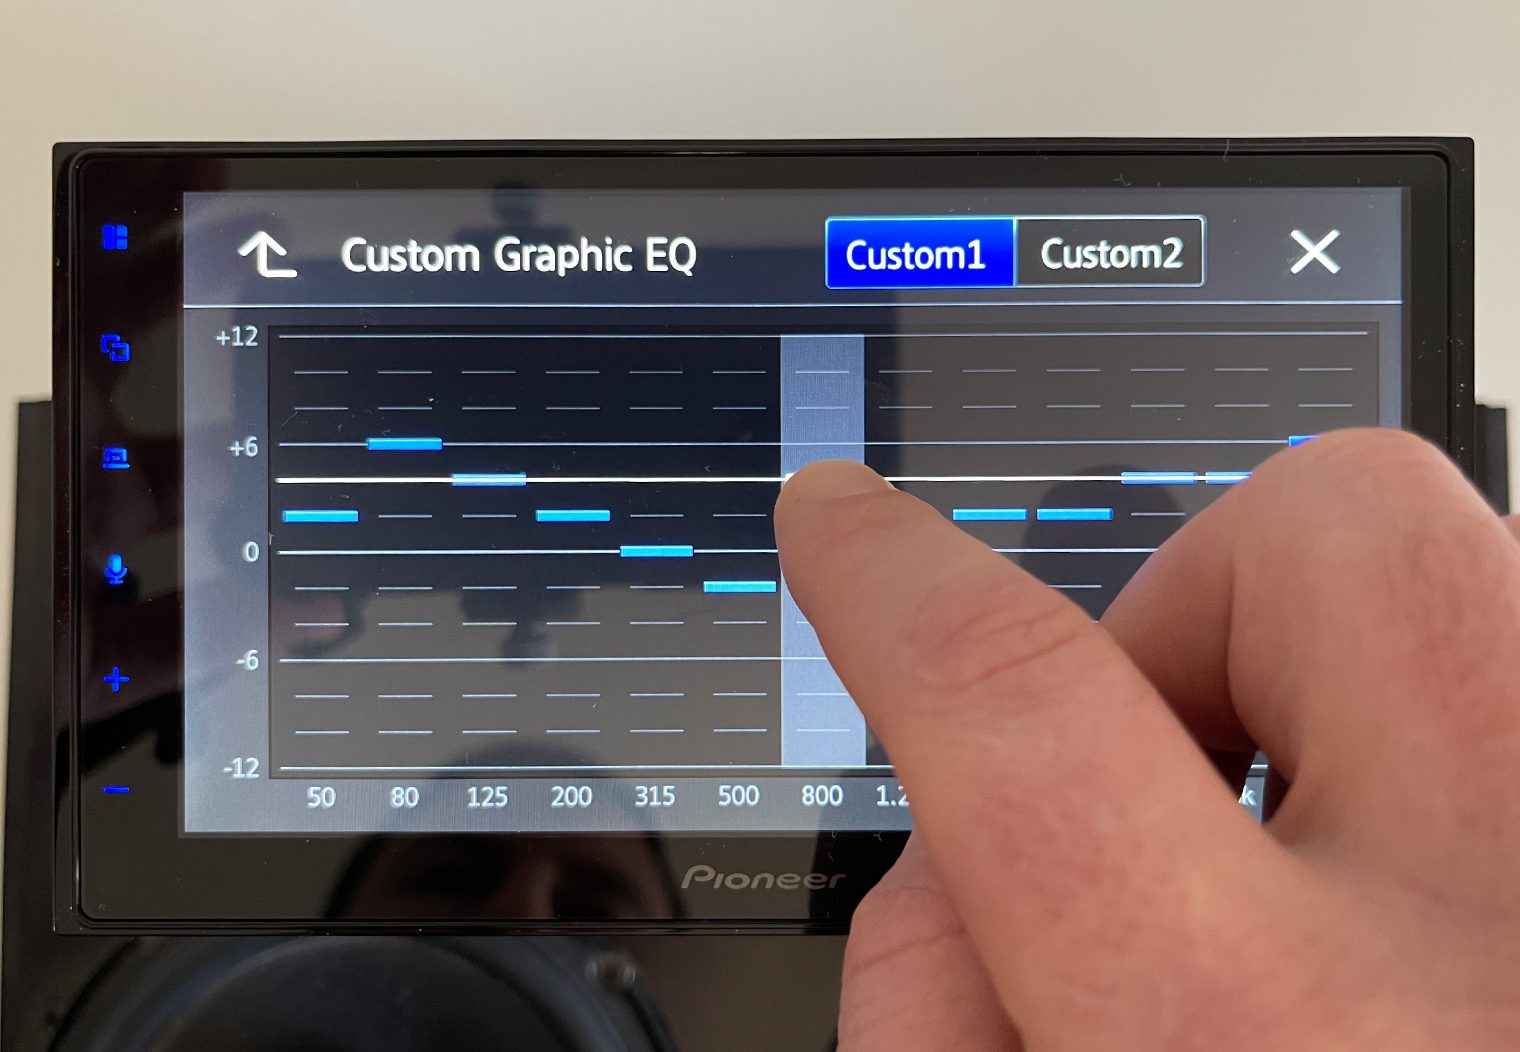
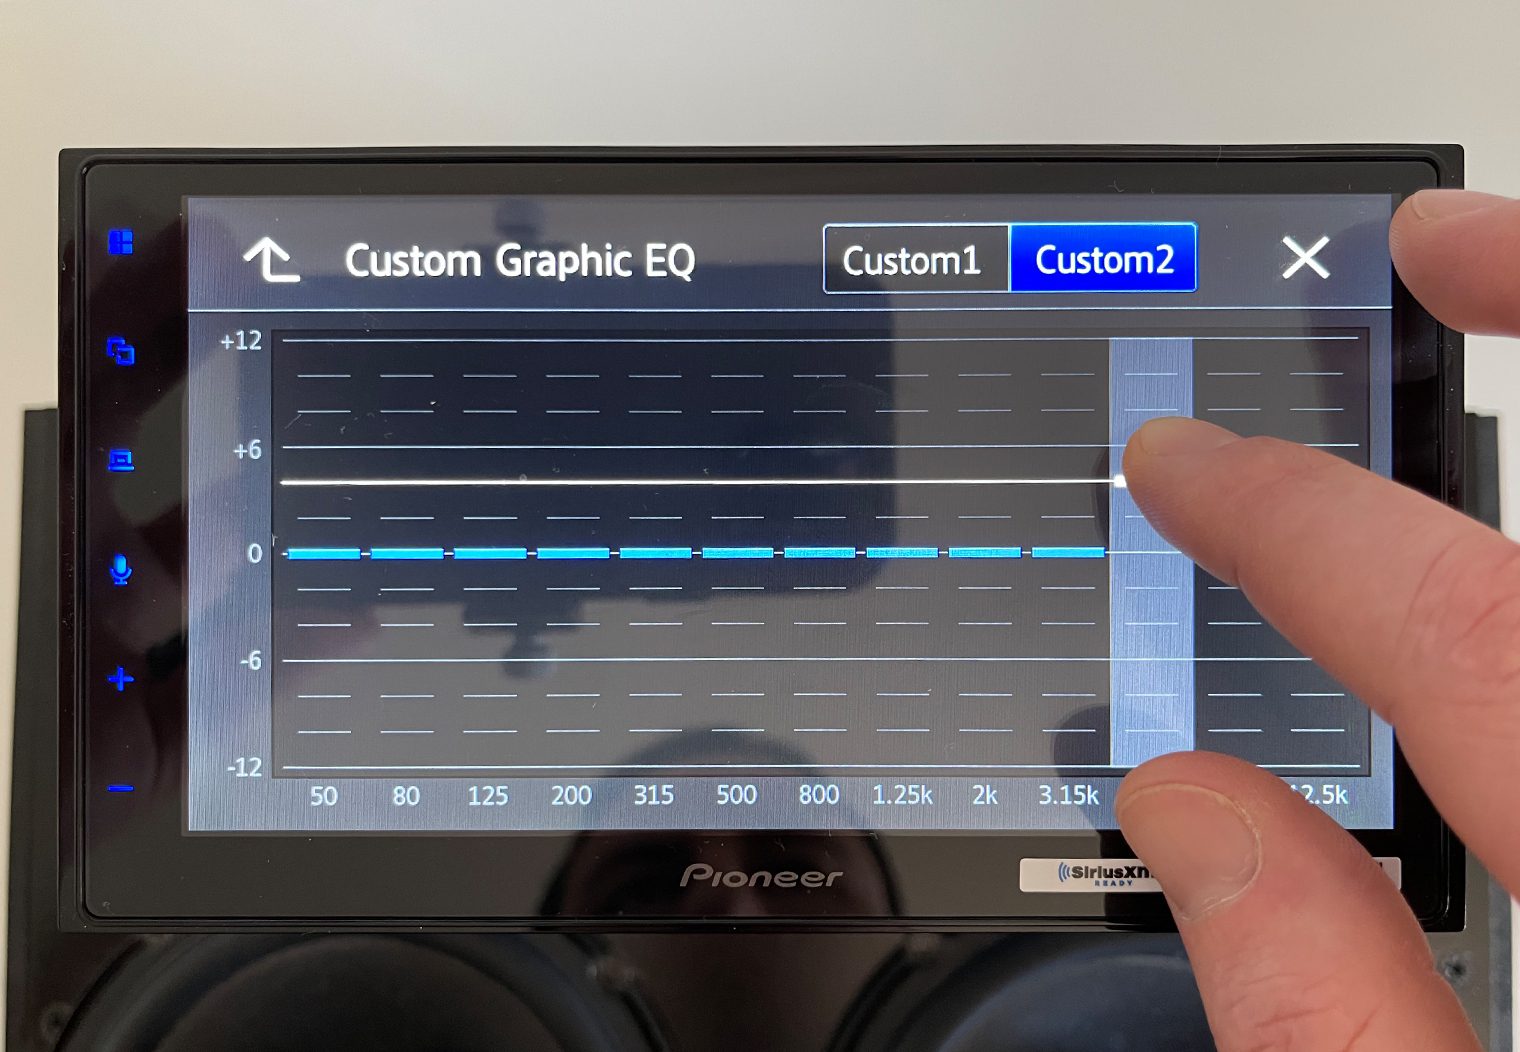
If you want to create your own custom EQ configuration, you can either start with one of the presets that's close to what you like and adjust it by clicking and dragging one of the band adjustments. Or, you can start fresh with a flat EQ and build from the ground up. You can create two separate custom EQ configurations too, which is actually a nice feature-add over some of the competing head units that only allow one custom EQ config.
To adjust a frequency band, use your finger to tap and drag each of the band adjustments to the level that require adjustment. Here's a few snapshots of what it looks like to adjust the EQ.
Crossover Control
For those who would prefer to tune the high pass and low pass filters directly from the head unit rather than on the amplifier, the DMH-2660NEX offers a pretty advanced crossover control feature that will allow you to tailor each preout channel independently. This includes the front, rear and subwoofer.
If you who aren't familiar with high pass (HPF) and low pass (LPF) filters, basically these are frequency filters that will set a ceiling or floor on the frequencies that are passed in the signal to your amplifiers. For example if you want to set a frequency floor for your car speakers because you have either a set of 6x9s that can better cover the mids or a subwoofer that can cover the lows, the HPF will allow you to filter out all of the frequencies below your selection (e.g. 100hz).
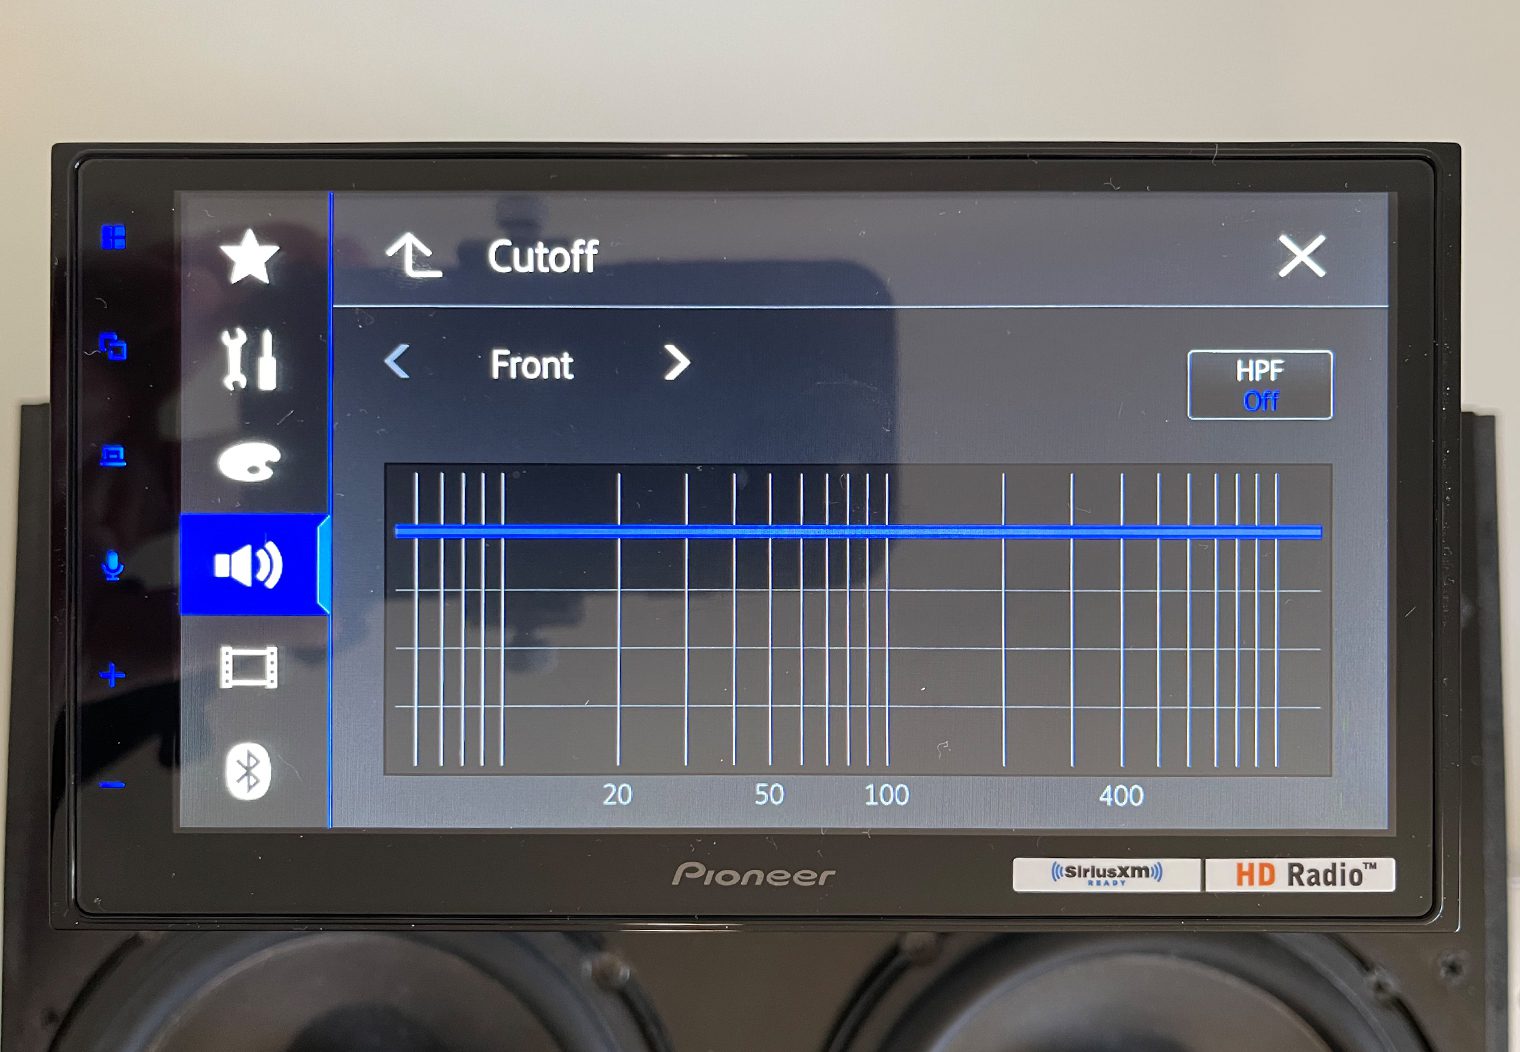
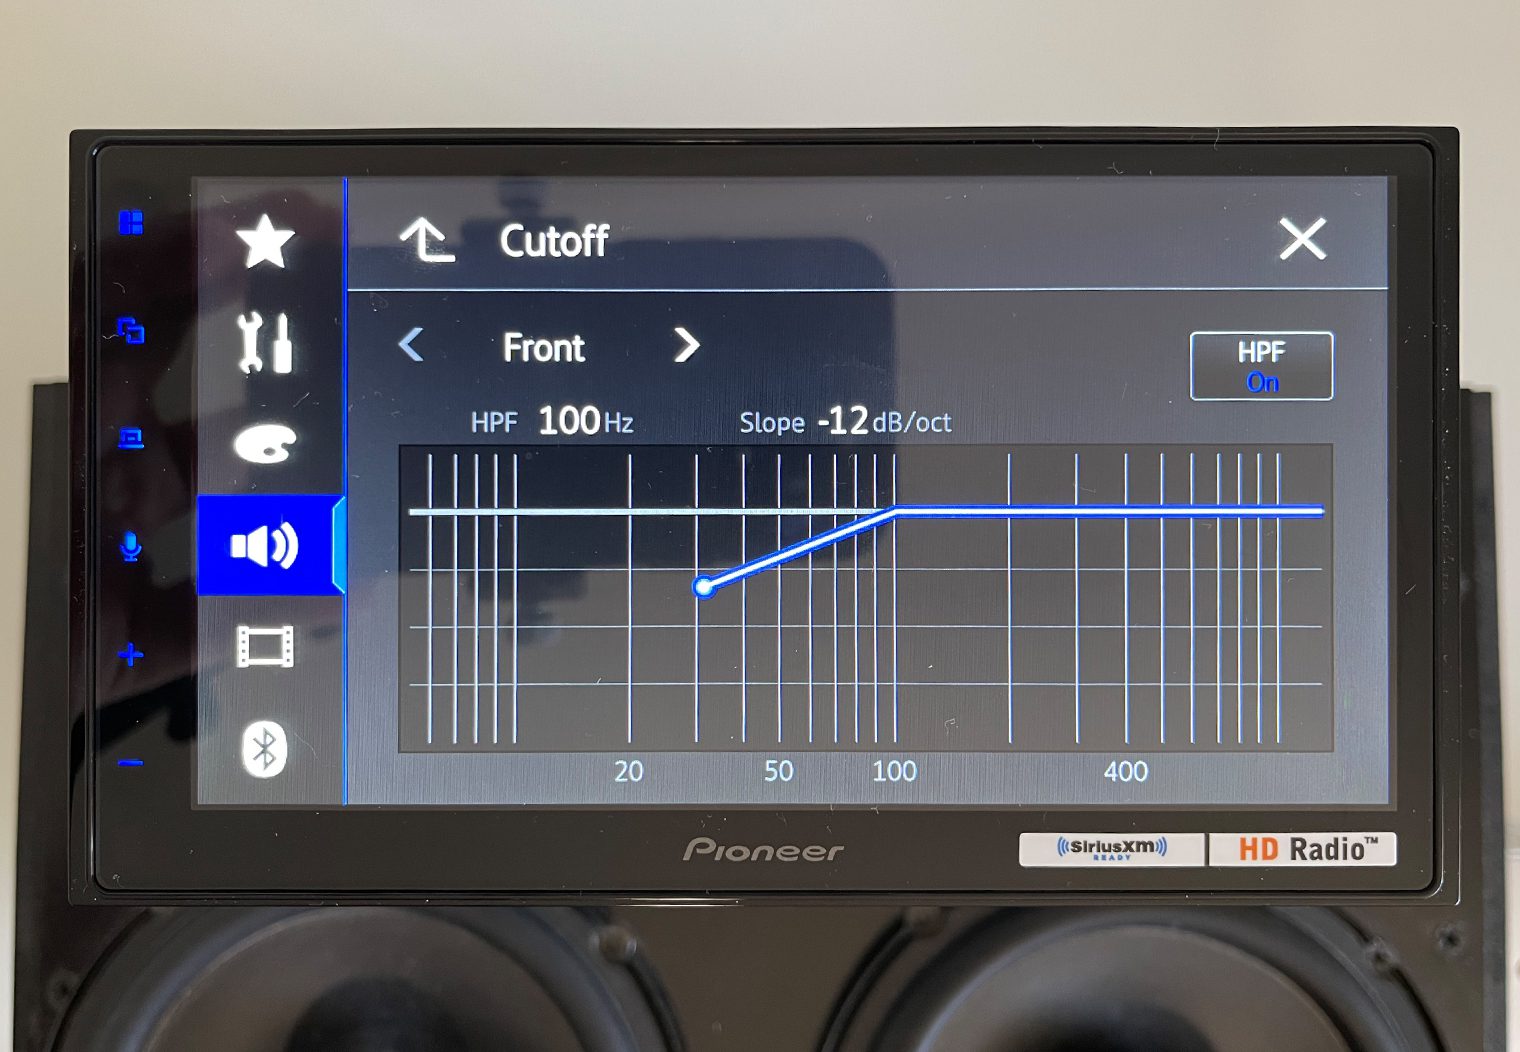
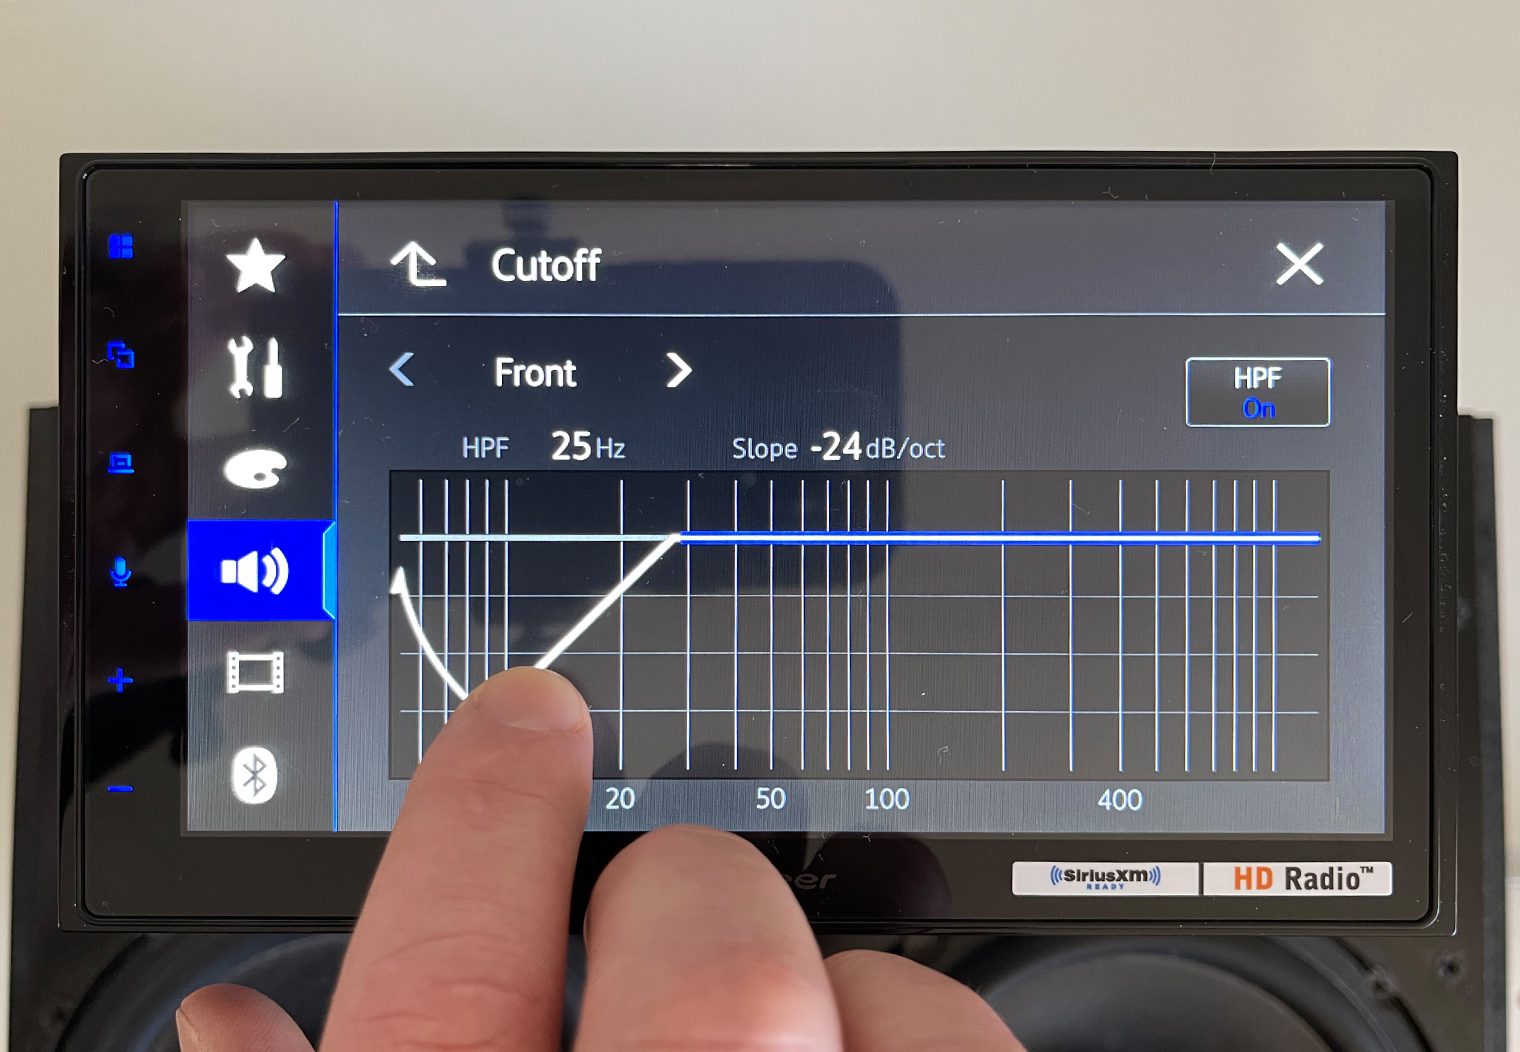

You'll also see a ‘slope' setting in the image above. In general, crossovers are meant for professional tuners or installers. They're used to tune your system since from the factory, an aftermarket head unit doesn't know how many speakers, the size of the speaker and frequency range they are capable of handling, etc. So crossovers allow you to configure and tune the signal for the setup that you have. Slope is an even more professional adjustment than typical HPF and LPF. Slope essentially will adjust the rate at which the audio will increase and decrease for the defined level of frequency. You can read up a little more on the difference between a filter and slope in this article. I would recommend letting a professional configure these settings though unless you know what you're adjusting here.
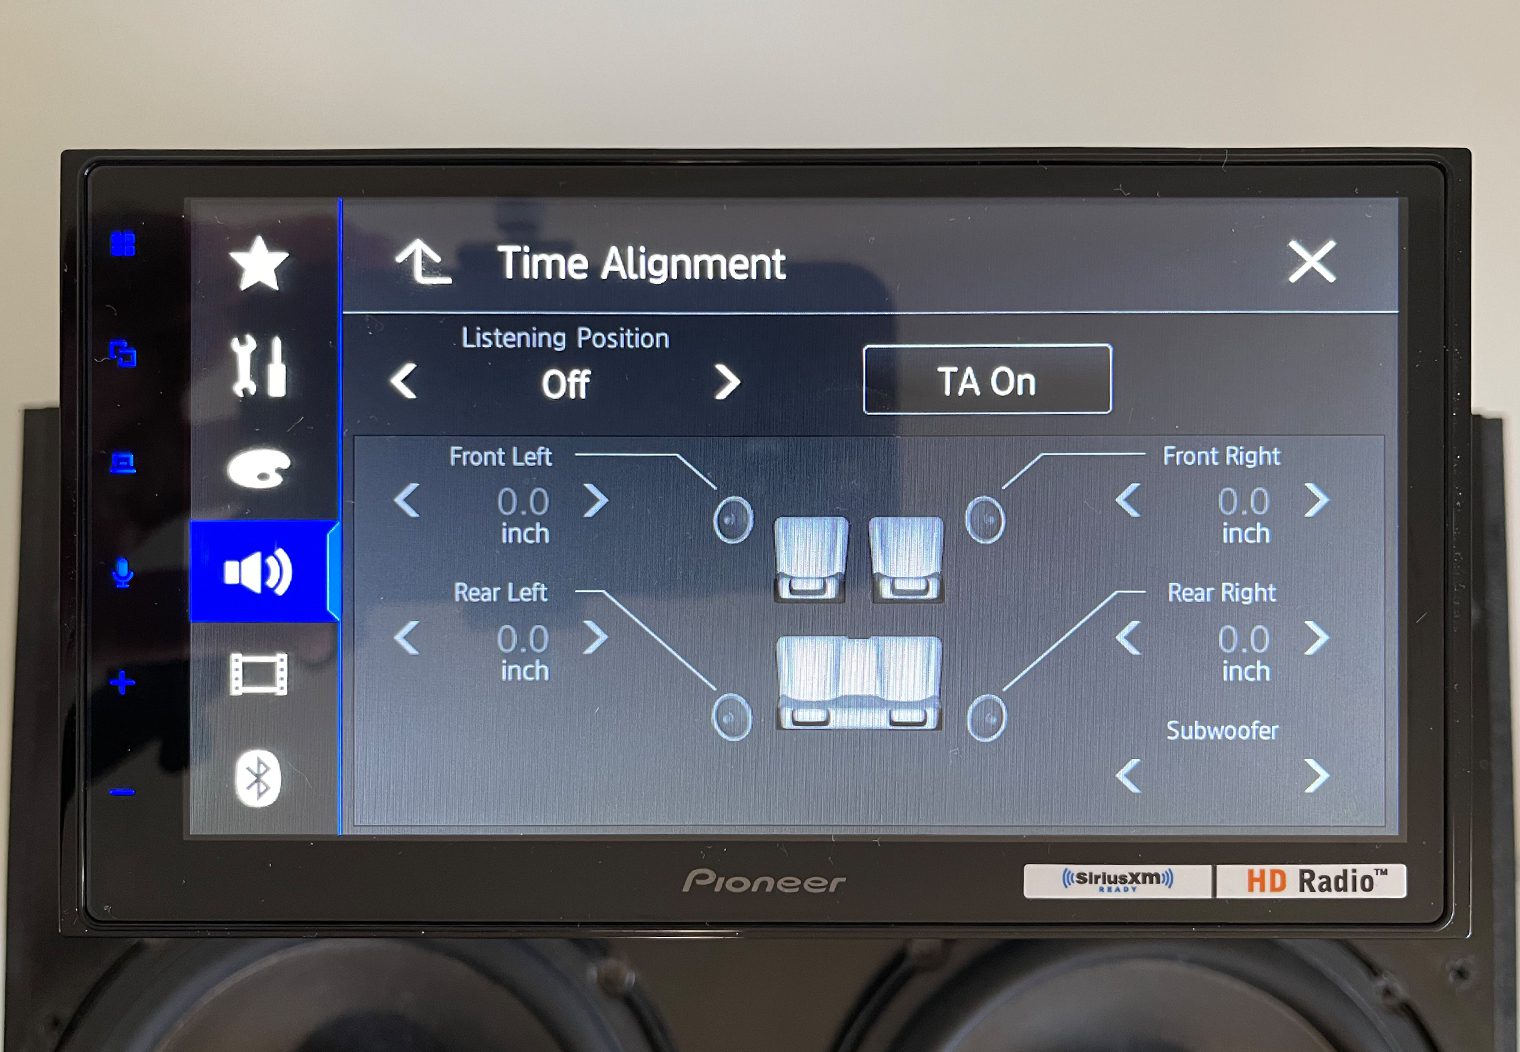
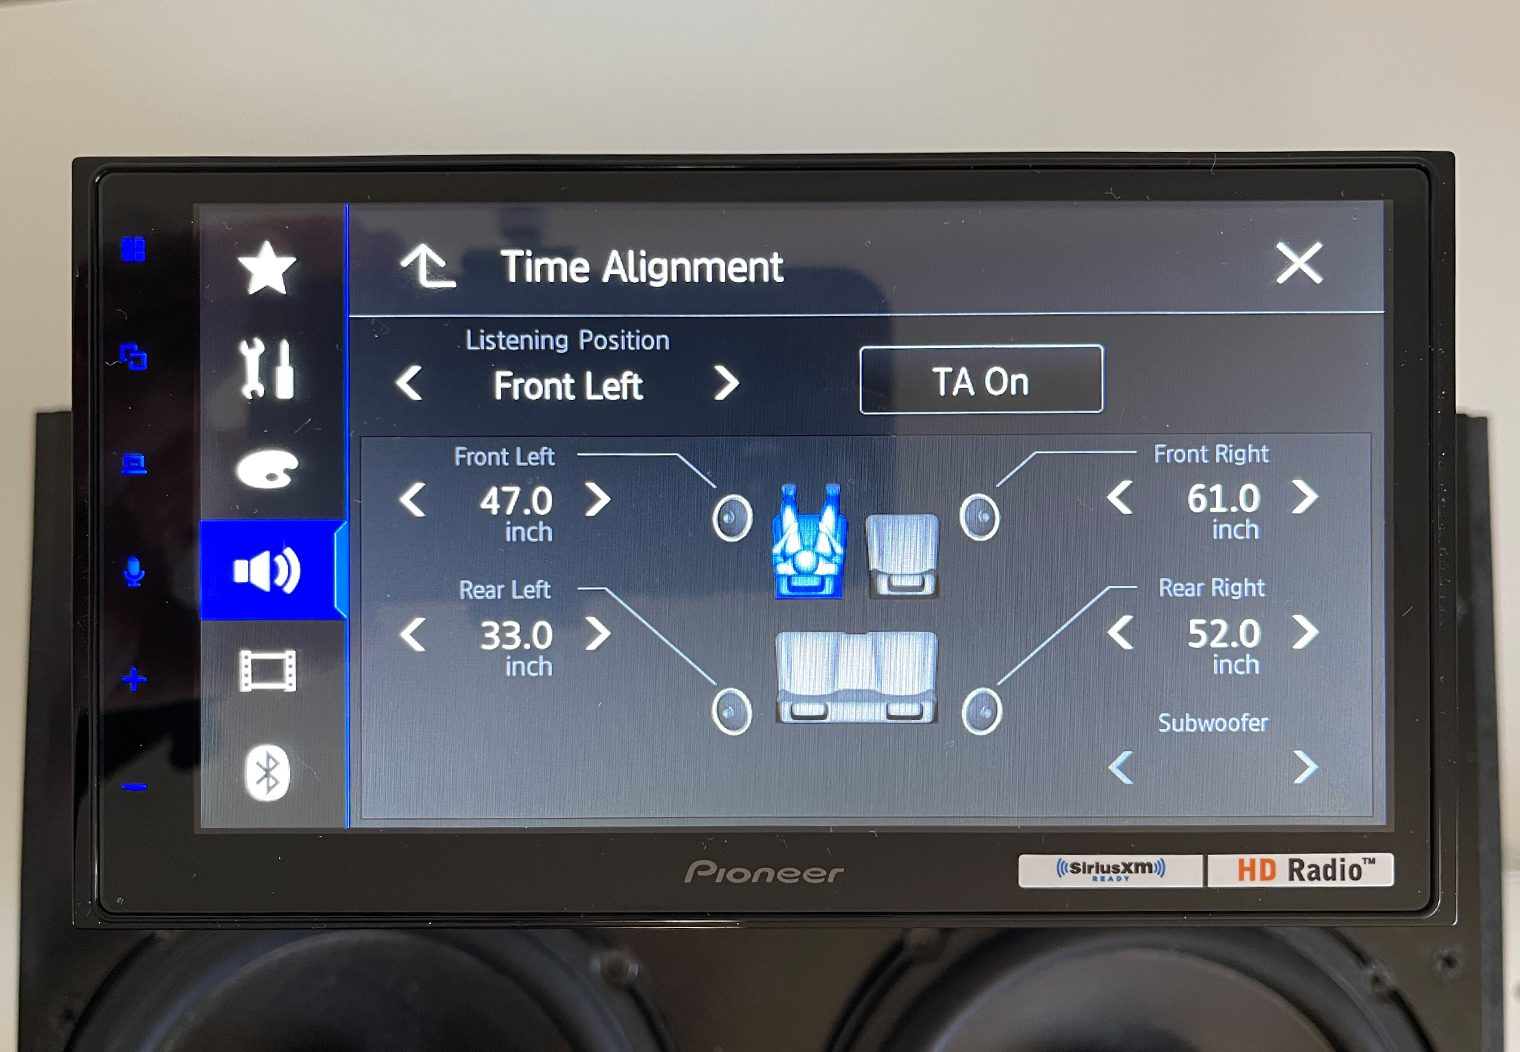
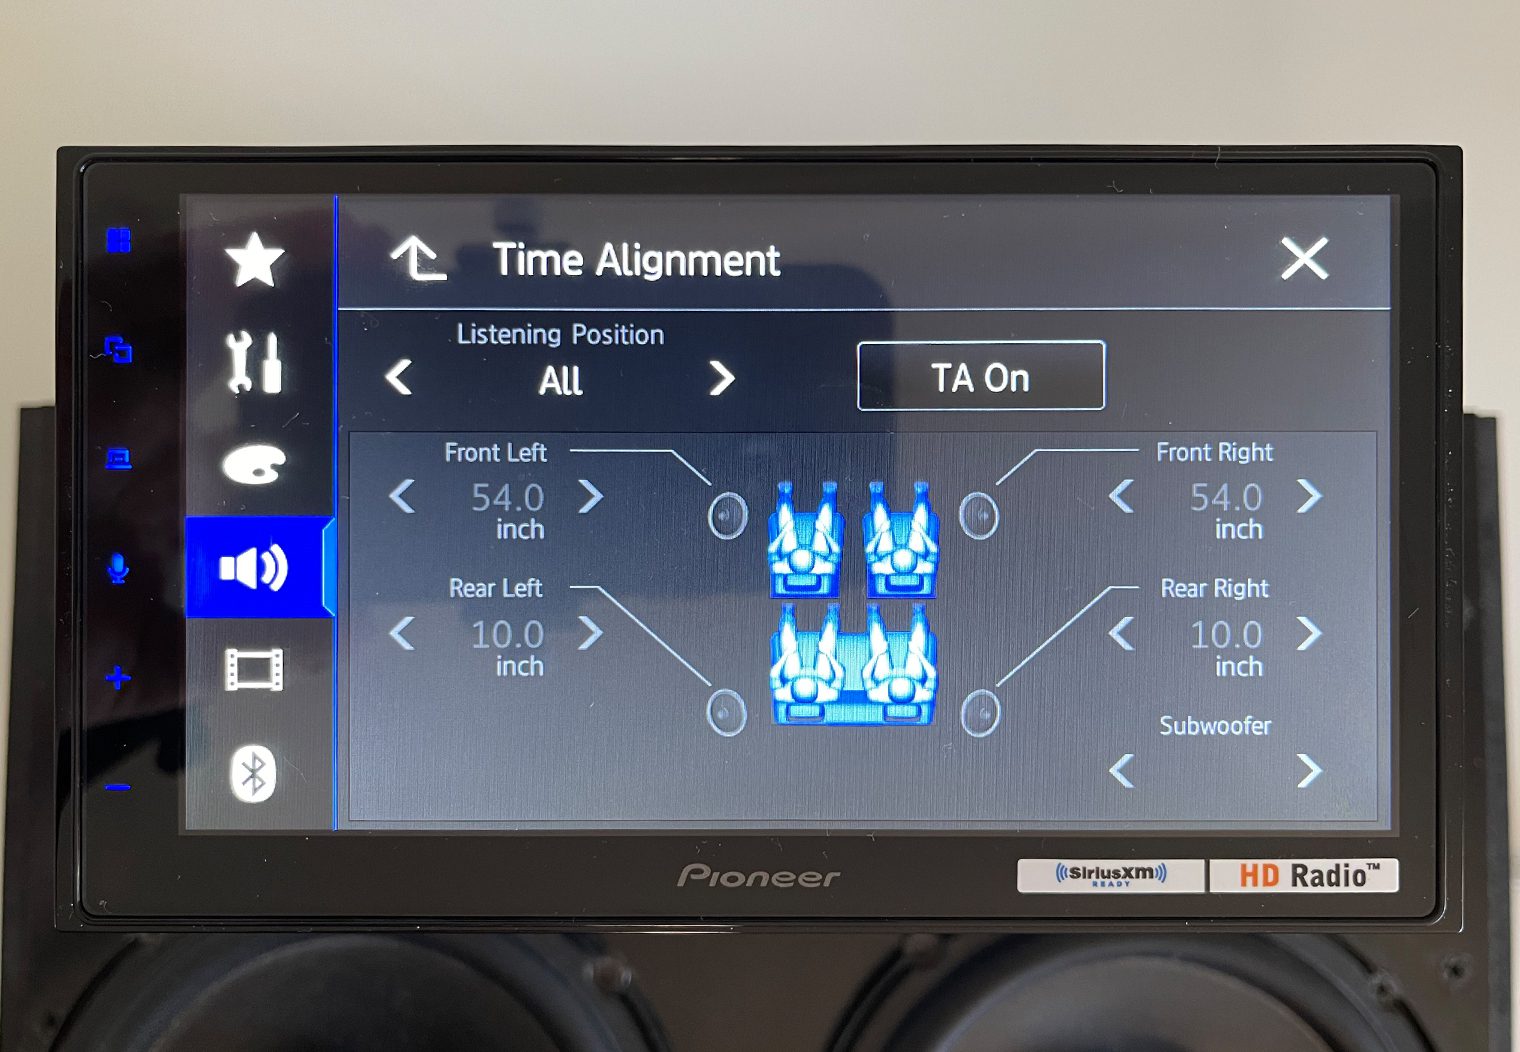
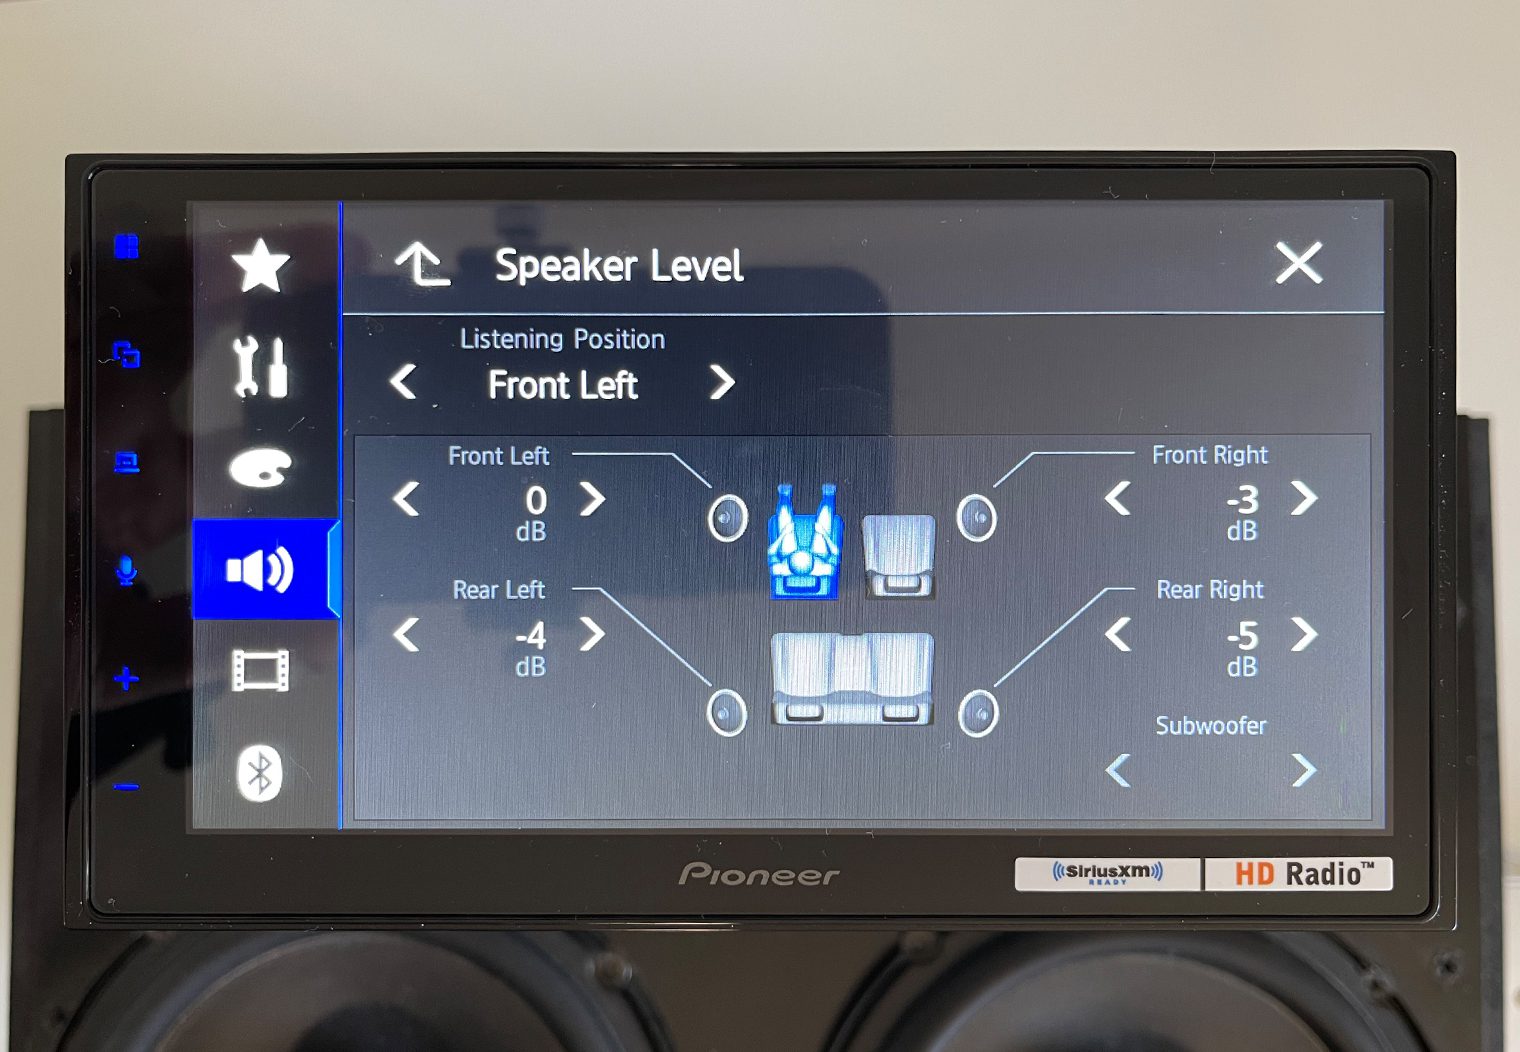
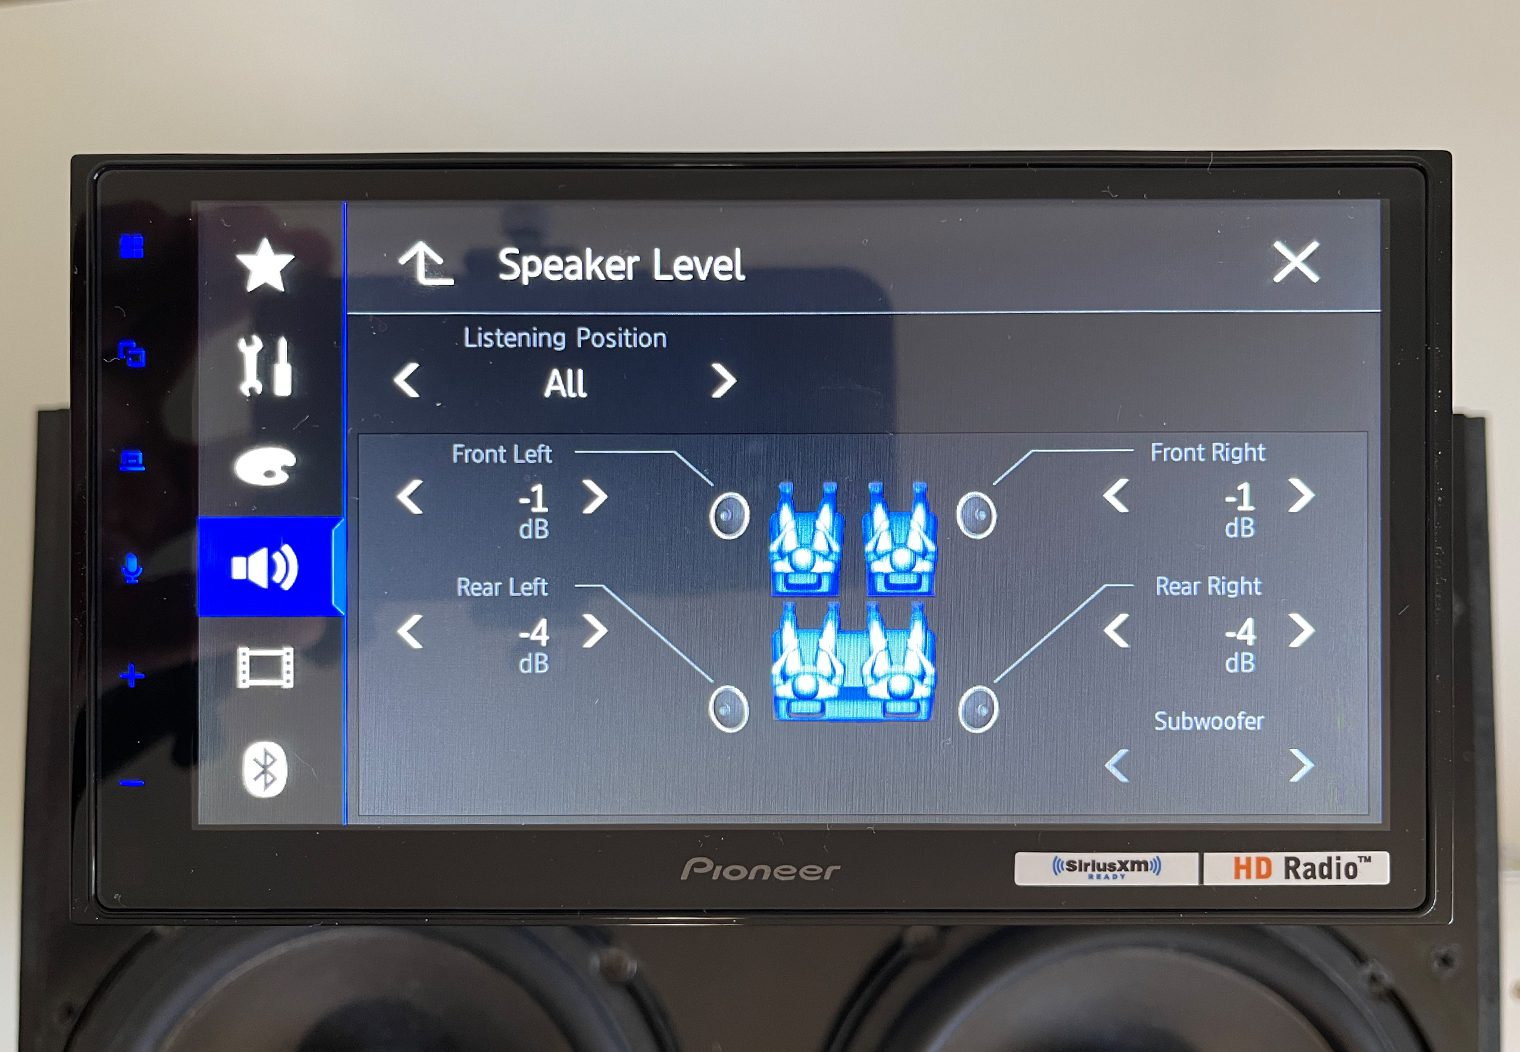
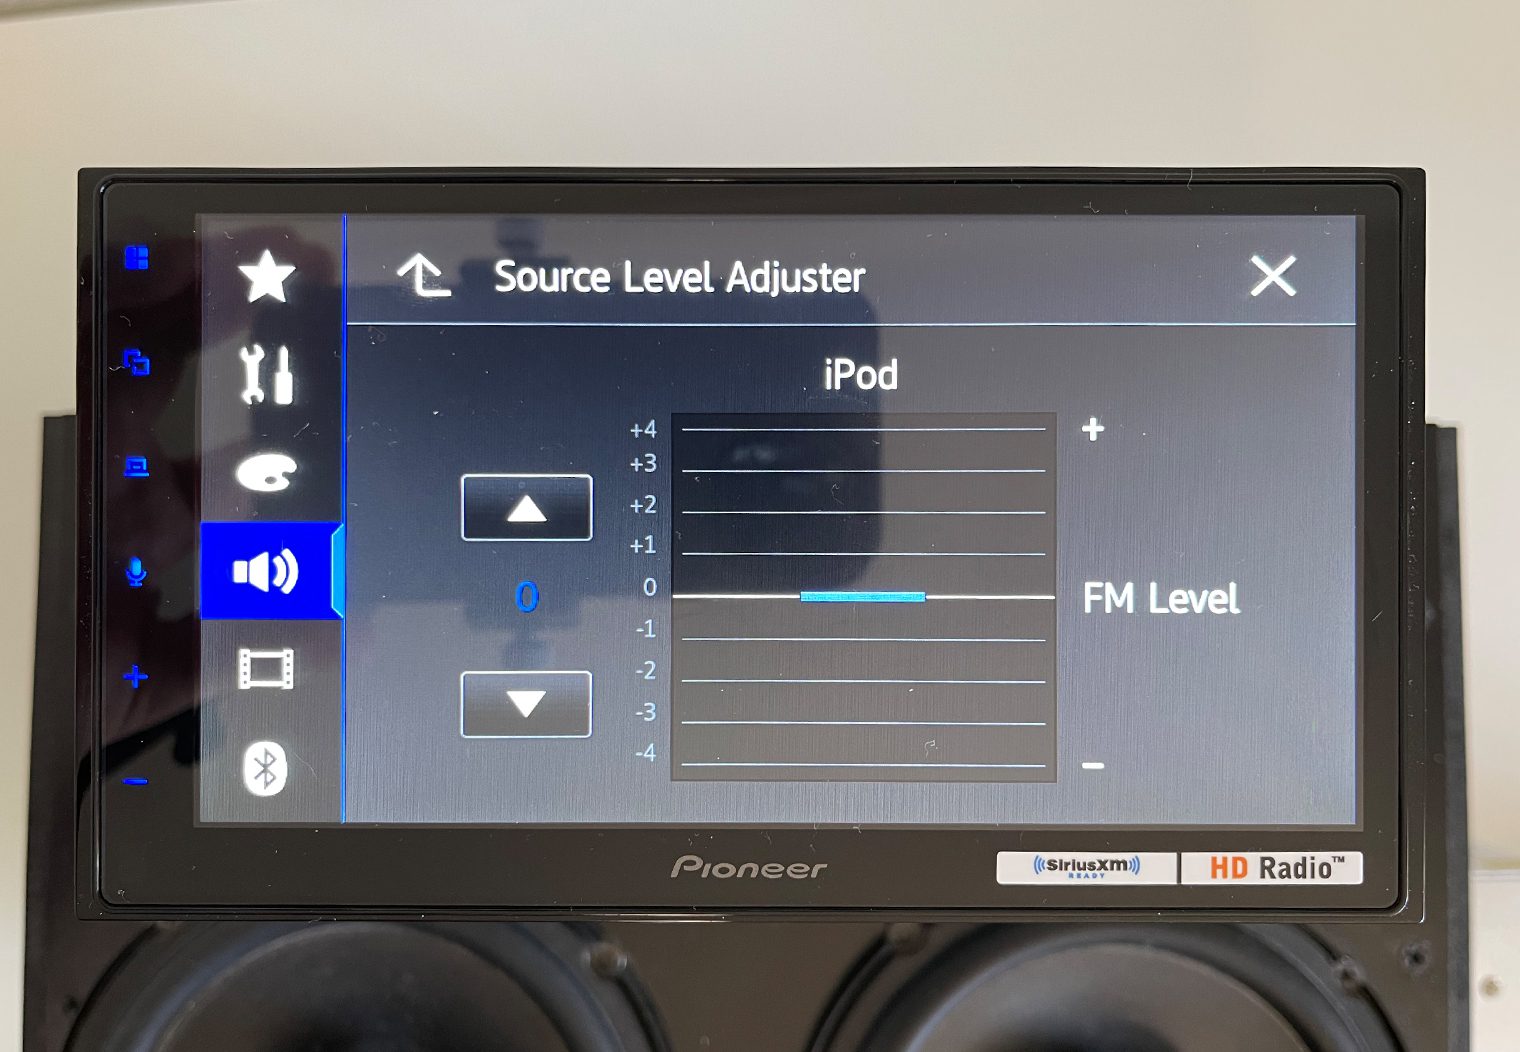
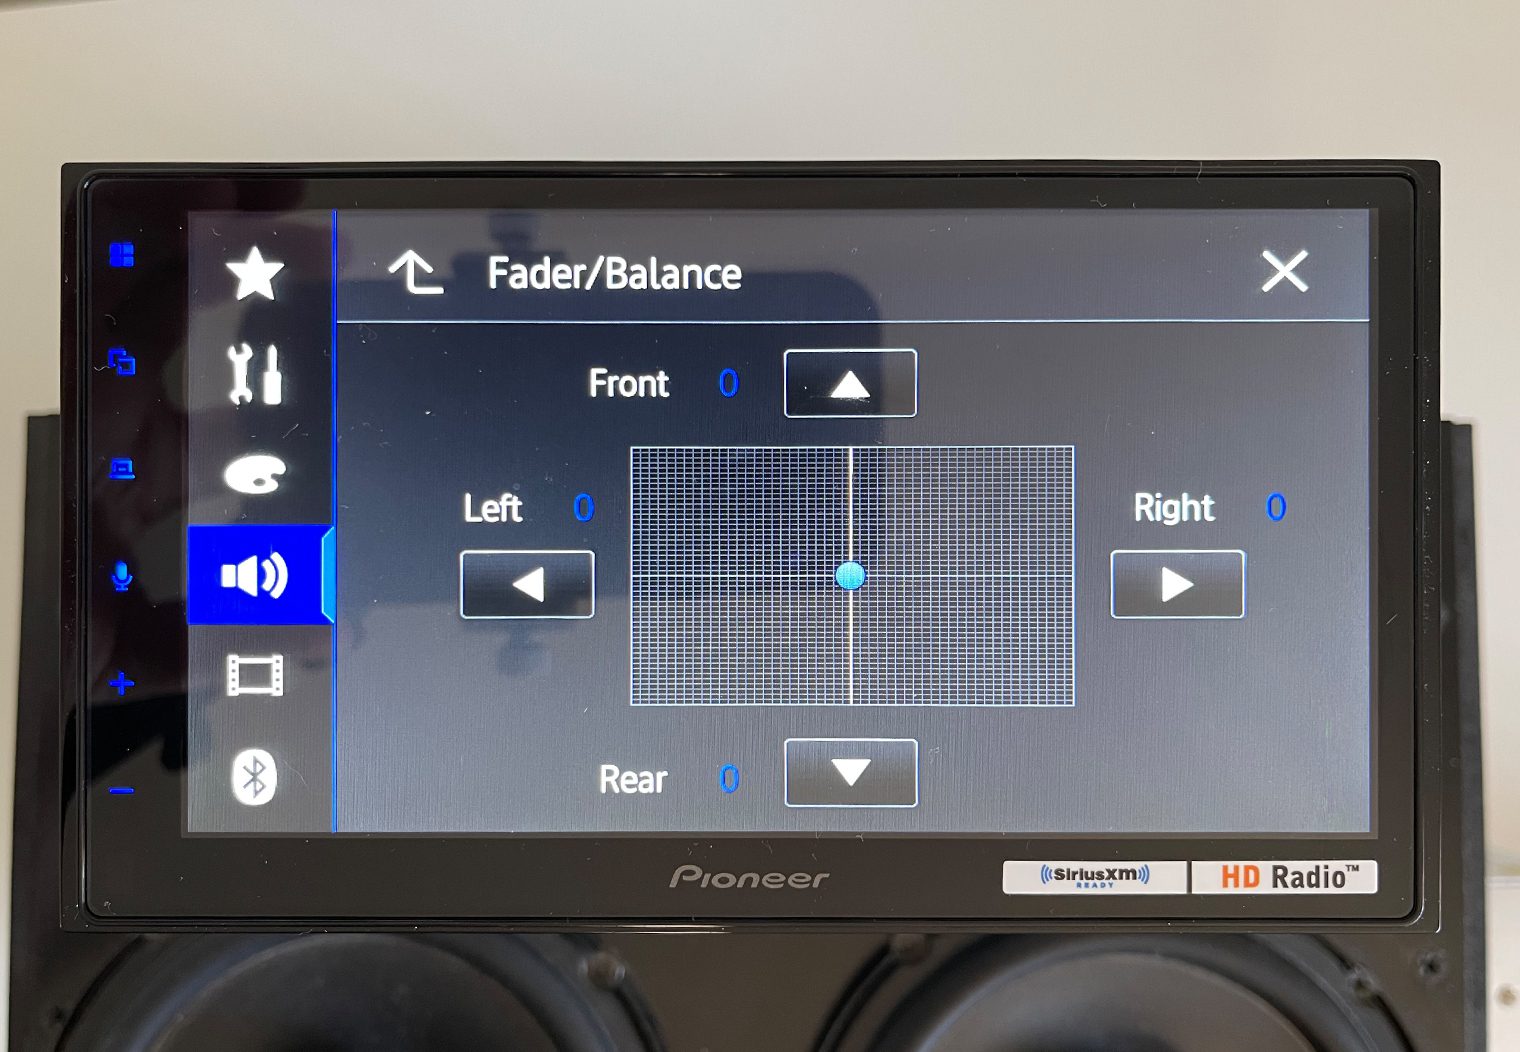
Listening Position & Speaker Level
Speaker levels and timing are both important for directing the sound towards a particular position in the vehicle. In many cases this is towards the center of your dash around ear height. Timing allows the sound from the speakers to reach a single point at the exact same time (aka a focal point). Speaker level will allow you to adjust each speaker volume so that each speaker omits the proper volume based on your chosen location in the vehicle.
The DMH-2660NEX will let you customize both timing and position in two ways: with presets and manually. In the audio settings, you can select either timing or speaker level and then select one of several presets including: front left seat, front right, front (both), all, custom or off. With the exception of the custom option, the presets are pretty self explanatory and use average measurements in order to estimate the distance of the preset position you select.
If you're looking to get an added level of precision, you can also adjust each speaker timing (in) or levels (dB) for each speaker. This includes the subwoofer. Here's a few snapshots of the position and timing interface in the audio settings:

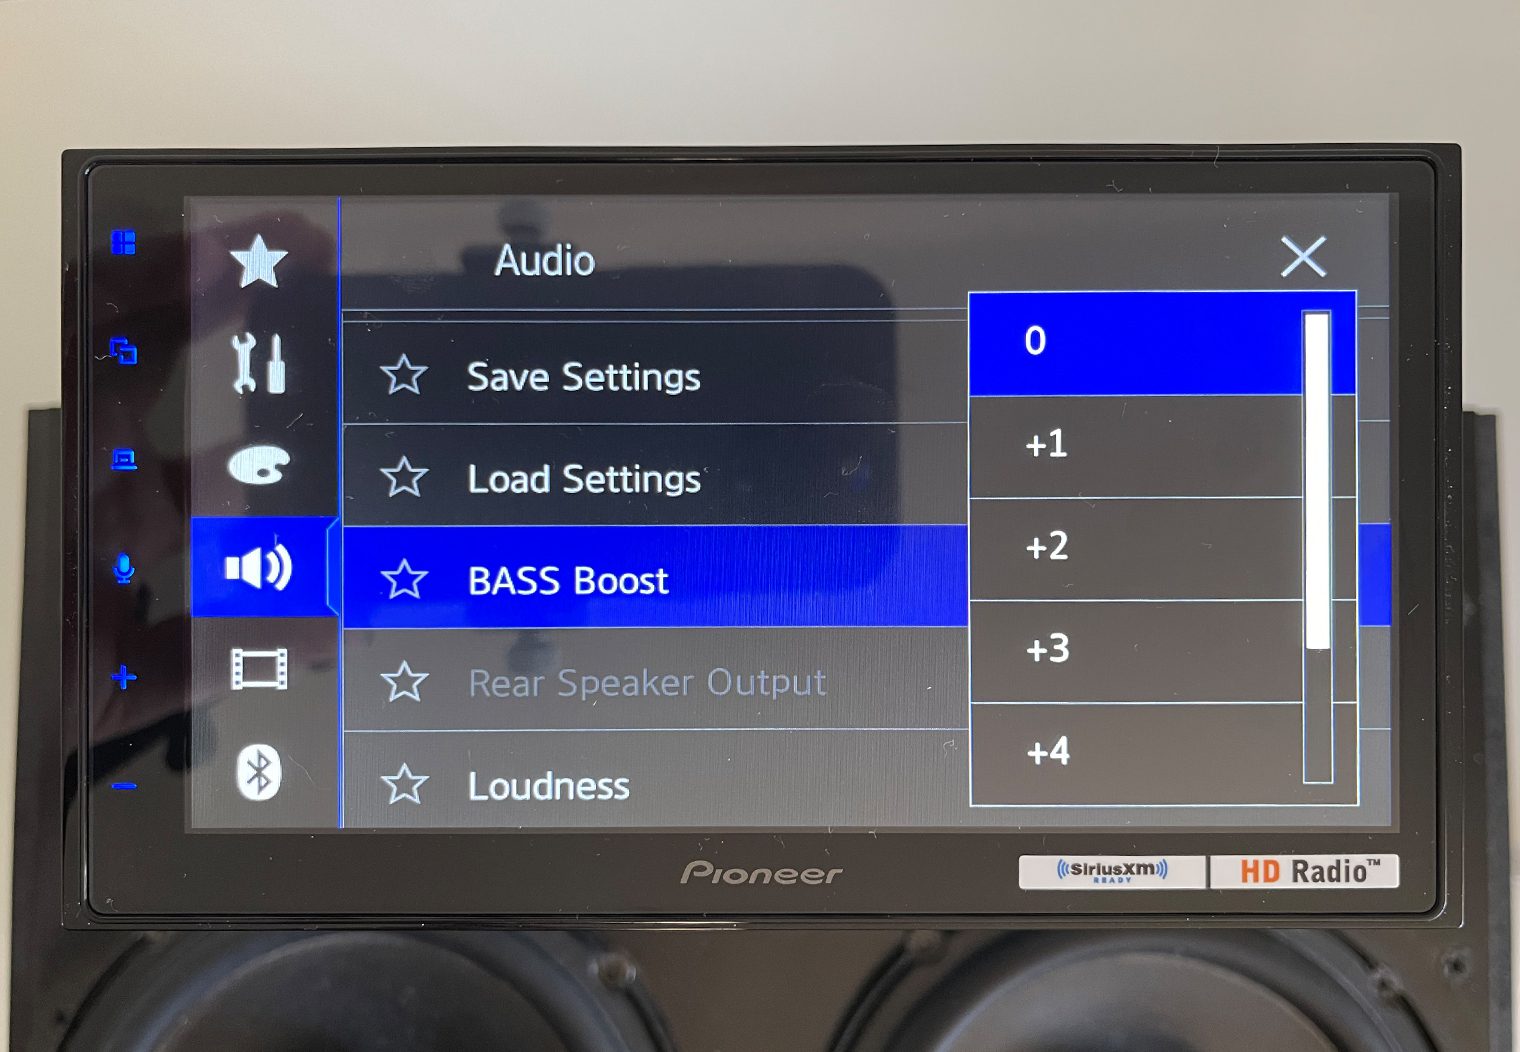
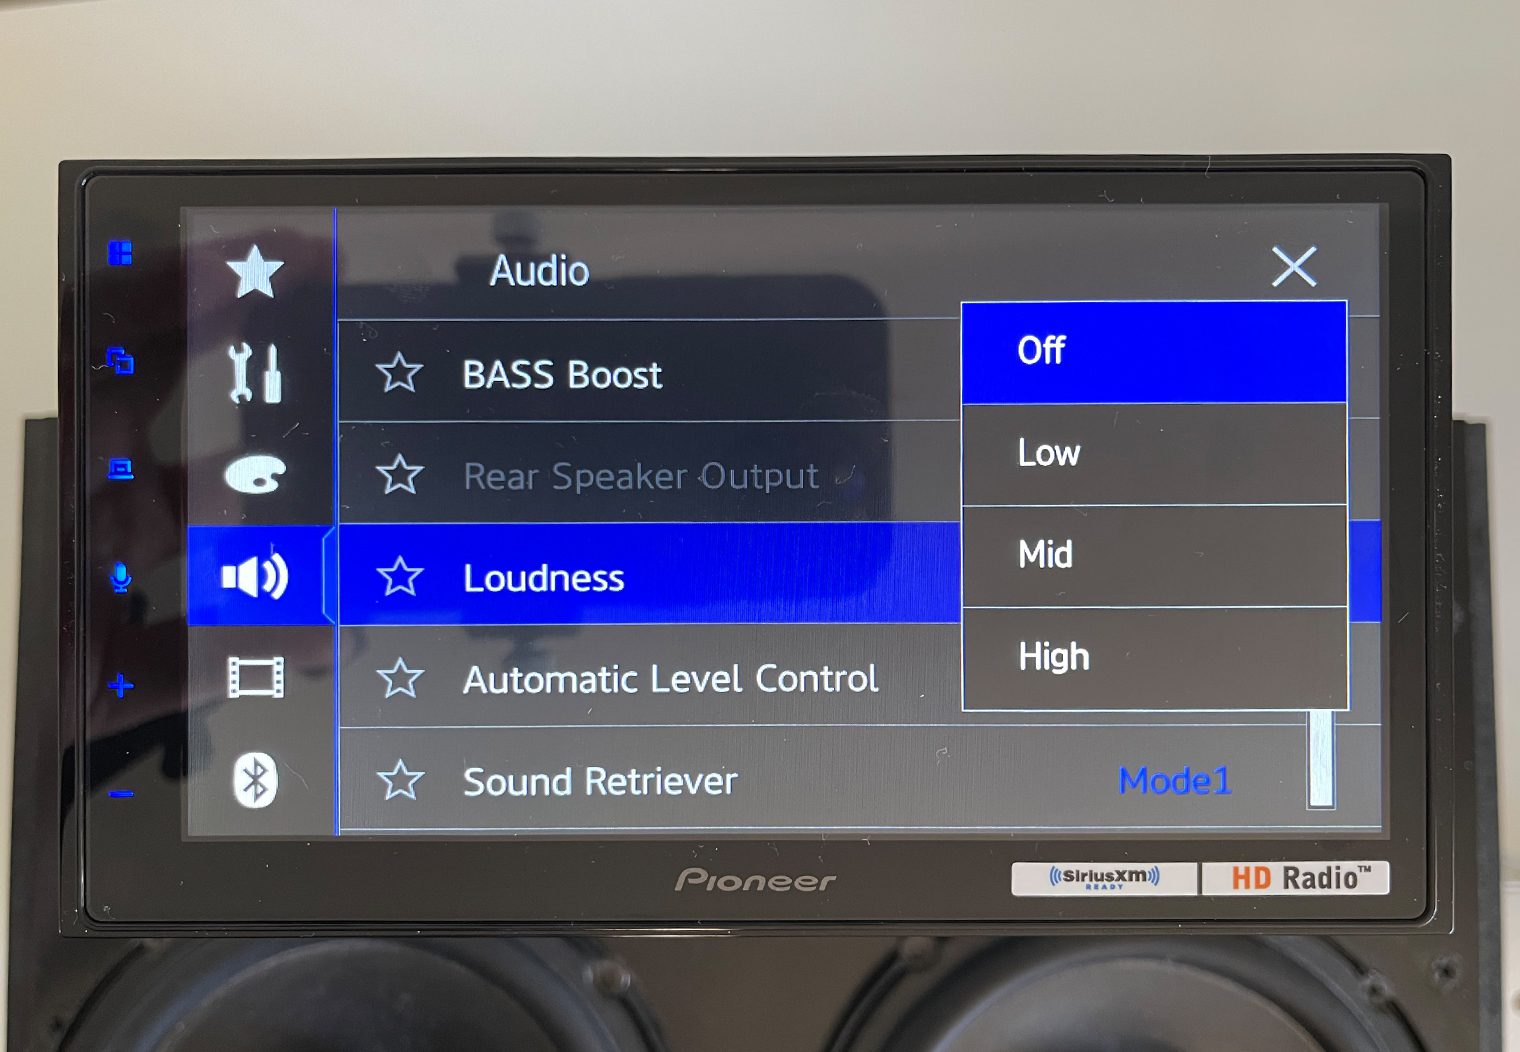
Other Audio Features
Here's a few additions, more standard features that are worth covering but don't really need much more explanation but worth pointing out:
iDatalink Maestro
Have features built into your OEM head unit that you don't want to lose when upgrading? No problem! iDatalink is an aftermarket interface system that will adapt features like climate control, heated seats and vehicle data and make them controllable on your new aftermarket head unit. It'll even display things like MPH, RPM, Fuel, tire pressure, battery voltage, check engine light, door alerts, and more. You can select the different gauges you want to view, and even customize the look and feel. It's a great way to bring your vehicle into the modern age or just ensure that you're not losing existing features from your current OEM head unit.
Unfortunately, I wasn't able to hook iDatalink Maestro to the unit in my demo box so I can't demo it. But the 2660NEX comes fully capable. You'll need to purchase an iDatalink Maestro adapter and install it separately. I'd recommend finding the appropriate product directly at iDatalink's Website.
User Interface and Customization Features
In my opinion, Pioneer has always been ahead of the game when it comes to its user interface and customization features. The operating system and configuration settings on the DMH-2660NEX are a great example of that. There's a ton of cool little features throughout this unit that allow you to make it your own.
Customized Background
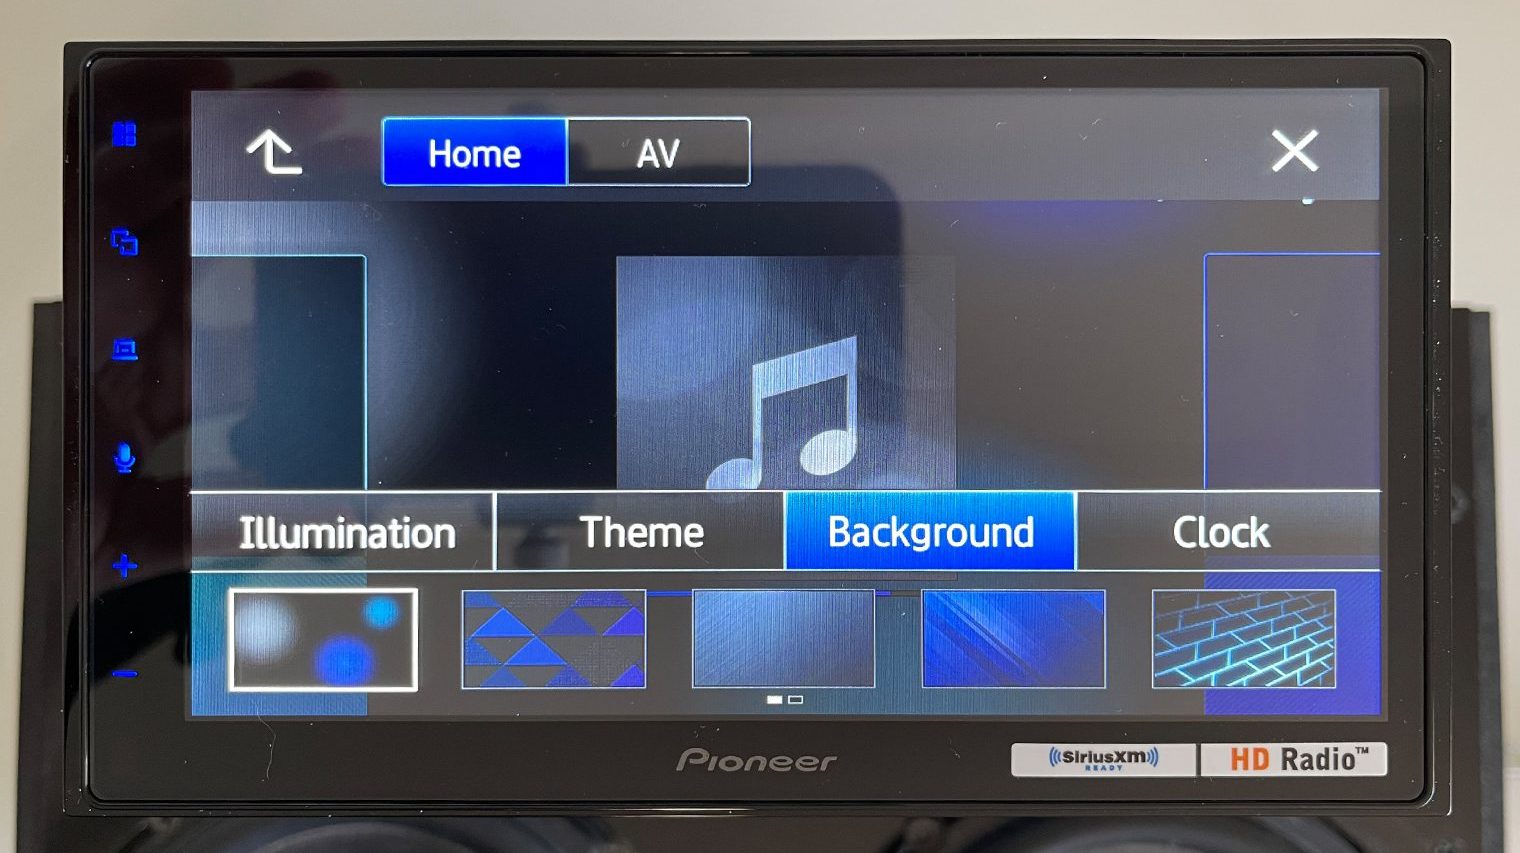
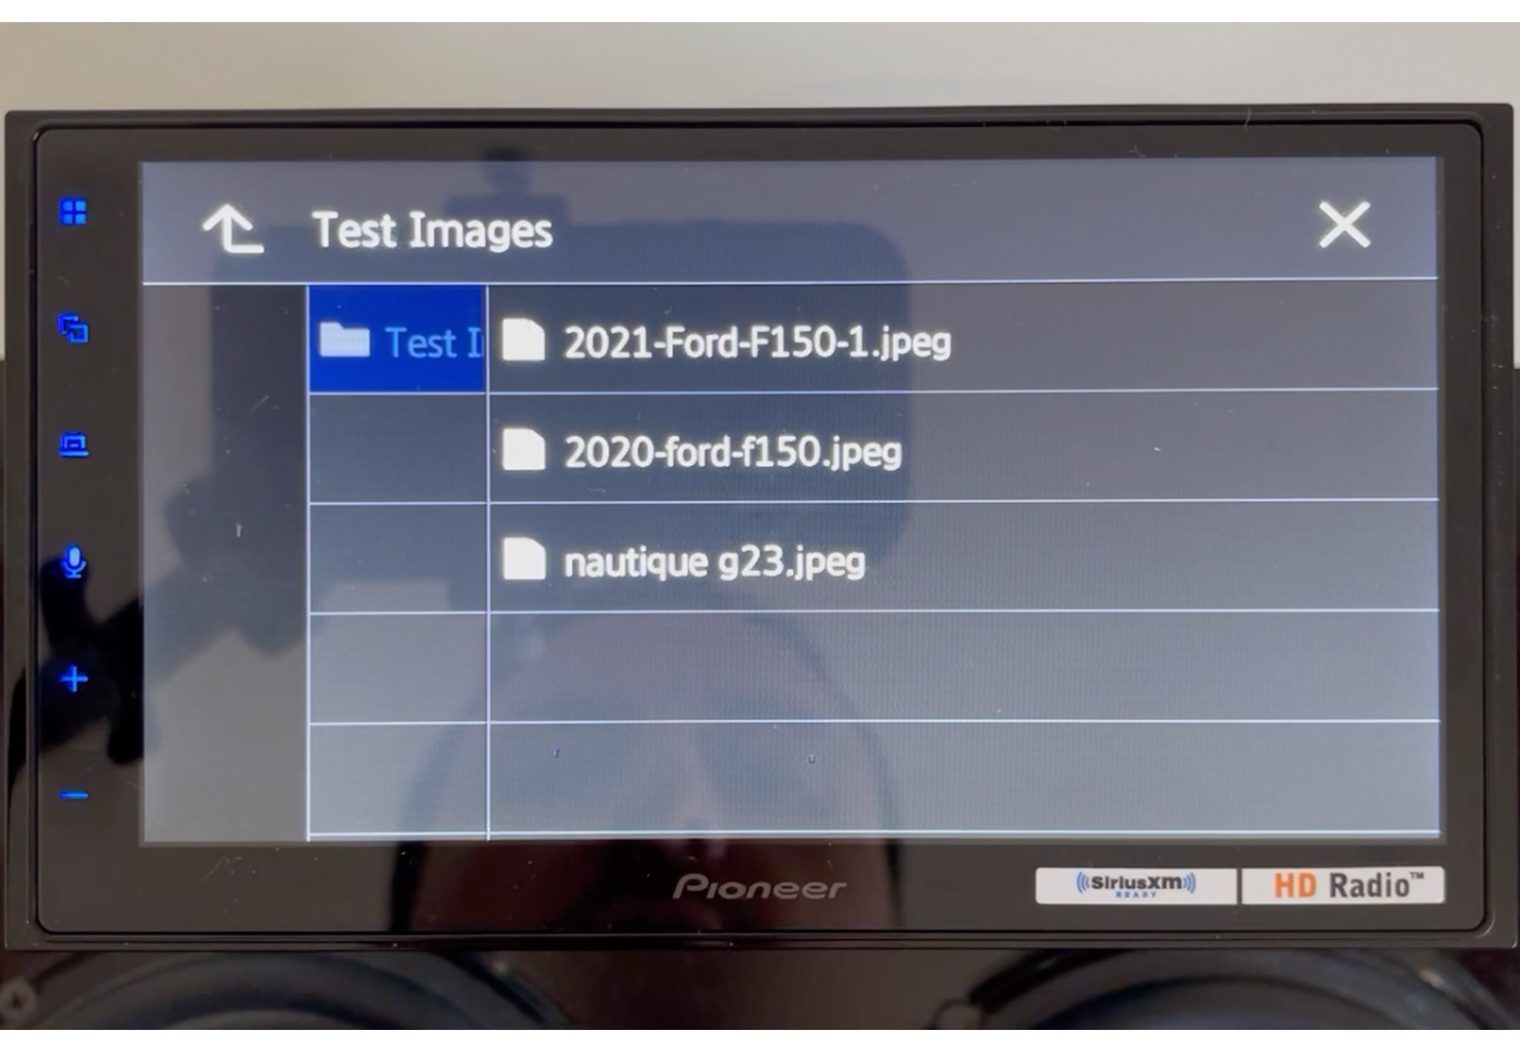
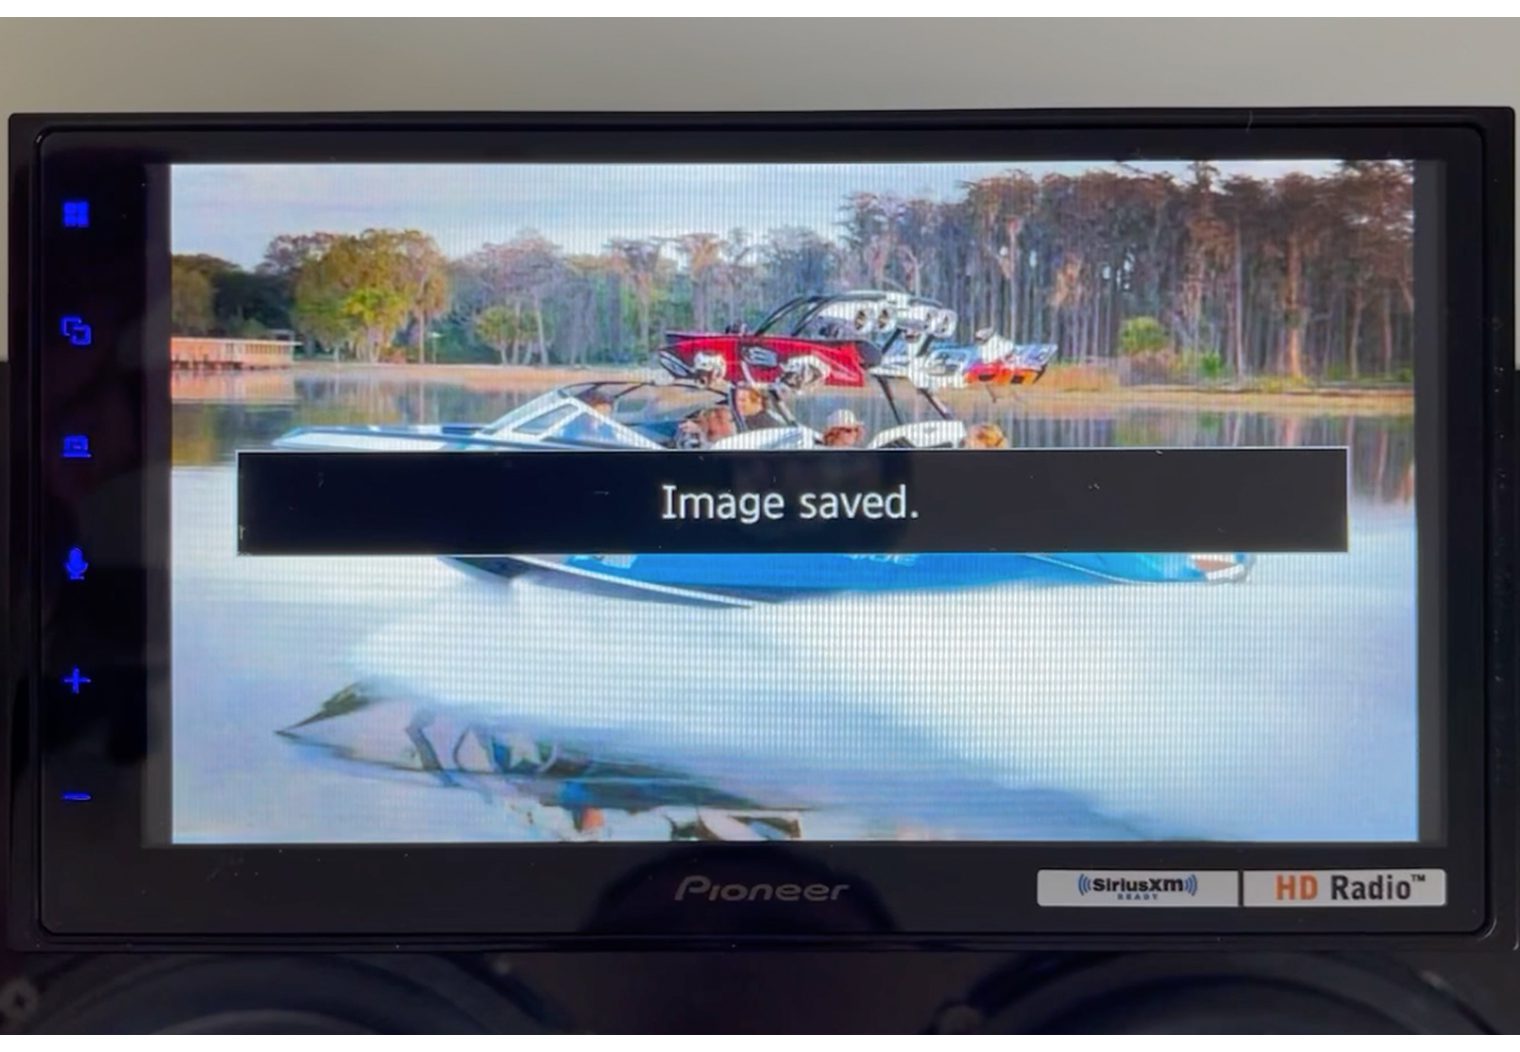
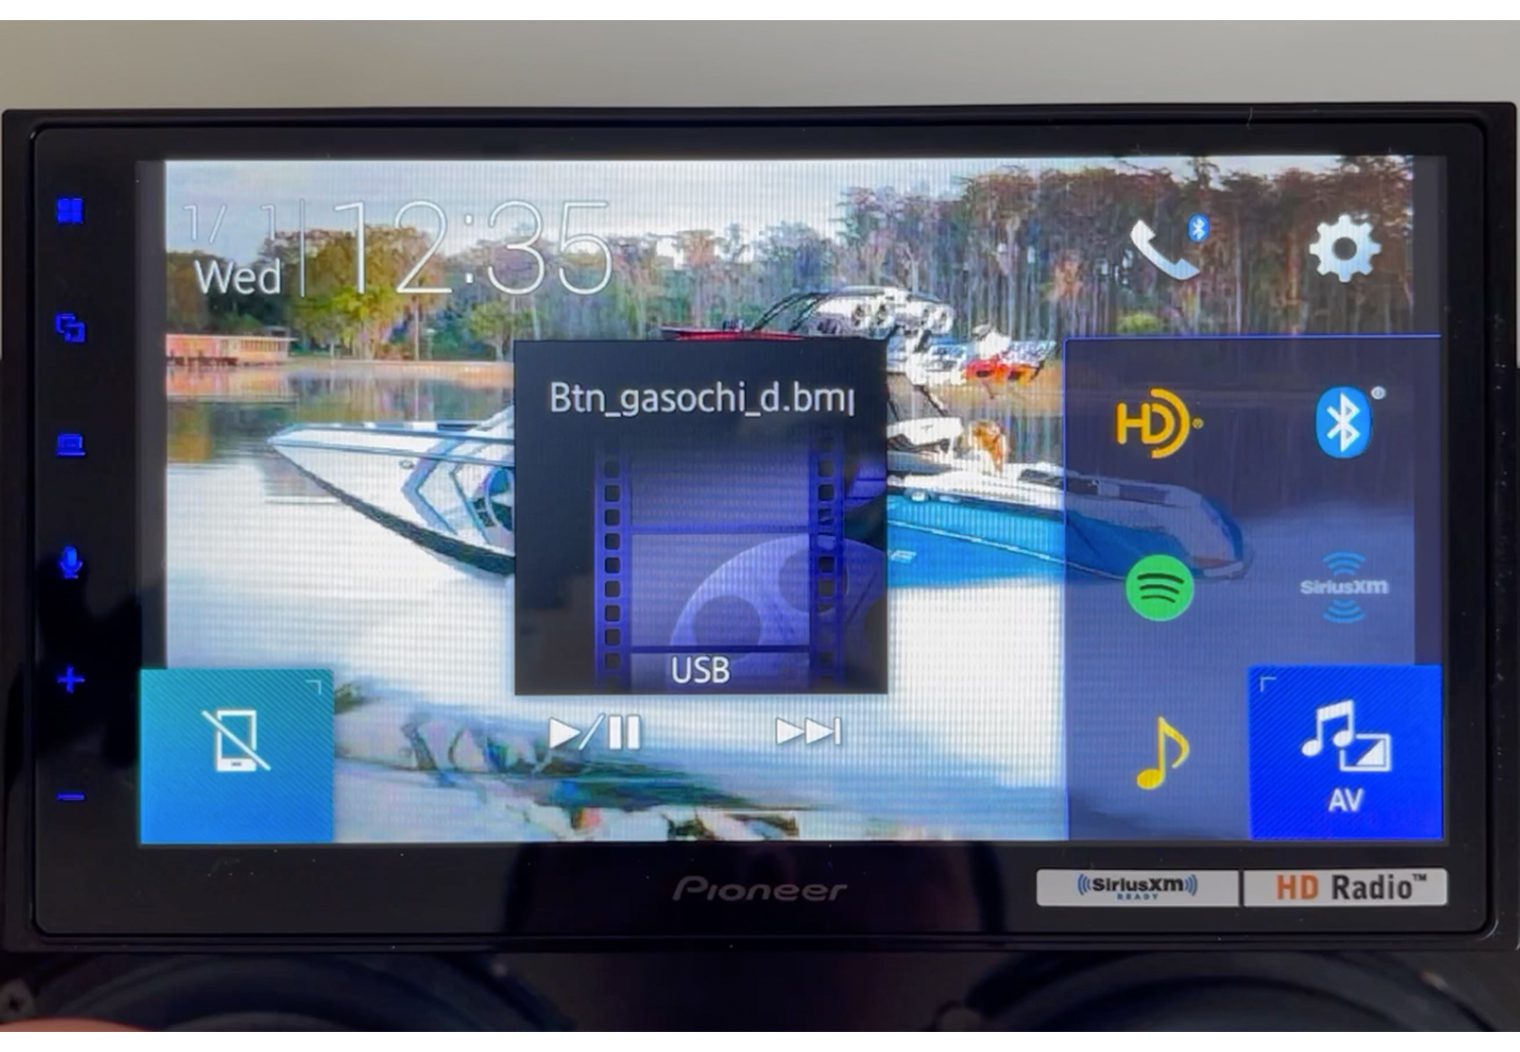
You can't say a car stereo is customizable without a custom background, right? With the 2660NEX, you can import your own custom background image and set it for your homescreen and A/V screen backgrounds if you'd like. Or select a preset but where's the fun in that?
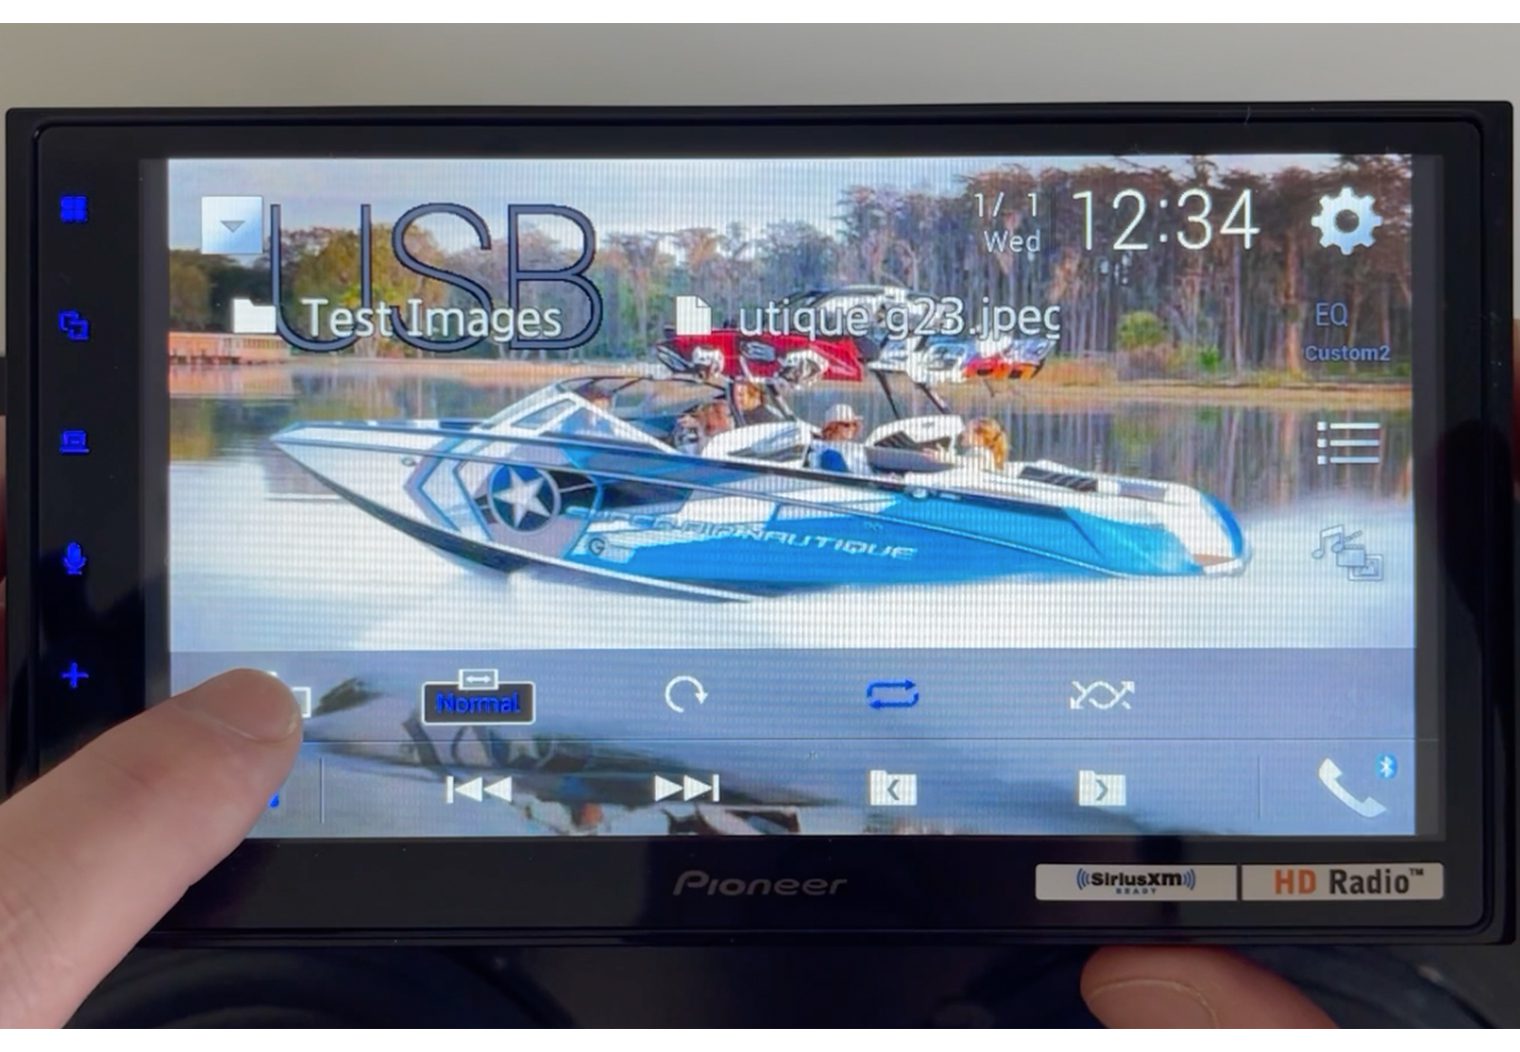
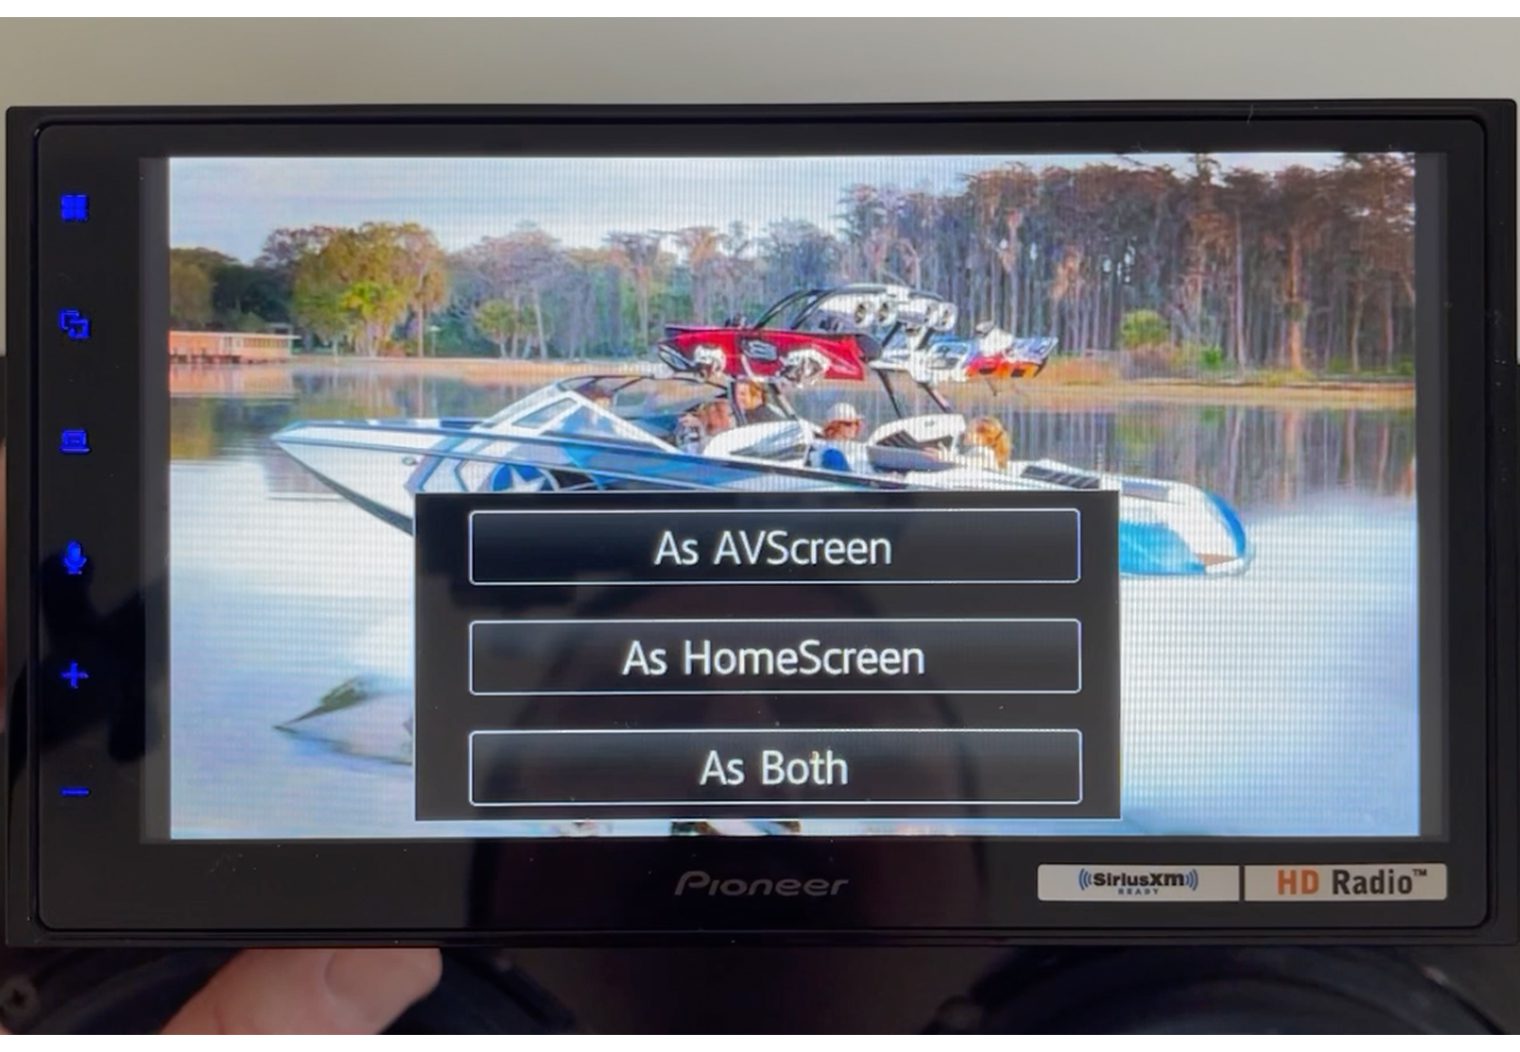
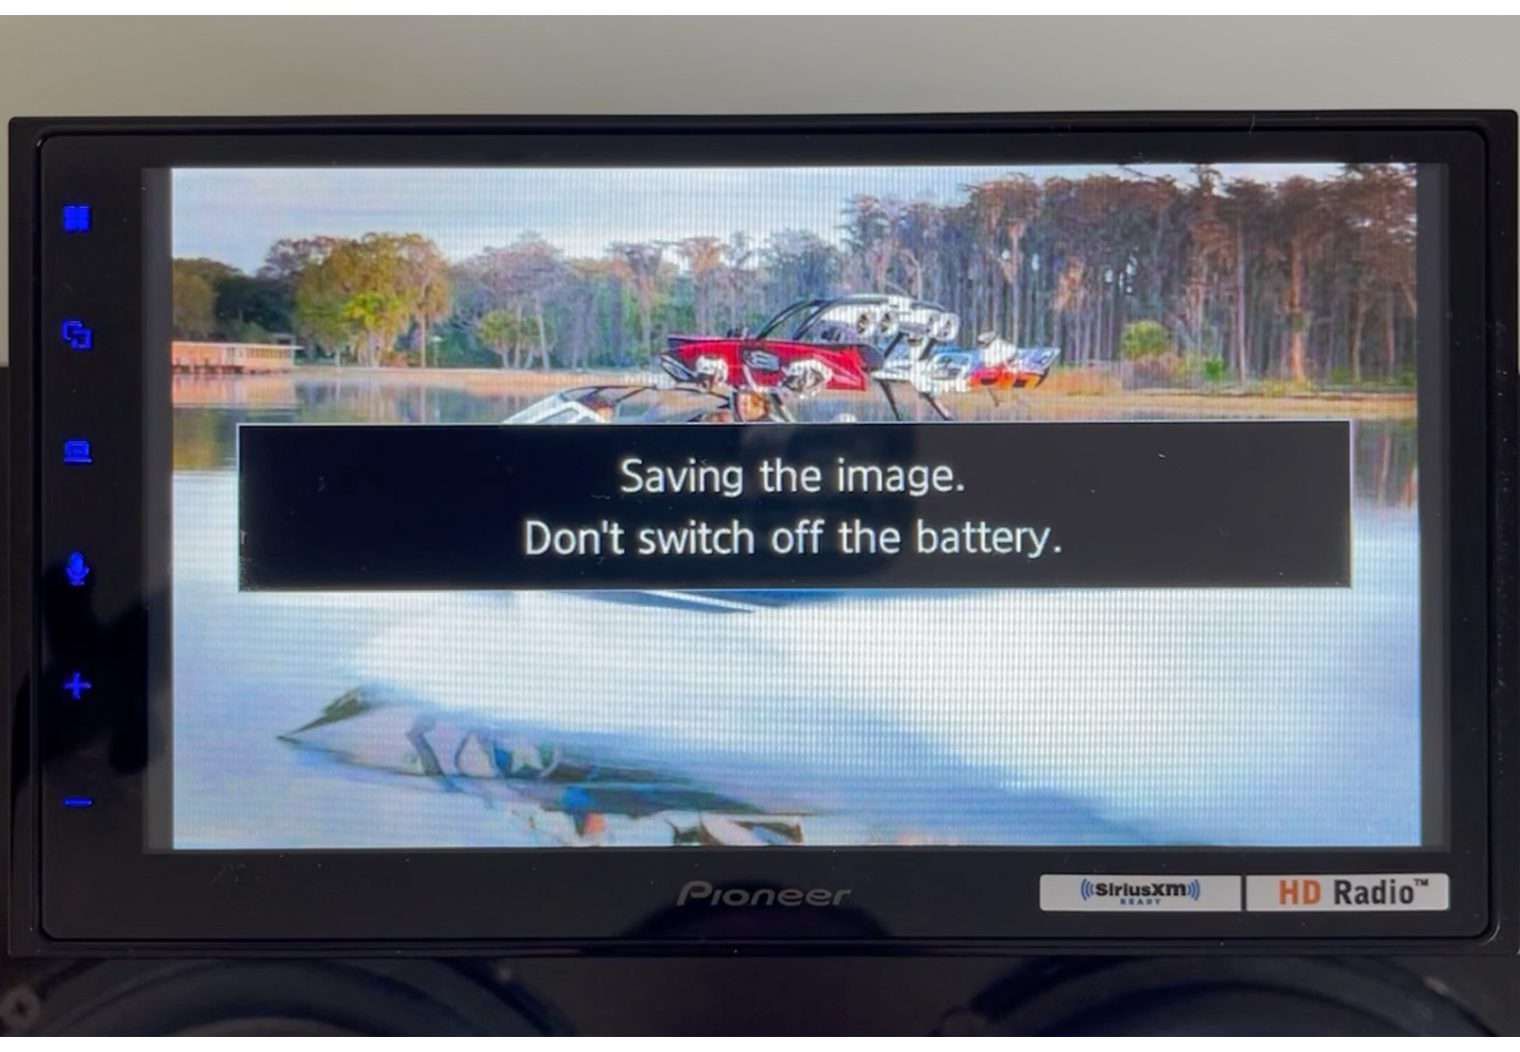
Setting a custom background image is not as intuitive as I would have liked it to be, but you can do it once you know how. You'll need to upload an image to your USB flash drive (no, it cannot be your iPhone), connect it to the unit and then navigate to the USB A/V input. Once you're there, you'll open up the file structure of your USB drive and find the image you want to set as your background. Select it and it'll appear on your screen. On the bottom left hand side of the screen there's an import button. Select import and then apply the image to either your homescreen of the A/V screen, or both. Here's a few photos of the process.
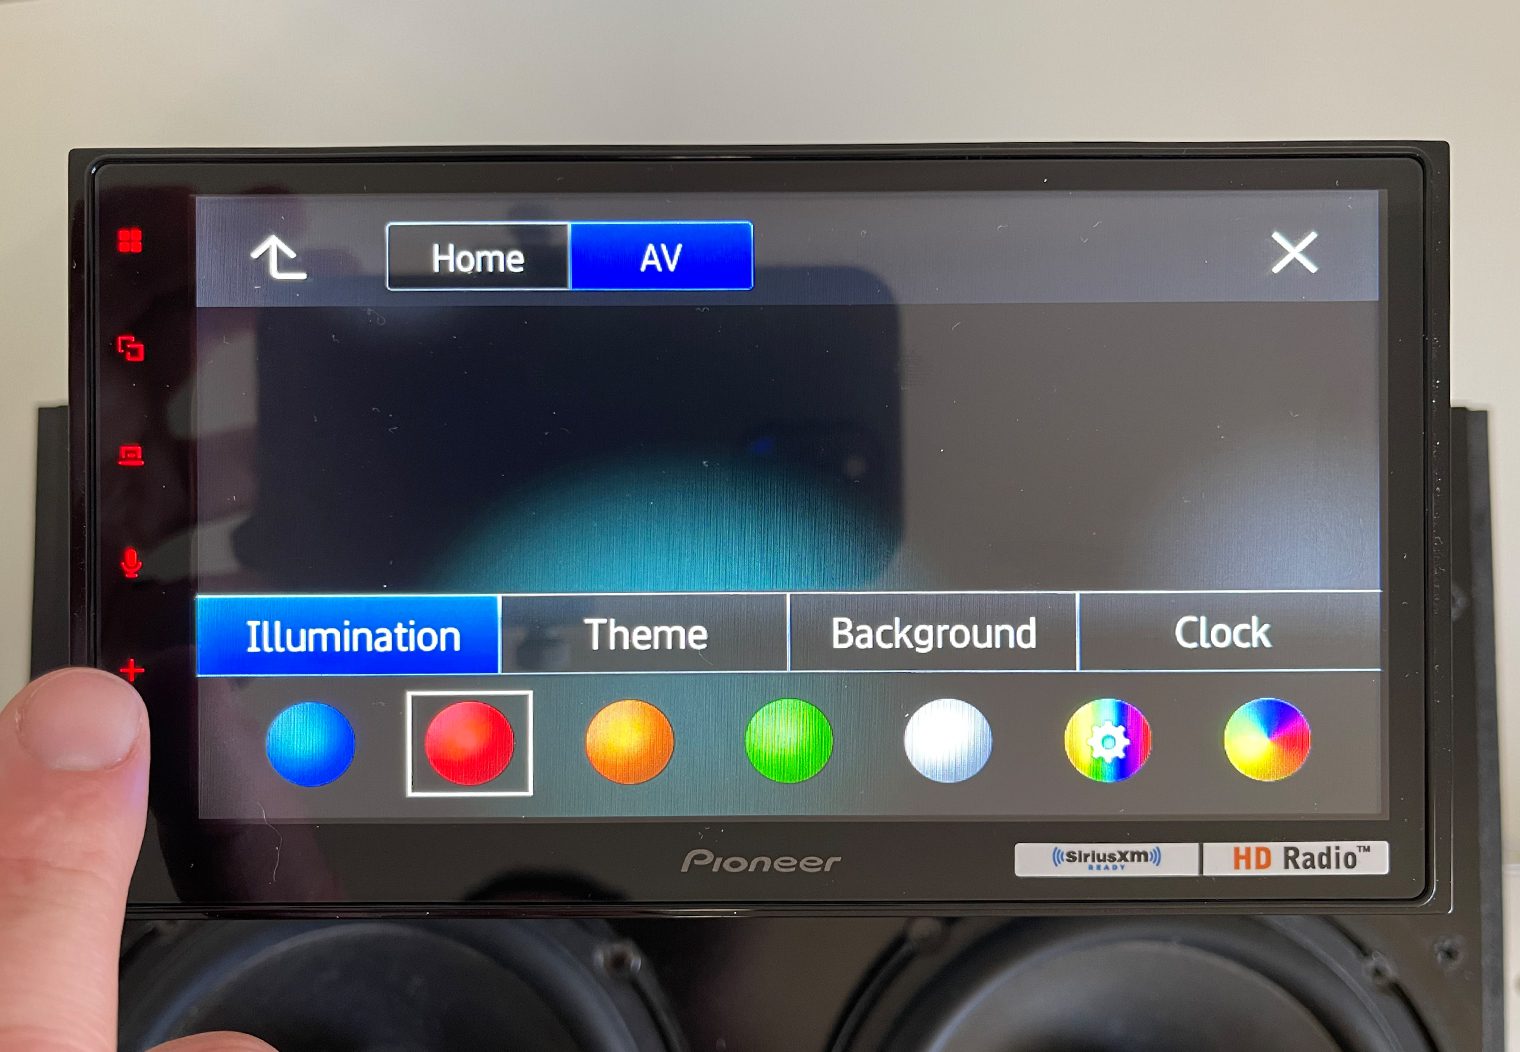
Custom Touch Button Colors
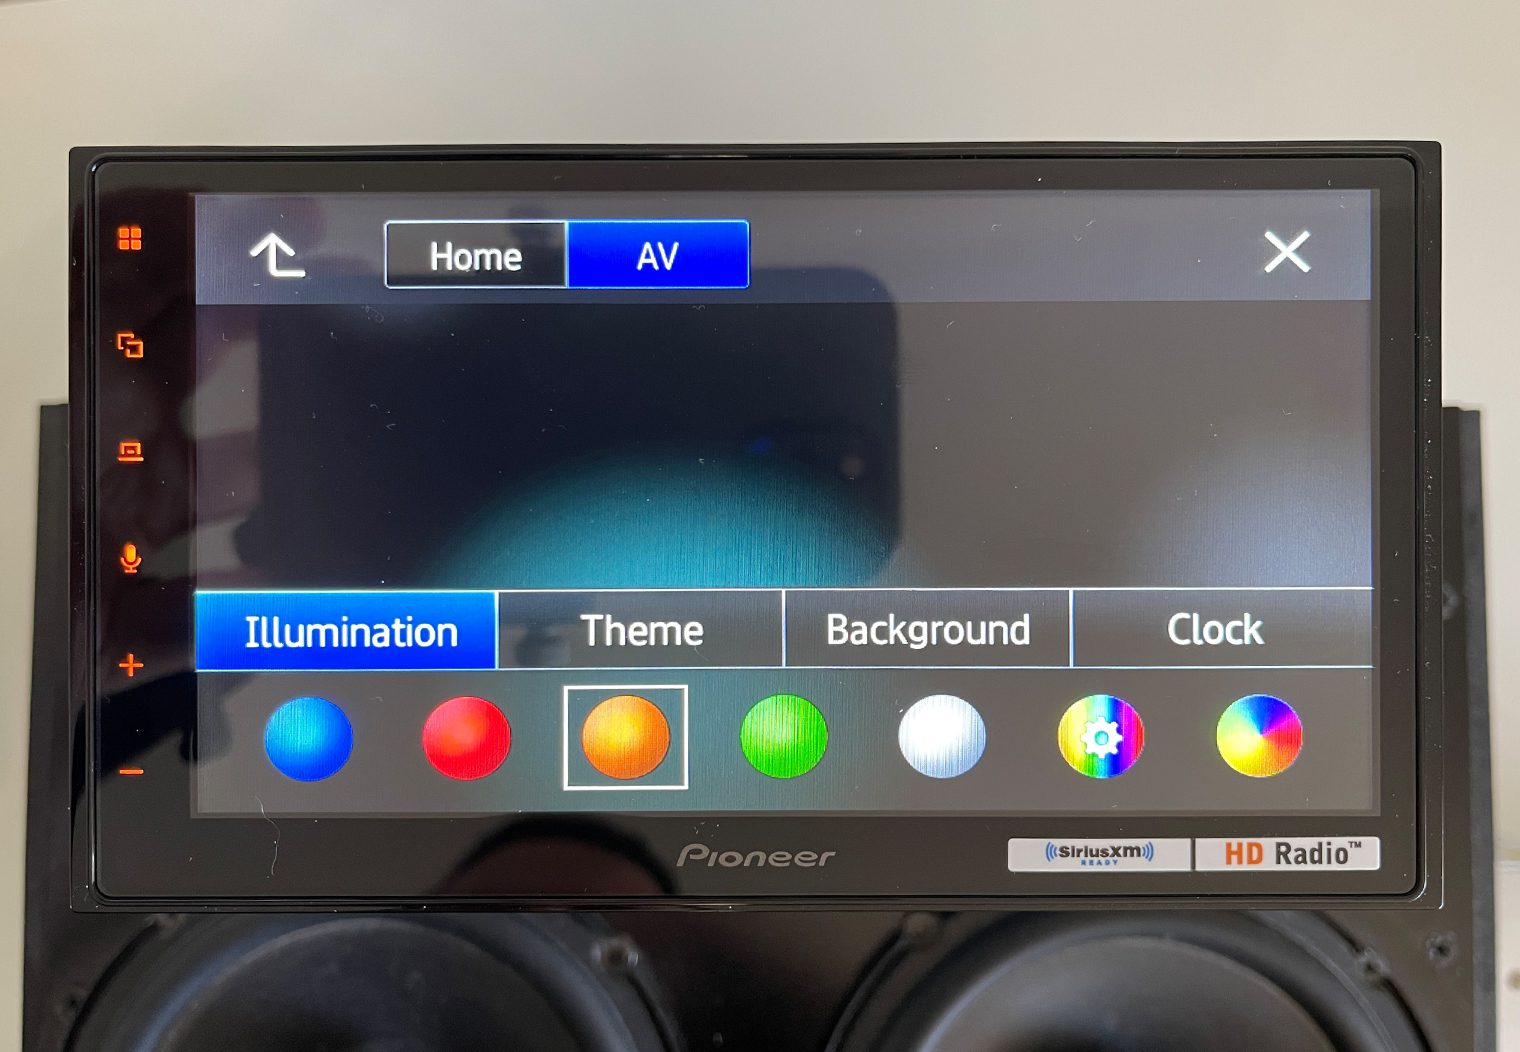
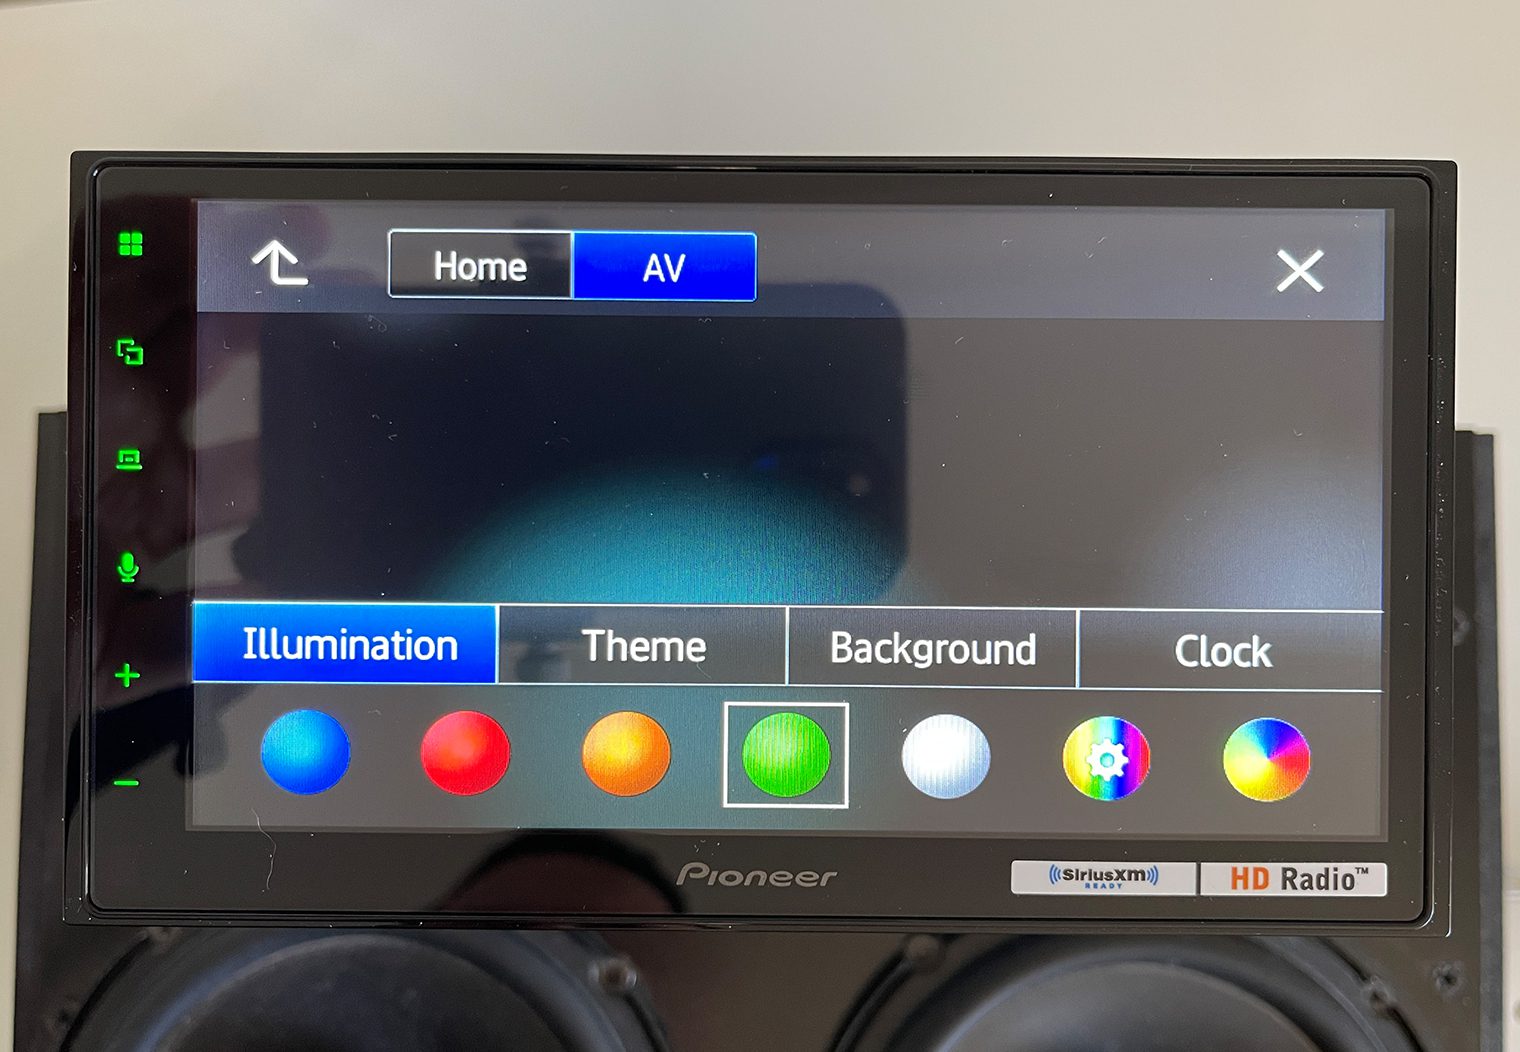
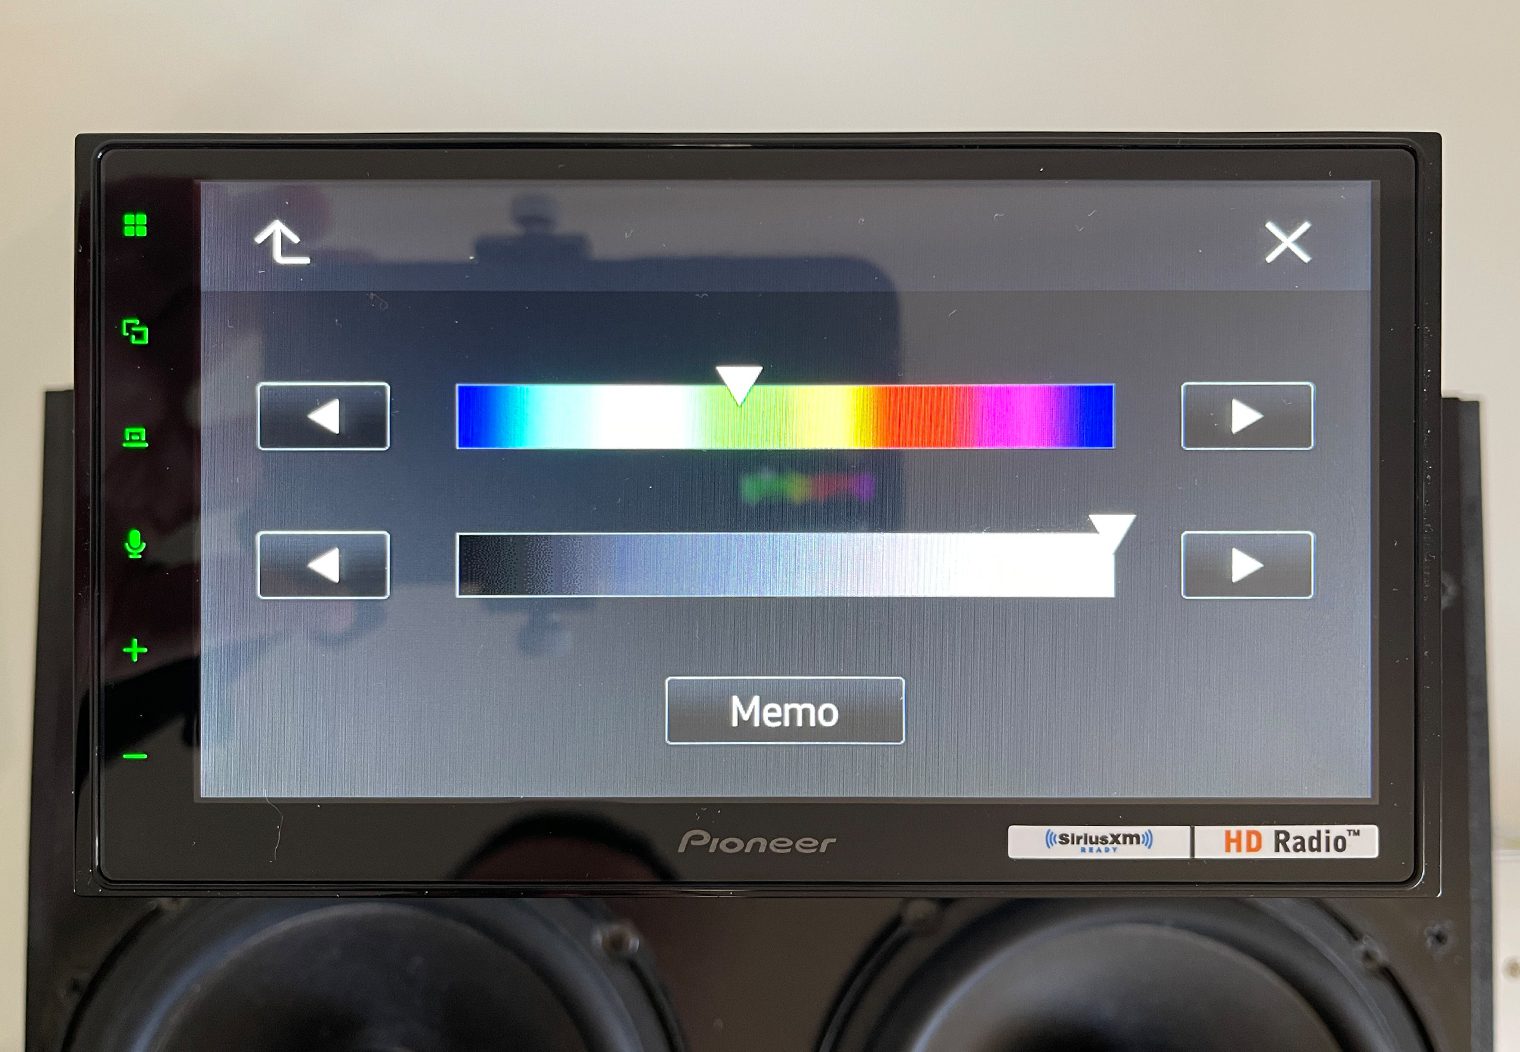
Personally, I think that one of the more important aspects of an aftermarket head unit such as this one is how well it integrates into your dash and blends with your OEM lighting. I always comment on units that don't have the ability to customize the colors of their interface and buttons. Luckily, the DMH-2660NEX does have that capability.
In the settings, you'll find adjustments for the touch button illumination color. They're RGB, so you can change the color to virtually anything you want. It has five presets: blue, red, orange, green and white but you can also select a custom color via the RGB color selector. This has always been a no brainer feature to me.
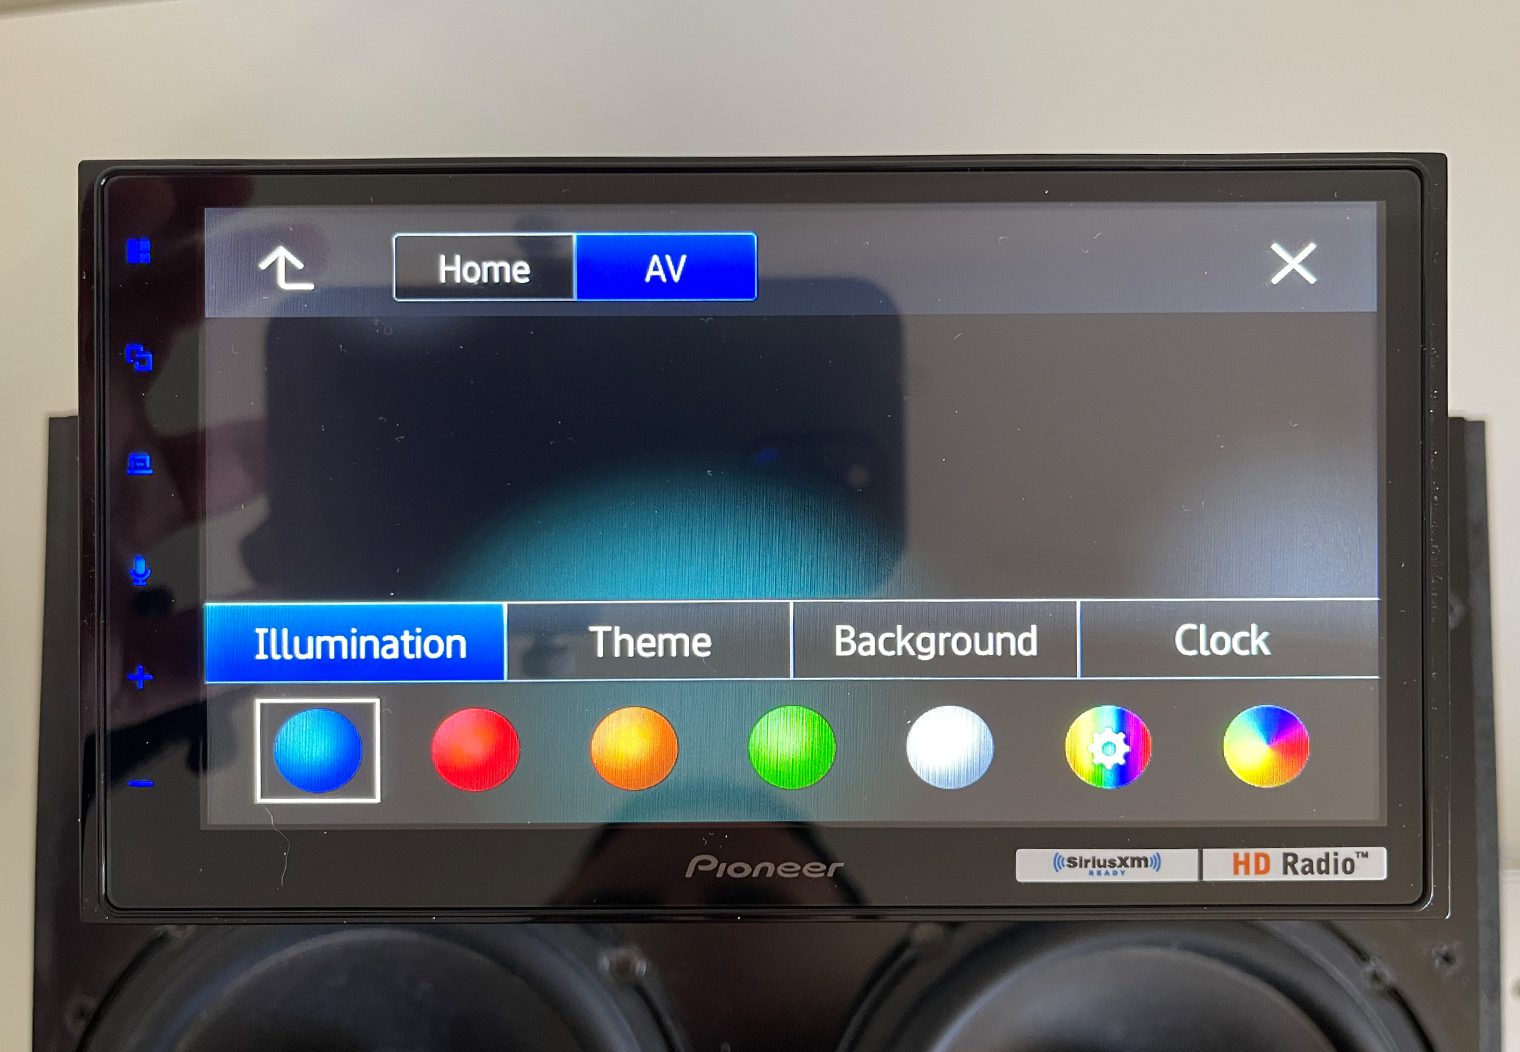
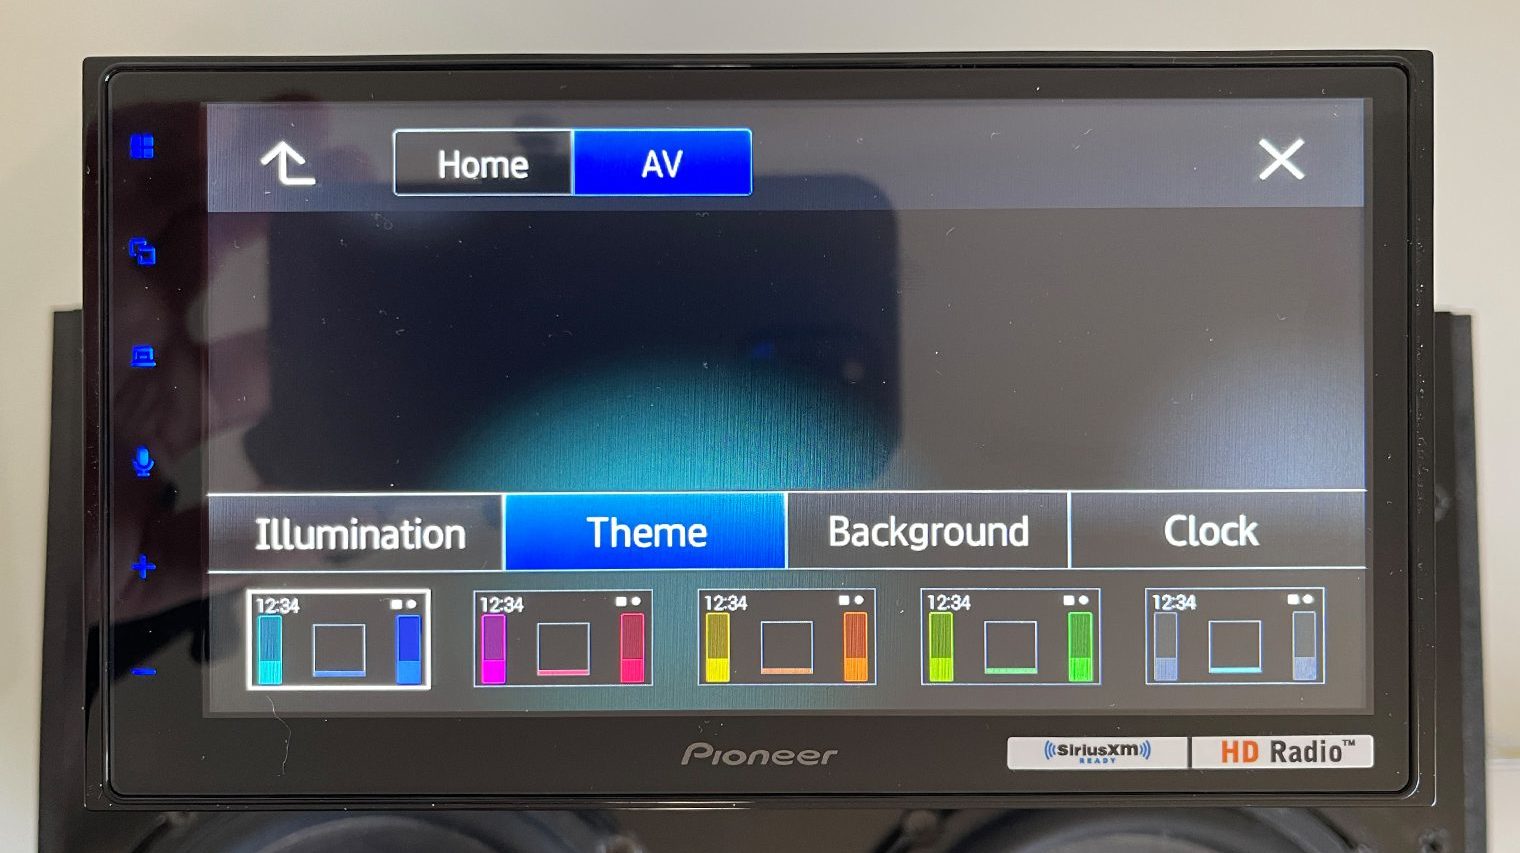
Custom Theme Colors
In addition to customizing the illumination color for the touch buttons, you can also add some additional flare and enhance the customized look with the theme color settings. In the same settings area that you adjust the background and illumination you'll find a ‘Theme' tab. Here, you can chose from a few select theme colors. This will change various parts of the interface to color in the selected theme.
Homescreen Customization
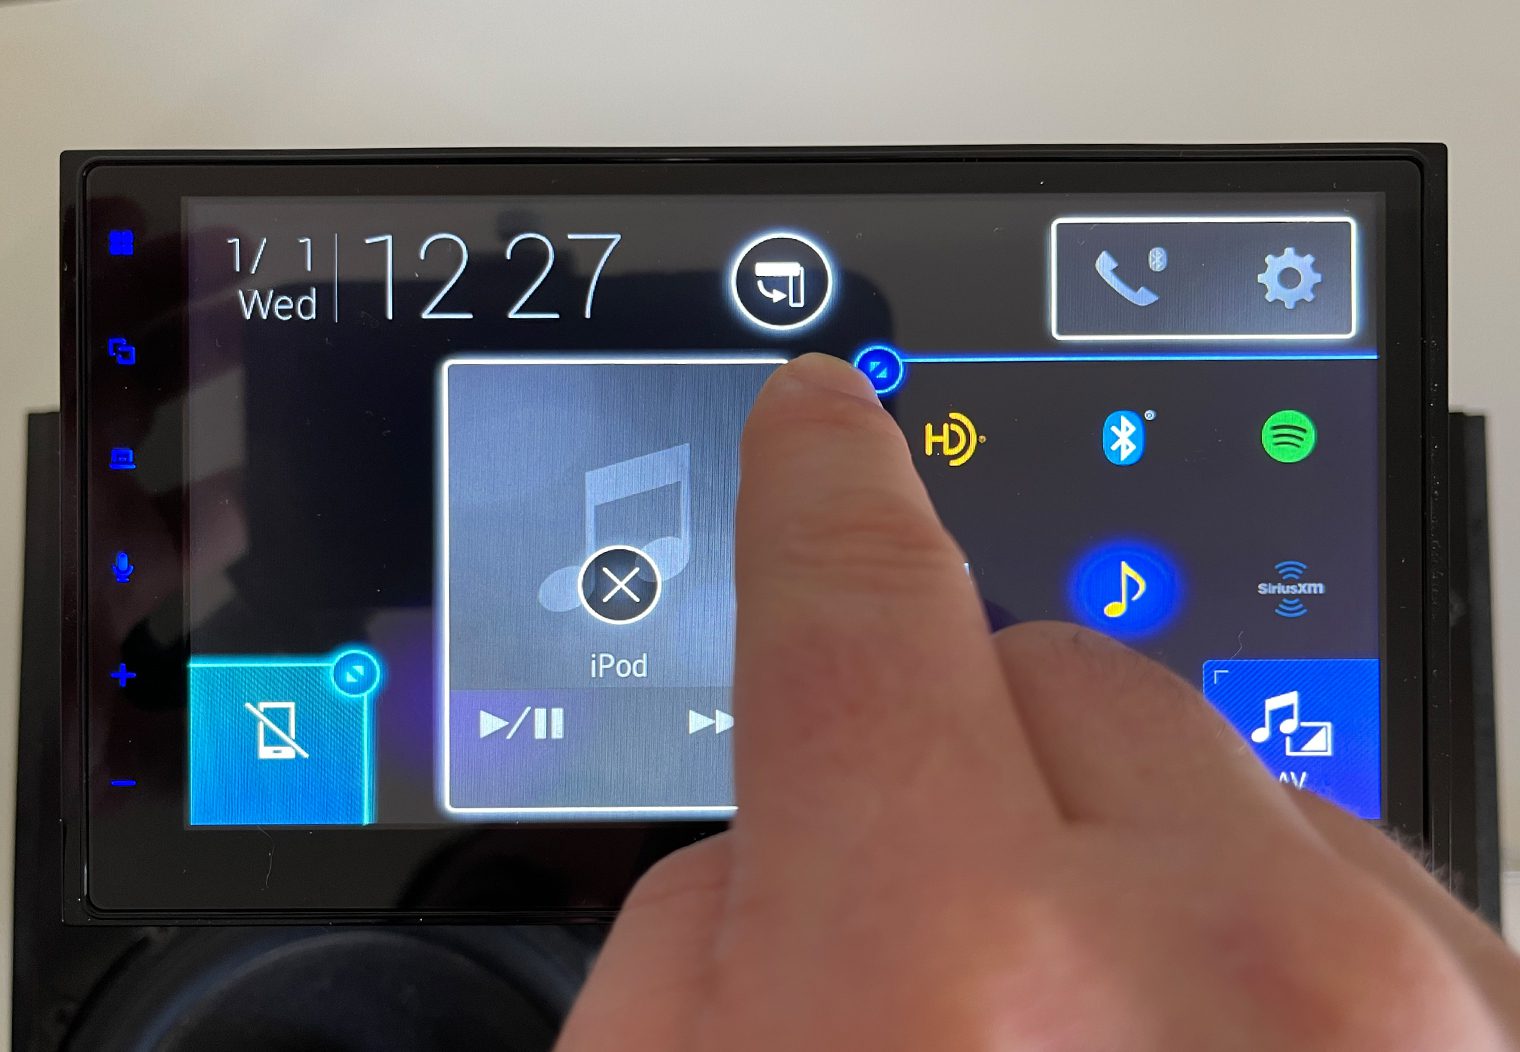
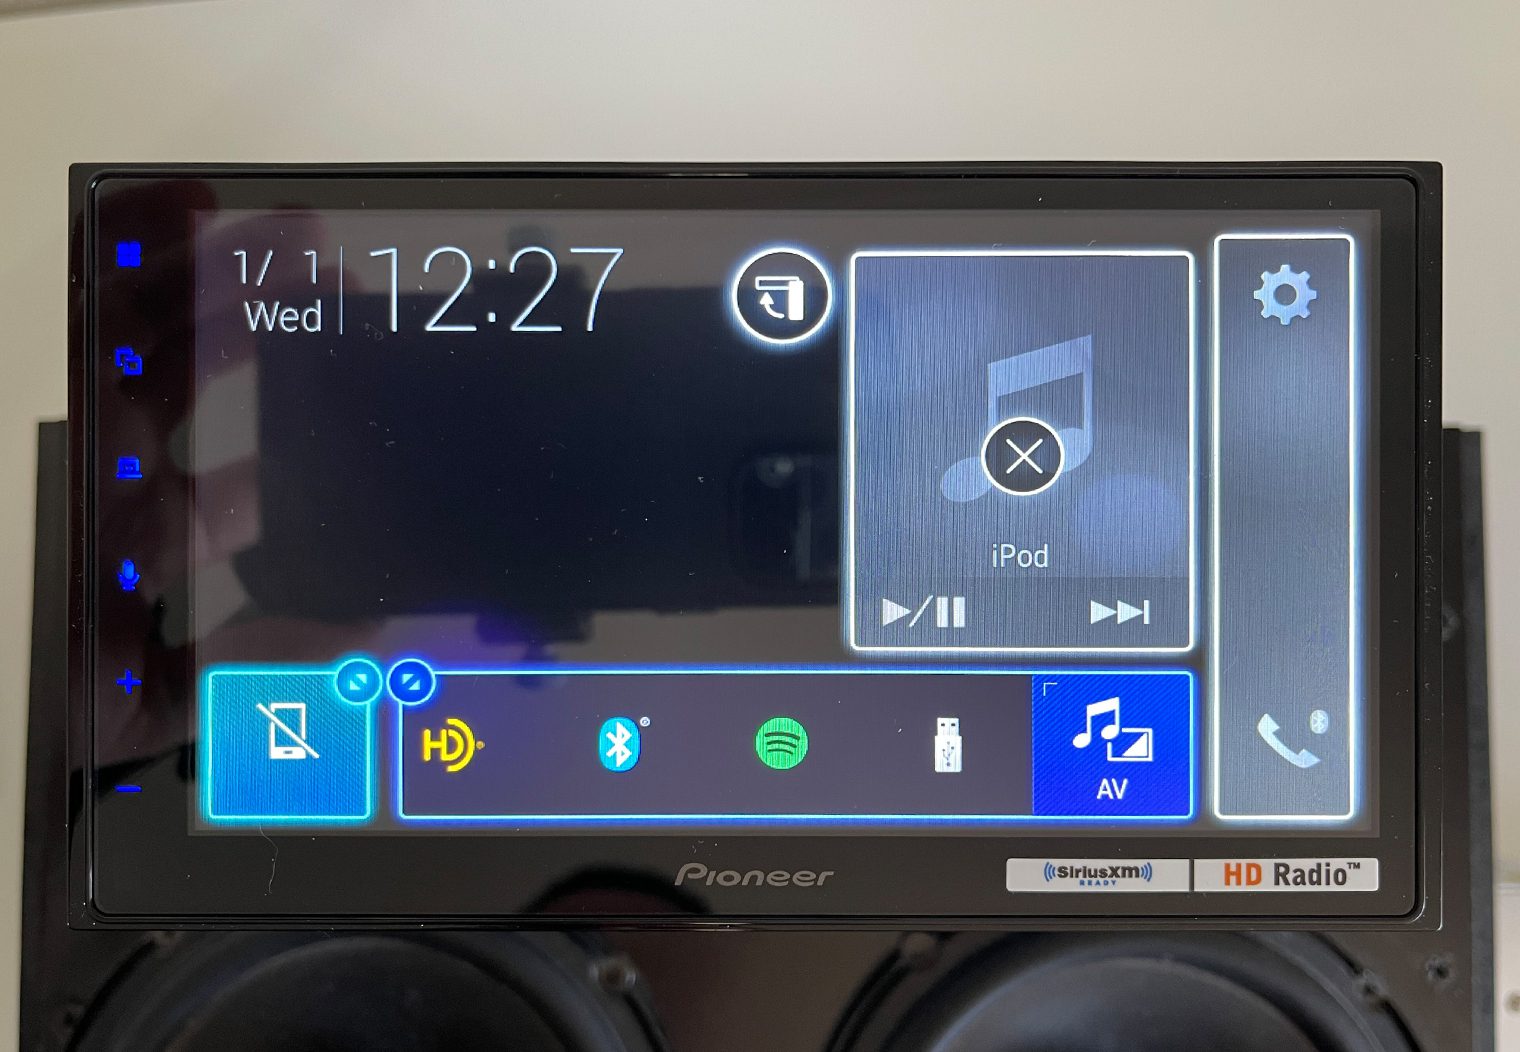
The last customization feature I'll touch on here is the homescreen. This is a pretty unique feature that I really liked with Pioneer's interface and reminds me a lot of an Android device homescreen. There's two ways to engage in the homescreen adjustment feature. First is to tap and hold one of the widgets while you're on your homescreen. Second, you can navigate to the settings and into the “Home Custom Settings” section.
This will enable you to alter the size of the widgets on the homepage, the orientation and even what A/V inputs appear on the screen. You can even click and drag A/V sources to the location/order you want them to be.
What's Missing or Could be Improved?
There's a few things that are worth pointing out that are missing from this head unit, or things I think might not make total sense. These are some of the items that might make a difference in your decision to purchase this unit.
- There's no HDMI input. Although it has A/V inputs in the rear, you'll need to purchase adapters if you're trying to hook in a video source that has an HDMI cable.
- No HD screen. The screen resolution is pretty low and the image/video quality is decent.
- Touch buttons are small. I had a tough time with some of the control buttons on the left hand side of the screen. And I wasn't even driving. That, and various other control buttons throughout the interface might be tough to use while you're driving.
- Custom background image isn't intuitive. Setting a custom background image isn't as intuitive as you'd think. I would have liked to see this functionality contained in the settings instead of having to navigate to the USB input, into the drive, import the image, etc etc.
- Low(er) power output. If you're looking to leverage the built-in amplifier the output is a bit low at 14W RMS x 4. The preouts are also 4V instead of 5V.
Conclusion
Improvements aside, the DMH-2660NEX is well priced for the amount of functionality and features it provies. I wouldn't expect every feature and functionality to be in this unit. I was actually surprised with how many features and functionality were crammed into the unit for its price point in the mid $300s.
Overall, this is a great multimedia and video car stereo with a ton of great video and audio functionality.

Just ordered this today. Great review and answered some questions. It looks like from other videos though, that it does have the multi view display like the Sony you compared it to. Was this a possible update with the unit? The video I saw this is linked below.
https://www.youtube.com/watch?v=WiKvnKlYElY